2005 BUICK CENTURY radio controls
[x] Cancel search: radio controlsPage 102 of 348

Malfunction Indicator Lamp.............................3-36
Oil Pressure Light.........................................3-40
Change Engine Oil Light................................3-40
Security Light...............................................3-41
Cruise Control Light......................................3-41
Low Washer Fluid Warning Light.....................3-41
Door/Trunk Ajar Warning Light........................3-42
Service Vehicle Soon Light............................3-42
Fuel Gage...................................................3-42
Low Fuel Warning Light.................................3-43Audio System(s).............................................3-44
Setting the Time...........................................3-44
Radio with CD..............................................3-45
Radio with Cassette and CD..........................3-53
Theft-Deterrent Feature..................................3-63
Audio Steering Wheel Controls.......................3-63
Radio Reception...........................................3-64
Care of Your Cassette Tape Player.................3-65
Care of Your CDs.........................................3-66
Care of Your CD Player................................3-66
Fixed Mast Antenna......................................3-66
Chime Level Adjustment................................3-66
Section 3 Instrument Panel
3-2
Page 144 of 348

Audio System(s)
Notice:Before adding any sound equipment to
your vehicle, like a tape player, CB radio, mobile
telephone, or two-way radio, make sure that it can
be added by checking with your dealer. Also,
check federal rules covering mobile radio and
telephone units. If sound equipment can be added,
it is very important to do it properly. Added sound
equipment may interfere with the operation of
your vehicle’s engine, radio, or other systems, and
even damage them. Your vehicle’s systems may
interfere with the operation of sound equipment that
has been added improperly.
Figure out which audio system is in your vehicle, �nd
out what your audio system can do, and how to operate
all of its controls.
Your vehicle has a feature called Retained Accessory
Power (RAP). With RAP, the audio system can be
played even after the ignition is turned off.
See “Retained Accessory Power (RAP)” under
Ignition Positions on page 2-18.
Setting the Time
Press and hold H until the correct hour appears on the
display. AM will appear for morning hours. Press and
hold M until the correct minute appears on the display.
The time can be set with the ignition on or off.
To synchronize the time with an FM station broadcasting
Radio Data System (RDS) information, press and
hold H and M at the same time until TIME UPDATED
appears on the display. If the time is not available from
the station, NO UPDATE will appear on the display.
RDS time is broadcast once a minute. After tuning to an
RDS broadcast station, it may take a few minutes for
the time to update.
3-44
Page 158 of 348

TRAF (Traffic):If TRAF appears on the display, the
tuned station broadcasts traffic announcements.
To receive the traffic announcement from the tuned
station, press this button. Brackets will be displayed
around TRAF and when a traffic announcement comes
on the tuned radio station you will hear it.
If the current tuned station does not broadcast traffic
announcements, press the TRAF button and the
radio will seek to a station that does. When the radio
�nds a station that broadcasts traffic announcements,
the radio will stop and brackets will be displayed around
TRAF. When a traffic announcement comes on the
tuned radio station you will hear it. If no station is found,
NO TRAFFIC will appear on the display.
If the brackets are on the display and TRAF is not,
you can then press the TRAF button to remove
the brackets or use the TUNE knob or the SEEK arrows
to go to a station that supports traffic announcements.
If no station is found, NO TRAFFIC will appear on
the display.
Your radio will play the traffic announcements even if
the volume is low. Your radio will interrupt the play of a
cassette tape or CD if the last tuned station broadcasts
traffic announcements.Radio Messages
CAL (CALIBRATE):Your audio system has been
calibrated for your vehicle from the factory. If CAL
appears on the display it means that your radio has not
been con�gured properly for your vehicle and must
be returned to the dealer for service.
Playing a Cassette Tape
You tape player is built to work best with tapes that are
up to 30 to 45 minutes long on each side. Tapes
longer than that are so thin they may not work well in
this player. The longer side with the tape visible should
face to the right. If the ignition and the radio are on,
the tape can be inserted and will begin playing. If you
hear nothing or hear a garbled sound, the tape may not
be in squarely. Press the eject button to remove the
tape and start over.
While the tape is playing, use the VOLUME and AUDIO
controls just as you do for the radio. The display will
show an arrow to show which side of the tape is playing.
If you want to insert a tape while the ignition or radio
is off, �rst press the eject or DISP button. Cassette tape
adapter kits for portable CD players will work in your
cassette tape player.
3-58
Page 163 of 348

Theft-Deterrent Feature
THEFTLOCK®is designed to discourage theft of your
vehicle’s radio. It works by using a secret code to
disable all radio functions whenever battery power is
removed and the radio is placed in a different vehicle.
This feature requires no user input to be activated.
The radio is automatically armed when it is put into the
vehicle for the �rst time.
When the ignition is turned off, the blinking red light
indicates that THEFTLOCK
®is armed.
If THEFTLOCK
®is activated, the radio will not operate
if stolen. The radio will display LOCKED and a red
LED indicator light will come on above the key symbol
to indicate a locked condition. If this occurs, the radio will
need to be returned to your GM dealer.
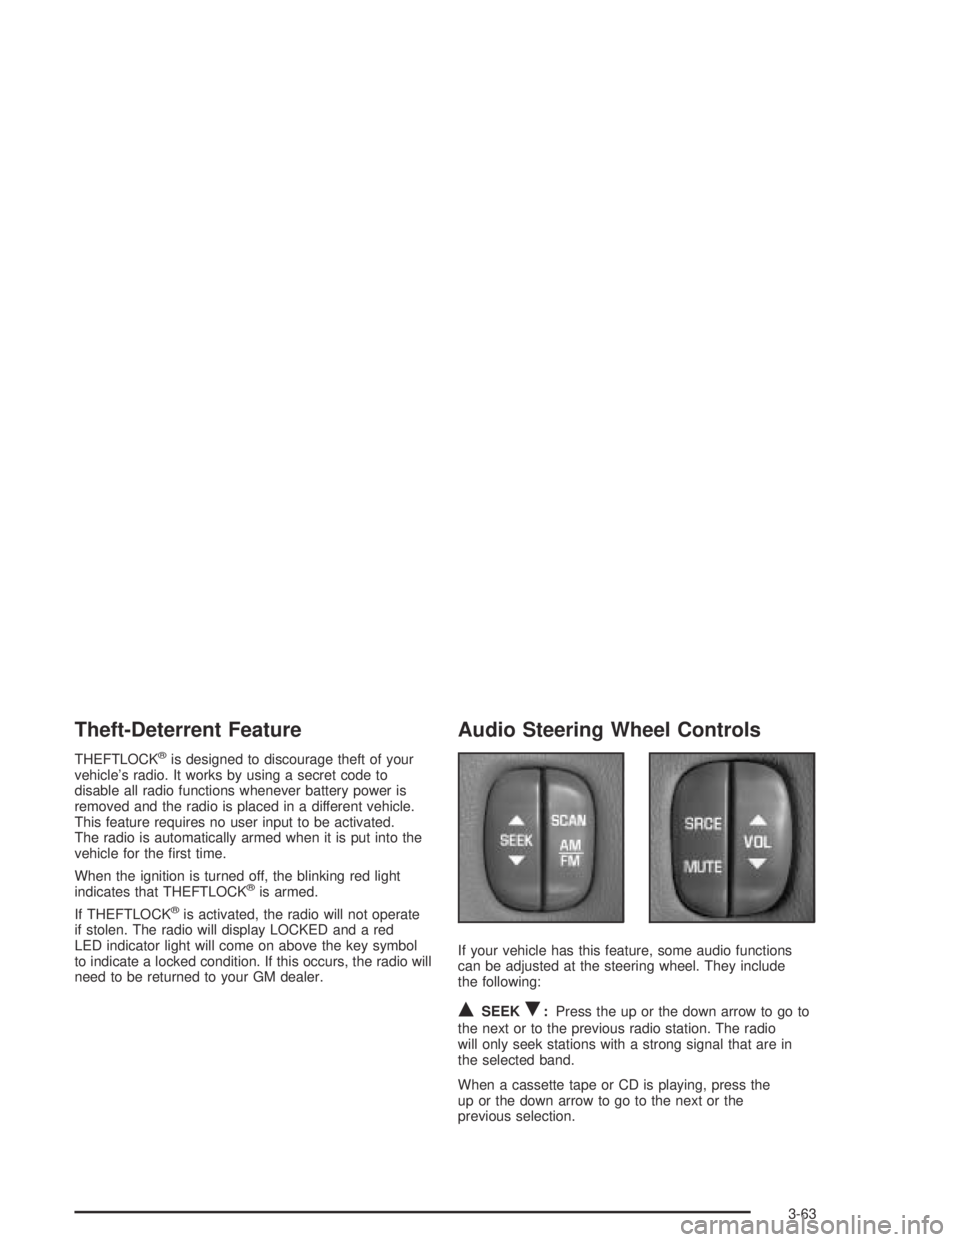
Audio Steering Wheel Controls
If your vehicle has this feature, some audio functions
can be adjusted at the steering wheel. They include
the following:
QSEEKR:Press the up or the down arrow to go to
the next or to the previous radio station. The radio
will only seek stations with a strong signal that are in
the selected band.
When a cassette tape or CD is playing, press the
up or the down arrow to go to the next or the
previous selection.
3-63
Page 303 of 348

Fuses Usage
Blank Not Used
R/LAMPS Taillamps, License Plate Lamps
Blank Not Used
Blank Not Used
CRUISE Cruise Control
Blank Not Used
CLSTR Instrument Panel Cluster
LTR Cigarette Lighter
STOP LAMPS Stoplamps
ONSTAR OnStar
®
PRK/LGHT Parking Lamps
Blank Not Used
CRNK SIG,
BCM, CLSTRCrank Signal, Body Control Module,
Cluster, Powertrain Control Module
HVACIgnition Signal, Heating, Ventilation,
and Air Conditioning Control Head
BTSI (REGAL) Not Used
AIR BAG Air Bag
Fuses Usage
BCM PWR Body Control Module
HAZARD Hazard Warning Flashers
LH HTD SEAT Not Used
Blank Not Used
BCM ACCYIgnition Signal: Hot in ACCESSORY
and RUN, Body Control Module
Blank Not Used
LOW BLWR Low Blower
ABS Anti-Lock Brakes
TRN SIG Turn Signals, Cornering Lamps
RADIO, HVAC,
RFA, CLSTR
ALDLRadio, Heating Ventilation and
Air Conditioning Head; Remote
Keyless Entry, Cluster
HI BLWR High Blower
RH HTD SEAT Not Used
STR/WHL/
CNTRLAudio Steering Wheel Controls
WPR Windshield Wipers
5-93
Page 304 of 348

Underhood Fuse Block
Some fuses and relays are located in the underhood
fuse block on the passenger’s side of the vehicle in the
engine compartment. SeeEngine Compartment
Overview on page 5-12for more information on location.
Fuses Usage
1 Anti-Lock Brake System
2 Starter Solenoid
3 Power Seat, Rear Window Defogger
4High Blower, Hazard Flasher,
Stoplamps, Power Mirror,
Door Locks
Fuses Usage
5Ignition Switch, Stoplamps,
Anti-Lock Brake System, Turn
Signals, Cluster, Air Bag, Daytime
Running Lamps Module
6 Cooling Fan
7Retained Accessory Power,
Remote Keyless Entry, Data Link,
Heating, Ventilation, and Air
Conditioning Head; Cluster, Radio,
Cigarette Lighter
8Ignition Switch, Wipers, Audio
Steering Wheel Controls, Body
Control Module, Power Windows,
Sunroof, Heating, Ventilation, and
Air Conditioning Controls; Daytime
Running Lamps, Rear Window
Defogger Relay
Relays Usage
9 Cooling Fan 2
10 Cooling Fan 3
11 Starter Solenoid
12 Cooling Fan 1
13 Ignition Main
14 Air Pump (Optional)
5-94
Page 337 of 348

A
Additives, Fuel................................................. 5-6
Add-On Electrical Equipment............................5-90
Air Cleaner/Filter, Engine.................................5-18
Air Conditioning......................................3-18, 3-21
Airbag
Readiness Light..........................................3-31
Airbag Sensing and Diagnostic Module (SDM)......... 7-9
Airbag System................................................1-49
How Does an Airbag Restrain?......................1-55
Servicing Your Airbag-Equipped Vehicle..........1-58
What Makes an Airbag In�ate?......................1-55
What Will You See After an
Airbag In�ates?........................................1-56
When Should an Airbag In�ate?....................1-54
Where Are the Airbags?...............................1-52
Antenna, Fixed Mast.......................................3-66
Anti-Lock Brake System (ABS)........................... 4-7
Anti-Lock Brake, System Warning Light..............3-33
Appearance Care............................................5-82
Aluminum Wheels........................................5-87
Care of Safety Belts....................................5-85
Chemical Paint Spotting...............................5-88
Cleaning Exterior Lamps/Lenses....................5-86
Fabric/Carpet..............................................5-82
Finish Care.................................................5-86
Finish Damage............................................5-88
Glass Surfaces............................................5-85Appearance Care (cont.)
Instrument Panel.........................................5-85
Interior Plastic Components...........................5-85
Leather......................................................5-84
Sheet Metal Damage...................................5-88
Tires..........................................................5-87
Underbody Maintenance...............................5-88
Vehicle Care/Appearance Materials................5-89
Vinyl..........................................................5-84
Washing Your Vehicle...................................5-86
Weatherstrips..............................................5-85
Windshield and Wiper Blades........................5-87
Ashtrays........................................................3-18
Audio System(s).............................................3-44
Audio Steering Wheel Controls......................3-63
Care of Your Cassette Tape Player................3-65
Care of Your CD Player...............................3-66
Care of Your CDs........................................3-66
Chime Level Adjustment...............................3-66
Fixed Mast Antenna.....................................3-66
Radio with Cassette and CD.........................3-53
Radio with CD............................................3-45
Setting the Time..........................................3-44
Theft-Deterrent Feature................................3-63
Understanding Radio Reception.....................3-64
Automatic Transaxle
Fluid..........................................................5-19
Operation...................................................2-21
1