2005 BUICK CENTURY fuel
[x] Cancel search: fuelPage 1 of 348

Seats and Restraint Systems........................... 1-1
Front Seats
............................................... 1-2
Rear Seats
............................................... 1-6
Safety Belts
.............................................. 1-6
Child Restraints
.......................................1-27
Airbag System
.........................................1-49
Restraint System Check
............................1-58
Features and Controls..................................... 2-1
Keys
........................................................ 2-2
Doors and Locks
......................................2-10
Windows
.................................................2-14
Theft-Deterrent Systems
............................2-16
Starting and Operating Your Vehicle
...........2-17
Mirrors
....................................................2-29
OnStar
®System
......................................2-31
Storage Areas
.........................................2-33
Instrument Panel............................................. 3-1
Instrument Panel Overview
.......................... 3-4
Climate Controls
......................................3-18
Warning Lights, Gages, and Indicators
........3-28
Audio System(s)
.......................................3-44Driving Your Vehicle....................................... 4-1
Your Driving, the Road, and Your Vehicle
........ 4-2
Towing
...................................................4-36
Service and Appearance Care.......................... 5-1
Service
..................................................... 5-3
Fuel
......................................................... 5-5
Checking Things Under the Hood
...............5-10
Headlamp Aiming
.....................................5-45
Bulb Replacement
....................................5-47
Windshield Wiper Blade Replacement
.........5-52
Tires
......................................................5-53
Appearance Care
.....................................5-82
Vehicle Identi�cation
.................................5-90
Electrical System
......................................5-90
Capacities and Speci�cations
.....................5-96
Maintenance Schedule..................................... 6-1
Maintenance Schedule
................................ 6-2
Customer Assistance and Information.............. 7-1
Customer Assistance and Information
........... 7-2
Reporting Safety Defects
...........................7-10
Index.................................................................1
2005 Buick Century Owner ManualM
Page 82 of 348

Theft-Deterrent Systems
Vehicle theft is big business, especially in some cities.
Although your vehicle has a number of theft-deterrent
features, we know that nothing we put on it can make it
impossible to steal. However, there are ways you
can help.
PASS-Key®II
The vehicle is equipped
with the PASS-Key®II
(Personalized Automotive
Security System)
theft-deterrent system.
PASS-Key
®II is a passive
theft-deterrent system.
It works when the ignition
key is inserted or
removed from the ignition.
PASS-Key
®II uses a resistor pellet in the ignition key
that matches a decoder in the vehicle.When the PASS-Key
®II system senses that the wrong
key has been inserted into the ignition, it shuts down
the vehicle’s starter and fuel systems. The starter will not
work and fuel will not go to the engine for about
three minutes. If someone tries to start the vehicle again
with the wrong key, or uses another incorrect key
during this time, the vehicle will not start. This
discourages someone from randomly trying keys with
different resistor pellets in an attempt to make a match.
The ignition key must be clean and dry before it is
inserted in the ignition or the engine may not start. If the
engine does not start and the SECURITY warning
light on the instrument panel is �ashing, the key may be
dirty or wet. Turn the ignition off.
Clean and dry the key. Wait about three minutes and try
again. If the vehicle still does not start, the ignition
key may be faulty. Wait about three more minutes and
try a spare ignition key. At this time, you may also
want to check the fuse. SeeFuses and Circuit Breakers
on page 5-91for information on fuse location. If the
starter will not work with the spare key, the vehicle
needs service. See your dealer or a locksmith who can
service the PASS-Key
®II.
2-16
Page 86 of 348

Engine Coolant Heater
Your vehicle may be equipped with this feature. In very
cold weather, 0°F (−18°C) or colder, the engine coolant
heater can help. You will get easier starting and better
fuel economy during engine warm-up. Usually, the
coolant heater should be plugged in a minimum of four
hours prior to starting your vehicle. At temperatures
above 32°F (0°C), use of the coolant heater is
not required.
To Use the Engine Coolant Heater
1. Turn off the engine.
2. Open the hood and unwrap the electrical cord.
The cord is attached to the underside of the
diagonal brace, which is located above the engine
air cleaner/�lter assembly.
3. Plug it into a normal, grounded 110-volt AC outlet.
{CAUTION:
Plugging the cord into an ungrounded outlet
could cause an electrical shock. Also, the
wrong kind of extension cord could overheat
and cause a �re. You could be seriously
injured. Plug the cord into a properly grounded
three-prong 110-volt AC outlet. If the cord will
not reach, use a heavy-duty three-prong
extension cord rated for at least 15 amps.
4. Before starting the engine, be sure to unplug and
store the cord as it was before to keep it away
from moving engine parts. If you do not, it could
be damaged.
How long should you keep the coolant heater plugged
in? The answer depends on the outside temperature, the
kind of oil you have, and some other things. Instead
of trying to list everything here, we ask that you contact
your dealer in the area where you will be parking
your vehicle. The dealer can give you the best advice
for that particular area.
2-20
Page 89 of 348

AUTOMATIC OVERDRIVE (X): This position is for
normal driving. If more power is needed for passing, and
the vehicle is:
Going less than 35 mph (55 km/h), push the
accelerator pedal about halfway down.
Going about 35 mph (55 km/h) or more, push the
accelerator pedal all the way down.
By doing this the vehicle will shift down to the next gear
and have more power.
THIRD (3): This position is also used for normal driving,
but it offers more power and lower fuel economy than
AUTOMATIC OVERDRIVE (
X).
Here are some times you might choose THIRD (3)
instead of AUTOMATIC OVERDRIVE (
X):
When driving on hilly, winding roads.
When towing a trailer, so there is less shifting
between gears.
When going down a steep hill.
When driving in no-highway scenarios such as
city streets.Notice:Driving in SECOND (2) for more than
25 miles (40 km) or at speeds over 55 mph (90 km/h)
may damage the transaxle. Also, shifting into
SECOND (2) at speeds above 65 mph (105 km/h) can
cause damage. Drive in THIRD (3) or AUTOMATIC
OVERDRIVE (D) instead of SECOND (2).
SECOND (2): This position gives the vehicle more
power than THIRD (3) but lower fuel economy
than THIRD (3). You can use SECOND (2) on hills. It
can help control the speed going down steep mountain
roads, but then you would also want to use your
brakes off and on.
FIRST (1): This position gives the vehicle even more
power but lower fuel economy than SECOND (2). It can
be used on very steep hills, or in deep snow or mud.
If the shift lever is put in FIRST (1), the transaxle will
not shift into �rst gear until the vehicle is going
slowly enough.
Notice:Spinning the tires or holding the vehicle in
one place on a hill using only the accelerator
pedal may damage the transaxle. If you are stuck,
do not spin the tires. When stopping on a hill,
use the brakes to hold the vehicle in place.
2-23
Page 102 of 348

Malfunction Indicator Lamp.............................3-36
Oil Pressure Light.........................................3-40
Change Engine Oil Light................................3-40
Security Light...............................................3-41
Cruise Control Light......................................3-41
Low Washer Fluid Warning Light.....................3-41
Door/Trunk Ajar Warning Light........................3-42
Service Vehicle Soon Light............................3-42
Fuel Gage...................................................3-42
Low Fuel Warning Light.................................3-43Audio System(s).............................................3-44
Setting the Time...........................................3-44
Radio with CD..............................................3-45
Radio with Cassette and CD..........................3-53
Theft-Deterrent Feature..................................3-63
Audio Steering Wheel Controls.......................3-63
Radio Reception...........................................3-64
Care of Your Cassette Tape Player.................3-65
Care of Your CDs.........................................3-66
Care of Your CD Player................................3-66
Fixed Mast Antenna......................................3-66
Chime Level Adjustment................................3-66
Section 3 Instrument Panel
3-2
Page 129 of 348

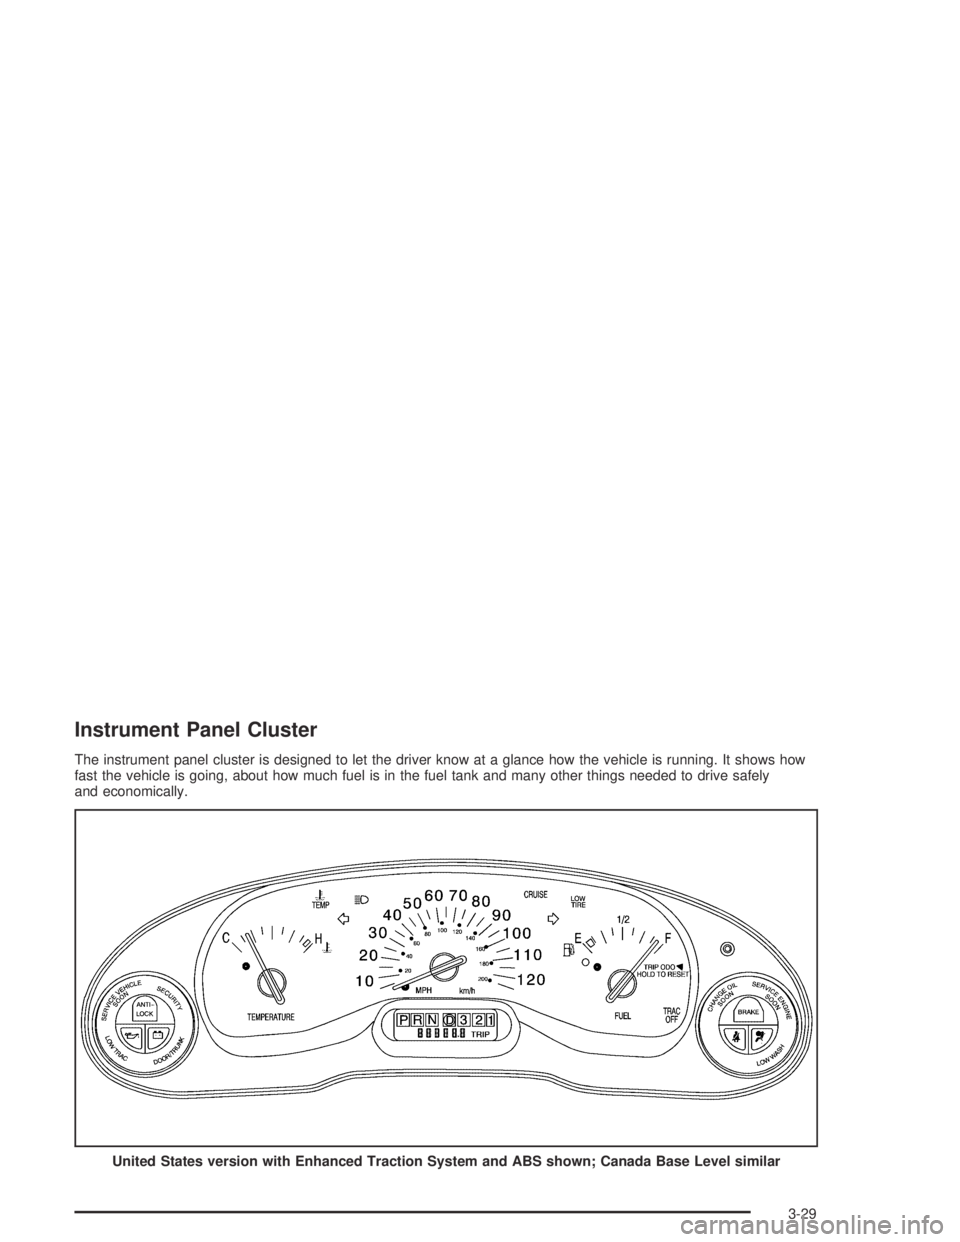
Instrument Panel Cluster
The instrument panel cluster is designed to let the driver know at a glance how the vehicle is running. It shows how
fast the vehicle is going, about how much fuel is in the fuel tank and many other things needed to drive safely
and economically.
United States version with Enhanced Traction System and ABS shown; Canada Base Level similar
3-29
Page 136 of 348

Tire Pressure Light
The vehicle may have a
tire pressure monitor that
indicates a large change
in the pressure in one tire.
The system stores the tire pressures of the vehicle’s
properly in�ated tires. The LOW TIRE light will come on
if the pressure in one tire becomes 12 psi (83 kPa)
lower than the other three tires. The LOW TIRE light will
not come on if the pressure in more than one tire is
low, if the system is not yet calibrated, or if the vehicle
is moving faster than 70 mph (110 km/h).
When the LOW TIRE light comes on, stop as soon as
possible and check all the tires for damage. If a tire
is �at, seeIf a Tire Goes Flat on page 5-69. Also check
the tire pressure in all four tires as soon as possible.
SeeIn�ation - Tire Pressure on page 5-60.
The light will stay on, while the ignition is on, until the
system is reset. SeeTire Pressure Monitor System
on page 5-61.
Malfunction Indicator Lamp
Service Engine Soon Light
Your vehicle is equipped
with a computer which
monitors operation of the
fuel, ignition, and emission
control systems.
This system is called OBD II (On-Board Diagnostics
Second Generation) and is intended to assure that
emissions are at acceptable levels for the life of
the vehicle, helping to produce a cleaner environment.
The SERVICE ENGINE SOON light comes on and
a chime will sound to indicate that there is a problem
and service is required. Malfunctions often will be
indicated by the system before any problem is apparent.
This may prevent more serious damage to your
vehicle. This system is also designed to assist
your service technician in correctly diagnosing
any malfunction.
3-36
Page 137 of 348

Notice:If you keep driving your vehicle with this
light on, after a while, your emission controls
may not work as well, your fuel economy may not
be as good, and your engine may not run as
smoothly. This could lead to costly repairs that may
not be covered by your warranty.
Notice:Modi�cations made to the engine,
transaxle, exhaust, intake, or fuel system of your
vehicle or the replacement of the original tires with
other than those of the same Tire Performance
Criteria (TPC) can affect your vehicle’s emission
controls and may cause this light to come on.
Modi�cations to these systems could lead to costly
repairs not covered by your warranty. This may
also result in a failure to pass a required Emission
Inspection/Maintenance test.This light should come on, as a check to show you it is
working, when the ignition is on and the engine is
not running. If the light does not come on, have it
repaired. This light will also come on during a
malfunction in one of two ways:
Light Flashing— A mis�re condition has been
detected. A mis�re increases vehicle emissions
and may damage the emission control system
on your vehicle. Diagnosis and service may
be required.
Light On Steady— An emission control system
malfunction has been detected on your vehicle.
Diagnosis and service may be required.
3-37