2005 BMW Z4 ROADSTER 2.5I clutch
[x] Cancel search: clutchPage 38 of 120

Driving
36
Driving
Ignition lock
0 Steering locked
This is the only position in which the ignition key
can be inserted or removed.
After removing the key, turn the steering wheel
slightly to the left or right until the lock engages.
If the key is not removed, an acoustic signal
sounds when the driver's door is opened.
Interlock
Vehicles with automatic transmission:
In order to turn the key back to position0 or to
remove it, move the selector level into position
P first.
1 Steering unlocked
You will find that it is often easier to turn the
ignition key from position0 to 1 if you move the
steering wheel slightly to help disengage the
detent.
Individual electrical equipment and accessories
are available for use.
2 Ignition switched on
All systems are operational.
3 Starting engine
Engine
Engine idle speed is controlled by the engine
computer system. Increased speeds at start-up are normal and should decrease as the engine
warms up. If engine speed does not decrease,
service is required.
To prevent the battery from discharging, always
deactivate electrical devices that are not in use.
Switch the ignition off when the vehicle is not
being driven.
Do not leave the engine running in
enclosed spaces. Otherwise, inhaling the
hazardous exhaust gases could lead to uncon-
sciousness and death. The exhaust gases con-
tain carbon monoxide, an odorless and color-
less, but highly toxic gas.
Do not leave the vehicle unattended with the
engine running. An unattended vehicle with a
running engine poses a safety hazard.
Before you leave the vehicle with the engine
running, place the engine in idle first or engage
the P position and apply the parking brake. If
you fail to do this, the vehicle could move.<
Starting the engine
Do not press the accelerator pedal while start-
ing the engine.
Do not let the engine warm up in idling position.
Instead, begin to drive at moderate engine
speeds.
Vehicles with manual transmission:
Step on the clutch when starting the vehi-
cle. A lockout prevents the engine from starting
if the clutch is not depressed.<
Do not end the starting procedure too early, but
do not continue it for more than 20 seconds.
Release the ignition key immediately when the
engine starts.
If the engine fails to start on the first attempt,
e.g. if it is very hot or cold:
Press the accelerator pedal halfway down.
Cold starts at very low temperatures, below
approx. +57/–156, and at high altitudes,
above 3,300 ft/1,000 m:
Page 39 of 120

Reference
At a glance
Controls
Driving tips
Mobility
37
>On the first attempt, engage the starter for
approx. 10 seconds
>Press the accelerator pedal halfway down.
Avoid frequent starting attempts in short
succession or repeated starting attempts
during which the engine does not start. Other-
wise, uncombusted or incompletely combusted
fuel will pose a risk of the catalytic converter
overheating and being damaged.<
Manual transmission
1.Engage the parking brake
2.Gearshift lever in idling position
3.Depress the clutch pedal.
If the clutch pedal is not depressed, the
engine cannot be started
4.Start the engine.
Automatic transmission
1.Depress footbrake
2.Place selector lever in position P or N
3.Start the engine.
Sequential manual gearbox SMG
1.Depress footbrake
2.Move selector lever to neutral position N
3.Start the engine.
If the engine does not start, re-engage the
position last selected, refer to the display
in the instrument cluster, and then engage posi-
tion N again.<
Switching off the engine
Do not remove the ignition key while the
vehicle is still moving. If you did so, the
steering lock would engage when the steering
wheel is turned.
When you leave the vehicle, always remove the
ignition key and engage the steering lock.
Apply the parking brake when parking on steep
gradients, as the vehicle could otherwise start
to roll.<
You can have an acoustic signal set as a
reminder that the ignition key is still in the ignition switch after the driver's door has been
opened.<
Manual transmission
1.Turn the ignition key to position 1 or 0
2.Engage first gear or reverse gear.
Automatic transmission
1.Place the selector lever in position P
2.Turn the ignition key to position 1 or 0.
Sequential manual gearbox SMG
1.Engage a drive position
2.Turn the ignition key to position 1 or 0. An
acoustic signal sounds if the engine is
switched off while position N is engaged.
Parking brake
The parking brake is designed primarily to pre-
vent the vehicle from rolling when parked. It
operates against the rear wheels.
The indicator lamp lights up. As the
vehicle drives off, an acoustic signal
also sounds. The parking brake has
been applied.
Indicator lamp for Canadian models.
To engage
The detent engages automatically and the indi-
cator lamp in the instrument cluster comes on
when the ignition key is in position 2.
Page 42 of 120

Driving
40
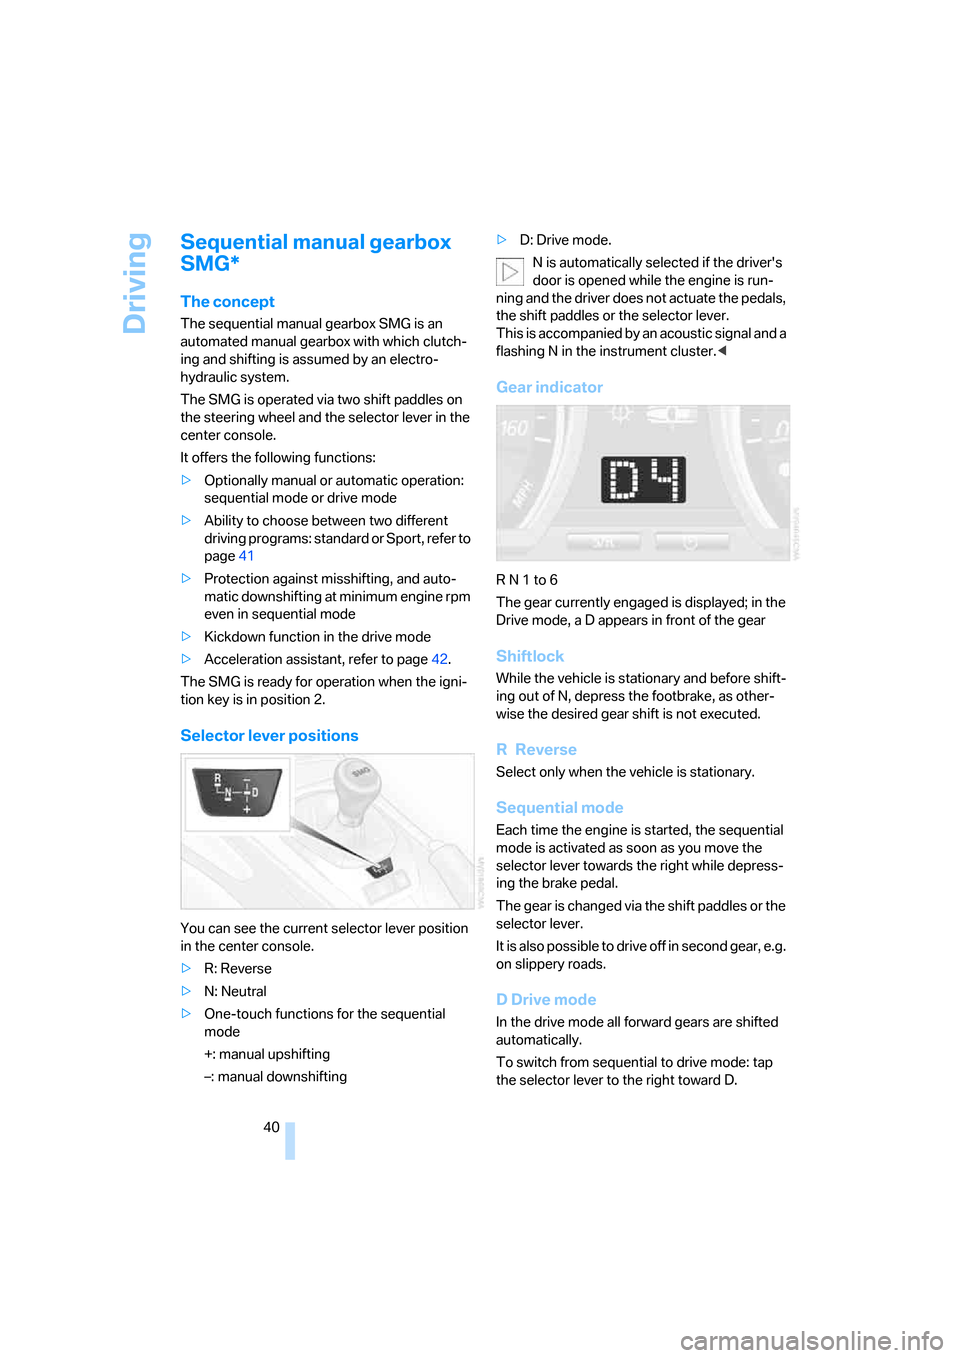
Sequential manual gearbox
SMG*
The concept
The sequential manual gearbox SMG is an
automated manual gearbox with which clutch-
ing and shifting is assumed by an electro-
hydraulic system.
The SMG is operated via two shift paddles on
the steering wheel and the selector lever in the
center console.
It offers the following functions:
>Optionally manual or automatic operation:
sequential mode or drive mode
>Ability to choose between two different
driving programs: standard or Sport, refer to
page41
>Protection against misshifting, and auto-
matic downshifting at minimum engine rpm
even in sequential mode
>Kickdown function in the drive mode
>Acceleration assistant, refer to page42.
The SMG is ready for operation when the igni-
tion key is in position 2.
Selector lever positions
You can see the current selector lever position
in the center console.
>R: Reverse
>N: Neutral
>One-touch functions for the sequential
mode
+: manual upshifting
–: manual downshifting>D: Drive mode.
N is automatically selected if the driver's
door is opened while the engine is run-
ning and the driver does not actuate the pedals,
the shift paddles or the selector lever.
This is accompanied by an acoustic signal and a
flashing N in the instrument cluster.<
Gear indicator
R N 1 to 6
The gear currently engaged is displayed; in the
Drive mode, a D appears in front of the gear
Shiftlock
While the vehicle is stationary and before shift-
ing out of N, depress the footbrake, as other-
wise the desired gear shift is not executed.
R Reverse
Select only when the vehicle is stationary.
Sequential mode
Each time the engine is started, the sequential
mode is activated as soon as you move the
selector lever towards the right while depress-
ing the brake pedal.
The gear is changed via the shift paddles or the
selector lever.
It is also possible to drive off in second gear, e.g.
on slippery roads.
D Drive mode
In the drive mode all forward gears are shifted
automatically.
To switch from sequential to drive mode: tap
the selector lever to the right toward D.
Page 47 of 120

Reference
At a glance
Controls
Driving tips
Mobility
45
is reduced by approx. 0.6 mph / 1 km/h every
time you tap the button.
Hold the lever in position2:
With the cruise control active, the system auto-
matically reduces the throttle opening to slow
the vehicle. As soon as you release the lever,
the system stores and maintains the current
speed.
To recall the stored speed
Press the lever briefly in direction 3:
The vehicle accelerates to and maintains the
last speed stored.
To deactivate the system
Press the lever briefly in direction 4:
The cruise control is deactivated immediately.
In addition, the system is automatically deacti-
vated in response to the following conditions:
>When you apply the brakes
>When you depress the clutch or move the
automatic selector lever from D to N
>If you exceed or fall below the preset speed
for an extended period, for example by
depressing the accelerator
>If DSC is in action.
You can recall the speed last stored.
Cruise control is also deactivated when the igni-
tion key is turned to position 0.
The stored speed is cleared in this case.
Page 70 of 120

Special operating instructions
68
Special operating instructions
Break-in procedures
Moving parts need to be given some time until
they can interact smoothly with one another. To
ensure that your vehicle provides maximum
economy throughout a long service life, we
request that you observe the following:
Engine and differential
Up to 1,200 miles/2,000 km:
Drive at varying engine and road speeds, but do
not exceed the following engine or road speed:
4,500 rpm / 4,500/min or 100 mph / 160 km/h.
Obey your local and state maximum speed lim-
its.
Refrain from using full throttle and avoid press-
ing the accelerator beyond the kickdown point.
After you have driven 1,200 miles/2,000 km,
you can gradually increase the engine or road
speeds.
Sequential manual gearbox SMG
Up to 1,200 miles/2,000 km:
Do not use the acceleration assistant during the
break-in period.
Tires
Due to technical factors associated with their
manufacture, tires do not achieve their full trac-
tion potential until an initial break-in period has
elapsed. You should therefore drive with extra
caution during the first 200 miles/300 km.
Obey your local and state maximum speed lim-
its.
When the vehicle is operated on wet or
slushy roads, a wedge of water may form
between the tire and the road surface. This phe-
nomenon is referred to as hydroplaning and can
lead to partial or complete loss of traction, vehi-
cle control and braking effectiveness. Reduce
your speed on wet roads.<
Brake system
Approx. 300 miles/500 km must elapse before
the brake pads and rotors achieve their optimal
surface and wear pattern.
To break in the separate parking brake drums,
apply the parking brake lightly when coasting to
a standstill – at a traffic signal, for instance; use
caution to avoid posing a danger to other road
users.
To avoid corrosion, repeat this procedure from
time to time.
The brake lamps do not come on when the
parking brake is set.
Vacuum for the brake system servo unit
on your BMW is available only when the
engine is running. When you move the car with
the engine off, e.g. by towing, substantially
higher levels of pedal force will be required to
brake the vehicle.<
Clutch
The clutch will achieve its optimal functionality
after approx. 300 miles/500 km. Shift gears
carefully during the break-in period.
After replacing components
Follow the same break-in procedure again if any
of the components mentioned above have to be
replaced in the future.
Driving notes
Close the luggage compartment lid
Operate the vehicle only when the lug-
gage compartment lid is completely
closed, otherwise exhaust fumes could pene-
trate into the interior of the vehicle.<
Should it be absolutely necessary to operate
the vehicle with the luggage compartment lid
open and with the convertible top closed:
Page 71 of 120

Reference
At a glance
Controls
Driving tips
Mobility
69
1.Close all windows
2.Increase the air supply from the air condi-
tioner or automatic climate control to a high
level. Refer to page58 or61.
Hot exhaust system
High temperatures occur with every vehi-
cle equipped with a catalytic converter.
Heat shields are installed adjacent to some sec-
tions of the exhaust system. Never remove
these shields; do not apply undercoating to
their surfaces. When driving, standing at idle
and parking the vehicle, take care to avoid con-
tact between the hot exhaust system and flam-
mable materials, e.g. hay, leaves, grass, etc.
Such contact could lead to a fire, resulting in
serious personal injury and property damage.<
Hydroplaning
When driving on wet or slushy roads,
reduce vehicle speed. If you do not, a
wedge of water may form between the tires and
the road surface. This phenomenon can lead to
partial or complete loss of traction, vehicle con-
trol and braking effectiveness.<
Driving through water
Do not drive through water on the road if it
is deeper than 1 ft/30 cm, and then only at
walking speed. Otherwise, the vehicle's engine,
the electrical systems and the transmission
may be damaged.<
Use the parking brake on inclines
On inclines, keep the vehicle from rolling
by using the parking brake rather than by
slipping the clutch, which would lead to a high
degree of clutch wear.<
Braking safely
Your BMW is equipped with ABS as a standard
feature. If you are in a situation which requires
full braking, it is best to brake using maximum
brake pressure: panic stop. Since the vehicle
maintains steering responsiveness, you can still
avoid possible obstacles with a minimum of
steering effort.Pulsation at the brake pedal combines with
sounds from the hydraulic circuits to indicate to
the driver that ABS is in its active mode.
Wet roads
If the roads are wet or if there is heavy rain, it is
advisable to gently press the brakes for a brief
moment every few miles/kilometers. Watch
traffic conditions to ensure that this maneuver
does not endanger other road users. The
resulting heat dries the brake rotors and brake
pads. Immediate braking force is then available
if necessary.
Inclines
To prevent overheating and, as a result,
diminished braking effectiveness, drive
down long or steep downhill grades in a gear
which requires the least braking. Otherwise,
even light but consistent pedal pressure can
lead to high temperatures, brake wear and pos-
sibly even brake failure.<
The braking power of the engine can be further
enhanced by downshifting the automatic trans-
mission in manual mode, if necessary, into first
gear; refer to pages39 and41. This prevents an
excessive load on the brakes.
Do not coast with the clutch depressed or
with the transmission or selector lever in
Neutral. Do not coast with the engine switched
off. Otherwise, the engine provides no braking
effect while the transmission is in idling posi-
tion, and there is no power-assist for braking or
steering when the engine is off.
Floor mats, floor carpets or other objects must
not be in the area near the brake or accelerator
pedal, as this could impair the movement of the
pedals.<
Corrosion on the brake rotors
Limited vehicle use, extended periods with the
vehicle parked or in storage, and operating con-
ditions in which braking is restricted to gentle,
low-pressure applications will all increase the
tendency for corrosion to form on the rotors and
contamination to accumulate on the brake
pads. This occurs because the minimal pres-
Page 101 of 120

Reference
At a glance
Controls
Driving tips
Mobility
99
Vehicles with automatic transmission
Selector lever in position N.
Do not exceed a towing speed of 45 mph /
70 km/h or a towing distance of 90 miles/
150 km. Otherwise, the automatic transmission
could be damaged.<
Vehicles with sequential manual
gearbox SMG
To push or tow the vehicle, turn on the ignition
and move the selector lever to position N, then
turn the ignition off again.
Towing methods
In some countries, it is not permitted to tow the
vehicle with a tow bar or tow rope on public
roads.
Familiarize yourself with the applicable towing
regulations for the country in which you are
driving.
With a tow bar
The towing vehicle must not be lighter
than the vehicle being towed; otherwise,
vehicle handling can no longer be controlled.<
The towing eyelets of both vehicles should be
on the same side. If the tow bar can only be
used in a diagonal position, please note the fol-
lowing:
>Clearance is restricted while you are driving
around corners
>The inclination of the tow bar produces late-
ral force.
Only attach the tow bar to the towing eye-
lets. Other parts of the vehicle could oth-
erwise be damaged.<
With a tow rope
When the towing vehicle is driving off, make
sure that the tow rope is taut.
Use nylon ropes or straps for towing
because they prevent sudden jerking
movements. Attach tow ropes only to the tow-
ing eyelet. Other parts of the vehicle could oth-
erwise be damaged.<
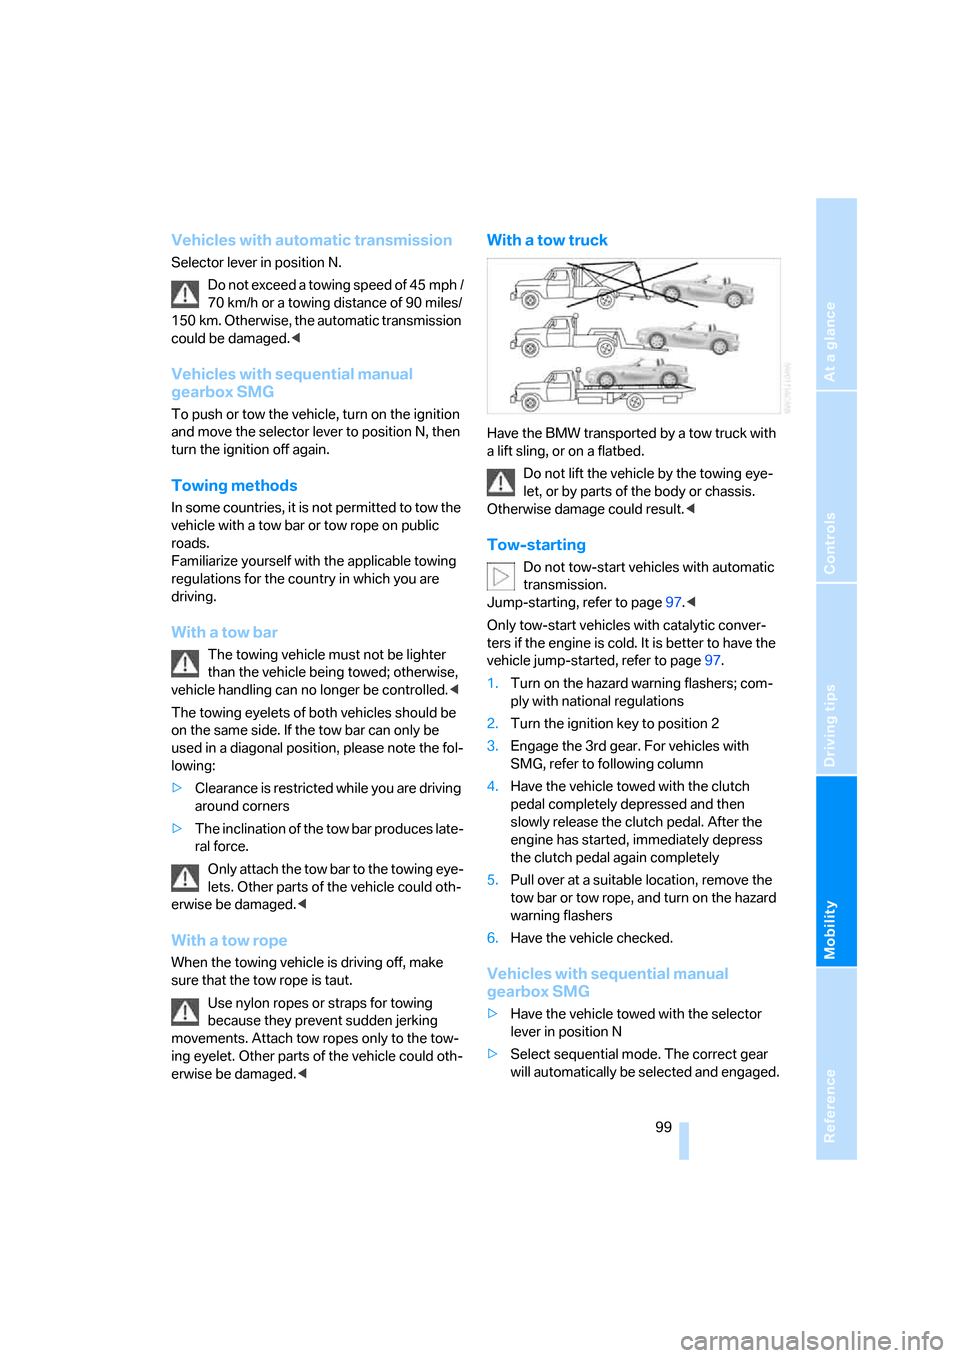
With a tow truck
Have the BMW transported by a tow truck with
a lift sling, or on a flatbed.
Do not lift the vehicle by the towing eye-
let, or by parts of the body or chassis.
Otherwise damage could result.<
Tow-starting
Do not tow-start vehicles with automatic
transmission.
Jump-starting, refer to page97.<
Only tow-start vehicles with catalytic conver-
ters if the engine is cold. It is better to have the
vehicle jump-started, refer to page97.
1.Turn on the hazard warning flashers; com-
ply with national regulations
2.Turn the ignition key to position 2
3.Engage the 3rd gear. For vehicles with
SMG, refer to following column
4.Have the vehicle towed with the clutch
pedal completely depressed and then
slowly release the clutch pedal. After the
engine has started, immediately depress
the clutch pedal again completely
5.Pull over at a suitable location, remove the
tow bar or tow rope, and turn on the hazard
warning flashers
6.Have the vehicle checked.
Vehicles with sequential manual
gearbox SMG
>Have the vehicle towed with the selector
lever in position N
>Select sequential mode. The correct gear
will automatically be selected and engaged.
Page 110 of 120

Everything from A to Z
108 Clock47,48
– 12- or 24-hour mode48
– refer to Owner's Manual for
Radio/Onboard Computer
– setting47
Clothes hooks25
Clutch, break-in
procedures68
Cockpit10
Cold start, refer to
Starting the engine36
Compact disc operation, refer
to Owner's Manual for
Radio/Onboard Computer
Compartments64
Computer48
– clock, 12- or 24-hour
mode48
– refer to Owner's Manual for
Onboard Computer
Computer, refer to Onboard
Computer48
Condensation, refer to Air
conditioning mode59,62
Condensation, removing from
windows
– air conditioning60
– automatic climate control62
Configuring settings, refer to
Vehicle Memory,
Key Memory31
Connecting a vacuum cleaner,
refer to Power socket65
Consumption, refer to
Average consumption49
Consumption display, refer to
Fuel gauge46
Contents3
Control elements, refer to
Cockpit10
Controls, lighting, refer to
Instrument lighting57
Convenience operation
– convertible top18
– from outside18
– windows18Convertible top20,21
– care, refer to the Caring for
your vehicle brochure
– convenience operation18
– electrical fault23
– emergency closing23
– fully automatic21
– malfunction23
– manual20
– mechanical20
Convertible top compartment
panel19
Coolant87
– indicator lamp13
– level88
– thermometer46
Coolant water, refer to
Coolant87
Cooling
– maximum62
– refer to Air conditioning
mode59,62
Cooling system, refer to
Capacities105
Copyright2
Correct tires82
Cruise control44
Cruising range49
Cup holders, refer to
Beverage holders64
Curb weight, refer to
Weights103
Cylinders, refer to Engine
data102
D
Dashboard, refer to
Cockpit10
Data, technical102
– capacities105
– dimensions104
– engine data102
– weights103
Daytime driving lamps56
DBC Dynamic Brake
Control50
– warning lamp13,51
Defective bulb56Defrosting rear window
– air conditioning59
– automatic climate control63
Defrosting windows60,62
Defrosting windows and
removing condensation
– air conditioning60
– automatic climate control62
Defrosting windshield, refer to
Defrosting windows60,62
Defrost position, refer to
Defrosting windows60,62
Digital clock47
Dimensions104
Dimming mirrors70
Dipstick, engine oil86
Directional indicators, refer to
Turn signal indicators42
Disc brakes69
Displacement, refer to Engine
data102
Display elements12
Display lighting,
refer to Instrument
lighting57
Displays, refer to Instrument
cluster12
Disposal
– of engine oil87
– vehicle battery95
Distance remaining, refer to
Range49
Door key16
Door lock17
Doors, unlocking and locking
– from inside18
– from outside16,17
DOT quality grades80
Draft-free ventilation59,63
Driving Dynamic Control41
Driving light, refer to Parking
lamps/Low beams56
Driving notes68
– break-in procedures68
– driving tips68
Driving stability control50
Driving stability control
systems50