2005 BMW Z4 2.5I seat adjustment
[x] Cancel search: seat adjustmentPage 29 of 120

Reference
At a glance
Controls
Driving tips
Mobility
27
Adjustments
Safe seating position
For relaxed driving with as little fatigue as pos-
sible, you should select a seating position that
reflects your personal requirements. In combi-
nation with the safety belts and airbags, the cor-
rect seating position also plays an important
role in enhancing occupant safety in the event
of an accident. To ensure that the vehicle's
safety systems provide you with optimal pro-
tection, we request that you direct your careful
attention to the following section.
For supplementary information on transporting
children refer to page33.
Airbags
Always maintain an adequate distance
between yourself and the airbags. Always
hold the steering wheel by its rim with hands at
the 9 and 3 o'clock positions to minimize the
r i s k o f i n j u r i e s t o y o u r h a n d s o r a r m s i n t h e e v e n t
of airbag deployment.
Never allow any objects, individuals or animals
to obstruct the areas between passengers and
airbags.
Never use the front airbag's cover as a storage
tray or support for objects of any kind. Ensure
that the passenger is correctly seated, i.e. does
not prop feet or legs against the dashboard.
Otherwise, leg injury could result if the knee air-
bag and front airbag suddenly deployed.
Never let an occupant's head rest near or on a
side airbag because the inflating airbag could
cause a serious or fatal injury.<
Even when all these guidelines are observed,
the risk of injury as a result of contact with the
airbags cannot entirely be ruled out in some sit-
uations. In sensitive individuals, the ignition and
inflation noise may induce a mild hearing loss
that is temporary in most cases.
For airbag locations and additional information
on airbags, refer to page53.
Safety belts
Always fasten your safety belt before starting
off. As supplemental restraint devices, the air-
bags are designed to enhance the effective-
ness of the safety belts, and not to replace
them.
Your vehicle offers two sitting positions, each of
which is equipped with a safety belt.
At all times, occupants should sit upright
and be properly restrained: infants and
small children in appropriate child-restraint sys-
tems; larger children and adults using the safety
belts.
Expectant mothers should always wear their
safety belts, taking care to position the belt in
the pelvic area against the lower hips, where it
will not exert pressure against the abdomen.
N e v e r a l l o w m o r e t h a n o n e p e r s o n t o w e a r a si n -
gle safety belt. Never allow infants or small chil-
dren to ride in a passenger's lap.
Do not route the belt across your neck, or run it
across sharp edges. Be sure that the belt does
not become caught or jammed. Avoid twisting
the belt while routing it firmly across the hips
and shoulder; wear it as snugly against your
body as possible. Do not allow the belt to rest
against hard or fragile objects. Otherwise, the
belt in the pelvic area could slide over the hips in
the event of a frontal impact, leading to abdom-
inal injury. Avoid wearing bulky clothing and pull
the belt in the upper-body area upward periodi-
cally to retension it. Otherwise, the restraining
effect of the safety belt could be diminished.<
For information on using the safety belts, refer
to page30.
Page 30 of 120

Adjustments
28
Seats
Before adjusting your seat, always
observe the following precautions
Never try to adjust your seat while operat-
ing the vehicle. The seat could respond
with an unexpected movement, and the ensu-
ing loss of vehicle control could result in an
accident.
Never ride with the backrest inclined to an
extreme angle – this also applies to the passen-
ger seat. If you do, there is a risk that you will
slide under the safety belt in the event of an
accident, thus reducing the protection provided
by the safety belt.<
In addition, observe the instructions regarding
damaged safety belts on page30.
Seat adjustment
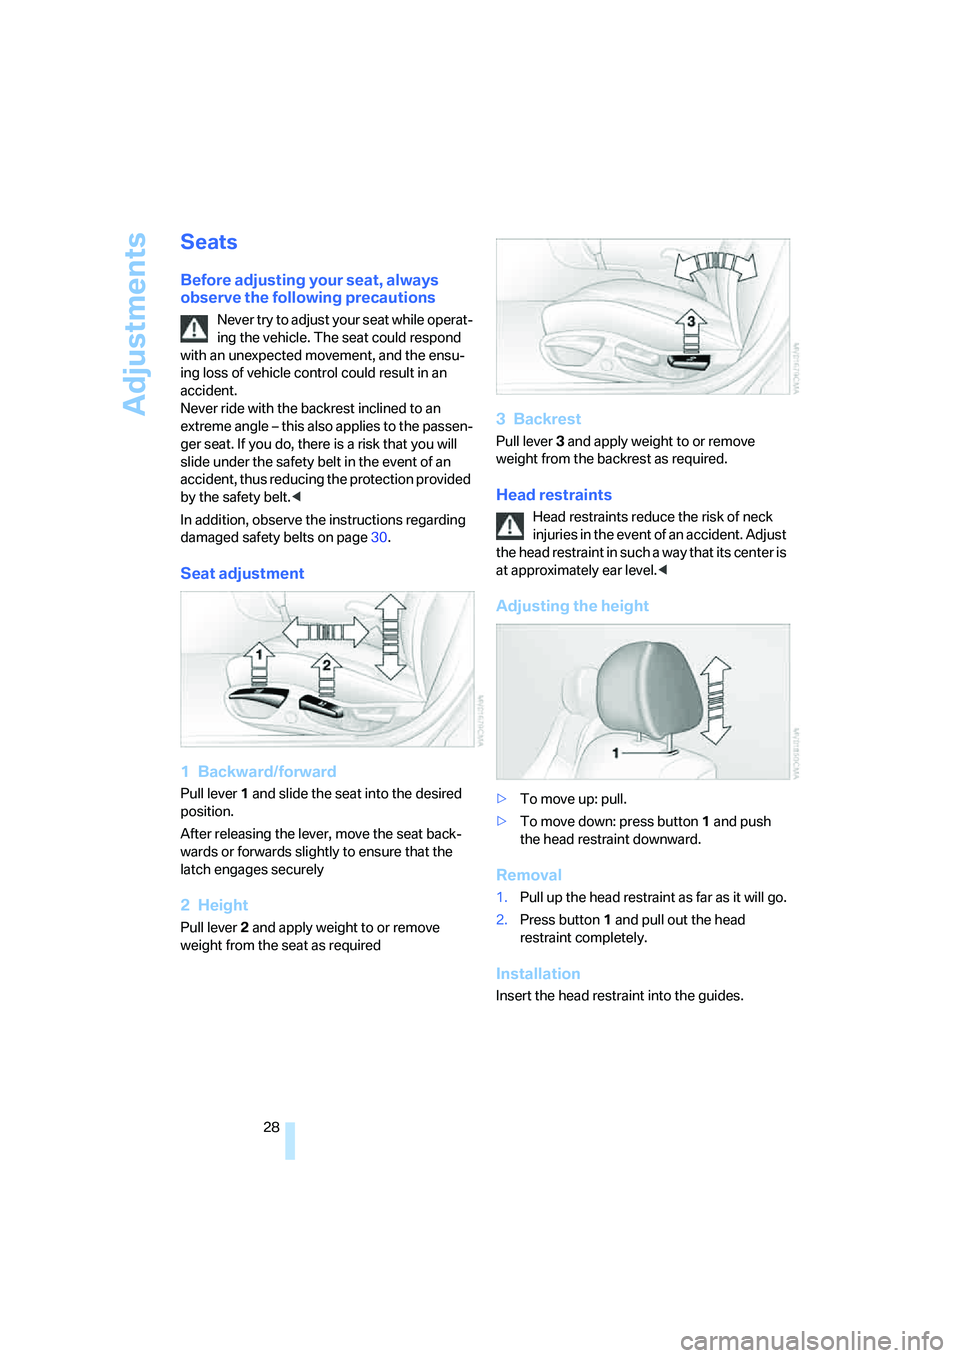
1 Backward/forward
Pull lever1 and slide the seat into the desired
position.
After releasing the lever, move the seat back-
wards or forwards slightly to ensure that the
latch engages securely
2Height
Pull lever 2 and apply weight to or remove
weight from the seat as required
3Backrest
Pull lever3 and apply weight to or remove
weight from the backrest as required.
Head restraints
Head restraints reduce the risk of neck
injuries in the event of an accident. Adjust
the head restraint in such a way that its center is
at approximately ear level.<
Adjusting the height
>To move up: pull.
>To move down: press button1 and push
the head restraint downward.
Removal
1.Pull up the head restraint as far as it will go.
2.Press button1 and pull out the head
restraint completely.
Installation
Insert the head restraint into the guides.
Page 31 of 120

Reference
At a glance
Controls
Driving tips
Mobility
29
Seat adjustment: M Sports seat*
You can also adjust the tilt and the thigh sup-
port.
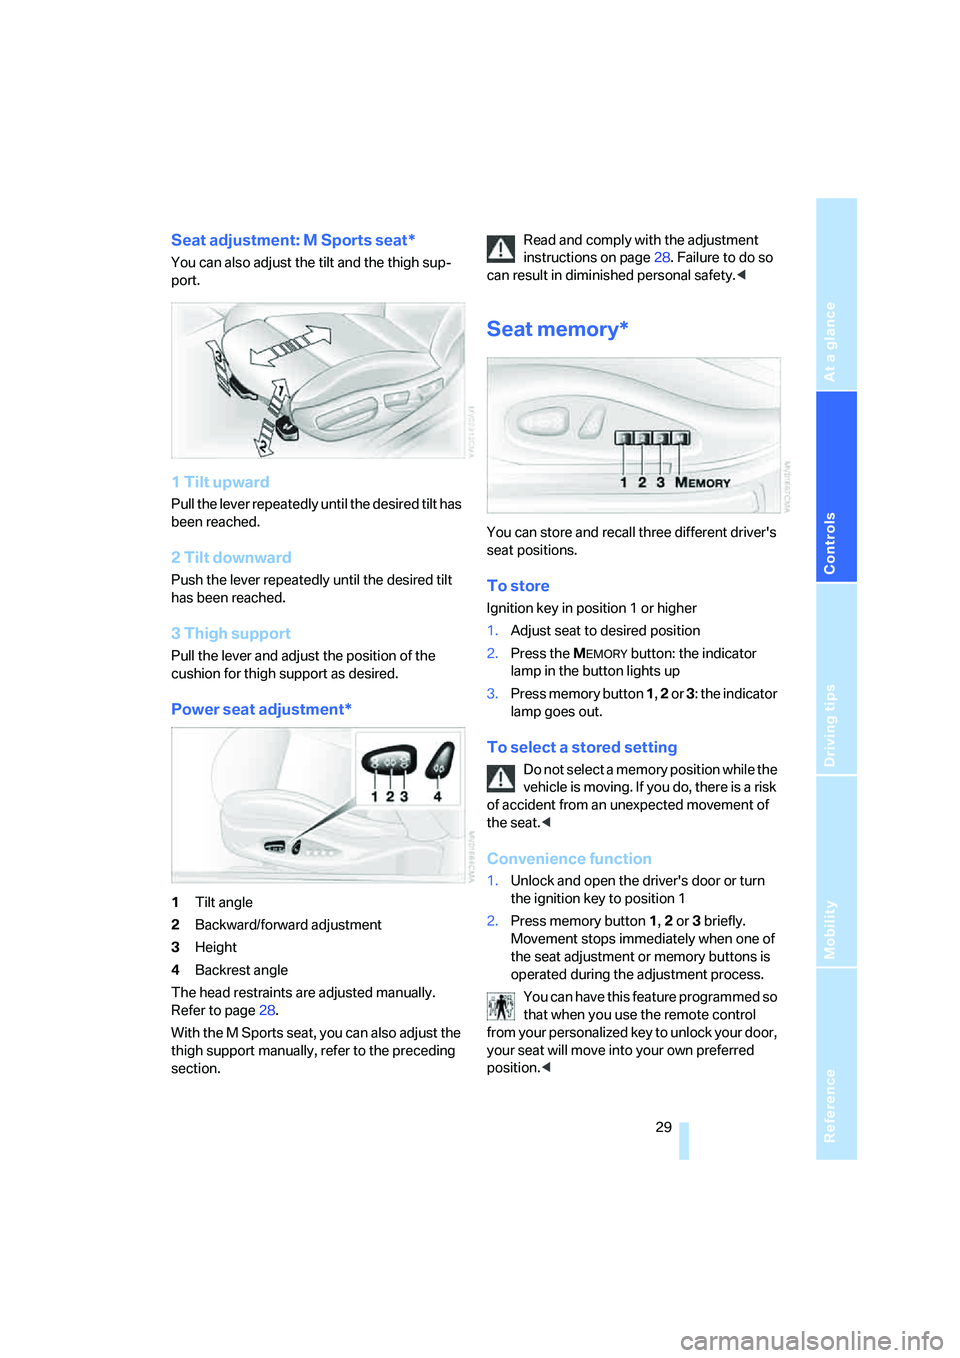
1 Tilt upward
Pull the lever repeatedly until the desired tilt has
been reached.
2 Tilt downward
Push the lever repeatedly until the desired tilt
has been reached.
3 Thigh support
Pull the lever and adjust the position of the
cushion for thigh support as desired.
Power seat adjustment*
1Tilt angle
2Backward/forward adjustment
3Height
4Backrest angle
The head restraints are adjusted manually.
Refer to page28.
With the M Sports seat, you can also adjust the
thigh support manually, refer to the preceding
section.Read and comply with the adjustment
instructions on page28. Failure to do so
can result in diminished personal safety.<
Seat memory*
You can store and recall three different driver's
seat positions.
To store
Ignition key in position 1 or higher
1.Adjust seat to desired position
2.Press the M
EMORY button: the indicator
lamp in the button lights up
3.Press memory button 1, 2 or 3: the indicator
lamp goes out.
To select a stored setting
Do not select a memory position while the
vehicle is moving. If you do, there is a risk
of accident from an unexpected movement of
the seat.<
Convenience function
1.Unlock and open the driver's door or turn
the ignition key to position 1
2.Press memory button 1, 2 or 3 briefly.
Movement stops immediately when one of
the seat adjustment or memory buttons is
operated during the adjustment process.
You can have this feature programmed so
that when you use the remote control
from your personalized key to unlock your door,
your seat will move into your own preferred
position.<
Page 32 of 120

Adjustments
30
Safety function
1.Close the driver's door and turn the ignition
key to position 0 or 2
2.Press and hold the desired memory button
1, 2 or 3 until the adjustment process is
completed.
If you press the M
EMORY button accidentally:
Press the button again; the indicator lamp goes
out.
Before activating the programmed
adjustment feature, ensure that the space
behind the driver's seat is empty and unob-
structed. If you fail to do so, objects behind the
seat could be damaged, should the seat move
backward.<
Seat heating*
The seat cushion and backrest can be heated
with the ignition key in position 2.
You can call up different heating modes by
repeatedly pressing the buttons.
The seat heating can also be switched off from
the higher heating modes:
Press the button and hold it slightly longer.
Safety belts
Comply with the instructions on page27,
or the occupants' personal safety will be
diminished.<
Make sure every occupant fastens his or her
safety belt. As supplemental restraint devices,
the airbags are designed to enhance the effec-
tiveness of the safety belts, and not to replace
them.
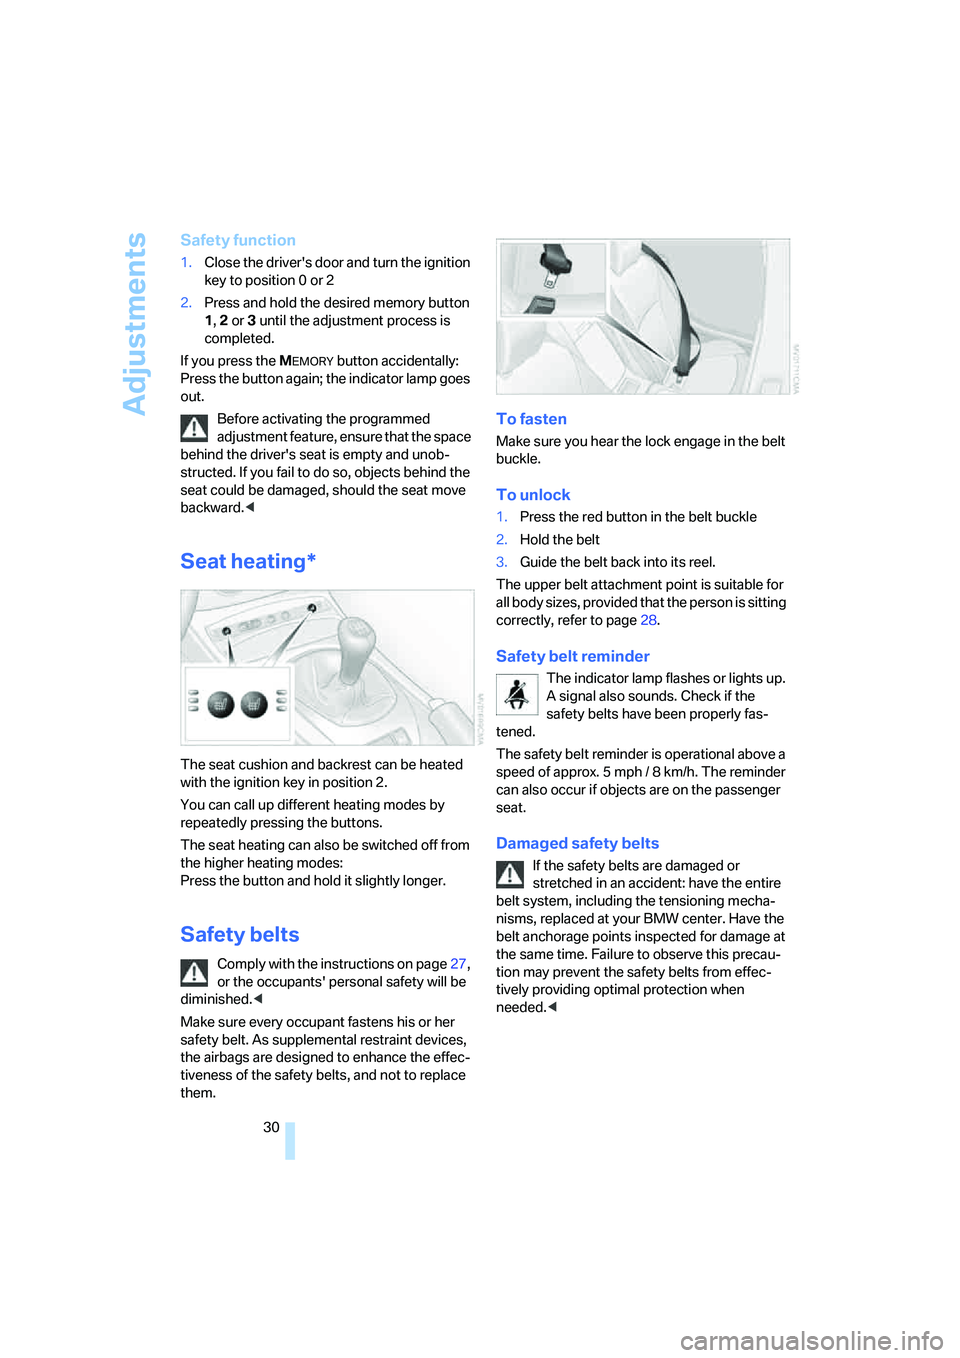
To fasten
Make sure you hear the lock engage in the belt
buckle.
To unlock
1.Press the red button in the belt buckle
2.Hold the belt
3.Guide the belt back into its reel.
The upper belt attachment point is suitable for
all body sizes, provided that the person is sitting
correctly, refer to page28.
Safety belt reminder
The indicator lamp flashes or lights up.
A signal also sounds. Check if the
safety belts have been properly fas-
tened.
The safety belt reminder is operational above a
speed of approx. 5 mph / 8 km/h. The reminder
can also occur if objects are on the passenger
seat.
Damaged safety belts
If the safety belts are damaged or
stretched in an accident: have the entire
belt system, including the tensioning mecha-
nisms, replaced at your BMW center. Have the
belt anchorage points inspected for damage at
the same time. Failure to observe this precau-
tion may prevent the safety belts from effec-
tively providing optimal protection when
needed.<
Page 33 of 120

Reference
At a glance
Controls
Driving tips
Mobility
31
Steering wheel
Adjustments
Never attempt to adjust the steering
wheel while driving the vehicle. It could
respond with unexpected movement, posing a
potential accident hazard.<
1.Swing the lever downward
2.Adjust the steering column's reach and
height to suit your seating position
3.Swing the lever back up.
Mirrors
Exterior mirrors
1Adjustments
2To switch from one mirror to the other
3To fold the mirrors in or out
*
To adjust manually
The mirrors can also be adjusted manually, if
necessary: press on the edges of the lens.
To fold the mirrors in and out
The mirrors can be folded in or out up to a road
speed of approx. 6 mph / 10 km/h by pressing
button3. This can be useful on narrow roads,
for example, or to reset the mirrors to their cor-
rect positions after they have been folded in.
Automatic heating*
Both exterior mirrors are automatically heated
when the engine is running or the ignition is
switched on.
Interior rearview mirror
To reduce the glare from vehicles behind you
when driving at night, turn the rotary knob.
For vehicles without an alarm system:
Tilt the small lever forward.
Vehicle Memory, Key Memory
How the system functions
You have probably frequently wished that you
could configure individual functions of your
vehicle to reflect your own personal require-
ments. In engineering your vehicle, BMW has
incorporated a number of options for personal
adjustment that can be programmed into your
vehicle at your BMW center.
Vehicle Memory refers to vehicle-oriented set-
tings and Key Memory refers to person-ori-
ented settings. You can have up to four different
basic settings adjusted for four different per-
sons. The only requirement is that each person
uses his or her own remote control key.
When your vehicle is unlocked with the remote
control, the vehicle recognizes the individual
Page 34 of 120

Adjustments
32 user by means of a data exchange with the key,
and makes adjustments accordingly.
Colored decals were provided with the keys to
help you distinguish between the different per-
sonal remote control keys.
What the system can do
You can learn about the entire array of features
that Vehicle Memory and Key Memory offer you
at your BMW center. A few examples follow
below:
Examples for Vehicle Memory:
>Various signals as acknowledgement when
locking or unlocking your vehicle: refer to
page17
>Windows are opened automatically, refer to
page20
>Reminder that the key is still in the ignition
switch after the driver's door has been
opened, refer to page37
>Activation/deactivation of the Follow-me-
home function: refer to page56
>Activation/deactivation of daytime driving
lamps: refer to page56
>Sets the units of measure for displaying
time, outside temperature, distance trav-
eled and fuel consumption in the instru-
ment cluster, refer to page48.
Examples for Key Memory:
>Locking of the vehicle when you start off:
refer to page18
>Automatically adjusts the driver's seat to
the personal programmed settings when
the vehicle is unlocked, refer to page29.
You will see this symbol throughout the
Owner's Manual. It is to remind you at
appropriate places of the settings that are avail-
able to you.<
Depending on how the memory functions
are configured, the vehicle may be oper-
ated differently from what is described in the
Owner's Manual. Should you decide to sell your
BMW one day, please remember to have the
memory functions returned to their original fac-
tory settings.<
Page 108 of 120

Everything from A to Z
106
A
ABS Antilock Brake
System50
– indicator lamp13
Acceleration assistant42
Accessories, refer to
– For your own safety6
– Your individual vehicle5
Accident, refer to Emergency
call96
Acknowledgment signal for
vehicle locking/unlocking16
Activated-charcoal filter63
Adjusting the thigh support29
Air, drying,
refer to Air conditioning
mode59,62
Airbags53
– deactivation33
– indicator lamp12
– passenger airbags indicator
lamp34
– reactivation33
– safe seating position27
Airbag switch33
Air conditioning58
Air conditioning mode
– air conditioning59
– automatic climate control62
Air conditioning mode
switching on/off
manually59,62
Air distribution
– air conditioning59
– automatic climate control62
Airing out, refer to
Ventilation59,63
Air outlets,
refer to Ventilation59,63
Air pressure, refer to Tire
inflation pressure78Air recirculation, refer to
Recirculated air
mode59,62
Air supply/blower
– air conditioning59
– automatic climate control62
AKI, refer to Fuel
specifications76
Alarm system25
– avoiding unintentional
alarms26
All-season tires, refer to
Winter tires81
Antenna, refer to the
Caring for your vehicle
brochure
Antifreeze86,87
– coolant87
– washing fluids86
Antilock Brake System
ABS50
– indicator lamp13
Anti-theft alarm system, refer
to Alarm system25
Anti-theft protection16,25
Approved axle load, refer to
Weights103
Approved engine oils87
Approved gross vehicle
weight, refer to Weights103
Artificial leather, refer to the
Caring for your vehicle
brochure
Ashtray65
Assistant systems,
refer to Dynamic Stability
Control DSC50
AUC Automatic recirculated
air control62Automatic
– air distribution62
– air supply/blower62
– cruise control44
– headlamp control56
– luggage compartment lid
operation19
Automatically dimming
interior rearview mirror31
Automatic car wash, refer to
the Caring for your vehicle
brochure
Automatic climate control61
Automatic recirculated air
control AUC62
Automatic transmission with
Steptronic38
– ignition36
– indicator lamp13
– interlock36
– selector lever lock38
– shiftlock38
– towing the vehicle99
– tow-starting99
AUTO program,
refer to Automatic air
distribution62
Average fuel consumption49
– setting unit of measure48
Average speed49
– setting unit of measure48
Avoiding unintentional
alarms26
Axle loads, refer to
Weights103
B
Backrest, refer to Seat
adjustment28
Backup lamps38
– bulb replacement93
Everything from A to Z
Index
Page 112 of 120

Everything from A to Z
110 Floor mats, refer to the Caring
for your vehicle brochure
Fluid reservoir, washer
systems86
Fog lamps57
– indicator lamp13
Follow me home lamps56
Footbrake, refer to Driving
notes69
Front airbags53
Fuel
– average
consumption49
– display46
– quality76
– volume, refer to
Capacities105
Fuel display, refer to Fuel
gauge46
Fuel filler door76
– unlocking in case of
electrical fault76
Fuel reserve indicator, refer to
Fuel gauge46
Fuel tank capacity, refer to
Capacities105
Fuses95
G
Gasoline, refer to Fuel
quality76
Gasoline gauge, refer to Fuel
gauge46
Gear indicator
– for automatic transmission
with Steptronic38
– for sequential manual
gearbox SMG40
Gear lever
– automatic transmission with
Steptronic38
– manual transmission38
– sequential manual gearbox
SMG40Gear shifts
– via automatic transmission
with Steptronic38
– via sequential manual
gearbox SMG41
Glove compartment64
Gross weight, refer to
Weights103
H
Handbrake, refer to Parking
brake37
Hands-free microphone,
refer to Preparations for the
cellular phone65
Hands-free system65
Hardtop, refer to the separate
Owner's Manual
Hardtop preparation72
Hazard warning flashers10
Headlamp cover, care, refer to
the Caring for your vehicle
brochure
Headlamp flasher42
– indicator lamp13
Headlamps
– bulb replacement91
– care, refer to the Caring for
your vehicle brochure
– cleaning43
Headlamps, automatic
control56
Headlamp washer
reservoir86
– volume, refer to
Capacities105
Headlamp washer
system
– cleaning the headlamps43
– washing fluids86
Head restraints28
Heated mirrors31
Heated seats30
Heating58
– exterior mirrors31
– rear window59,63
– seats30Heavy loads, refer to Stowing
cargo71
Height, refer to
Dimensions104
Height adjustment
– seats28
– steering wheel31
High beams57
– bulb replacement92
– headlamp flasher42
– indicator lamp13
High Performance
Synthetic Oil87
– alternative oils87
– approved oils87
Holders for beverages64
Hood84
Horn10
Hot exhaust system69
Hydraulic Brake Assistant,
refer to Dynamic Brake
Control DBC50
Hydraulics, brake88
Hydroplaning69
I
Ice warning48
Identification mark
– Run Flat tires82
– tire coding80
Ignition36
Ignition key16
Ignition lock36
Imprint2
Inclines69
Index106