2005 BMW 645I COUPE Head lights
[x] Cancel search: Head lightsPage 49 of 217
Adjustments
48
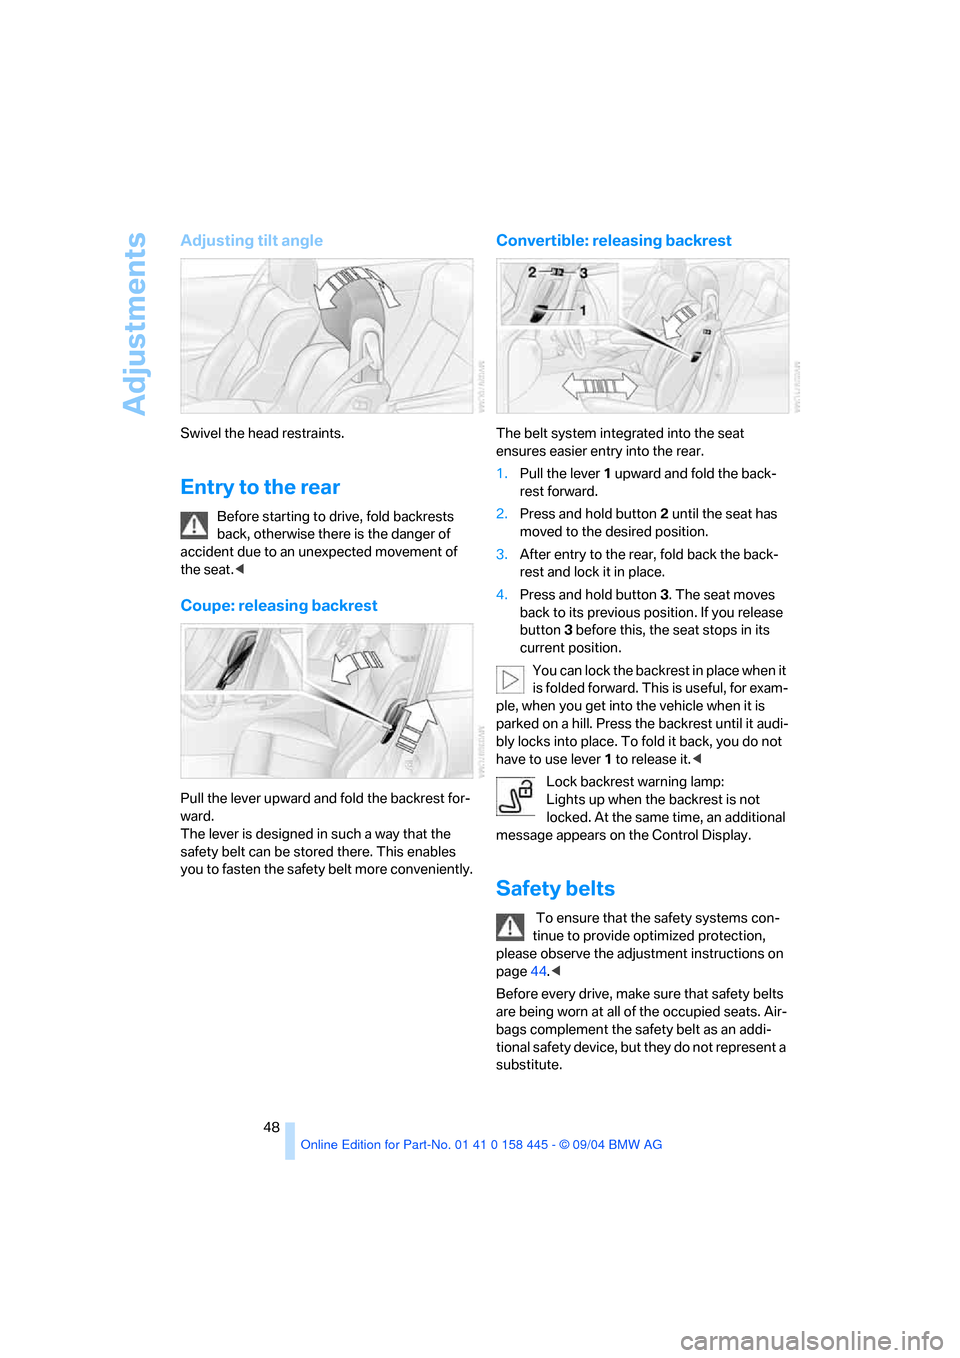
Adjusting tilt angle
Swivel the head restraints.
Entry to the rear
Before starting to drive, fold backrests
back, otherwise there is the danger of
accident due to an unexpected movement of
the seat.<
Coupe: releasing backrest
Pull the lever upward and fold the backrest for-
ward.
The lever is designed in such a way that the
safety belt can be stored there. This enables
you to fasten the safety belt more conveniently.
Convertible: releasing backrest
The belt system integrated into the seat
ensures easier entry into the rear.
1.Pull the lever 1 upward and fold the back-
rest forward.
2.Press and hold button 2 until the seat has
moved to the desired position.
3.After entry to the rear, fold back the back-
rest and lock it in place.
4.Press and hold button 3. The seat moves
back to its previous position. If you release
button 3 before this, the seat stops in its
current position.
You can lock the backrest in place when it
is folded forward. This is useful, for exam-
ple, when you get into the vehicle when it is
parked on a hill. Press the backrest until it audi-
bly locks into place. To fold it back, you do not
have to use lever 1 to release it.<
Lock backrest warning lamp:
Lights up when the backrest is not
locked. At the same time, an additional
message appears on the Control Display.
Safety belts
To ensure that the safety systems con-
tinue to provide optimized protection,
please observe the adjustment instructions on
page44.<
Before every drive, make sure that safety belts
are being worn at all of the occupied seats. Air-
bags complement the safety belt as an addi-
tional safety device, but they do not represent a
substitute.
Page 62 of 217

Controls
61Reference
At a glance
Driving tips
Communications
Navigation
Entertainment
Mobility
The system reverts to operation at normal
speed whenever the vehicle is stationary.
Rain sensor
Wiper operation is controlled automatically as a
function of the rain intensity. The rain sensor is
located on the windshield, directly in front of the
interior rearview mirror.
Activating rain sensor
Press button. The LED in the button lights up.
Adjusting rain sensor sensitivity level
Turn the serrated dial 5.
Deactivating rain sensor
Press the button again. The LED goes out.
Deactivate the rain sensor when passing
through an automatic car wash. Failure to
do so could result in damage caused by undes-
ired wiper activation.<
Cleaning windshield and headlamps
The system sprays washer fluid against the
windshield and activates the wipers for a brief
period.
When the vehicle lighting system is switched
on, the headlamps are also cleaned at regular
and appropriate intervals.
Do not use the washers if there is any
danger that the fluid will freeze on the
windshield. If you do so, your vision could be
obscured. To avoid freezing, use a washer fluid
antifreeze, refer to Washer fluid.
Do not use washers when the washer fluid res-
ervoir is empty, as otherwise the washer pump
will be damaged.<
Windshield washer nozzles
The windshield washer nozzles are automati-
cally heated in ignition key position 2.
Washer fluid
Washer fluid antifreeze is flammable.
Always keep it well away from sparks and
open flames, and store it in tightly closed con-
tainers well out of the reach of children. Always
observe the instructions for use provided on the
containers.<
Washer fluid reservoir
Capacity approx. 5.3 US quarts/5 liters
Fill with water and – if required – with a washer
antifreeze, according to manufacturer's recom-
mendations.
In order maintain the mixture ratio, mix
the washer fluid before filling.<
Cruise control
The concept
The cruise control is available for use at speeds
of approx. 20 mph/30 km/h and higher. The
vehicle maintains and stores the speed that you
set using the lever mounted on the steering col-
umn.
Do not use the cruise control under driv-
ing conditions that do not permit a con-
stant speed, e.g.when driving on winding roads,
in heavy traffic or in poor road conditions such
as snow, rain, ice, and loose road surface.<
Page 65 of 217
Driving
64
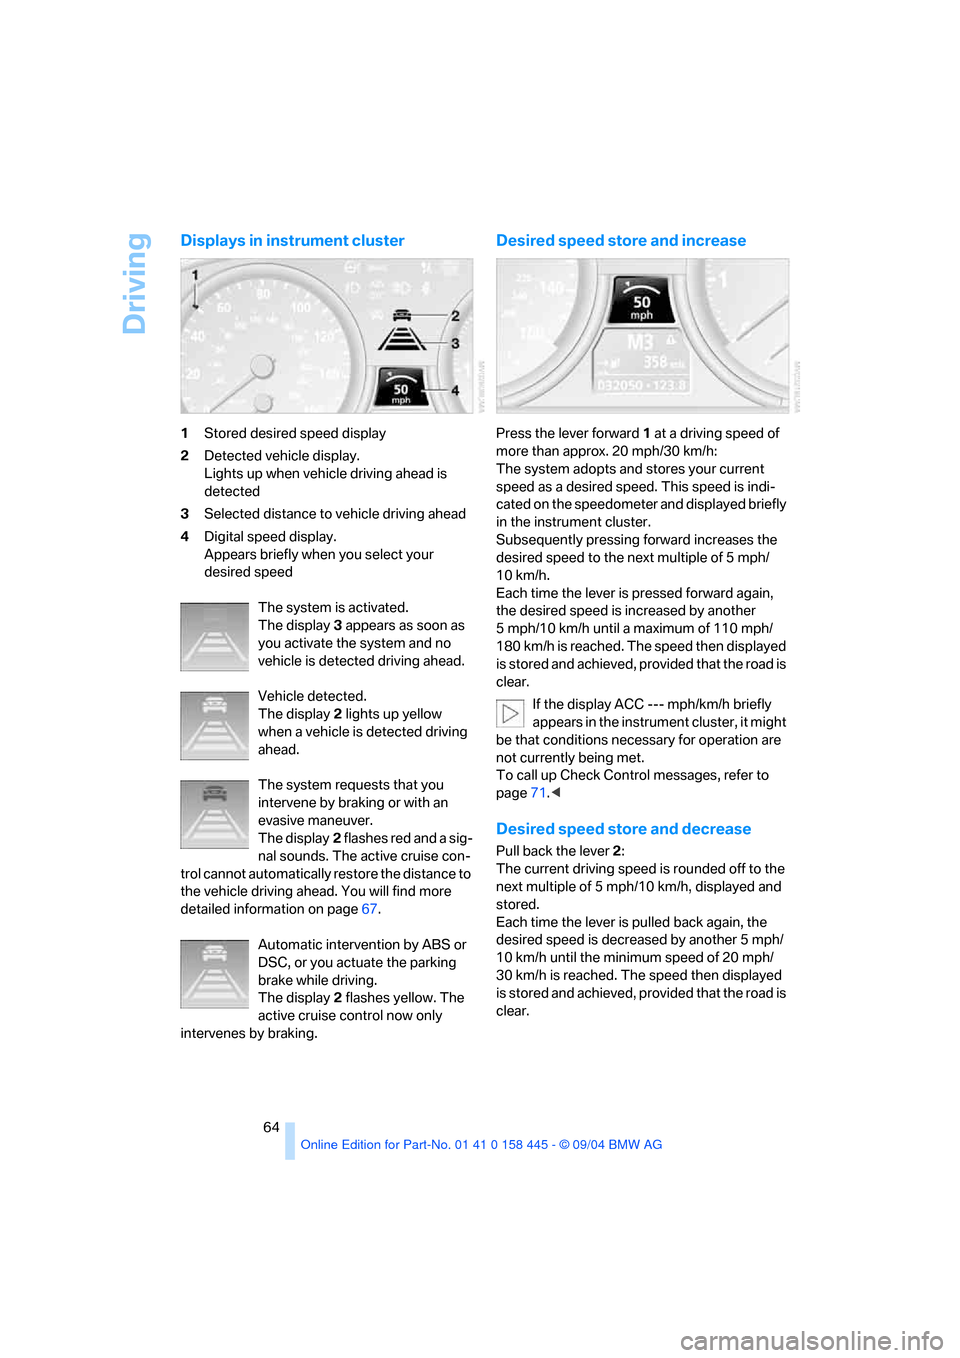
Displays in instrument cluster
1Stored desired speed display
2Detected vehicle display.
Lights up when vehicle driving ahead is
detected
3Selected distance to vehicle driving ahead
4Digital speed display.
Appears briefly when you select your
desired speed
The system is activated.
The display3 appears as soon as
you activate the system and no
vehicle is detected driving ahead.
Vehicle detected.
The display2 lights up yellow
when a vehicle is detected driving
ahead.
The system requests that you
intervene by braking or with an
evasive maneuver.
The display2 flashes red and a sig-
nal sounds. The active cruise con-
trol cannot automatically restore the distance to
the vehicle driving ahead. You will find more
detailed information on page67.
Automatic intervention by ABS or
DSC, or you actuate the parking
brake while driving.
The display2 flashes yellow. The
active cruise control now only
intervenes by braking.
Desired speed store and increase
Press the lever forward1 at a driving speed of
more than approx. 20 mph/30 km/h:
The system adopts and stores your current
speed as a desired speed. This speed is indi-
cated on the speedometer and displayed briefly
in the instrument cluster.
Subsequently pressing forward increases the
desired speed to the next multiple of 5 mph/
10 km/h.
Each time the lever is pressed forward again,
the desired speed is increased by another
5 mph/10 km/h until a maximum of 110 mph/
180 km/h is reached. The speed then displayed
is stored and achieved, provided that the road is
clear.
If the display ACC --- mph/km/h briefly
appears in the instrument cluster, it might
be that conditions necessary for operation are
not currently being met.
To call up Check Control messages, refer to
page71.<
Desired speed store and decrease
Pull back the lever2:
The current driving speed is rounded off to the
next multiple of 5 mph/10 km/h, displayed and
stored.
Each time the lever is pulled back again, the
desired speed is decreased by another 5 mph/
10 km/h until the minimum speed of 20 mph/
30 km/h is reached. The speed then displayed
is stored and achieved, provided that the road is
clear.
Page 69 of 217

Driving
68
Swerving vehicles
When a vehicle moves from an adjacent lane
into your lane, active cruise control will not
recognize this vehicle until it is fully in your lane
ahead of your vehicle.
Malfunction
The indicator lamp lights up and a mes-
sage appears on the Control Display.
The build-up of foreign matter, e. g.,
snow, ice, dirt, road debris, etc., can lead to
reduced detection performance of active cruise
control. You should check the sensor under the
front bumper and clean it as necessary prior to
driving your vehicle. If the sensor becomes cov-
ered by foreign matter or has a malfunction, it is
possible that the sensor will no longer be able to
detect vehicles in front of you. After the system
recognizes that the sensor is no longer func-
tional, a message is displayed on the Control
Display and an acoustic signal is emitted.
When the system does not detect any objects,
e.g. on seldom used roads without a shoulder or
guard rails, the system may temporarily deacti-
vate itself.
Page 87 of 217
Technology for comfort, convenience and safety
86
Initializing system
1.Start the engine.
2.With the vehicle stationary, turn the steer-
ing wheel from the straight-ahead position
to the left as far as it will go and then back to
the straight-ahead position.
3.Switch off the engine.
When you start the engine again, all the func-
tions of the active steering will be available once
again.
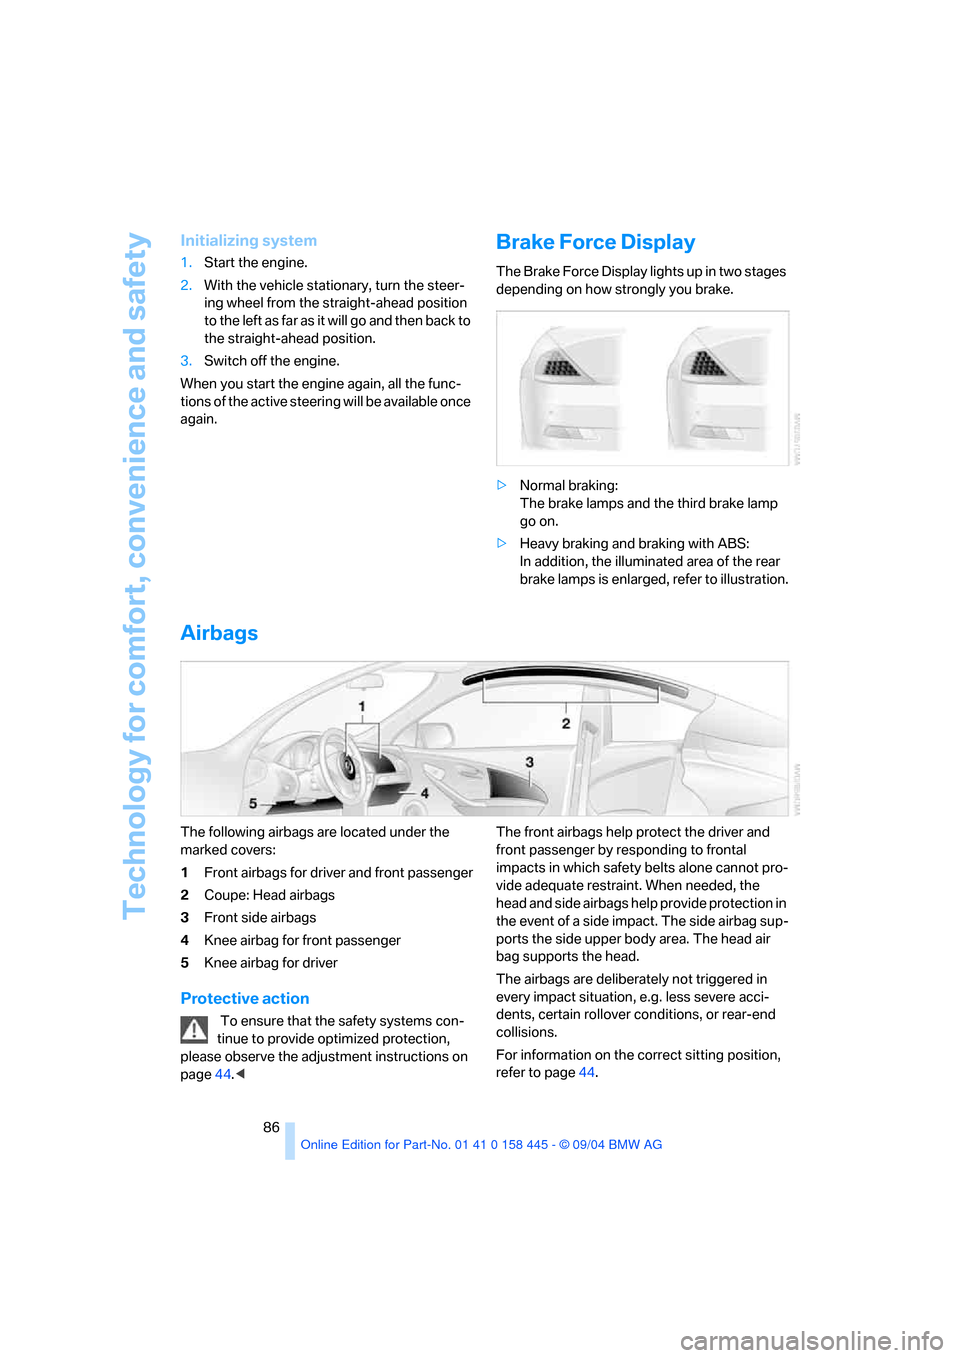
Brake Force Display
The Brake Force Display lights up in two stages
depending on how strongly you brake.
>Normal braking:
The brake lamps and the third brake lamp
go on.
>Heavy braking and braking with ABS:
In addition, the illuminated area of the rear
brake lamps is enlarged, refer to illustration.
Airbags
The following airbags are located under the
marked covers:
1Front airbags for driver and front passenger
2Coupe: Head airbags
3Front side airbags
4Knee airbag for front passenger
5Knee airbag for driver
Protective action
To ensure that the safety systems con-
tinue to provide optimized protection,
please observe the adjustment instructions on
page44.
impacts in which safety belts alone cannot pro-
vide adequate restraint. When needed, the
head and side airbags help provide protection in
the event of a side impact. The side airbag sup-
ports the side upper body area. The head air
bag supports the head.
The airbags are deliberately not triggered in
every impact situation, e.g. less severe acci-
dents, certain rollover conditions, or rear-end
collisions.
For information on the correct sitting position,
refer to page44.
Page 88 of 217
Controls
87Reference
At a glance
Driving tips
Communications
Navigation
Entertainment
Mobility
Do not apply adhesive materials to the
cover panels of the airbags, cover them or
modify them in any other way.
Do not attempt to remove the airbag retention
system from the vehicle. Never modify or
tamper with either the wiring or the individual
components in the airbag system. This cate-
gory includes the upholstery in the center of the
steering wheel, on the instrument panel, the
side trim panels on the doors and on the Coupe,
the roof pillars along with the sides of the head-
liner. Do not attempt to remove or dismantle the
steering wheel.
Do not touch the individual components
directly after the system has been triggered,
because there is a danger of burns.
If you note any indication of system malfunc-
tion, if you wish to have an airbag deactivated,
or if the airbag retention system is triggered in
response to an accident, you should always
entrust all inspection, repair and dismantling
operations to your BMW center. Unprofessional
attempts to service the system could lead to
failure in an emergency or undesired airbag
activation, either of which could result in per-
sonal injury.<
Airbag warning information is also provided on
the sun visors.
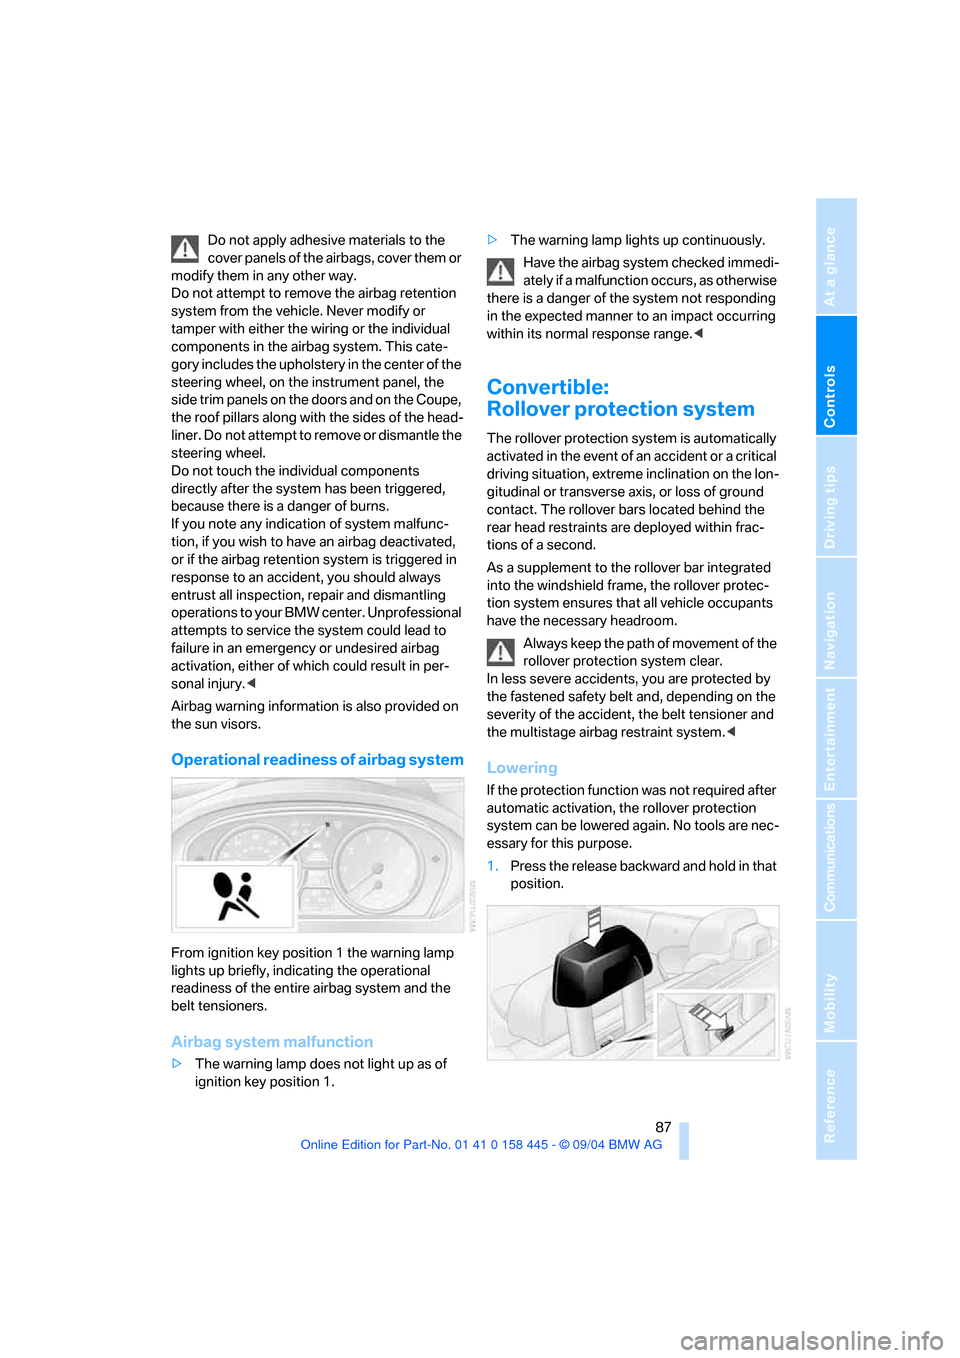
Operational readiness of airbag system
From ignition key position 1 the warning lamp
lights up briefly, indicating the operational
readiness of the entire airbag system and the
belt tensioners.
Airbag system malfunction
>The warning lamp does not light up as of
ignition key position 1.>The warning lamp lights up continuously.
Have the airbag system checked immedi-
ately if a malfunction occurs, as otherwise
there is a danger of the system not responding
in the expected manner to an impact occurring
within its normal response range.<
Convertible:
Rollover protection system
The rollover protection system is automatically
activated in the event of an accident or a critical
driving situation, extreme inclination on the lon-
gitudinal or transverse axis, or loss of ground
contact. The rollover bars located behind the
rear head restraints are deployed within frac-
tions of a second.
As a supplement to the rollover bar integrated
into the windshield frame, the rollover protec-
tion system ensures that all vehicle occupants
have the necessary headroom.
Always keep the path of movement of the
rollover protection system clear.
In less severe accidents, you are protected by
the fastened safety belt and, depending on the
severity of the accident, the belt tensioner and
the multistage airbag restraint system.<
Lowering
If the protection function was not required after
automatic activation, the rollover protection
system can be lowered again. No tools are nec-
essary for this purpose.
1.Press the release backward and hold in that
position.
Page 92 of 217
Controls
91Reference
At a glance
Driving tips
Communications
Navigation
Entertainment
Mobility
Lamps
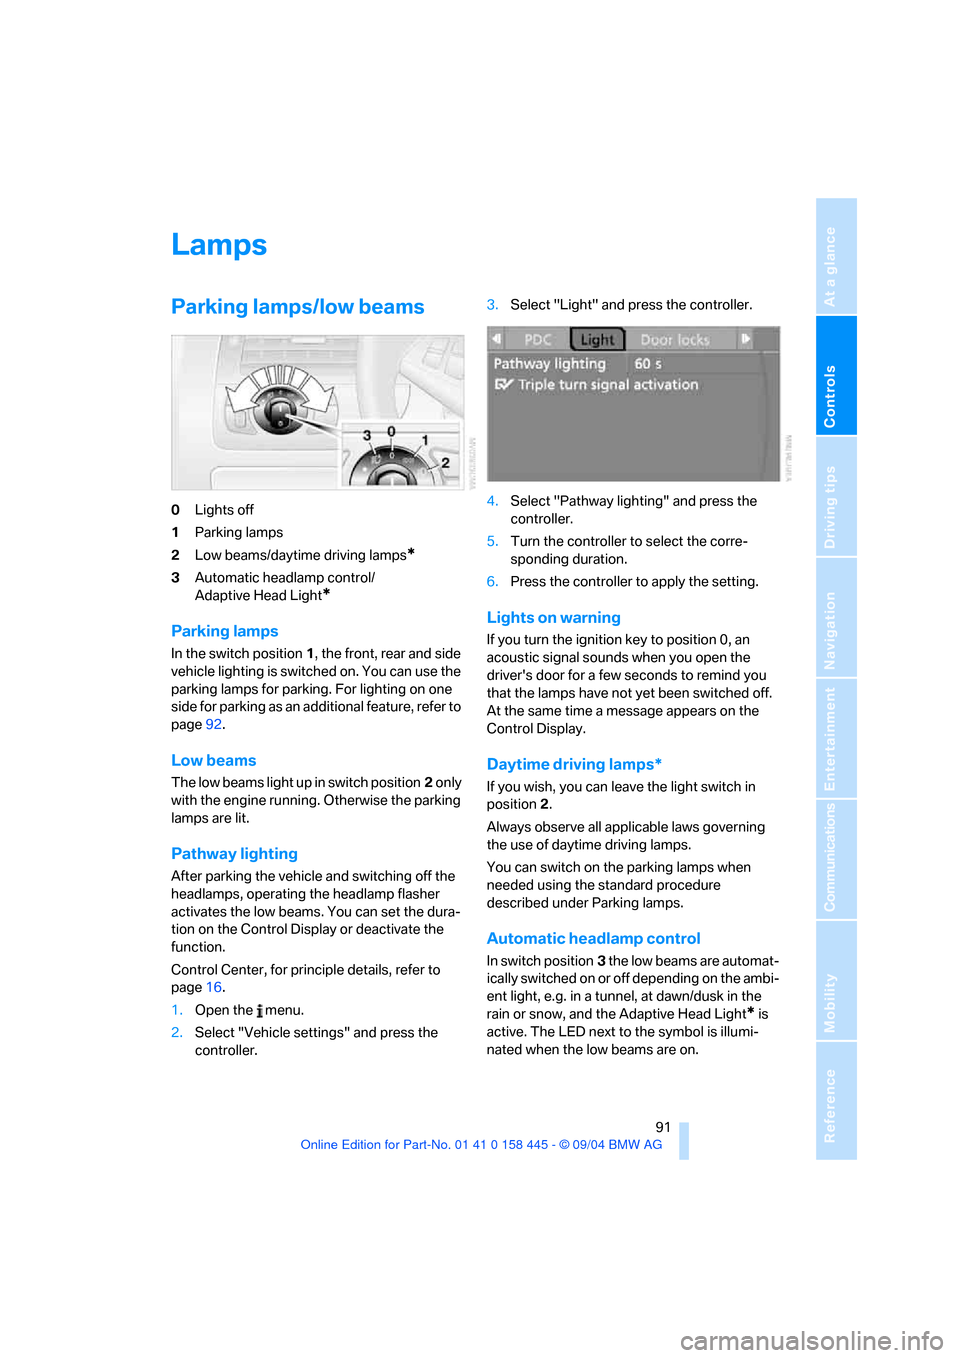
Parking lamps/low beams
0Lights off
1Parking lamps
2Low beams/daytime driving lamps
*
3Automatic headlamp control/
Adaptive Head Light
*
Parking lamps
In the switch position1, the front, rear and side
vehicle lighting is switched on. You can use the
parking lamps for parking. For lighting on one
side for parking as an additional feature, refer to
page92.
Low beams
The low beams light up in switch position2 only
with the engine running. Otherwise the parking
lamps are lit.
Pathway lighting
After parking the vehicle and switching off the
headlamps, operating the headlamp flasher
activates the low beams. You can set the dura-
tion on the Control Display or deactivate the
function.
Control Center, for principle details, refer to
page16.
1.Open the menu.
2.Select "Vehicle settings" and press the
controller.3.Select "Light" and press the controller.
4.Select "Pathway lighting" and press the
controller.
5.Turn the controller to select the corre-
sponding duration.
6.Press the controller to apply the setting.
Lights on warning
If you turn the ignition key to position 0, an
acoustic signal sounds when you open the
driver's door for a few seconds to remind you
that the lamps have not yet been switched off.
At the same time a message appears on the
Control Display.
Daytime driving lamps*
If you wish, you can leave the light switch in
position2.
Always observe all applicable laws governing
the use of daytime driving lamps.
You can switch on the parking lamps when
needed using the standard procedure
described under Parking lamps.
Automatic headlamp control
In switch position3 the low beams are automat-
ically switched on or off depending on the ambi-
ent light, e.g. in a tunnel, at dawn/dusk in the
rain or snow, and the Adaptive Head Light
* is
active. The LED next to the symbol is illumi-
nated when the low beams are on.
Page 93 of 217
Lamps
92 The low beams remain on independent of
the ambient lighting conditions when you
switch on the fog lamps.
With the daytime driving lamps activated, the
low beams are always switched on in this switch
position with the ignition key in position 2.<
The automatic headlamp control cannot
serve as a substitute for your personal
judgment in determining when the lamps
should be switched on in response to ambient
lighting conditions. For example, the system
cannot detect fog. To avoid safety risks, you
should always switch on the lamps manually
under these conditions.<
Adaptive Head Light*
The concept
Adaptive Head Light is a variable headlamp
control system that enables better illumination
of the road surface. Depending on the steering
angle and other assumptions, the light from the
headlamp follows the course of the road.
Activating Adaptive Head Light
In switch position3 the Adaptive Head Light is
active and the automatic headlamp control is
switched on.
To avoid blinding oncoming traffic, the Adaptive
Head Light
>is not active when driving in reverse
>i s o n l y a c t i v e t o w a r d p a s s e n g e r ' s s i d e w h e n
stationary
Malfunction
The LED beside the symbol for automatic head-
lamp control flashes. The Adaptive Head Light
is malfunctioning or has failed. Have the system
checked as soon as possible.
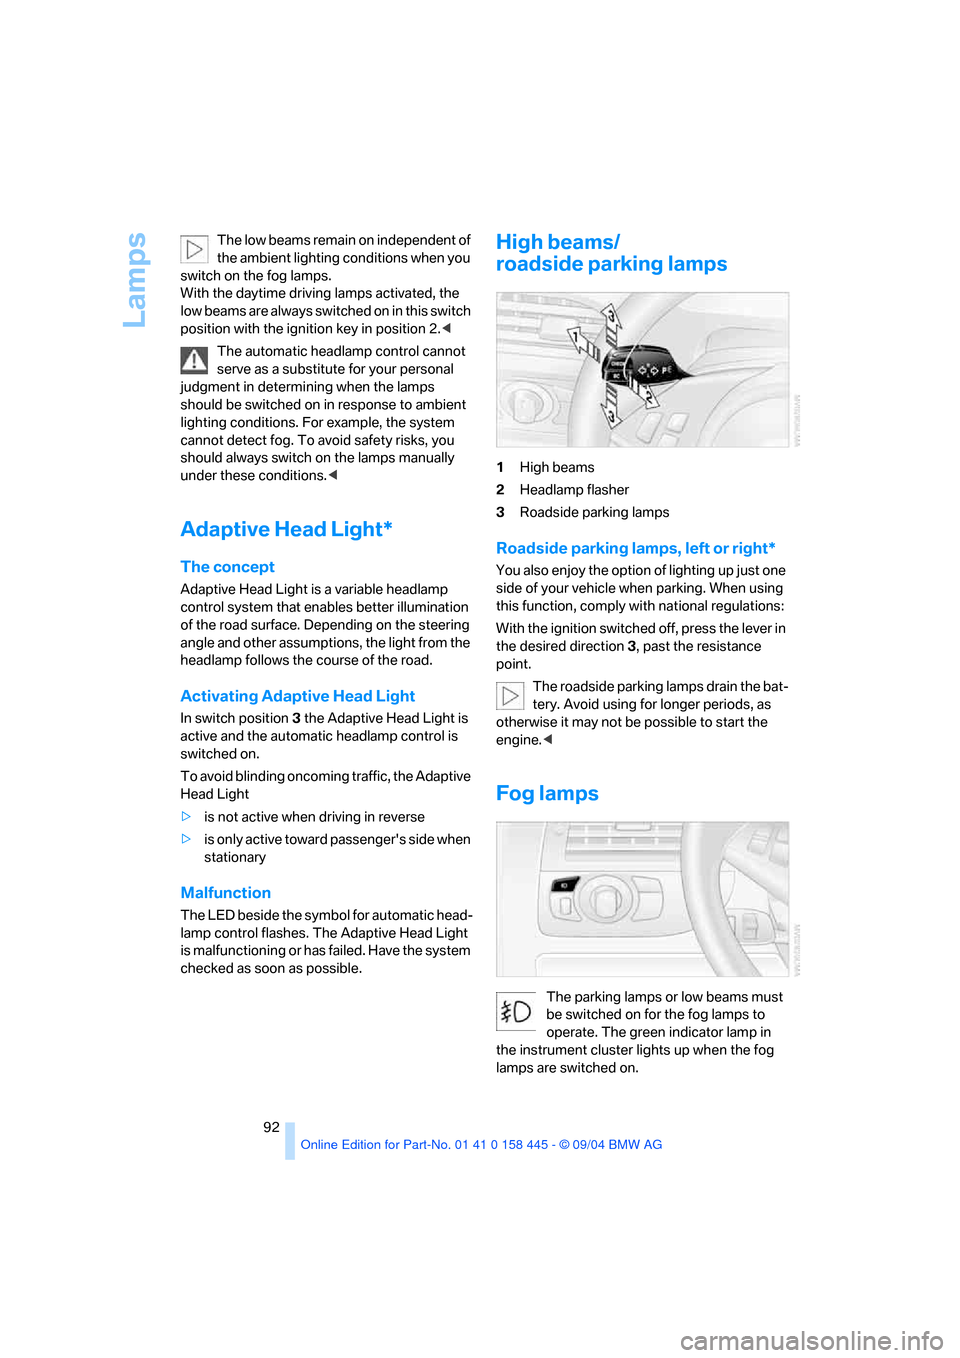
High beams/
roadside parking lamps
1High beams
2Headlamp flasher
3Roadside parking lamps
Roadside parking lamps, left or right*
You also enjoy the option of lighting up just one
side of your vehicle when parking. When using
this function, comply with national regulations:
With the ignition switched off, press the lever in
the desired direction3, past the resistance
point.
The roadside parking lamps drain the bat-
tery. Avoid using for longer periods, as
otherwise it may not be possible to start the
engine.<
Fog lamps
The parking lamps or low beams must
be switched on for the fog lamps to
operate. The green indicator lamp in
the instrument cluster lights up when the fog
lamps are switched on.