2005 BMW 645I COUPE light
[x] Cancel search: lightPage 93 of 217
Lamps
92 The low beams remain on independent of
the ambient lighting conditions when you
switch on the fog lamps.
With the daytime driving lamps activated, the
low beams are always switched on in this switch
position with the ignition key in position 2.<
The automatic headlamp control cannot
serve as a substitute for your personal
judgment in determining when the lamps
should be switched on in response to ambient
lighting conditions. For example, the system
cannot detect fog. To avoid safety risks, you
should always switch on the lamps manually
under these conditions.<
Adaptive Head Light*
The concept
Adaptive Head Light is a variable headlamp
control system that enables better illumination
of the road surface. Depending on the steering
angle and other assumptions, the light from the
headlamp follows the course of the road.
Activating Adaptive Head Light
In switch position3 the Adaptive Head Light is
active and the automatic headlamp control is
switched on.
To avoid blinding oncoming traffic, the Adaptive
Head Light
>is not active when driving in reverse
>i s o n l y a c t i v e t o w a r d p a s s e n g e r ' s s i d e w h e n
stationary
Malfunction
The LED beside the symbol for automatic head-
lamp control flashes. The Adaptive Head Light
is malfunctioning or has failed. Have the system
checked as soon as possible.
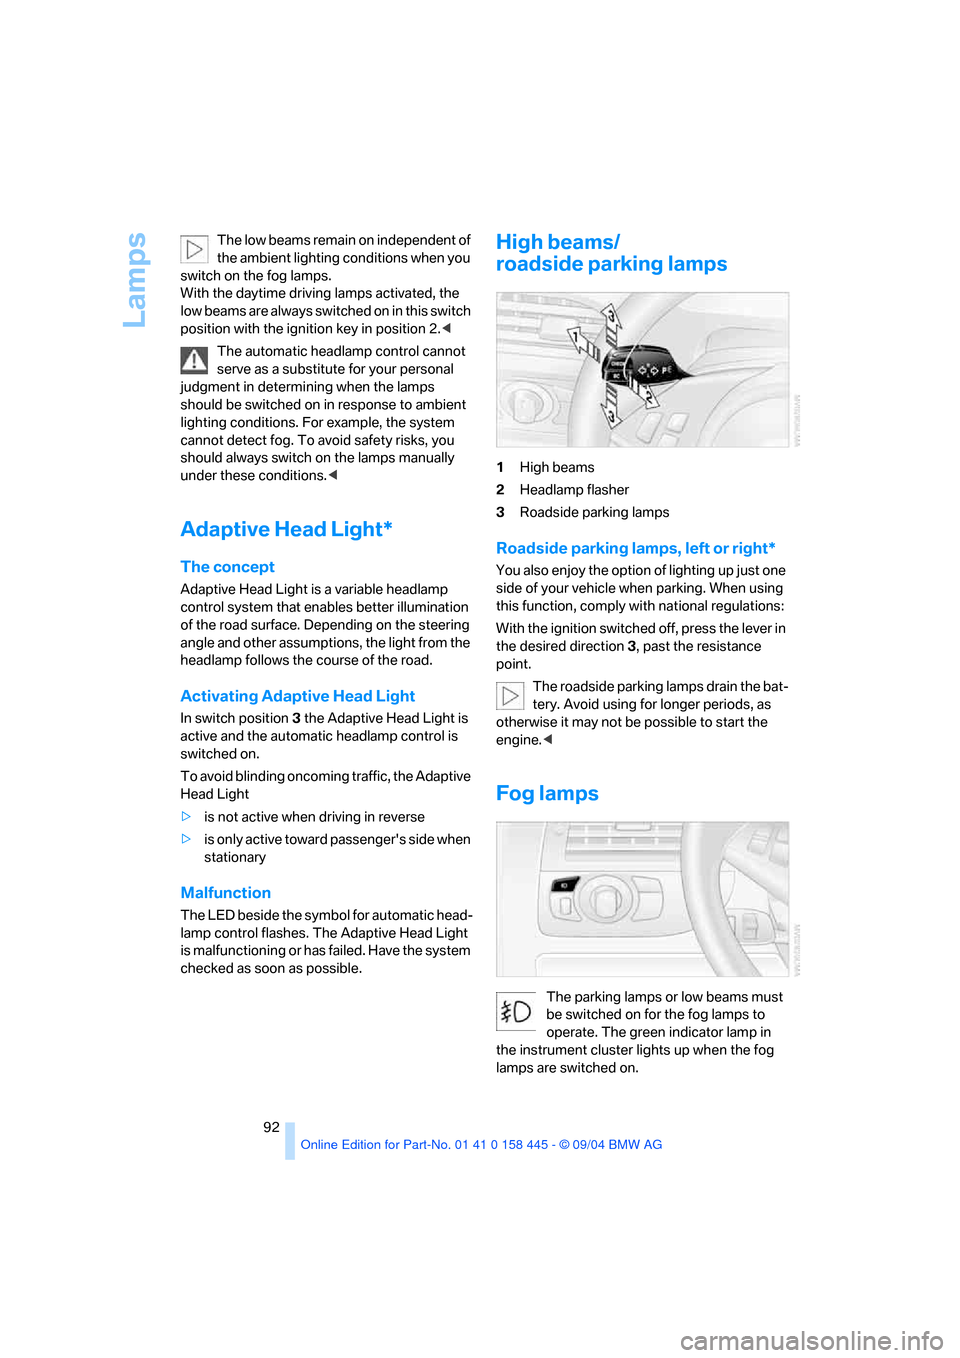
High beams/
roadside parking lamps
1High beams
2Headlamp flasher
3Roadside parking lamps
Roadside parking lamps, left or right*
You also enjoy the option of lighting up just one
side of your vehicle when parking. When using
this function, comply with national regulations:
With the ignition switched off, press the lever in
the desired direction3, past the resistance
point.
The roadside parking lamps drain the bat-
tery. Avoid using for longer periods, as
otherwise it may not be possible to start the
engine.<
Fog lamps
The parking lamps or low beams must
be switched on for the fog lamps to
operate. The green indicator lamp in
the instrument cluster lights up when the fog
lamps are switched on.
Page 94 of 217
Controls
93Reference
At a glance
Driving tips
Communications
Navigation
Entertainment
Mobility
The fog lamps are switched off whenever the
high beams are switched on.
If the automatic headlamp control is acti-
vated, the low beams will come on auto-
matically when you switch on the fog lamps.<
Instrument lighting
The lighting intensity can be adjusted with the
serrated dial.
Interior lamps
Control of the interior lamps, footwell lamps,
door entry lighting, courtesy lamps
* and sill
panel lighting
* is automatic.
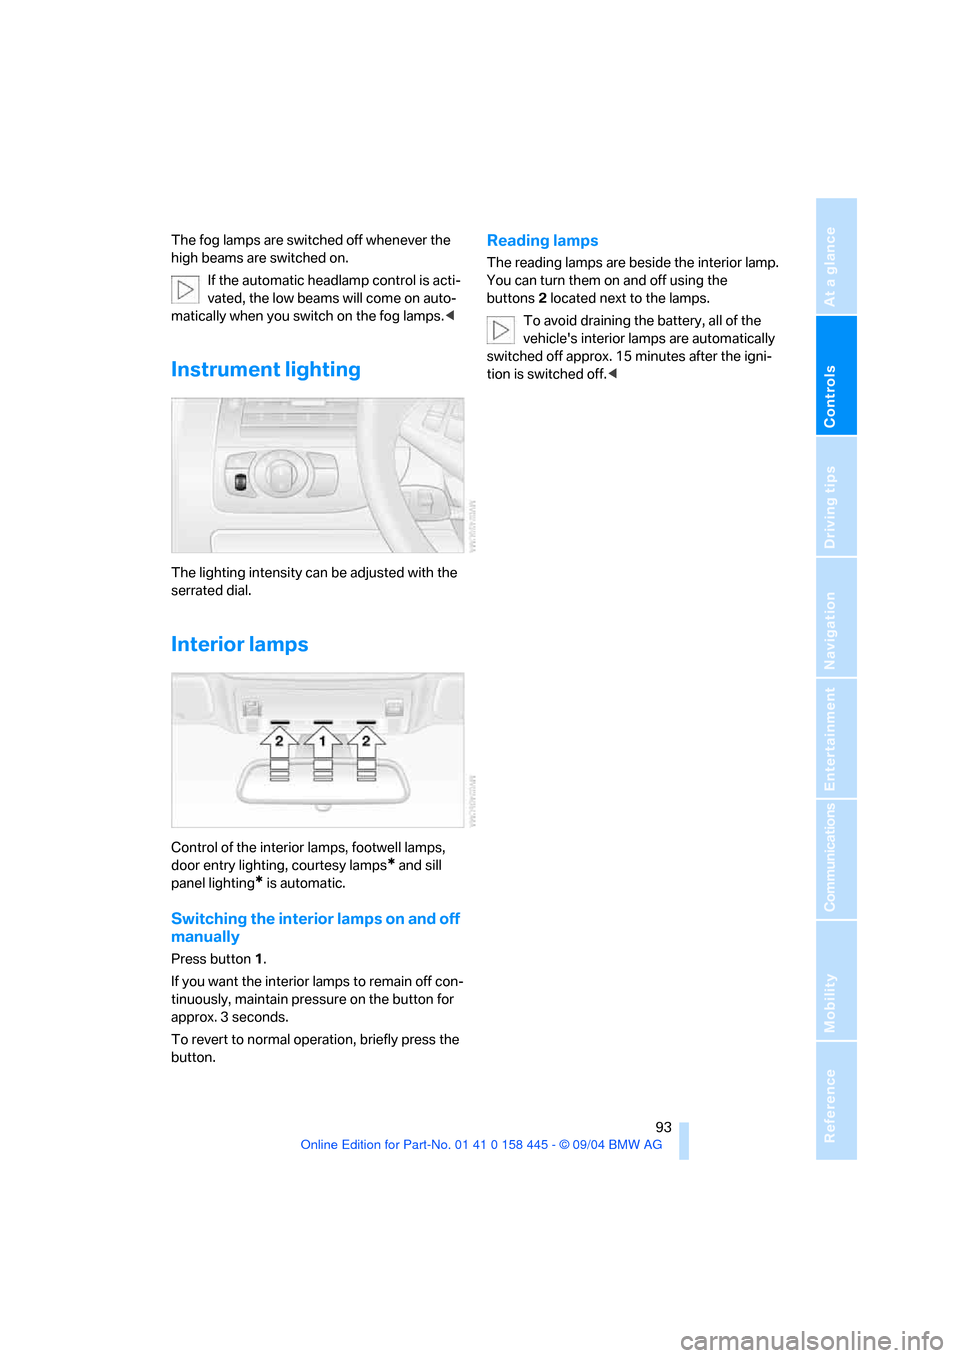
Switching the interior lamps on and off
manually
Press button 1.
If you want the interior lamps to remain off con-
tinuously, maintain pressure on the button for
approx. 3 seconds.
To revert to normal operation, briefly press the
button.
Reading lamps
The reading lamps are beside the interior lamp.
You can turn them on and off using the
buttons2 located next to the lamps.
To avoid draining the battery, all of the
vehicle's interior lamps are automatically
switched off approx. 15 minutes after the igni-
tion is switched off.<
Page 97 of 217
A congenial climate
96 it off while also increasing the air volume as
required.
The recirculated-air mode should not be used
over a longer period of time, as the air quality
inside the vehicle deteriorates continuously.<
Residual heat mode
Press the button when the motor is
switched off and warm.
The heat stored in the engine is
used to heat the passenger com-
partment, e.g. when stopped at a school to pick
up a child.
You can adjust the automatic climate control
settings as of ignition key position 1.
Provided that the engine has warmed to its nor-
mal operating temperature and the battery is
charged, you can use this function for up to
15 minutes after switching off the ignition. The
LED in the button lights up to confirm compli-
ance with both of these conditions.
Switching off automatic climate control
The air volume, the heater and the
cooling function are all switched
off.
You can restart the automatic cli-
mate control by pressing any of its buttons
except the REST button.
Settings using Control Center
Ignition key:
>In vehicles with separate drives for audio
CDs and navigation DVDs, ignition key in
position 2.
>In vehicles with one drive for audio CDs,
ignition key in position 1.
Control Center, for principle details, refer to
page16.1.Press the button.
This opens the start menu.
2.Move the controller to the left to open "Cli-
mate".
You can set the following:
>Manual air distribution, separate for driver's
side and passenger side
>Adapting temperature in upper body region
>Intensity of the AUTO program
The settings are stored for the remote control
currently in use.
Manual air distribution
You can preset the air distribution yourself and
also adjust the air temperature in the upper
body area.
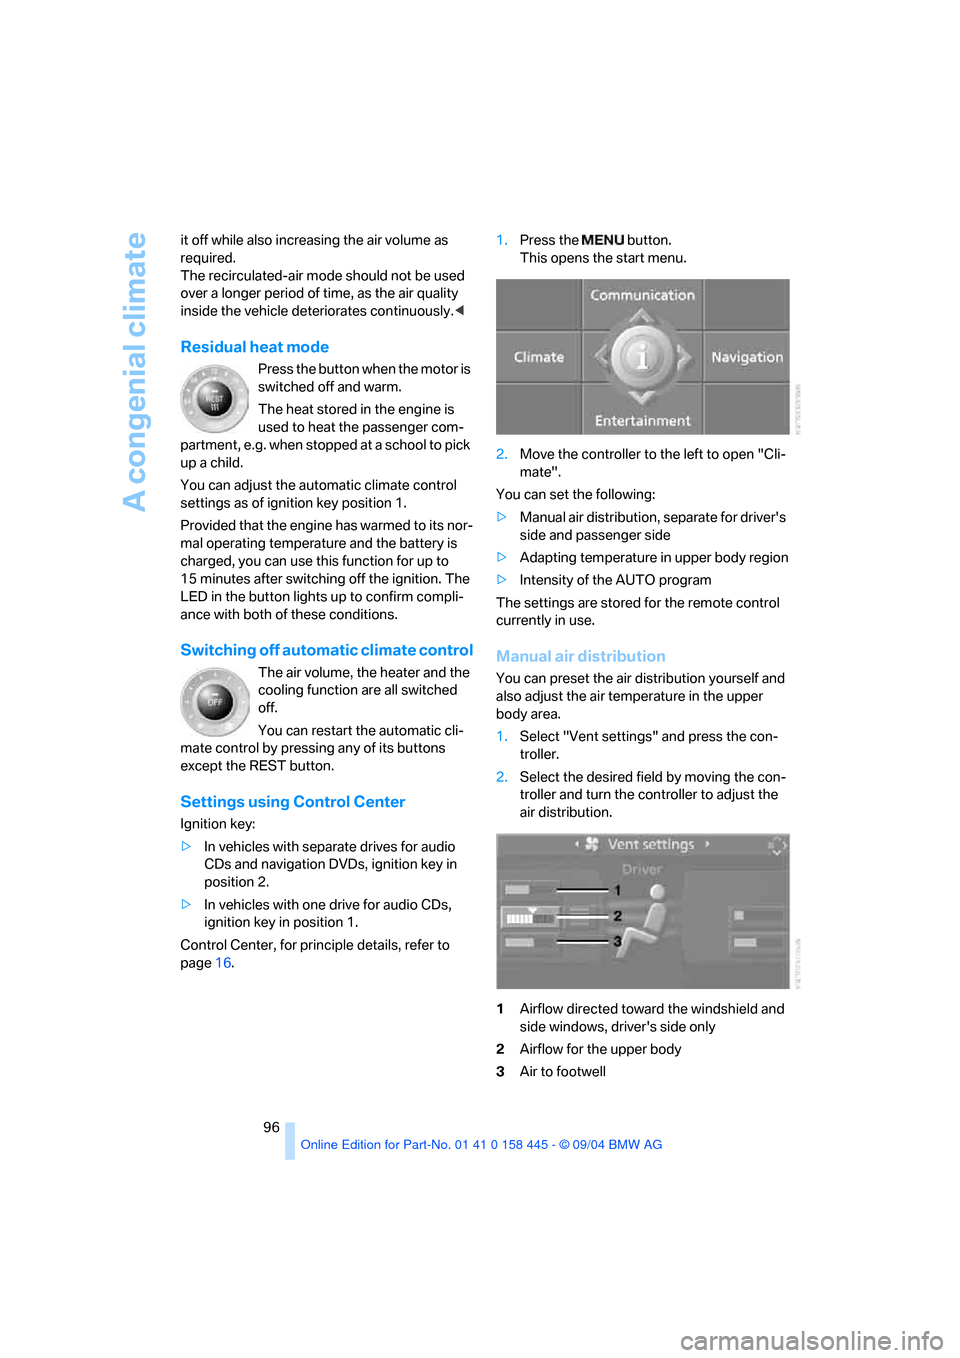
1.Select "Vent settings" and press the con-
troller.
2.Select the desired field by moving the con-
troller and turn the controller to adjust the
air distribution.
1Airflow directed toward the windshield and
side windows, driver's side only
2Airflow for the upper body
3Air to footwell
Page 99 of 217
A congenial climate
98
Independent ventilation
The independent ventilation blows air into the
passenger compartment to lower interior tem-
peratures.
The independent ventilation is controlled using
the Control Center. You can set two different
times for the system to start.
The independent ventilation remains on for
30 minutes. It can also be switched on and off
directly. Since the system uses a substantial
amount of electrical current, you should refrain
from activating it twice in succession without
allowing the battery to be recharged in normal
operation between use.
The independent ventilation is ready for use at
any outside temperature up to ignition key
position 1.
The air emerges through the upper body region
vent outlets in the instrument panel. These vent
outlets must be open for the system to operate.
Switching on and off directly
Ignition key in position 2:
Control Center, for principle details, refer to
page16.
1.Open "Climate".
2.Select "Parked car operation" and press the
controller.
3.Select "Automatic ventilation" and press
the controller.
4.Select "Parked car ventilation" and press
the controller.
The independent ventilation is switched on and
the LED flashes.
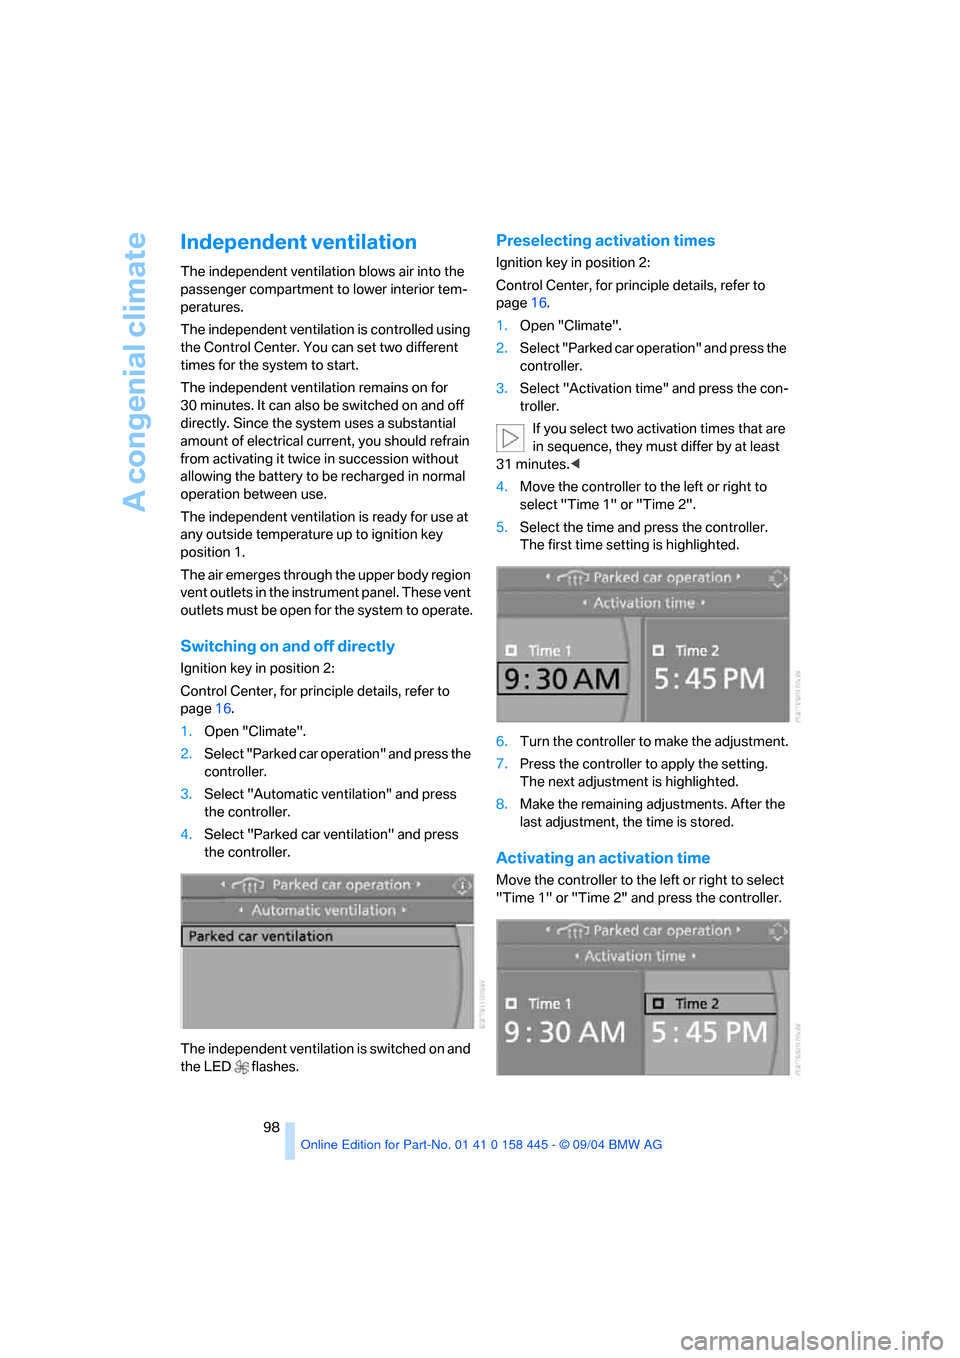
Preselecting activation times
Ignition key in position 2:
Control Center, for principle details, refer to
page16.
1.Open "Climate".
2.Select "Parked car operation" and press the
controller.
3.Select "Activation time" and press the con-
troller.
If you select two activation times that are
in sequence, they must differ by at least
31 minutes.<
4.Move the controller to the left or right to
select "Time 1" or "Time 2".
5.Select the time and press the controller.
The first time setting is highlighted.
6.Turn the controller to make the adjustment.
7.Press the controller to apply the setting.
The next adjustment is highlighted.
8.Make the remaining adjustments. After the
last adjustment, the time is stored.
Activating an activation time
Move the controller to the left or right to select
"Time 1" or "Time 2" and press the controller.
Page 100 of 217

Controls
99Reference
At a glance
Driving tips
Communications
Navigation
Entertainment
Mobility
The activation time is activated and the
LED lights up.
The independent ventilation is only avail-
able for activation within the subsequent
24 hours. After that, the time must be reacti-
vated.<
Page 102 of 217
Controls
101Reference
At a glance
Driving tips
Communications
Navigation
Entertainment
Mobility
You can operate the system when the ignition
key is in position 2.
If the device cannot be used after
repeated programming, check whether
the original hand-held transmitter uses an alter-
nating-code system. To do so, either read the
instructions for the original hand-held transmit-
ter or press the programmed memory button1
of the integrated universal remote control
longer. If the LED 2 on the integrated universal
remote control flashes rapidly for a short time
then lights up for approx. 2 seconds, this indi-
cates that the original hand-held transmitter
uses an alternating-code system. In the case of
an alternating-code system, program the mem-
ory buttons1 as described at Alternating-code
hand-held transmitters.<
Alternating-code hand-held
transmitters
To program the integrated universal remote
control, consult the operating instructions for
the equipment to be set. You will find informa-
tion there on the possibilities for synchroniza-
tion.
When programming hand-held transmitters
that employ an alternating code, please observe
the following supplementary instructions:
P r o g ra m m in g w i ll b e ea s i er w it h t h e a i d o f
a second person.<
1.Park your vehicle within the range of the
remote-controlled equipment.
2.Program the integrated universal remote
control as described above at Fixed-code
hand-held transmitters.
3.Locate the button at the receiver of the
equipment to be set, e.g. on the drive.
4.Press the button on the receiver of the
equipment to be set. After step 4, you have
approx. 30 seconds for step 5.
5.Press the programmed memory button1 of
the integrated universal remote control
three times.
The corresponding memory button1 is now
programmed with the signal of the original
hand-held transmitter.
Clearing memory buttons
Press both outer buttons 1 for approx. 20 sec-
onds, maintaining pressure until the LED 2
starts to flash: All of the memory buttons are
cleared.
The memory of individual memory buttons1
cannot be cleared.
Glove compartment
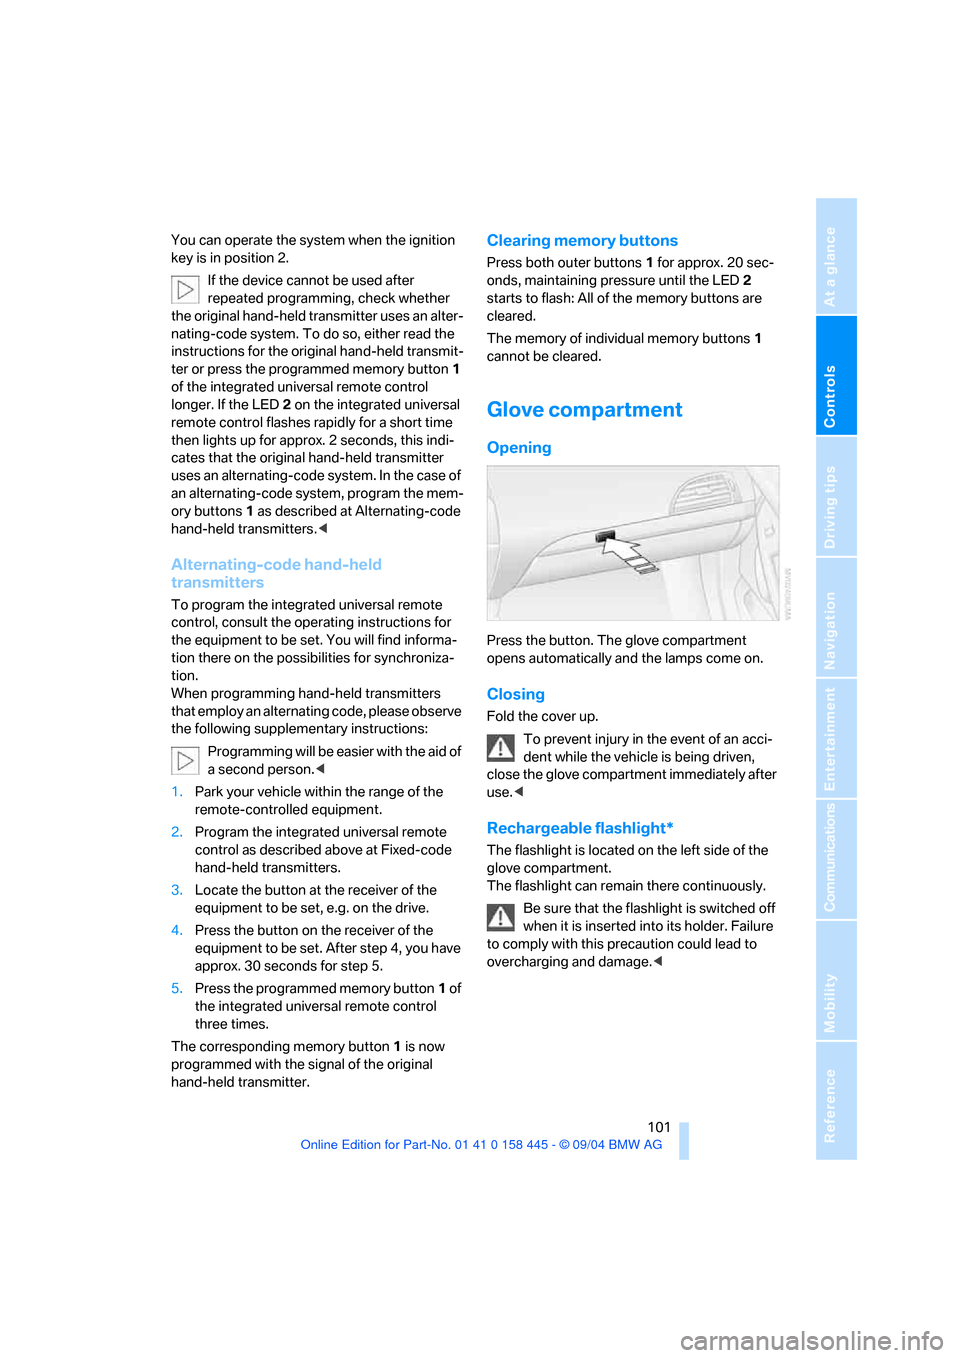
Opening
Press the button. The glove compartment
opens automatically and the lamps come on.
Closing
Fold the cover up.
To prevent injury in the event of an acci-
dent while the vehicle is being driven,
close the glove compartment immediately after
use.<
Rechargeable flashlight*
The flashlight is located on the left side of the
glove compartment.
The flashlight can remain there continuously.
Be sure that the flashlight is switched off
when it is inserted into its holder. Failure
to comply with this precaution could lead to
overcharging and damage.<
Page 104 of 217
Controls
103Reference
At a glance
Driving tips
Communications
Navigation
Entertainment
Mobility
Cup holders
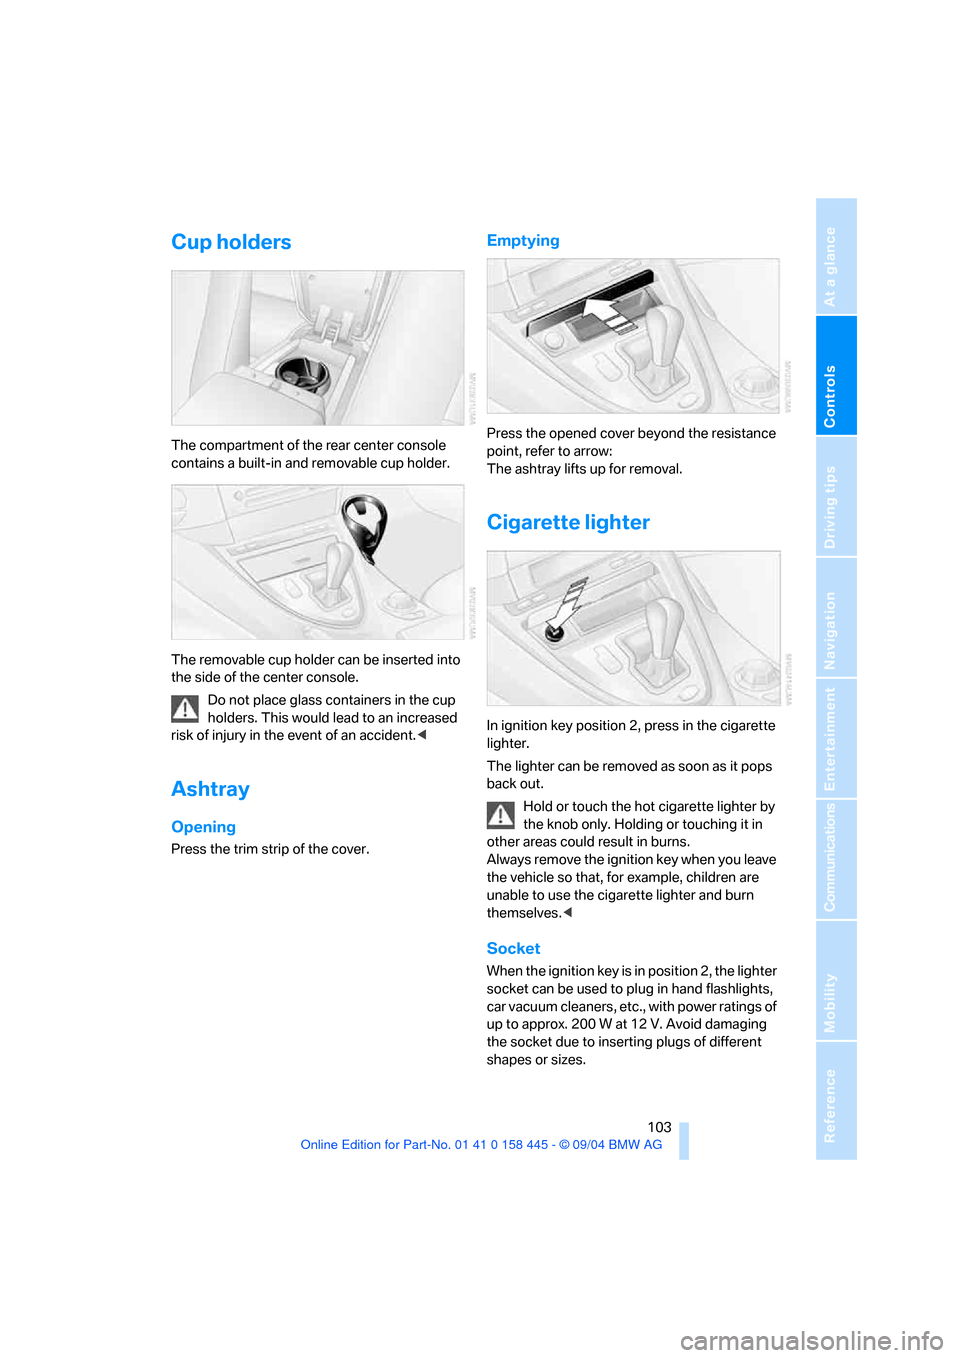
The compartment of the rear center console
contains a built-in and removable cup holder.
The removable cup holder can be inserted into
the side of the center console.
Do not place glass containers in the cup
holders. This would lead to an increased
risk of injury in the event of an accident.<
Ashtray
Opening
Press the trim strip of the cover.
Emptying
Press the opened cover beyond the resistance
point, refer to arrow:
The ashtray lifts up for removal.
Cigarette lighter
In ignition key position 2, press in the cigarette
lighter.
The lighter can be removed as soon as it pops
back out.
Hold or touch the hot cigarette lighter by
the knob only. Holding or touching it in
other areas could result in burns.
Always remove the ignition key when you leave
the vehicle so that, for example, children are
unable to use the cigarette lighter and burn
themselves.<
Socket
When the ignition key is in position 2, the lighter
socket can be used to plug in hand flashlights,
car vacuum cleaners, etc., with power ratings of
up to approx. 200 W at 12 V. Avoid damaging
the socket due to inserting plugs of different
shapes or sizes.
Page 110 of 217
Driving tips
109Reference
At a glance
Controls
Communications
Navigation
Entertainment
Mobility
Mobile communication devices in
vehicle
BMW advises against using mobile com-
munication devices, e.g. portable phones,
inside the vehicle without a direct connection to
an external antenna. Otherwise, the vehicle
electronics and mobile communication device
can influence one another. In addition, there is
no assurance that the radiation emitted during
transmission will be conveyed out of the vehicle
interior.<
Hydroplaning
When driving on wet or slushy roads,
reduce road speed. If you do not, a wedge
of water can form between tires and road sur-
face. This phenomenon is referred to as hydro-
planing, and is characterized by a partial or
complete loss of contact between the tires and
the road surface, ultimately undermining your
ability to steer and brake the vehicle.<
The risk of hydroplaning increases as the tread
depth of the tires decreases, also refer to Mini-
mum tire tread on page171.
Driving through water
Do not drive through water on the road if it
is deeper than 1 ft/30 cm, and then only at
walking speed at the most. Otherwise, the vehi-
cle's engine, the electrical systems and the
transmission may be damaged.<
Using handbrake on inclines.
On inclines, do not hold the vehicle with
the clutch; use the handbrake. Otherwise
greater clutch wear will result.<
SMG Sequential manual transmission
Start off quickly on slopes. Do not hold
the vehicle on a hill by applying the throt-
tle, but engage the handbrake instead. Other-
wise overheating can occur in the transmission
region.<
Braking safely
Your BMW is equipped with ABS as standard. In
situations that require it, it is best to brake with
full force. Since the vehicle maintains steering
responsiveness, you can still avoid possible
obstacles with a minimum of steering effort.
Pulsation at the brake pedal combines with
sounds from the hydraulic circuits to indicate to
the driver that ABS is in its active mode.
Do not drive with your foot resting on the
brake pedal. Even light but consistent
pedal pressure can lead to high temperatures,
brake wear and possibly even brake failure.<
Driving in wet conditions
When driving on wet roads or in heavy rain,
briefly brake with light pedal pressure at inter-
vals of a few miles. Monitor traffic conditions to
ensure that this maneuver does not endanger
other road users. The heat generated in this
process helps dry the pads and rotors to ensure
that full braking efficiency will then be available
when you need it.
Hills
To prevent overheating and thus reduced
efficiency of the brake system, downshift
to a gear in which only minimal brake applica-
tions are needed when descending long or
steep downhill stretches. Even light but consis-
tent pedal pressure can lead to high tempera-
tures, brake wear and possibly even brake fail-
ure.<
You can further enhance the engine's braking
effect by selecting a lower gear in the automatic
transmission's manual mode, downshifting as
far as first gear on extremely steep stretches,
refer to page58. This strategy helps you avoid
placing excessive loads on the brake system.
Never drive with the clutch pressed
or allow the vehicle to coast with the
transmission in Neutral – or with the engine
switched off – there is no engine braking when
the transmission is in Neutral, and no power
assist for brakes and steering when the engine
is not running.