2005 BMW 645I COUPE check engine
[x] Cancel search: check enginePage 13 of 217
Cockpit
12
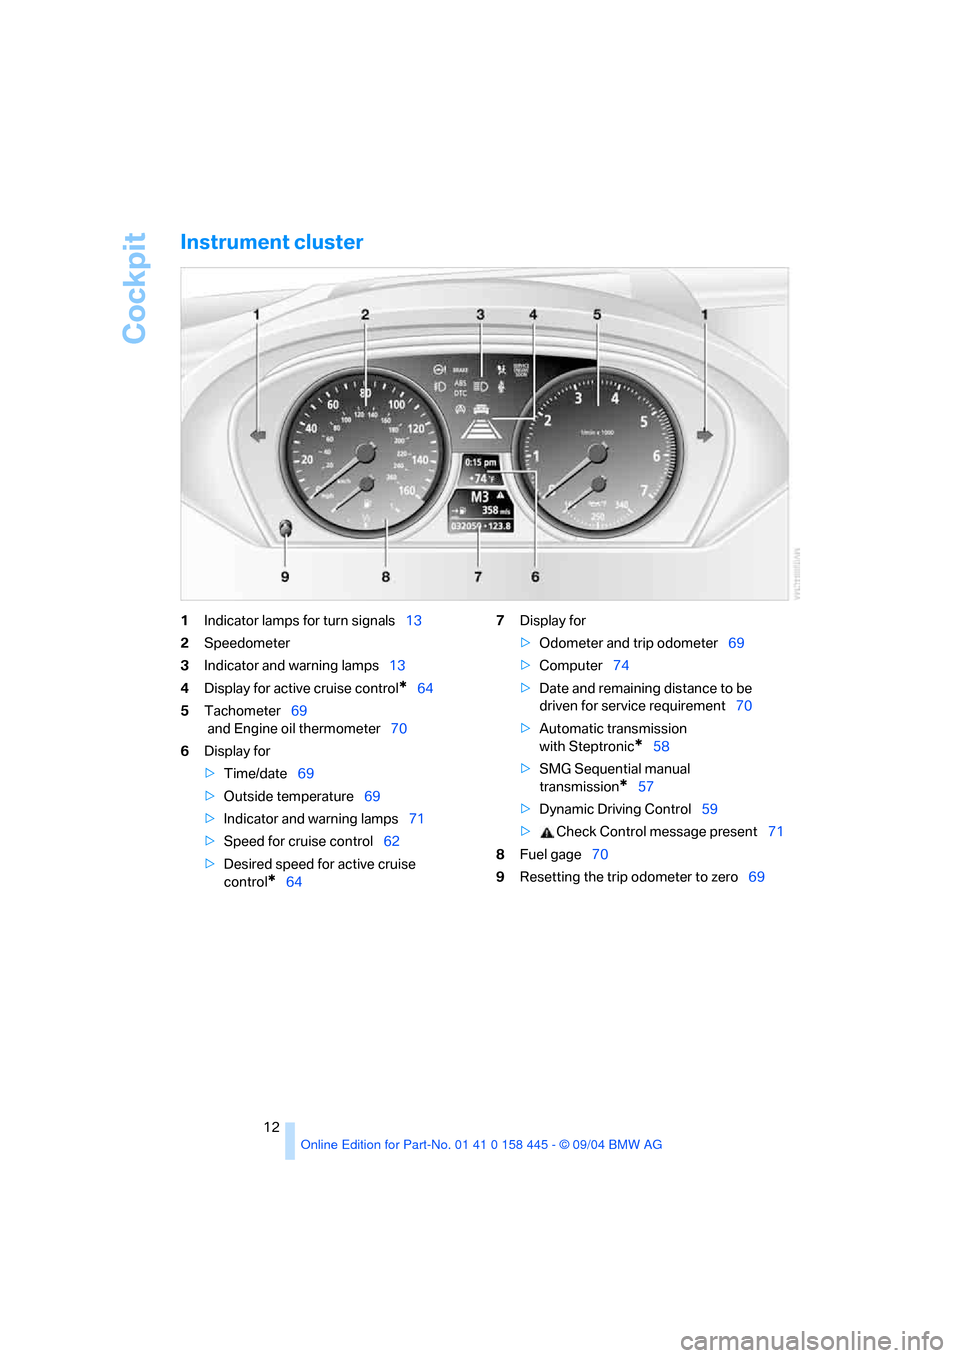
Instrument cluster
1Indicator lamps for turn signals13
2Speedometer
3Indicator and warning lamps13
4Display for active cruise control
*64
5Tachometer69
and Engine oil thermometer70
6Display for
>Time/date69
>Outside temperature69
>Indicator and warning lamps71
>Speed for cruise control62
>Desired speed for active cruise
control
*647Display for
>Odometer and trip odometer69
>Computer74
>Date and remaining distance to be
driven for service requirement70
>Automatic transmission
with Steptronic
*58
>SMG Sequential manual
transmission
*57
>Dynamic Driving Control59
> Check Control message present71
8Fuel gage70
9Resetting the trip odometer to zero69
Page 14 of 217
At a glance
13Reference
Controls
Driving tips
Communications
Navigation
Entertainment
Mobility
Indicator and warning lamps
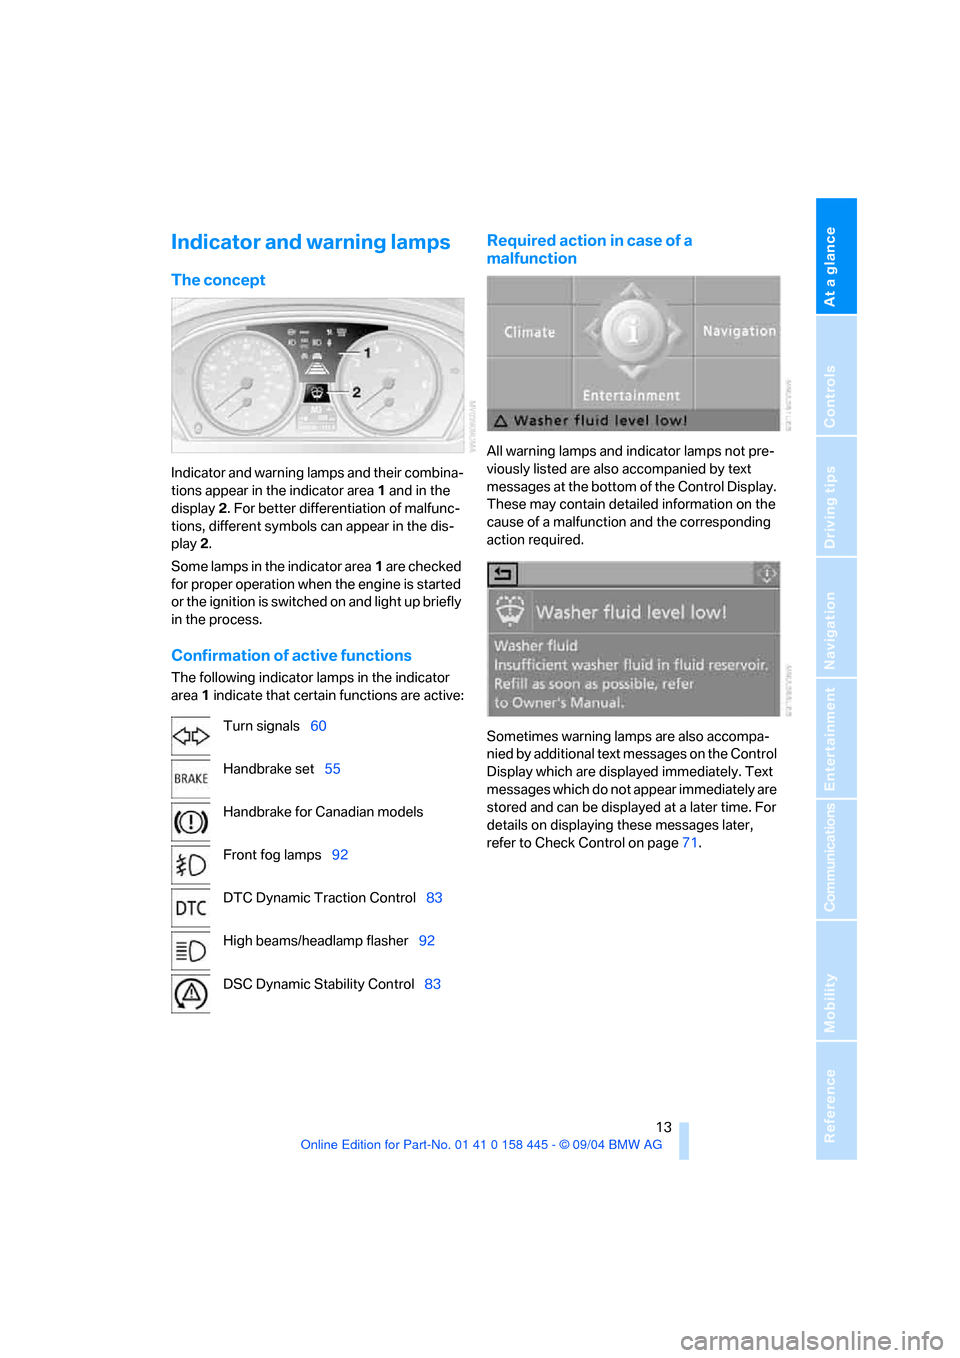
The concept
Indicator and warning lamps and their combina-
tions appear in the indicator area1 and in the
display2. For better differentiation of malfunc-
tions, different symbols can appear in the dis-
play 2.
Some lamps in the indicator area1 are checked
for proper operation when the engine is started
or the ignition is switched on and light up briefly
in the process.
Confirmation of active functions
The following indicator lamps in the indicator
area1 indicate that certain functions are active:
Required action in case of a
malfunction
All warning lamps and indicator lamps not pre-
viously listed are also accompanied by text
messages at the bottom of the Control Display.
These may contain detailed information on the
cause of a malfunction and the corresponding
action required.
Sometimes warning lamps are also accompa-
nied by additional text messages on the Control
Display which are displayed immediately. Text
messages which do not appear immediately are
stored and can be displayed at a later time. For
details on displaying these messages later,
refer to Check Control on page71. Turn signals60
Handbrake set55
Handbrake for Canadian models
Front fog lamps92
DTC Dynamic Traction Control83
High beams/headlamp flasher92
DSC Dynamic Stability Control83
Page 70 of 217
Controls
69Reference
At a glance
Driving tips
Communications
Navigation
Entertainment
Mobility
Everything under control
Odometer, outside
temperature display, clock
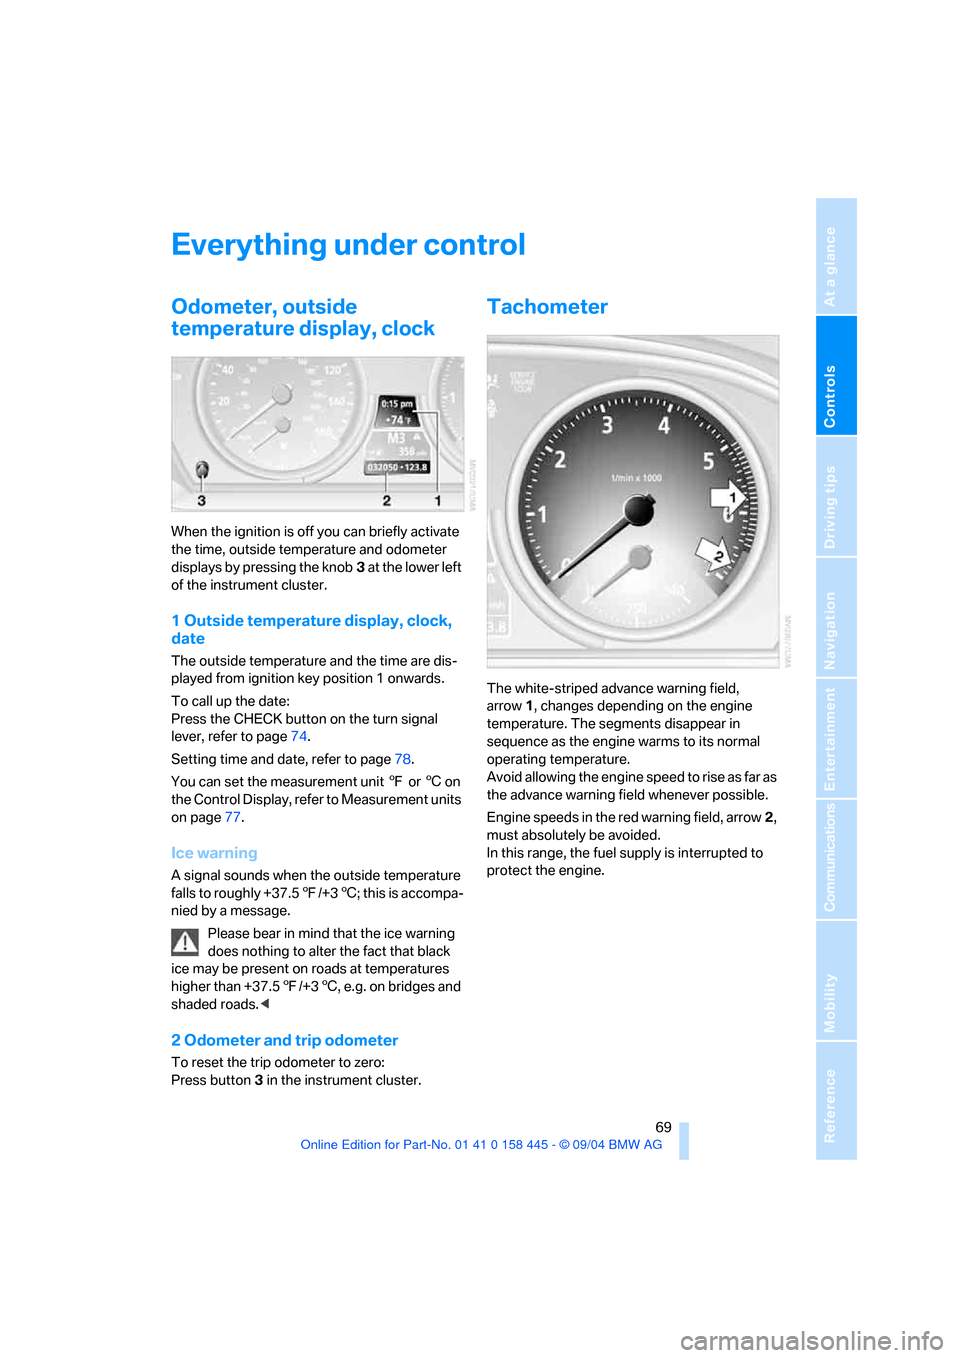
When the ignition is off you can briefly activate
the time, outside temperature and odometer
displays by pressing the knob3 at the lower left
of the instrument cluster.
1 Outside temperature display, clock,
date
The outside temperature and the time are dis-
played from ignition key position 1 onwards.
To call up the date:
Press the CHECK button on the turn signal
lever, refer to page74.
Setting time and date, refer to page78.
You can set the measurement unit 7 or 6 on
the Control Display, refer to Measurement units
on page77.
Ice warning
A signal sounds when the outside temperature
falls to roughly +37.57/+36; this is accompa-
nied by a message.
Please bear in mind that the ice warning
does nothing to alter the fact that black
ice may be present on roads at temperatures
higher than +37.57/+36, e.g. on bridges and
shaded roads.<
2 Odometer and trip odometer
To reset the trip odometer to zero:
Press button3 in the instrument cluster.
Tachometer
The white-striped advance warning field,
arrow1, changes depending on the engine
temperature. The segments disappear in
sequence as the engine warms to its normal
operating temperature.
Avoid allowing the engine speed to rise as far as
the advance warning field whenever possible.
Engine speeds in the red warning field, arrow2,
must absolutely be avoided.
In this range, the fuel supply is interrupted to
protect the engine.
Page 84 of 217
Controls
83Reference
At a glance
Driving tips
Communications
Navigation
Entertainment
Mobility
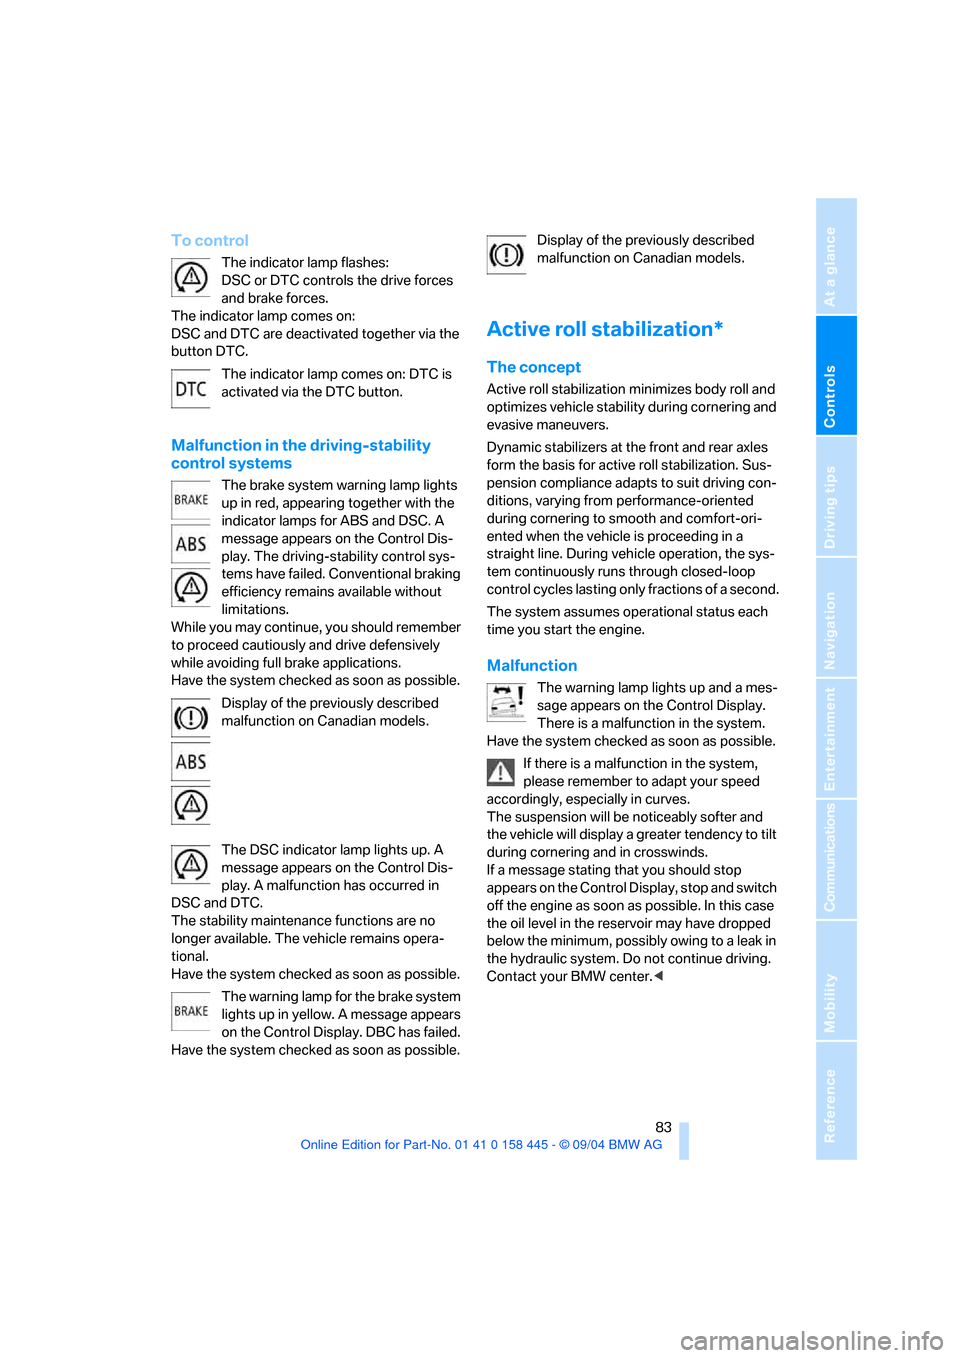
To control
The indicator lamp flashes:
DSC or DTC controls the drive forces
and brake forces.
The indicator lamp comes on:
DSC and DTC are deactivated together via the
button DTC.
The indicator lamp comes on: DTC is
activated via the DTC button.
Malfunction in the driving-stability
control systems
The brake system warning lamp lights
up in red, appearing together with the
indicator lamps for ABS and DSC. A
message appears on the Control Dis-
play. The driving-stability control sys-
tems have failed. Conventional braking
efficiency remains available without
limitations.
While you may continue, you should remember
to proceed cautiously and drive defensively
while avoiding full brake applications.
Have the system checked as soon as possible.
Display of the previously described
malfunction on Canadian models.
The DSC indicator lamp lights up. A
message appears on the Control Dis-
play. A malfunction has occurred in
DSC and DTC.
The stability maintenance functions are no
longer available. The vehicle remains opera-
tional.
Have the system checked as soon as possible.
The warning lamp for the brake system
lights up in yellow. A message appears
on the Control Display. DBC has failed.
Have the system checked as soon as possible.Display of the previously described
malfunction on Canadian models.
Active roll stabilization*
The concept
Active roll stabilization minimizes body roll and
optimizes vehicle stability during cornering and
evasive maneuvers.
Dynamic stabilizers at the front and rear axles
form the basis for active roll stabilization. Sus-
pension compliance adapts to suit driving con-
ditions, varying from performance-oriented
during cornering to smooth and comfort-ori-
ented when the vehicle is proceeding in a
straight line. During vehicle operation, the sys-
tem continuously runs through closed-loop
control cycles lasting only fractions of a second.
The system assumes operational status each
time you start the engine.
Malfunction
The warning lamp lights up and a mes-
sage appears on the Control Display.
There is a malfunction in the system.
Have the system checked as soon as possible.
If there is a malfunction in the system,
please remember to adapt your speed
accordingly, especially in curves.
The suspension will be noticeably softer and
the vehicle will display a greater tendency to tilt
during cornering and in crosswinds.
If a message stating that you should stop
appears on the Control Display, stop and switch
off the engine as soon as possible. In this case
the oil level in the reservoir may have dropped
below the minimum, possibly owing to a leak in
the hydraulic system. Do not continue driving.
Contact your BMW center.<
Page 86 of 217
Controls
85Reference
At a glance
Driving tips
Communications
Navigation
Entertainment
Mobility
Report of a flat tire
The warning lamp lights up in red. A
message appears on the Control Dis-
play. In addition, an acoustic signal
sounds. There is a flat tire or extensive inflation
pressure loss.
1.Cautiously reduce the vehicle speed to
below 50 mph/80 km/h. Avoid sudden brak-
ing and steering maneuvers. Do not exceed
a vehicle speed of 50 mph/80 km/h.
If the vehicle is not, as provided at the
factory, equipped with run-flat tires,
refer to page172, stop driving. Continued
driving after a flat tire can result in serious
accidents.<
2.Check the air pressure in all four tires at the
next opportunity.
If the tire inflation pressure in all four
tires is correct, the Flat Tire Monitor
may not have been initialized. The system
must then be initialized.<
3.In case of a complete loss of the tire inflation
pressure or obvious tire damage, you can
estimate the possible driving distance for
continued driving base on the following ref-
erence values:
>With low load:
1 to 2 persons without luggage:
approx. 155 miles/250 km.
>With medium load:
2 persons, luggage compartment full, or
4 persons without luggage:
approx. 94 miles/150 km.
>With full load:
4 persons, luggage compartment full:
approx. 30 miles/50 km.
Drive reservedly and do not exceed
a speed of 50 mph/80 km/h. In the
event of pressure loss, vehicle handling
changes. This includes reduced tracking
stability in braking, extended braking dis-
tance and altered natural steering charac-
teristics.
If unusual vibrations occur while the vehicle
is being driven, this can indicate final failure
of the damaged tire. Reduce speed and stop as soon as possible. Do not continue
driving. Contact your BMW center.<
Malfunction
The warning lamp lights up in yellow. A
message appears on the Control Dis-
play. The Flat Tire Monitor has a mal-
function or has failed. Have the system checked
as soon as possible.
Active steering*
The concept
The active steering is a system that actively var-
ies the steering angle of the front wheels in rela-
tion to the steering wheel movements.
A t l o w s p e e d , e . g . i n a t o w n o r w h e n p a r k i n g , t h e
steering angle of the wheels is reinforced, i.e.
the steering becomes very direct.
In the higher speed range, on the other hand,
the steering angle is reduced more and more.
This improves the handling capability of your
BMW over the entire speed range.
In critical situations, the system can make tar-
geted corrections to the steering angle pro-
vided by the driver and thus stabilize the vehicle
before the driver intervenes. This stability-pro-
moting intervention is deactivated when DSC is
switched off, refer to page82.
Malfunction
The warning lamp lights up. The active
steering is no longer operational. At low
speed, larger steering wheel move-
ments are required, while the vehicle reacts
more sensitively to steering wheel movements
in the higher road-speed range. Have the sys-
tem checked.
If the warning lamp lights up during the first
engine starting following a power supply inter-
ruption, the system must be activated by being
initialized.
Page 93 of 217
Lamps
92 The low beams remain on independent of
the ambient lighting conditions when you
switch on the fog lamps.
With the daytime driving lamps activated, the
low beams are always switched on in this switch
position with the ignition key in position 2.<
The automatic headlamp control cannot
serve as a substitute for your personal
judgment in determining when the lamps
should be switched on in response to ambient
lighting conditions. For example, the system
cannot detect fog. To avoid safety risks, you
should always switch on the lamps manually
under these conditions.<
Adaptive Head Light*
The concept
Adaptive Head Light is a variable headlamp
control system that enables better illumination
of the road surface. Depending on the steering
angle and other assumptions, the light from the
headlamp follows the course of the road.
Activating Adaptive Head Light
In switch position3 the Adaptive Head Light is
active and the automatic headlamp control is
switched on.
To avoid blinding oncoming traffic, the Adaptive
Head Light
>is not active when driving in reverse
>i s o n l y a c t i v e t o w a r d p a s s e n g e r ' s s i d e w h e n
stationary
Malfunction
The LED beside the symbol for automatic head-
lamp control flashes. The Adaptive Head Light
is malfunctioning or has failed. Have the system
checked as soon as possible.
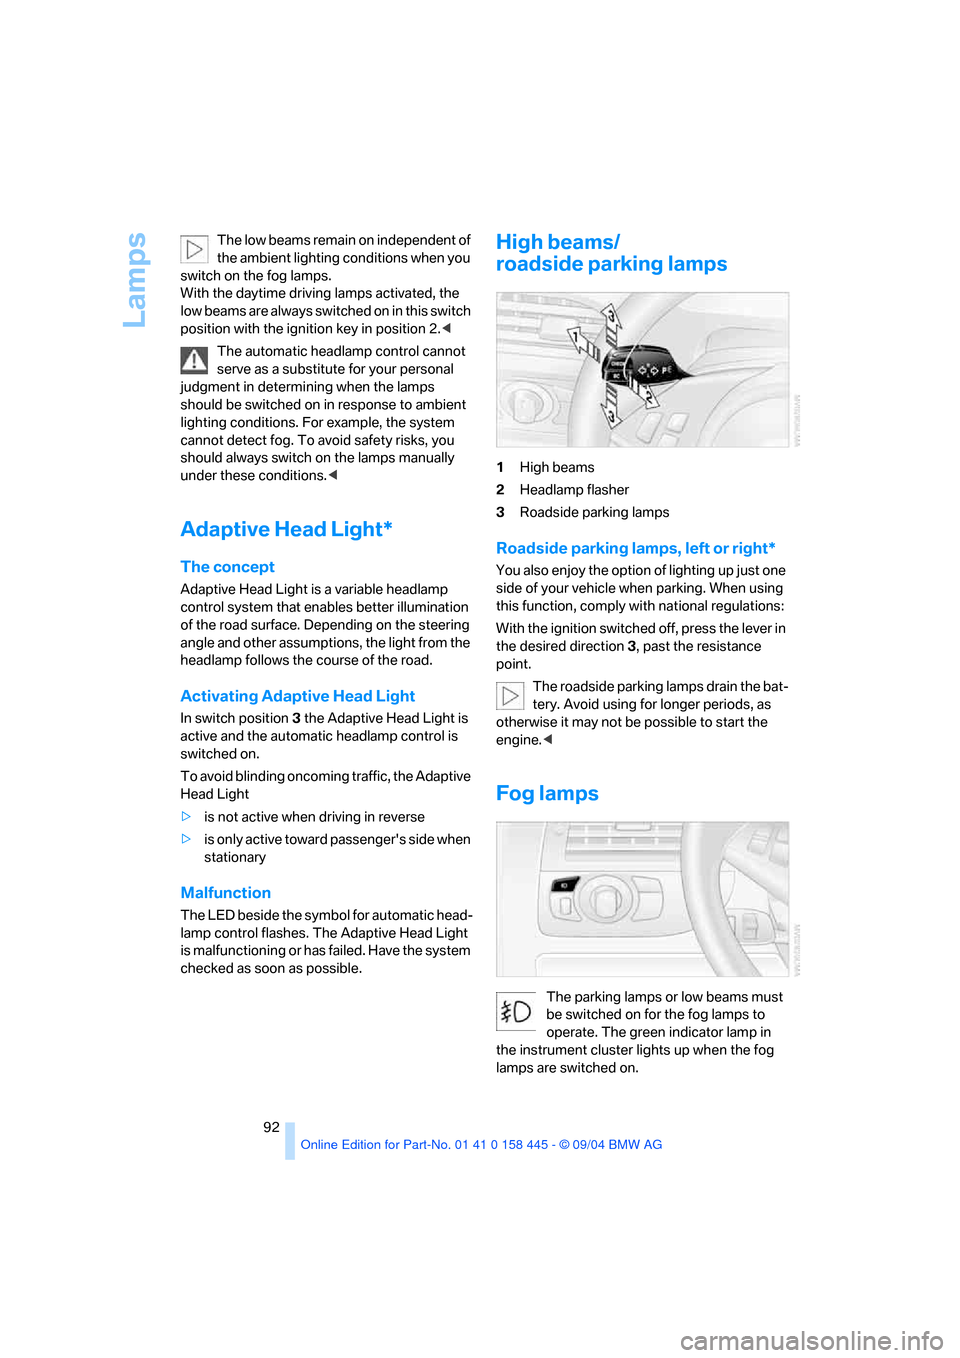
High beams/
roadside parking lamps
1High beams
2Headlamp flasher
3Roadside parking lamps
Roadside parking lamps, left or right*
You also enjoy the option of lighting up just one
side of your vehicle when parking. When using
this function, comply with national regulations:
With the ignition switched off, press the lever in
the desired direction3, past the resistance
point.
The roadside parking lamps drain the bat-
tery. Avoid using for longer periods, as
otherwise it may not be possible to start the
engine.<
Fog lamps
The parking lamps or low beams must
be switched on for the fog lamps to
operate. The green indicator lamp in
the instrument cluster lights up when the fog
lamps are switched on.
Page 167 of 217
Refueling
166
Refueling
Always switch off the engine before refu-
eling. If you do not, fuel cannot be dis-
pensed into the tank and a message on the
Control Display will appear.<
Always observe all applicable precautions
and regulations when handling fuels.
Never carry spare fuel containers in your vehi-
cle. Whether empty or full, these containers can
leak, cause an explosion, and lead to fire in the
event of a collision.<
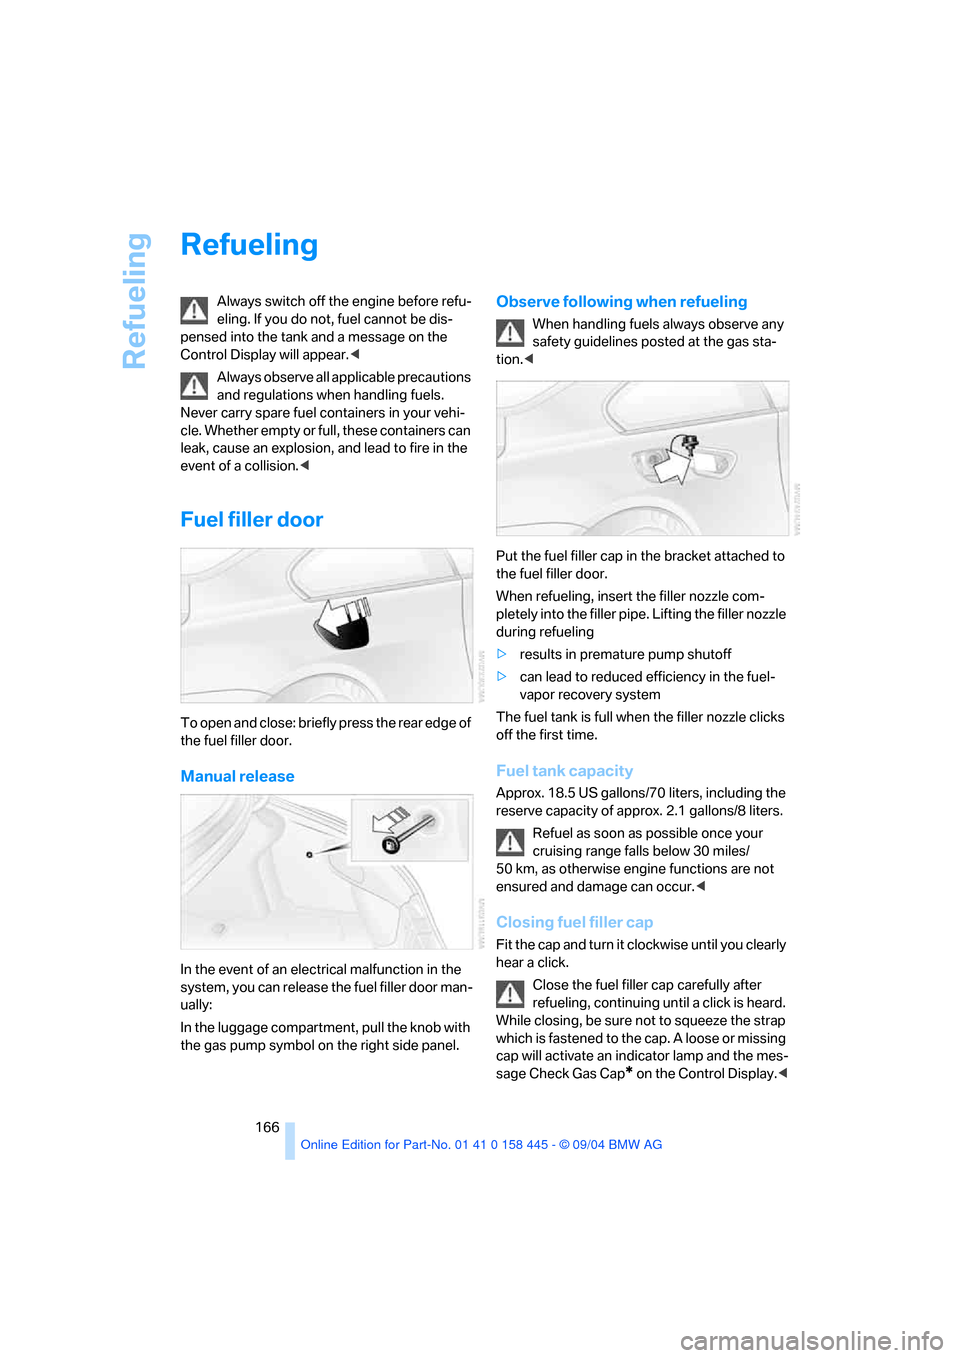
Fuel filler door
To open and close: briefly press the rear edge of
the fuel filler door.
Manual release
In the event of an electrical malfunction in the
system, you can release the fuel filler door man-
ually:
In the luggage compartment, pull the knob with
the gas pump symbol on the right side panel.
Observe following when refueling
When handling fuels always observe any
safety guidelines posted at the gas sta-
tion.<
Put the fuel filler cap in the bracket attached to
the fuel filler door.
When refueling, insert the filler nozzle com-
pletely into the filler pipe. Lifting the filler nozzle
during refueling
>results in premature pump shutoff
>can lead to reduced efficiency in the fuel-
vapor recovery system
The fuel tank is full when the filler nozzle clicks
off the first time.
Fuel tank capacity
Approx. 18.5 US gallons/70 liters, including the
reserve capacity of approx. 2.1 gallons/8 liters.
Refuel as soon as possible once your
cruising range falls below 30 miles/
50 km, as otherwise engine functions are not
ensured and damage can occur.<
Closing fuel filler cap
Fit the cap and turn it clockwise until you clearly
hear a click.
Close the fuel filler cap carefully after
refueling, continuing until a click is heard.
While closing, be sure not to squeeze the strap
which is fastened to the cap. A loose or missing
cap will activate an indicator lamp and the mes-
sage Check Gas Cap
* on the Control Display.<
Page 176 of 217
Mobility
175Reference
At a glance
Controls
Driving tips
Communications
Navigation
Entertainment
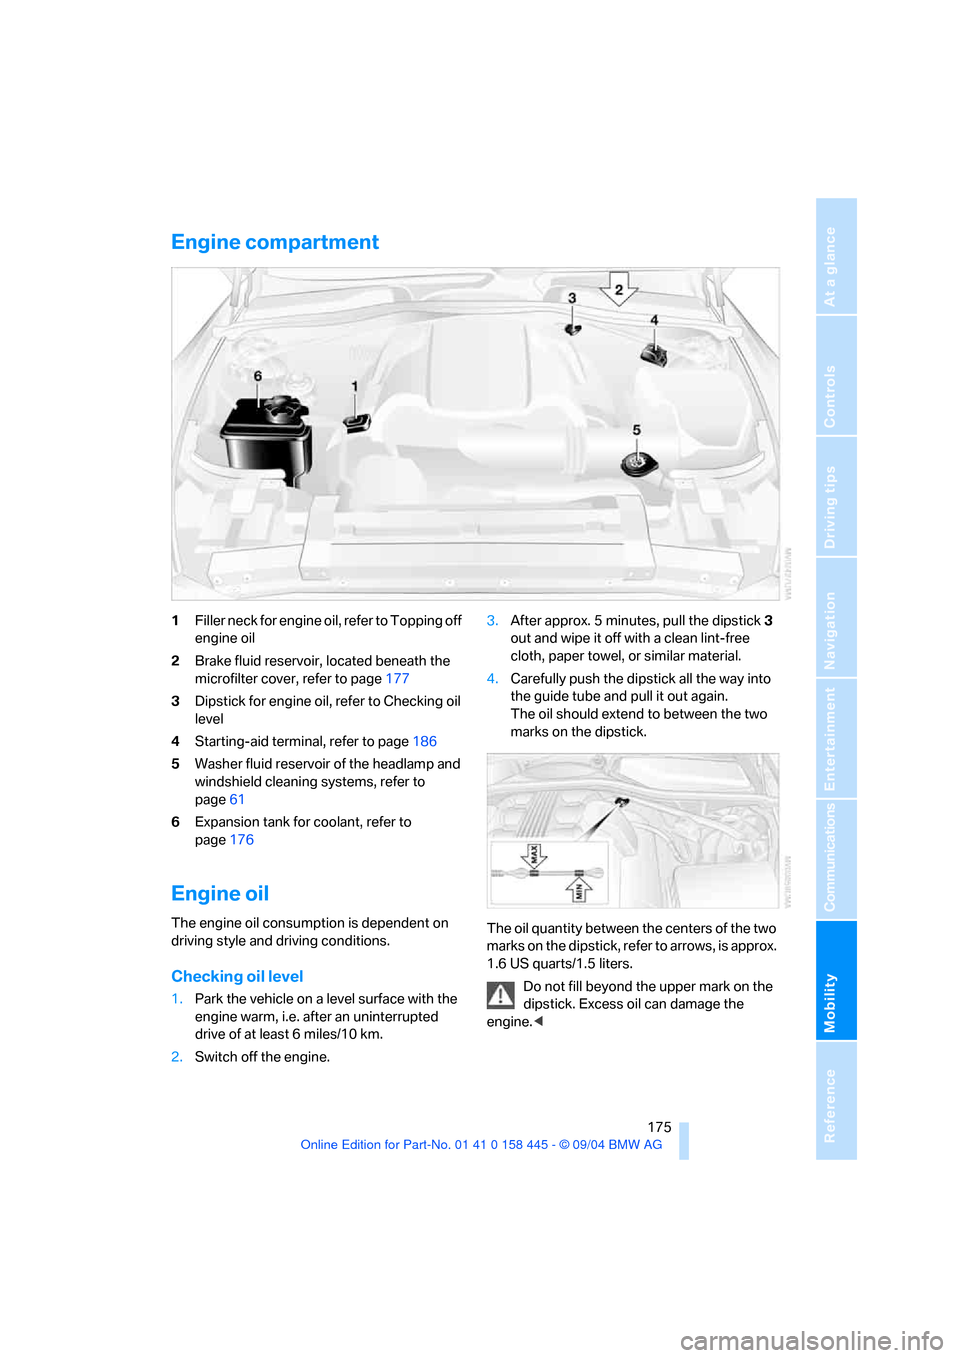
Engine compartment
1Filler neck for engine oil, refer to Topping off
engine oil
2Brake fluid reservoir, located beneath the
microfilter cover, refer to page177
3Dipstick for engine oil, refer to Checking oil
level
4Starting-aid terminal, refer to page186
5Washer fluid reservoir of the headlamp and
windshield cleaning systems, refer to
page61
6Expansion tank for coolant, refer to
page176
Engine oil
The engine oil consumption is dependent on
driving style and driving conditions.
Checking oil level
1.Park the vehicle on a level surface with the
engine warm, i.e. after an uninterrupted
drive of at least 6 miles/10 km.
2.Switch off the engine.3.After approx. 5 minutes, pull the dipstick3
out and wipe it off with a clean lint-free
cloth, paper towel, or similar material.
4.Carefully push the dipstick all the way into
the guide tube and pull it out again.
The oil should extend to between the two
marks on the dipstick.
The oil quantity between the centers of the two
marks on the dipstick, refer to arrows, is approx.
1.6 US quarts/1.5 liters.
Do not fill beyond the upper mark on the
dipstick. Excess oil can damage the
engine.<