2005 BMW 645CI COUPE&CONVERTIBLE change time
[x] Cancel search: change timePage 21 of 217

Control Center
20
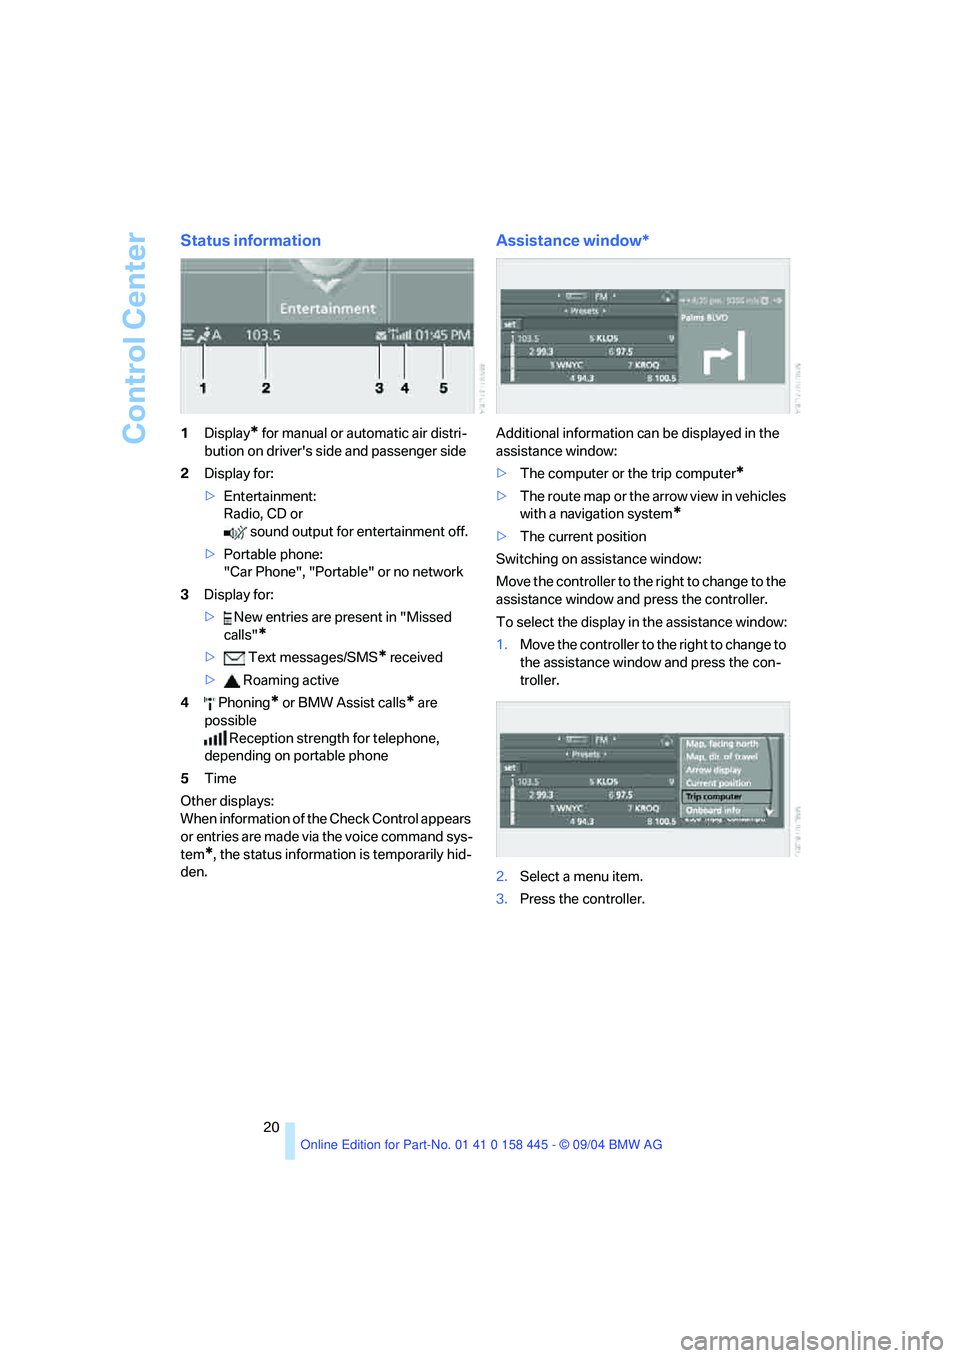
Status information
1Display* for manual or automatic air distri-
bution on driver's side and passenger side
2Display for:
>Entertainment:
Radio, CD or
sound output for entertainment off.
>Portable phone:
"Car Phone", "Portable" or no network
3Display for:
> New entries are present in "Missed
calls"
*
> Text messages/SMS* received
> Roaming active
4 Phoning
* or BMW Assist calls* are
possible
Reception strength for telephone,
depending on portable phone
5Time
Other displays:
When information of the Check Control appears
or entries are made via the voice command sys-
tem
*, the status information is temporarily hid-
den.
Assistance window*
Additional information can be displayed in the
assistance window:
>The computer or the trip computer
*
>The route map or the arrow view in vehicles
with a navigation system
*
>The current position
Switching on assistance window:
Move the controller to the right to change to the
assistance window and press the controller.
To select the display in the assistance window:
1.Move the controller to the right to change to
the assistance window and press the con-
troller.
2.Select a menu item.
3.Press the controller.
Page 29 of 217

Opening and closing
28
Opening and closing
The key set
1Every master key with remote control con-
tains an extended-life battery as a power
supply, which is charged automatically in
the ignition lock as you drive. You should
use each master key at least twice a year in
order to maintain the charge condition.
Depending on which master key is detected
by the vehicle during unlocking, different
settings in the vehicle are requested and
executed, refer to Key Memory below.
2Spare key for storage in a safe place, such
as in your wallet.
This key does not fit in the locks of the lug-
gage compartment lid and the hotel func-
tion, refer to page32. This is an advantage
when valet parking at a hotel, for example.
The key is not intended for constant use.
New keys
New, additional or replacement keys are avail-
able at your BMW center.
Key Memory
How the system functions
Doubtless you have often reflected on how
great it would be if you could configure your
vehicle's various adjustment settings to meet
your own personal requirements. BMW has
designed several freely selectable options into
the vehicle during its development. You can set
these as desired via the Control Center.You can have up to four different basic settings
adjusted for four different persons for the spe-
cific keys. The only requirement is that each
person uses his or her own master key with
remote control.
When your vehicle is unlocked with the remote
control, the vehicle recognizes the individual
key by means of a data exchange and makes
adjustments accordingly.
Scope of Key Memory
>When unlocking with the remote control,
either unlock only the driver's door or the
entire vehicle, refer to page29.
>Locking the vehicle after a short time or
after starting to drive, refer to page31
>Assigning the programmable function but-
tons on the steering wheel, refer to page51.
>Settings for the display on the Control Dis-
play:
>Brightness of the Control Display, refer
to page77
>Units of measure for consumption,
route/distances, temperature and pres-
sure, refer to page77
>Language on the Control Display, refer
to page78
>12h/24h clock mode, refer to page78
>Date format, refer to page79.
>Displaying optical warning for the PDC Park
Distance Control
*, refer to page80.
>Selection and brightness of the display for
the Head-Up Display
*, refer to page89.
>Air distribution, temperature and intensity
for the automatic climate control, refer to
page96.
>Setting the language information for the
destination guidance of the navigation sys-
tem
*, refer to page126.
Page 32 of 217

Controls
31Reference
At a glance
Driving tips
Communications
Navigation
Entertainment
Mobility
this remote control during an extended drive;
this will recharge the battery, refer to page28.
For US owners only
The transmitter and receiver units comply with
part 15 of the FCC/Federal Communication
Commission regulations. Operation is gov-
erned by the following:
FCC ID:
LX8766S
LX8766E
LX8CAS
Compliance statement:
This device complies with part 15 of the FCC
Rules. Operation is subject to the following two
conditions:
>This device may not cause harmful interfer-
ence, and
>this device must accept any interference
received, including interference that may
cause undesired operation.
Any unauthorized modifications or
changes to these devices could void the
user's authority to operate this equipment.<
Using door lock
One turn of the key in the driver's door lock
unlocks the driver's door only.
Turning the key a second time unlocks all of the
remaining doors, the luggage compartment lid
and the fuel filler door.
Convenience operation
You can also use the door lock to operate the
windows and the glass sunroof
* in the Coupe
or to operate the windows and the top in the
convertible.>To open:
With the door closed, turn the key to the
Unlock position and hold it there.
>To close:
With the door closed, turn the key to the
Lock position and hold it there.
Keep a close eye on the closing process
and also on the opening process of the
convertible top to be sure that no one is injured.
Releasing the key stops the operation.<
Manual operation
In the event of an electrical malfunction, you can
turn the key all the way to the right or left in the
door lock to lock or unlock the driver's door.
Opening and closing: from
inside
This button serves to unlock or lock doors and
the luggage compartment lid, but does not acti-
vate the anti-theft system. The fuel filler door
remains unlocked.
You can also make the following settings:
>The central locking system automatically
locks the vehicle after a short time when no
door has been opened.
>The central locking system automatically
locks the vehicle as soon as you start to
drive.
Control Center, for principle details, refer to
page16.
1.Open the menu.
2.Select "Vehicle settings" and press the
controller.
Page 35 of 217

Opening and closing
34 If special circumstances should make it abso-
lutely necessary to operate the vehicle with the
luggage compartment lid open:
1.Coupe: close both windows and the glass
sunroof
*.
Convertible: with closed top, close all win-
dows.
2.Increase the air volume of the automatic
climate control to a high level, refer to
page95.
Luggage compartment
There are four lashing eyes on the inner corners
of the luggage compartment for securing lug-
gage nets
* or securing straps to fix luggage in
position.
Also refer to Securing cargo, page111.
Convertible: increasing luggage
compartment capacity
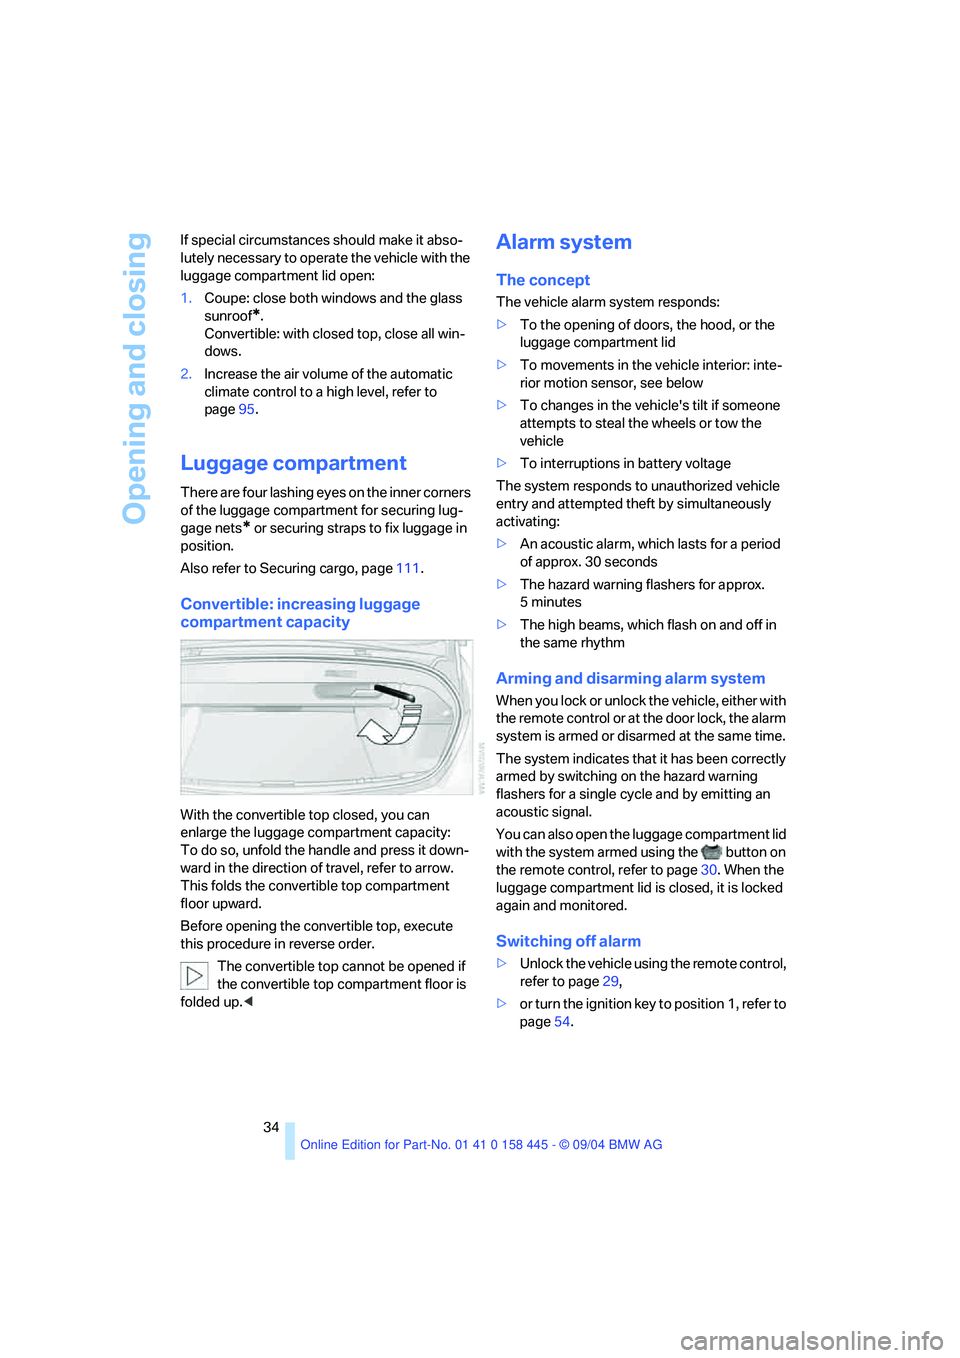
With the convertible top closed, you can
enlarge the luggage compartment capacity:
To do so, unfold the handle and press it down-
ward in the direction of travel, refer to arrow.
This folds the convertible top compartment
floor upward.
Before opening the convertible top, execute
this procedure in reverse order.
The convertible top cannot be opened if
the convertible top compartment floor is
folded up.<
Alarm system
The concept
The vehicle alarm system responds:
>To the opening of doors, the hood, or the
luggage compartment lid
>To movements in the vehicle interior: inte-
rior motion sensor, see below
>To changes in the vehicle's tilt if someone
attempts to steal the wheels or tow the
vehicle
>To interruptions in battery voltage
The system responds to unauthorized vehicle
entry and attempted theft by simultaneously
activating:
>An acoustic alarm, which lasts for a period
of approx. 30 seconds
>The hazard warning flashers for approx.
5minutes
>The high beams, which flash on and off in
the same rhythm
Arming and disarming alarm system
When you lock or unlock the vehicle, either with
the remote control or at the door lock, the alarm
system is armed or disarmed at the same time.
The system indicates that it has been correctly
armed by switching on the hazard warning
flashers for a single cycle and by emitting an
acoustic signal.
You can also open the luggage compartment lid
with the system armed using the button on
the remote control, refer to page30. When the
luggage compartment lid is closed, it is locked
again and monitored.
Switching off alarm
>Unlock the vehicle using the remote control,
refer to page29,
>or turn the ignition key to position 1, refer to
page54.
Page 64 of 217

Controls
63Reference
At a glance
Driving tips
Communications
Navigation
Entertainment
Mobility
cially on longer trips, the system can reduce
fatigue and tension, while increasing your
enjoyment of driving. Please use it safely and
responsibly.
In addition to holding a steady cruising speed, if
you encounter slower vehicles ahead, active
cruise control will, within the scope of given
possibilities, adjust your vehicle's speed auto-
matically so that one can flow with the traffic
without having to make constant adjustments.
If, for example, while cruising at the selected
speed, you begin to approach a slower vehicle
ahead of you in the same lane, the system will
reduce your vehicle's speed to the same as that
of the vehicle ahead to maintain your selected
distance setting between your vehicle and the
vehicle ahead. There are four settings for dis-
tance, which are additionally speed-dependent.
Based on your selected distance setting, the
system automatically decreases the throttle
setting and lightly applies the brakes if neces-
sary. The vehicle brake lamps will automatically
illuminate to signal a following driver to take
action. In addition, it may be necessary for the
vehicle or the driver to downshift, depending on
the kind of transmission your vehicle is
equipped with, to maintain the distance setting
selected. If the vehicle ahead speeds up or
when the lane ahead becomes clear, your vehi-
cle will accelerate to the speed you have
selected by increasing the throttle setting and
shifting gears automatically or by the driver as
needed.
Active cruise control is not and must not
be used as a collision avoidance/warning
system.<
Since this active cruise control system is
a new technology and operates differ-
ently from conventional cruise control systems
which you may be accustomed to, you are
strongly urged to read all of the pages relating
to this system before use. Pay special attention
to the information contained in the Things to
know about active cruise control section in this
manual beginning on page66.
within a normal engine speed range and also
change gears. Continuous operation at very
high or very low engine speeds is not possible.
In this case the driver is asked to shift or the
system deactivates itself.
Vehicles with SMG
Continuous operation at very high engine
speeds is not possible in the Sequential mode.
In this case the driver is asked to shift or the
system deactivates itself.
In the Drive mode the SMG acts similarly to the
automatic transmission in the D position.
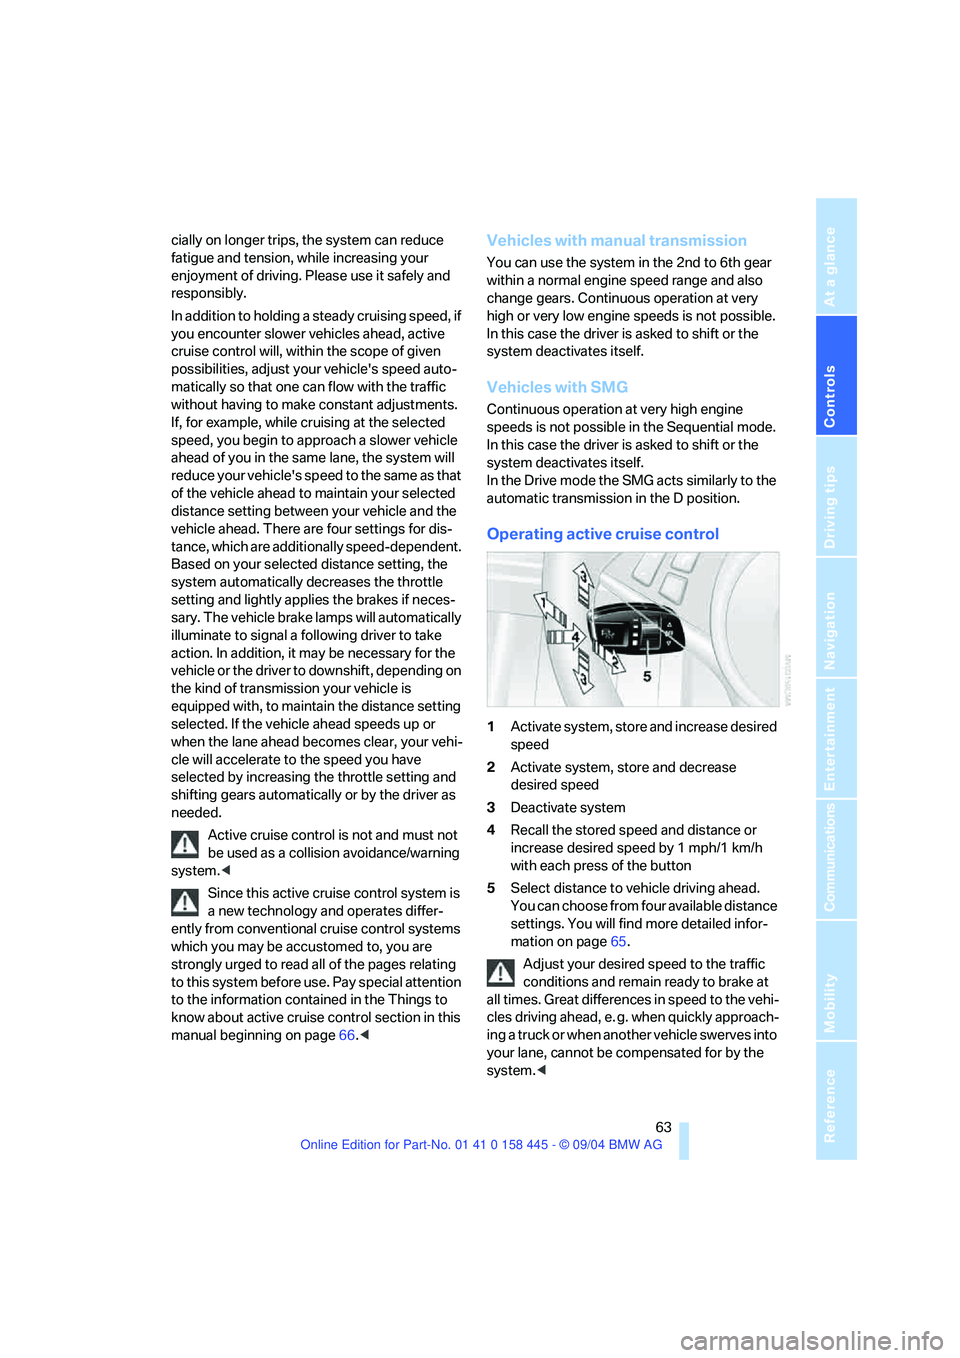
Operating active cruise control
1Activate system, store and increase desired
speed
2Activate system, store and decrease
desired speed
3Deactivate system
4Recall the stored speed and distance or
increase desired speed by 1 mph/1 km/h
with each press of the button
5Select distance to vehicle driving ahead.
You can choose from four available distance
settings. You will find more detailed infor-
mation on page65.
Adjust your desired speed to the traffic
conditions and remain ready to brake at
all times. Great differences in speed to the vehi-
cles driving ahead, e. g. when quickly approach-
ing a truck or when another vehicle swerves into
your lane, cannot be compensated for by the
system.<
Page 70 of 217

Controls
69Reference
At a glance
Driving tips
Communications
Navigation
Entertainment
Mobility
Everything under control
Odometer, outside
temperature display, clock
When the ignition is off you can briefly activate
the time, outside temperature and odometer
displays by pressing the knob3 at the lower left
of the instrument cluster.
1 Outside temperature display, clock,
date
The outside temperature and the time are dis-
played from ignition key position 1 onwards.
To call up the date:
Press the CHECK button on the turn signal
lever, refer to page74.
Setting time and date, refer to page78.
You can set the measurement unit 7 or 6 on
the Control Display, refer to Measurement units
on page77.
Ice warning
A signal sounds when the outside temperature
falls to roughly +37.57/+36; this is accompa-
nied by a message.
Please bear in mind that the ice warning
does nothing to alter the fact that black
ice may be present on roads at temperatures
higher than +37.57/+36, e.g. on bridges and
shaded roads.<
2 Odometer and trip odometer
To reset the trip odometer to zero:
Press button3 in the instrument cluster.
Tachometer
The white-striped advance warning field,
arrow1, changes depending on the engine
temperature. The segments disappear in
sequence as the engine warms to its normal
operating temperature.
Avoid allowing the engine speed to rise as far as
the advance warning field whenever possible.
Engine speeds in the red warning field, arrow2,
must absolutely be avoided.
In this range, the fuel supply is interrupted to
protect the engine.
Page 77 of 217

Everything under control
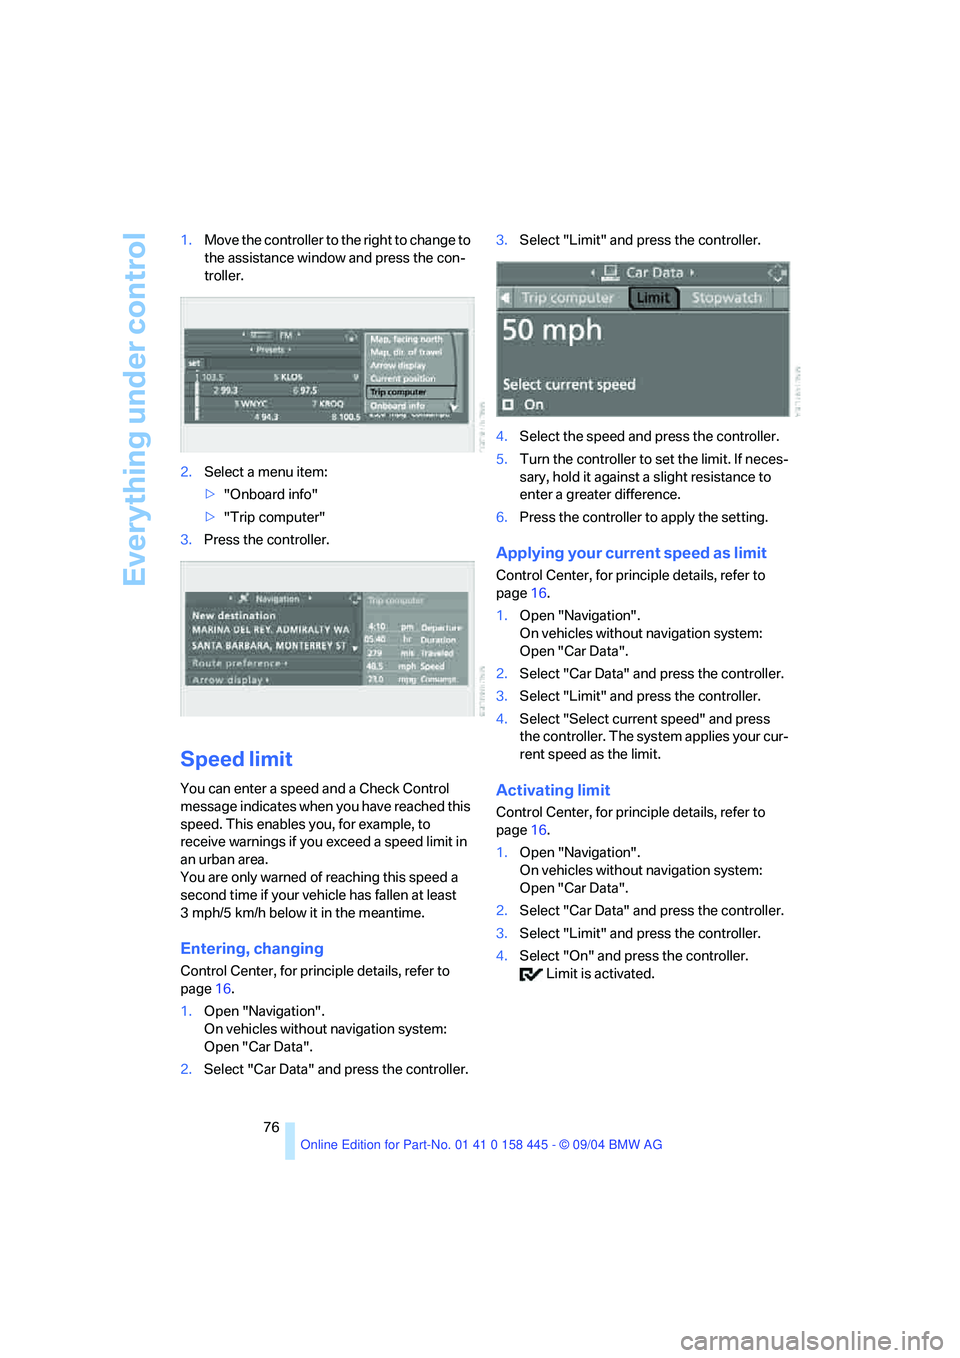
76 1.Move the controller to the right to change to
the assistance window and press the con-
troller.
2.Select a menu item:
>"Onboard info"
>"Trip computer"
3.Press the controller.
Speed limit
You can enter a speed and a Check Control
message indicates when you have reached this
speed. This enables you, for example, to
receive warnings if you exceed a speed limit in
an urban area.
You are only warned of reaching this speed a
second time if your vehicle has fallen at least
3 mph/5 km/h below it in the meantime.
Entering, changing
Control Center, for principle details, refer to
page16.
1.Open "Navigation".
On vehicles without navigation system:
Open "Car Data".
2.Select "Car Data" and press the controller.3.Select "Limit" and press the controller.
4.Select the speed and press the controller.
5.Turn the controller to set the limit. If neces-
sary, hold it against a slight resistance to
enter a greater difference.
6.Press the controller to apply the setting.
Applying your current speed as limit
Control Center, for principle details, refer to
page16.
1.Open "Navigation".
On vehicles without navigation system:
Open "Car Data".
2.Select "Car Data" and press the controller.
3.Select "Limit" and press the controller.
4.Select "Select current speed" and press
the controller. The system applies your cur-
rent speed as the limit.
Activating limit
Control Center, for principle details, refer to
page16.
1.Open "Navigation".
On vehicles without navigation system:
Open "Car Data".
2.Select "Car Data" and press the controller.
3.Select "Limit" and press the controller.
4.Select "On" and press the controller.
Limit is activated.
Page 78 of 217

Controls
77Reference
At a glance
Driving tips
Communications
Navigation
Entertainment
Mobility
Stopwatch
Control Center, for principle details, refer to
page16.
1.Open "Navigation".
On vehicles without navigation system:
Open "Car Data".
2.Select "Car Data" and press the controller.
3.Select "Stopwatch" and press the control-
ler.
Starting and stopping
>Select "Start" and press the controller.
The stopwatch starts at the displayed time.
>Select "Reset" and press the controller.
The stopwatch is reset and it restarts if it
was running beforehand.
>Select "Stop" and press the controller.
This stops the timer.
Taking an intermediate time reading
Select "Interim time" and press the controller.
The interim time appears below the ongoing
primary stopwatch count.
All of the remaining functions remain
available at all times while the stopwatch
is running. The stopwatch continues operation
in the background.<
Settings on Control Display
Brightness of Control Display
The brightness is automatically adapted to the
ambient lighting conditions. However, you can
change the base setting.Control Center, for principle details, refer to
page16.
1.Press the button.
This opens the start menu.
2.Press the controller to open the menu.
3.Select "Display settings" and press the
controller.
4.Select "Brightness" and press the control-
ler.
5.If necessary, move the controller to the right
to select "Display Offset".
6.Turn the controller until the desired setting
is selected.
The setting is stored for the remote control cur-
rently in use.
Measurement units
You can change the measurement units for
consumption, distances, temperature and
pressure.
1.Open the menu.
2.Select "Display settings" and press the
controller.