2005 BMW 645CI COUPE&CONVERTIBLE ESP
[x] Cancel search: ESPPage 7 of 217
Notes
6
For your own safety
Maintenance and repair
Advanced technology, e. g. the use of
modern materials and high-performance
electronics, requires specially adapted mainte-
nance and repair methods. Therefore, have cor-
responding work on your BMW carried out only
by a BMW center or a workshop that works
according to BMW repair procedures with cor-
respondingly trained personnel. If work is car-
ried out improperly there is a danger of conse-
quential damage and the related safety risks.<
California Proposition 65 Warning
California law requires us to issue the following
warning:
Engine exhaust and a wide variety of
automobile components and parts,
including components found in the interior fur-
nishings in a vehicle, contain or emit chemicals
known to the State of California to cause cancer
and birth defects and reproductive harm. In
addition, certain fluids contained in vehicles and
certain products of component wear contain or
emit chemicals known to the State of California
to cause cancer and birth defects or other
reproductive harm.
Battery posts, terminals and related accesso-
ries contain lead and lead compounds. Wash
your hands after handling.
Used engine oil contains chemicals that have
caused cancer in laboratory animals. Always
protect your skin by washing thoroughly with
soap and water.<
Parts and accessories
For your own safety, use genuine parts
and accessories approved by BMW.
When you purchase accessories tested and
approved by BMW and Genuine BMW Parts,
you simultaneously acquire the assurance that
they have been thoroughly tested by BMW to
ensure optimum performance when installed
on your vehicle.
BMW warrants these parts to be free from
defects in material and workmanship.
BMW will not accept any liability for damage
resulting from installation of parts and accesso-
ries not approved by BMW.
BMW cannot test every product made by other
manufacturers to verify if it can be used on a
BMW safely and without risk to either the vehi-
cle, its operation, or its occupants.
Genuine BMW Parts, BMW Accessories and
other products approved by BMW, together
with professional advice on using these items,
are available from all BMW centers.
Installation and operation of non-BMW
approved accessories such as alarms, radios,
amplifiers, radar detectors, wheels, suspension
components, brake dust shields, telephones,
including operation of any mobile phone from
within the vehicle without using an externally
mounted antenna, or transceiver equipment, for
instance, CBs, walkie-talkies, ham radios or
similar accessories, may cause extensive dam-
age to the vehicle, compromise its safety, inter-
fere with the vehicle's electrical system or affect
the validity of the BMW Limited Warranty. Refer
to your BMW center for additional informa-
tion.<
Maintenance, replacement, or repair of
the emission control devices and sys-
tems may be performed by any automotive
repair establishment or individual using any cer-
tified automotive part.<
Page 14 of 217

At a glance
13Reference
Controls
Driving tips
Communications
Navigation
Entertainment
Mobility
Indicator and warning lamps
The concept
Indicator and warning lamps and their combina-
tions appear in the indicator area1 and in the
display2. For better differentiation of malfunc-
tions, different symbols can appear in the dis-
play 2.
Some lamps in the indicator area1 are checked
for proper operation when the engine is started
or the ignition is switched on and light up briefly
in the process.
Confirmation of active functions
The following indicator lamps in the indicator
area1 indicate that certain functions are active:
Required action in case of a
malfunction
All warning lamps and indicator lamps not pre-
viously listed are also accompanied by text
messages at the bottom of the Control Display.
These may contain detailed information on the
cause of a malfunction and the corresponding
action required.
Sometimes warning lamps are also accompa-
nied by additional text messages on the Control
Display which are displayed immediately. Text
messages which do not appear immediately are
stored and can be displayed at a later time. For
details on displaying these messages later,
refer to Check Control on page71. Turn signals60
Handbrake set55
Handbrake for Canadian models
Front fog lamps92
DTC Dynamic Traction Control83
High beams/headlamp flasher92
DSC Dynamic Stability Control83
Page 18 of 217
At a glance
17Reference
Controls
Driving tips
Communications
Navigation
Entertainment
Mobility
Entertainment
>Radio
>CD player and CD changer
*
Climate
>Air distribution
>Independent ventilation
menu
>Switching off the Control Display
>Tone and display settings
>Settings for traffic information
>Settings for your vehicle, e.g. for the central
locking system
>Display of the service requirements and
dates for statutory emission and vehicle
inspections
Menu navigation
As of ignition key position 1, the following mes-
sage appears on the Control Display:
Confirm the message by pressing the control-
ler; this opens the start menu.
Start menu
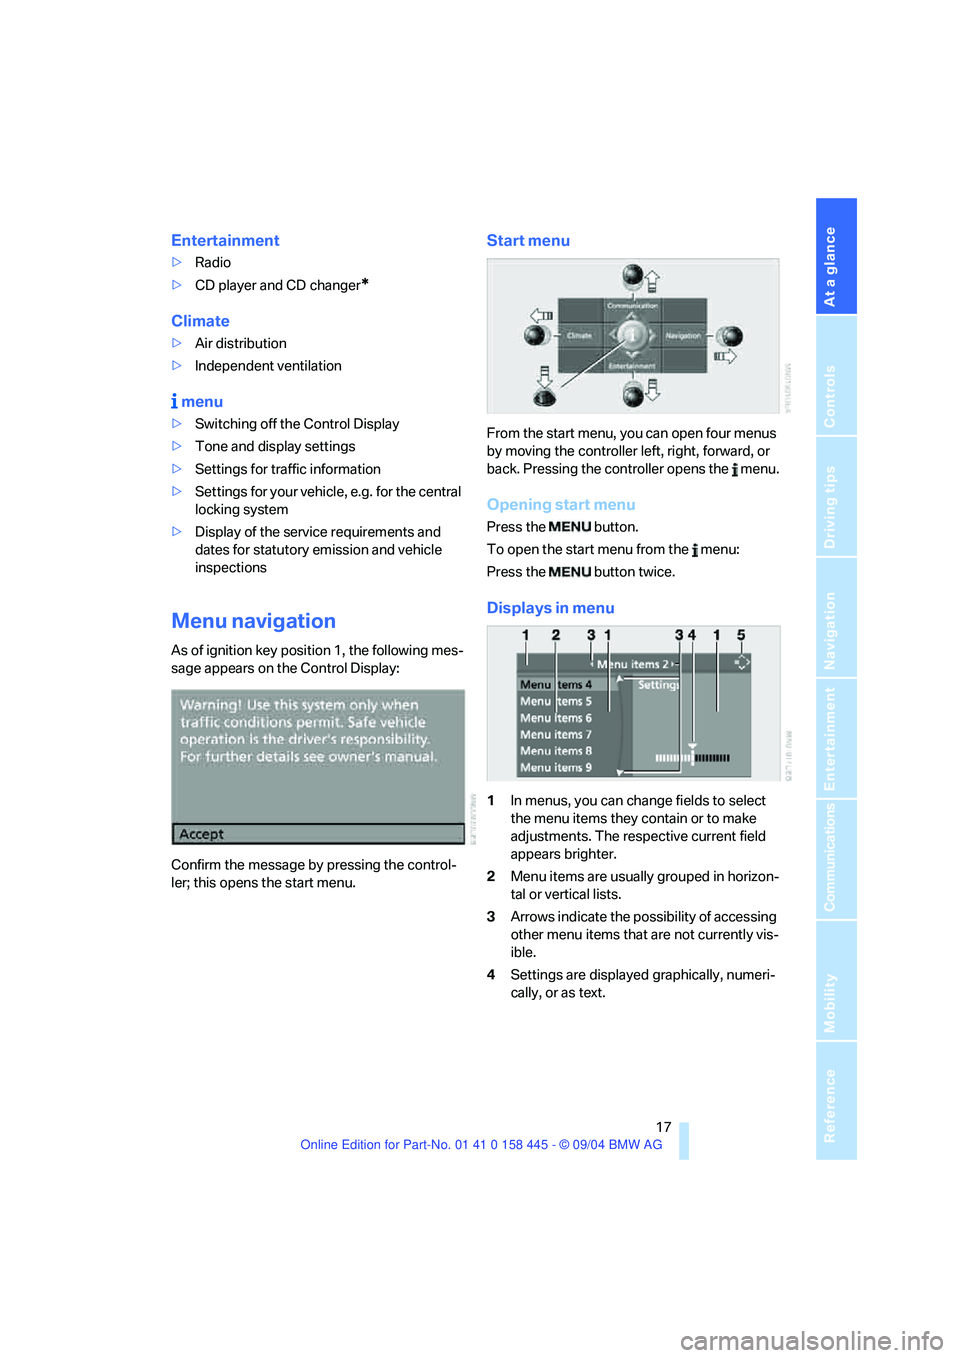
From the start menu, you can open four menus
by moving the controller left, right, forward, or
back. Pressing the controller opens the menu.
Opening start menu
Press the button.
To open the start menu from the menu:
Press the button twice.
Displays in menu
1In menus, you can change fields to select
the menu items they contain or to make
adjustments. The respective current field
appears brighter.
2Menu items are usually grouped in horizon-
tal or vertical lists.
3Arrows indicate the possibility of accessing
other menu items that are not currently vis-
ible.
4Settings are displayed graphically, numeri-
cally, or as text.
Page 20 of 217
At a glance
19Reference
Controls
Driving tips
Communications
Navigation
Entertainment
Mobility
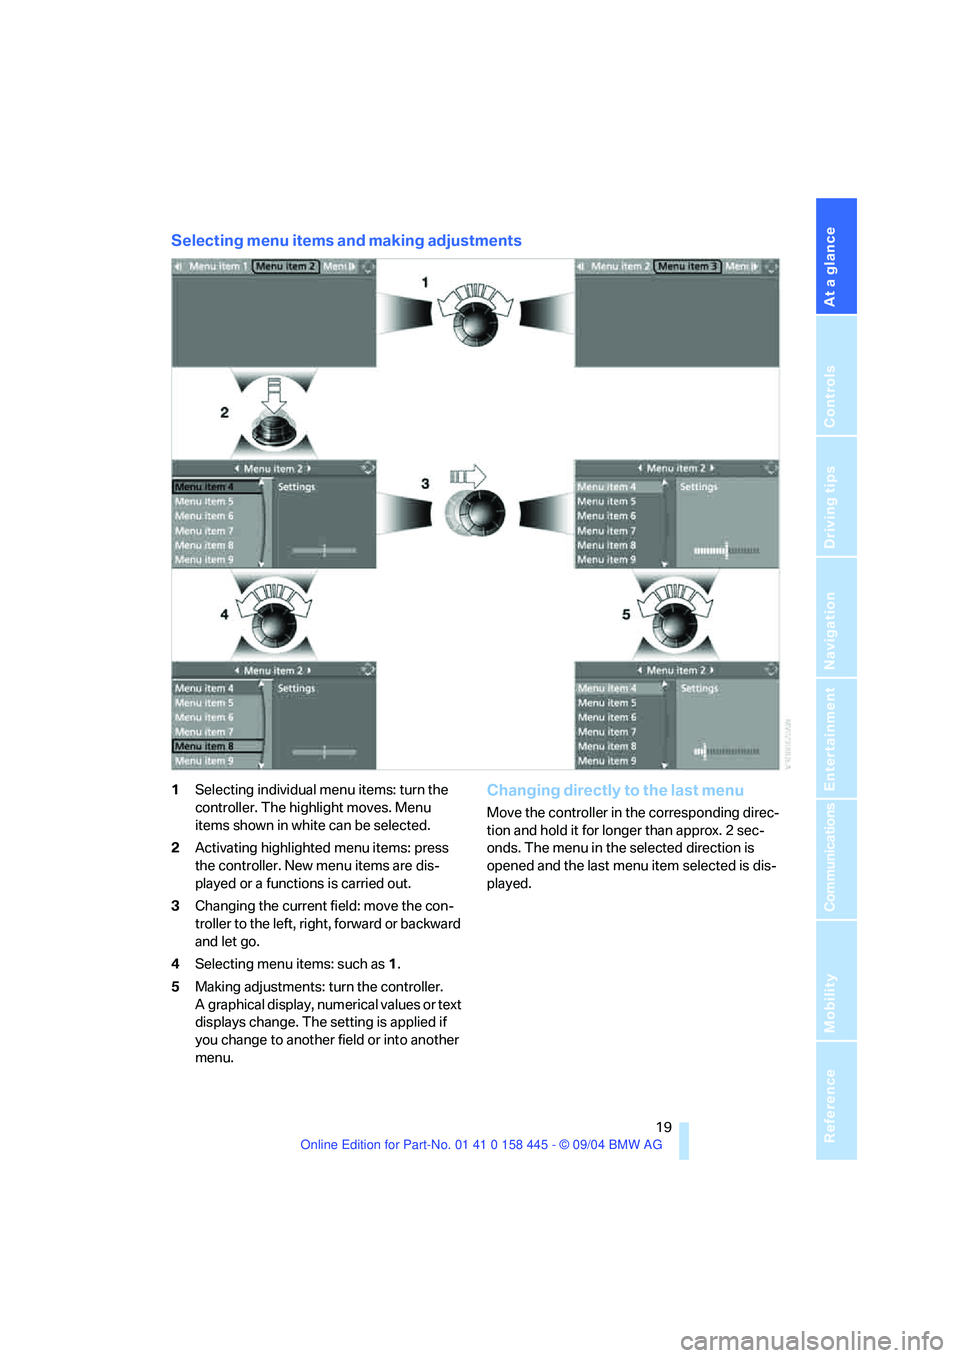
Selecting menu items and making adjustments
1Selecting individual menu items: turn the
controller. The highlight moves. Menu
items shown in white can be selected.
2Activating highlighted menu items: press
the controller. New menu items are dis-
played or a functions is carried out.
3Changing the current field: move the con-
troller to the left, right, forward or backward
and let go.
4Selecting menu items: such as1.
5Making adjustments: turn the controller.
A graphical display, numerical values or text
displays change. The setting is applied if
you change to another field or into another
menu.Changing directly to the last menu
Move the controller in the corresponding direc-
tion and hold it for longer than approx. 2 sec-
onds. The menu in the selected direction is
opened and the last menu item selected is dis-
played.
Page 23 of 217

Voice command system
22
Voice command system
The concept
The voice command system allows you to con-
trol operation of various vehicle systems with-
out ever removing your hands from the steering
wheel.
Individual menu items on the Control Display
can be spoken as commands. This frees you of
having to use the controller.
The voice command system transforms your
oral commands into control signals for the
selected systems and provides support in the
form of instructions or questions.
The voice command system includes a special
microphone.
The microphone is located:
>In the Coupe near the interior rearview mir-
ror, refer to page14
>In the Convertible on the steering column
Precondition
In the Control Center, set the language that
applies for the voice command system in order
to enable identification of the spoken com-
mands. For information on setting the language
of the Control Center, refer to page78.
Symbol in the Owner's Manual
Voice commands
Activating voice command system
1.Press the button on the steering wheel
or on the center console.
This symbol on the Control Display and
an acoustic signal indicate that the voice
command system can respond to com-
mands.
2.Say the command.
Text or numbers that the voice command
system has registered will appear on the
Control Display.
*
{...} Say the specified commands word for
word.
{{...}} Indicates the responses of the voice
command system.
Page 31 of 217
Opening and closing
30 Press the button twice to unlock the
entire vehicle.
7.Press the controller.
The setting is stored for the remote control cur-
rently in use.
Convenience opening mode
Hold the button down:
>Coupe: the windows are opened, the glass
sunroof
* is raised, and the sliding panel
moves back approx. 2 in/5 cm.
>Convertible: the windows and the convert-
ible top are opened.
Watch the convertible top during the
opening process to be sure that no
one is injured. Releasing the button stops
the operation.<
Locking the doors
Press the button.
Switching on the interior lamps
Press the button if the vehicle is locked.
You can also use this function to locate your
vehicle in parking garages etc.
Panic mode*
By pressing and holding the button for more
than approx. 2 seconds, you can trigger the
alarm system in response to any impending
danger.
To switch off the alarm: press any of the but-
tons.
Opening luggage compartment lid
Press the button.
The luggage compartment lid opens, regard-
less of whether it was previously locked or
unlocked.
A previously locked luggage compart-
ment lid is also locked after closing.
Coupe: the luggage compartment lid swings to
the rear and upward when opened. Make sure
there is sufficient free space.<
Setting confirmation signals
You can set confirmation signals to acknowl-
edge the locking and unlocking of the vehicle.
Control Center, for principle details, refer to
page16.
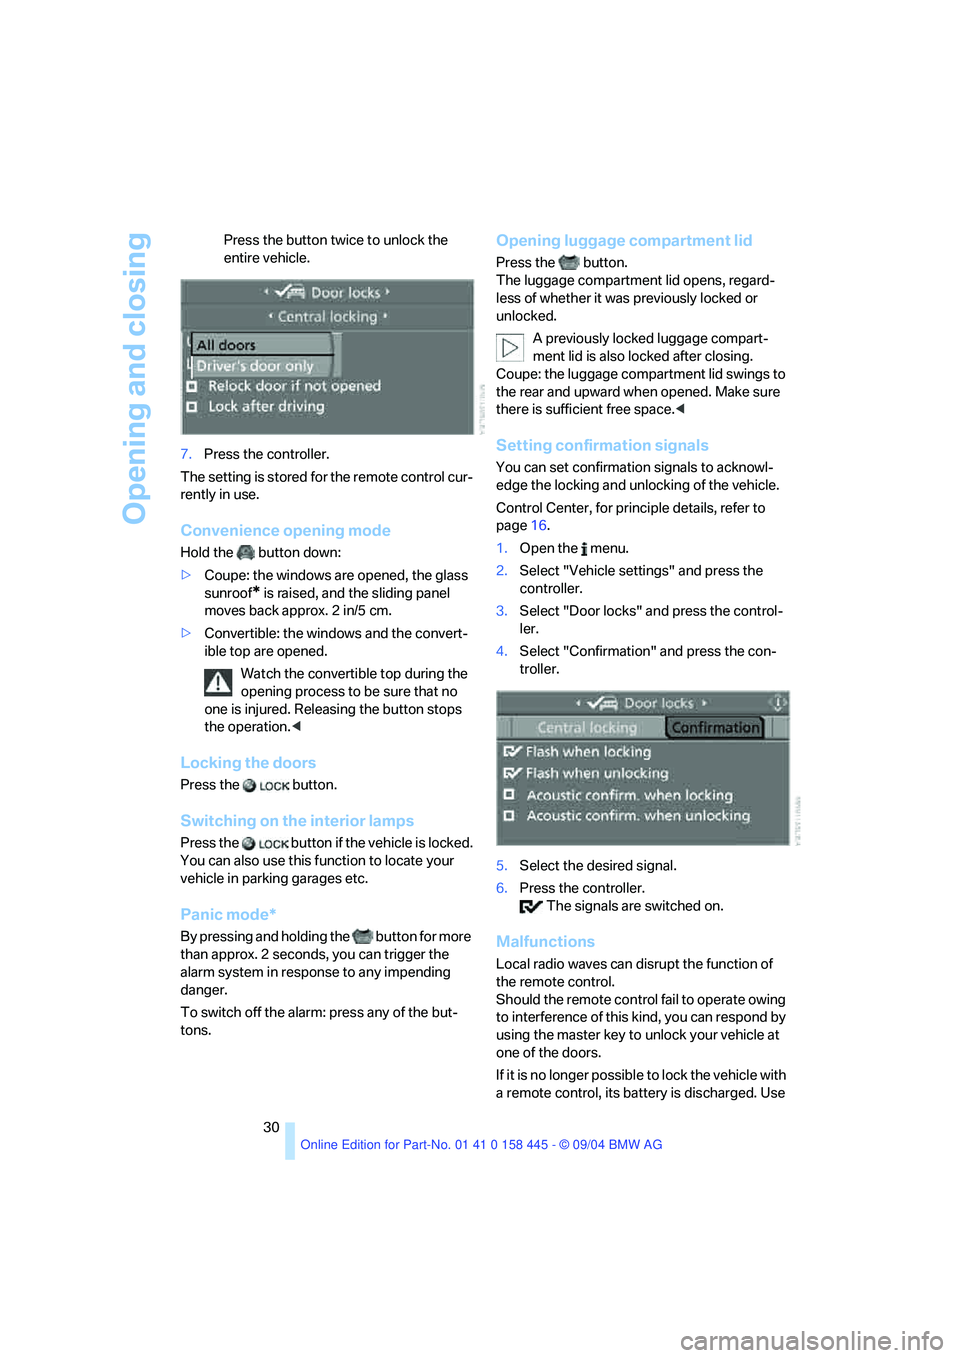
1.Open the menu.
2.Select "Vehicle settings" and press the
controller.
3.Select "Door locks" and press the control-
ler.
4.Select "Confirmation" and press the con-
troller.
5.Select the desired signal.
6.Press the controller.
The signals are switched on.
Malfunctions
Local radio waves can disrupt the function of
the remote control.
Should the remote control fail to operate owing
to interference of this kind, you can respond by
using the master key to unlock your vehicle at
one of the doors.
If it is no longer poss ible to lock the vehicle with
a remote control, its battery is discharged. Use
Page 35 of 217
Opening and closing
34 If special circumstances should make it abso-
lutely necessary to operate the vehicle with the
luggage compartment lid open:
1.Coupe: close both windows and the glass
sunroof
*.
Convertible: with closed top, close all win-
dows.
2.Increase the air volume of the automatic
climate control to a high level, refer to
page95.
Luggage compartment
There are four lashing eyes on the inner corners
of the luggage compartment for securing lug-
gage nets
* or securing straps to fix luggage in
position.
Also refer to Securing cargo, page111.
Convertible: increasing luggage
compartment capacity
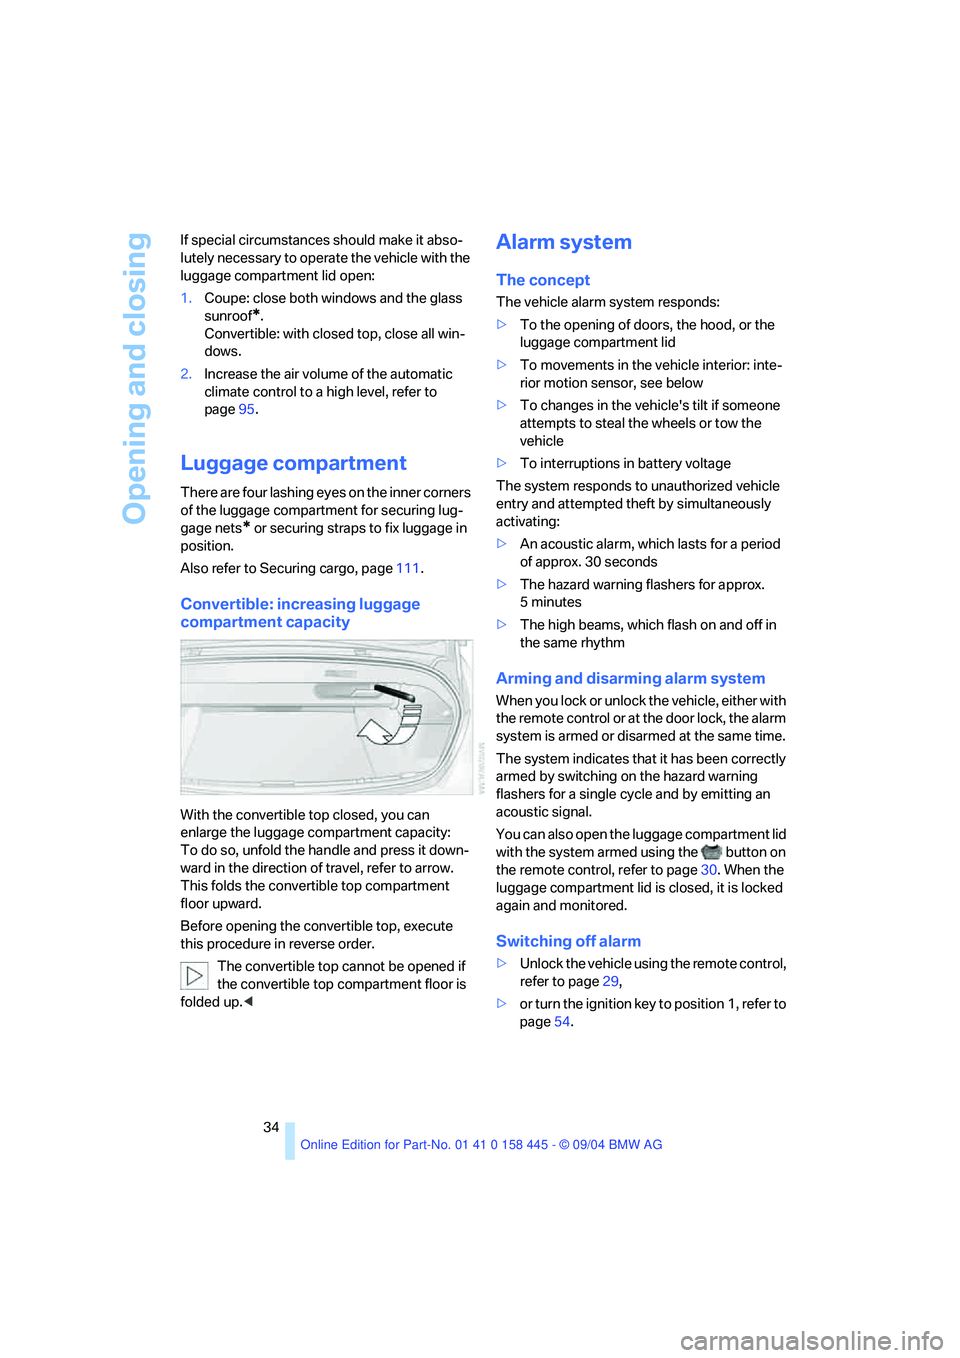
With the convertible top closed, you can
enlarge the luggage compartment capacity:
To do so, unfold the handle and press it down-
ward in the direction of travel, refer to arrow.
This folds the convertible top compartment
floor upward.
Before opening the convertible top, execute
this procedure in reverse order.
The convertible top cannot be opened if
the convertible top compartment floor is
folded up.<
Alarm system
The concept
The vehicle alarm system responds:
>To the opening of doors, the hood, or the
luggage compartment lid
>To movements in the vehicle interior: inte-
rior motion sensor, see below
>To changes in the vehicle's tilt if someone
attempts to steal the wheels or tow the
vehicle
>To interruptions in battery voltage
The system responds to unauthorized vehicle
entry and attempted theft by simultaneously
activating:
>An acoustic alarm, which lasts for a period
of approx. 30 seconds
>The hazard warning flashers for approx.
5minutes
>The high beams, which flash on and off in
the same rhythm
Arming and disarming alarm system
When you lock or unlock the vehicle, either with
the remote control or at the door lock, the alarm
system is armed or disarmed at the same time.
The system indicates that it has been correctly
armed by switching on the hazard warning
flashers for a single cycle and by emitting an
acoustic signal.
You can also open the luggage compartment lid
with the system armed using the button on
the remote control, refer to page30. When the
luggage compartment lid is closed, it is locked
again and monitored.
Switching off alarm
>Unlock the vehicle using the remote control,
refer to page29,
>or turn the ignition key to position 1, refer to
page54.
Page 38 of 217
Controls
37Reference
At a glance
Driving tips
Communications
Navigation
Entertainment
Mobility
Rear window
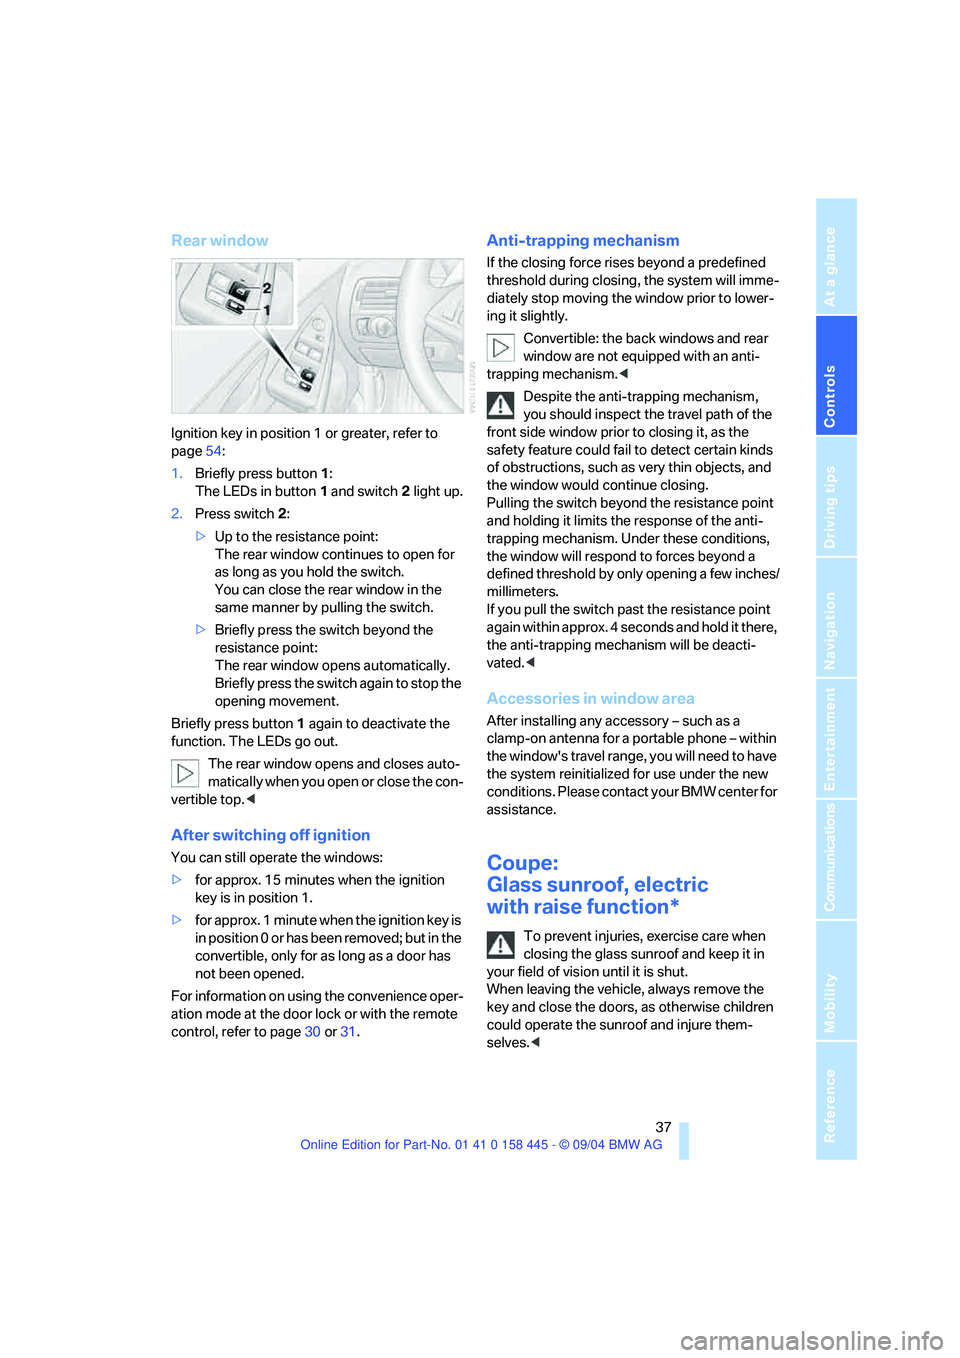
Ignition key in position 1 or greater, refer to
page54:
1.Briefly press button1:
The LEDs in button 1 and switch 2 light up.
2.Press switch 2:
>Up to the resistance point:
The rear window continues to open for
as long as you hold the switch.
You can close the rear window in the
same manner by pulling the switch.
>Briefly press the switch beyond the
resistance point:
The rear window opens automatically.
Briefly press the switch again to stop the
opening movement.
Briefly press button 1 again to deactivate the
function. The LEDs go out.
The rear window opens and closes auto-
matically when you open or close the con-
vertible top.<
After switching off ignition
You can still operate the windows:
>for approx. 15 minutes when the ignition
key is in position 1.
>for approx. 1 minute when the ignition key is
in position 0 or has been removed; but in the
convertible, only for as long as a door has
not been opened.
For information on using the convenience oper-
ation mode at the door lock or with the remote
control, refer to page30 or31.
Anti-trapping mechanism
If the closing force rises beyond a predefined
threshold during closing, the system will imme-
diately stop moving the window prior to lower-
ing it slightly.
Convertible: the back windows and rear
window are not equipped with an anti-
trapping mechanism.<
Despite the anti-trapping mechanism,
you should inspect the travel path of the
front side window prior to closing it, as the
safety feature could fail to detect certain kinds
of obstructions, such as very thin objects, and
the window would continue closing.
Pulling the switch beyond the resistance point
and holding it limits the response of the anti-
trapping mechanism. Under these conditions,
the window will respond to forces beyond a
defined threshold by only opening a few inches/
millimeters.
If you pull the switch past the resistance point
again within approx. 4 seconds and hold it there,
the anti-trapping mechanism will be deacti-
vated.<
Accessories in window area
After installing any accessory – such as a
clamp-on antenna for a portable phone – within
the window's travel range, you will need to have
the system reinitialized for use under the new
conditions. Please contact your BMW center for
assistance.
Coupe:
Glass sunroof, electric
with raise function*
To prevent injuries, exercise care when
closing the glass sunroof and keep it in
your field of vision until it is shut.
When leaving the vehicle, always remove the
key and close the doors, as otherwise children
could operate the sunroof and injure them-
selves.<