2005 BMW 645CI COUPE&CONVERTIBLE light
[x] Cancel search: lightPage 112 of 217
Driving tips
111Reference
At a glance
Controls
Communications
Navigation
Entertainment
Mobility
Load
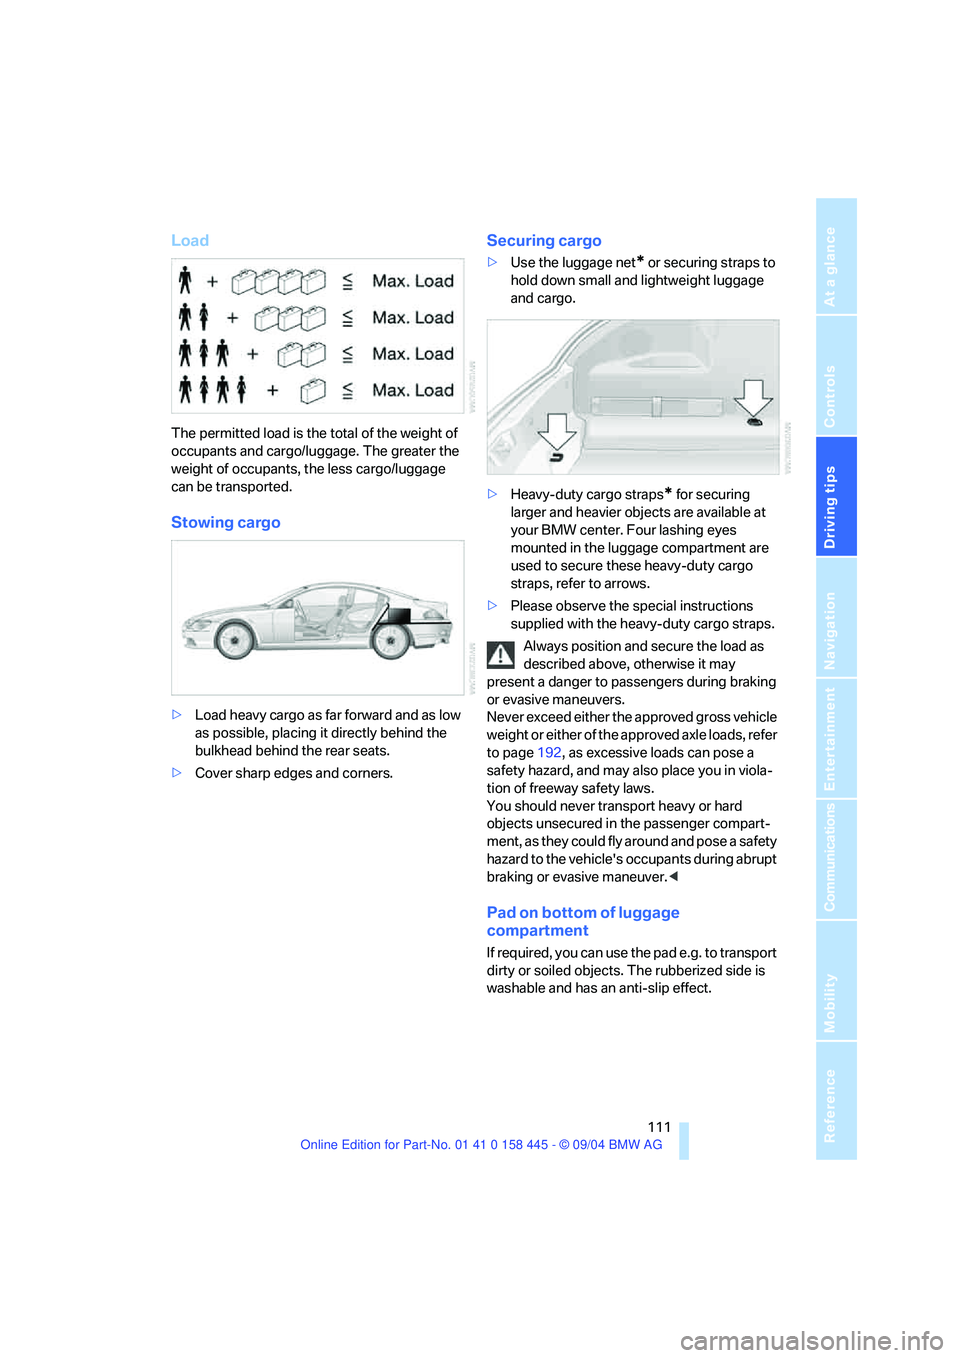
The permitted load is the total of the weight of
occupants and cargo/luggage. The greater the
weight of occupants, the less cargo/luggage
can be transported.
Stowing cargo
>Load heavy cargo as far forward and as low
as possible, placing it directly behind the
bulkhead behind the rear seats.
>Cover sharp edges and corners.
Securing cargo
>Use the luggage net* or securing straps to
hold down small and lightweight luggage
and cargo.
>Heavy-duty cargo straps
* for securing
larger and heavier objects are available at
your BMW center. Four lashing eyes
mounted in the luggage compartment are
used to secure these heavy-duty cargo
straps, refer to arrows.
>Please observe the special instructions
supplied with the heavy-duty cargo straps.
Always position and secure the load as
described above, otherwise it may
present a danger to passengers during braking
or evasive maneuvers.
Never exceed either the approved gross vehicle
weight or either of the approved axle loads, refer
to page192, as excessive loads can pose a
safety hazard, and may also place you in viola-
tion of freeway safety laws.
You should never transport heavy or hard
objects unsecured in the passenger compart-
ment, as they could fly around and pose a safety
hazard to the vehicle's occupants during abrupt
braking or evasive maneuver.<
Pad on bottom of luggage
compartment
If required, you can use the pad e.g. to transport
dirty or soiled objects. The rubberized side is
washable and has an anti-slip effect.
Page 115 of 217
Starting navigation system
114
Starting navigation system
Your navigation system can use satellites to
ascertain the precise position of your vehicle
and guide you reliably to any destination you
enter.
Navigation DVD
Special navigation DVDs are required for each
navigation system. You can obtain the latest
version at your BMW center.
Inserting navigation DVD
1.Insert the navigation DVD with the labeled
side up.
2.Allow approx. 8 seconds for the system to
scan the data from the DVD.
Removing navigation DVD
1.Press button 1.
The DVD emerges slightly from the drive.
2.Remove the DVD.
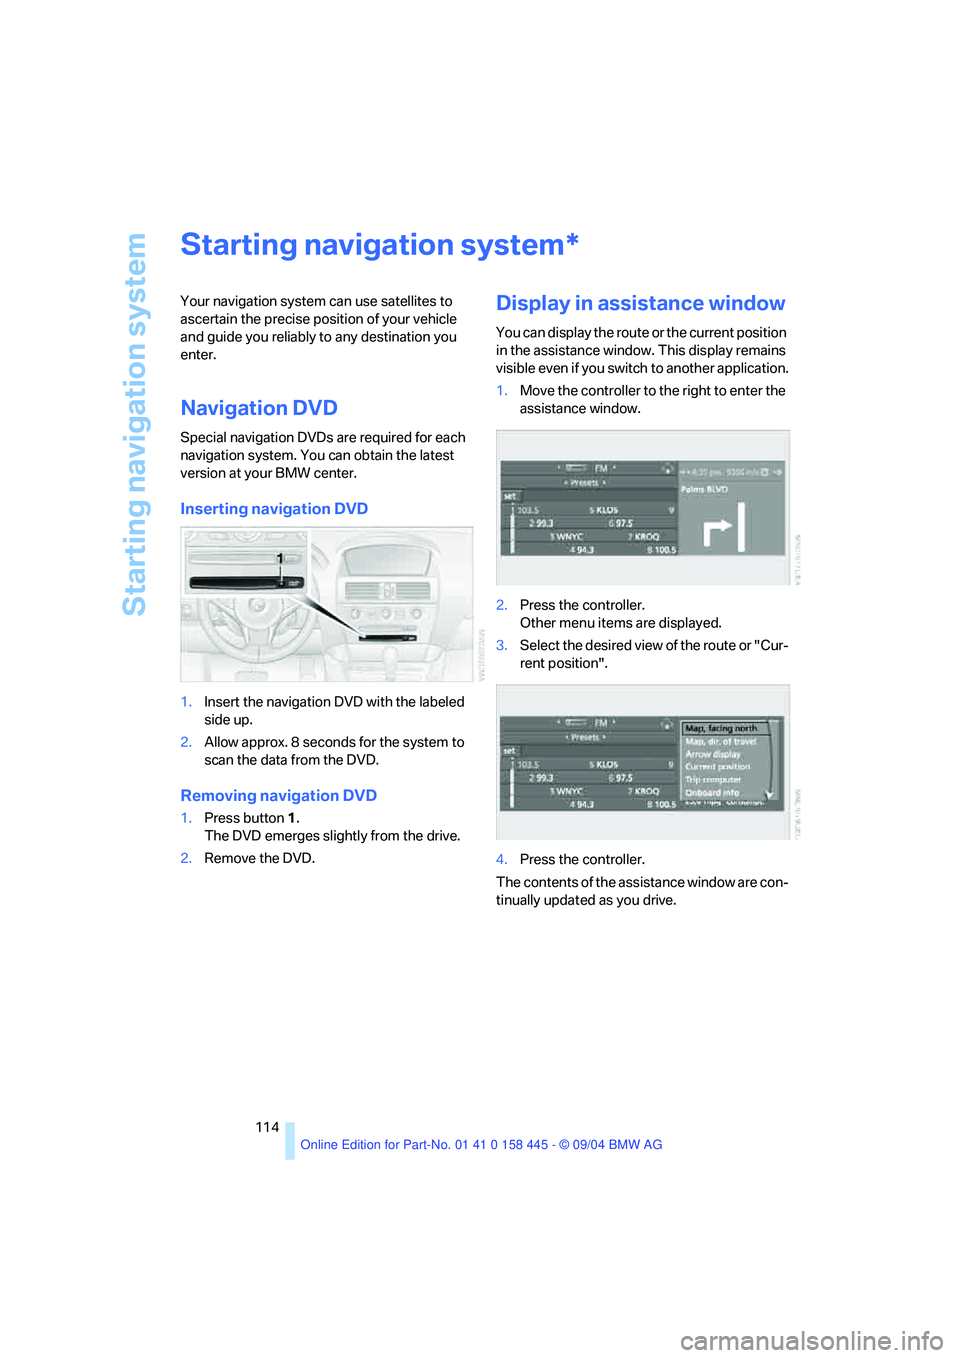
Display in assistance window
You can display the route or the current position
in the assistance window. This display remains
visible even if you switch to another application.
1.Move the controller to the right to enter the
assistance window.
2.Press the controller.
Other menu items are displayed.
3.Select the desired view of the route or "Cur-
rent position".
4.Press the controller.
The contents of the assistance window are con-
tinually updated as you drive.
*
Page 123 of 217
Destination entry
122
Storing home address
You can store your current position or the cur-
rent destination as a home address in the
address book. This entry is in the second posi-
tion in the address book.
Control Center, for principle details, refer to
page16.
1.Select "Address book" and press the con-
troller.
2.Select "Home address" and press the con-
troller.
Select "Use current location as address" or
during destination guidance "Save current
destination".
3.Press the controller.
To select the home address as the destination:
Select "Start guidance" and press the control-
ler.
To change the entry:
Select "Edit address" and press the controller.
For operation, refer to Entering a destination
manually, page115
Route selection
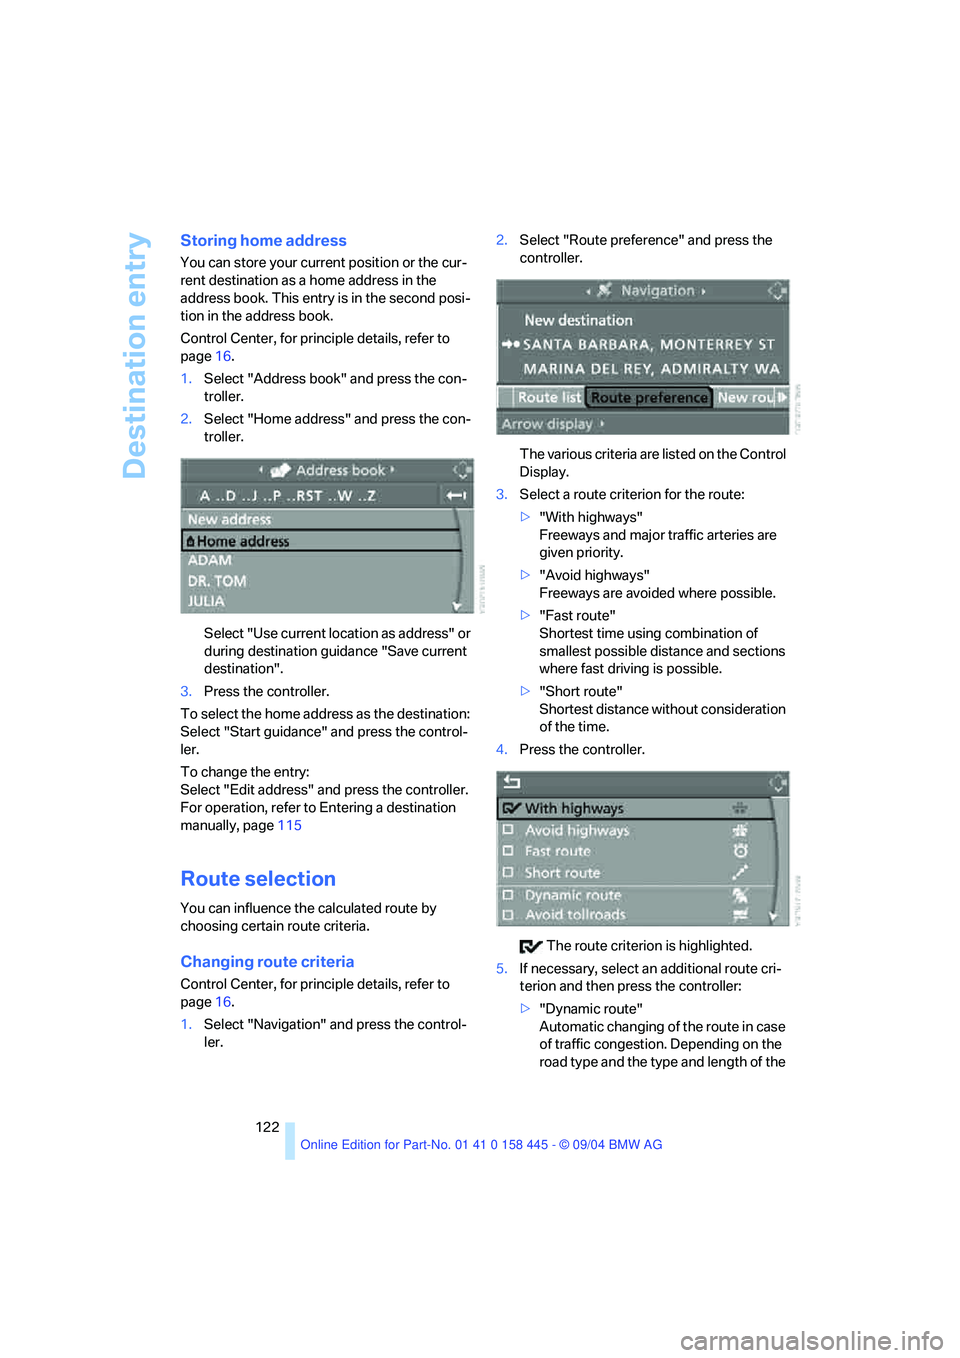
You can influence the calculated route by
choosing certain route criteria.
Changing route criteria
Control Center, for principle details, refer to
page16.
1.Select "Navigation" and press the control-
ler.2.Select "Route preference" and press the
controller.
The various criteria are listed on the Control
Display.
3.Select a route criterion for the route:
>"With highways"
Freeways and major traffic arteries are
given priority.
>"Avoid highways"
Freeways are avoided where possible.
>"Fast route"
Shortest time using combination of
smallest possible distance and sections
where fast driving is possible.
>"Short route"
Shortest distance without consideration
of the time.
4.Press the controller.
The route criterion is highlighted.
5.If necessary, select an additional route cri-
terion and then press the controller:
>"Dynamic route"
Automatic changing of the route in case
of traffic congestion. Depending on the
road type and the type and length of the
Page 144 of 217
Navigation
Entertainment
Driving tips
143Reference
At a glance
Controls
Communications
Mobility
CD player and CD changer
Listening to CDs
CD player: starting CD
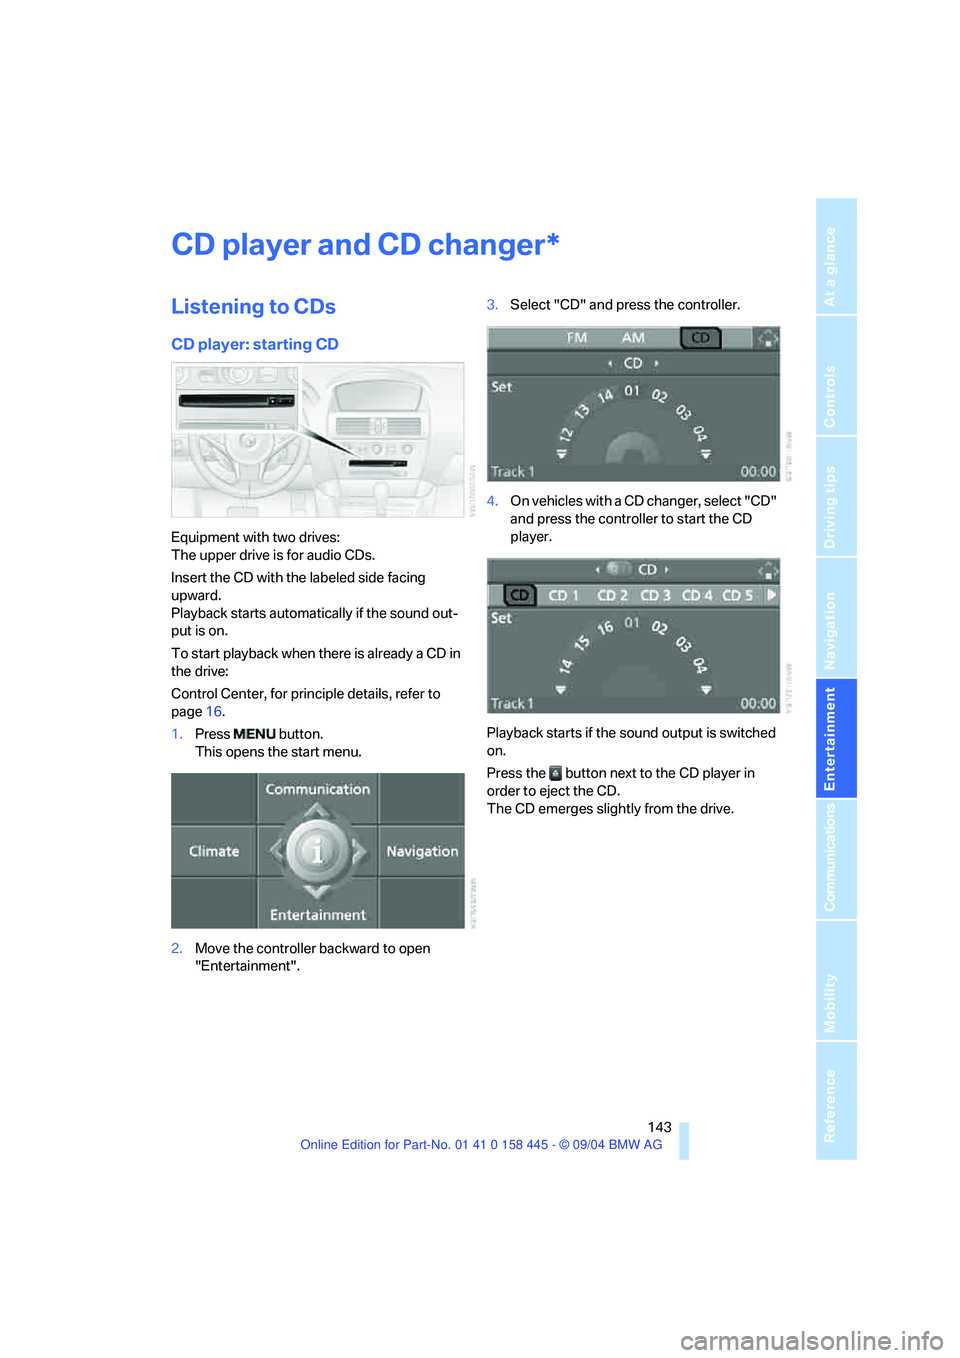
Equipment with two drives:
The upper drive is for audio CDs.
Insert the CD with the labeled side facing
upward.
Playback starts automatically if the sound out-
put is on.
To start playback when there is already a CD in
the drive:
Control Center, for principle details, refer to
page16.
1.Press button.
This opens the start menu.
2.Move the controller backward to open
"Entertainment".3.Select "CD" and press the controller.
4.On vehicles with a CD changer, select "CD"
and press the controller to start the CD
player.
Playback starts if the sound output is switched
on.
Press the button next to the CD player in
order to eject the CD.
The CD emerges slightly from the drive.
*
Page 174 of 217
Mobility
173Reference
At a glance
Controls
Driving tips
Communications
Navigation
Entertainment
Run-flat tires
If you switch from summer to winter tires, or
vice versa, use run-flat tires, refer to page172,
as in the event of a flat tire there is no spare tire
available. Your BMW center will be glad to
advise you.
Watch speed
Observe the permissible maximum speed
for the respective winter tires, as other-
wise tire damage and occur and cause acci-
dents.<
Storage
Always store wheels and tires in a cool, dry
place with as little exposure to light as possible.
Always protect tires against all contact with oil,
grease and fuels. Do not exceed the maximum
tire inflation pressure indicated on the side wall
of the tire.
Snow chains*
BMW only tests certain fine-link snow chains,
classifies them as road-safe and approves
them. Consult your BMW center for more infor-
mation. BMW recommends using these
approved snow chains. These snow chains are
approved exclusively for use in pairs on the rear
wheels with the tire size:
>245/50 R 17 Y
>245/45 R 18 Y
Observe the chain manufacturer's instructions
when mounting snow chains. Do not exceed a
vehicle speed of 30 mph/50 km/h with the
chains mounted.
Do not initialize the Flat Tire Monitor after
mounting snow chains.
When you are driving with snow chains, it can
be beneficial to switch off DTC briefly, refer to
page82.<
Page 178 of 217
Mobility
177Reference
At a glance
Controls
Driving tips
Communications
Navigation
Entertainment
2.Turn the cap of the expansion tank counter-
clockwise to allow any accumulated pres-
sure to escape, then continue turning to
open.
3.The coolant level is correct when it lies
between the Min and Max mark, also refer to
the drawing next the filler neck.
4.If the coolant is low, slowly add coolant up to
the specified level – do not overfill.
5.Turn the cap until it clicks.
6.Have the reason for the coolant loss elimi-
nated as soon as possible.
Brake system
Malfunction
Brake fluid
The warning lamp lights up in red
in spite of the handbrake being
released; a message appears on the
Control Display.
Stop the vehicle immediately.
The brake fluid in the reservoir has fallen to
below the minimum level. At the same time, a
significantly longer brake pedal path may be
noticeable. Have the system checked immedi-
ately by a BMW center.
Warning lamp for Canadian models.
When you continue driving, an increased
brake pedal path can be necessary, and
significantly longer braking distances might be
required. Please adapt your driving style
accordingly.<
Brake pads
The warning lamp lights up in red
in spite of the handbrake being
released; a message appears on the
Control Display. The brake pads have reached
their minimum pad thickness. Have the brake
pads replaced as soon as possible.Warning lamp for Canadian models.
For your own safety: use only brake pads
that BMW has approved for your particu-
lar vehicle model. As BMW cannot assess the
suitability of other brake pads for use on your
vehicle, BMW is unable to assume continued
responsibility for the vehicle's operating safety
if non-approved pads are installed.<
Page 180 of 217

Mobility
179Reference
At a glance
Controls
Driving tips
Communications
Navigation
Entertainment
OBD Socket
The Onboard Diagnostics OBD interface
socket is located on the left of the driver's side
under the instrument panel and under a cover.
The cover has the letters OBD on it.
The purpose of the OBD system is to ensure
proper operation of the emission control sys-
tem for the vehicle's lifetime. The system mon-
itors emission-related components and sys-
tems for deterioration and malfunction.
An illuminated indicator lamp informs
you of the need for service, not of the
need to stop the vehicle. However, the
systems should be checked by your BMW cen-
ter at the earliest possible opportunity.
Display of the previously described
malfunction on Canadian models.
Under certain conditions, the indicator
lamp will blink or flash. This indicates a rather
severe level of engine misfire. When this
occurs, you should reduce speed and consult
the nearest BMW center as soon as possible.
Severe engine misfire over only a short period
of time can seriously damage emissions control
components, especially the catalytic converter.
When the fuel filler cap is not properly
tightened, the OBD system can detect
the vapor leak and the indicator lamp will light
up. If the filler cap is subsequently tightened,
the indicator lamp should go out within a few
days.<
Event Data Recorders
Your vehicle may be equipped with one or more
sensing and diagnostic modules or a recording
device capable of recording or transmitting cer-
tain vehicle data or information. In addition, if
you have a Subscription Service Agreement for
the BMW Assist system, certain vehicle infor-
mation may be transmitted or recorded in order
to provide such services.
Care
Important information on care and maintenance
of your BMW is contained in the Caring for your
vehicle brochure.
Page 181 of 217
Replacing components
180
Replacing components
Onboard tool kit
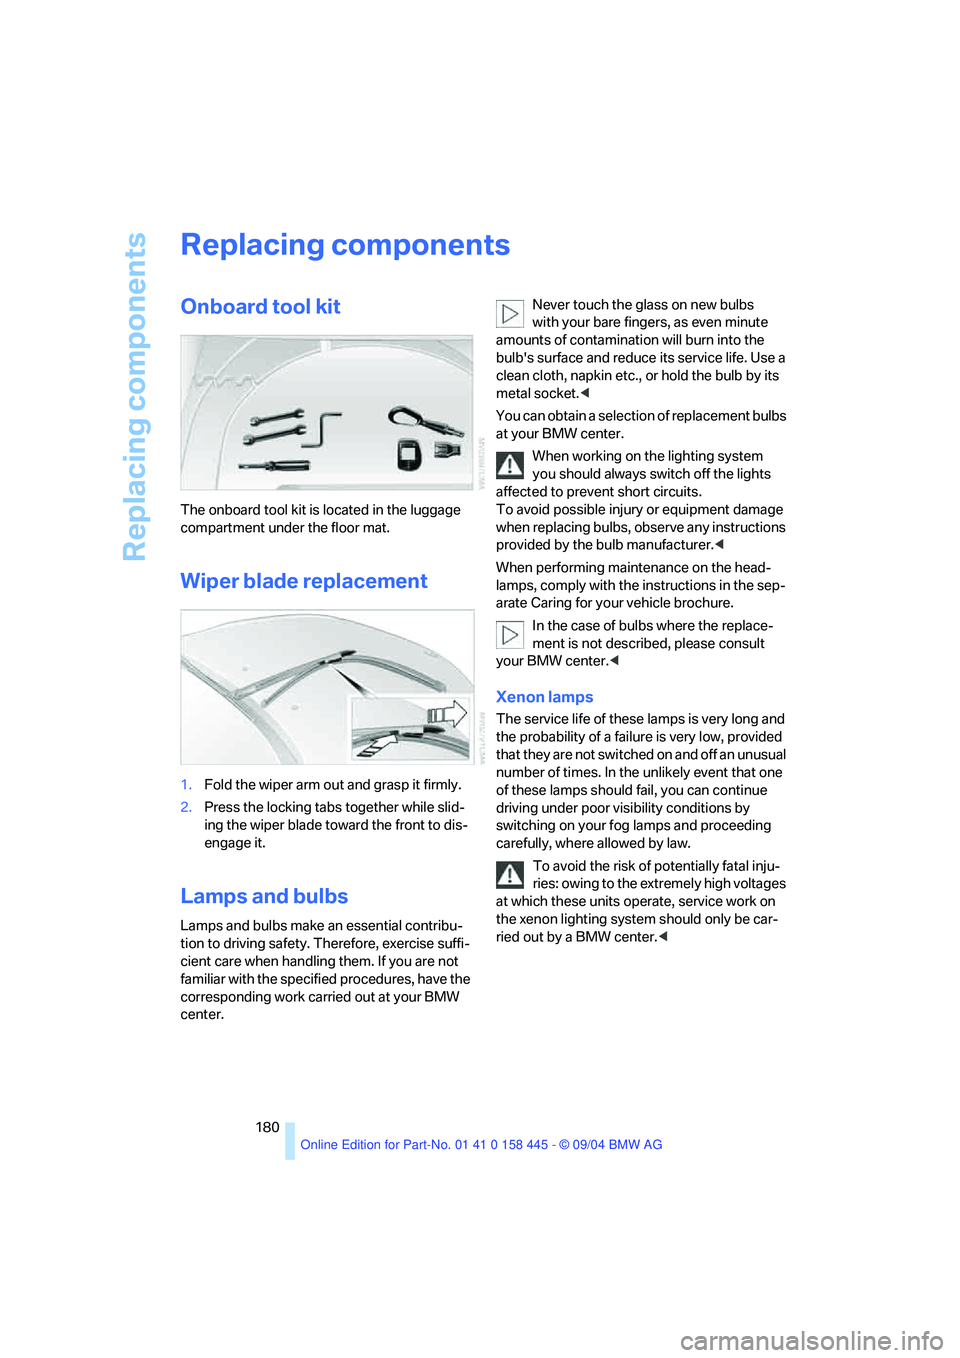
The onboard tool kit is located in the luggage
compartment under the floor mat.
Wiper blade replacement
1.Fold the wiper arm out and grasp it firmly.
2.Press the locking tabs together while slid-
ing the wiper blade toward the front to dis-
engage it.
Lamps and bulbs
Lamps and bulbs make an essential contribu-
tion to driving safety. Therefore, exercise suffi-
cient care when handling them. If you are not
familiar with the specified procedures, have the
corresponding work carried out at your BMW
center.Never touch the glass on new bulbs
with your bare fingers, as even minute
amounts of contamination will burn into the
bulb's surface and reduce its service life. Use a
clean cloth, napkin etc., or hold the bulb by its
metal socket.<
You can obtain a selection of replacement bulbs
at your BMW center.
When working on the lighting system
you should always switch off the lights
affected to prevent short circuits.
To avoid possible injury or equipment damage
when replacing bulbs, observe any instructions
provided by the bulb manufacturer.<
When performing maintenance on the head-
lamps, comply with the instructions in the sep-
arate Caring for your vehicle brochure.
In the case of bulbs where the replace-
ment is not described, please consult
your BMW center.<
Xenon lamps
The service life of these lamps is very long and
the probability of a failure is very low, provided
that they are not switched on and off an unusual
number of times. In the unlikely event that one
of these lamps should fail, you can continue
driving under poor visibility conditions by
switching on your fog lamps and proceeding
carefully, where allowed by law.
To avoid the risk of potentially fatal inju-
ries: owing to the extremely high voltages
at which these units operate, service work on
the xenon lighting system should only be car-
ried out by a BMW center.<