2005 BMW 645CI COUPE&CONVERTIBLE steering
[x] Cancel search: steeringPage 133 of 217
On/off and tone
132
On/off and tone
The following audio sources have shared
controls and setting options:
>Radio Business
>CD player
>CD changer
*
Controls
The audio sources can be operated using:
>Buttons near CD player
>Control Center
>Buttons on the steering wheel, refer to
page11
Buttons near CD player
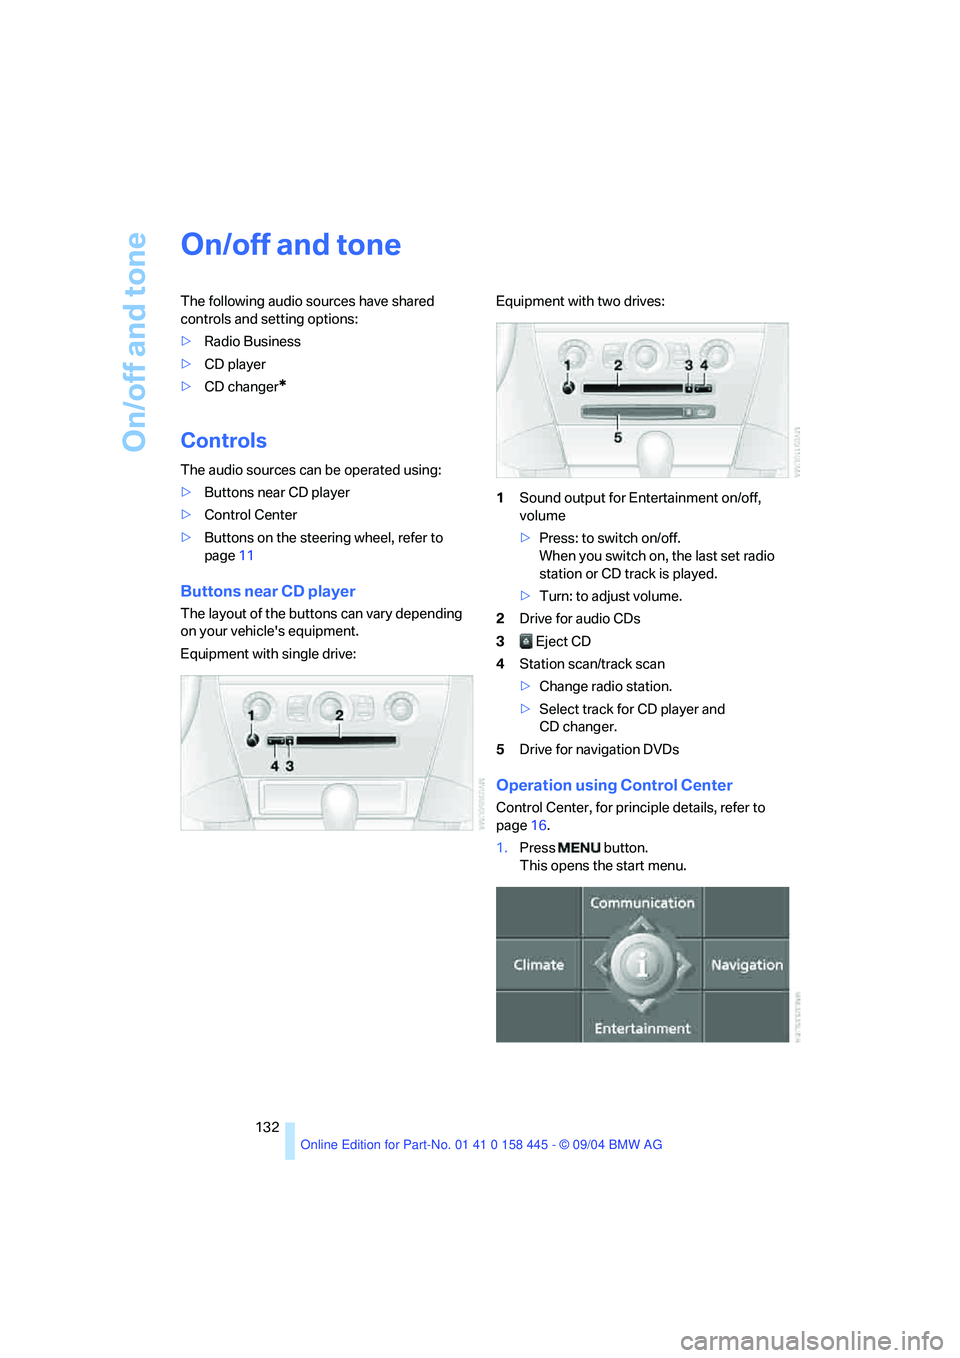
The layout of the buttons can vary depending
on your vehicle's equipment.
Equipment with single drive:Equipment with two drives:
1Sound output for Entertainment on/off,
volume
>Press: to switch on/off.
When you switch on, the last set radio
station or CD track is played.
>Turn: to adjust volume.
2Drive for audio CDs
3 Eject CD
4Station scan/track scan
>Change radio station.
>Select track for CD player and
CD changer.
5Drive for navigation DVDs
Operation using Control Center
Control Center, for principle details, refer to
page16.
1.Press button.
This opens the start menu.
Page 134 of 217
Navigation
Entertainment
Driving tips
133Reference
At a glance
Controls
Communications
Mobility
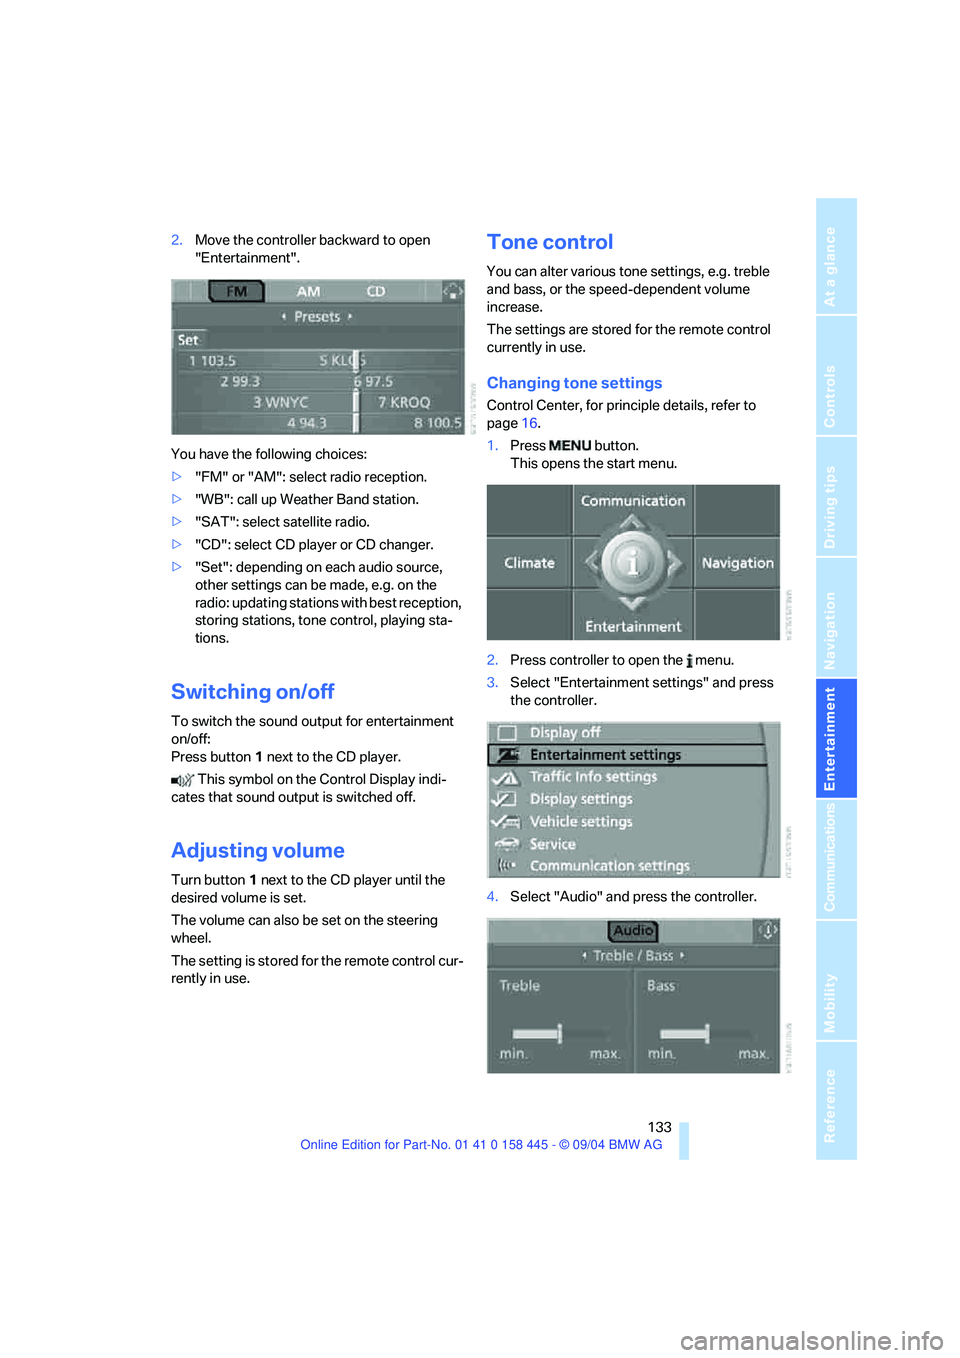
2.Move the controller backward to open
"Entertainment".
You have the following choices:
>"FM" or "AM": select radio reception.
>"WB": call up Weather Band station.
>"SAT": select satellite radio.
>"CD": select CD player or CD changer.
>"Set": depending on each audio source,
other settings can be made, e.g. on the
radio: updating stations with best reception,
storing stations, tone control, playing sta-
tions.
Switching on/off
To switch the sound output for entertainment
on/off:
Press button1 next to the CD player.
This symbol on the Control Display indi-
cates that sound output is switched off.
Adjusting volume
Turn button1 next to the CD player until the
desired volume is set.
The volume can also be set on the steering
wheel.
The setting is stored for the remote control cur-
rently in use.
Tone control
You can alter various tone settings, e.g. treble
and bass, or the speed-dependent volume
increase.
The settings are stored for the remote control
currently in use.
Changing tone settings
Control Center, for principle details, refer to
page16.
1.Press button.
This opens the start menu.
2.Press controller to open the menu.
3.Select "Entertainment settings" and press
the controller.
4.Select "Audio" and press the controller.
Page 145 of 217
CD player and CD changer
144
CD changer: starting CD
1.Fill the CD magazine and insert, refer to
page145.
Control Center, for principle details, refer to
page16.
2.Press button.
This opens the start menu.
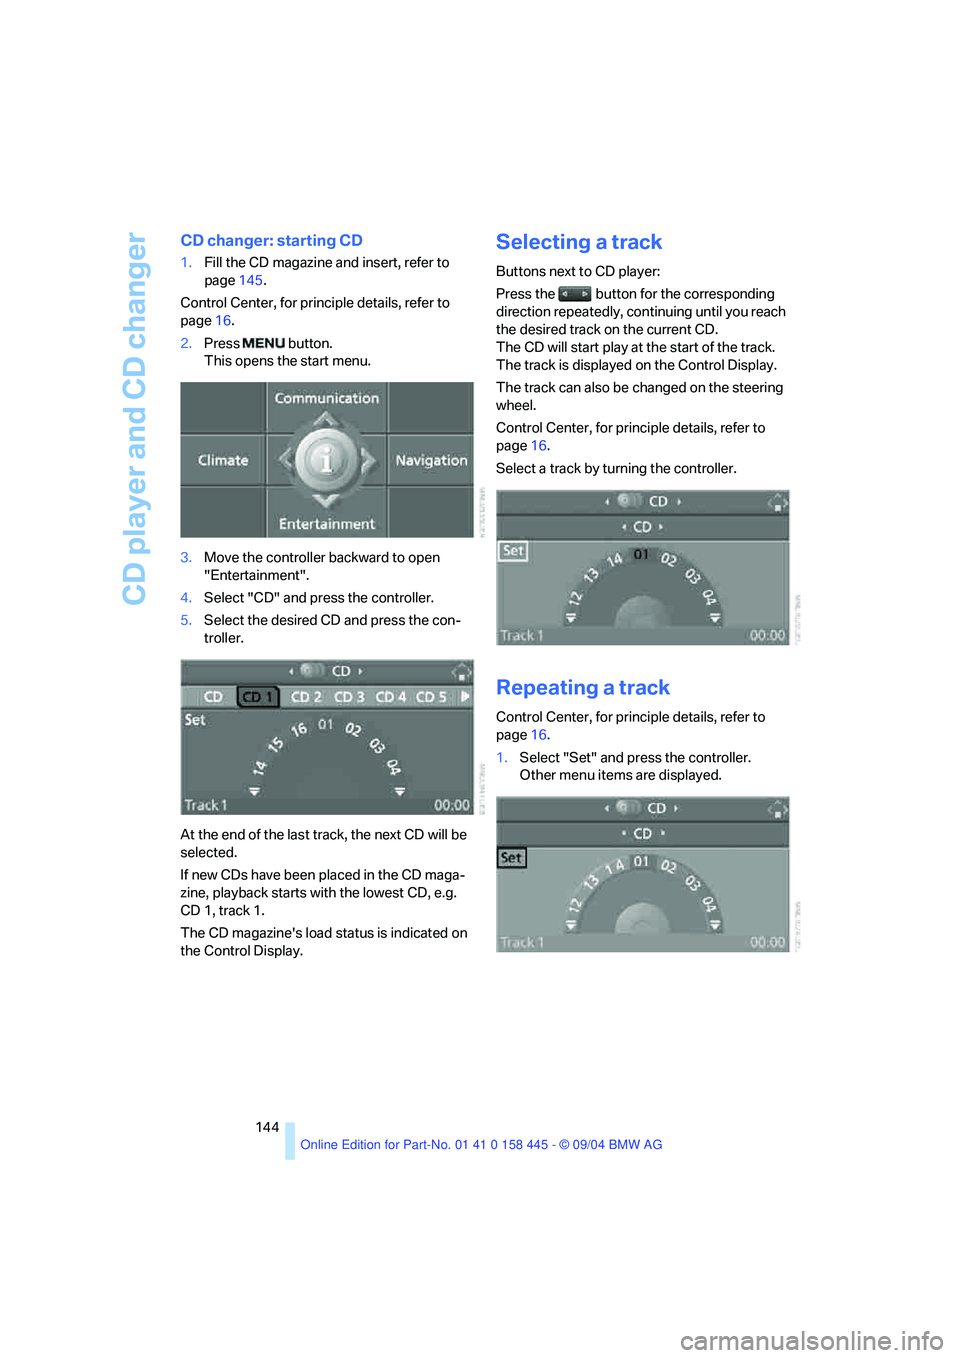
3.Move the controller backward to open
"Entertainment".
4.Select "CD" and press the controller.
5.Select the desired CD and press the con-
troller.
At the end of the last track, the next CD will be
selected.
If new CDs have been placed in the CD maga-
zine, playback starts with the lowest CD, e.g.
CD 1, track 1.
The CD magazine's load status is indicated on
the Control Display.
Selecting a track
Buttons next to CD player:
Press the button for the corresponding
direction repeatedly, continuing until you reach
the desired track on the current CD.
The CD will start play at the start of the track.
The track is displayed on the Control Display.
The track can also be changed on the steering
wheel.
Control Center, for principle details, refer to
page16.
Select a track by turning the controller.
Repeating a track
Control Center, for principle details, refer to
page16.
1.Select "Set" and press the controller.
Other menu items are displayed.
Page 152 of 217
151
Entertainment
Reference
At a glance
Controls
Driving tips Communications
Navigation
Mobility
your portable phone.
To avoid possible short circuits, after removing
a battery you should never allow it to come into
contact with metallic surfaces of any kind.<
Disposing of used batteries
Return used batteries to a recycling col-
lection point or to your BMW center.<
Care instructions
You can find what you need to know about car-
ing for your portable phone in the Caring for
your vehicle brochure and in the separate porta-
ble phone Owner's Manual.
Operating options
You can operate the portable phone* with:
>The steering wheel, refer to page11
>The Control Center, refer to page152
>Voice commands, refer to page156
Information on operating the portable phone is
contained in the separate Owner's Manual on
the Full Preparation Package Cellphone.
Telephoning with car phone:
BMW Assist calls
You can use the car phone via the hands-free
system for BMW Assist calls.
When the status information "Car Phone" is
displayed in "Communication", only BMW
Assist calls are possible.
Hands-free system
The microphone is located:
>In the Coupe near the interior rearview mir-
ror, refer to page14
>In the Convertible on the steering columnThe hands-free system is activated whenever
you establish or receive a call using:
>The button on the steering wheel
>The Control Center
>Voice commands
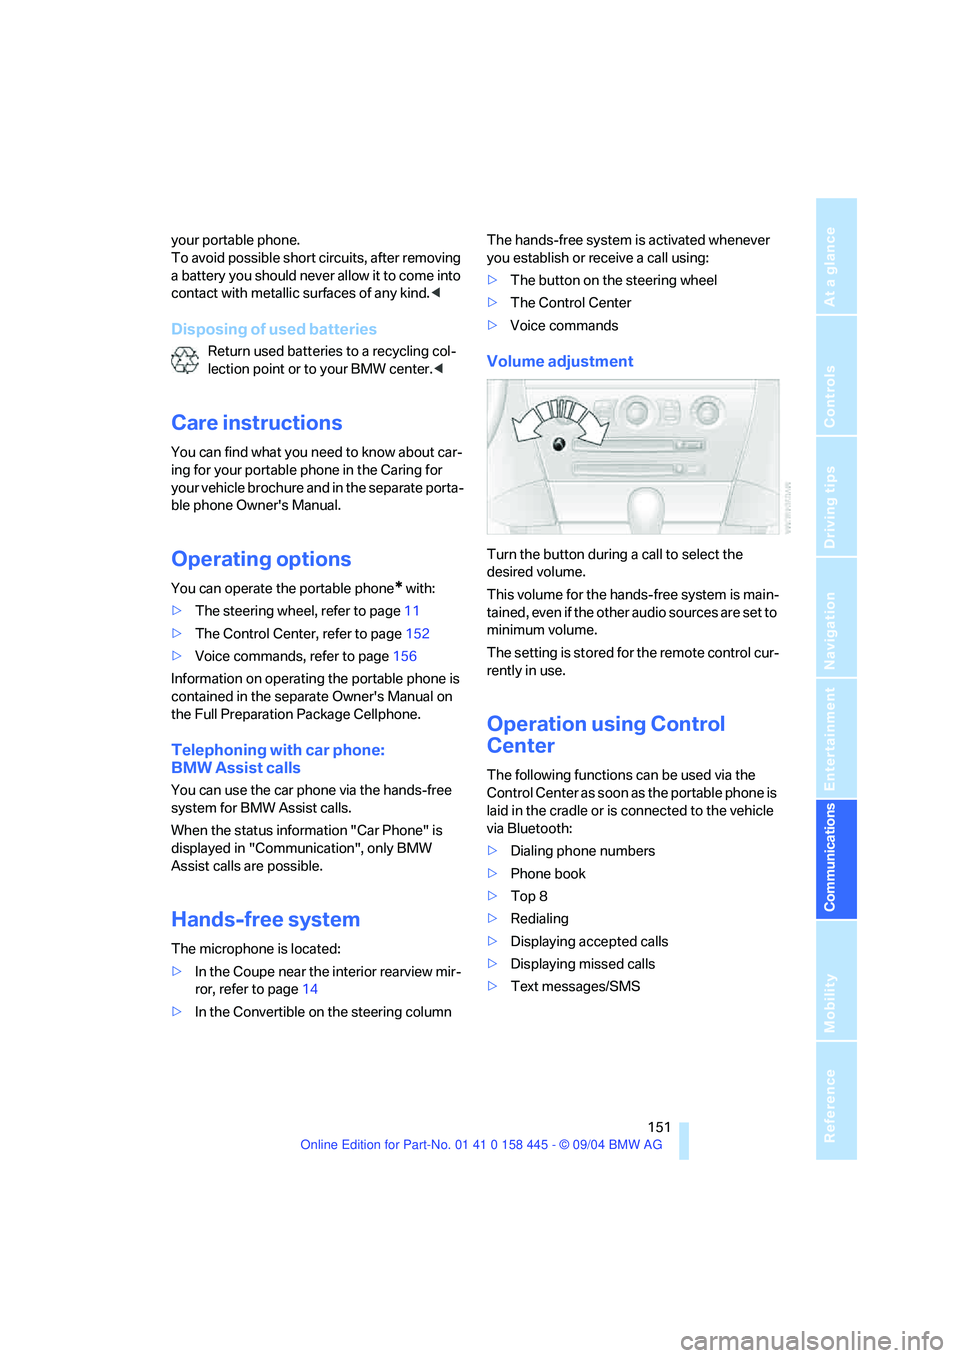
Volume adjustment
Turn the button during a call to select the
desired volume.
This volume for the hands-free system is main-
tained, even if the other audio sources are set to
minimum volume.
The setting is stored for the remote control cur-
rently in use.
Operation using Control
Center
The following functions can be used via the
Control Center as soon as the portable phone is
laid in the cradle or is connected to the vehicle
via Bluetooth:
>Dialing phone numbers
>Phone book
>Top 8
>Redialing
>Displaying accepted calls
>Displaying missed calls
>Text messages/SMS
Page 157 of 217
Telephoning
156 2.Select "Options" and press the controller.
3.Select "Call sender" and press the control-
ler.
The selected sender is called.
Deleting text messages/SMS
1.Select the desired text message and press
the controller.
The text message is displayed.
2.Select "Options" and press the controller.
3.Select "Delete" and press the controller.
The text message of the portable phone is
deleted.
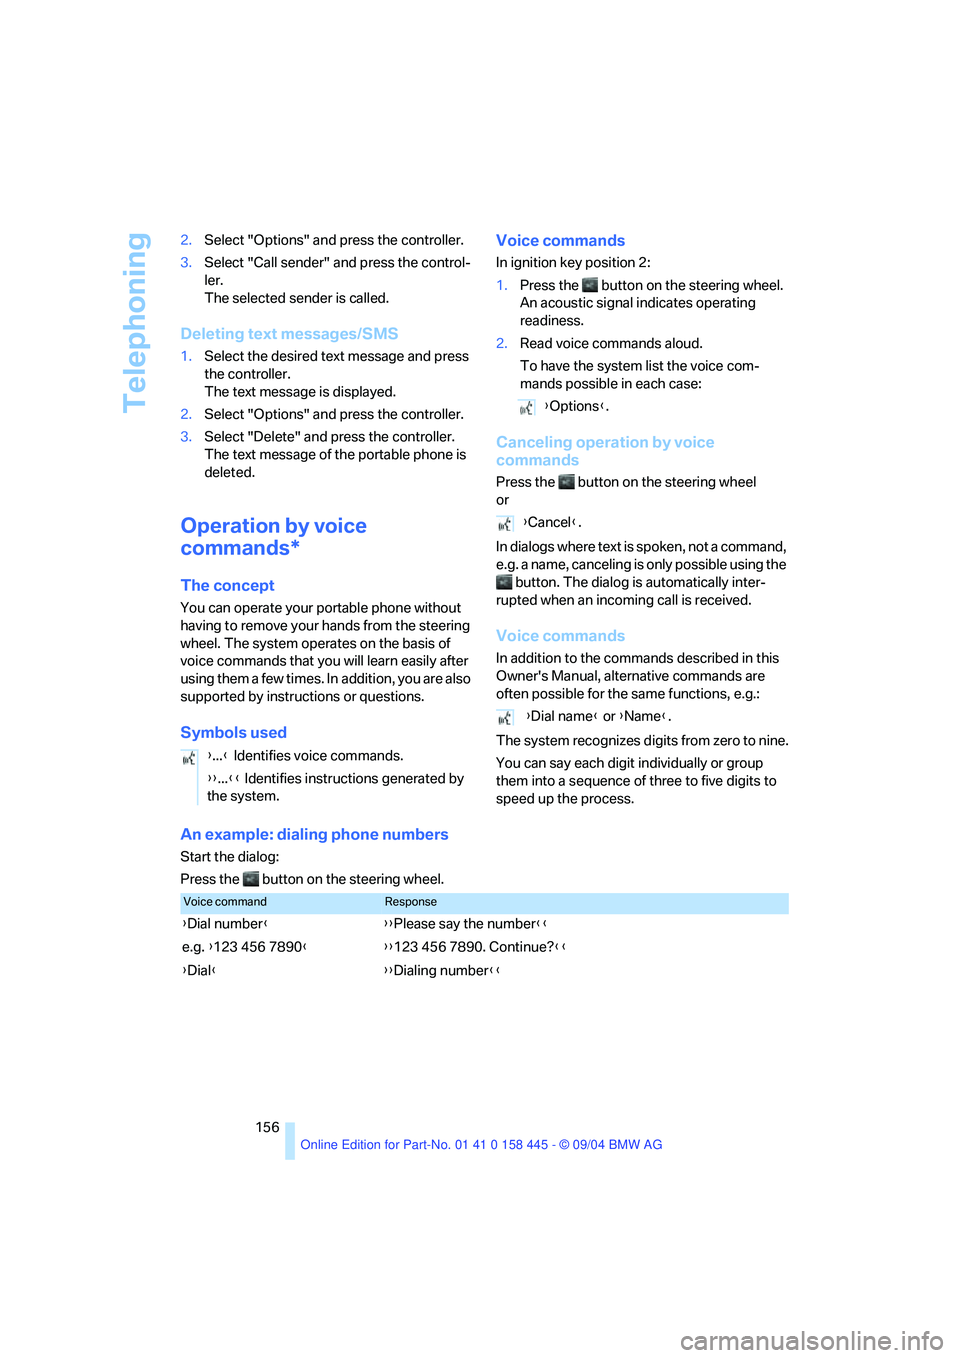
Operation by voice
commands*
The concept
You can operate your portable phone without
having to remove your hands from the steering
wheel. The system operates on the basis of
voice commands that you will learn easily after
using them a few times. In addition, you are also
supported by instructions or questions.
Symbols usedVoice commands
In ignition key position 2:
1.Press the button on the steering wheel.
An acoustic signal indicates operating
readiness.
2.Read voice commands aloud.
To have the system list the voice com-
mands possible in each case:
Canceling operation by voice
commands
Press the button on the steering wheel
or
In dialogs where text is spoken, not a command,
e.g. a name, canceling is only possible using the
button. The dialog is automatically inter-
rupted when an incoming call is received.
Voice commands
In addition to the commands described in this
Owner's Manual, alternative commands are
often possible for the same functions, e.g.:
The system recognizes digits from zero to nine.
You can say each digit individually or group
them into a sequence of three to five digits to
speed up the process.
An example: dialing phone numbers
Start the dialog:
Press the button on the steering wheel.{...} Identifies voice commands.
{{...}} Identifies instructions generated by
the system.
{Options}.
{Cancel}.
{Dial name} or {Name}.
Voice commandResponse
{Dial number}{{Please say the number}}
e.g. {123 456 7890}{{123 456 7890. Continue?}}
{Dial}{{Dialing number}}
Page 182 of 217
Mobility
181Reference
At a glance
Controls
Driving tips
Communications
Navigation
Entertainment
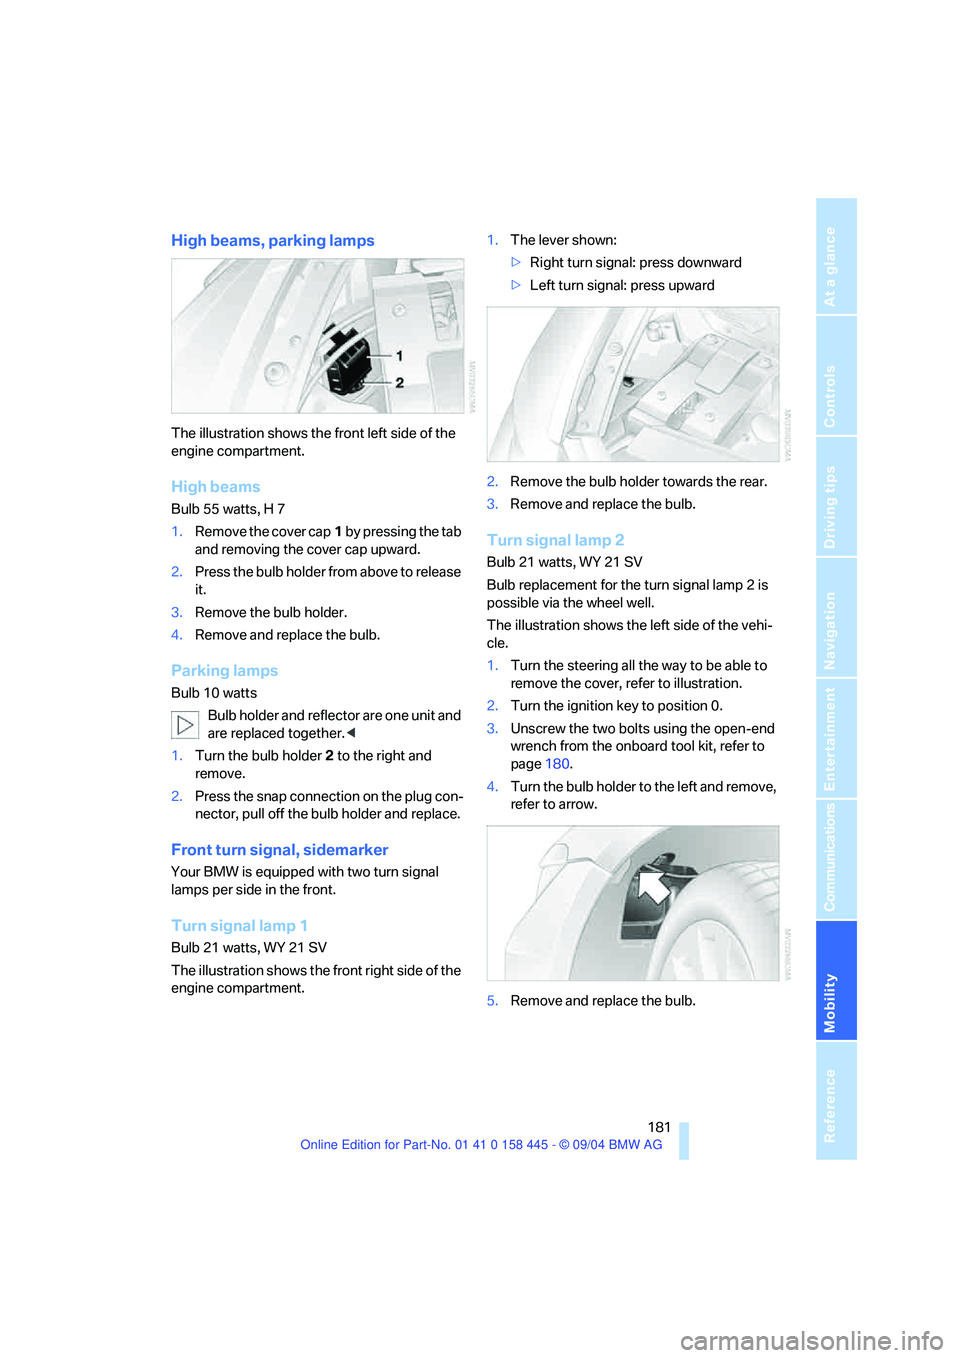
High beams, parking lamps
The illustration shows the front left side of the
engine compartment.
High beams
Bulb 55 watts, H 7
1.Remove the cover cap1 by pressing the tab
and removing the cover cap upward.
2.Press the bulb holder from above to release
it.
3.Remove the bulb holder.
4.Remove and replace the bulb.
Parking lamps
Bulb 10 watts
Bulb holder and reflector are one unit and
are replaced together.<
1.Turn the bulb holder2 to the right and
remove.
2.Press the snap connection on the plug con-
nector, pull off the bulb holder and replace.
Front turn signal, sidemarker
Your BMW is equipped with two turn signal
lamps per side in the front.
Turn signal lamp 1
Bulb 21 watts, WY 21 SV
The illustration shows the front right side of the
engine compartment.1.The lever shown:
>Right turn signal: press downward
>Left turn signal: press upward
2.Remove the bulb holder towards the rear.
3.Remove and replace the bulb.
Turn signal lamp 2
Bulb 21 watts, WY 21 SV
Bulb replacement for the turn signal lamp 2 is
possible via the wheel well.
The illustration shows the left side of the vehi-
cle.
1.Turn the steering all the way to be able to
remove the cover, refer to illustration.
2.Turn the ignition key to position 0.
3.Unscrew the two bolts using the open-end
wrench from the onboard tool kit, refer to
page180.
4.Turn the bulb holder to the left and remove,
refer to arrow.
5.Remove and replace the bulb.
Page 185 of 217
Replacing components
184
Power failure
Following a temporary interruption of the power
supply, the operation of some equipment is lim-
ited and must be reinitialized. Individual settings
are also lost and have to be updated:
>Active steering
The system is deactivated and has to be ini-
tialized, refer to page86. Until then, the
steering will react in an unaccustomed
manner.
>Seat, mirror and steering wheel memory
The position must be stored again, refer to
page46.
>Time and date
The settings must be updated, refer to
page78.
>Radio
Radio stations have to be stored again, refer
to page138.
>Navigation system
You must wait until it becomes operational
again, refer to page129.
Fuses
Never attempt to repair a blown fuse, and
do not replace a defective fuse with a sub-
stitute of another color or amperage rating, as
this could lead to overloading of the wiring, ulti-
mately resulting in a fire in the vehicle.<
Spare fuses and a pair of plastic tweezers are
located in the compartment for the onboard tool
kit, refer to page180.
Information on fuse allocation is located below
the bracket for the onboard tool kit, see below.
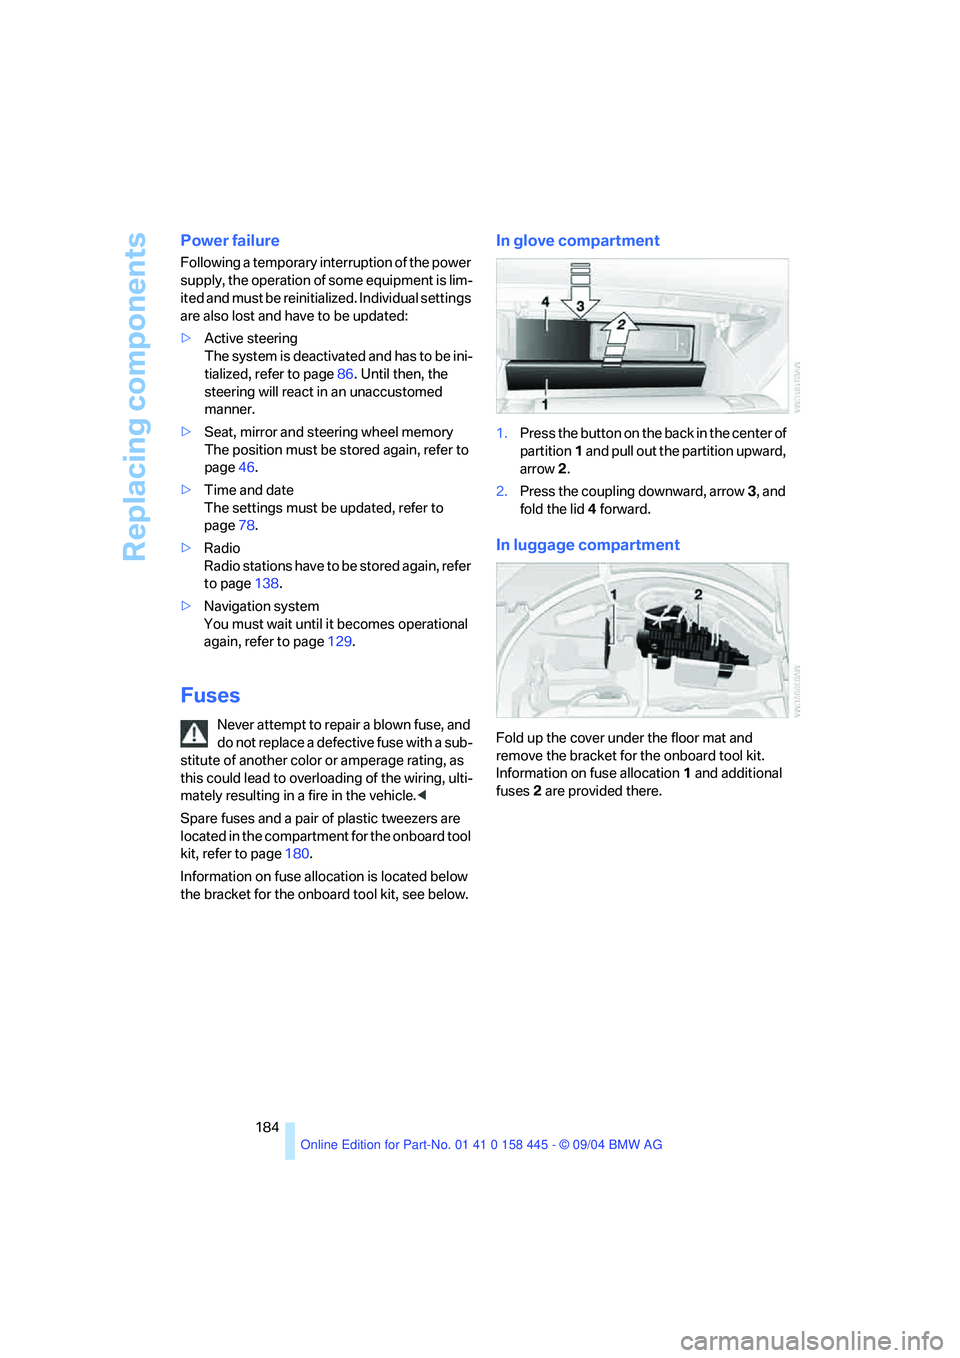
In glove compartment
1.Press the button on the back in the center of
partition1 and pull out the partition upward,
arrow2.
2.Press the coupling downward, arrow3, and
fold the lid 4 forward.
In luggage compartment
Fold up the cover under the floor mat and
remove the bracket for the onboard tool kit.
Information on fuse allocation1 and additional
fuses2 are provided there.
Page 189 of 217
Giving and receiving assistance
188
Towing and tow-starting
Always observe all applicable towing laws
and regulations.<
Never allow passengers to ride in a towed
vehicle for any reason.<
Use tow fitting
The threaded tow fitting is stored in the tool kit
mounted on the inside of the luggage compart-
ment under the floor mat, refer to page180, and
should always remain in the vehicle. It can be
screwed in at the front or rear of the BMW.
To avoid damage to the tow fitting and the
vehicle, observe the following: only use
the tow fitting that comes with the vehicle and
screw it in as far as possible. Use the tow fitting
for towing only on roads. Avoid lateral strains on
the tow fitting, e.g. do not the lift vehicle by the
tow fitting.<
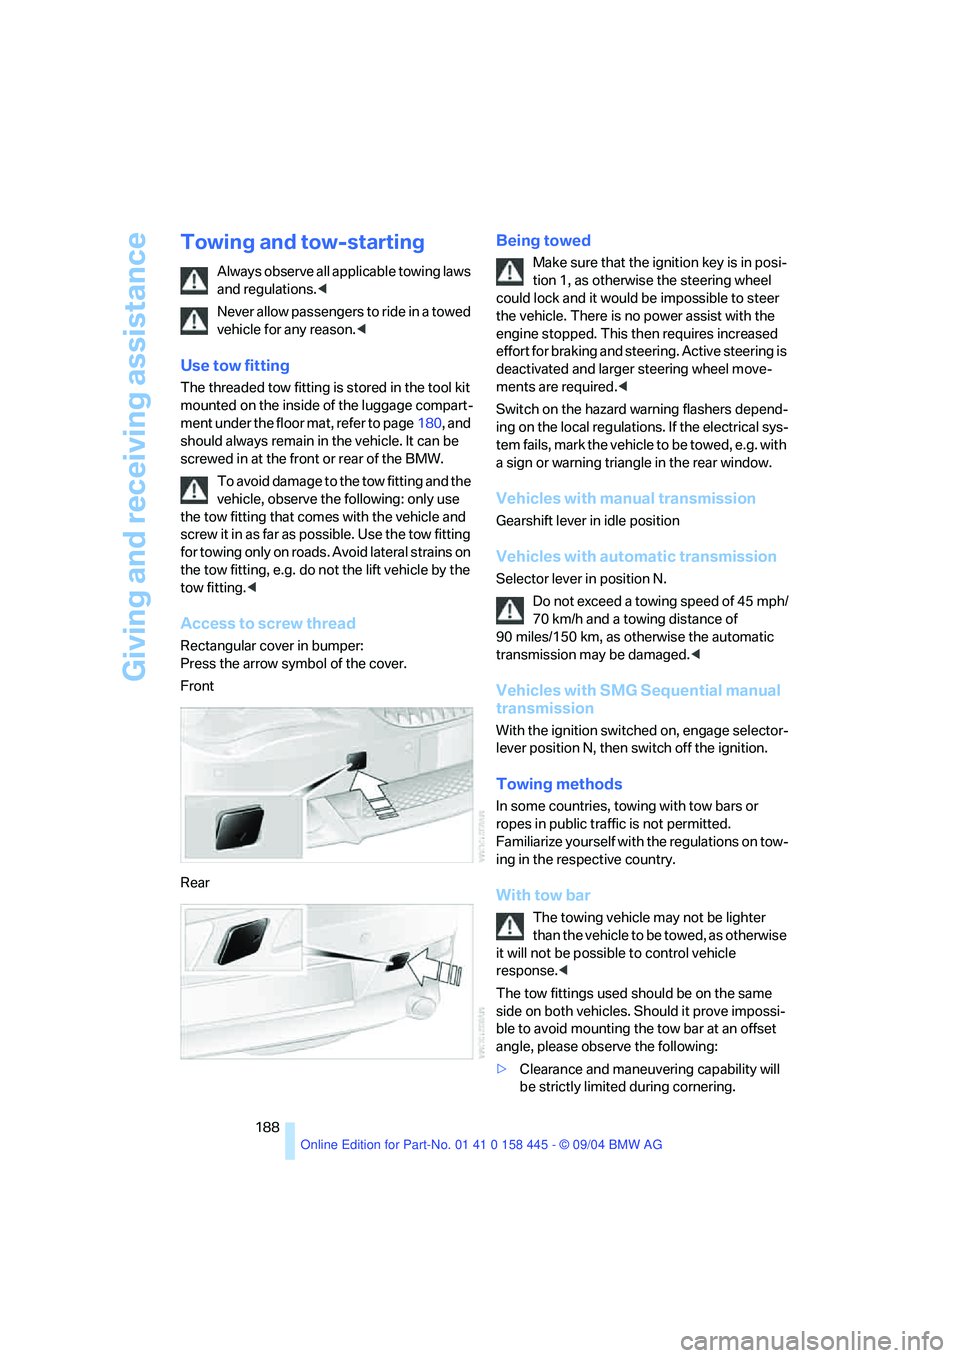
Access to screw thread
Rectangular cover in bumper:
Press the arrow symbol of the cover.
Front
Rear
Being towed
Make sure that the ignition key is in posi-
tion 1, as otherwise the steering wheel
could lock and it would be impossible to steer
the vehicle. There is no power assist with the
engine stopped. This then requires increased
effort for braking and steering. Active steering is
deactivated and larger steering wheel move-
ments are required.<
Switch on the hazard warning flashers depend-
ing on the local regulations. If the electrical sys-
tem fails, mark the vehicle to be towed, e.g. with
a sign or warning triangle in the rear window.
Vehicles with manual transmission
Gearshift lever in idle position
Vehicles with automatic transmission
Selector lever in position N.
Do not exceed a towing speed of 45 mph/
70 km/h and a towing distance of
90 miles/150 km, as otherwise the automatic
transmission may be damaged.<
Vehicles with SMG Sequential manual
transmission
With the ignition switched on, engage selector-
lever position N, then switch off the ignition.
Towing methods
In some countries, towing with tow bars or
ropes in public traffic is not permitted.
Familiarize yourself with the regulations on tow-
ing in the respective country.
With tow bar
The towing vehicle may not be lighter
than the vehicle to be towed, as otherwise
it will not be possible to control vehicle
response.<
The tow fittings used should be on the same
side on both vehicles. Should it prove impossi-
ble to avoid mounting the tow bar at an offset
angle, please observe the following:
>Clearance and maneuvering capability will
be strictly limited during cornering.