2005 BMW 645CI COUPE&CONVERTIBLE door lock
[x] Cancel search: door lockPage 39 of 217
Opening and closing
38
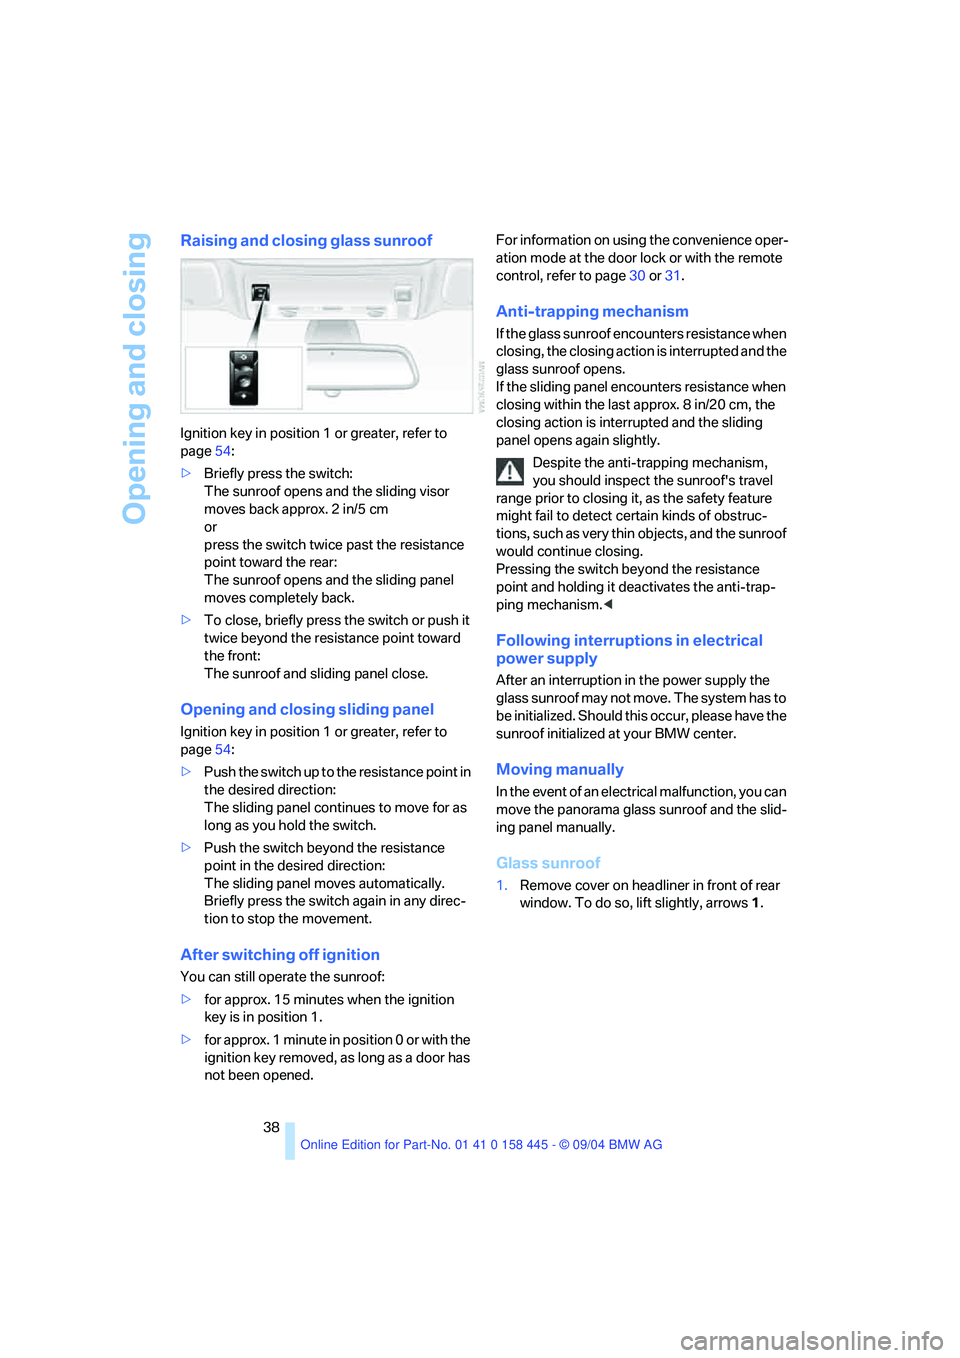
Raising and closing glass sunroof
Ignition key in position 1 or greater, refer to
page54:
>Briefly press the switch:
The sunroof opens and the sliding visor
moves back approx. 2 in/5 cm
or
press the switch twice past the resistance
point toward the rear:
The sunroof opens and the sliding panel
moves completely back.
>To close, briefly press the switch or push it
twice beyond the resistance point toward
the front:
The sunroof and sliding panel close.
Opening and closing sliding panel
Ignition key in position 1 or greater, refer to
page54:
>Push the switch up to the resistance point in
the desired direction:
The sliding panel continues to move for as
long as you hold the switch.
>Push the switch beyond the resistance
point in the desired direction:
The sliding panel moves automatically.
Briefly press the switch again in any direc-
tion to stop the movement.
After switching off ignition
You can still operate the sunroof:
>for approx. 15 minutes when the ignition
key is in position 1.
>for approx. 1 minute in position 0 or with the
ignition key removed, as long as a door has
not been opened.For information on using the convenience oper-
ation mode at the door lock or with the remote
control, refer to page30 or31.
Anti-trapping mechanism
If the glass sunroof encounters resistance when
closing, the closing action is interrupted and the
glass sunroof opens.
If the sliding panel encounters resistance when
closing within the last approx. 8 in/20 cm, the
closing action is interrupted and the sliding
panel opens again slightly.
Despite the anti-trapping mechanism,
you should inspect the sunroof's travel
range prior to closing it, as the safety feature
might fail to detect certain kinds of obstruc-
tions, such as very thin objects, and the sunroof
would continue closing.
Pressing the switch beyond the resistance
point and holding it deactivates the anti-trap-
ping mechanism.<
Following interruptions in electrical
power supply
After an interruption in the power supply the
glass sunroof may not move. The system has to
b e i n i t i a l i z e d . S h o u l d t h i s o c c u r , p l e a s e h a v e t h e
sunroof initialized at your BMW center.
Moving manually
In the event of an electrical malfunction, you can
move the panorama glass sunroof and the slid-
ing panel manually.
Glass sunroof
1.Remove cover on headliner in front of rear
window. To do so, lift slightly, arrows1.
Page 42 of 217
Controls
41Reference
At a glance
Driving tips
Communications
Navigation
Entertainment
Mobility
If the opening or closing action is not
completed, the luggage compartment lid
cannot be opened.<
Convenience operation with the
remote control and via the door lock
Refer to pages30 and31.
Manual closing in the event of an
electrical malfunction
Only close the convertible top manually if
absolutely necessary; never open it man-
ually. The convertible top compartment lid can-
not be locked in the event of an electrical mal-
function and would open while the vehicle is
being driven.
Improper handling can lead to damage.<
Before closing
1.Open the luggage compartment lid.
2.Take the Allen wrench and the screwdriver
from the on-board tool kit, refer to
page180.
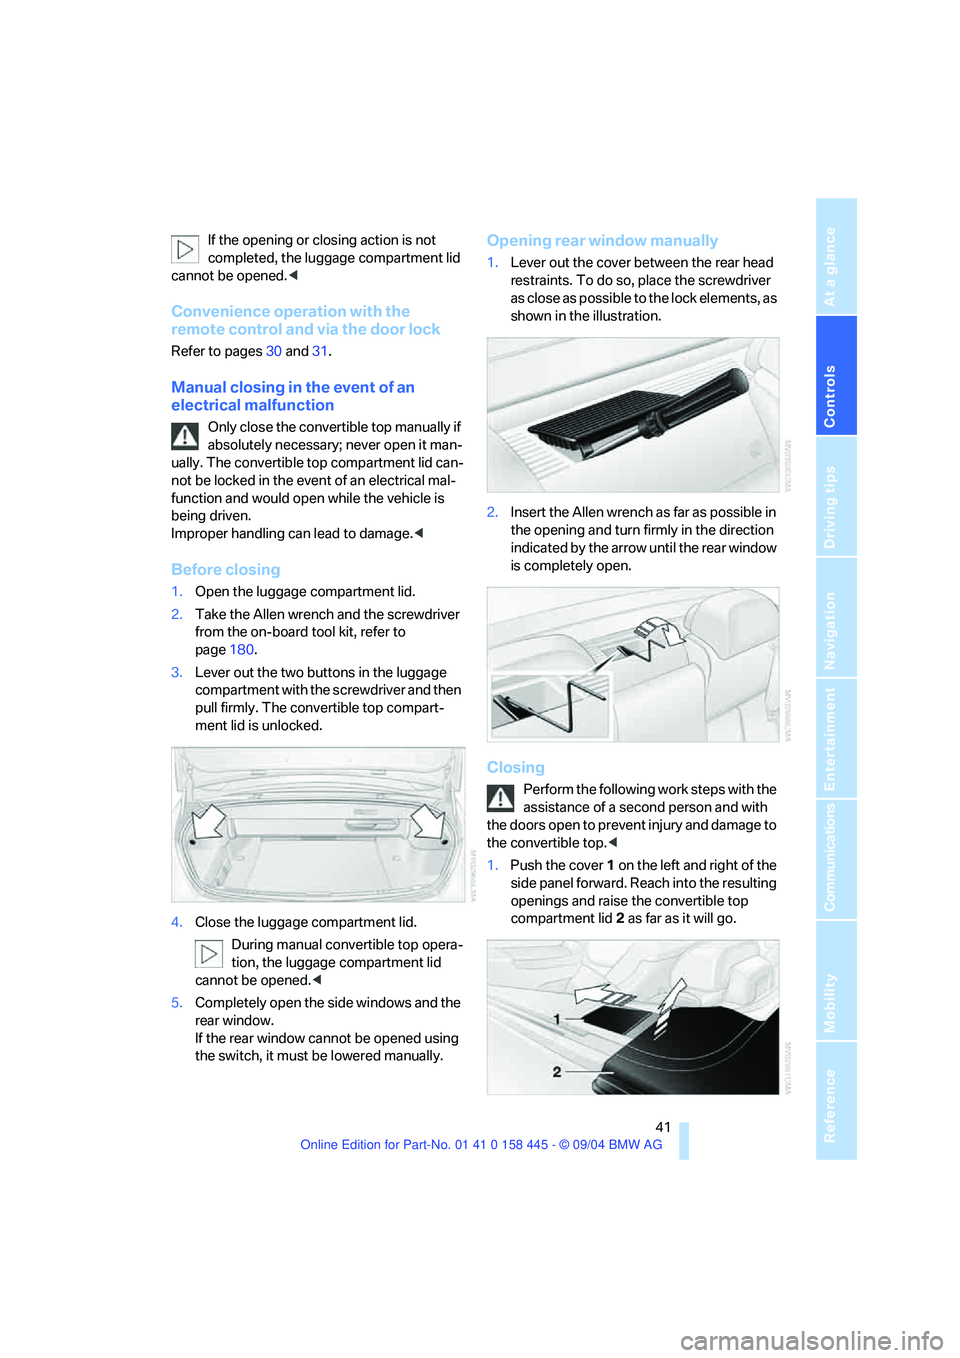
3.Lever out the two buttons in the luggage
compartment with the screwdriver and then
pull firmly. The convertible top compart-
ment lid is unlocked.
4.Close the luggage compartment lid.
During manual convertible top opera-
tion, the luggage compartment lid
cannot be opened.<
5.Completely open the side windows and the
rear window.
If the rear window cannot be opened using
the switch, it must be lowered manually.
Opening rear window manually
1.Lever out the cover between the rear head
restraints. To do so, place the screwdriver
as close as possible to the lock elements, as
shown in the illustration.
2.Insert the Allen wrench as far as possible in
the opening and turn firmly in the direction
indicated by the arrow until the rear window
is completely open.
Closing
Perform the following work steps with the
assistance of a second person and with
the doors open to prevent injury and damage to
the convertible top.<
1.Push the cover 1 on the left and right of the
side panel forward. Reach into the resulting
openings and raise the convertible top
compartment lid2 as far as it will go.
Page 47 of 217
Adjustments
46
Seat, mirror and steering
wheel memory
You can store and select three different adjust-
ment settings for the driver's seat, exterior mir-
rors and steering wheel.
The adjustment of the lumbar support is not
stored in the memory.
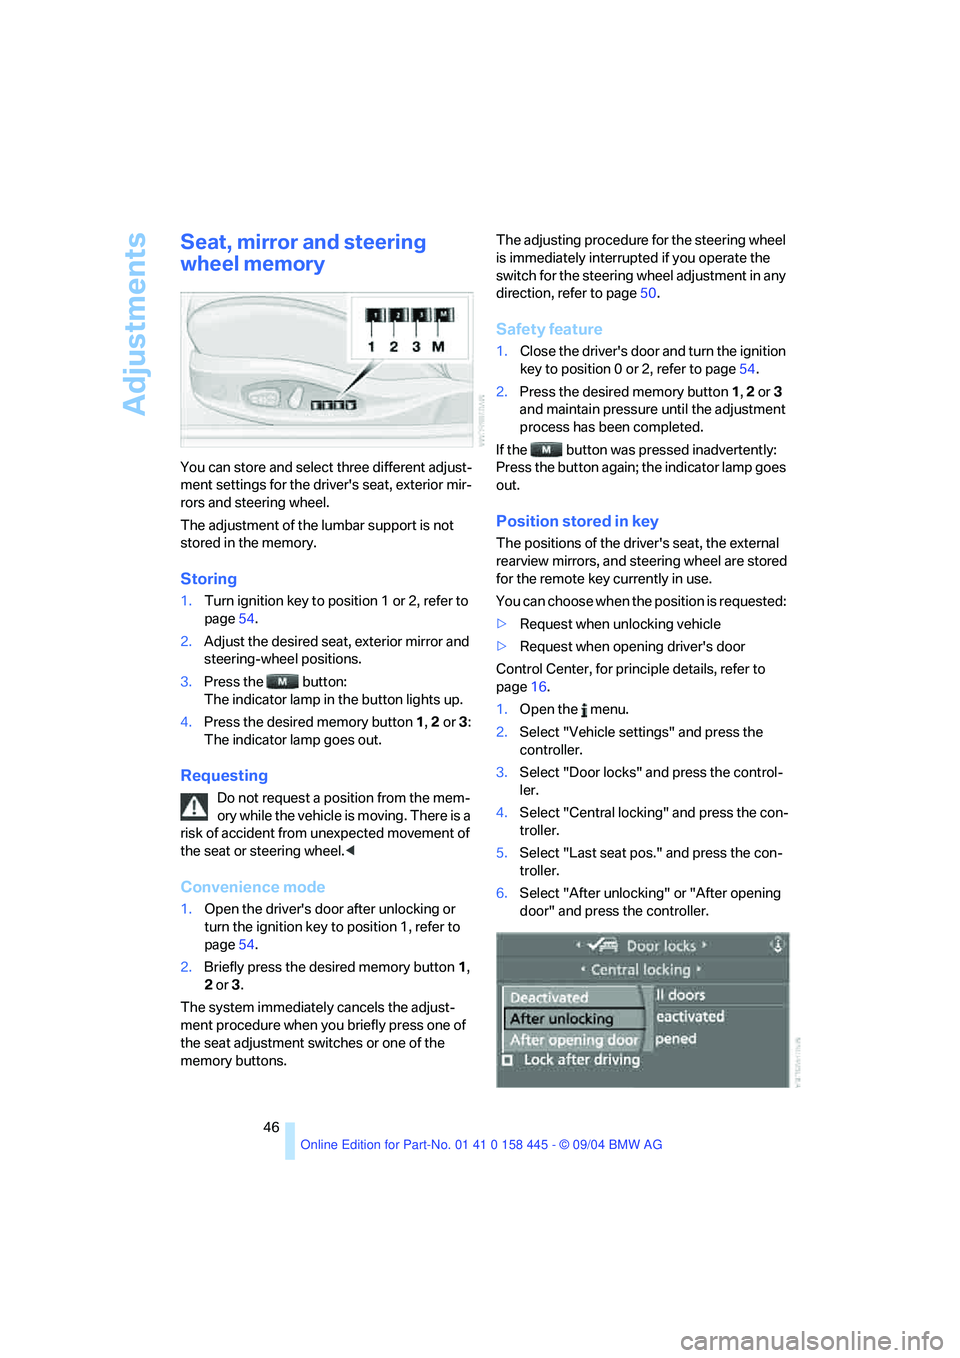
Storing
1.Turn ignition key to position 1 or 2, refer to
page54.
2.Adjust the desired seat, exterior mirror and
steering-wheel positions.
3.Press the button:
The indicator lamp in the button lights up.
4.Press the desired memory button 1, 2 or3:
The indicator lamp goes out.
Requesting
Do not request a position from the mem-
ory while the vehicle is moving. There is a
risk of accident from unexpected movement of
the seat or steering wheel.<
Convenience mode
1.Open the driver's door after unlocking or
turn the ignition key to position 1, refer to
page54.
2.Briefly press the desired memory button 1,
2 or3.
The system immediately cancels the adjust-
ment procedure when you briefly press one of
the seat adjustment switches or one of the
memory buttons.The adjusting procedure for the steering wheel
is immediately interrupted if you operate the
switch for the steering wheel adjustment in any
direction, refer to page50.
Safety feature
1.Close the driver's door and turn the ignition
key to position 0 or 2, refer to page54.
2.Press the desired memory button 1, 2 or3
and maintain pressure until the adjustment
process has been completed.
If the button was pressed inadvertently:
Press the button again; the indicator lamp goes
out.
Position stored in key
The positions of the driver's seat, the external
rearview mirrors, and steering wheel are stored
for the remote key currently in use.
You can choose when the position is requested:
>Request when unlocking vehicle
>Request when opening driver's door
Control Center, for principle details, refer to
page16.
1.Open the menu.
2.Select "Vehicle settings" and press the
controller.
3.Select "Door locks" and press the control-
ler.
4.Select "Central locking" and press the con-
troller.
5.Select "Last seat pos." and press the con-
troller.
6.Select "After unlocking" or "After opening
door" and press the controller.
Page 103 of 217
Practical interior accessories
102
Center armrest
A storage compartment is located in the arm-
rest between the front seats. This compartment
is integrated into the central locking system and
can also be locked separately using the hotel
function, refer to page32.
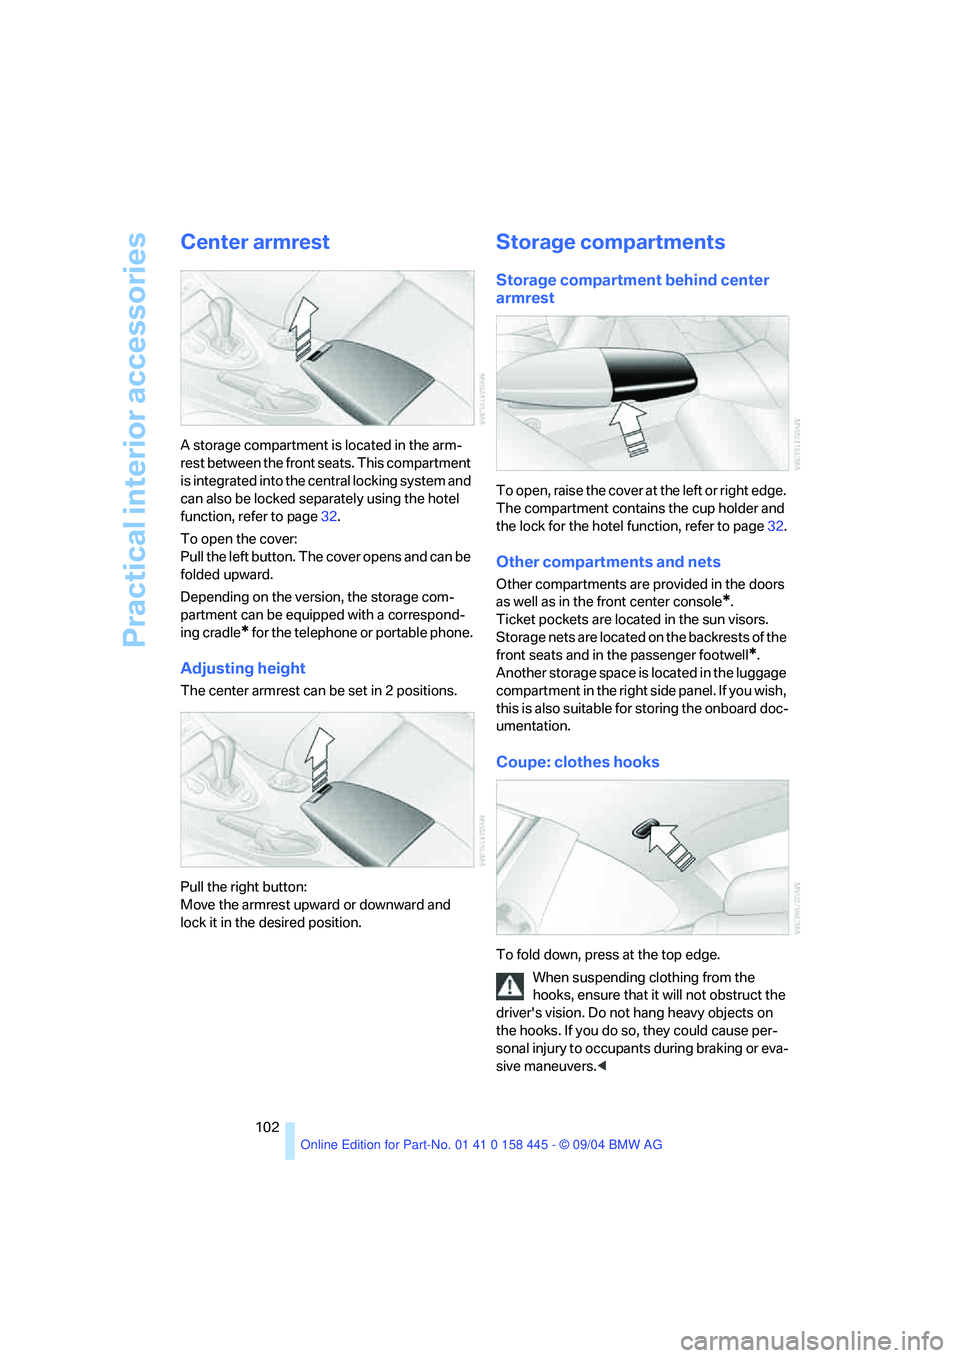
To open the cover:
Pull the left button. The cover opens and can be
folded upward.
Depending on the version, the storage com-
partment can be equipped with a correspond-
ing cradle
* for the telephone or portable phone.
Adjusting height
The center armrest can be set in 2 positions.
Pull the right button:
Move the armrest upward or downward and
lock it in the desired position.
Storage compartments
Storage compartment behind center
armrest
To open, raise the cover at the left or right edge.
The compartment contains the cup holder and
the lock for the hotel function, refer to page32.
Other compartments and nets
Other compartments are provided in the doors
as well as in the front center console
*.
Ticket pockets are located in the sun visors.
Storage nets are located on the backrests of the
front seats and in the passenger footwell
*.
Another storage space is located in the luggage
compartment in the right side panel. If you wish,
this is also suitable for storing the onboard doc-
umentation.
Coupe: clothes hooks
To fold down, press at the top edge.
When suspending clothing from the
hooks, ensure that it will not obstruct the
driver's vision. Do not hang heavy objects on
the hooks. If you do so, they could cause per-
sonal injury to occupants during braking or eva-
sive maneuvers.<
Page 167 of 217
Refueling
166
Refueling
Always switch off the engine before refu-
eling. If you do not, fuel cannot be dis-
pensed into the tank and a message on the
Control Display will appear.<
Always observe all applicable precautions
and regulations when handling fuels.
Never carry spare fuel containers in your vehi-
cle. Whether empty or full, these containers can
leak, cause an explosion, and lead to fire in the
event of a collision.<
Fuel filler door
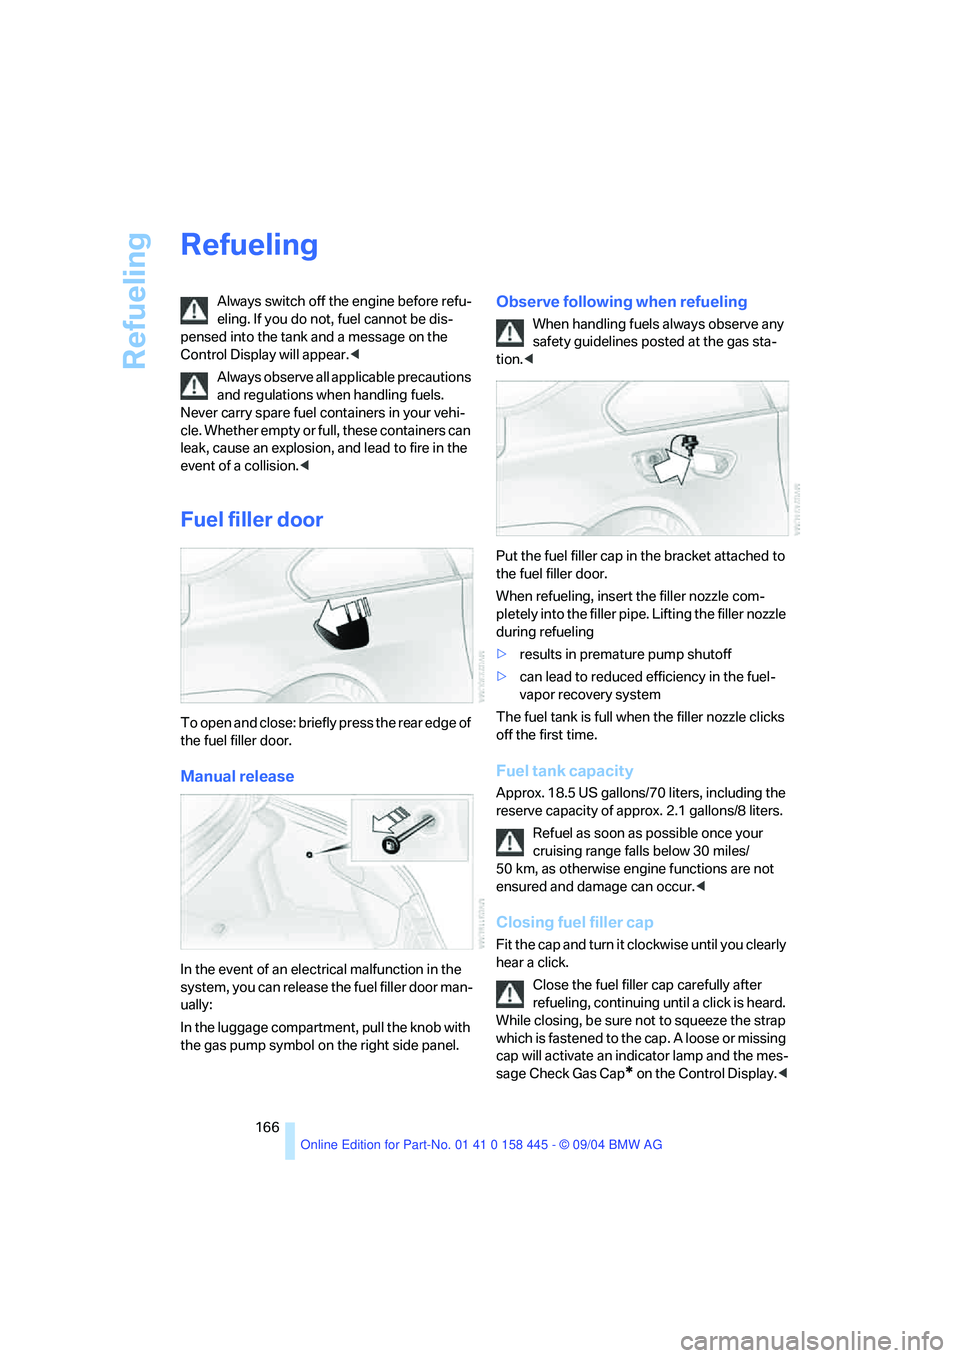
To open and close: briefly press the rear edge of
the fuel filler door.
Manual release
In the event of an electrical malfunction in the
system, you can release the fuel filler door man-
ually:
In the luggage compartment, pull the knob with
the gas pump symbol on the right side panel.
Observe following when refueling
When handling fuels always observe any
safety guidelines posted at the gas sta-
tion.<
Put the fuel filler cap in the bracket attached to
the fuel filler door.
When refueling, insert the filler nozzle com-
pletely into the filler pipe. Lifting the filler nozzle
during refueling
>results in premature pump shutoff
>can lead to reduced efficiency in the fuel-
vapor recovery system
The fuel tank is full when the filler nozzle clicks
off the first time.
Fuel tank capacity
Approx. 18.5 US gallons/70 liters, including the
reserve capacity of approx. 2.1 gallons/8 liters.
Refuel as soon as possible once your
cruising range falls below 30 miles/
50 km, as otherwise engine functions are not
ensured and damage can occur.<
Closing fuel filler cap
Fit the cap and turn it clockwise until you clearly
hear a click.
Close the fuel filler cap carefully after
refueling, continuing until a click is heard.
While closing, be sure not to squeeze the strap
which is fastened to the cap. A loose or missing
cap will activate an indicator lamp and the mes-
sage Check Gas Cap
* on the Control Display.<
Page 199 of 217
Short commands of the voice command system
198
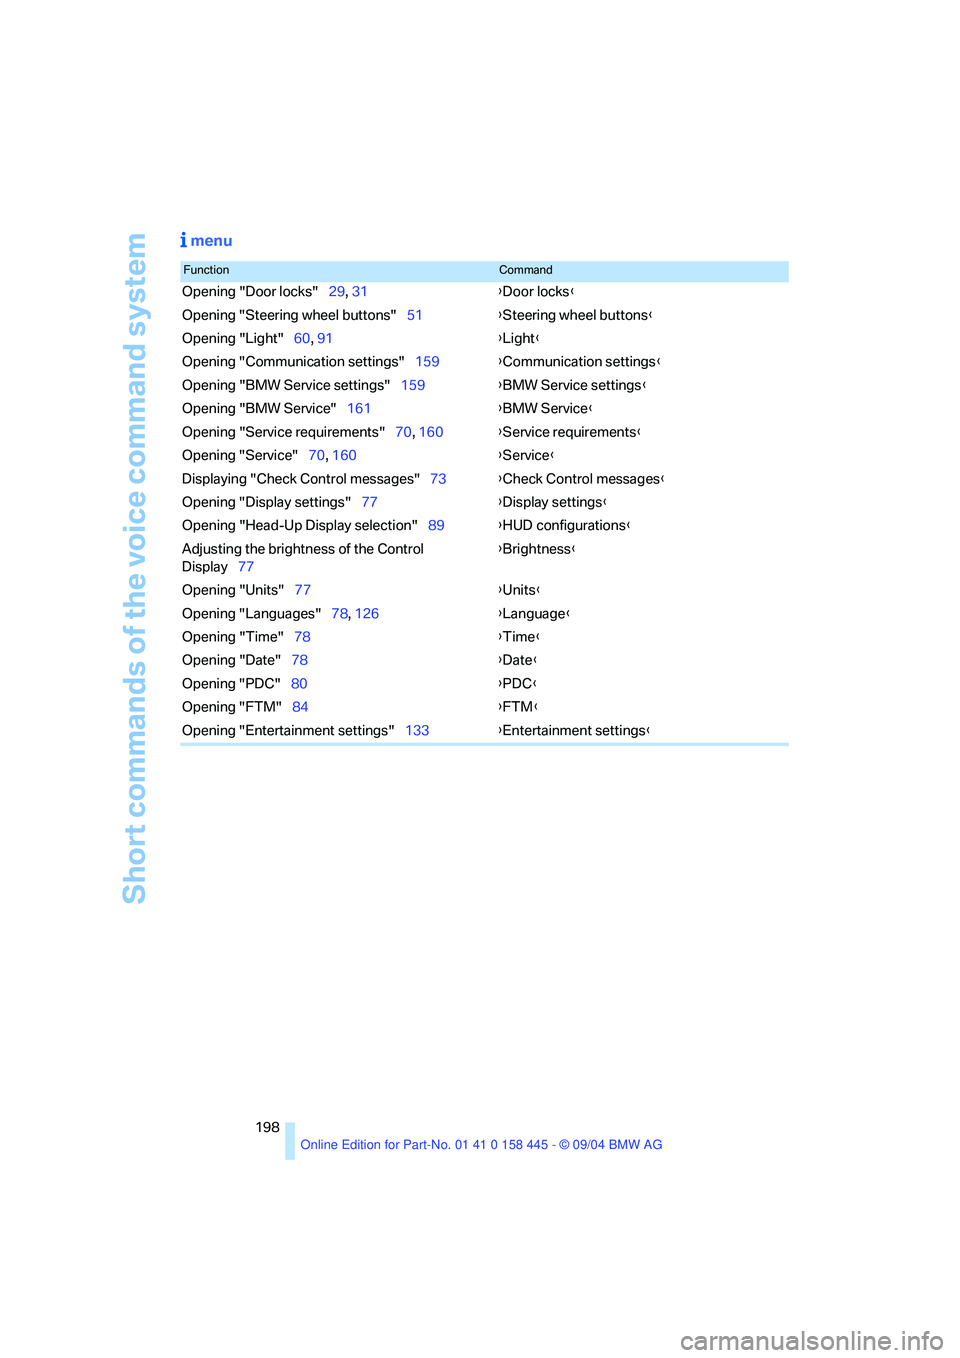
menu
FunctionCommand
Opening "Door locks"29, 31{Door locks}
Opening "Steering wheel buttons"51{Steering wheel buttons}
Opening "Light"60, 91{Light}
Opening "Communication settings"159{Communication settings}
Opening "BMW Service settings"159{BMW Service settings}
Opening "BMW Service"161{BMW Service}
Opening "Service requirements"70, 160{Service requirements}
Opening "Service"70, 160{Service}
Displaying "Check Control messages"73{Check Control messages}
Opening "Display settings"77{Display settings}
Opening "Head-Up Display selection"89{HUD configurations}
Adjusting the brightness of the Control
Display77{Brightness}
Opening "Units"77{Units}
Opening "Languages"78, 126{Language}
Opening "Time"78{Time}
Opening "Date"78{Date}
Opening "PDC"80{PDC}
Opening "FTM"84{FTM}
Opening "Entertainment settings"133{Entertainment settings}
Page 200 of 217
199Reference
At a glance
Controls
Driving tips
Communications
Navigation
Entertainment
Mobility
Everything from A to Z
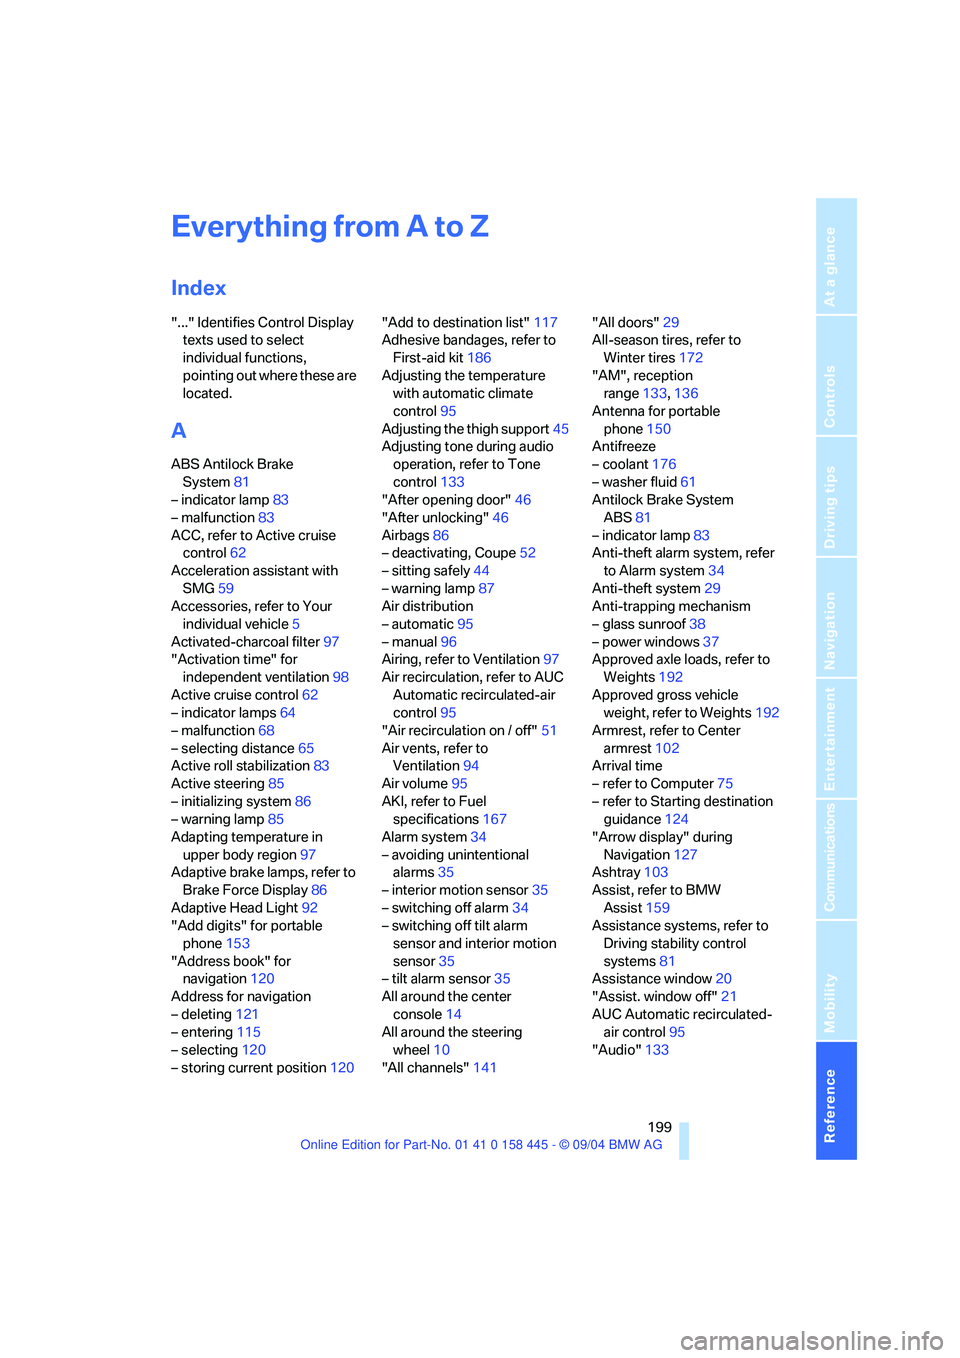
Index
"..." Identifies Control Display
texts used to select
individual functions,
pointing out where these are
located.
A
ABS Antilock Brake
System81
– indicator lamp83
– malfunction83
ACC, refer to Active cruise
control62
Acceleration assistant with
SMG59
Accessories, refer to Your
individual vehicle5
Activated-charcoal filter97
"Activation time" for
independent ventilation98
Active cruise control62
– indicator lamps64
– malfunction68
– selecting distance65
Active roll stabilization83
Active steering85
– initializing system86
– warning lamp85
Adapting temperature in
upper body region97
Adaptive brake lamps, refer to
Brake Force Display86
Adaptive Head Light92
"Add digits" for portable
phone153
"Address book" for
navigation120
Address for navigation
– deleting121
– entering115
– selecting120
– storing current position120"Add to destination list"117
Adhesive bandages, refer to
First-aid kit186
Adjusting the temperature
with automatic climate
control95
Adjusting the thigh support45
Adjusting tone during audio
operation, refer to Tone
control133
"After opening door"46
"After unlocking"46
Airbags86
– deactivating, Coupe52
– sitting safely44
– warning lamp87
Air distribution
– automatic95
– manual96
Airing, refer to Ventilation97
Air recirculation, refer to AUC
Automatic recirculated-air
control95
"Air recirculation on / off"51
Air vents, refer to
Ventilation94
Air volume95
AKI, refer to Fuel
specifications167
Alarm system34
– avoiding unintentional
alarms35
– interior motion sensor35
– switching off alarm34
– switching off tilt alarm
sensor and interior motion
sensor35
– tilt alarm sensor35
All around the center
console14
All around the steering
wheel10
"All channels"141"All doors"29
All-season tires, refer to
Winter tires172
"AM", reception
range133,136
Antenna for portable
phone150
Antifreeze
– coolant176
– washer fluid61
Antilock Brake System
ABS81
– indicator lamp83
Anti-theft alarm system, refer
to Alarm system34
Anti-theft system29
Anti-trapping mechanism
– glass sunroof38
– power windows37
Approved axle loads, refer to
Weights192
Approved gross vehicle
weight, refer to Weights192
Armrest, refer to Center
armrest102
Arrival time
– refer to Computer75
– refer to Starting destination
guidance124
"Arrow display" during
Navigation127
Ashtray103
Assist, refer to BMW
Assist159
Assistance systems, refer to
Driving stability control
systems81
Assistance window20
"Assist. window off"21
AUC Automatic recirculated-
air control95
"Audio"133
Page 204 of 217

Reference 203
At a glance
Controls
Driving tips
Communications
Navigation
Entertainment
Mobility
Destination for navigation
– destination list119
– entry115
– home address122
– selecting from address
book120
– selecting using
information118
– storing120
Destination guidance124
– bypassing route
sections128
– canceling voice
instructions51
– changing specified
route122
– displaying route127
– distance and arrival124
– interrupting125
– starting124
– terminating/continuing125
– voice instructions126
– volume of voice
instructions126
Destination list119
Destinations recently driven
to119
"Dial" for portable phone152
"Dial number"152
"Diamond button"51
Digital clock69
Dimensions
– Convertible194
– Coupe193
Dipstick for engine oil175
Directional indicators, refer to
Turn signals60
Direction announcements,
refer to Voice
instructions126
Direction instructions, refer to
Voice instructions126
Directory, refer to Phone
book153
Directory for navigation, refer
to Address book120
Disc brakes109Displacement, refer to Engine
data192
Display, refer to Control
Center16
"Display off"21
Displays, refer to Instrument
cluster12
"Display settings"77
Displays on the windshield,
refer to Head-Up Display88
Disposal, vehicle battery183
Distance, refer to
Computer75
Distance control, refer to
Active cruise control62
"Distance to dest."75
Distance to destination, refer
to Computer75
Distance warning, refer to
PDC Park Distance
Control80
Door entry lighting93
Door keys28
Door lock31
"Door locks"29
Doors
– manual operation31
– remote control30
DOT Quality Grades170
Draft-free ventilation97
"Driver's door only"29
Driving lamps, refer to Parking
lamps/low beams91
Driving notes108
Driving route, refer to
Displaying the route127
Driving stability control
systems82
Driving through water109
Driving tips, refer to Driving
notes108
Drying the air, refer to Cooling
function95
DSC Dynamic Stability
Control82
– indicator lamp13,83
– malfunction83DTC Dynamic Traction
Control82
– activating82
– indicator lamp13,82
DVD for navigation114
Dynamic Brake Control
DBC81
Dynamic Driving Control59
"Dynamic route" for
navigation122
Dynamic Stability Control
DSC82
– indicator lamp13,83
Dynamic Traction Control
DTC82
– indicator lamp13
E
Easy entry, refer to Entry to
the rear48
Easy entry/exit50
EBV, refer to Electronic brake-
force distribution81
"Edit address" for
navigation121
Eject button, refer to Buttons
on CD player132
Electrical malfunction
– convertible top41
– door lock31
– driver's door31
– fuel filler door166
– glass sunroof38
– luggage compartment lid33
– storage compartment, hotel
function32
Electric steering wheel
adjustment50
Electronic brake-force
distribution81
Emergency Assistance, refer
to Roadside Assistance186
Emergency call185