2005 BMW 645CI COUPE&CONVERTIBLE ECU
[x] Cancel search: ECUPage 58 of 217
Controls
57Reference
At a glance
Driving tips
Communications
Navigation
Entertainment
Mobility
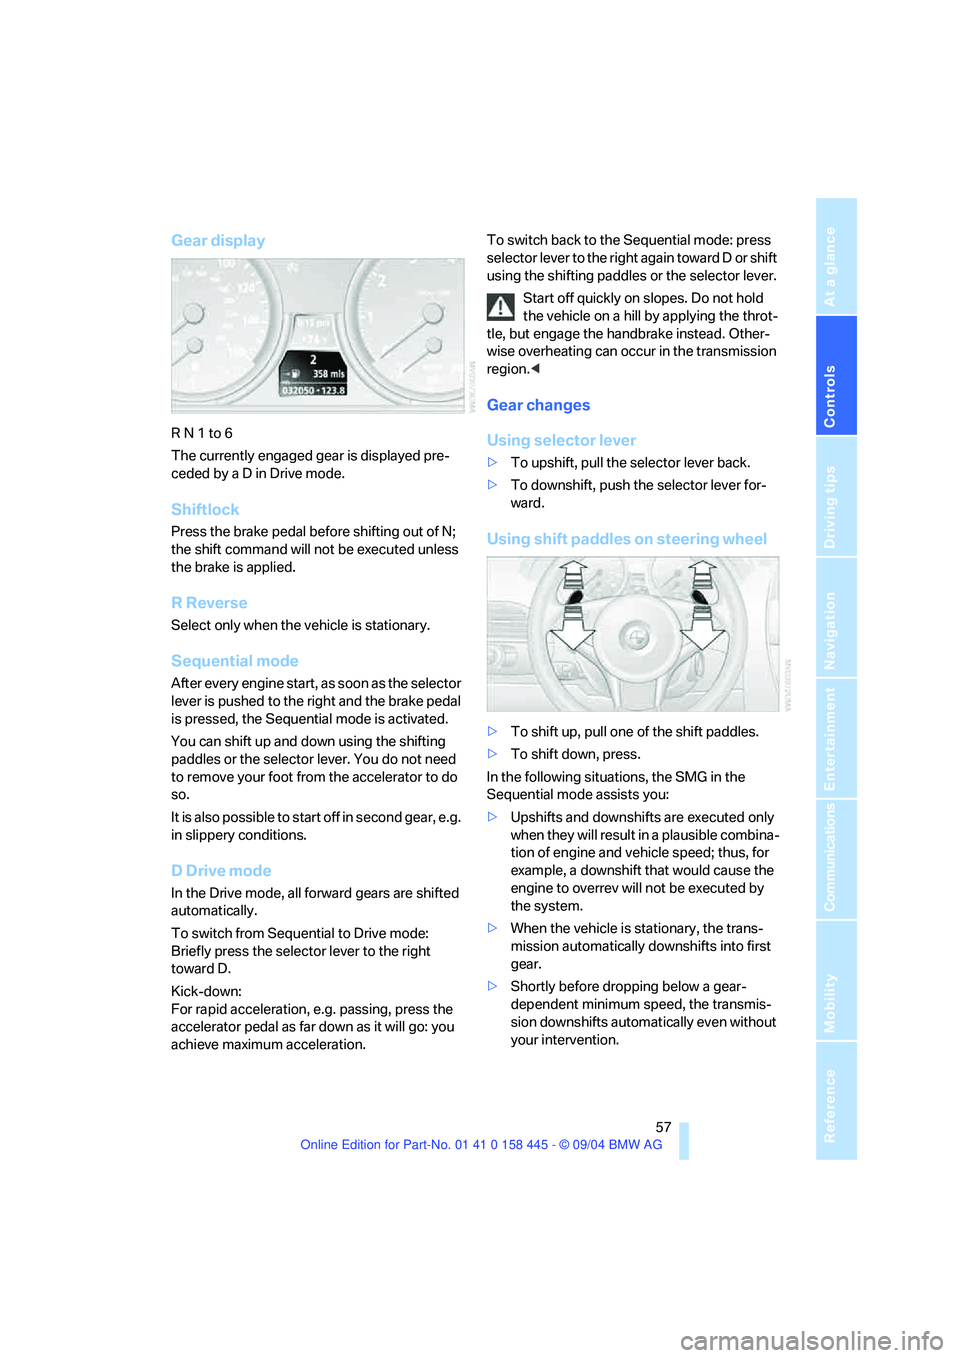
Gear display
R N 1 to 6
The currently engaged gear is displayed pre-
ceded by a D in Drive mode.
Shiftlock
Press the brake pedal before shifting out of N;
the shift command will not be executed unless
the brake is applied.
R Reverse
Select only when the vehicle is stationary.
Sequential mode
After every engine start, as soon as the selector
lever is pushed to the right and the brake pedal
is pressed, the Sequential mode is activated.
You can shift up and down using the shifting
paddles or the selector lever. You do not need
to remove your foot from the accelerator to do
so.
It is also possible to start off in second gear, e.g.
in slippery conditions.
D Drive mode
In the Drive mode, all forward gears are shifted
automatically.
To switch from Sequential to Drive mode:
Briefly press the selector lever to the right
toward D.
Kick-down:
For rapid acceleration, e.g. passing, press the
accelerator pedal as far down as it will go: you
achieve maximum acceleration.To switch back to the Sequential mode: press
selector lever to the right again toward D or shift
using the shifting paddles or the selector lever.
Start off quickly on slopes. Do not hold
the vehicle on a hill by applying the throt-
tle, but engage the handbrake instead. Other-
wise overheating can occur in the transmission
region.<
Gear changes
Using selector lever
>To upshift, pull the selector lever back.
>To downshift, push the selector lever for-
ward.
Using shift paddles on steering wheel
>To shift up, pull one of the shift paddles.
>To shift down, press.
In the following situations, the SMG in the
Sequential mode assists you:
>Upshifts and downshifts are executed only
when they will res ult in a plausible combina-
tion of engine and vehicle speed; thus, for
example, a downshift that would cause the
engine to overrev will not be executed by
the system.
>When the vehicle is stationary, the trans-
mission automatically downshifts into first
gear.
>Shortly before dropping below a gear-
dependent minimum speed, the transmis-
sion downshifts automatically even without
your intervention.
Page 59 of 217
Driving
58
Automatic transmission with
Steptronic*
In addition to the fully automatic mode, you can
also shift manually with Steptronic, refer to
page58.
Selector-lever positions
P R N D M/S + –
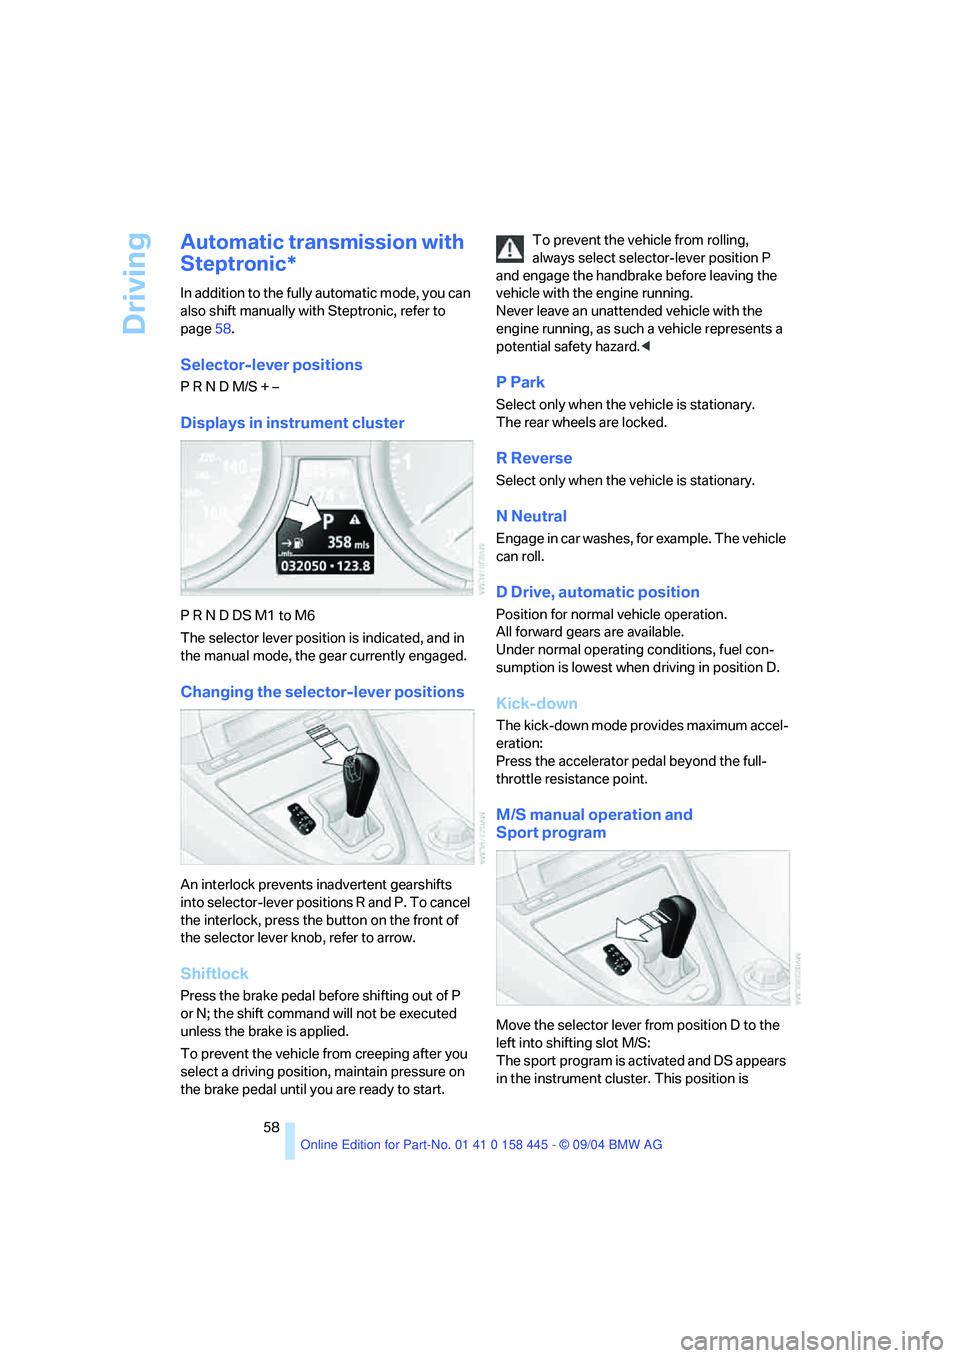
Displays in instrument cluster
P R N D DS M1 to M6
The selector lever position is indicated, and in
the manual mode, the gear currently engaged.
Changing the selector-lever positions
An interlock prevents inadvertent gearshifts
into selector-lever positions R and P. To cancel
the interlock, press the button on the front of
the selector lever knob, refer to arrow.
Shiftlock
Press the brake pedal before shifting out of P
or N; the shift command will not be executed
unless the brake is applied.
To prevent the vehicle from creeping after you
select a driving position, maintain pressure on
the brake pedal until you are ready to start.To prevent the vehicle from rolling,
always select selector-lever position P
and engage the handbrake before leaving the
vehicle with the engine running.
Never leave an unattended vehicle with the
engine running, as such a vehicle represents a
potential safety hazard.<
P Park
Select only when the vehicle is stationary.
The rear wheels are locked.
R Reverse
Select only when the vehicle is stationary.
N Neutral
Engage in car washes, for example. The vehicle
can roll.
D Drive, automatic position
Position for normal vehicle operation.
All forward gears are available.
Under normal operating conditions, fuel con-
sumption is lowest when driving in position D.
Kick-down
The kick-down mode provides maximum accel-
eration:
Press the accelerator pedal beyond the full-
throttle resistance point.
M/S manual operation and
Sport program
Move the selector lever from position D to the
left into shifting slot M/S:
The sport program is activated and DS appears
in the instrument cluster. This position is
Page 60 of 217
Controls
59Reference
At a glance
Driving tips
Communications
Navigation
Entertainment
Mobility
recommended for a performance-oriented driv-
ing style. It is engaged automatically when the
Dynamic Driving Control is activated, see
below.
When the selector lever is briefly moved for-
ward or back, the manual mode is activated and
the Steptronic shifts gear. The instrument clus-
ter shows M1 through M6.
Upshifts and downshifts are executed only
when they will result in a plausible combination
of engine and vehicle speed; thus, for example,
a downshift that would cause the engine to
overrev will not be executed by the system. The
selected gear appears briefly in the instrument
cluster, followed by the current gear.
To use the automatic function again, move the
selector lever to the right into position D.
Dynamic Driving Control
The Dynamic Driving Control makes it possible
for your BMW to react in an even more perfor-
mance-oriented manner at the push of a button:
>The engine responds more spontaneously
to accelerator pedal movements.
>Cruise control:
The stored speed is reached more quickly
when it is requested.
Additionally with SMG:
>Gearshifts are faster.
>The engine speed range is used optimally in
the Drive mode.
With automatic transmission:
>The Sport program is activated.
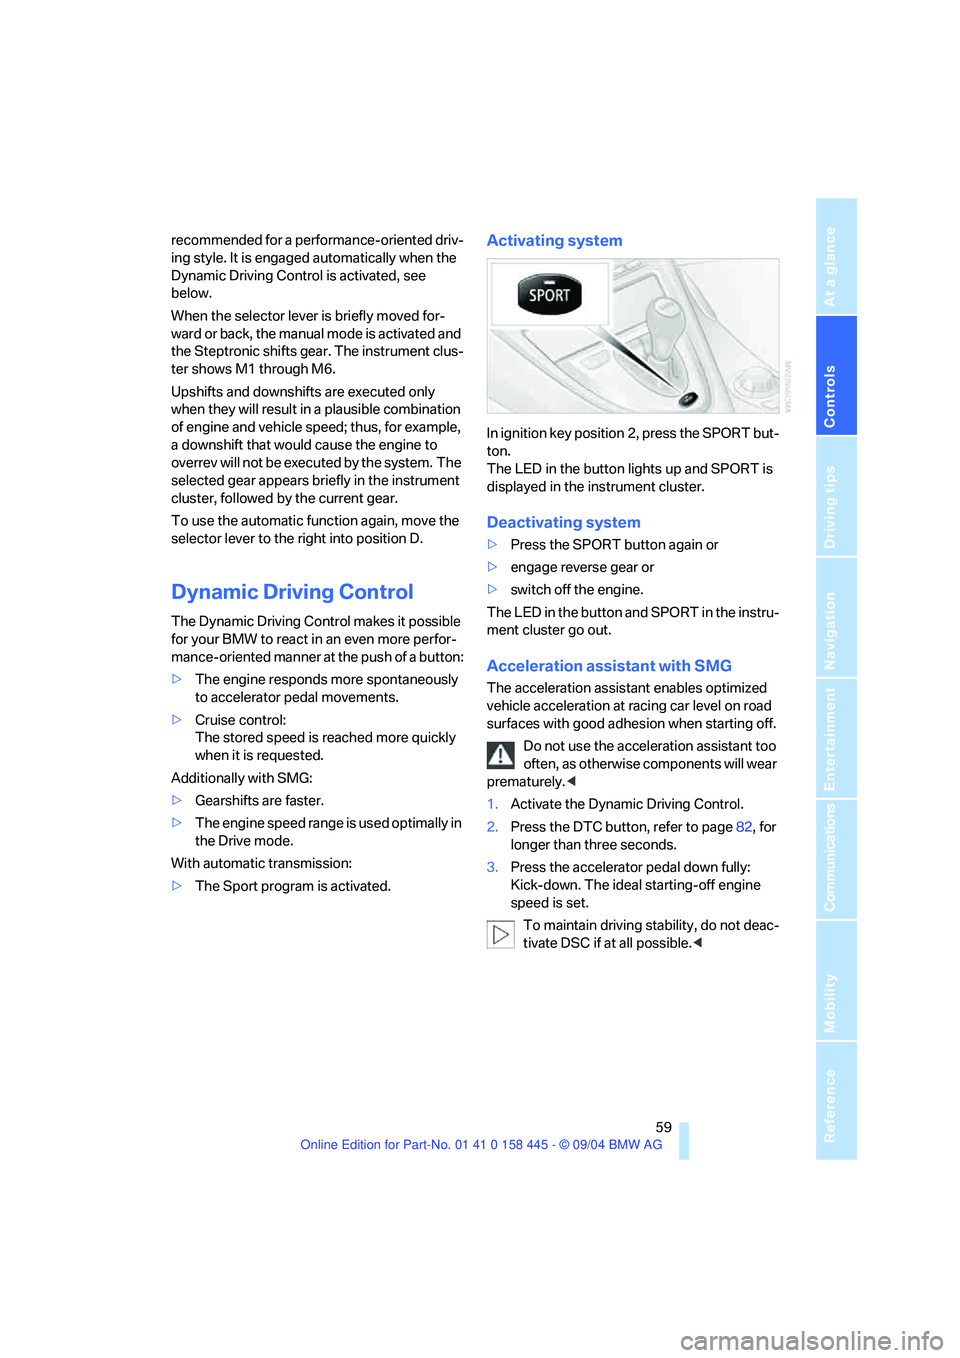
Activating system
In ignition key position 2, press the SPORT but-
ton.
The LED in the button lights up and SPORT is
displayed in the instrument cluster.
Deactivating system
>Press the SPORT button again or
>engage reverse gear or
>switch off the engine.
The LED in the button and SPORT in the instru-
ment cluster go out.
Acceleration assistant with SMG
The acceleration assistant enables optimized
vehicle acceleration at racing car level on road
surfaces with good adhesion when starting off.
Do not use the acceleration assistant too
often, as otherwise components will wear
prematurely.<
1.Activate the Dynamic Driving Control.
2.Press the DTC button, refer to page82, for
longer than three seconds.
3.Press the accelerator pedal down fully:
Kick-down. The ideal starting-off engine
speed is set.
To maintain driving stability, do not deac-
tivate DSC if at all possible.<
Page 74 of 217
Controls
73Reference
At a glance
Driving tips
Communications
Navigation
Entertainment
Mobility
Displaying stored messages
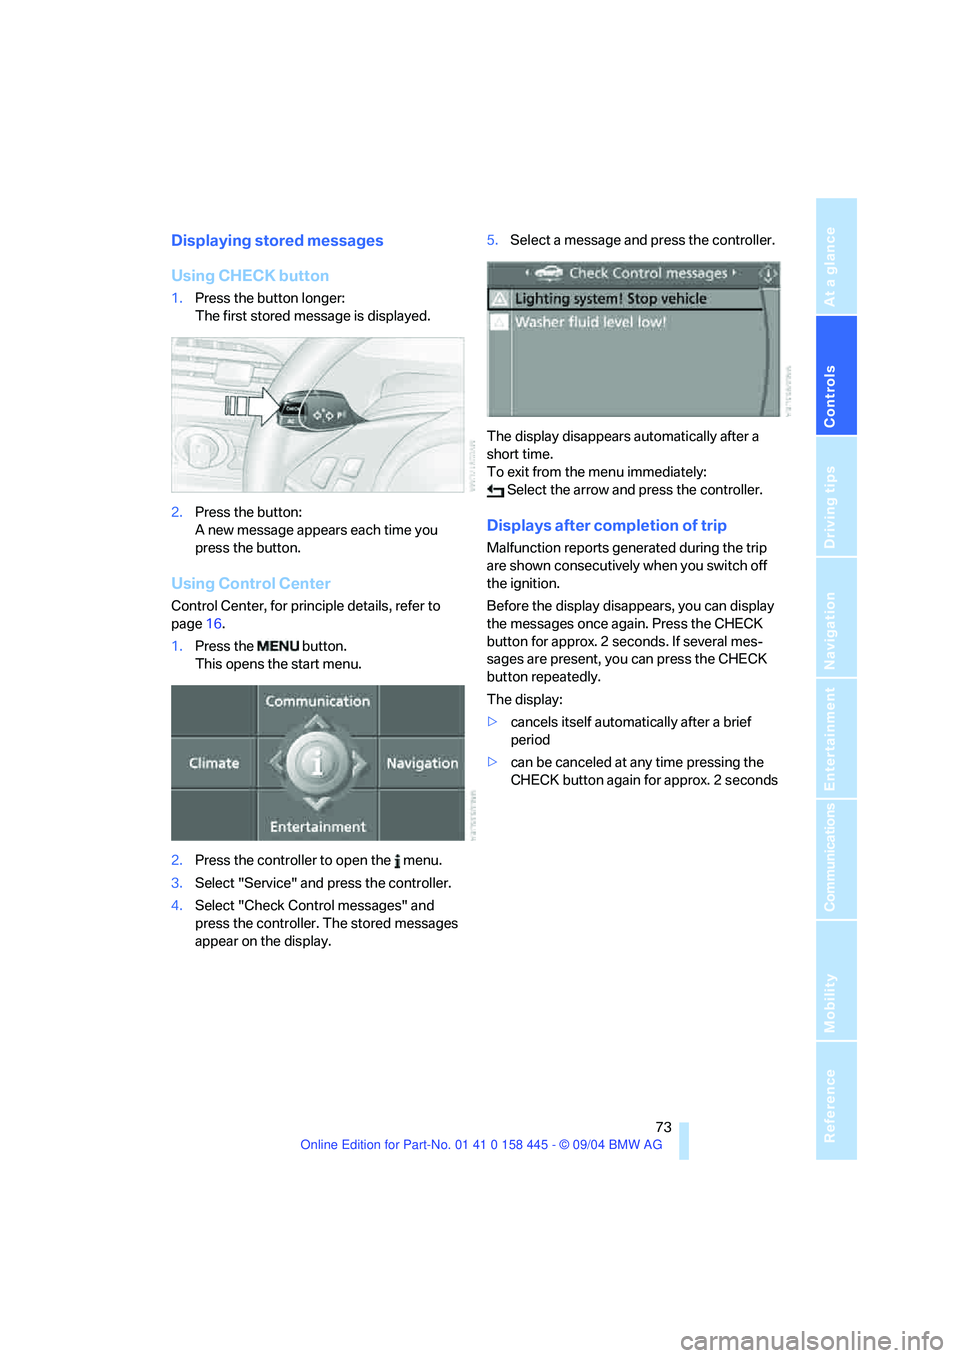
Using CHECK button
1.Press the button longer:
The first stored message is displayed.
2.Press the button:
A new message appears each time you
press the button.
Using Control Center
Control Center, for principle details, refer to
page16.
1.Press the button.
This opens the start menu.
2.Press the controller to open the menu.
3.Select "Service" and press the controller.
4.Select "Check Control messages" and
press the controller. The stored messages
appear on the display.5.Select a message and press the controller.
The display disappears automatically after a
short time.
To exit from the menu immediately:
Select the arrow and press the controller.
Displays after completion of trip
Malfunction reports generated during the trip
are shown consecutively when you switch off
the ignition.
Before the display disappears, you can display
the messages once again. Press the CHECK
button for approx. 2 seconds. If several mes-
sages are present, you can press the CHECK
button repeatedly.
The display:
>cancels itself automatically after a brief
period
>can be canceled at any time pressing the
CHECK button again for approx. 2 seconds
Page 101 of 217
Practical interior accessories
100
Practical interior accessories
Integrated universal remote
control*
The concept
The integrated universal remote control
replaces up to three different hand-held trans-
mitters for various items of radio-controlled
equipment such as door openers and house
alarm systems. The integrated universal remote
control registers and stores signals from the
original hand-held transmitters.
The signal of an original hand-held transmitter
can be programmed into one of the three mem-
ory buttons1. Then the respective device can
be actuated using the memory button1 pro-
grammed for its use when the ignition key is in
position 2. The LED2 flashes to confirm trans-
mission of the signal.
If you sell your vehicle one day, delete the saved
programs beforehand for your own security,
refer to page101.
To prevent possible damage or injury,
before programming or using the inte-
grated universal remote control, always inspect
the immediate area to make certain that no peo-
ple, animals or objects are within the travel
range of the device. Also comply with the safety
precautions of the original hand-held transmit-
ter.<
Checking compatibility
If you see this symbol on the packaging
or in the manual supplied with the orig-
inal hand-held transmitter, it is safe to
assume that it is compatible with the integrated
universal remote control.
If you have additional questions, please consult
your BMW center or call 1-800-355-3515.
You can also visit these websites:
www.bmwusa.com or
www.homelink.com.
HomeLink is a registered trademark owned by
Johnson Controls, Inc.
Programming
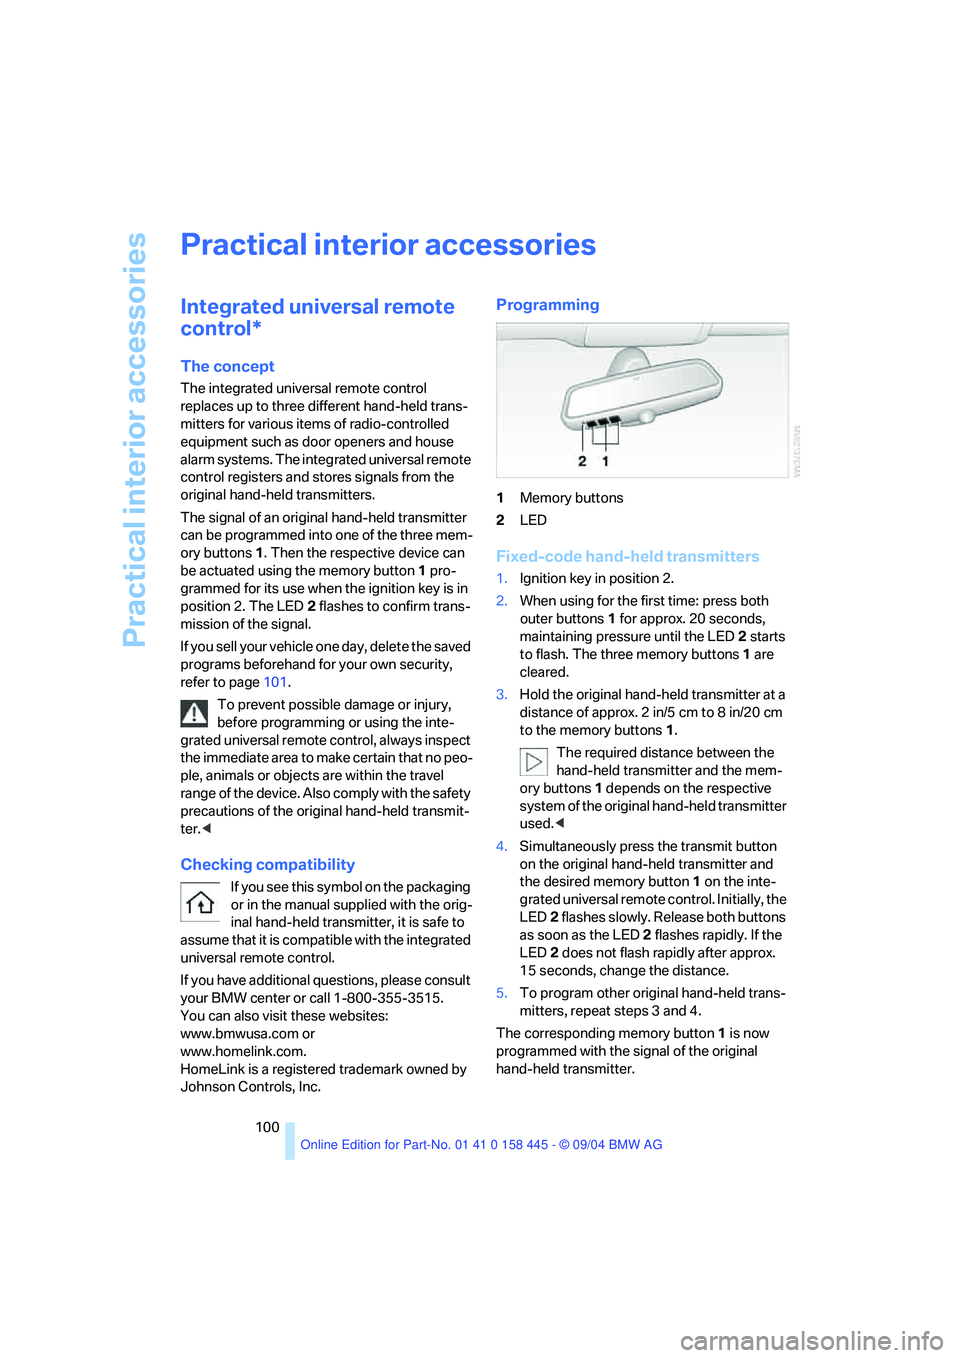
1Memory buttons
2LED
Fixed-code hand-held transmitters
1.Ignition key in position 2.
2.When using for the first time: press both
outer buttons 1 for approx. 20 seconds,
maintaining pressure until the LED 2 starts
to flash. The three memory buttons1 are
cleared.
3.Hold the original hand-held transmitter at a
distance of approx. 2 in/5 cm to 8 in/20 cm
to the memory buttons1.
The required distance between the
hand-held transmitter and the mem-
ory buttons1 depends on the respective
system of the original hand-held transmitter
used.<
4.Simultaneously press the transmit button
on the original hand-held transmitter and
the desired memory button1 on the inte-
grated universal remote control. Initially, the
LED2 flashes slowly. Release both buttons
as soon as the LED 2 flashes rapidly. If the
LED2 does not flash rapidly after approx.
15 seconds, change the distance.
5.To program other original hand-held trans-
mitters, repeat steps 3 and 4.
The corresponding memory button1 is now
programmed with the signal of the original
hand-held transmitter.
Page 105 of 217
Practical interior accessories
104
Socket
In front passenger footwell
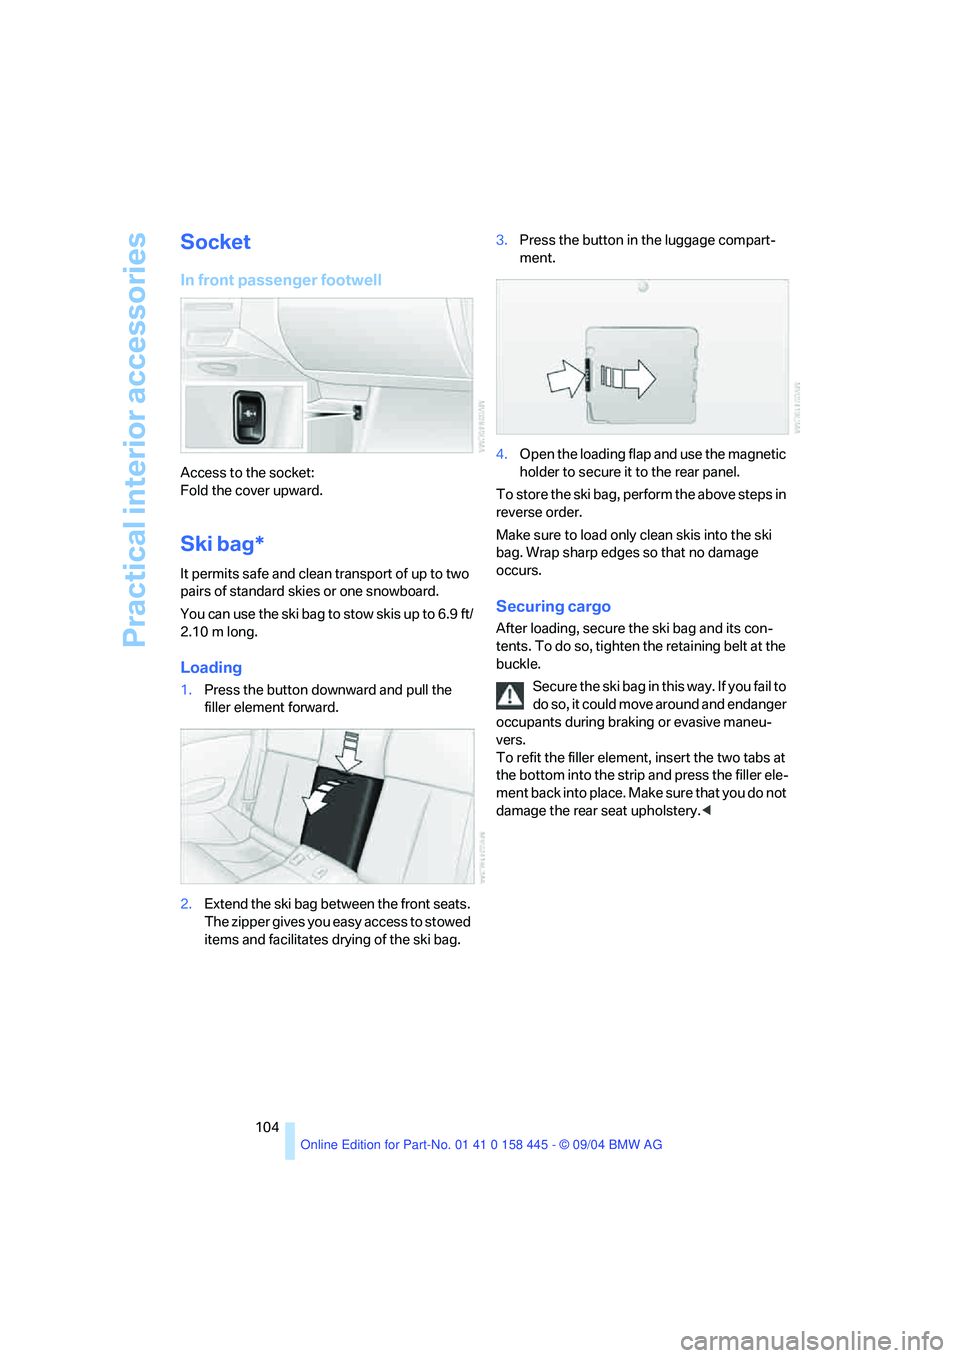
Access to the socket:
Fold the cover upward.
Ski bag*
It permits safe and clean transport of up to two
pairs of standard skies or one snowboard.
You can use the ski bag to stow skis up to 6.9 ft/
2.10 m long.
Loading
1.Press the button downward and pull the
filler element forward.
2.Extend the ski bag between the front seats.
The zipper gives you easy access to stowed
items and facilitates drying of the ski bag.3.Press the button in the luggage compart-
ment.
4.Open the loading flap and use the magnetic
holder to secure it to the rear panel.
To store the ski bag, perform the above steps in
reverse order.
Make sure to load only clean skis into the ski
bag. Wrap sharp edges so that no damage
occurs.
Securing cargo
After loading, secure the ski bag and its con-
tents. To do so, tighten the retaining belt at the
buckle.
Secure the ski bag in this way. If you fail to
do so, it could move around and endanger
occupants during braking or evasive maneu-
vers.
To refit the filler element, insert the two tabs at
the bottom into the strip and press the filler ele-
m e n t b a c k i n t o p l a c e . M a k e s u r e t h a t y o u d o n o t
damage the rear seat upholstery.<
Page 112 of 217
Driving tips
111Reference
At a glance
Controls
Communications
Navigation
Entertainment
Mobility
Load
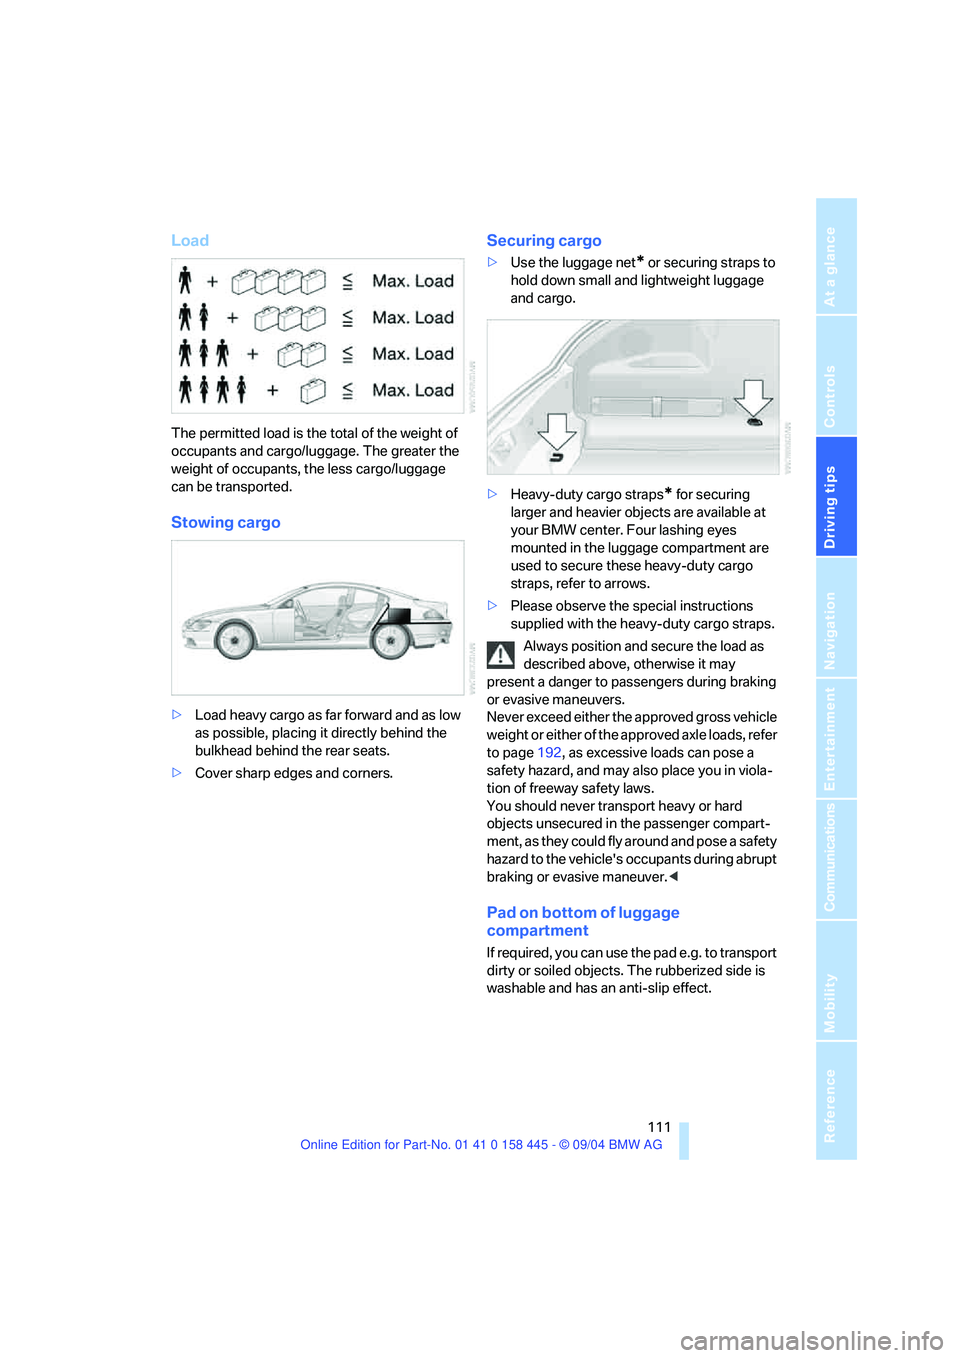
The permitted load is the total of the weight of
occupants and cargo/luggage. The greater the
weight of occupants, the less cargo/luggage
can be transported.
Stowing cargo
>Load heavy cargo as far forward and as low
as possible, placing it directly behind the
bulkhead behind the rear seats.
>Cover sharp edges and corners.
Securing cargo
>Use the luggage net* or securing straps to
hold down small and lightweight luggage
and cargo.
>Heavy-duty cargo straps
* for securing
larger and heavier objects are available at
your BMW center. Four lashing eyes
mounted in the luggage compartment are
used to secure these heavy-duty cargo
straps, refer to arrows.
>Please observe the special instructions
supplied with the heavy-duty cargo straps.
Always position and secure the load as
described above, otherwise it may
present a danger to passengers during braking
or evasive maneuvers.
Never exceed either the approved gross vehicle
weight or either of the approved axle loads, refer
to page192, as excessive loads can pose a
safety hazard, and may also place you in viola-
tion of freeway safety laws.
You should never transport heavy or hard
objects unsecured in the passenger compart-
ment, as they could fly around and pose a safety
hazard to the vehicle's occupants during abrupt
braking or evasive maneuver.<
Pad on bottom of luggage
compartment
If required, you can use the pad e.g. to transport
dirty or soiled objects. The rubberized side is
washable and has an anti-slip effect.
Page 175 of 217
Under the hood
174
Under the hood
Never attempt to perform any service or
repair operations on your vehicle without
the required, professional technical training. If
you are unfamiliar with the specifications to be
observed, only have work carried out on your
vehicle by a BMW center or a workshop which
works with personnel trained in accordance
with BMW specifications. Otherwise there is a
danger of damage and associated safety risks if
this work is performed improperly.<
Hood
Releasing
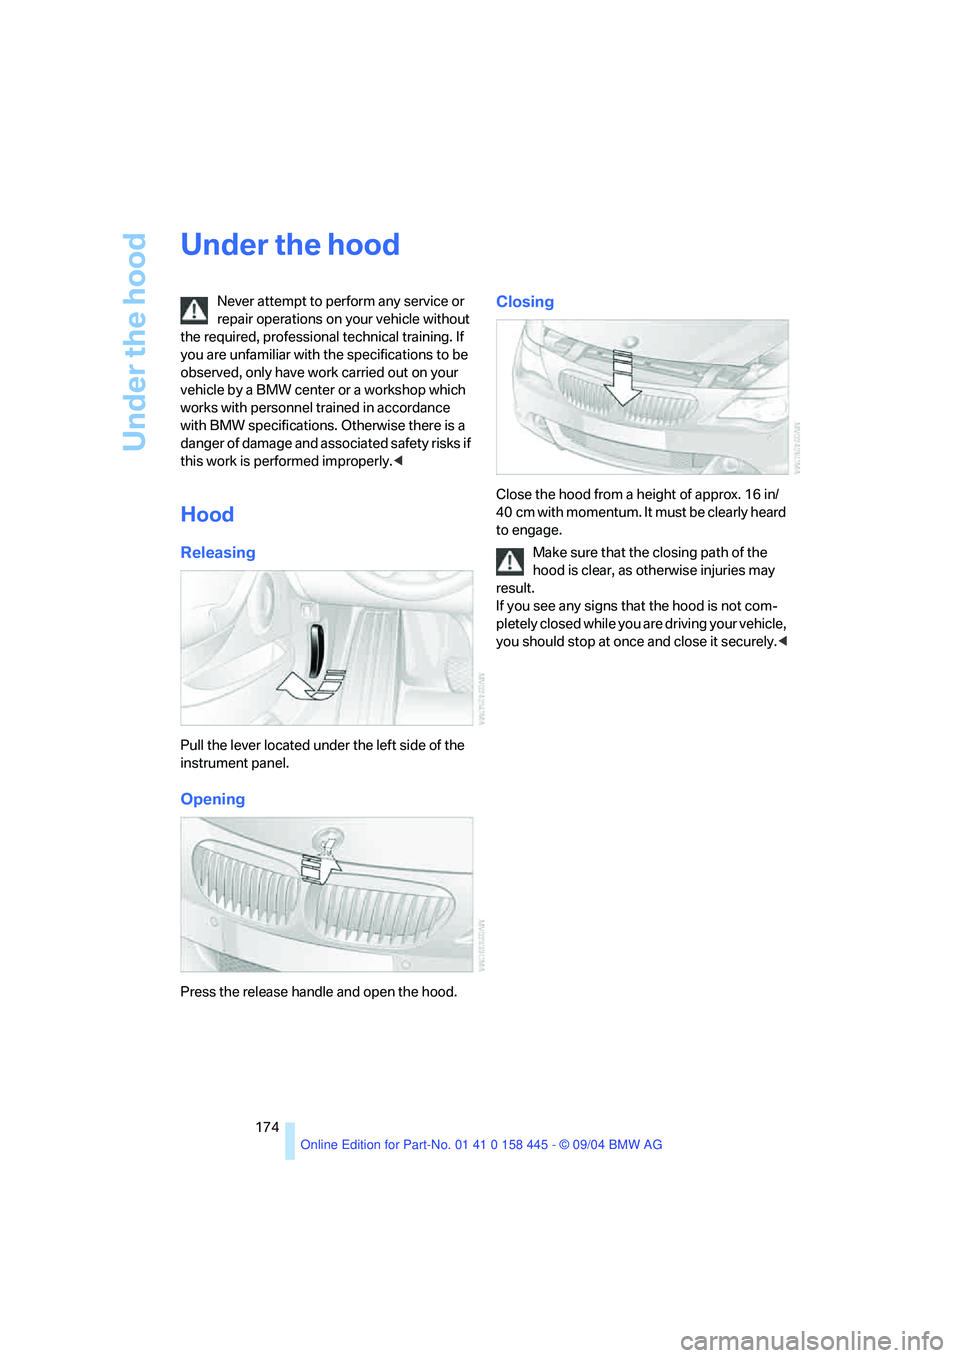
Pull the lever located under the left side of the
instrument panel.
Opening
Press the release handle and open the hood.
Closing
Close the hood from a height of approx. 16 in/
40 cm with momentum. It must be clearly heard
to engage.
Make sure that the closing path of the
hood is clear, as otherwise injuries may
result.
If you see any signs that the hood is not com-
pletely closed while you are driving your vehicle,
you should stop at once and close it securely.<