2005 BMW 645CI CONVERTIBLE check engine
[x] Cancel search: check enginePage 177 of 217
Under the hood
176
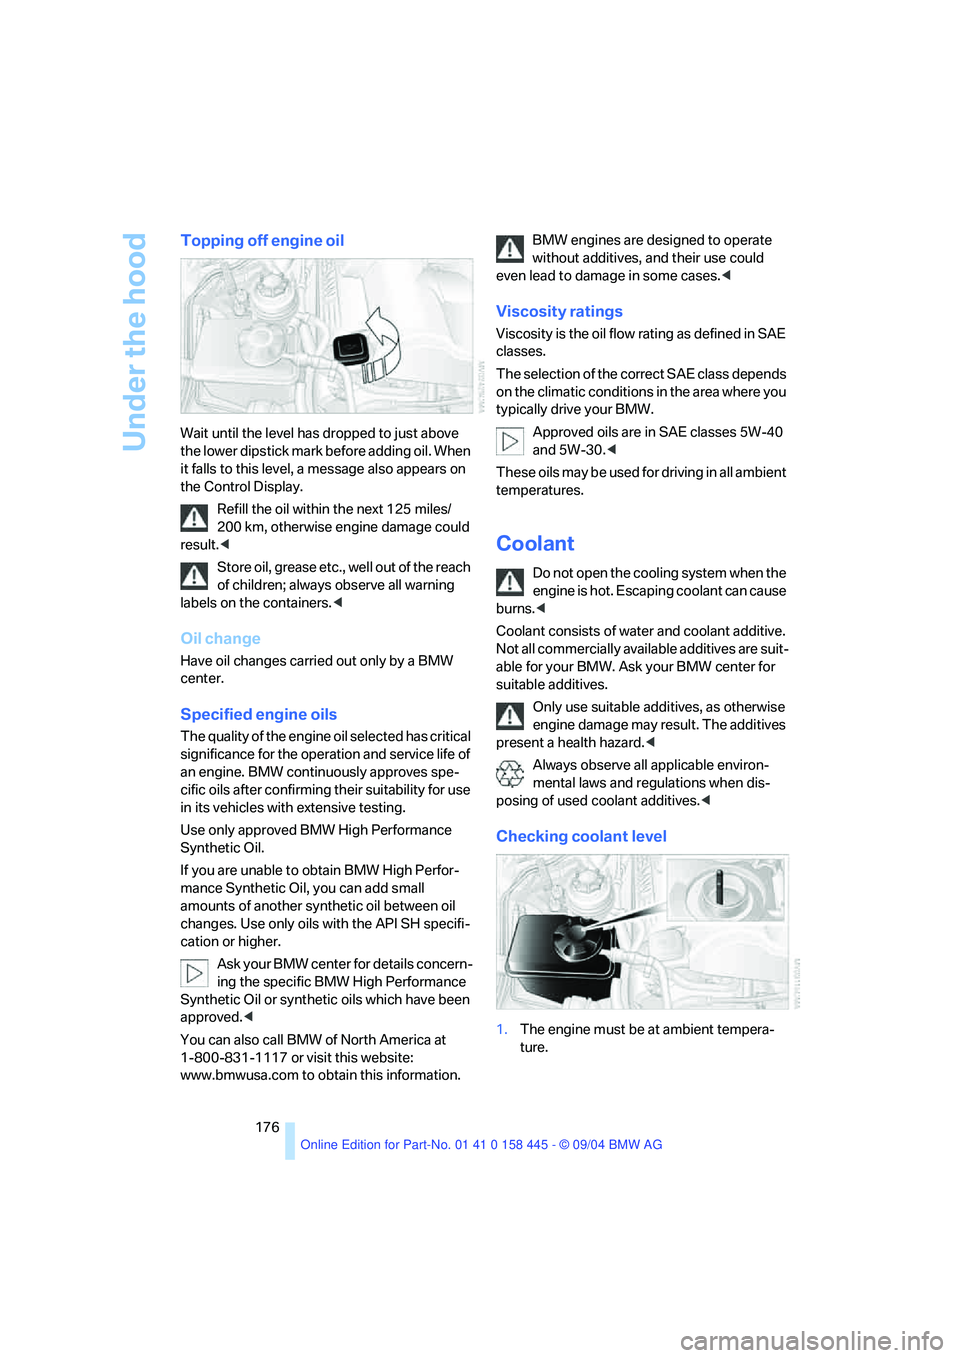
Topping off engine oil
Wait until the level has dropped to just above
the lower dipstick mark before adding oil. When
it falls to this level, a message also appears on
the Control Display.
Refill the oil within the next 125 miles/
200 km, otherwise engine damage could
result.<
Store oil, grease etc., well out of the reach
of children; always observe all warning
labels on the containers.<
Oil change
Have oil changes carried out only by a BMW
center.
Specified engine oils
The quality of the engine oil selected has critical
significance for the operation and service life of
an engine. BMW continuously approves spe-
cific oils after confirming their suitability for use
in its vehicles with extensive testing.
Use only approved BMW High Performance
Synthetic Oil.
If you are unable to obtain BMW High Perfor-
mance Synthetic Oil, you can add small
amounts of another synthetic oil between oil
changes. Use only oils with the API SH specifi-
cation or higher.
Ask your BMW center for details concern-
ing the specific BMW High Performance
Synthetic Oil or synthetic oils which have been
approved.<
You can also call BMW of North America at
1-800-831-1117 or visit this website:
www.bmwusa.com to obtain this information.BMW engines are designed to operate
without additives, and their use could
even lead to damage in some cases.<
Viscosity ratings
Viscosity is the oil flow rating as defined in SAE
classes.
The selection of the correct SAE class depends
on the climatic conditions in the area where you
typically drive your BMW.
Approved oils are in SAE classes 5W-40
and 5W-30.<
These oils may be used for driving in all ambient
temperatures.
Coolant
Do not open the cooling system when the
engine is hot. Escaping coolant can cause
burns.<
Coolant consists of water and coolant additive.
Not all commercially available additives are suit-
able for your BMW. Ask your BMW center for
suitable additives.
Only use suitable additives, as otherwise
engine damage may result. The additives
present a health hazard.<
Always observe all applicable environ-
mental laws and regulations when dis-
posing of used coolant additives.<
Checking coolant level
1.The engine must be at ambient tempera-
ture.
Page 179 of 217

Maintenance
178
Maintenance
The BMW Maintenance
System
The BMW maintenance system supports the
preservation of the traffic and operating safety
of your BMW. The service schedule also
includes operations related to the vehicle's
comfort and convenience features, such as
replacement of the filters for the inside air. The
ultimate objective is to ensure economical
maintenance by providing the ideal service for
your vehicle.
Should the day come when you decide to sell
your BMW, you will find that a complete dealer
service history is an asset of inestimable value.
CBS Condition Based Service
Sensors and special algorithms take the differ-
ent driving conditions of your BMW into
account. Condition Based Service uses this to
determine the current and future service
requirements. By letting you define a service
and maintenance regimen that reflects your
own individual requirements, the system builds
the basis for trouble-free driving.
You can set the Control Display to show
remaining times or distances of selected main-
tenance intervals and legally mandated dead-
lines, refer to page70:
>Engine oil
>Brakes, front and rear separately
>Microfilter/activated-charcoal filter
>Brake fluid>Spark plugs
>Vehicle check
>Legally required tests depending on local
regulations
Your vehicle stores this information continu-
ously in the master key while the vehicle is
being driven. After accessing the data stored in
the master key, your BMW Service Advisor can
suggest precisely the right array of service pro-
cedures for your own individual vehicle. You
should therefore give your BMW Service Advi-
sor the key you last used to drive when you take
your vehicle in for service.
Make sure the date in the Control Center
is always set correctly, refer to page78,
as otherwise the effectiveness of CBS Condi-
tion Based Service is not ensured.<
Service and Warranty Information
Booklet for US models and Warranty
and Service Guide Booklet for
Canadian models
Please consult your Service and Warranty Infor-
mation Booklet for US models and Warranty
and Service Guide Booklet for Canadian models
for additional information regarding service
requirements.
Have service and repair operations per-
formed at your BMW center.
Take the time to ensure that these service pro-
cedures are confirmed by entries in your vehi-
cle's Service and Warranty Information Booklet
for US models and Warranty and Service Guide
Booklet for Canadian models. These entries
verify that your vehicle has received the speci-
fied regular maintenance, and may also be
required when submitting warranty claims.<
Page 180 of 217
Mobility
179Reference
At a glance
Controls
Driving tips
Communications
Navigation
Entertainment
OBD Socket
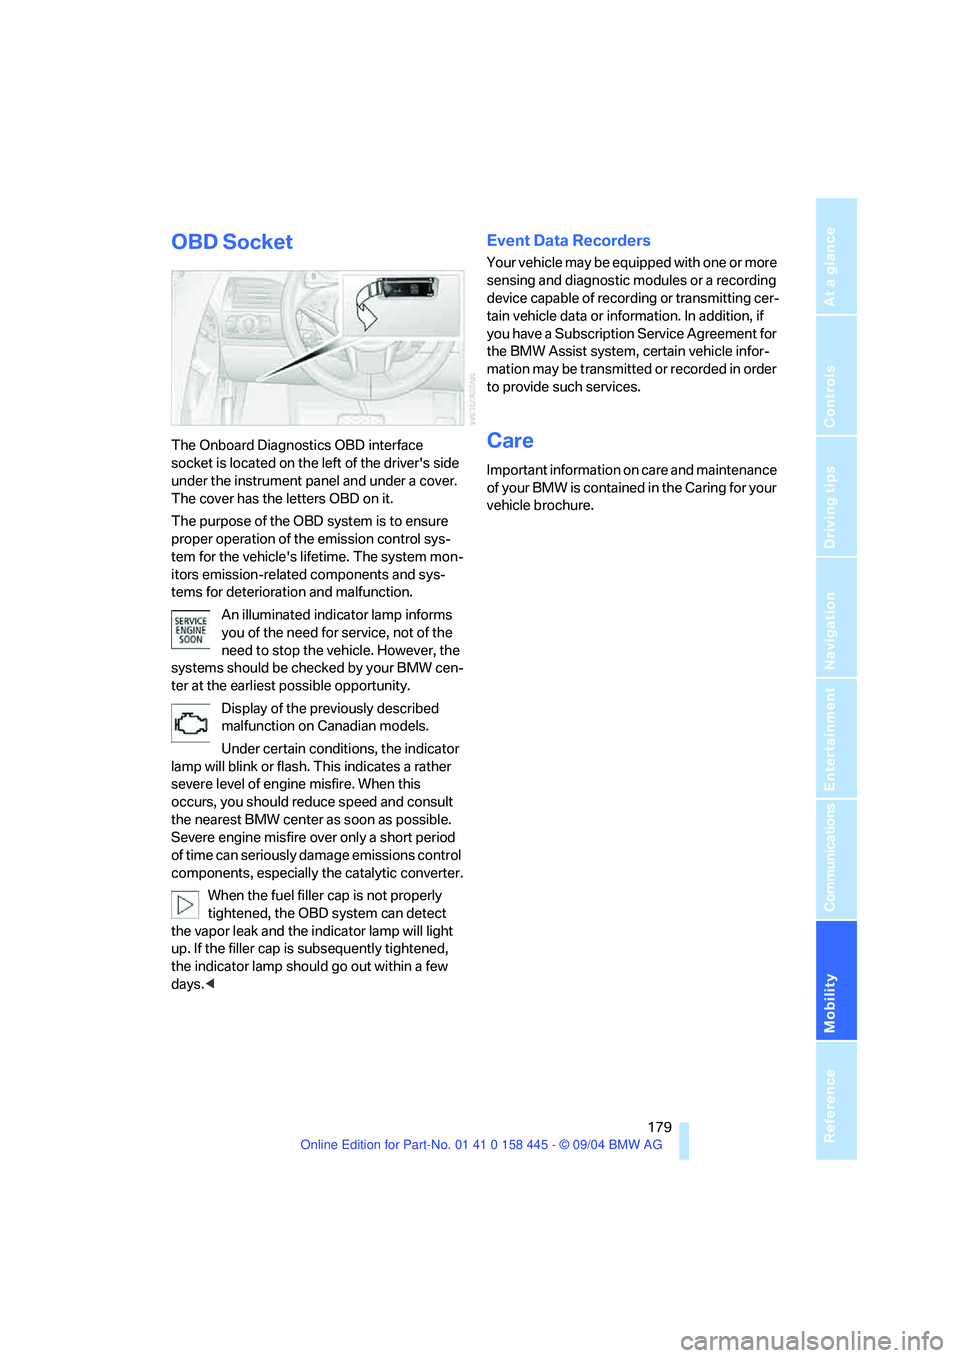
The Onboard Diagnostics OBD interface
socket is located on the left of the driver's side
under the instrument panel and under a cover.
The cover has the letters OBD on it.
The purpose of the OBD system is to ensure
proper operation of the emission control sys-
tem for the vehicle's lifetime. The system mon-
itors emission-related components and sys-
tems for deterioration and malfunction.
An illuminated indicator lamp informs
you of the need for service, not of the
need to stop the vehicle. However, the
systems should be checked by your BMW cen-
ter at the earliest possible opportunity.
Display of the previously described
malfunction on Canadian models.
Under certain conditions, the indicator
lamp will blink or flash. This indicates a rather
severe level of engine misfire. When this
occurs, you should reduce speed and consult
the nearest BMW center as soon as possible.
Severe engine misfire over only a short period
of time can seriously damage emissions control
components, especially the catalytic converter.
When the fuel filler cap is not properly
tightened, the OBD system can detect
the vapor leak and the indicator lamp will light
up. If the filler cap is subsequently tightened,
the indicator lamp should go out within a few
days.<
Event Data Recorders
Your vehicle may be equipped with one or more
sensing and diagnostic modules or a recording
device capable of recording or transmitting cer-
tain vehicle data or information. In addition, if
you have a Subscription Service Agreement for
the BMW Assist system, certain vehicle infor-
mation may be transmitted or recorded in order
to provide such services.
Care
Important information on care and maintenance
of your BMW is contained in the Caring for your
vehicle brochure.
Page 187 of 217
Giving and receiving assistance
186
Warning triangle*
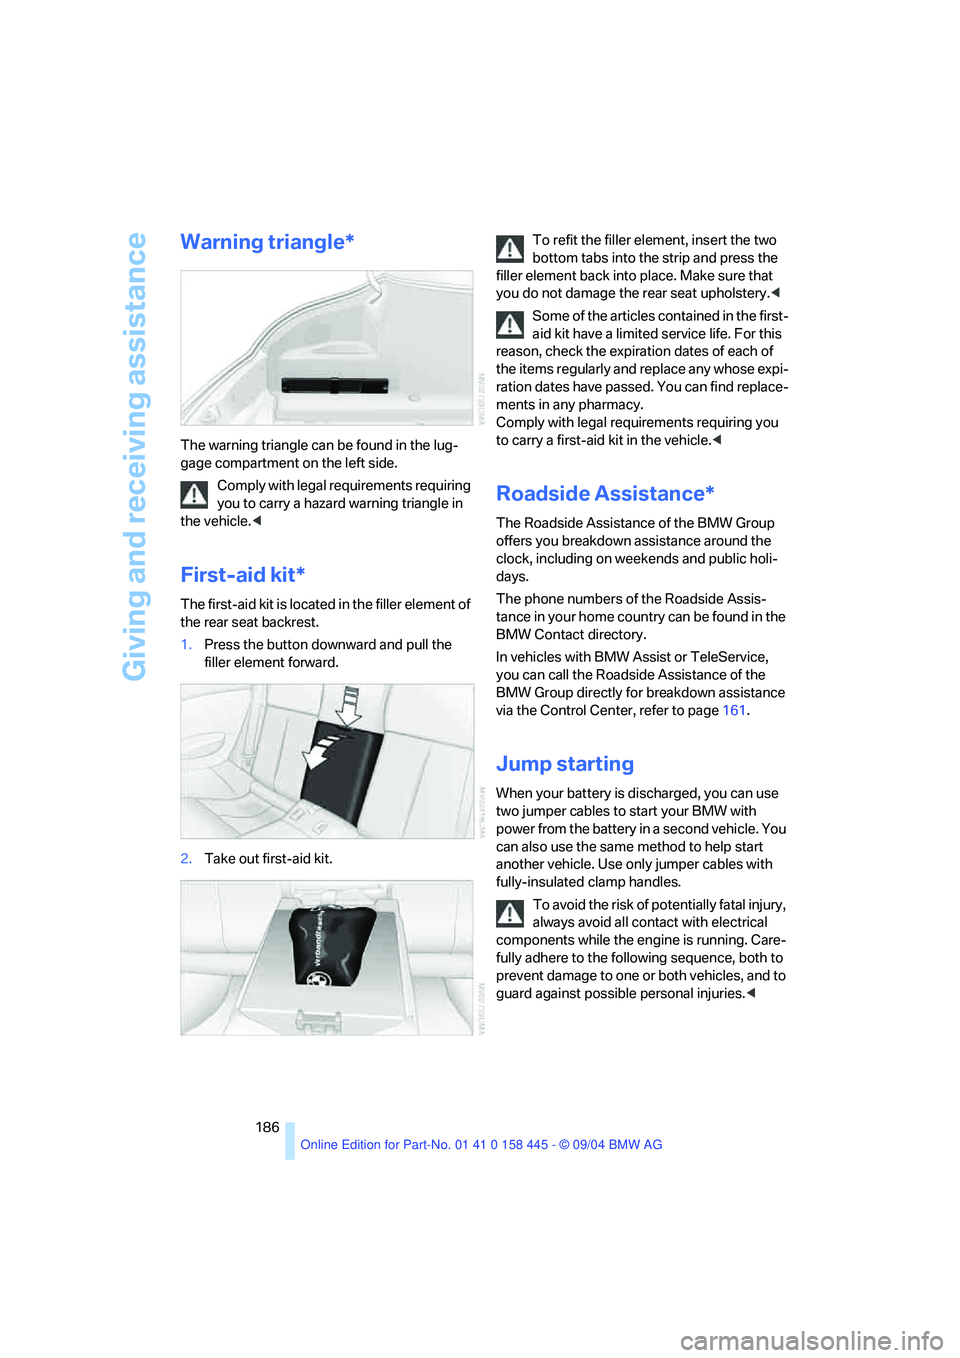
The warning triangle can be found in the lug-
gage compartment on the left side.
Comply with legal requirements requiring
you to carry a hazard warning triangle in
the vehicle.<
First-aid kit*
The first-aid kit is located in the filler element of
the rear seat backrest.
1.Press the button downward and pull the
filler element forward.
2.Take out first-aid kit.To refit the filler element, insert the two
bottom tabs into the strip and press the
filler element back into place. Make sure that
you do not damage the rear seat upholstery.<
Some of the articles contained in the first-
aid kit have a limited service life. For this
reason, check the expiration dates of each of
the items regularly and replace any whose expi-
ration dates have passed. You can find replace-
ments in any pharmacy.
Comply with legal requirements requiring you
to carry a first-aid kit in the vehicle.<
Roadside Assistance*
The Roadside Assistance of the BMW Group
offers you breakdown assistance around the
clock, including on weekends and public holi-
days.
The phone numbers of the Roadside Assis-
tance in your home country can be found in the
BMW Contact directory.
In vehicles with BMW Assist or TeleService,
you can call the Roadside Assistance of the
BMW Group directly for breakdown assistance
via the Control Center, refer to page161.
Jump starting
When your battery is discharged, you can use
two jumper cables to start your BMW with
power from the battery in a second vehicle. You
can also use the same method to help start
another vehicle. Use only jumper cables with
fully-insulated clamp handles.
To avoid the risk of potentially fatal injury,
always avoid all contact with electrical
components while the engine is running. Care-
fully adhere to the following sequence, both to
prevent damage to one or both vehicles, and to
guard against possible personal injuries.<
Page 188 of 217
Mobility
187Reference
At a glance
Controls
Driving tips
Communications
Navigation
Entertainment
Preparing
1.Check whether the battery of the other
vehicle has a voltage of 12 Volts and
approximately the same capacitance in Ah.
This information can be found on the bat-
tery.
2.Switch off the engine of the vehicle provid-
ing assistance.
3.Switch off all electrical accessories in both
vehicles.
There must not be any contact between
the bodies of the two vehicles, as other-
wise there is a danger of shorting.<
Connecting jumper cables
To avoid personal injury from sparks,
observe this sequence when connecting
jumper cables.<
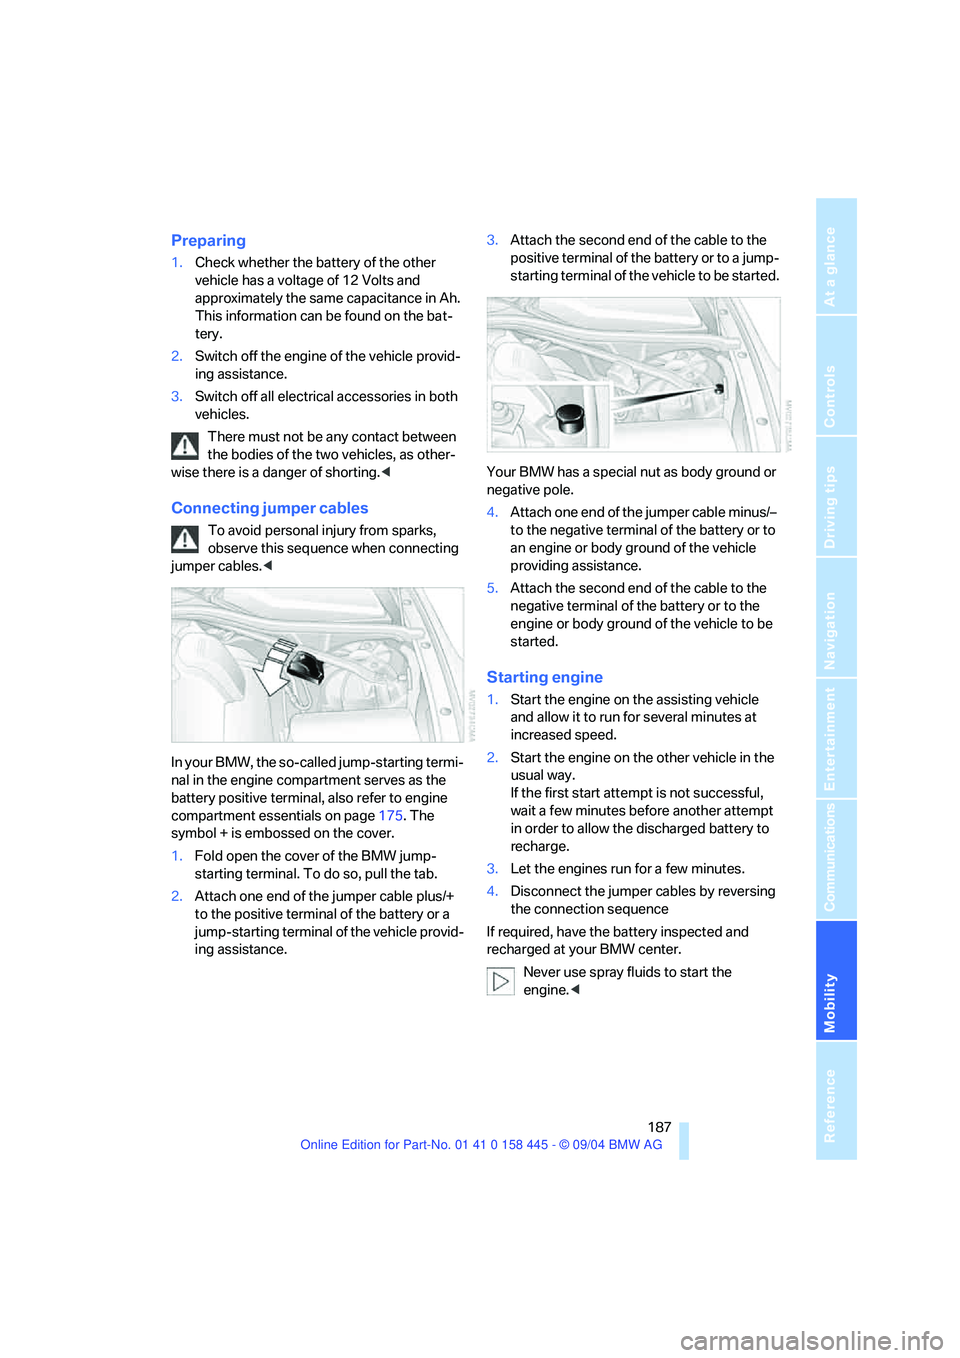
In your BMW, the so-called jump-starting termi-
nal in the engine compartment serves as the
battery positive terminal, also refer to engine
compartment essentials on page175. The
symbol + is embossed on the cover.
1.Fold open the cover of the BMW jump-
starting terminal. To do so, pull the tab.
2.Attach one end of the jumper cable plus/+
to the positive terminal of the battery or a
jump-starting terminal of the vehicle provid-
ing assistance.3.Attach the second end of the cable to the
positive terminal of the battery or to a jump-
starting terminal of the vehicle to be started.
Your BMW has a special nut as body ground or
negative pole.
4.Attach one end of the jumper cable minus/–
to the negative terminal of the battery or to
an engine or body ground of the vehicle
providing assistance.
5.Attach the second end of the cable to the
negative terminal of the battery or to the
engine or body ground of the vehicle to be
started.
Starting engine
1.Start the engine on the assisting vehicle
and allow it to run for several minutes at
increased speed.
2.Start the engine on the other vehicle in the
usual way.
If the first start attempt is not successful,
wait a few minutes before another attempt
in order to allow the discharged battery to
recharge.
3.Let the engines run for a few minutes.
4.Disconnect the jumper cables by reversing
the connection sequence
If required, have the battery inspected and
recharged at your BMW center.
Never use spray fluids to start the
engine.<
Page 190 of 217
Mobility
189Reference
At a glance
Controls
Driving tips
Communications
Navigation
Entertainment
>When mounted at an angle, the tow bar will
exert lateral forces, tending to push the
vehicle sideways.
Secure the tow bar to the tow fitting only.
Otherwise to other vehicle parts could
result.<
With tow rope
When starting off in the towing vehicle, make
sure that the tow rope is taut.
To avoid jerking and the associated
stresses on vehicle components when
towing, always use nylon ropes or nylon straps.
Secure the tow rope to the tow fitting only. Oth-
erwise damage to other vehicle parts could
result.<
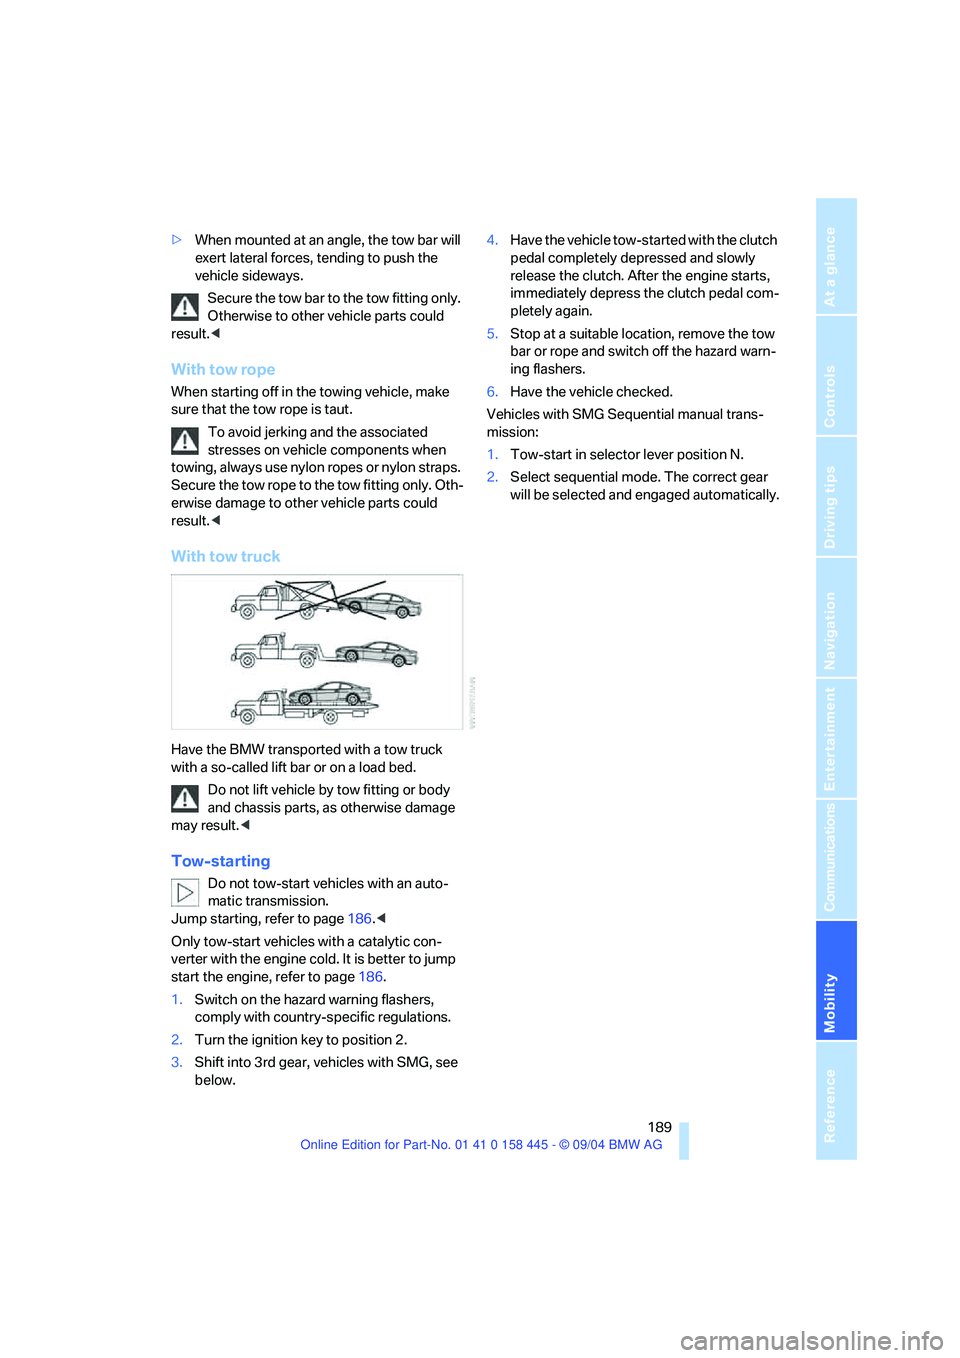
With tow truck
Have the BMW transported with a tow truck
with a so-called lift bar or on a load bed.
Do not lift vehicle by tow fitting or body
and chassis parts, as otherwise damage
may result.<
Tow-starting
Do not tow-start vehicles with an auto-
matic transmission.
Jump starting, refer to page186.<
Only tow-start vehicles with a catalytic con-
verter with the engine cold. It is better to jump
start the engine, refer to page186.
1.Switch on the hazard warning flashers,
comply with country-specific regulations.
2.Turn the ignition key to position 2.
3.Shift into 3rd gear, vehicles with SMG, see
below.4.Have the vehicle tow-started with the clutch
pedal completely depressed and slowly
release the clutch. After the engine starts,
immediately depress the clutch pedal com-
pletely again.
5.Stop at a suitable location, remove the tow
bar or rope and switch off the hazard warn-
ing flashers.
6.Have the vehicle checked.
Vehicles with SMG Sequential manual trans-
mission:
1.Tow-start in selector lever position N.
2.Select sequential mode. The correct gear
will be selected and engaged automatically.
Page 205 of 217
Everything from A to Z
204 Emergency operation, refer to
Manual operation
– convertible top41
– door lock31
– driver's door31
– fuel filler door166
– glass sunroof38
– luggage compartment
lid32,33
Emergency release33
Emergency services, refer to
Roadside Assistance186
"Emission inspect."71
"Enable services"160
"End call"153
Engine
– breaking-in108
– data192
– speed192
– starting54
– starting difficulties54
– switching off55
Engine compartment175
Engine coolant176
Engine oil
– checking the oil level175
– dipstick175
– specified engine oils176
– temperature70
– temperature gage70
– topping off176
Engine output, refer to Engine
data192
Engine speed, refer to Engine
specifications192
Engine starting, refer to
Starting engine54
"Enter address" for
navigation116
Entering destination116
Entering the address115
Entering the intersection117
Entering the town/city for
navigation116
Entering zip code for
navigation116
"Entertainment"133"Entertainment settings"133
Entry map for destination117
Entry to the rear48
"Equalizer", refer to Tone
control135
"ESN"140
ESP Electronic Stability
Program, refer to DSC
Dynamic Stability
Control82
Exhaust system, refer to Hot
exhaust system108
Exterior mirrors49
– automatic dimming
feature50
– automatic heating50
Eye for towing, refer to Tow
fitting188
Eyes for lashing, refer to
Securing load111
F
Fader, refer to Tone
control134
Failure messages, refer to
Check Control71
False alarms, refer to Avoiding
unintentional alarms35
Fastening safety belts, refer to
Safety belts48
Fastest route for
navigation122
Fast forward
– CD changer145
– CD player145
"Fast route" for
navigation122
First aid, refer to First-aid
kit186
First-aid kit186
First-aid pouch, refer to First-
aid kit186
Flashing when locking and
unlocking, refer to Setting
acknowledgement
signals30Flashlight, refer to
Rechargeable flashlight101
Flat tire
– Flat Tire Monitor84
– run-flat tires85,172
Flat Tire Monitor84
– false alarms84
– initializing system84
– malfunction85
– snow chains173
– system limits84
– warning lamp85
"FM", reception
range133,136
FM, waveband136
Fog lamps92
– indicator lamp13,92
Folding up convertible top
compartment floor,
Convertible34
Footbrake, refer to Braking
safely109
Footwell lamps93
For your own safety6
Front airbags86
Front head restraints47
"FTM"84
Fuel
– average consumption74
– display70
– fuel specifications167
– high-quality brands167
– quality167
– tank capacity166
Fuel display, refer to Fuel
gage70
Fuel filler door166
– releasing in the event of
electrical malfunction166
Fuel gage70
Fuel specifications167
Fuses184
Page 214 of 217
Reference 213
At a glance
Controls
Driving tips
Communications
Navigation
Entertainment
Mobility
V
Vehicle
– battery183
– breaking-in108
– care, refer to the Caring for
your vehicle brochure
– cargo loading110
– decommissioning, refer to
the Caring for your vehicle
brochure
– dimensions193
– parking55
– washing, refer to the Caring
for your vehicle brochure
– weights192
Vehicle jack183
– jacking points183
Vehicle position, refer to
Displaying current
position125
"Vehicle settings"29
Ventilating
– independent ventilation98
– refer to Ventilation97
Ventilation97
– draft-free97
Vent outlets of automatic
climate control94
Voice command system22
– short commands196
Voice instructions for
navigation system126
– muting51
– repeating51,126
– switching on/off51,126
– volume126
Voice phone book157
Volume132
– audio sources132
– portable phone151,157
– setting speed-
dependent134
– voice instructions126
Volume adjustment in audio
mode, front-to-rear134
W
Warning lamps, refer to
Indicator/warning lamps13
Warning messages, refer to
Check Control71
Warning triangle186
Warranty and Service Guide
Booklet for Canadian
models178
Washer fluid
– capacity of the reservoir61
– wiper system61
Washer fluid reservoir61
Water on roads, refer to
Driving through water109
Waveband136
"WB"133,139
Wear indicators in tires, refer
to Minimum tread depth171
Weights192
Wheel/tire combination, refer
to New wheels and tires172
Wheel/tire replacement, refer
to New wheels and tires172
Wheelbase, refer to
Dimensions193
Wheels and tires168
Width, refer to
Dimensions193
Wind deflector42
Windows35
– convenience
operation30,31
– opening and closing,
Convertible36
– opening and closing,
Coupe36
– rear window, Convertible37
Windshield washer nozzles61
Windshield washer system,
refer to Washer/wiper
system61
Windshield wiper blade
replacement180
Windshield wipers, refer to
Wiper/washer system60Winter tires172
– setting speed limit76
– storage173
Wiper blade replacement180
Wiper system60
– washer fluid61
– windshield washer
nozzles61
"With highways" for
navigation122
Word matching principle for
navigation123
Working in the engine
compartment174
Wrenches/screwdrivers, refer
to Onboard tool kit180
X
Xenon lamps180
– replacing bulbs180