2005 BMW 645CI CONVERTIBLE change wheel
[x] Cancel search: change wheelPage 82 of 217
Controls
81Reference
At a glance
Driving tips
Communications
Navigation
Entertainment
Mobility
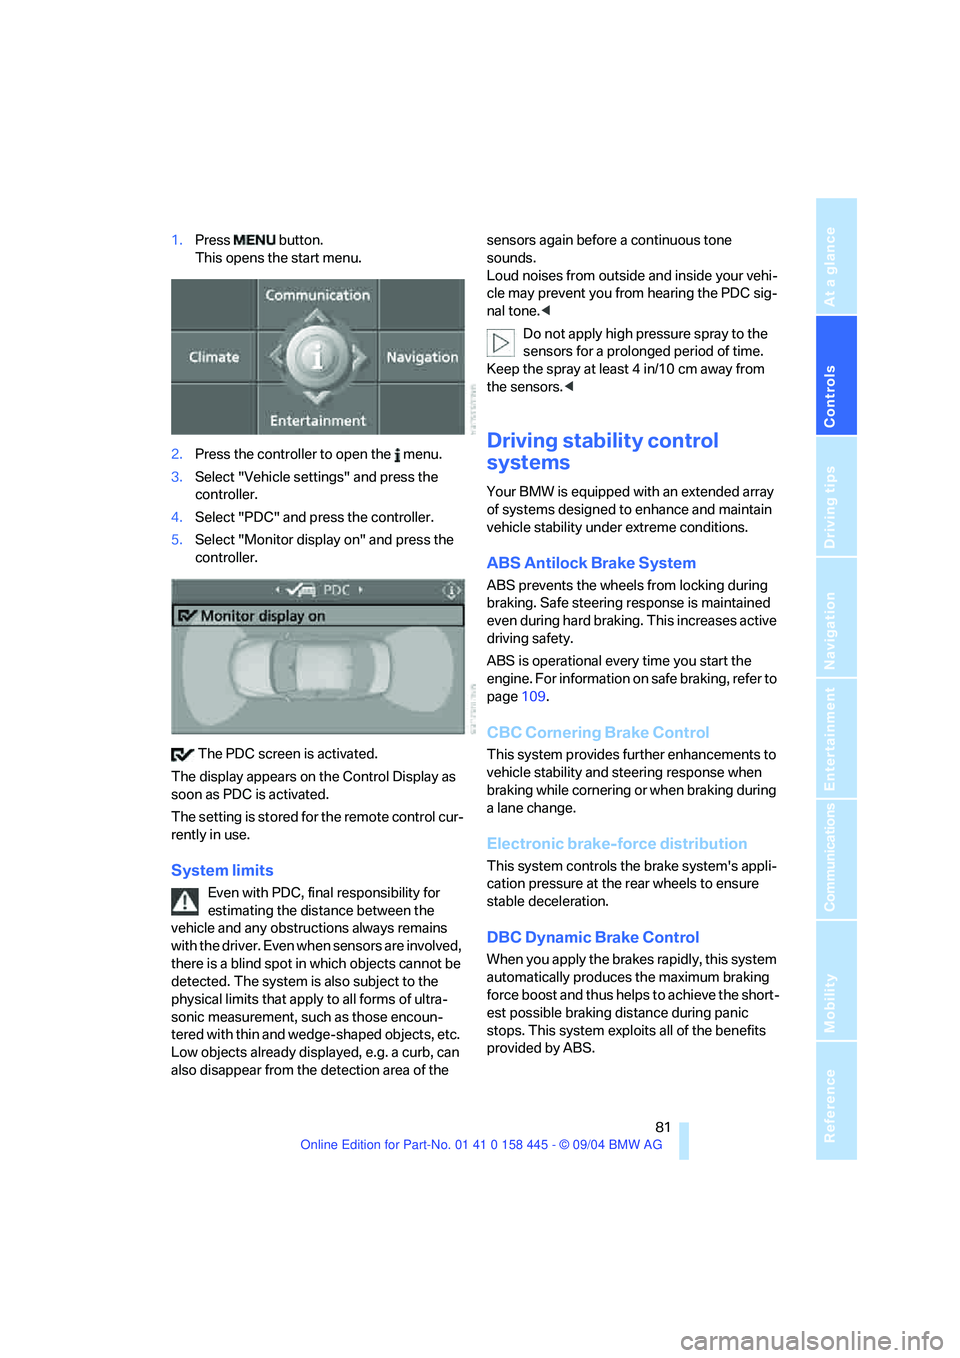
1.Press button.
This opens the start menu.
2.Press the controller to open the menu.
3.Select "Vehicle settings" and press the
controller.
4.Select "PDC" and press the controller.
5.Select "Monitor display on" and press the
controller.
The PDC screen is activated.
The display appears on the Control Display as
soon as PDC is activated.
The setting is stored for the remote control cur-
rently in use.
System limits
Even with PDC, final responsibility for
estimating the distance between the
vehicle and any obstructions always remains
with the driver. Even when sensors are involved,
there is a blind spot in which objects cannot be
detected. The system is also subject to the
physical limits that apply to all forms of ultra-
sonic measurement, such as those encoun-
tered with thin and wedge-shaped objects, etc.
Low objects already displayed, e.g. a curb, can
also disappear from the detection area of the sensors again before a continuous tone
sounds.
Loud noises from outside and inside your vehi-
cle may prevent you from hearing the PDC sig-
nal tone.<
Do not apply high pressure spray to the
sensors for a prolonged period of time.
Keep the spray at least 4 in/10 cm away from
the sensors.<
Driving stability control
systems
Your BMW is equipped with an extended array
of systems designed to enhance and maintain
vehicle stability under extreme conditions.
ABS Antilock Brake System
ABS prevents the wheels from locking during
braking. Safe steering response is maintained
even during hard braking. This increases active
driving safety.
ABS is operational every time you start the
engine. For information on safe braking, refer to
page109.
CBC Cornering Brake Control
This system provides further enhancements to
vehicle stability and steering response when
braking while cornering or when braking during
a lane change.
Electronic brake-force distribution
This system controls the brake system's appli-
cation pressure at the rear wheels to ensure
stable deceleration.
DBC Dynamic Brake Control
When you apply the brakes rapidly, this system
automatically produces the maximum braking
force boost and thus helps to achieve the short-
est possible braking distance during panic
stops. This system exploits all of the benefits
provided by ABS.
Page 85 of 217
Technology for comfort, convenience and safety
84
Flat Tire Monitor
The concept
The Flat Tire Monitor keeps track of the infla-
tion pressures in the four tires as you drive. The
system provides an alert whenever the inflation
pressure drops significantly in relation to the
pressure in another tire.
When a loss of pressure occurs, the rolling
radius changes and with it, the rotational speed
of the wheels. This change is detected and sig-
naled as a flat tire.
Functional requirement
To ensure the reliable signaling of a flat tire, the
system must be initialized at the correct tire
inflation pressure.
The initialization must be repeated after
every correction of the tire inflation pres-
sure and after every tire or wheel change.<
System limits
The Flat Tire Monitor cannot indicate
sudden severe tire damage caused by
outside factors and does not detect a natural,
even pressure drop in all four tires.<
In the following situations, the system could be
delayed or malfunction:
>System has not been initialized
>Driving on snow-covered or slippery roads
>Sporty driving style: slip in the drive wheels,
high lateral acceleration
>When driving with snow chains
*
Initializing system
The initialization is completed during driv-
ing, which can be interrupted at any time.
When driving continues, the initialization is also
automatically continued.
Do not initialize the system when driving with
snow chains
*.<
Control Center, for principle details, refer to
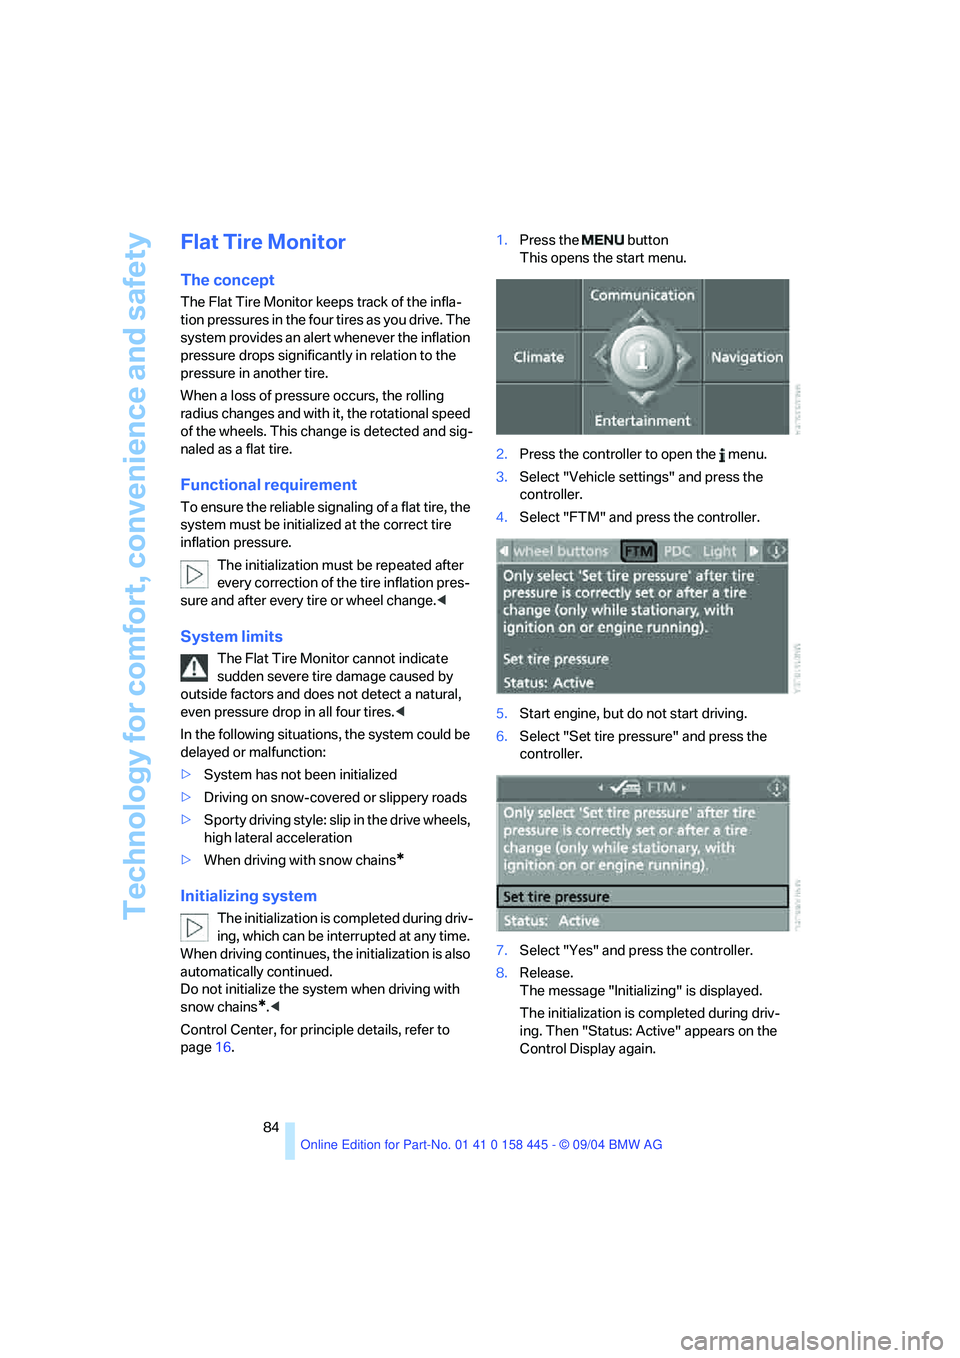
page16.1.Press the button
This opens the start menu.
2.Press the controller to open the menu.
3.Select "Vehicle settings" and press the
controller.
4.Select "FTM" and press the controller.
5.Start engine, but do not start driving.
6.Select "Set tire pressure" and press the
controller.
7.Select "Yes" and press the controller.
8.Release.
The message "Initializing" is displayed.
The initialization is completed during driv-
ing. Then "Status: Active" appears on the
Control Display again.
Page 86 of 217
Controls
85Reference
At a glance
Driving tips
Communications
Navigation
Entertainment
Mobility
Report of a flat tire
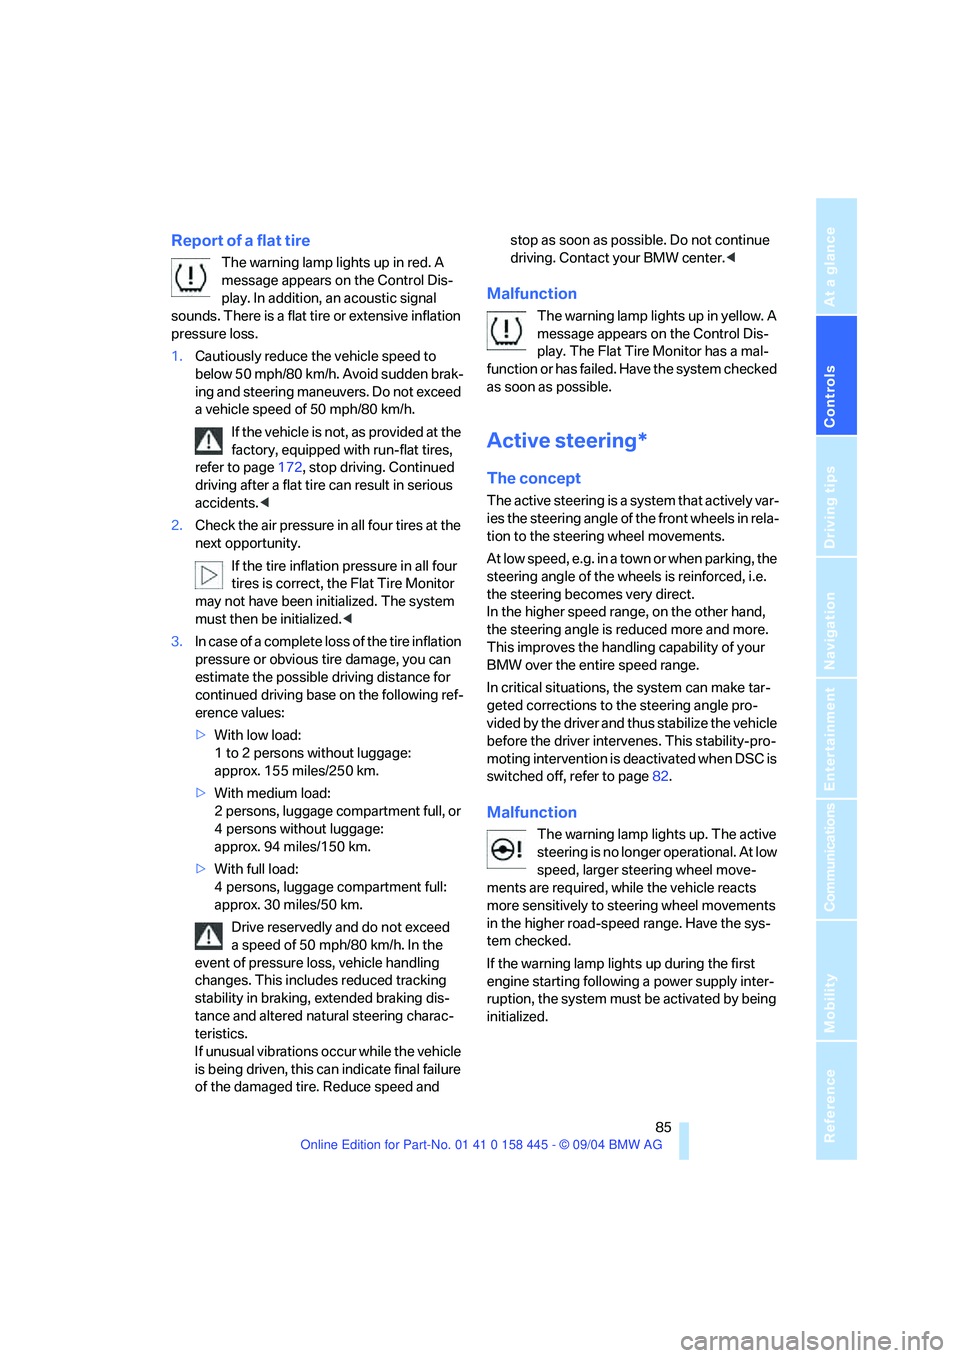
The warning lamp lights up in red. A
message appears on the Control Dis-
play. In addition, an acoustic signal
sounds. There is a flat tire or extensive inflation
pressure loss.
1.Cautiously reduce the vehicle speed to
below 50 mph/80 km/h. Avoid sudden brak-
ing and steering maneuvers. Do not exceed
a vehicle speed of 50 mph/80 km/h.
If the vehicle is not, as provided at the
factory, equipped with run-flat tires,
refer to page172, stop driving. Continued
driving after a flat tire can result in serious
accidents.<
2.Check the air pressure in all four tires at the
next opportunity.
If the tire inflation pressure in all four
tires is correct, the Flat Tire Monitor
may not have been initialized. The system
must then be initialized.<
3.In case of a complete loss of the tire inflation
pressure or obvious tire damage, you can
estimate the possible driving distance for
continued driving base on the following ref-
erence values:
>With low load:
1 to 2 persons without luggage:
approx. 155 miles/250 km.
>With medium load:
2 persons, luggage compartment full, or
4 persons without luggage:
approx. 94 miles/150 km.
>With full load:
4 persons, luggage compartment full:
approx. 30 miles/50 km.
Drive reservedly and do not exceed
a speed of 50 mph/80 km/h. In the
event of pressure loss, vehicle handling
changes. This includes reduced tracking
stability in braking, extended braking dis-
tance and altered natural steering charac-
teristics.
If unusual vibrations occur while the vehicle
is being driven, this can indicate final failure
of the damaged tire. Reduce speed and stop as soon as possible. Do not continue
driving. Contact your BMW center.<
Malfunction
The warning lamp lights up in yellow. A
message appears on the Control Dis-
play. The Flat Tire Monitor has a mal-
function or has failed. Have the system checked
as soon as possible.
Active steering*
The concept
The active steering is a system that actively var-
ies the steering angle of the front wheels in rela-
tion to the steering wheel movements.
A t l o w s p e e d , e . g . i n a t o w n o r w h e n p a r k i n g , t h e
steering angle of the wheels is reinforced, i.e.
the steering becomes very direct.
In the higher speed range, on the other hand,
the steering angle is reduced more and more.
This improves the handling capability of your
BMW over the entire speed range.
In critical situations, the system can make tar-
geted corrections to the steering angle pro-
vided by the driver and thus stabilize the vehicle
before the driver intervenes. This stability-pro-
moting intervention is deactivated when DSC is
switched off, refer to page82.
Malfunction
The warning lamp lights up. The active
steering is no longer operational. At low
speed, larger steering wheel move-
ments are required, while the vehicle reacts
more sensitively to steering wheel movements
in the higher road-speed range. Have the sys-
tem checked.
If the warning lamp lights up during the first
engine starting following a power supply inter-
ruption, the system must be activated by being
initialized.
Page 133 of 217
On/off and tone
132
On/off and tone
The following audio sources have shared
controls and setting options:
>Radio Business
>CD player
>CD changer
*
Controls
The audio sources can be operated using:
>Buttons near CD player
>Control Center
>Buttons on the steering wheel, refer to
page11
Buttons near CD player
The layout of the buttons can vary depending
on your vehicle's equipment.
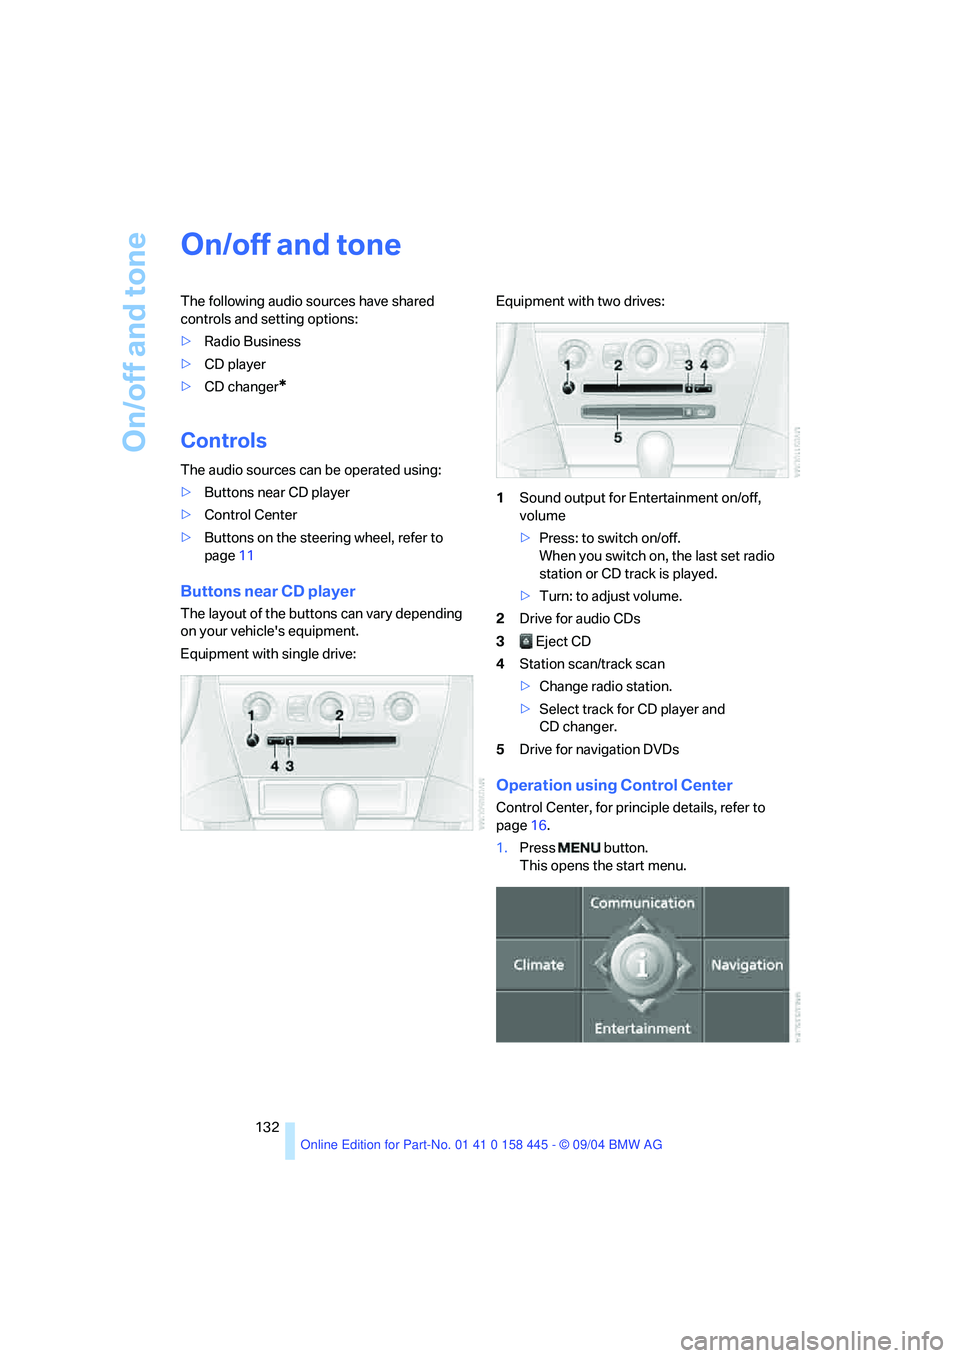
Equipment with single drive:Equipment with two drives:
1Sound output for Entertainment on/off,
volume
>Press: to switch on/off.
When you switch on, the last set radio
station or CD track is played.
>Turn: to adjust volume.
2Drive for audio CDs
3 Eject CD
4Station scan/track scan
>Change radio station.
>Select track for CD player and
CD changer.
5Drive for navigation DVDs
Operation using Control Center
Control Center, for principle details, refer to
page16.
1.Press button.
This opens the start menu.
Page 134 of 217
Navigation
Entertainment
Driving tips
133Reference
At a glance
Controls
Communications
Mobility
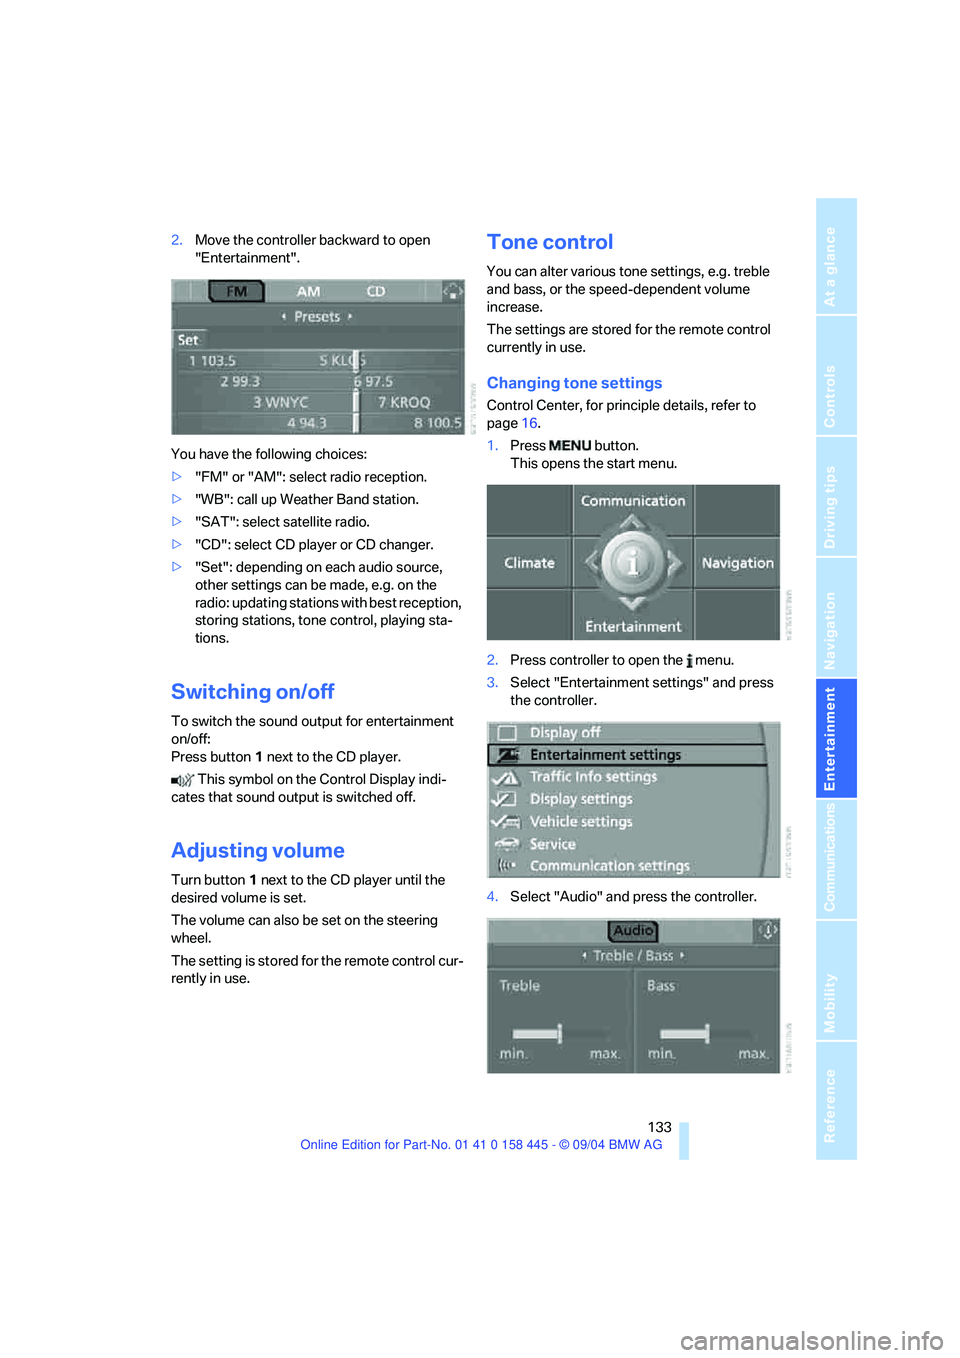
2.Move the controller backward to open
"Entertainment".
You have the following choices:
>"FM" or "AM": select radio reception.
>"WB": call up Weather Band station.
>"SAT": select satellite radio.
>"CD": select CD player or CD changer.
>"Set": depending on each audio source,
other settings can be made, e.g. on the
radio: updating stations with best reception,
storing stations, tone control, playing sta-
tions.
Switching on/off
To switch the sound output for entertainment
on/off:
Press button1 next to the CD player.
This symbol on the Control Display indi-
cates that sound output is switched off.
Adjusting volume
Turn button1 next to the CD player until the
desired volume is set.
The volume can also be set on the steering
wheel.
The setting is stored for the remote control cur-
rently in use.
Tone control
You can alter various tone settings, e.g. treble
and bass, or the speed-dependent volume
increase.
The settings are stored for the remote control
currently in use.
Changing tone settings
Control Center, for principle details, refer to
page16.
1.Press button.
This opens the start menu.
2.Press controller to open the menu.
3.Select "Entertainment settings" and press
the controller.
4.Select "Audio" and press the controller.
Page 138 of 217
Navigation
Entertainment
Driving tips
137Reference
At a glance
Controls
Communications
Mobility
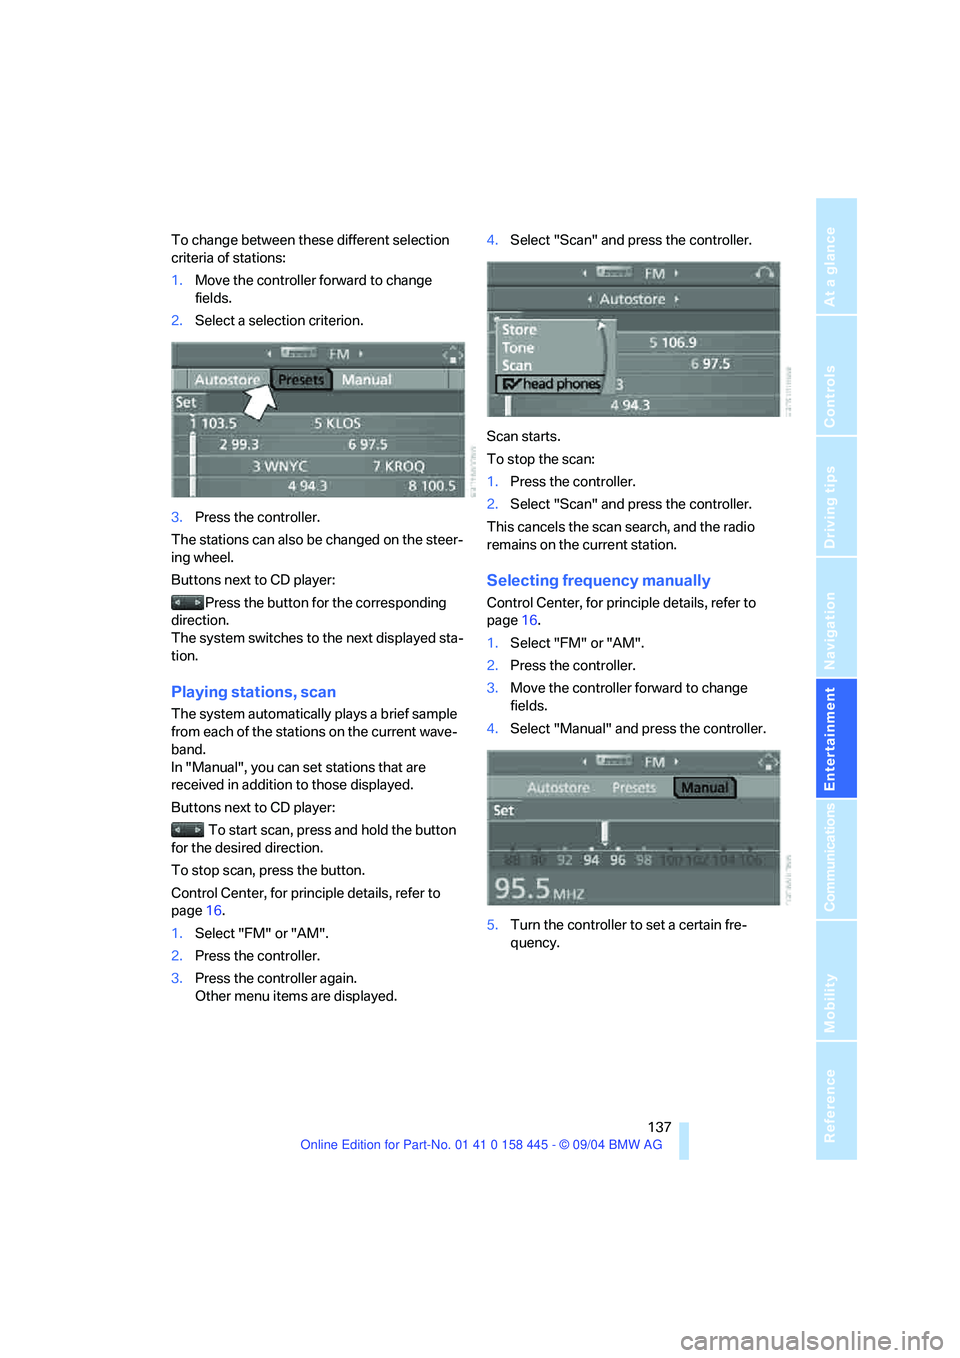
To change between these different selection
criteria of stations:
1.Move the controller forward to change
fields.
2.Select a selection criterion.
3.Press the controller.
The stations can also be changed on the steer-
ing wheel.
Buttons next to CD player:
Press the button for the corresponding
direction.
The system switches to the next displayed sta-
tion.
Playing stations, scan
The system automatically plays a brief sample
from each of the stations on the current wave-
band.
In "Manual", you can set stations that are
received in addition to those displayed.
Buttons next to CD player:
To start scan, press and hold the button
for the desired direction.
To stop scan, press the button.
Control Center, for principle details, refer to
page16.
1.Select "FM" or "AM".
2.Press the controller.
3.Press the controller again.
Other menu items are displayed.4.Select "Scan" and press the controller.
Scan starts.
To stop the scan:
1.Press the controller.
2.Select "Scan" and press the controller.
This cancels the scan search, and the radio
remains on the current station.
Selecting frequency manually
Control Center, for principle details, refer to
page16.
1.Select "FM" or "AM".
2.Press the controller.
3.Move the controller forward to change
fields.
4.Select "Manual" and press the controller.
5.Turn the controller to set a certain fre-
quency.
Page 145 of 217
CD player and CD changer
144
CD changer: starting CD
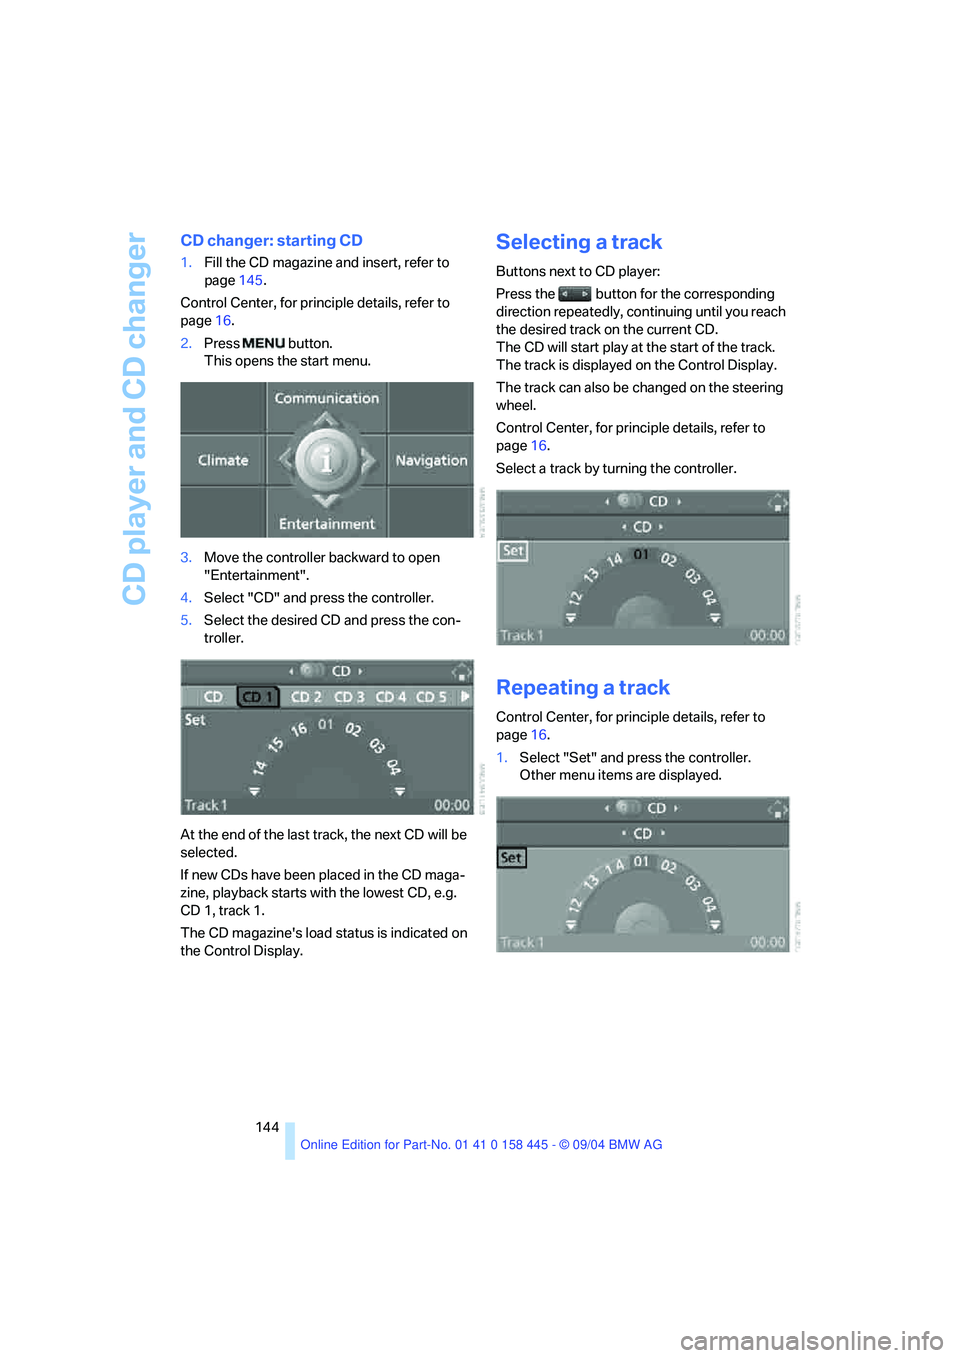
1.Fill the CD magazine and insert, refer to
page145.
Control Center, for principle details, refer to
page16.
2.Press button.
This opens the start menu.
3.Move the controller backward to open
"Entertainment".
4.Select "CD" and press the controller.
5.Select the desired CD and press the con-
troller.
At the end of the last track, the next CD will be
selected.
If new CDs have been placed in the CD maga-
zine, playback starts with the lowest CD, e.g.
CD 1, track 1.
The CD magazine's load status is indicated on
the Control Display.
Selecting a track
Buttons next to CD player:
Press the button for the corresponding
direction repeatedly, continuing until you reach
the desired track on the current CD.
The CD will start play at the start of the track.
The track is displayed on the Control Display.
The track can also be changed on the steering
wheel.
Control Center, for principle details, refer to
page16.
Select a track by turning the controller.
Repeating a track
Control Center, for principle details, refer to
page16.
1.Select "Set" and press the controller.
Other menu items are displayed.
Page 172 of 217
Mobility
171Reference
At a glance
Controls
Driving tips
Communications
Navigation
Entertainment
heat when tested under controlled conditions
on a specified indoor laboratory test wheel.
Sustained high temperature can cause the
material of the tire to degenerate and reduce
tire life, and excessive temperature can lead to
sudden tire failure. The grade C corresponds to
a level of performance which all passenger car
tires must meet under the Federal Motor Vehi-
cle Safety Standard No. 109. Grades B and A
represent higher levels of performance on the
laboratory test wheel than the minimum
required by law.
The temperature grade for this tire is
established for a tire that is properly
inflated and not overloaded. Excessive speed,
underinflation, or excessive loading, either sep-
arately or in combination, can cause heat
buildup and possible tire failure.<
RSC – run-flat tires
You will recognize run-flat tires by a circular
symbol containing the letters RSC on the side
of the tire, refer to page172.
M+S
Winter and all-season tires.
These have better winter properties than sum-
mer tires.
Tire condition
Inspect your tires frequently for tread wear,
signs of damage and foreign objects lodged in
the tread, and check the tread depth.
Minimum tread depth
The tread depth should not drop below 0.12 in/
3 mm, although, for example, European legisla-
tion only specifies a minimum tread depth of
0.063 in/1.6 mm.
At tread depths below 0.12 in/3 mm there is an
increased risk of high-speed hydroplaning,
even when only small amounts of water are
present on the road surface.
Winter tires noticeably loose their suitability for
winter use below a tread depth of 0.16 in/4 mm. New tires should be mounted in the interest of
safety.
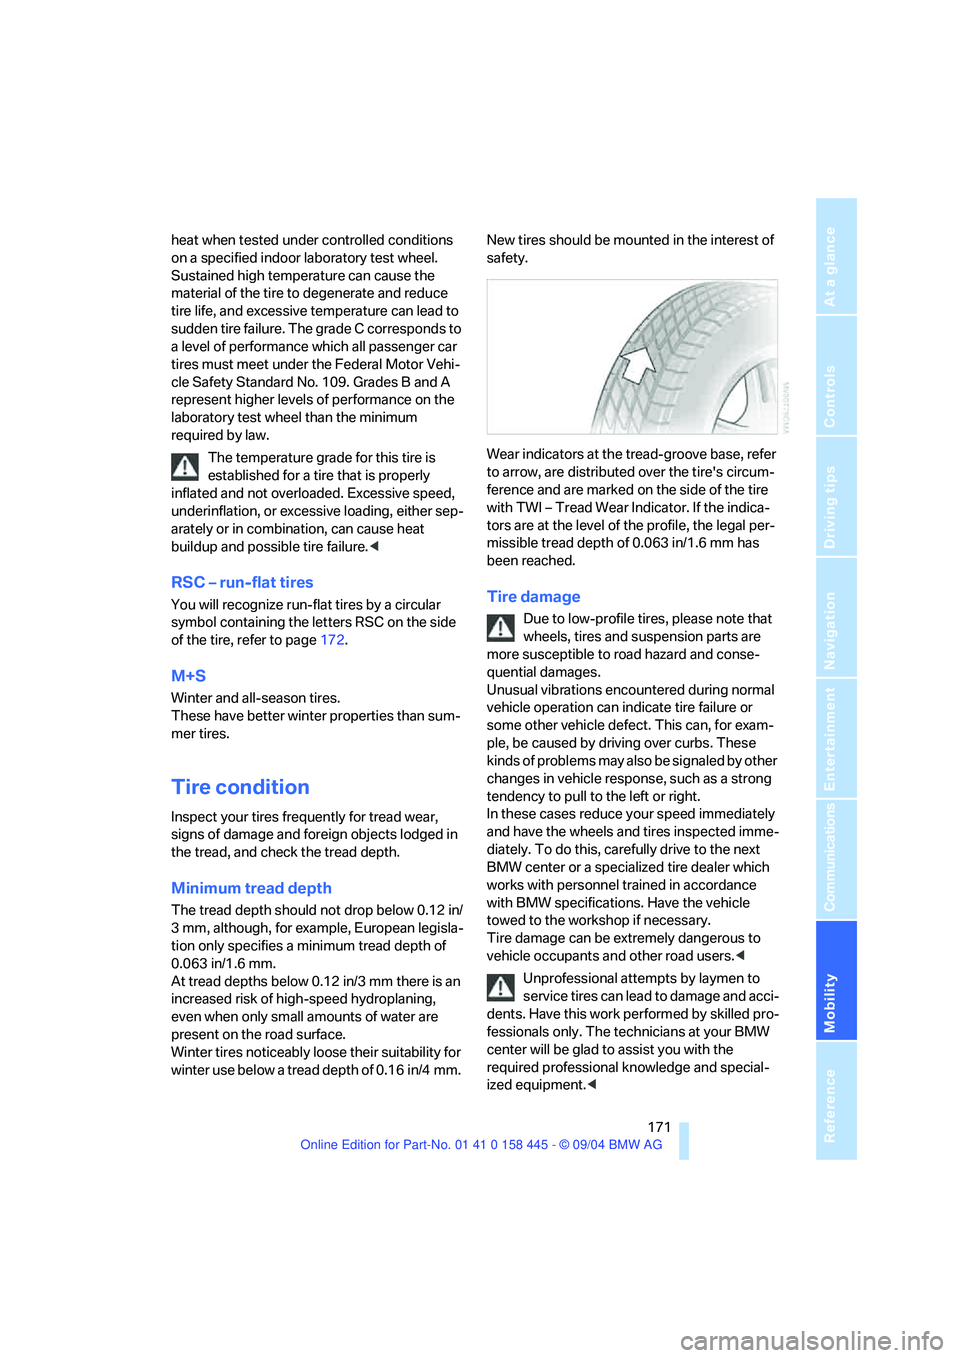
Wear indicators at the tread-groove base, refer
to arrow, are distributed over the tire's circum-
ference and are marked on the side of the tire
with TWI – Tread Wear Indicator. If the indica-
tors are at the level of the profile, the legal per-
missible tread depth of 0.063 in/1.6 mm has
been reached.
Tire damage
Due to low-profile tires, please note that
wheels, tires and suspension parts are
more susceptible to road hazard and conse-
quential damages.
Unusual vibrations encountered during normal
vehicle operation can indicate tire failure or
some other vehicle defect. This can, for exam-
ple, be caused by driving over curbs. These
kinds of problems may also be signaled by other
changes in vehicle response, such as a strong
tendency to pull to the left or right.
In these cases reduce your speed immediately
and have the wheels and tires inspected imme-
diately. To do this, carefully drive to the next
BMW center or a specialized tire dealer which
works with personnel trained in accordance
with BMW specifications. Have the vehicle
towed to the workshop if necessary.
Tire damage can be extremely dangerous to
vehicle occupants and other road users.<
Unprofessional attempts by laymen to
service tires can lead to damage and acci-
dents. Have this work performed by skilled pro-
fessionals only. The technicians at your BMW
center will be glad to assist you with the
required professional knowledge and special-
ized equipment.<