2005 BMW 645CI CONVERTIBLE ESP
[x] Cancel search: ESPPage 39 of 217
Opening and closing
38
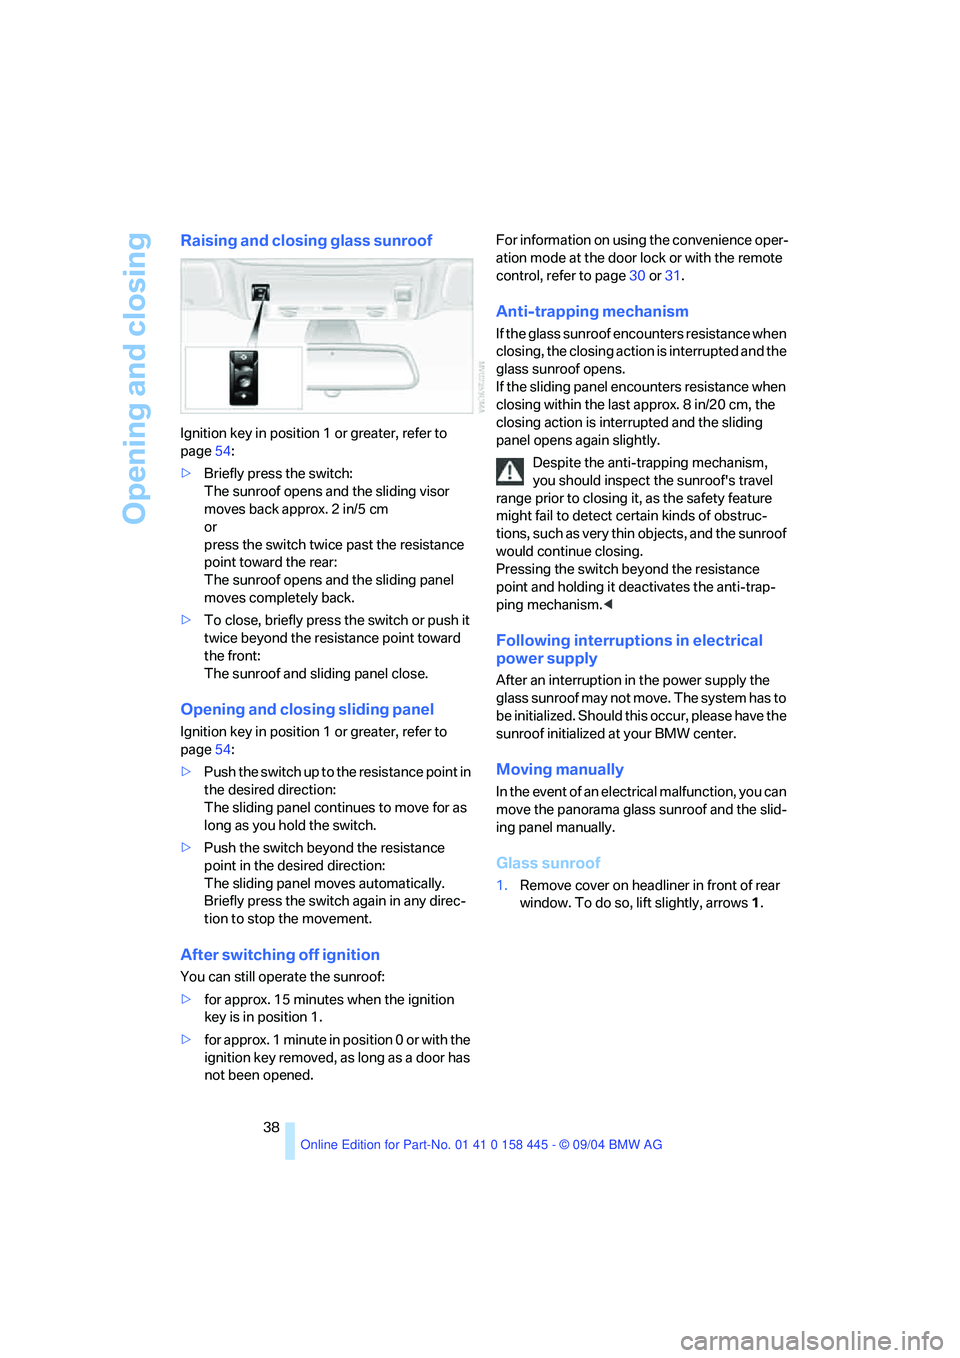
Raising and closing glass sunroof
Ignition key in position 1 or greater, refer to
page54:
>Briefly press the switch:
The sunroof opens and the sliding visor
moves back approx. 2 in/5 cm
or
press the switch twice past the resistance
point toward the rear:
The sunroof opens and the sliding panel
moves completely back.
>To close, briefly press the switch or push it
twice beyond the resistance point toward
the front:
The sunroof and sliding panel close.
Opening and closing sliding panel
Ignition key in position 1 or greater, refer to
page54:
>Push the switch up to the resistance point in
the desired direction:
The sliding panel continues to move for as
long as you hold the switch.
>Push the switch beyond the resistance
point in the desired direction:
The sliding panel moves automatically.
Briefly press the switch again in any direc-
tion to stop the movement.
After switching off ignition
You can still operate the sunroof:
>for approx. 15 minutes when the ignition
key is in position 1.
>for approx. 1 minute in position 0 or with the
ignition key removed, as long as a door has
not been opened.For information on using the convenience oper-
ation mode at the door lock or with the remote
control, refer to page30 or31.
Anti-trapping mechanism
If the glass sunroof encounters resistance when
closing, the closing action is interrupted and the
glass sunroof opens.
If the sliding panel encounters resistance when
closing within the last approx. 8 in/20 cm, the
closing action is interrupted and the sliding
panel opens again slightly.
Despite the anti-trapping mechanism,
you should inspect the sunroof's travel
range prior to closing it, as the safety feature
might fail to detect certain kinds of obstruc-
tions, such as very thin objects, and the sunroof
would continue closing.
Pressing the switch beyond the resistance
point and holding it deactivates the anti-trap-
ping mechanism.<
Following interruptions in electrical
power supply
After an interruption in the power supply the
glass sunroof may not move. The system has to
b e i n i t i a l i z e d . S h o u l d t h i s o c c u r , p l e a s e h a v e t h e
sunroof initialized at your BMW center.
Moving manually
In the event of an electrical malfunction, you can
move the panorama glass sunroof and the slid-
ing panel manually.
Glass sunroof
1.Remove cover on headliner in front of rear
window. To do so, lift slightly, arrows1.
Page 41 of 217
Opening and closing
40 dren away from the travel path of the convert-
ible top.
For safety reasons, only operate the convertible
top when the vehicle is at a standstill.<
If you have initiated top operation with the
vehicle at a stop and then start to drive,
e.g. at a traffic light, you can continue the ini-
tiated operation up to a speed of 20 mph/
30 km/h:
To do so, press and hold the corresponding
button.<
Partial vacuums that occur at higher
speeds in the passenger compartment
can make the convertible top flap. Use the auto-
matic climate control to increase the air supply
so that a partial vacuum in the vehicle does not
occur.<
Prior to opening and closing
>Read carefully and comply with the safety
precautions that appear above.
>Ensure that the convertible top compart-
ment floor in the luggage compartment is
folded down, refer to page34, as otherwise
the convertible top cannot be opened.
>Ensure that the luggage compartment lid is
closed.
Opening and closing
With the ignition key in position 1 or greater,
refer to page54, and the vehicle stationary:
So as not to place an excessive load on
the battery, only operate the convertible
top with the engine running, if possible.
Before closing the convertible top, remove for-
eign bodies from the windshield frame, as these
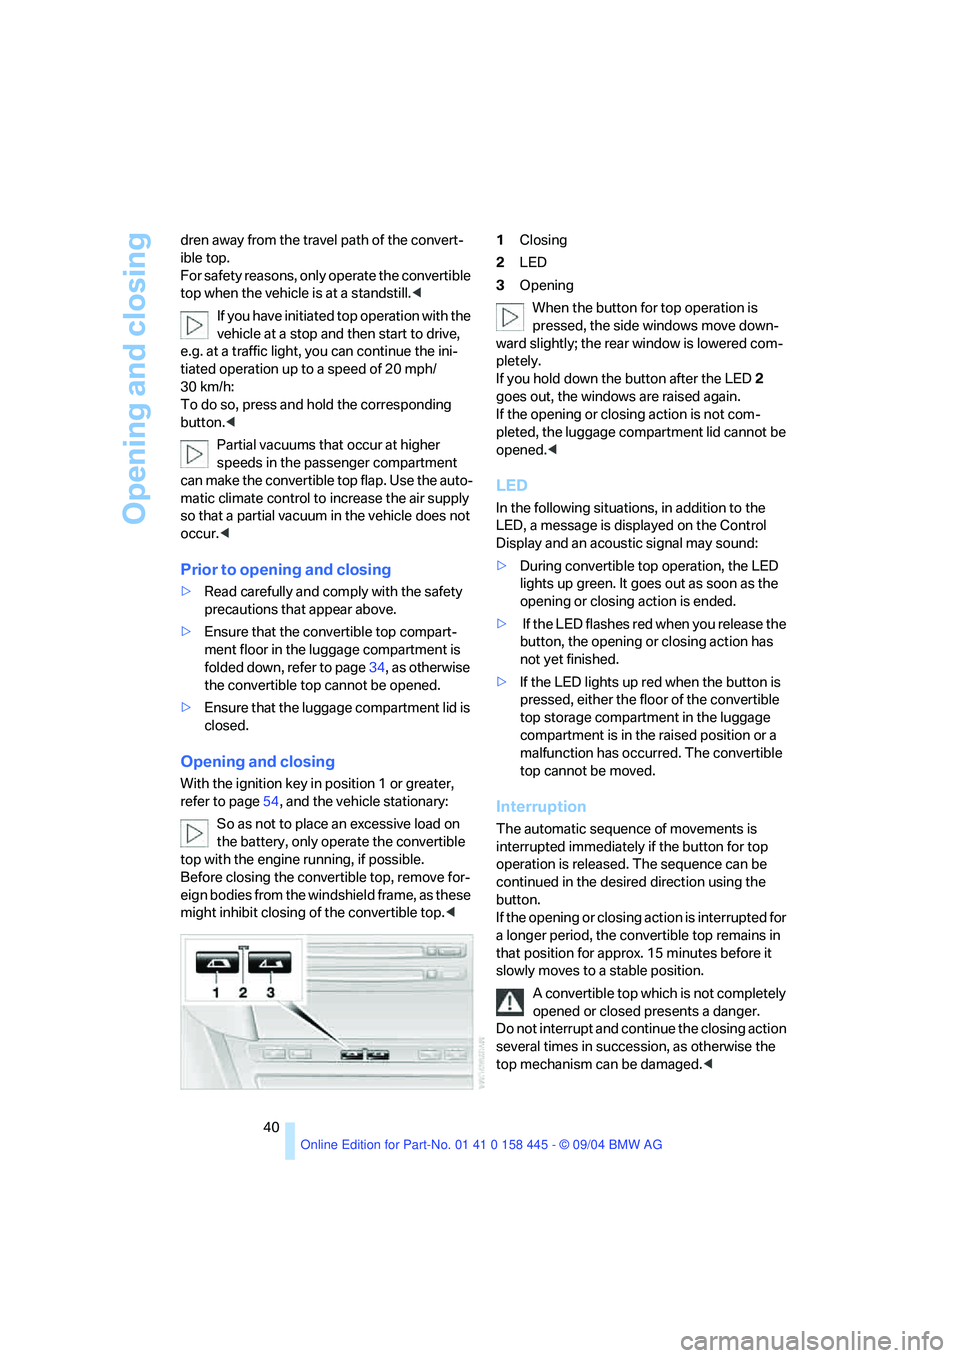
might inhibit closing of the convertible top.<1Closing
2LED
3Opening
When the button for top operation is
pressed, the side windows move down-
ward slightly; the rear window is lowered com-
pletely.
If you hold down the button after the LED2
goes out, the windows are raised again.
If the opening or closing action is not com-
pleted, the luggage compartment lid cannot be
opened.<
LED
In the following situations, in addition to the
LED, a message is displayed on the Control
Display and an acoustic signal may sound:
>During convertible top operation, the LED
lights up green. It goes out as soon as the
opening or closing action is ended.
> If the LED flashes red when you release the
button, the opening or closing action has
not yet finished.
>If the LED lights up red when the button is
pressed, either the floor of the convertible
top storage compartment in the luggage
compartment is in the raised position or a
malfunction has occurred. The convertible
top cannot be moved.
Interruption
The automatic sequence of movements is
interrupted immediately if the button for top
operation is released. The sequence can be
continued in the desired direction using the
button.
If the opening or closing action is interrupted for
a longer period, the convertible top remains in
that position for approx. 15 minutes before it
slowly moves to a stable position.
A convertible top which is not completely
opened or closed presents a danger.
Do not interrupt and continue the closing action
several times in succession, as otherwise the
top mechanism can be damaged.<
Page 45 of 217
Adjustments
44
Adjustments
Sitting safely
The ideal sitting position can make a vital con-
tribution to relaxed, fatigue-free driving. The sit-
ting position also plays an important role
together with the safety belts and airbags in
providing occupants with maximum levels of
passive safety in an accident. To ensure that
the safety systems operate with optimal effi-
ciency, we strongly urge you to observe the
instructions contained in the following section.
For additional information on transporting chil-
dren safely, refer to page52.
Airbags
Always maintain an adequate distance
between yourself and the airbags. Always
hold the steering wheel by its rim with hands at
the 9 o'clock and 3 o'clock positions, to mini-
mize the risk of injuries to your hands and arms
in the event of airbag deployment.
No one and nothing is to come between the air-
bags and the seat occupant.
Do not use the cover of the front airbag on the
front passenger side as a storage area. Make
sure that the front passenger is sitting correctly
and does not rest feet or legs on the instrument
panel, otherwise leg injuries can occur if the
knee and front airbags are triggered.
Never let an occupant's head rest near or on a
side airbag because the inflating airbag could
cause a serious or fatal injury.<
Even if you adhere to all the instructions, inju-
ries resulting from contact with airbags cannot
be fully excluded, depending on the circum-
stances. The ignition and inflation noise may
provoke a mild hearing loss in extremely sensi-
tive individuals. This effect is usually only tem-
porary.
For airbag locations and additional information
on airbags, refer to page86.
Safety belt
Fasten your safety belt before starting any trip.
Airbags complement the safety belt as an addi-
tional safety device, but they do not represent a
substitute.
Your vehicle has four seats that are all equipped
with a safety belt.
At all times, occupants should sit upright
and be properly restrained: infants and
small children in appropriate child-restraint sys-
tems; larger children and adults using the safety
belts.
Never allow more than one person to wear a sin-
gle safety belt. Never allow infants or small chil-
dren to ride in a passenger's lap.
Expectant mothers should always wear their
safety belts, taking care to position the lap belt
against the lower hips, where it will not exert
pressure against the abdominal area.
Do not route the belt across your neck, or run it
across sharp edges. Be sure that the belt does
not become caught or jammed. Avoid twisting
the belt while routing it firmly across the hips
and shoulder. Do not allow the belt to rest
against hard or fragile objects. Otherwise, in the
event of a frontal impact, a loose lap belt could
slide over your hips, leading to abdominal injury.
Avoid wearing clothing that prevents the belt
from fitting properly and pull the shoulder belt
periodically to readjust the tension across your
lap in order to avoid a reduction in the retention
effect of the safety belt.<
For instructions on operating safety belts, refer
to page48.
Seats
Note before adjusting
Never attempt to adjust your seat while
operating the vehicle. The seat could
respond with unexpected movement, and the
ensuing loss of vehicle control could lead to an
accident.
Page 51 of 217
Adjustments
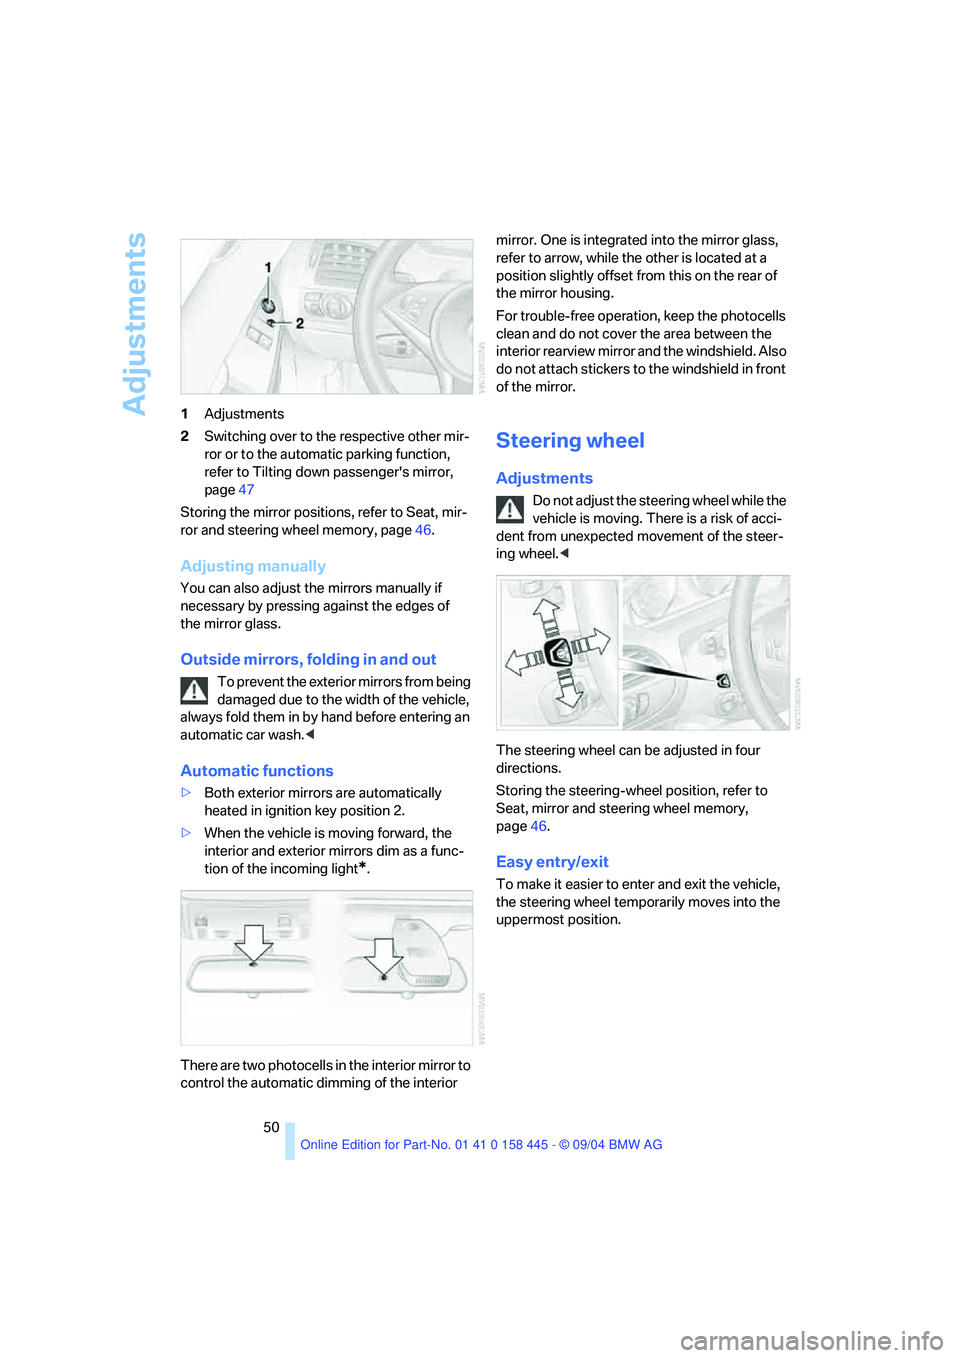
50 1Adjustments
2Switching over to the respective other mir-
ror or to the automatic parking function,
refer to Tilting down passenger's mirror,
page47
Storing the mirror positions, refer to Seat, mir-
ror and steering wheel memory, page46.
Adjusting manually
You can also adjust the mirrors manually if
necessary by pressing against the edges of
the mirror glass.
Outside mirrors, folding in and out
To prevent the exterior mirrors from being
damaged due to the width of the vehicle,
always fold them in by hand before entering an
automatic car wash.<
Automatic functions
>Both exterior mirrors are automatically
heated in ignition key position 2.
>When the vehicle is moving forward, the
interior and exterior mirrors dim as a func-
tion of the incoming light
*.
There are two photocells in the interior mirror to
control the automatic dimming of the interior mirror. One is integrated into the mirror glass,
refer to arrow, while the other is located at a
position slightly offset from this on the rear of
the mirror housing.
For trouble-free operation, keep the photocells
clean and do not cover the area between the
interior rearview mirror and the windshield. Also
do not attach stickers to the windshield in front
of the mirror.
Steering wheel
Adjustments
Do not adjust the steering wheel while the
vehicle is moving. There is a risk of acci-
dent from unexpected movement of the steer-
ing wheel.<
The steering wheel can be adjusted in four
directions.
Storing the steering-wheel position, refer to
Seat, mirror and steering wheel memory,
page46.
Easy entry/exit
To make it easier to enter and exit the vehicle,
the steering wheel temporarily moves into the
uppermost position.
Page 52 of 217
Controls
51Reference
At a glance
Driving tips
Communications
Navigation
Entertainment
Mobility
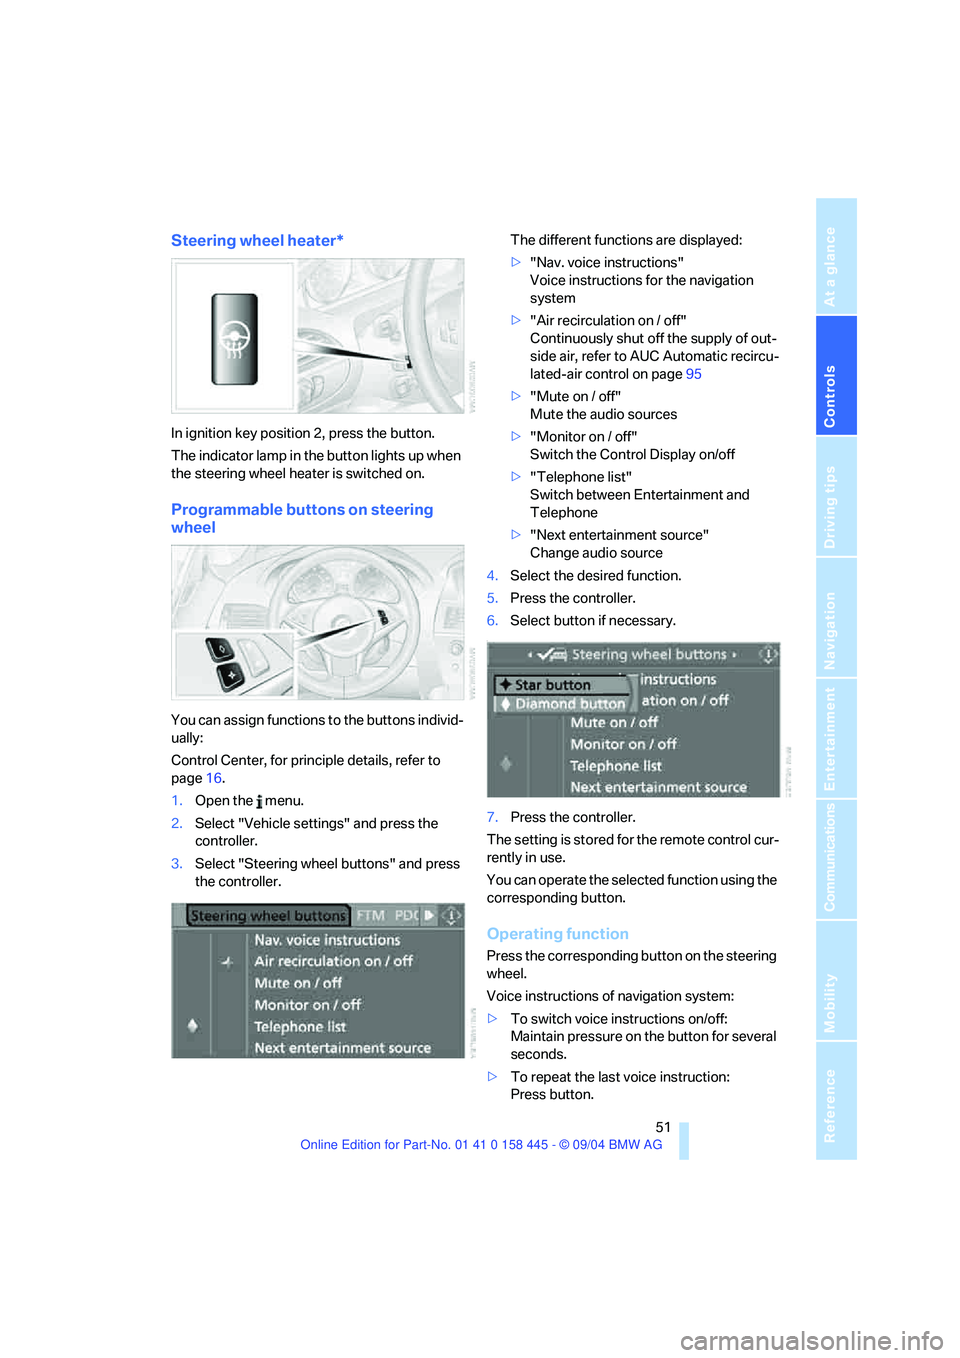
Steering wheel heater*
In ignition key position 2, press the button.
The indicator lamp in the button lights up when
the steering wheel heater is switched on.
Programmable buttons on steering
wheel
You can assign functions to the buttons individ-
ually:
Control Center, for principle details, refer to
page16.
1.Open the menu.
2.Select "Vehicle settings" and press the
controller.
3.Select "Steering wheel buttons" and press
the controller.The different functions are displayed:
>"Nav. voice instructions"
Voice instructions for the navigation
system
>"Air recirculation on / off"
Continuously shut off the supply of out-
side air, refer to AUC Automatic recircu-
lated-air control on page95
>"Mute on / off"
Mute the audio sources
>"Monitor on / off"
Switch the Control Display on/off
>"Telephone list"
Switch between Entertainment and
Telephone
>"Next entertainment source"
Change audio source
4.Select the desired function.
5.Press the controller.
6.Select button if necessary.
.
7.Press the controller.
The setting is stored for the remote control cur-
rently in use.
You can operate the selected function using the
corresponding button.
Operating function
Press the corresponding button on the steering
wheel.
Voice instructions of navigation system:
>To switch voice instructions on/off:
Maintain pressure on the button for several
seconds.
>To repeat the last voice instruction:
Press button.
Page 54 of 217
Controls
53Reference
At a glance
Driving tips
Communications
Navigation
Entertainment
Mobility
Information regarding this is located near the
buckle latch of each safety belt.
To lock safety belt
Pull the entire length of the belt from the belt
retractor. Allow the reel to retract the belt
somewhat and engage the buckle, then tighten
the belt against the child-restraint system. The
retraction mechanism is now locked.
To unlock safety belt
Release the buckle, remove the child-restraint
system and allow the belt retractor to reel the
belt completely in.
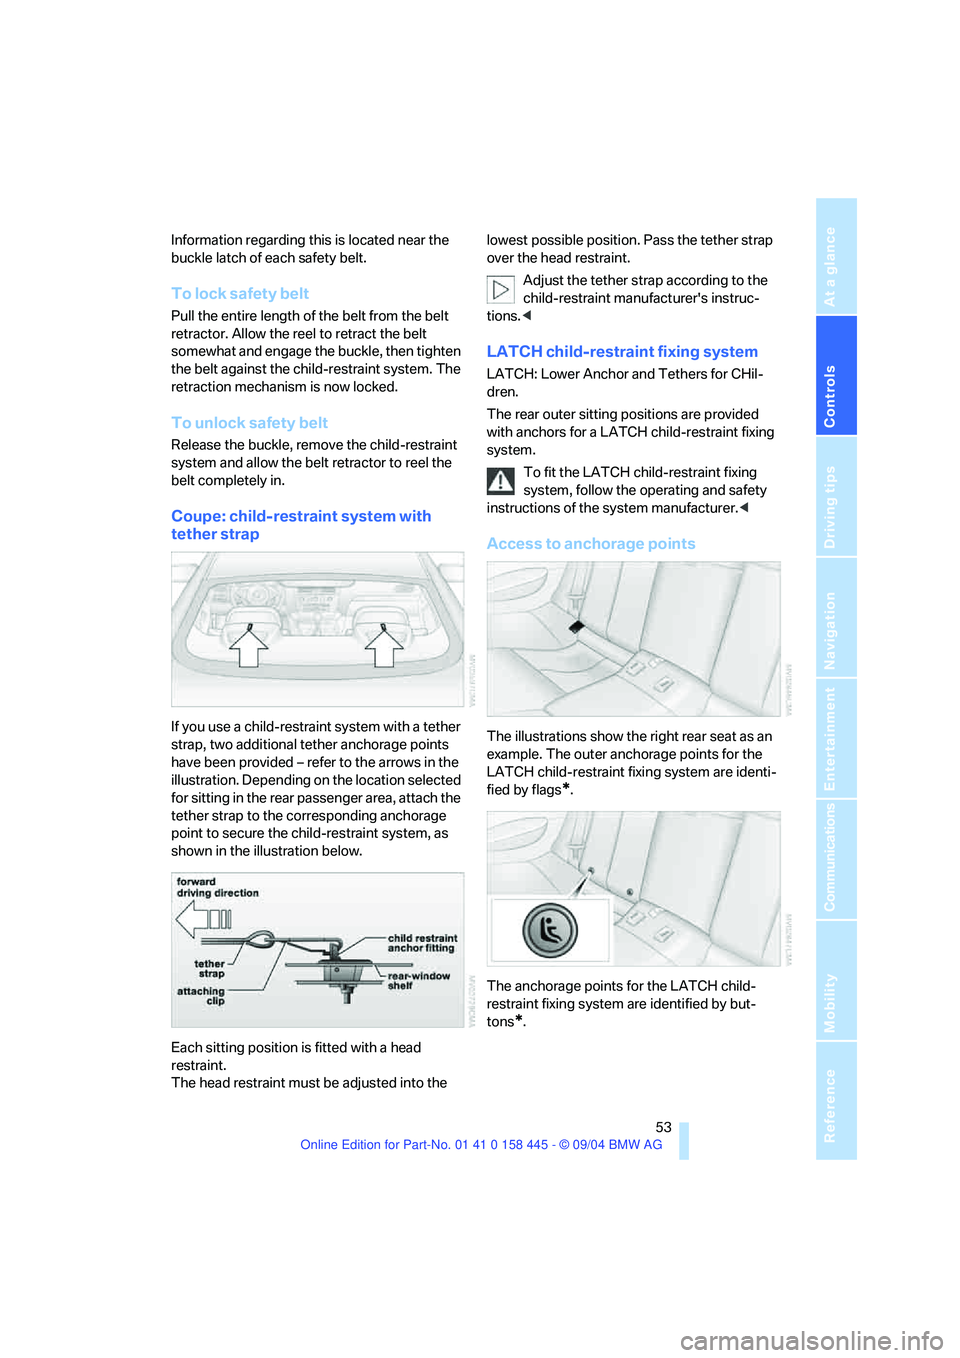
Coupe: child-restraint system with
tether strap
If you use a child-restraint system with a tether
strap, two additional tether anchorage points
have been provided – refer to the arrows in the
illustration. Depending on the location selected
for sitting in the rear passenger area, attach the
tether strap to the corresponding anchorage
point to secure the child-restraint system, as
shown in the illustration below.
Each sitting position is fitted with a head
restraint.
The head restraint must be adjusted into the lowest possible position. Pass the tether strap
over the head restraint.
Adjust the tether strap according to the
child-restraint manufacturer's instruc-
tions.<
LATCH child-restraint fixing system
LATCH: Lower Anchor and Tethers for CHil-
dren.
The rear outer sitting positions are provided
with anchors for a LATCH child-restraint fixing
system.
To fit the LATCH child-restraint fixing
system, follow the operating and safety
instructions of the system manufacturer.<
Access to anchorage points
The illustrations show the right rear seat as an
example. The outer anchorage points for the
LATCH child-restraint fixing system are identi-
fied by flags
*.
The anchorage points for the LATCH child-
restraint fixing system are identified by but-
tons
*.
Page 56 of 217
Controls
55Reference
At a glance
Driving tips
Communications
Navigation
Entertainment
Mobility
SMG Sequential manual transmission*
and automatic transmission*
Your BMW is equipped with the convenience
starting feature. It is sufficient to turn the igni-
tion key only briefly to position 3 and then
release it right away. The system responds by
automatically engaging the starter for a certain
period and allowing it to run until the engine
starts, after which it then disengages automati-
cally.
SMG Sequential manual transmission*
1.Press the brake pedal.
2.Engage selector-lever position N.
3.Start the engine.
If the engine does not start, engage the
last gear selected again, refer to instru-
ment cluster display, and then shift into posi-
tion N.<
Automatic transmission with
Steptronic*
1.Press the brake pedal.
2.Engage selector-lever position P or N.
3.Start the engine.
Switching off engine
Do not remove the ignition key while the
vehicle is rolling, as otherwise the steer-
ing wheel lock will immobilize the steering.
When leaving the vehicle, remove the ignition
key and lock the steering.
When parking on a downhill incline, apply the
handbrake, as otherwise the vehicle could roll
away.<
Manual transmission
1.Turn the ignition key to position 1 or 0.
2.Shift into first gear or reverse.
SMG Sequential manual transmission*
1.Engage a drive position.
2.Turn the ignition key to position 1 or 0.
A signal sounds on stopping the engine.
Automatic transmission with
Steptronic*
1.Engage selector-lever position P.
2.Turn the ignition key to position 1 or 0.
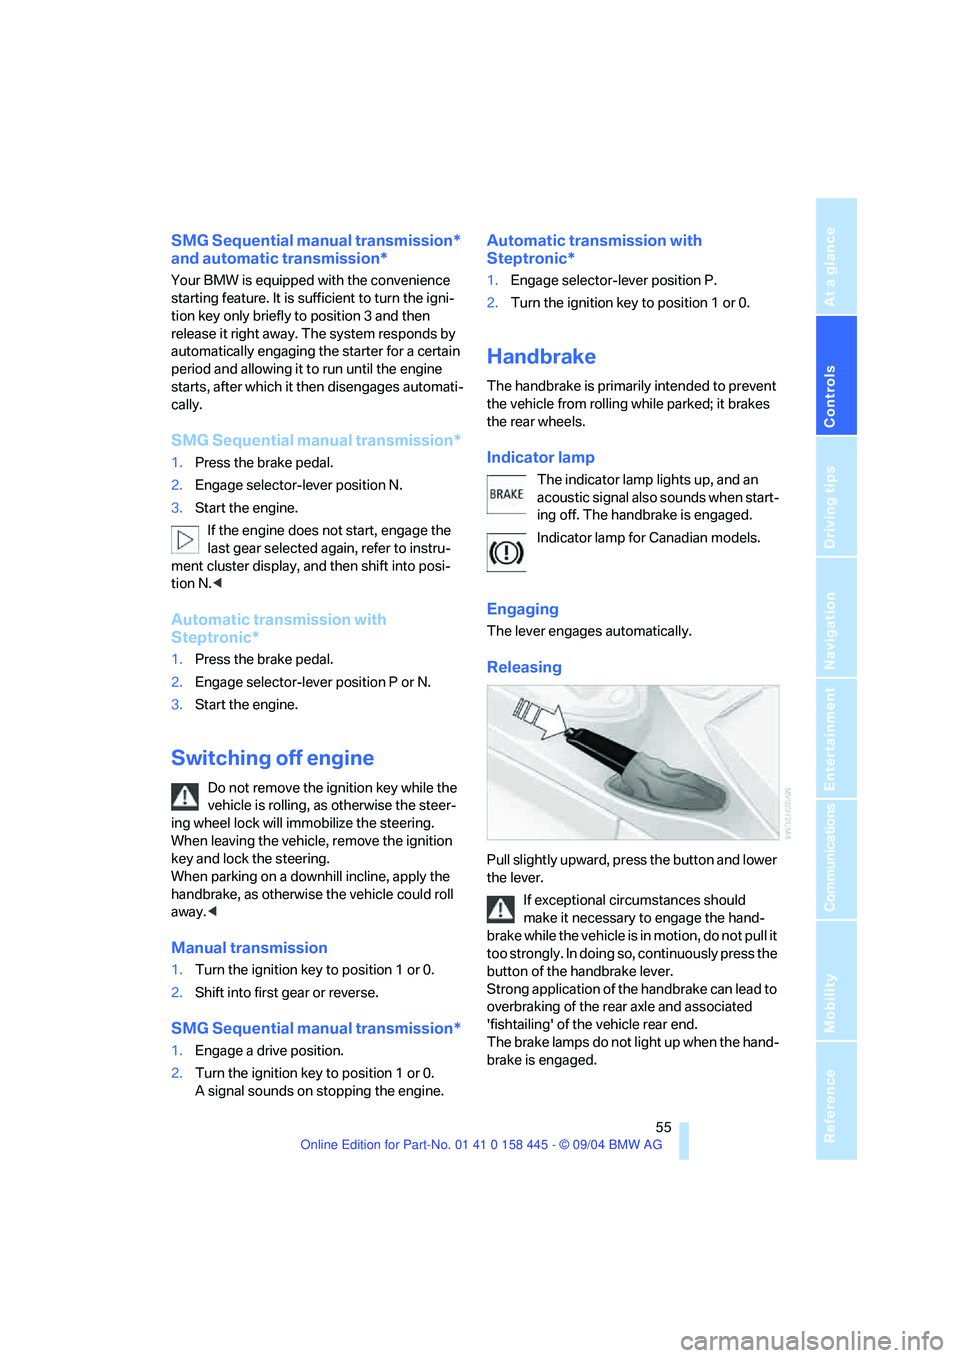
Handbrake
The handbrake is primarily intended to prevent
the vehicle from rolling while parked; it brakes
the rear wheels.
Indicator lamp
The indicator lamp lights up, and an
acoustic signal also sounds when start-
ing off. The handbrake is engaged.
Indicator lamp for Canadian models.
Engaging
The lever engages automatically.
Releasing
Pull slightly upward, press the button and lower
the lever.
If exceptional circumstances should
make it necessary to engage the hand-
brake while the vehicle is in motion, do not pull it
too strongly. In doing so, continuously press the
button of the handbrake lever.
Strong application of the handbrake can lead to
overbraking of the rear axle and associated
'fishtailing' of the vehicle rear end.
The brake lamps do not light up when the hand-
brake is engaged.
Page 60 of 217
Controls
59Reference
At a glance
Driving tips
Communications
Navigation
Entertainment
Mobility
recommended for a performance-oriented driv-
ing style. It is engaged automatically when the
Dynamic Driving Control is activated, see
below.
When the selector lever is briefly moved for-
ward or back, the manual mode is activated and
the Steptronic shifts gear. The instrument clus-
ter shows M1 through M6.
Upshifts and downshifts are executed only
when they will result in a plausible combination
of engine and vehicle speed; thus, for example,
a downshift that would cause the engine to
overrev will not be executed by the system. The
selected gear appears briefly in the instrument
cluster, followed by the current gear.
To use the automatic function again, move the
selector lever to the right into position D.
Dynamic Driving Control
The Dynamic Driving Control makes it possible
for your BMW to react in an even more perfor-
mance-oriented manner at the push of a button:
>The engine responds more spontaneously
to accelerator pedal movements.
>Cruise control:
The stored speed is reached more quickly
when it is requested.
Additionally with SMG:
>Gearshifts are faster.
>The engine speed range is used optimally in
the Drive mode.
With automatic transmission:
>The Sport program is activated.
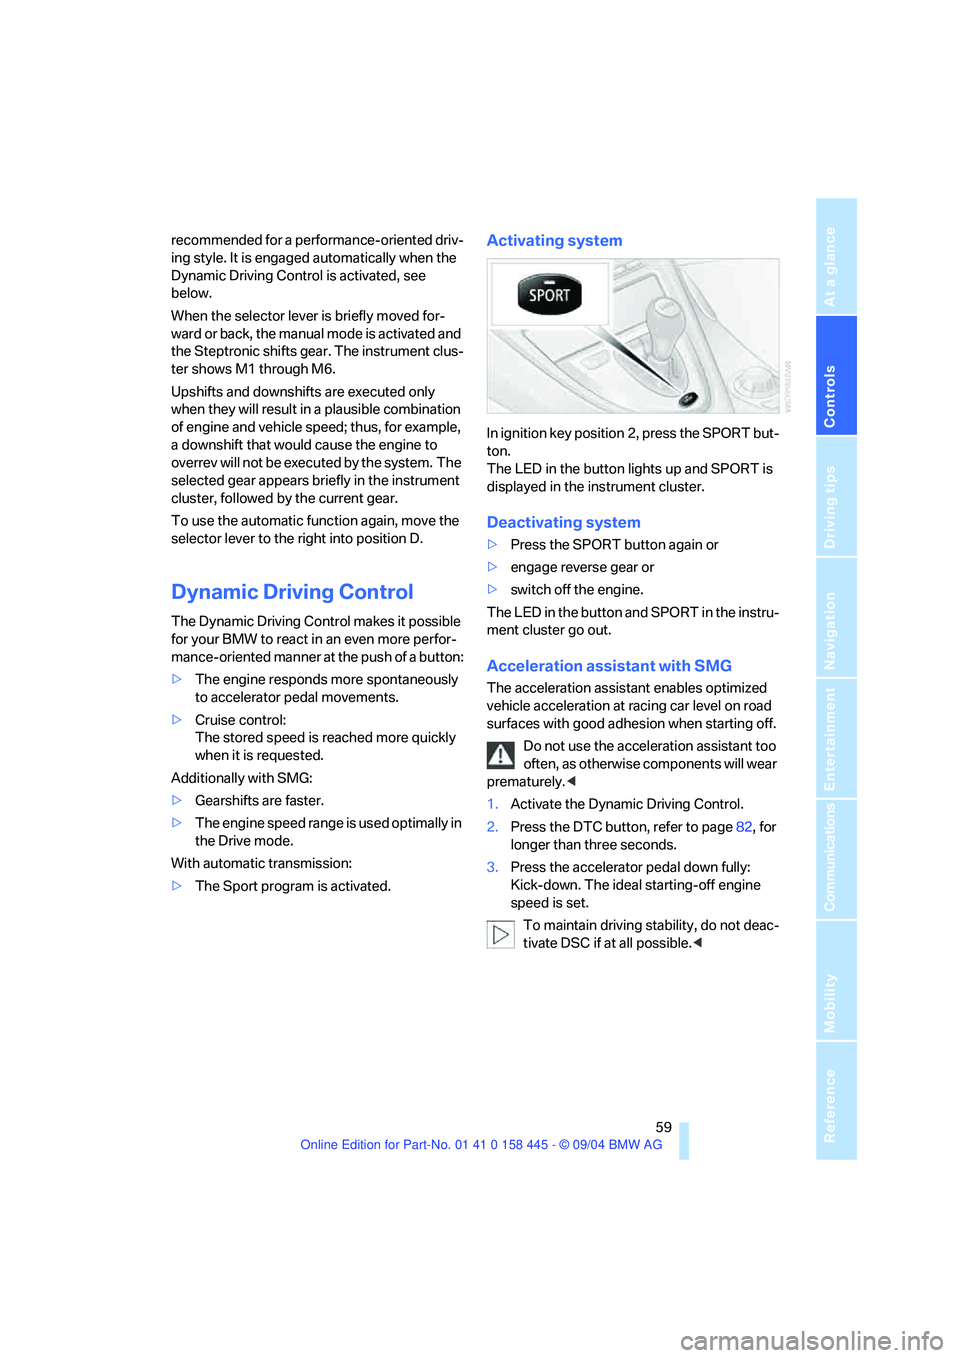
Activating system
In ignition key position 2, press the SPORT but-
ton.
The LED in the button lights up and SPORT is
displayed in the instrument cluster.
Deactivating system
>Press the SPORT button again or
>engage reverse gear or
>switch off the engine.
The LED in the button and SPORT in the instru-
ment cluster go out.
Acceleration assistant with SMG
The acceleration assistant enables optimized
vehicle acceleration at racing car level on road
surfaces with good adhesion when starting off.
Do not use the acceleration assistant too
often, as otherwise components will wear
prematurely.<
1.Activate the Dynamic Driving Control.
2.Press the DTC button, refer to page82, for
longer than three seconds.
3.Press the accelerator pedal down fully:
Kick-down. The ideal starting-off engine
speed is set.
To maintain driving stability, do not deac-
tivate DSC if at all possible.<