2005 BMW 545I SEDAN tow
[x] Cancel search: towPage 175 of 221

Wheels and tires
174 Wear indicators at the tread-groove base, refer
to arrow, are distributed over the tire's circum-
ference and are marked on the side of the tire
with TWI – Tread Wear Indicator. If the indica-
tors are at the level of the tread, the legally per-
missible tread depth of 0.063 in/1,6 mm has
been reached.
Wheel/tire damage
Please note that low-profile tires cause wheels,
tires and suspension parts to be more suscep-
tible to road hazard and consequential dam-
ages. Unusual vibrations encountered during
normal vehicle operation can indicate tire failure
or some other vehicle defect. This can, for
example, be caused by driving over curbs.
These kinds of problems may also be signaled
by other changes in vehicle response, such as a
strong tendency to pull to the left or right.
In these cases, reduce speed immedi-
ately and have wheels and tires thor-
oughly checked. To do so, drive carefully to the
nearest BMW center or tire shop that works
according to BMW repair procedures with cor-
respondingly trained personnel. If necessary,
have the vehicle towed there. Tire damage can
be extremely dangerous for vehicle occupants
and other road users.<
Servicing tires
Unprofessional attempts by laymen to
service tires can lead to damage and acci-
dents. Have this work performed by skilled pro-
fessionals only. The technicians at your BMW
center will be glad to assist you with the
required professional knowledge and special-
ized equipment.<
Run-flat tires*
You will recognize run-flat tires by a circular
symbol containing the letters RSC on the side
of the tire.
Run-flat tires consist of self-contained tires and
special rims. The tire reinforcement ensures
that the tire retains some residual safety in the
event of pressure drop and driving remains pos-
sible to a restricted degree.
New wheels and tires
Have new wheels and tires installed only
by your BMW center or tire shop that
works according to BMW repair procedures
with correspondingly trained personnel. If this
work is not carried out properly, there is a dan-
ger of subsequent damage and related safety
hazards.<
Retreaded tires
BMW does not recommend that you use
retreaded tires, since driving safety may
be impaired. The causes for this include the
possibly different tire casing structures and the
often wide variations in their age, which can
result in a limited service life.<
The right wheels and tires
BMW recommends that you use only
wheel and tire combinations that BMW
has tested and approved for your particular
vehicle. Variations in factors such as manufac-
turing tolerances mean that even wheels and
tires with identical official size ratings could
actually have different dimensions than the
Page 178 of 221

Mobility
177Reference
At a glance
Controls
Driving tips
Communica-
Navigation
Entertainment
Engine compartment
1Filler neck for engine oil, refer to Adding
engine oil
2Brake fluid reservoir, located beneath the
microfilter cover
3Starting-aid terminal, refer to page1904Dipstick for engine oil, refer to Checking oil
level. The dipstick is further toward the rear
on the 545i
5Washer fluid reservoir of the headlamp and
windshield cleaning systems, refer to
page58
6Expansion tank for coolant, refer to
page178
Engine oil
The engine oil consumption is dependent on
driving style and driving conditions.
Checking oil level
1.With the engine at operating temperature,
i.e. after at least 6 miles/10 km of uninter-
rupted driving, park the vehicle in a horizon-
tal position.
2.Switch off the engine.
3.After approx. 5 minutes, pull out the dip-
stick 4 and wipe it off with a clean lint-free
cloth, paper towel, or similar material.
4.Carefully push the dipstick all the way into
the guide tube and pull it out again.The oil should extend to between the two
marks on the dipstick.
The oil quantity between the middle of the two
marks on the dipstick is approx. 1.6 US quarts/
1.5 liters.
Page 183 of 221
Replacing components
182
Replacing components
Onboard tool kit
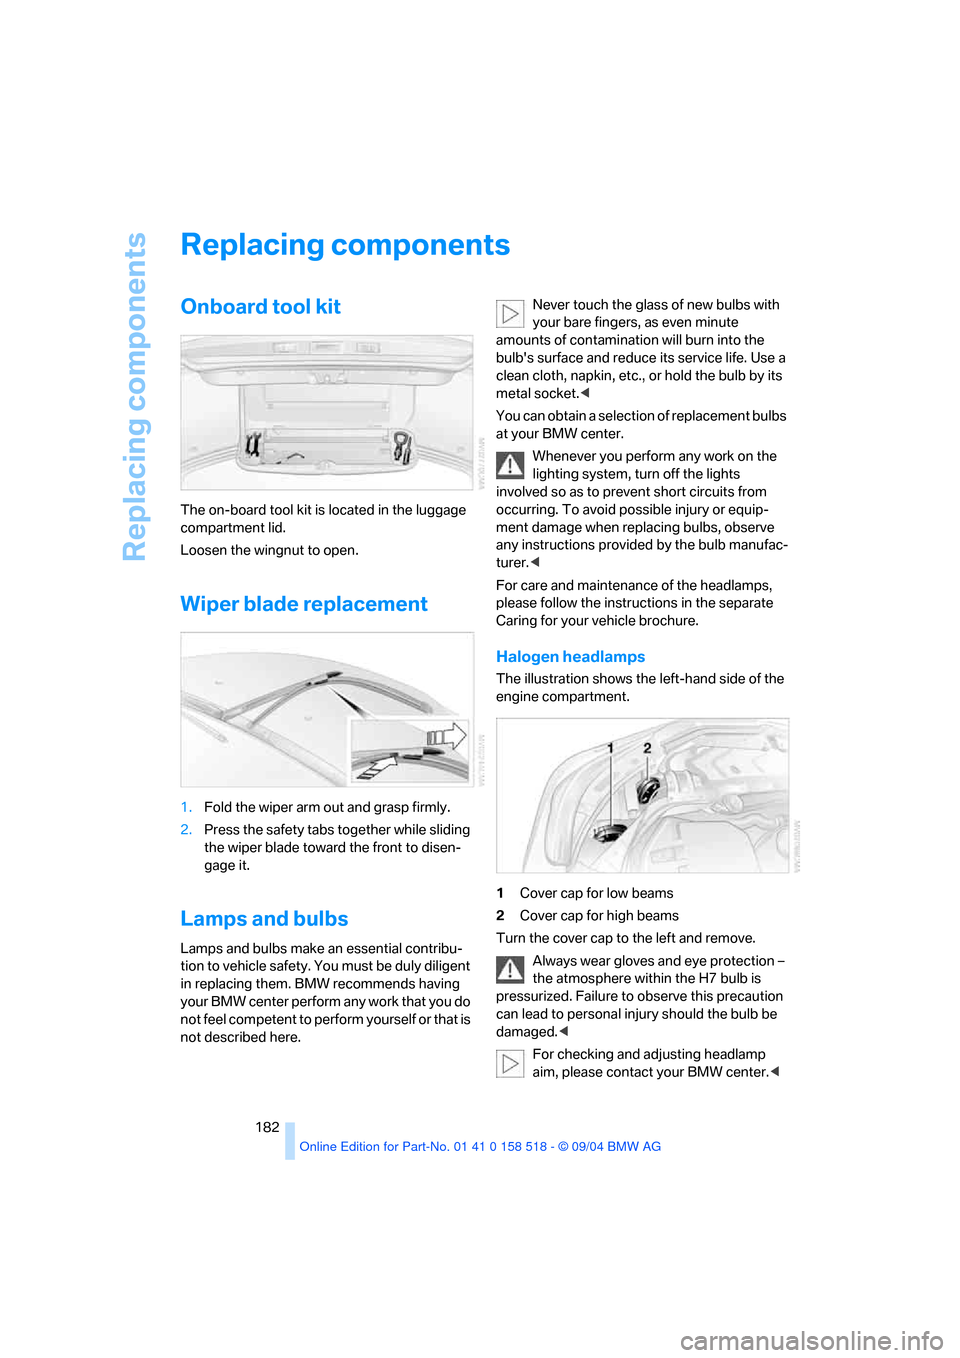
The on-board tool kit is located in the luggage
compartment lid.
Loosen the wingnut to open.
Wiper blade replacement
1.Fold the wiper arm out and grasp firmly.
2.Press the safety tabs together while sliding
the wiper blade toward the front to disen-
gage it.
Lamps and bulbs
Lamps and bulbs make an essential contribu-
tion to vehicle safety. You must be duly diligent
in replacing them. BMW recommends having
your BMW center perform any work that you do
not feel competent to perform yourself or that is
not described here.Never touch the glass of new bulbs with
your bare fingers, as even minute
amounts of contamination will burn into the
bulb's surface and reduce its service life. Use a
clean cloth, napkin, etc., or hold the bulb by its
metal socket.<
You can obtain a selection of replacement bulbs
at your BMW center.
Whenever you perform any work on the
lighting system, turn off the lights
involved so as to prevent short circuits from
occurring. To avoid possible injury or equip-
ment damage when replacing bulbs, observe
any instructions provided by the bulb manufac-
turer.<
For care and maintenance of the headlamps,
please follow the instructions in the separate
Caring for your vehicle brochure.
Halogen headlamps
The illustration shows the left-hand side of the
engine compartment.
1Cover cap for low beams
2Cover cap for high beams
Turn the cover cap to the left and remove.
Always wear gloves and eye protection –
the atmosphere within the H7 bulb is
pressurized. Failure to observe this precaution
can lead to personal injury should the bulb be
damaged.<
For checking and adjusting headlamp
aim, please contact your BMW center.<
Page 187 of 221

Replacing components
186 With run-flat tires, no tools are provided
for wheel changes. They can be pur-
chased as accessories at your BMW center.<
Compact wheel*
1.Unscrew the wing nut 1.
2.Remove the washer 2 laterally.
3.Take out the tool mounts 3.
4.Remove the compact wheel.
Preparing wheel change
1.Observe the safety precautions above.
2.Prevent the vehicle from rolling:
Place the chock behind the front wheel on
the other side of the vehicle, or on inclines,
in front of this wheel. On a steep grade, take
other steps to prevent the vehicle from roll-
ing.
3.Loosen the lug bolts a half turn.
Jacking up vehicle
1.Position the vehicle jack at the jacking point
closest to the wheel so that the entire sur-
face of the jack base rests on the ground
perpendicularly beneath the jacking point.
The vehicle jack is designed for
changing wheels only. Do not attempt
to raise another vehicle model with it or to
raise any load of any kind. To do so could
cause accidents and personal injury.<2.Guide the jack head into the rectangular
recess of the jacking point when cranking
up, refer to illustration detail.
3.Jack the vehicle up until the wheel you are
changing is raised from the ground.
Mounting a wheel
1.Unscrew the lug bolts and remove the
wheel.
2.Remove accumulations of mud or dirt from
the mounting surfaces of the wheel and
hub. Also clean the lug bolts.
3.Position the new wheel or compact wheel.
Secure the wheel by turning at least two lug
bolts into opposite bolt holes.
When you mount wheels other than Genu-
ine BMW light-alloy wheels, different lug
bolts may also be required.
4.Screw in the remaining lug bolts. Tighten all
the bolts securely in a diagonal pattern.
5.Lower the vehicle and remove the jack from
beneath the vehicle.
After mounting
1.Tighten the lug bolts in a diagonal pattern.
To ensure safety, always have the
lug bolts checked with a calibrated
torque wrench as soon as possible to
ensure that they are tightened to the speci-
fied torque. The tightening torque is
88.5 lb ft/120 Nm.<
2.When stowing the wheel and tools in the
vehicle, execute these steps in the reverse
order.
Page 192 of 221
Mobility
191Reference
At a glance
Controls
Driving tips
Communication
Navigation
Entertainment
an engine or body ground of the assisting
vehicle.
5.Attach the second end of the cable to the
negative terminal of the battery or to the
engine or body ground of the vehicle to be
started.
Starting engine
1.Start the engine on the assisting vehicle
and allow it to run for several minutes at
increased speed.
2.Start the engine on the other vehicle in the
usual way. If the first start attempt is not
successful, wait a few minutes before
another attempt in order to allow the dis-
charged battery to recharge.
3.Let the engines run for a few minutes.
4.Disconnect the jumper cables by reversing
the connection sequence.
Check the battery and recharge if necessary.
Never use spray fluids to start the
engine.<
Towing and tow-starting
Always observe all applicable towing laws
and regulations.<
Never allow passengers to ride in a towed
vehicle for any reason.<
Using tow fitting
The threaded tow fitting is stored in the
onboard tool kit and must always remain in the
vehicle. It can be screwed in at the front or rear
of the BMW.In order to avoid damaging the tow fitting
and the vehicle, please follow these
instructions: use only the tow fitting provided
with the vehicle and screw it all the way in. Use
the tow fitting for towing only on roads. Avoid
lateral loading of the tow fitting, e.g. do not lift
the vehicle by the tow fitting.<
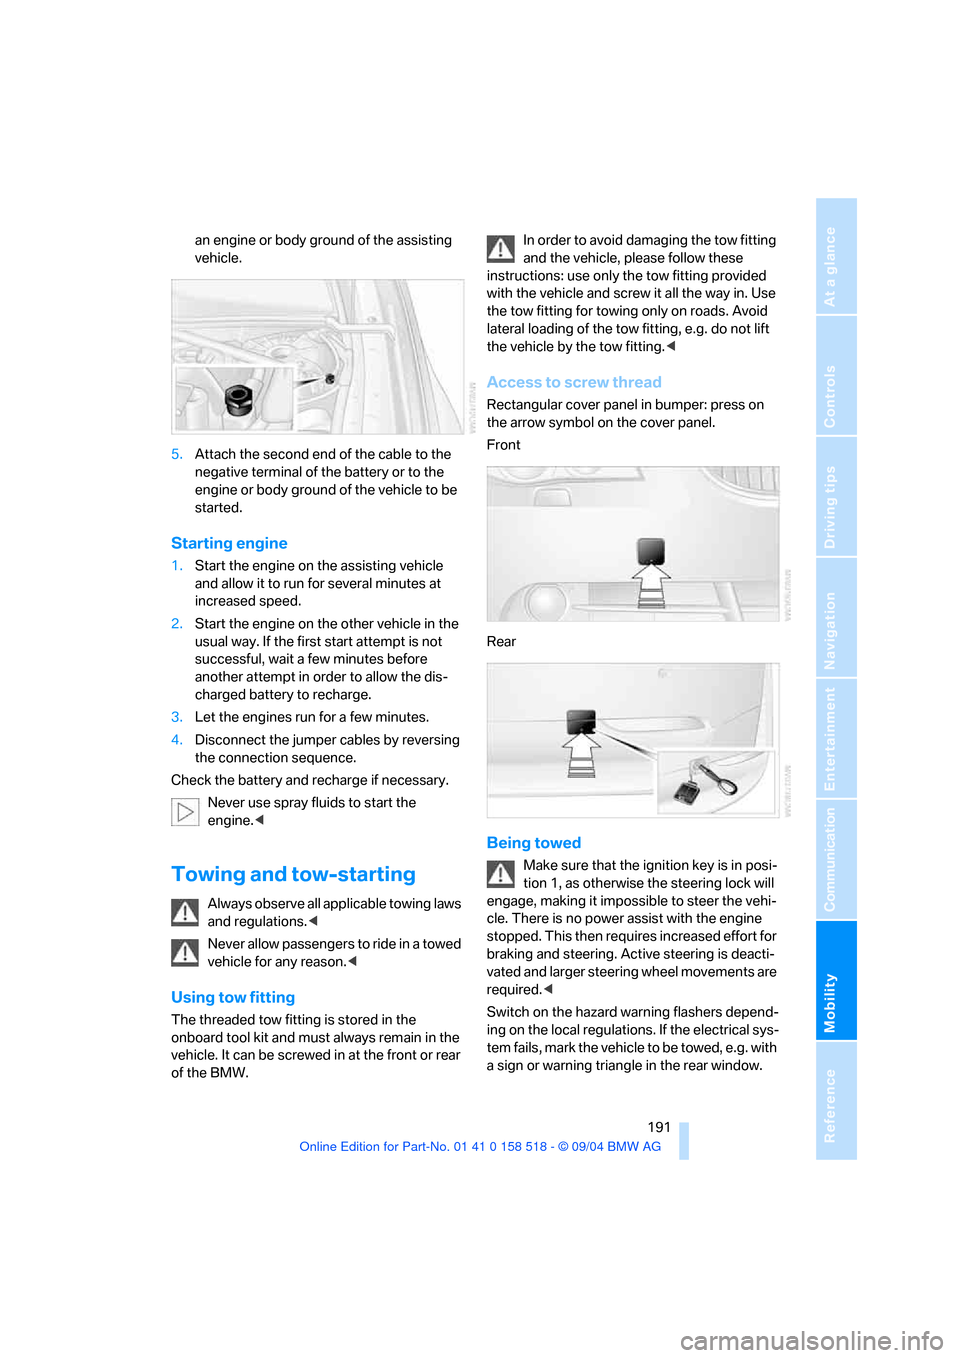
Access to screw thread
Rectangular cover panel in bumper: press on
the arrow symbol on the cover panel.
Front
Rear
Being towed
Make sure that the ignition key is in posi-
tion 1, as otherwise the steering lock will
engage, making it impossible to steer the vehi-
cle. There is no power assist with the engine
stopped. This then requires increased effort for
braking and steering. Active steering is deacti-
vated and larger steering wheel movements are
required.<
Switch on the hazard warning flashers depend-
ing on the local regulations. If the electrical sys-
tem fails, mark the vehicle to be towed, e.g. with
a sign or warning triangle in the rear window.
Page 193 of 221
Giving and receiving assistance
192
Vehicles with manual transmission
Gearshift lever in neutral position.
Vehicles with automatic transmission
Selector lever in position N.
Do not exceed a towing speed of 45 mph/
70 km/h and a towing distance of
90 miles/150 km, as otherwise the automatic
transmission may be damaged.<
Vehicles with SMG Sequential manual
transmission
With the ignition switched on, engage the
selector lever position N, then switch off the
ignition again.
Towing methods
In some countries, towing with tow bars or
ropes in public traffic is not permitted. Familiar-
ize yourself with the regulations on towing in the
respective country.
With tow bar
The towing vehicle may not be lighter
than the vehicle to be towed, as otherwise
it will not be possible to control vehicle
response.<
The tow fittings used should be on the same
side on both vehicles. Should it prove impossi-
ble to avoid mounting the tow bar at an offset
angle, please observe the following:
>Clearance and maneuvering capability will
be sharply limited during cornering.
>When mounted at an angle, the tow bar will
exert lateral forces, tending to push the
vehicle sideways.
Secure the tow bar to the tow fitting only.
Otherwise damage to other vehicle parts
could result.<
With tow rope
When starting off in the towing vehicle, make
sure that the tow rope is taut.To avoid jerking and the associated
stresses on vehicle components when
towing, always use nylon ropes or nylon straps.
Secure the tow rope to the tow fitting only.
Otherwise damage to other vehicle parts could
result.<
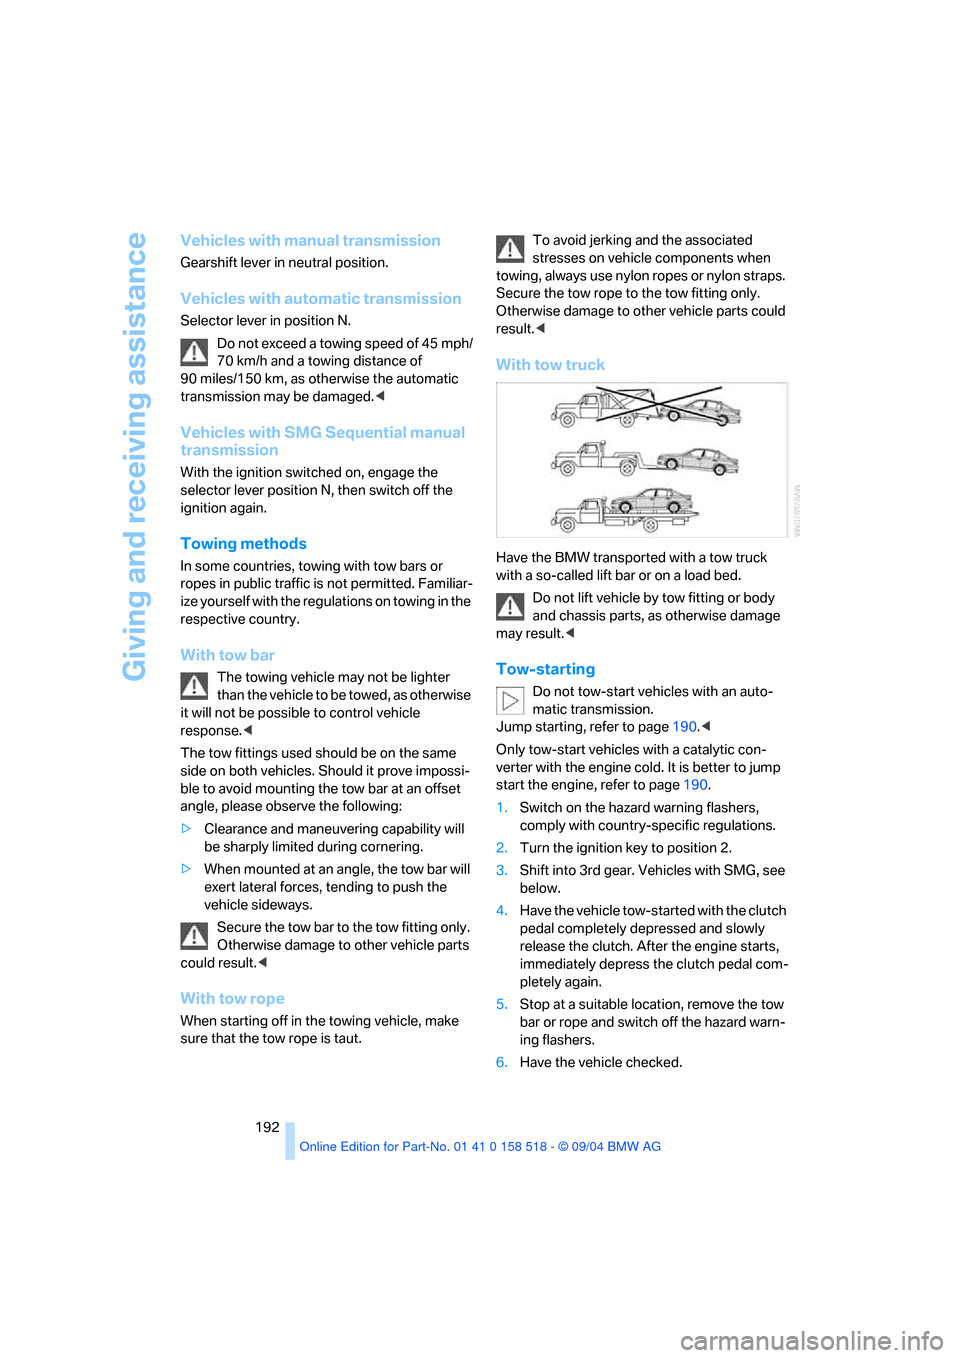
With tow truck
Have the BMW transported with a tow truck
with a so-called lift bar or on a load bed.
Do not lift vehicle by tow fitting or body
and chassis parts, as otherwise damage
may result.<
Tow-starting
Do not tow-start vehicles with an auto-
matic transmission.
Jump starting, refer to page190.<
Only tow-start vehicles with a catalytic con-
verter with the engine cold. It is better to jump
start the engine, refer to page190.
1.Switch on the hazard warning flashers,
comply with country-specific regulations.
2.Turn the ignition key to position 2.
3.Shift into 3rd gear. Vehicles with SMG, see
below.
4.Have the vehicle tow-started with the clutch
pedal completely depressed and slowly
release the clutch. After the engine starts,
immediately depress the clutch pedal com-
pletely again.
5.Stop at a suitable location, remove the tow
bar or rope and switch off the hazard warn-
ing flashers.
6.Have the vehicle checked.
Page 194 of 221

Mobility
193Reference
At a glance
Controls
Driving tips
Communication
Navigation
Entertainment
Vehicles with SMG Sequential manual trans-
mission:
1.Tow-start in selector lever position N.
2.Select Sequential mode. The correct gear
will be selected and engaged automatically.
Page 200 of 221
Reference 199
At a glance
Controls
Driving tips
Communication
Navigation
Entertainment
Mobility
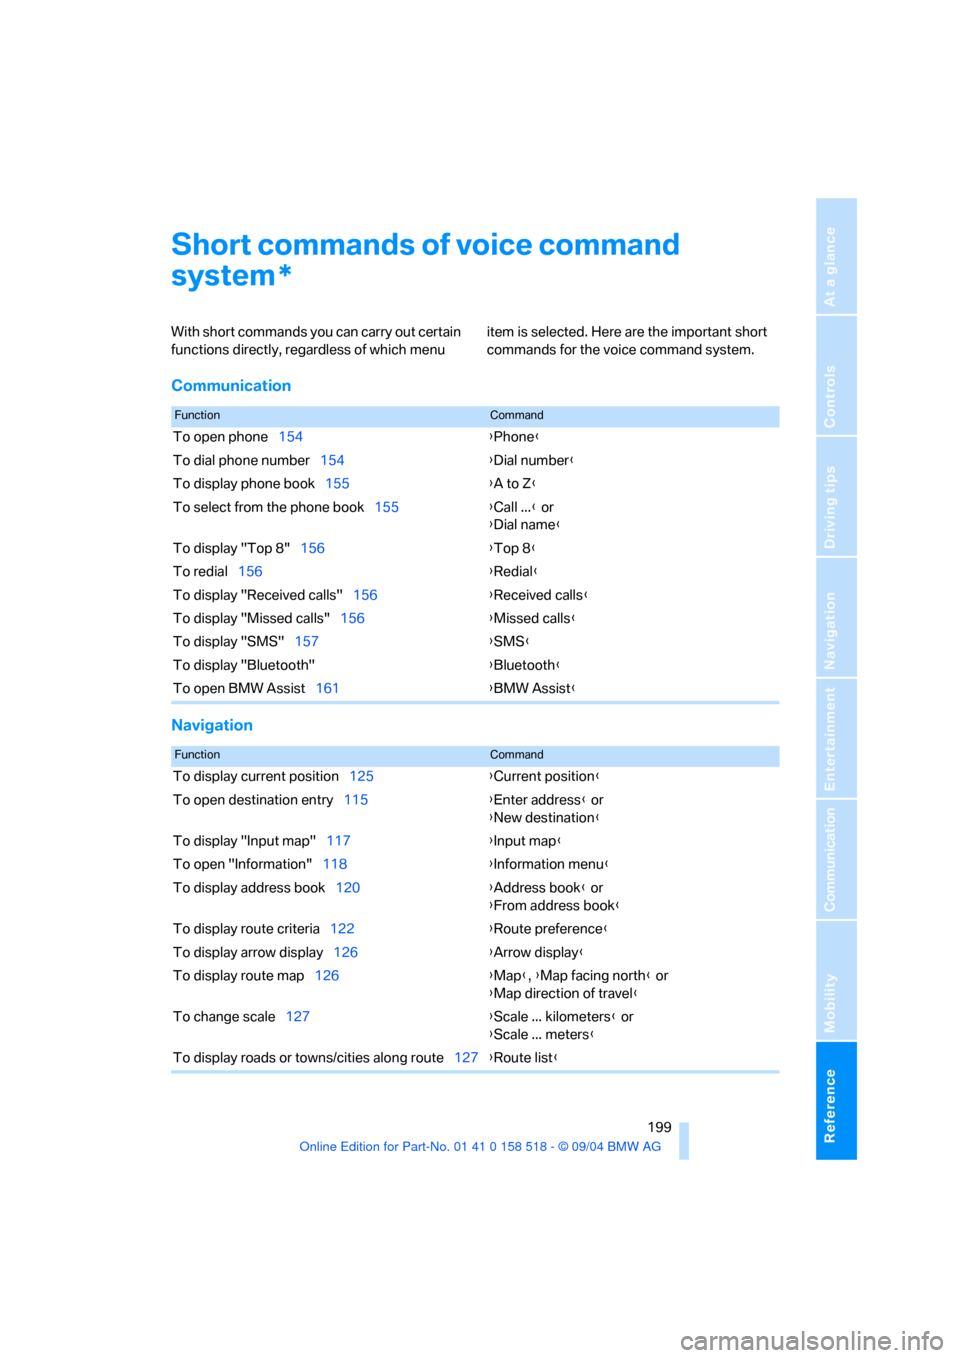
Short commands of voice command
system
With short commands you can carry out certain
functions directly, regardless of which menu item is selected. Here are the important short
commands for the voice command system.
Communication
Navigation
*
FunctionCommand
To open phone154{Phone}
To dial phone number154{Dial number}
To display phone book155{A to Z}
To select from the phone book155{Call ...} or
{Dial name}
To display "Top 8"156{Top 8}
To redial156{Redial}
To display "Received calls"156{Received calls}
To display "Missed calls"156{Missed calls}
To display "SMS"157{SMS}
To display "Bluetooth"{Bluetooth}
To open BMW Assist161{BMW Assist}
FunctionCommand
To display current position125{Current position}
To open destination entry115{Enter address} or
{New destination}
To display "Input map"117{Input map}
To open "Information"118{Information menu}
To display address book120{Address book} or
{From address book}
To display route criteria122{Route preference}
To display arrow display126{Arrow display}
To display route map126{Map}, {Map facing north} or
{Map direction of travel}
To change scale127{Scale ... kilometers} or
{Scale ... meters}
To display roads or towns/cities along route127{Route list}