2005 BMW 545I SEDAN clock
[x] Cancel search: clockPage 13 of 221

Cockpit
12
Instrument cluster
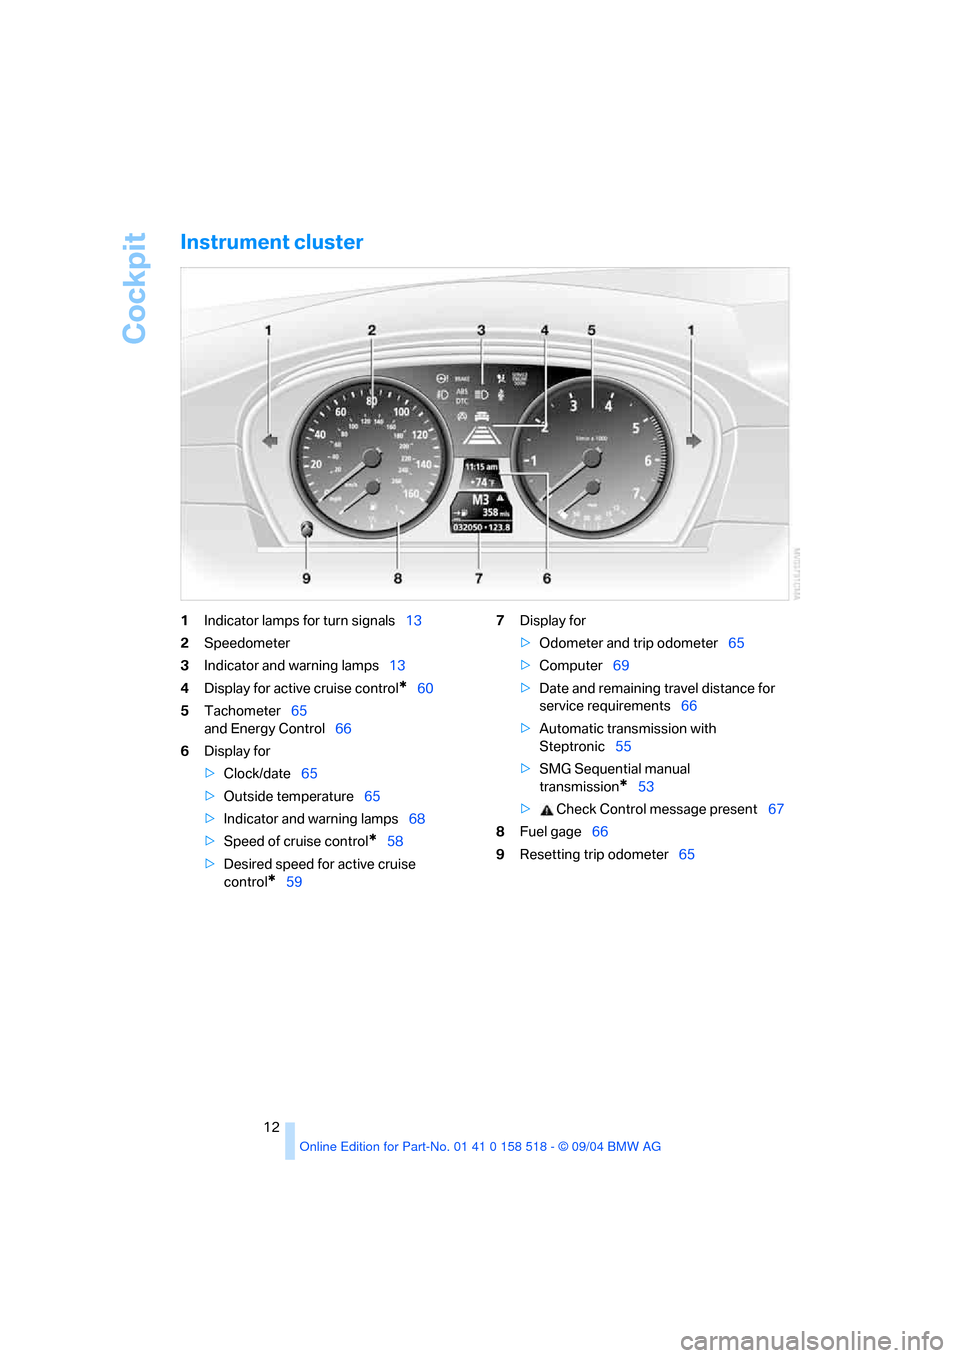
1Indicator lamps for turn signals13
2Speedometer
3Indicator and warning lamps13
4Display for active cruise control
*60
5Tachometer65
and Energy Control66
6Display for
>Clock/date65
>Outside temperature65
>Indicator and warning lamps68
>Speed of cruise control
*58
>Desired speed for active cruise
control
*597Display for
>Odometer and trip odometer65
>Computer69
>Date and remaining travel distance for
service requirements66
>Automatic transmission with
Steptronic55
>SMG Sequential manual
transmission
*53
> Check Control message present67
8Fuel gage66
9Resetting trip odometer65
Page 29 of 221

Opening and closing
28
Opening and closing
The key set
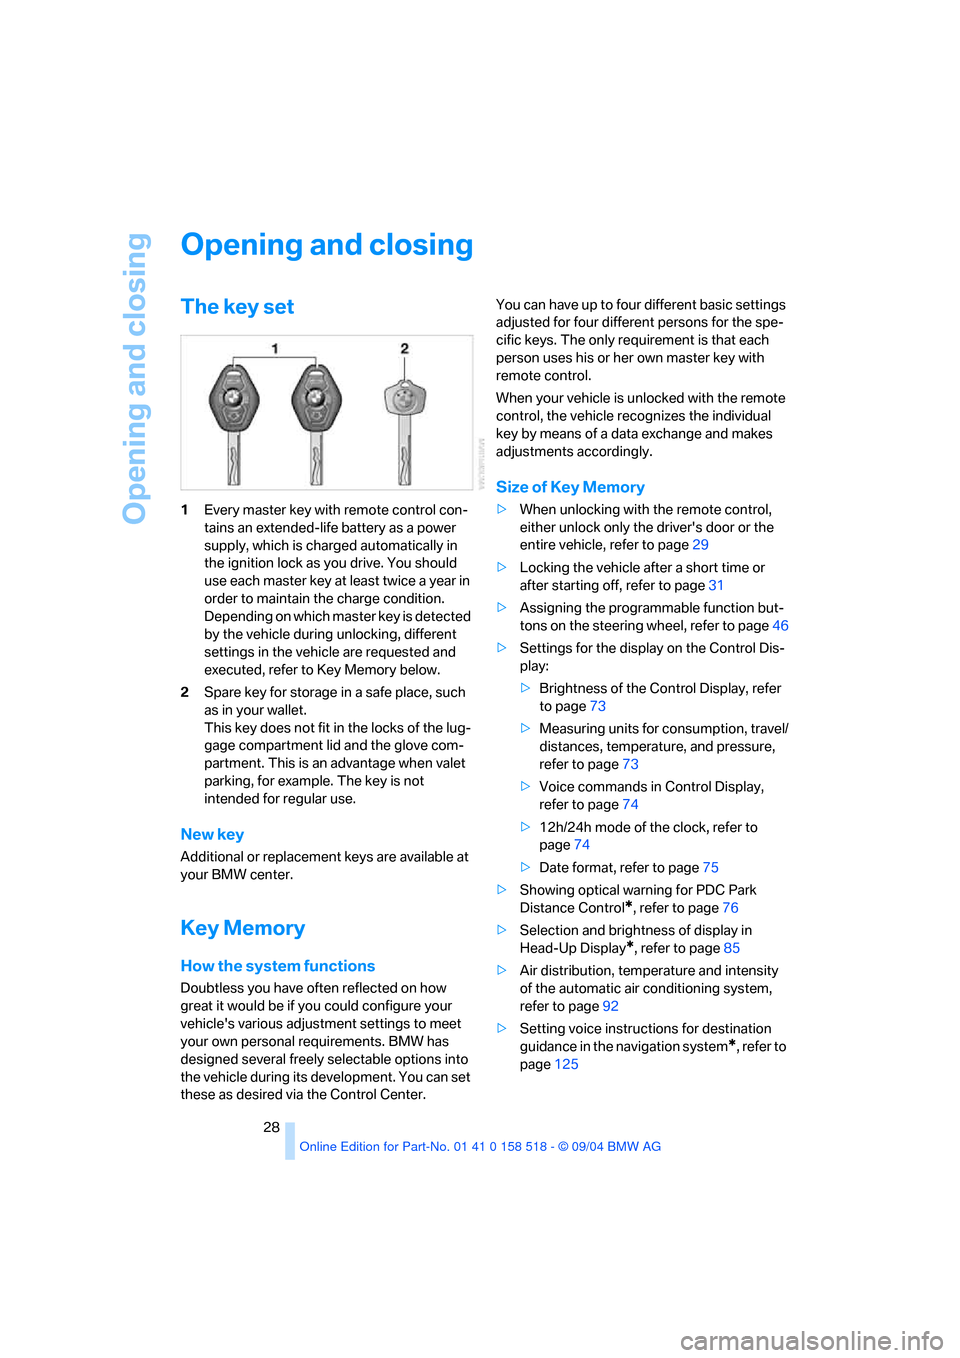
1Every master key with remote control con-
tains an extended-life battery as a power
supply, which is charged automatically in
the ignition lock as you drive. You should
use each master key at least twice a year in
order to maintain the charge condition.
Depending on which master key is detected
by the vehicle during unlocking, different
settings in the vehicle are requested and
executed, refer to Key Memory below.
2Spare key for storage in a safe place, such
as in your wallet.
This key does not fit in the locks of the lug-
gage compartment lid and the glove com-
partment. This is an advantage when valet
parking, for example. The key is not
intended for regular use.
New key
Additional or replacement keys are available at
your BMW center.
Key Memory
How the system functions
Doubtless you have often reflected on how
great it would be if you could configure your
vehicle's various adjustment settings to meet
your own personal requirements. BMW has
designed several freely selectable options into
the vehicle during its development. You can set
these as desired via the Control Center.You can have up to four different basic settings
adjusted for four different persons for the spe-
cific keys. The only requirement is that each
person uses his or her own master key with
remote control.
When your vehicle is unlocked with the remote
control, the vehicle recognizes the individual
key by means of a data exchange and makes
adjustments accordingly.
Size of Key Memory
>When unlocking with the remote control,
either unlock only the driver's door or the
entire vehicle, refer to page29
>Locking the vehicle after a short time or
after starting off, refer to page31
>Assigning the programmable function but-
tons on the steering wheel, refer to page46
>Settings for the display on the Control Dis-
play:
>Brightness of the Control Display, refer
to page73
>Measuring units for consumption, travel/
distances, temperature, and pressure,
refer to page73
>Voice commands in Control Display,
refer to page74
>12h/24h mode of the clock, refer to
page74
>Date format, refer to page75
>Showing optical warning for PDC Park
Distance Control
*, refer to page76
>Selection and brightness of display in
Head-Up Display
*, refer to page85
>Air distribution, temperature and intensity
of the automatic air conditioning system,
refer to page92
>Setting voice instructions for destination
guidance in the navigation system
*, refer to
page125
Page 39 of 221

Adjustments
38
Adjustments
Sitting safely
The ideal sitting position can make a vital con-
tribution to relaxed, fatigue-free driving. The sit-
ting position of the occupants also plays an
important role for passive safety together with
the safety belts and airbags in an accident. To
ensure that the safety systems operate with
optimal efficiency, we strongly urge you to
observe the instructions contained in the fol-
lowing section.
For additional information on transporting chil-
dren safely, refer to page47.
Airbags
Always maintain an adequate distance
between yourself and the airbags. Always
hold the steering wheel by its rim with hands at
the 9 o'clock and 3 o'clock positions, to mini-
mize the risk of injuries to your hands and arms
in the event of airbag deployment. No one and
nothing is to come between the airbags and the
seat occupant. Do not use the cover of the front
airbag on the front passenger side as a storage
area. Make sure that the front passenger is sit-
ting correctly and does not rest feet or legs on
the instrument panel, otherwise leg injuries can
occur if the front airbag is triggered. Never let an
occupant's head rest near or on a side airbag
because the inflating airbag could cause a seri-
ous or fatal injury.<
Even if you adhere to all the instructions, inju-
ries resulting from contact with airbags cannot
be fully excluded, depending on the circum-
stances. The ignition and inflation noise may
provoke a mild hearing loss in extremely sensi-
tive individuals. This effect is usually only tem-
porary.
For airbag locations and additional information
on airbags, refer to page83.
Safety belt
Before every drive, make sure that safety belts
are being worn at all of the occupied seats. Airbags complement the safety belt as an addi-
tional safety device, but they do not represent a
substitute.
At all times, occupants should sit upright
and be properly restrained: infants and
small children in appropriate child-restraint sys-
tems; larger children and adults using the safety
belts. Never allow more than one person to
wear a single safety belt. Never allow infants or
small children to ride in a passenger's lap.
Expectant mothers should always wear their
safety belts, taking care to position the lap belt
against the lower hips, where it will not exert
pressure against the abdominal area. Do not
route the belt across your neck, or run it across
sharp edges. Be sure that the belt does not
become caught or jammed. Avoid twisting the
belt while routing it snugly across the hips and
shoulder. Do not allow the belt to rest against
hard or fragile objects. Otherwise, in the event
of a frontal impact, a loose lap belt could slide
over your hips, leading to abdominal injury.
Avoid wearing clothing that prevents the belt
from fitting properly and pull the shoulder belt
periodically to readjust the tension across your
lap in order to avoid a reduction in the retention
effect of the safety belt.<
For instructions on operating safety belts, refer
to page42.
Seats
Note before adjusting
Never attempt to adjust your seat while
the vehicle is moving. The seat could
respond with unexpected movement, and the
ensuing loss of vehicle control could lead to an
accident. Also on the passenger side, do not
incline the backrest too far to the rear while the
vehicle is being driven, as otherwise there is a
danger in the event of an accident of 'sliding
under' the safety belt, eliminating the protec-
tion normally provided by the belt.<
Page 66 of 221

Controls
65Reference
At a glance
Driving tips
Communication
Navigation
Entertainment
Mobility
Everything under control
Odometer, outside
temperature display, clock
When the ignition is off you can briefly activate
the time, outside temperature and odometer
displays by pressing the knob 3 in the instru-
ment cluster.
1 Outside temperature display, time,
date
The outside temperature and the time are dis-
played as of ignition key position 1.
Date retrieval:
Press CHECK button on turn signal lever, refer
to page69.
Time and date setting, refer to page74.
You can set the measurement unit 7 or 6 on
the Control Display, refer to Measurement units
on page73.
Ice warning
A signal sounds when the outside temperature
falls to approx. +37.57/+36; this is accompa-
nied by a message.
Please bear in mind that the ice warning
does nothing to alter the fact that black
ice may be present on roads at temperatures
higher than +37.57/+36, e. g. on bridges and
shaded roads.<
2 Odometer and trip odometer
Resetting trip odometer: press the knob3 in the
instrument cluster.
Tachometer
The white-striped advance warning field,
arrow1, changes depending on the engine
temperature. The segments disappear in
sequence as the engine warms to its normal
operating temperature. Avoid allowing the
engine speed to rise as far as the orange warn-
ing sector whenever possible.
Engine speeds in the red warning field, arrow2,
must absolutely be avoided. In this range, the
fuel supply is interrupted to protect the engine.
Page 169 of 221

Refueling
168
Refueling
Always switch off the engine before refu-
eling. If you do not, fuel cannot be dis-
pensed into the tank and a message on the
Control Display will appear.<
Always observe all applicable precautions
and regulations when handling fuels.
Never carry spare fuel containers in your vehi-
cle. Whether empty or full, these containers can
leak, cause an explosion, and lead to fire in the
event of a collision.<
Fuel filler door
To open and close: press the rear edge of the
fuel filler door.
Manual release
If an electrical malfunction should occur, you
can unlock the fuel filler door manually.
1.In the luggage compartment, raise the floor
mat and the cover located beneath it.
2.Open the snap fasteners of the right side
panel and take off the side panel.
3.Pull the knob with the gas pump symbol.
Observe the following when refueling
When handling fuels always observe any
safety guidelines posted at the service
station.<
Place the fuel filler cap in the bracket attached
to the fuel filler door.
When refueling, insert the filler nozzle com-
pletely into the filler pipe. Lifting the filler nozzle
during refueling leads to
>premature pump shutoff
>a reduced efficiency of the fuel-vapor
recovery system.
The fuel tank is full when the filler nozzle clicks
off the first time.
Fuel tank capacity
Approx. 18.5 gallons/70 liters, including the
reserve capacity of approx. 2.1 gallons/8 liters.
Refuel as soon as possible once your
cruising range falls below 30 miles/
50 km, as otherwise engine functions are not
ensured and damage can occur.<
Closing fuel filler cap
Fit the cap and turn it clockwise until you clearly
hear a click.
Close the filler cap carefully after refuel-
ling until a click is heard. While closing, be
sure not to squeeze the strap which is fastened
to the cap. A loose or missing cap will activate
an indicator lamp and the message Check Gas
Cap
* on the Control Display.<
Page 179 of 221

Under the hood
178 Do not exceed the upper marking on the
dipstick, otherwise an overfilling of oil can
damage the engine.<
Adding engine oil
Do not top off the oil until the oil level has
dropped to just above the lower marking on the
dipstick. In this area a message also appears on
the Control Display.
Refill the oil within the next 125 miles/
200 km, otherwise engine damage could
result.<
Continuous exposure to used oil has
caused cancer in laboratory testing.
For this reason, any skin areas that come into
contact with oil should be thoroughly washed
with soap and water.
Store oil, grease, etc., well out of the reach of
children; always observe all warning labels on
the containers.<
Oil change
Have oil changed only at your BMW center or
at a workshop that works according to BMW
repair procedures with correspondingly trained
personnel.
Specified engine oils
The quality of the engine oil selected has critical
significance for the operation and service life of
an engine. BMW continuously approves spe-
cific oils after confirming their suitability for use
in its vehicles with extensive testing.
Use only approved BMW High Performance
Synthetic Oil.
If you are unable to obtain BMW High Perfor-
mance Synthetic Oil, you can add small amounts of another synthetic oil between oil
changes. Use only oils with the API SH specifi-
cation or higher.
Ask your BMW center for details concern-
ing the specific BMW High Performance
Synthetic Oil or synthetic oils which have been
approved.<
You can also call BMW of North America at
1-800-831-1117 or visit this website:
www.bmwusa.com to obtain this information.
Viscosity ratings
Viscosity is the oil flow rating as defined in
SAE classes.
The selection of the correct SAE class depends
on the climatic conditions in the area where you
typically drive your BMW.
Approved oils are in SAE classes 5W-40
and 5W-30.<
These oils may be used for driving in all ambient
temperatures.
Coolant
Do not add coolant to the cooling system
when the engine is hot. Escaping coolant
can cause burns.<
Coolant consists of water and the addition of
antifreeze and anticorrosion agent. Not all com-
mercially available additives are suitable for
your BMW. Ask your BMW center for suitable
additives.
Only use suitable additives, as otherwise
engine damage may result. The additives
present a health hazard; observe the instruc-
tions on the containers.<
Comply with the appropriate environ-
mental protection regulations when dis-
posing of coolant additives.<
Checking coolant level
1.The engine must be at ambient tempera-
ture.
2.Turn the cap of the expansion tank counter-
clockwise to allow any accumulated pres-
Page 191 of 221

Giving and receiving assistance
190 The first-aid kit is located in the luggage com-
partment lid.
Loosen the wingnut to open.
Roadside Assistance*
The Roadside Assistance of the BMW Group
offers you assistance in the event of a break-
down around the clock, also on weekends and
public holidays.
The phone numbers of the Roadside Assis-
tance in your home country can be found in the
Contact brochure.
In the case of vehicles with BMW Assist or
TeleService, you can contact the Roadside
Assistance of the BMW Group for assistance in
the event of a breakdown directly via the Con-
trol Center, refer to page163.
Jump starting
When your battery is discharged, you can use
two jumper cables to start your BMW with
power from the battery in a second vehicle. You
can also use the same method to help start
another vehicle. Use only jumper cables with
fully-insulated clamp handles.
To avoid the risk of potentially fatal injury,
always avoid all contact with electrical
components while the engine is running. Care-
fully adhere to the following sequence, both to
prevent damage to one or both vehicles, and to
guard against possible personal injuries.<
Preparation
1.Check whether the battery of the other
vehicle has a voltage of 12 Volts and
approximately the same capacitance in Ah.
This information can be found on the bat-
tery.
2.Switch off the engine of the assisting vehi-
cle.
3.Switch off any electrical accessories in both
vehicles.
There must not be any contact between
the bodies of the two vehicles, as other-
wise there is a danger of shorting.<
Connecting jumper cables
To avoid personal injury from sparks,
always observe this sequence when con-
necting jumper cables.<
On your BMW, the so-called starting-aid termi-
nal in the engine compartment serves as the
battery positive terminal, also refer to Engine
compartment essentials on page177. The
symbol + is embossed on the cover.
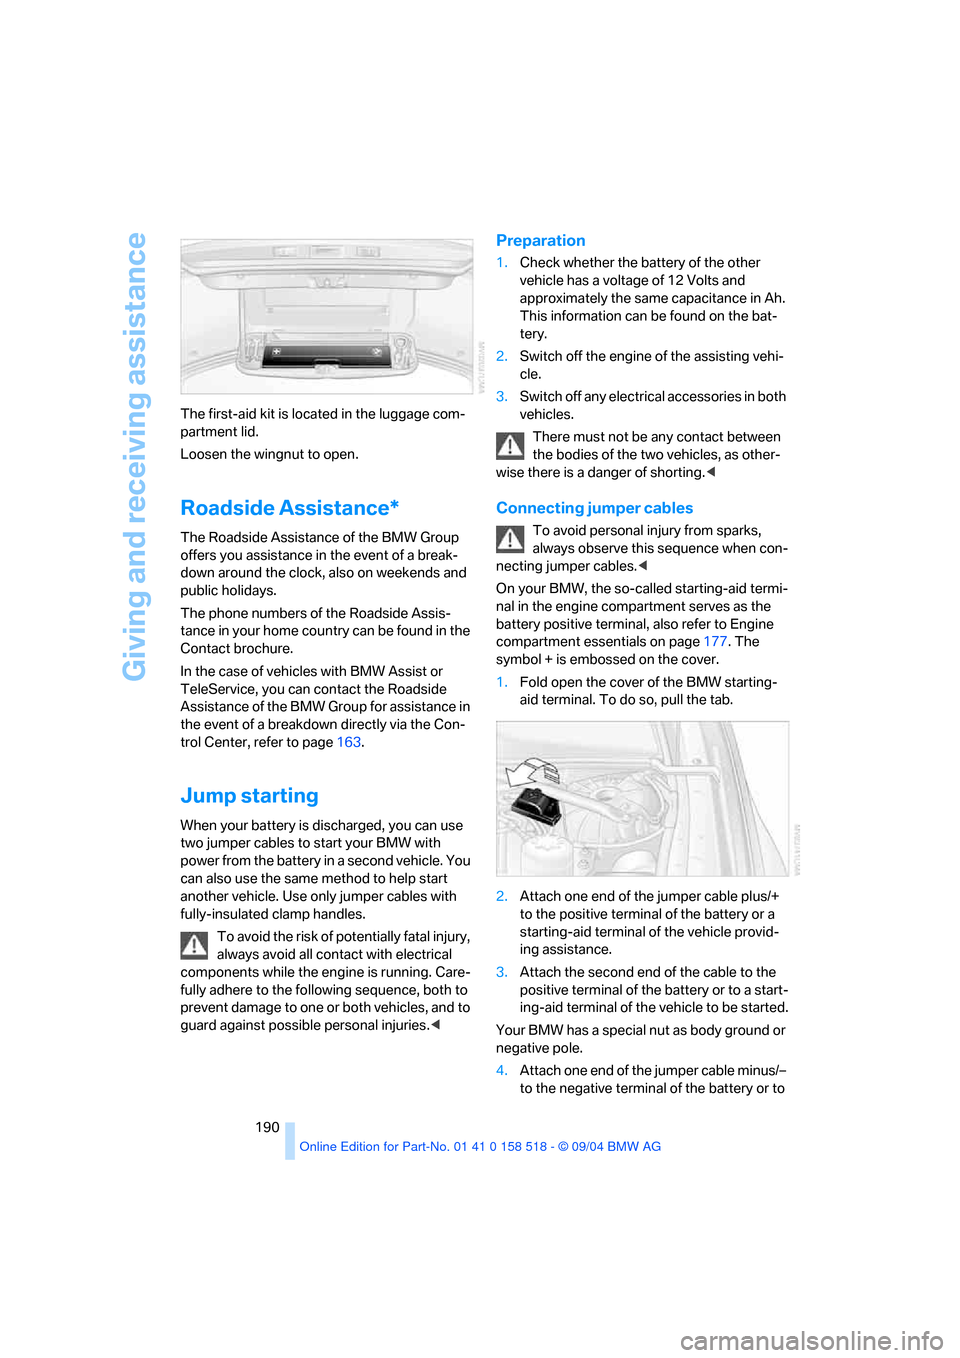
1.Fold open the cover of the BMW starting-
aid terminal. To do so, pull the tab.
2.Attach one end of the jumper cable plus/+
to the positive terminal of the battery or a
starting-aid terminal of the vehicle provid-
ing assistance.
3.Attach the second end of the cable to the
positive terminal of the battery or to a start-
ing-aid terminal of the vehicle to be started.
Your BMW has a special nut as body ground or
negative pole.
4.Attach one end of the jumper cable minus/–
to the negative terminal of the battery or to
Page 206 of 221

Reference 205
At a glance
Controls
Driving tips
Communica-
Navigation
Entertainment
Mobility
"Check Control
messages"69
Check Gas Cap168
Checking the air pressure,
refer to Tire inflation
pressure170
Child-restraint fixing system
LATCH49
Child restraints47
Child restraint systems47
Child-safety lock50
Child seats47
Chime, refer to Check
Control67
Chock185
Chrome parts, care, refer to
Caring for your vehicle
brochure
Cigarette lighter99
Cleaning, refer to Caring for
your vehicle brochure
Cleaning the windshield, refer
to Wiper system57
"Climate"44
Clock65
– 12h/24h mode74
– time setting74
Closing
– from inside31
– from outside29
Clothes hooks99
Cockpit10
Cold start, refer to Starting
engine51
"Comfort", active backrest
width adjustment40
Comfort area, refer to All
about the center console14
Comfort seat39
"Communication"154
"Communication
settings"161
Compact Disc
– refer to CD changer145
– refer to CD player145
Compact wheel
– changing wheels186
– inflation pressure171Computer69
– clock, 12h/24h mode74
– displays on Control
Display70
– hour signal74
"Concert hall"135
Condition Based Service
CBS180
"Confirmation"30
Confirmation signals for
locking and unlocking30
Consumption, refer to
Average consumption70
Consumption indicator
– Energy Control66
"Continue guidance to
destination?"125
Control Center16
– adjusting brightness73
– assistance window20
– automatic climate control92
– changing settings19,73
– changing the menu page19
– confirming selection or
entry19
– controller16
– displays, menus16
– language selection74
– lists19
– menu item selection19
– menu navigation17
– operating elements16
– selecting units of
measurement and display
format73
– setting time and date74
– start menu17
– status information20
– symbols17
Control Display, refer to
Control Center16
Controller, refer to Control
Center16
Controls, refer to Cockpit10
Convenience operation
– glass sunroof30
– windows30
Convenience start, refer to
Starting engine51Coolant178
– level178
Cooling, maximum91
Cornering Brake Control
CBC77
Country of destination for
navigation116
Courtesy lamps89
Cradle for telephone or
portable phone98
Cruise control58,59
– active cruise control59
Cruising range70
Cup holders99
Curb weight, refer to
Weights198
Current fuel consumption66
"Current position"125
Current position
– displaying125
– entering120
– storing120
"Customer Relations"164
Cylinders, refer to Engine
data196
D
Dashboard, refer to
Cockpit10
Data196
– capacities198
– dimensions197
– engine196
– technical data196
– weights198
"Date"74
Date65
– display format75
– retrieval65
– setting74
"Date format"75
Daytime driving lamps87
DBC Dynamic Brake
Control77
– warning lamp79
"Deactivated"41
Deactivating front passenger
airbags47,83