2005 BMW 545I SEDAN navigation
[x] Cancel search: navigationPage 174 of 221
Mobility
173Reference
At a glance
Controls
Driving tips
Communication
Navigation
Entertainment
Uniform Tire Quality Grading
Quality grades can be found where applicable
on the tire sidewall between tread shoulder and
maximum section width. For example:
Tread wear 200 Traction AA
Temperature A
DOT Quality Grades
Tread wear
Traction AA A B C
Temperature A B C
All passenger car tires must conform to
Federal Safety Requirements in addition
to these grades.<
Tread wear
The tread wear grade is a comparative rating
based on the wear rate of the tire when tested
under controlled conditions on a specified gov-
ernment test course. For example, a tire graded
150 would wear one and one-half, 1γ, times as
well on the government course as a tire graded
100. The relative performance of tires depends
upon the actual conditions of their use, how-
ever, and may depart significantly from the
norm due to variations in driving habits, service
practices and differences in road characteris-
tics and climate.
Traction
The traction grades, from highest to lowest, are
AA, A, B, and C.
Those grades represent the tire's ability to stop
on wet pavement as measured under controlled
conditions on specified government test sur-
faces of asphalt and concrete. A tire marked C
may have poor traction performance.
The traction grade assigned to this tire is
based on straight-ahead braking traction
tests, and does not include acceleration, cor-
nering, hydroplaning, or peak traction charac-
teristics.<
Temperature
The temperature grades are A, the highest, B,
and C, representing the tire's resistance to the
generation of heat and its ability to dissipate heat when tested under controlled conditions
on a specified indoor laboratory test wheel.
Sustained high temperature can cause the
material of the tire to degenerate and reduce
tire life, and excessive temperature can lead to
sudden tire failure. The grade C corresponds to
a level of performance which all passenger car
tires must meet under the Federal Motor Vehi-
cle Safety Standard No. 109. Grades B and A
represent higher levels of performance on the
laboratory test wheel than the minimum
required by law.
The temperature grade for this tire is
established for a tire that is properly
inflated and not overloaded. Excessive speed,
underinflation, or excessive loading, either sep-
arately or in combination, can cause heat
buildup and possible tire failure.<
RSC – run-flat tires
You will recognize run-flat tires by a circular
symbol containing the letters RSC on the side
of the tire, refer to page174.
M+S
Winter and all-season tires.
These have better winter properties than sum-
mer tires.
Tire condition
Inspect your tires frequently for tread wear,
signs of damage and for foreign objects lodged
in the tread. Check the tread depth.
Minimum tread depth
The tread depth should not drop below 0.12 in/
3 mm, although, for example, European legisla-
tion only specifies a minimum tread depth of
0.063 in/1.6 mm. At tread depths below 0.12 in/
3 mm there is an increased risk of high-speed
hydroplaning, even when only small amounts of
water are present on the road surface.
When winter tires wear down past a tread depth
of 0.16 in/4 mm, they become perceptibly less
suitable for winter conditions. For the sake of
safety, new tires should be installed.
Page 176 of 221
Mobility
175Reference
At a glance
Controls
Driving tips
Communication
Navigation
Entertainment
approved units – these differences could lead to
body contact, and with it the risk of severe acci-
dents. If non-approved wheels and tires are
used, BMW cannot evaluate their suitability,
and therefore cannot be held liable for driving
safety.<
You can inquire about the right wheel/tire com-
bination at your BMW center.
The correct combination of wheels and tires is
another vital factor in ensuring reliable opera-
tion of various vehicle systems such as ABS
and DSC.
To maintain good handling and vehicle
response, use only tires of a single tread config-
uration from a single manufacturer. After a flat
tire, have the original wheel and tire combina-
tion remounted on the vehicle as soon as possi-
ble.
Recommended tire brands
BMW tests certain tire brands for each tire size,
classifies them as road-safe and approves
them. Consult your BMW center for more infor-
mation.
Observe any country-specific regulations, e.g.
on making a corresponding entry in the vehicle
documents.
The factory-mounted tires have been specially
selected to provide optimized performance
when installed on yo ur vehicle; if pro perly cared
for, they will provide a combination of safety and
excellent ride comfort.
Run-flat tires
When mounting new tires or changing from
summer tires to winter tires or vice versa, use
run-flat tires because there is no spare tire in
case of a flat. Your BMW center will be glad to
advise you.
For safety reasons, BMW recommends
that you do not have damaged run-flat
tires repaired; they should be replaced.<
Special characteristics of winter tires
BMW recommends winter tires for use in cold
winter driving conditions. Although all-season
M+S tires provide better winter traction than
summer tires, they generally fail to provide the
same levels of cold-weather performance as
winter tires.
Pay attention to speed
Do not exceed the maximum permissible
speed for the winter tires, otherwise tire
damage may occur, which can result in acci-
dents.<
Storage
Always store wheels and tires in a cool, dry
place with as little exposure to light as possible.
Always protect tires against all contact with oil,
grease and fuels. Do not exceed the maximum
tire inflation pressure indicated on the side wall
of the tire.
Snow chains*
BMW only tests certain fine-link snow chains,
classifies them as road-safe and approves
them. Consult your BMW center for more infor-
mation. BMW recommends using these
approved, fine-link snow chains.
Use is only permitted in pairs, with winter tires
on the rear wheels.
Observe the manufacturer's instructions when
mounting snow chains. Do not exceed a speed
of 30 mph/50 km/h with the chains mounted.
After snow chains are mounted, do not
initialize the Flat Tire Monitor.
When driving with snow chains, it can be useful
to activate the DTC temporarily, refer to
page78.<
Page 178 of 221

Mobility
177Reference
At a glance
Controls
Driving tips
Communica-
Navigation
Entertainment
Engine compartment
1Filler neck for engine oil, refer to Adding
engine oil
2Brake fluid reservoir, located beneath the
microfilter cover
3Starting-aid terminal, refer to page1904Dipstick for engine oil, refer to Checking oil
level. The dipstick is further toward the rear
on the 545i
5Washer fluid reservoir of the headlamp and
windshield cleaning systems, refer to
page58
6Expansion tank for coolant, refer to
page178
Engine oil
The engine oil consumption is dependent on
driving style and driving conditions.
Checking oil level
1.With the engine at operating temperature,
i.e. after at least 6 miles/10 km of uninter-
rupted driving, park the vehicle in a horizon-
tal position.
2.Switch off the engine.
3.After approx. 5 minutes, pull out the dip-
stick 4 and wipe it off with a clean lint-free
cloth, paper towel, or similar material.
4.Carefully push the dipstick all the way into
the guide tube and pull it out again.The oil should extend to between the two
marks on the dipstick.
The oil quantity between the middle of the two
marks on the dipstick is approx. 1.6 US quarts/
1.5 liters.
Page 180 of 221
Mobility
179Reference
At a glance
Controls
Driving tips
Communica-
Navigation
Entertainment
sure to escape, then continue turning to
open.
3.The coolant level is correct when the cool-
ant level is between the MIN and MAX
marks, refer to the diagram adjacent to the
filler neck.
4.If the coolant is low, slowly add coolant up to
the specified level – do not overfill.
5.Turn the cap until there is an audible click.
6.Have the reason for the coolant loss elimi-
nated as soon as possible.
Brake system
Malfunctions
Brake fluid
The warning lamp lights up in spite of
the handbrake being released; a mes-
sage appears on the Control Display:
Stop immediately.
The brake fluid in the reservoir has fallen to
below the minimum level. At the same time, a
considerably longer brake pedal travel may be
noticeable. Have the system thoroughly
checked.
Display of the previously described
malfunction on Canadian models.
When you continue driving, an increased
brake pedal path can be necessary, and
significantly longer braking distances might be
required. Please adapt your driving style
accordingly.<
Brake pads
The warning lamp lights up in spite of
the handbrake being released; a mes-
sage appears on the Control Display:
The brake pads have reached their minimum
pad thickness. Have brake pads replaced
immediately.
Display of the previously described
malfunction on Canadian models.
For your own safety: use only brake pads
that BMW has approved for the corre-
sponding vehicle model. As BMW cannot
assess the suitability of other brake pads for
use on your vehicle, we are unable to assume
continued responsibility for the vehicle's oper-
ating safety if non-approved pads are
installed.<
Page 182 of 221
Mobility
181Reference
At a glance
Controls
Driving tips
Communication
Navigation
Entertainment
OBD Socket
The Onboard Diagnostics OBD interface
socket is located on the left of the driver's side
under the instrument panel and under a cover.
The cover has the letters OBD on it.
The purpose of the OBD system is to ensure
proper operation of the emission control sys-
tem for the vehicle's lifetime. The system mon-
itors emission-related components and sys-
tems for deterioration and malfunction.
An illuminated lamp informs you of the
need for service, not of the need to stop
the vehicle. However, the systems
should be checked by your BMW center at the
earliest possible opportunity.
Display of the previously described
malfunction on Canadian models.
Under certain conditions, the indicator will blink
or flash. This indicates a rather severe level of
engine misfire. When this occurs, you should
reduce speed and consult the nearest BMW
center as soon as possible. Severe engine mis-
fire over only a short period of time can seri-
ously damage emissions control components,
especially the catalytic converter.
When the fuel filler cap is not properly
tightened, the OBD system can detect
the vapor leak and the indicator will light up. If
the filler cap is subsequently tightened, the
indicator should go out within a few days.<
Event Data Recorders
Your vehicle may be equipped with one or more
sensing and diagnostic modules or a recording
device capable of recording or transmitting cer-
tain vehicle data or information. In addition, if
you have a Subscription Service Agreement for
the BMW Assist system, certain vehicle infor-
mation may be transmitted or recorded in order
to provide such services.
Care
Important information on the care and mainte-
nance of your BMW is contained in the Caring
for your vehicle brochure.
Page 184 of 221
Mobility
183Reference
At a glance
Controls
Driving tips
Communication
Navigation
Entertainment
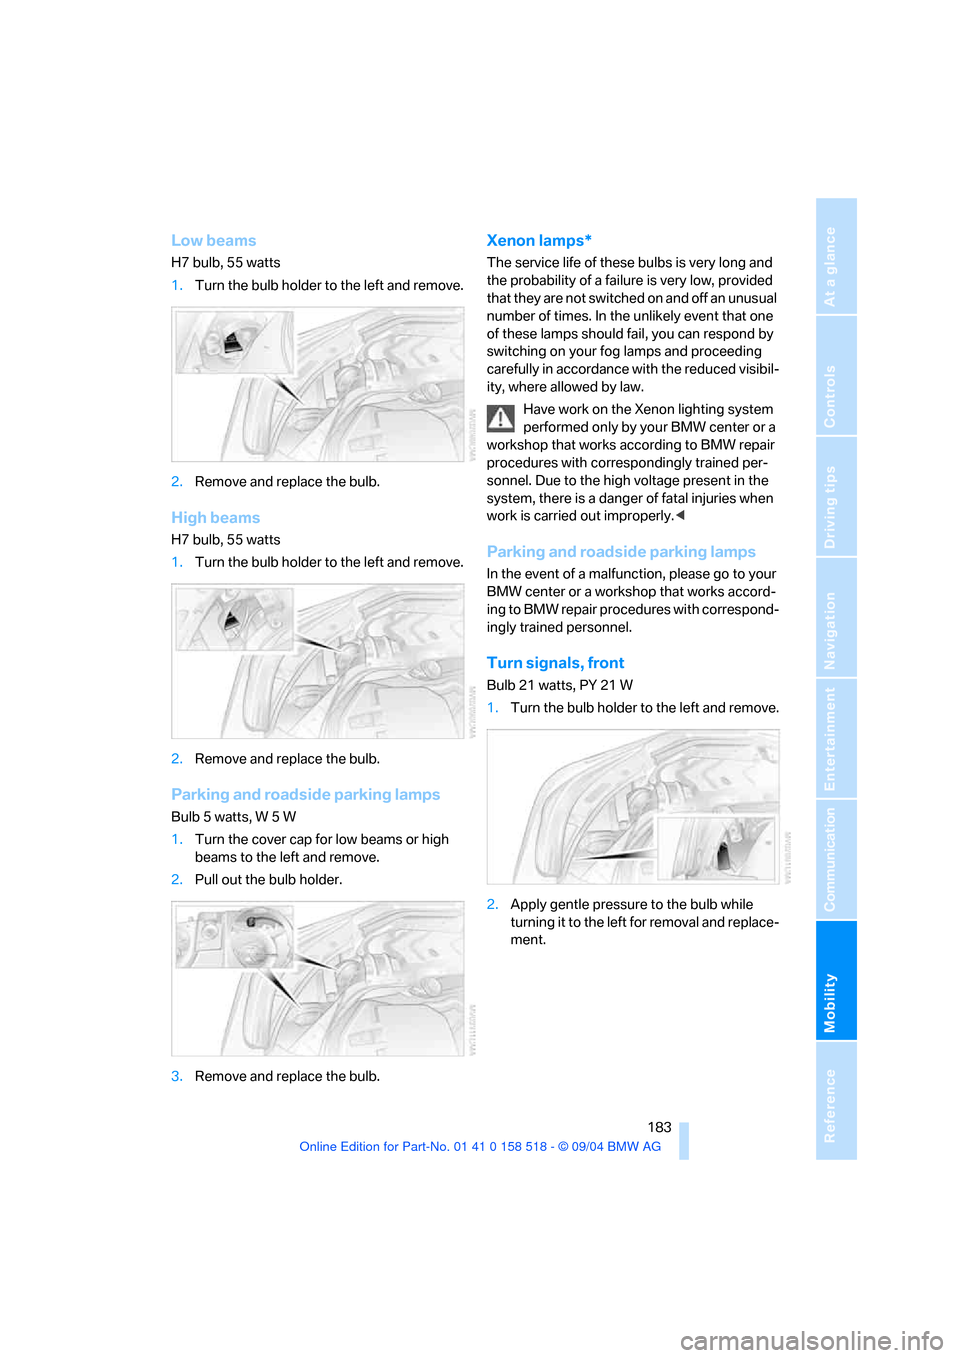
Low beams
H7 bulb, 55 watts
1.Turn the bulb holder to the left and remove.
2.Remove and replace the bulb.
High beams
H7 bulb, 55 watts
1.Turn the bulb holder to the left and remove.
2.Remove and replace the bulb.
Parking and roadside parking lamps
Bulb 5 watts, W 5 W
1.Turn the cover cap for low beams or high
beams to the left and remove.
2.Pull out the bulb holder.
3.Remove and replace the bulb.
Xenon lamps*
The service life of these bulbs is very long and
the probability of a failure is very low, provided
that they are not switched on and off an unusual
number of times. In the unlikely event that one
of these lamps should fail, you can respond by
switching on your fog lamps and proceeding
carefully in accordance with the reduced visibil-
ity, where allowed by law.
Have work on the Xenon lighting system
performed only by your BMW center or a
workshop that works according to BMW repair
procedures with correspondingly trained per-
sonnel. Due to the high voltage present in the
system, there is a danger of fatal injuries when
work is carried out improperly.<
Parking and roadside parking lamps
In the event of a malfunction, please go to your
BMW center or a workshop that works accord-
ing to BMW repair procedures with correspond-
ingly trained personnel.
Turn signals, front
Bulb 21 watts, PY 21 W
1.Turn the bulb holder to the left and remove.
2.Apply gentle pressure to the bulb while
turning it to the left for removal and replace-
ment.
Page 186 of 221
Mobility
185Reference
At a glance
Controls
Driving tips
Communication
Navigation
Entertainment
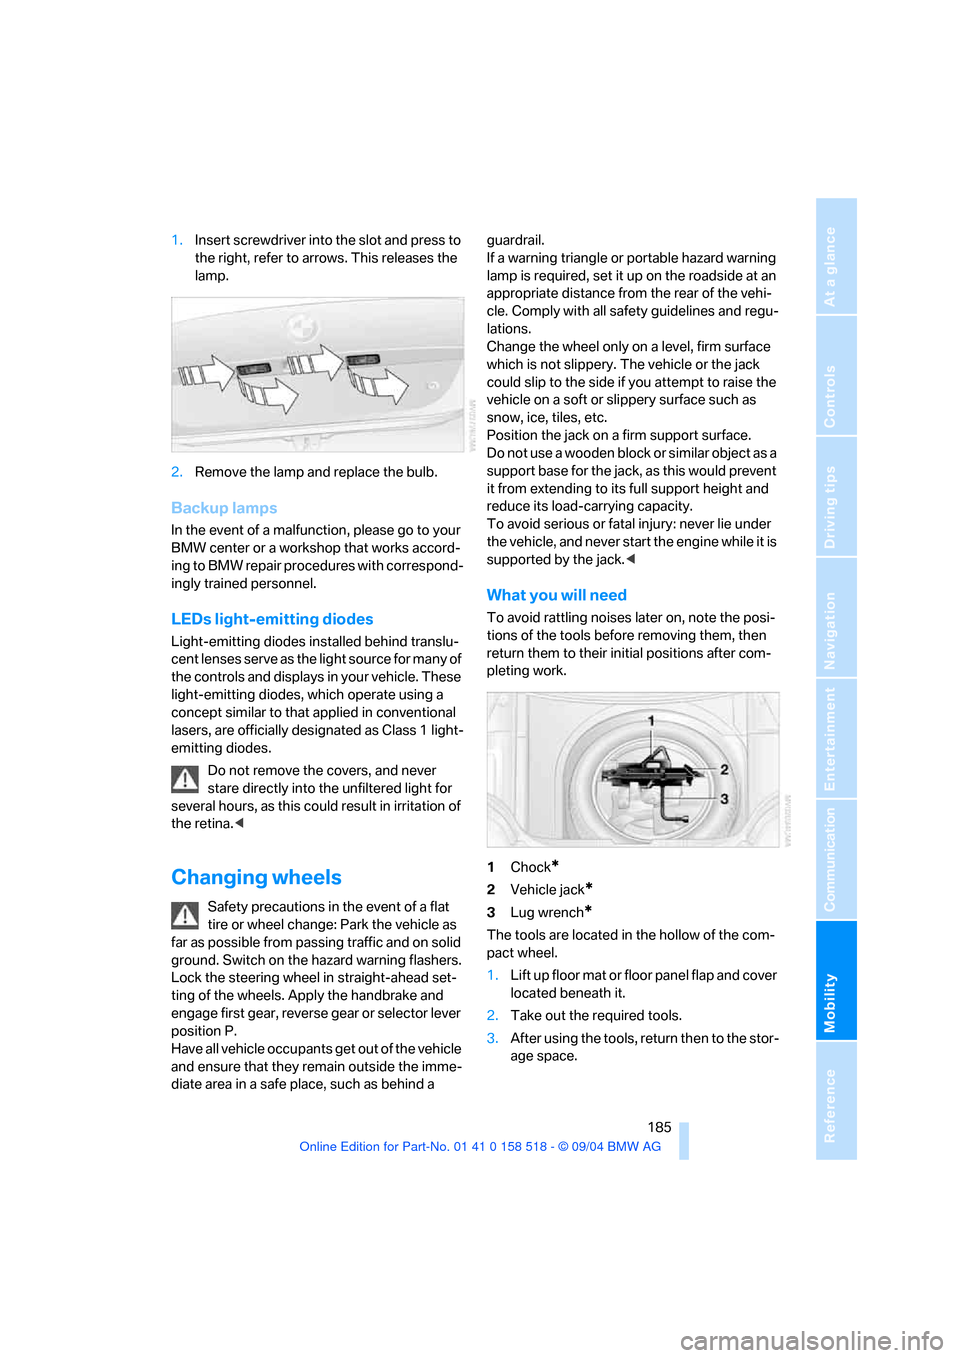
1.Insert screwdriver into the slot and press to
the right, refer to arrows. This releases the
lamp.
2.Remove the lamp and replace the bulb.
Backup lamps
In the event of a malfunction, please go to your
BMW center or a workshop that works accord-
ing to BMW repair procedures with correspond-
ingly trained personnel.
LEDs light-emitting diodes
Light-emitting diodes installed behind translu-
cent lenses serve as the light source for many of
the controls and displays in your vehicle. These
light-emitting diodes, which operate using a
concept similar to that applied in conventional
lasers, are officially designated as Class 1 light-
emitting diodes.
Do not remove the covers, and never
stare directly into the unfiltered light for
several hours, as this could result in irritation of
the retina.<
Changing wheels
Safety precautions in the event of a flat
tire or wheel change: Park the vehicle as
far as possible from passing traffic and on solid
ground. Switch on the hazard warning flashers.
Lock the steering wheel in straight-ahead set-
ting of the wheels. Apply the handbrake and
engage first gear, reverse gear or selector lever
position P.
Have all vehicle occupants get out of the vehicle
and ensure that they remain outside the imme-
diate area in a safe place, such as behind a guardrail.
If a warning triangle or portable hazard warning
lamp is required, set it up on the roadside at an
appropriate distance from the rear of the vehi-
cle. Comply with all safety guidelines and regu-
lations.
Change the wheel only on a level, firm surface
which is not slippery. The vehicle or the jack
could slip to the side if you attempt to raise the
vehicle on a soft or slippery surface such as
snow, ice, tiles, etc.
Position the jack on a firm support surface.
Do not use a wooden block or similar object as a
support base for the jack, as this would prevent
it from extending to its full support height and
reduce its load-carrying capacity.
To avoid serious or fatal injury: never lie under
the vehicle, and never start the engine while it is
supported by the jack.<
What you will need
To avoid rattling noises later on, note the posi-
tions of the tools before removing them, then
return them to their initial positions after com-
pleting work.
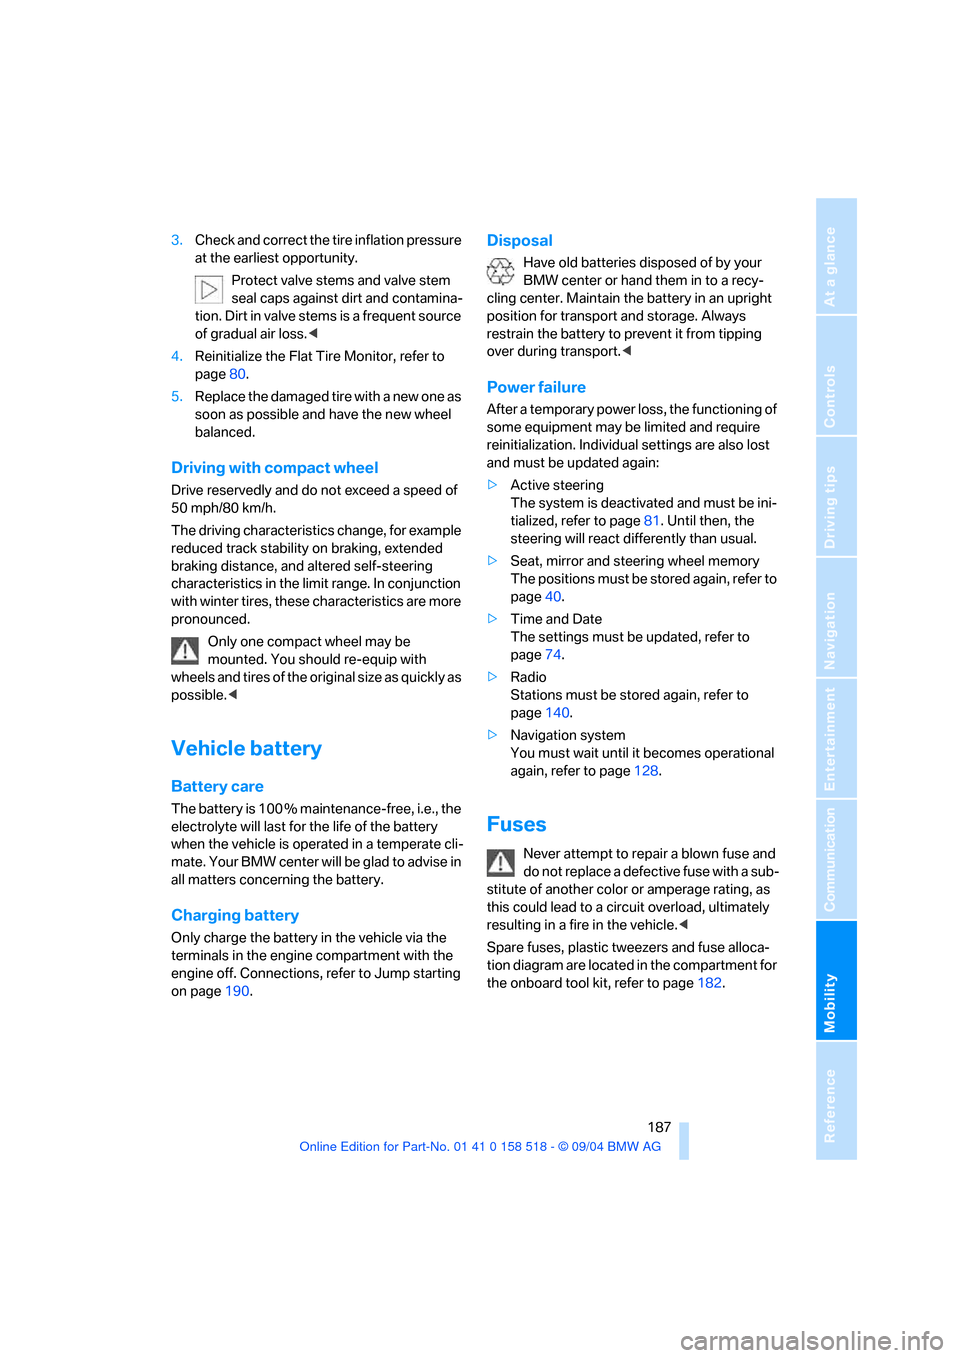
1Chock
*
2Vehicle jack*
3Lug wrench*
The tools are located in the hollow of the com-
pact wheel.
1.Lift up floor mat or floor panel flap and cover
located beneath it.
2.Take out the required tools.
3.After using the tools, return then to the stor-
age space.
Page 188 of 221
Mobility
187Reference
At a glance
Controls
Driving tips
Communication
Navigation
Entertainment
3.Check and correct the tire inflation pressure
at the earliest opportunity.
Protect valve stems and valve stem
seal caps against dirt and contamina-
tion. Dirt in valve stems is a frequent source
of gradual air loss.<
4.Reinitialize the Flat Tire Monitor, refer to
page80.
5.Replace the damaged tire with a new one as
soon as possible and have the new wheel
balanced.
Driving with compact wheel
Drive reservedly and do not exceed a speed of
50 mph/80 km/h.
The driving characteristics change, for example
reduced track stability on braking, extended
braking distance, and altered self-steering
characteristics in the limit range. In conjunction
with winter tires, these characteristics are more
pronounced.
Only one compact wheel may be
mounted. You should re-equip with
wheels and tires of the original size as quickly as
possible.<
Vehicle battery
Battery care
The battery is 100 % maintenance-free, i.e., the
electrolyte will last for the life of the battery
when the vehicle is operated in a temperate cli-
mate . Your BMW center will be glad to advise in
all matters concerning the battery.
Charging battery
Only charge the battery in the vehicle via the
terminals in the engine compartment with the
engine off. Connections, refer to Jump starting
on page190.
Disposal
Have old batteries disposed of by your
BMW center or hand them in to a recy-
cling center. Maintain the battery in an upright
position for transport and storage. Always
restrain the battery to prevent it from tipping
over during transport.<
Power failure
After a temporary power loss, the functioning of
some equipment may be limited and require
reinitialization. Individual settings are also lost
and must be updated again:
>Active steering
The system is deactivated and must be ini-
tialized, refer to page81. Until then, the
steering will react differently than usual.
>Seat, mirror and steering wheel memory
The positions must be stored again, refer to
page40.
>Time and Date
The settings must be updated, refer to
page74.
>Radio
Stations must be stored again, refer to
page140.
>Navigation system
You must wait until it becomes operational
again, refer to page128.
Fuses
Never attempt to repair a blown fuse and
do not replace a defective fuse with a sub-
stitute of another color or amperage rating, as
this could lead to a circuit overload, ultimately
resulting in a fire in the vehicle.<
Spare fuses, plastic tweezers and fuse alloca-
tion diagram are located in the compartment for
the onboard tool kit, refer to page182.