2005 BMW 530I SEDAN key battery
[x] Cancel search: key batteryPage 29 of 221
Opening and closing
28
Opening and closing
The key set
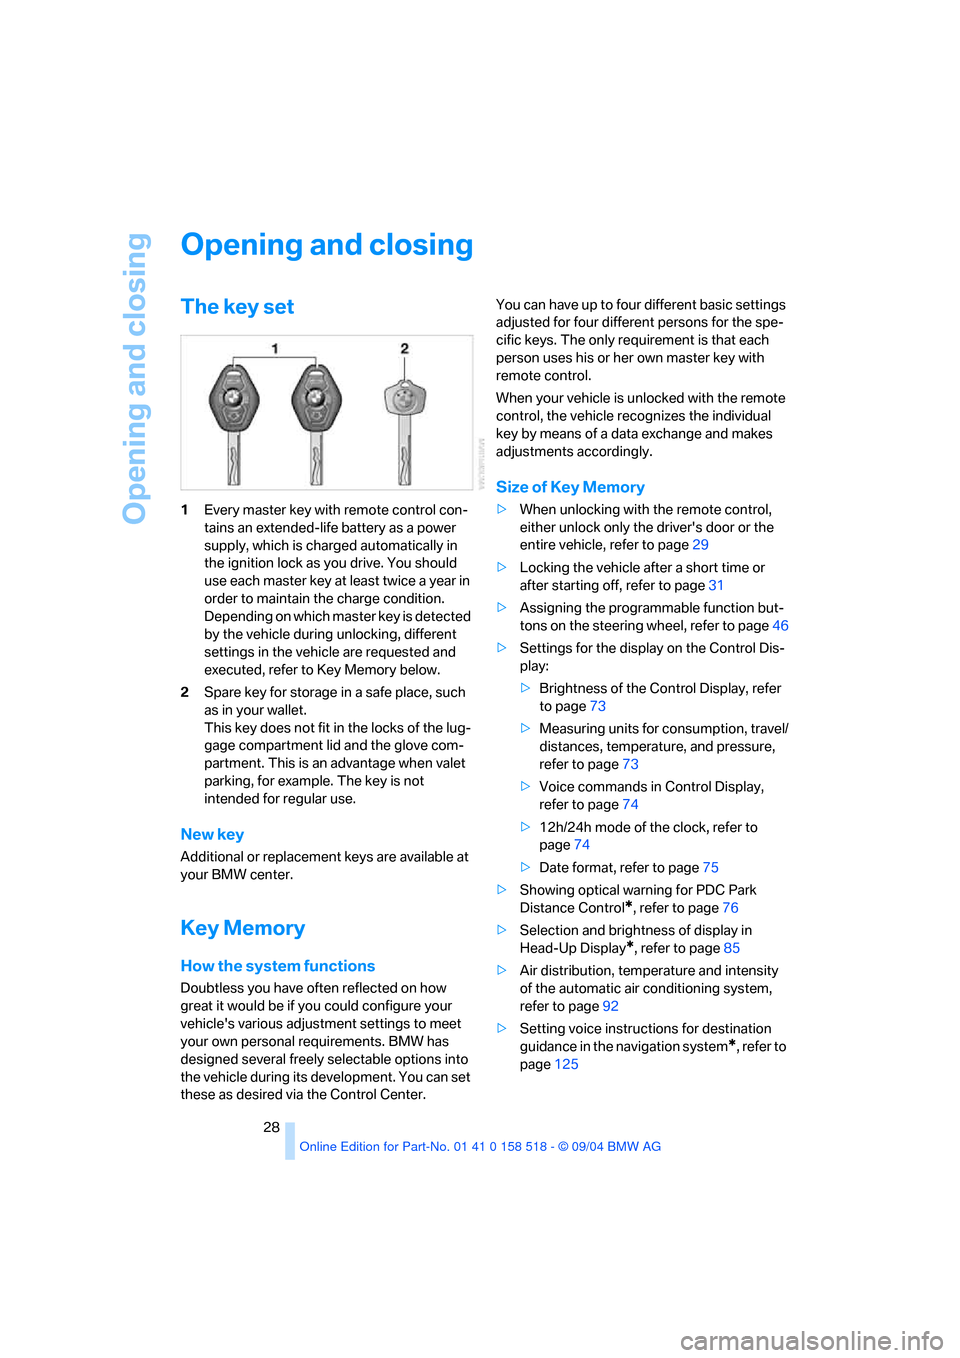
1Every master key with remote control con-
tains an extended-life battery as a power
supply, which is charged automatically in
the ignition lock as you drive. You should
use each master key at least twice a year in
order to maintain the charge condition.
Depending on which master key is detected
by the vehicle during unlocking, different
settings in the vehicle are requested and
executed, refer to Key Memory below.
2Spare key for storage in a safe place, such
as in your wallet.
This key does not fit in the locks of the lug-
gage compartment lid and the glove com-
partment. This is an advantage when valet
parking, for example. The key is not
intended for regular use.
New key
Additional or replacement keys are available at
your BMW center.
Key Memory
How the system functions
Doubtless you have often reflected on how
great it would be if you could configure your
vehicle's various adjustment settings to meet
your own personal requirements. BMW has
designed several freely selectable options into
the vehicle during its development. You can set
these as desired via the Control Center.You can have up to four different basic settings
adjusted for four different persons for the spe-
cific keys. The only requirement is that each
person uses his or her own master key with
remote control.
When your vehicle is unlocked with the remote
control, the vehicle recognizes the individual
key by means of a data exchange and makes
adjustments accordingly.
Size of Key Memory
>When unlocking with the remote control,
either unlock only the driver's door or the
entire vehicle, refer to page29
>Locking the vehicle after a short time or
after starting off, refer to page31
>Assigning the programmable function but-
tons on the steering wheel, refer to page46
>Settings for the display on the Control Dis-
play:
>Brightness of the Control Display, refer
to page73
>Measuring units for consumption, travel/
distances, temperature, and pressure,
refer to page73
>Voice commands in Control Display,
refer to page74
>12h/24h mode of the clock, refer to
page74
>Date format, refer to page75
>Showing optical warning for PDC Park
Distance Control
*, refer to page76
>Selection and brightness of display in
Head-Up Display
*, refer to page85
>Air distribution, temperature and intensity
of the automatic air conditioning system,
refer to page92
>Setting voice instructions for destination
guidance in the navigation system
*, refer to
page125
Page 31 of 221
Opening and closing
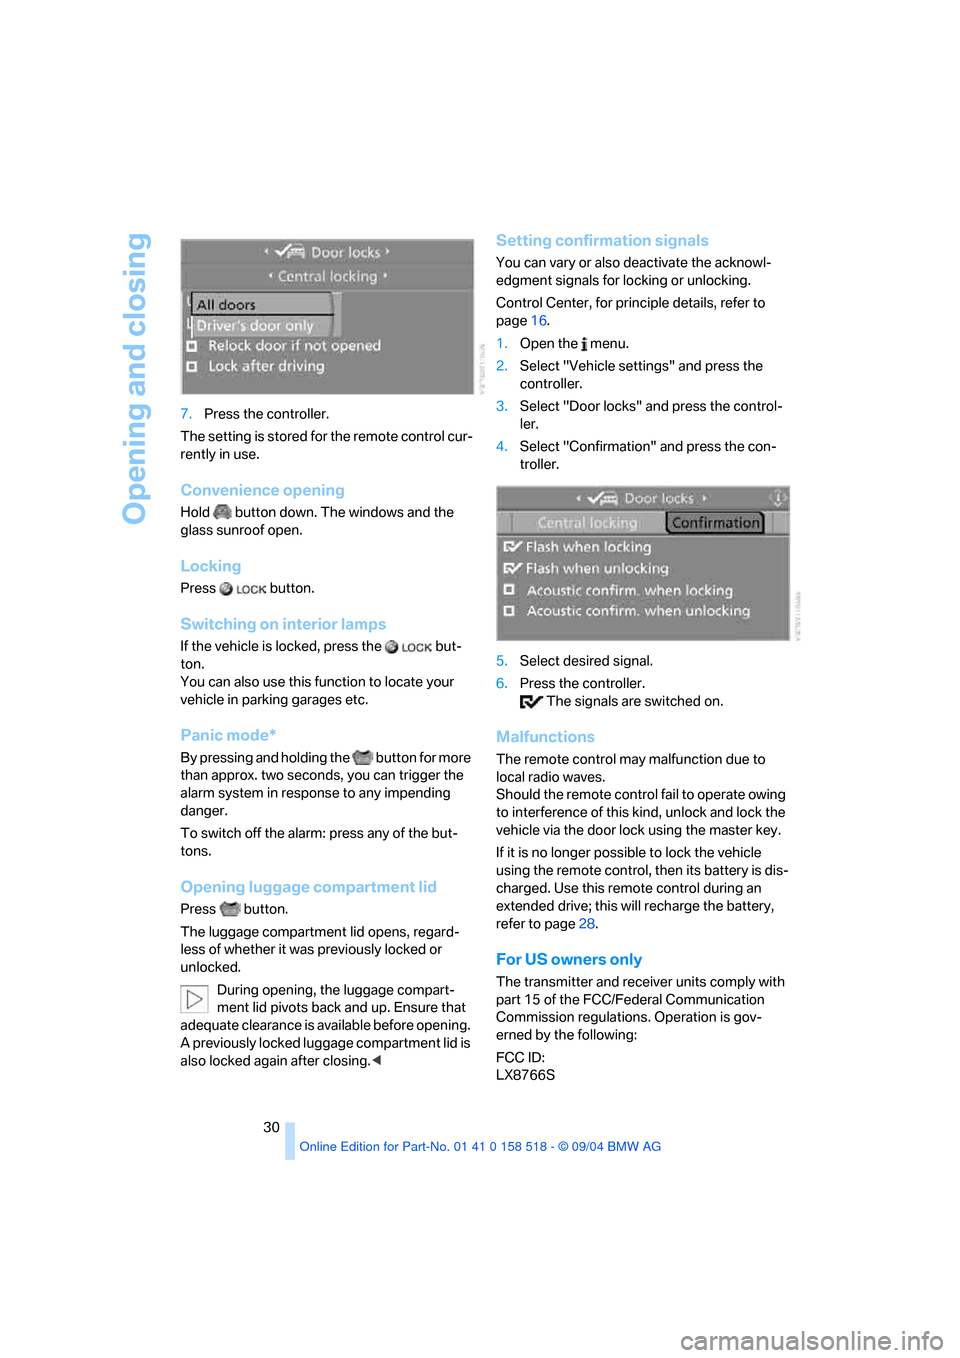
30 7.Press the controller.
The setting is stored for the remote control cur-
rently in use.
Convenience opening
Hold button down. The windows and the
glass sunroof open.
Locking
Press button.
Switching on interior lamps
If the vehicle is locked, press the but-
ton.
You can also use this function to locate your
vehicle in parking garages etc.
Panic mode*
By pressing and holding the button for more
than approx. two seconds, you can trigger the
alarm system in response to any impending
danger.
To switch off the alarm: press any of the but-
tons.
Opening luggage compartment lid
Press button.
The luggage compartment lid opens, regard-
less of whether it was previously locked or
unlocked.
During opening, the luggage compart-
ment lid pivots back and up. Ensure that
adequate clearance is available before opening.
A previously locked luggage compartment lid is
also locked again after closing.<
Setting confirmation signals
You can vary or also deactivate the acknowl-
edgment signals for locking or unlocking.
Control Center, for principle details, refer to
page16.
1.Open the menu.
2.Select "Vehicle settings" and press the
controller.
3.Select "Door locks" and press the control-
ler.
4.Select "Confirmation" and press the con-
troller.
5.Select desired signal.
6.Press the controller.
The signals are switched on.
Malfunctions
The remote control may malfunction due to
local radio waves.
Should the remote control fail to operate owing
to interference of this kind, unlock and lock the
vehicle via the door lock using the master key.
If it is no longer possible to lock the vehicle
using the remote control, then its battery is dis-
charged. Use this remote control during an
extended drive; this will recharge the battery,
refer to page28.
For US owners only
The transmitter and receiver units comply with
part 15 of the FCC/Federal Communication
Commission regulations. Operation is gov-
erned by the following:
FCC ID:
LX8766S
Page 34 of 221

Controls
33Reference
At a glance
Driving tips
Communication
Navigation
Entertainment
Mobility
Locking separately
Turn the master key with remote control in the
lock of the luggage compartment lid beyond a
resistance point to the right and withdraw it in
the horizontal position.
This locks the luggage compartment lid and
disconnects it from the central locking system.
If you then only hand over the spare key, refer to
page28, no access is possible via the luggage
compartment lid. This is an advantage when
valet parking, for example.
Unlocking again and opening manually
Turn master key toward the left until the resis-
tance point: the luggage compartment lid
opens.
If you use the key to unlock the luggage
compartment lid while the alarm system
is armed, the alarm will be triggered. You should
therefore unlock the vehicle ahead of time.
If the alarm is inadvertently triggered: switch off
the alarm, refer to page34.<
Emergency release
This lever releases the luggage compartment
lid from inside the luggage compartment.
Closing
The handle recesses on the interior trim of the
luggage compartment lid make it easier to pull
down.
Make sure that the closing path of the
luggage compartment lid is clear, as oth-
erwise injuries may result.<
Alarm system
The concept
The vehicle alarm system responds:
>When a door, the hood, or the luggage com-
partment lid is opened
>To movements inside the vehicle: Inner
motion sensor, see below
>To changes in the vehicle's tilt if someone
attempts to steal the wheels or tow the
vehicle
>To interruptions in battery voltage
The system responds to unauthorized vehicle
entry and attempted theft by simultaneously
activating:
>An acoustic alarm, which lasts for a period
of approx. 30 seconds
>The hazard warning flashers for approx. 5
minutes
>The high beams, which flash on and off in
the same rhythm
Arming and disarming alarm system
When you lock or unlock the vehicle, either with
the remote control or at the door lock, the alarm
system is armed or disarmed at the same time.
Page 93 of 221
A congenial climate
92 The recirculated-air mode should not be used
over an extended period of time, as the air qual-
ity inside the vehicle deteriorates continu-
ously.<
Residual heat mode
Press this button when the engine
is switched off, but warm.
The heat stored in the engine is
used to heat the passenger com-
partment, e.g. while stopped at a school to pick
up a child.
You can adjust the automatic climate control
settings in ignition key position 1.
Provided that the engine has warmed to its nor-
mal operating temperature and the battery is
charged, you can use this function for up to
15 minutes after switching off the ignition. The
LED in the button lights up to confirm compli-
ance with both of these conditions.
Switching off automatic climate control
The air volume, the heater and the
cooling function are all switched
off.
You can restart the automatic cli-
mate control by pressing any of its buttons
except the REST button.
Settings using Control Center
Ignition key:
>On vehicles with separate drives for audio
CDs and navigation DVDs, ignition key in
position 2
>In vehicles with one drive for audio CDs,
ignition key in position 1Control Center, for principle details, refer to
page16.
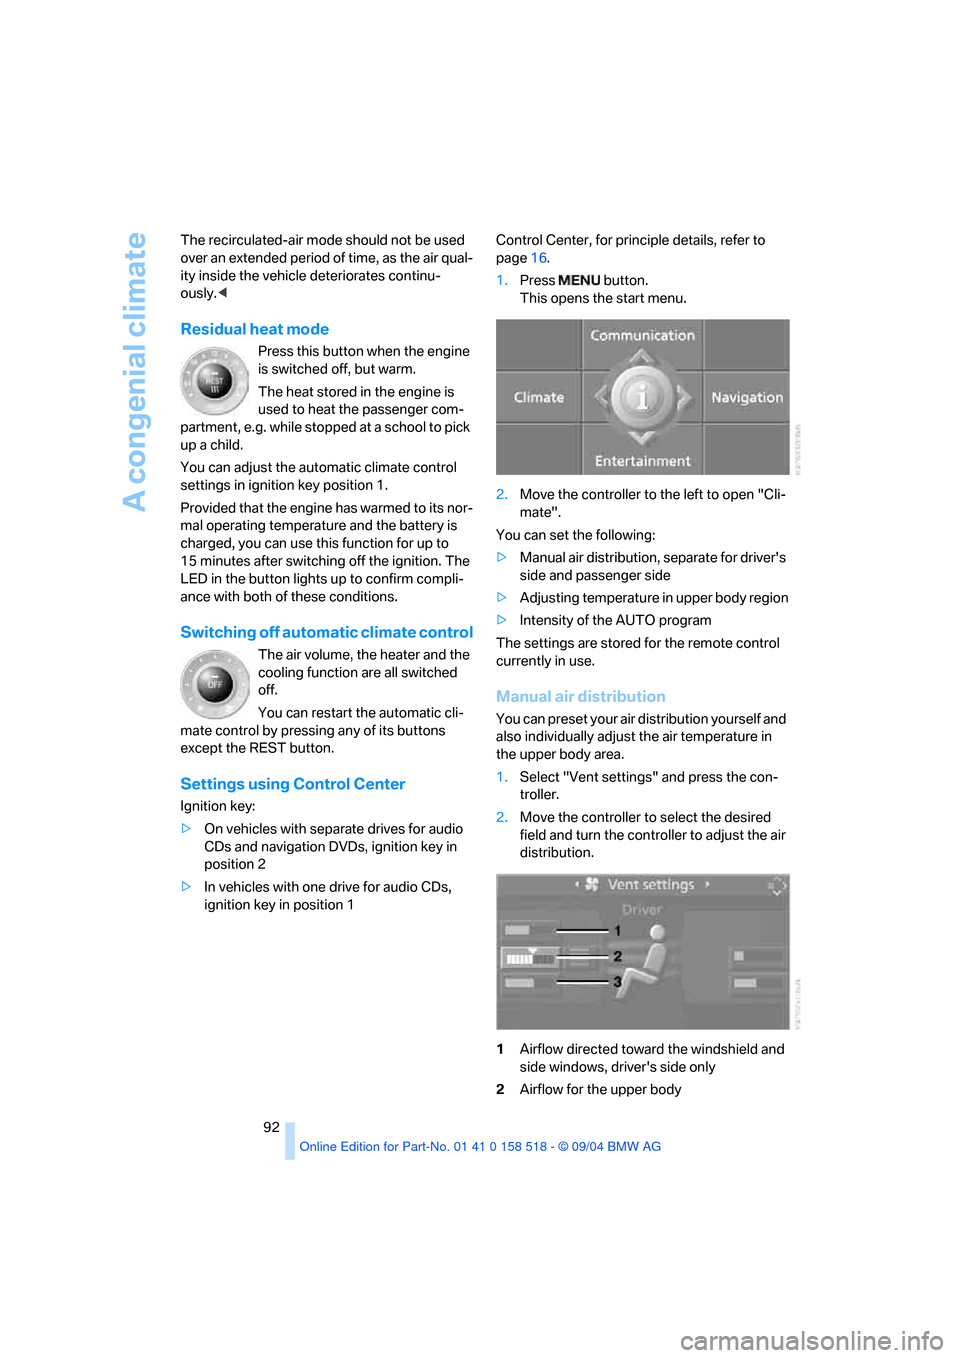
1.Press button.
This opens the start menu.
2.Move the controller to the left to open "Cli-
mate".
You can set the following:
>Manual air distribution, separate for driver's
side and passenger side
>Adjusting temperature in upper body region
>Intensity of the AUTO program
The settings are stored for the remote control
currently in use.
Manual air distribution
You can preset your air distribution yourself and
also individually adjust the air temperature in
the upper body area.
1.Select "Vent settings" and press the con-
troller.
2.Move the controller to select the desired
field and turn the controller to adjust the air
distribution.
1Airflow directed toward the windshield and
side windows, driver's side only
2Airflow for the upper body
Page 95 of 221
A congenial climate
94
Microfilter/activated-charcoal filter
The microfilter removes dust and pollen from
the incoming air. The activated-charcoal filter
provides additional protection by filtering gas-
eous pollutants from the outside air. Your BMW
center replaces this combined filter as a stan-
dard part of your scheduled maintenance.
You can select a display of more detailed infor-
mation on the Control Display, refer to page66.
Independent ventilation*
The independent ventilation blows air into the
passenger compartment to lower interior tem-
peratures.
The independent ventilation is controlled using
the Control Center. You can set two different
times for the system to start.
The independent ventilation remains on for
30 minutes. It can also be switched on and off
directly. Since the system uses a substantial
amount of electrical current, you should refrain
from activating it twice in succession without
allowing the battery to be recharged in normal
operation between use.
The independent ventilation is ready for use at
any outside temperature, up to ignition key
position 1.
The air emerges through the upper body region
vent outlets in the instrument panel. These vent
outlets must be open for the system to operate.
Switching on and off directly
Control Center, for principle details, refer to
page16.
1.Open "Climate".
2.Select "Parked car operation" and press the
controller.
3.Select "Automatic ventilation" and press
the controller.4.Select "Parked car ventilation" and press
the controller.
Independent ventilation is switched on and the
LED flashes.
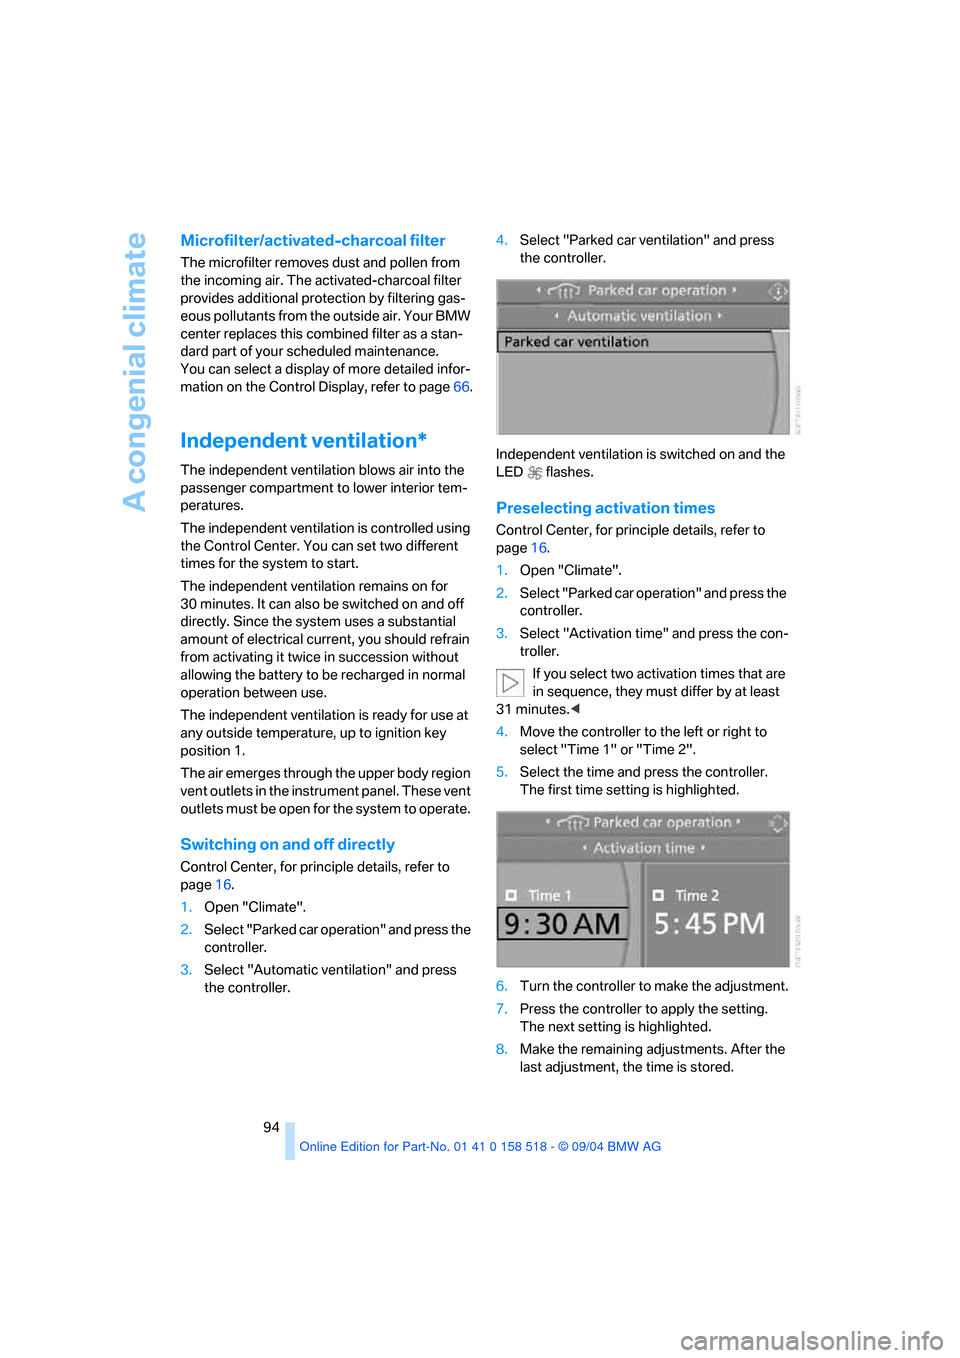
Preselecting activation times
Control Center, for principle details, refer to
page16.
1.Open "Climate".
2.Select "Parked car operation" and press the
controller.
3.Select "Activation time" and press the con-
troller.
If you select two activation times that are
in sequence, they must differ by at least
31 minutes.<
4.Move the controller to the left or right to
select "Time 1" or "Time 2".
5.Select the time and press the controller.
The first time setting is highlighted.
6.Turn the controller to make the adjustment.
7.Press the controller to apply the setting.
The next setting is highlighted.
8.Make the remaining adjustments. After the
last adjustment, the time is stored.
Page 192 of 221
Mobility
191Reference
At a glance
Controls
Driving tips
Communication
Navigation
Entertainment
an engine or body ground of the assisting
vehicle.
5.Attach the second end of the cable to the
negative terminal of the battery or to the
engine or body ground of the vehicle to be
started.
Starting engine
1.Start the engine on the assisting vehicle
and allow it to run for several minutes at
increased speed.
2.Start the engine on the other vehicle in the
usual way. If the first start attempt is not
successful, wait a few minutes before
another attempt in order to allow the dis-
charged battery to recharge.
3.Let the engines run for a few minutes.
4.Disconnect the jumper cables by reversing
the connection sequence.
Check the battery and recharge if necessary.
Never use spray fluids to start the
engine.<
Towing and tow-starting
Always observe all applicable towing laws
and regulations.<
Never allow passengers to ride in a towed
vehicle for any reason.<
Using tow fitting
The threaded tow fitting is stored in the
onboard tool kit and must always remain in the
vehicle. It can be screwed in at the front or rear
of the BMW.In order to avoid damaging the tow fitting
and the vehicle, please follow these
instructions: use only the tow fitting provided
with the vehicle and screw it all the way in. Use
the tow fitting for towing only on roads. Avoid
lateral loading of the tow fitting, e.g. do not lift
the vehicle by the tow fitting.<
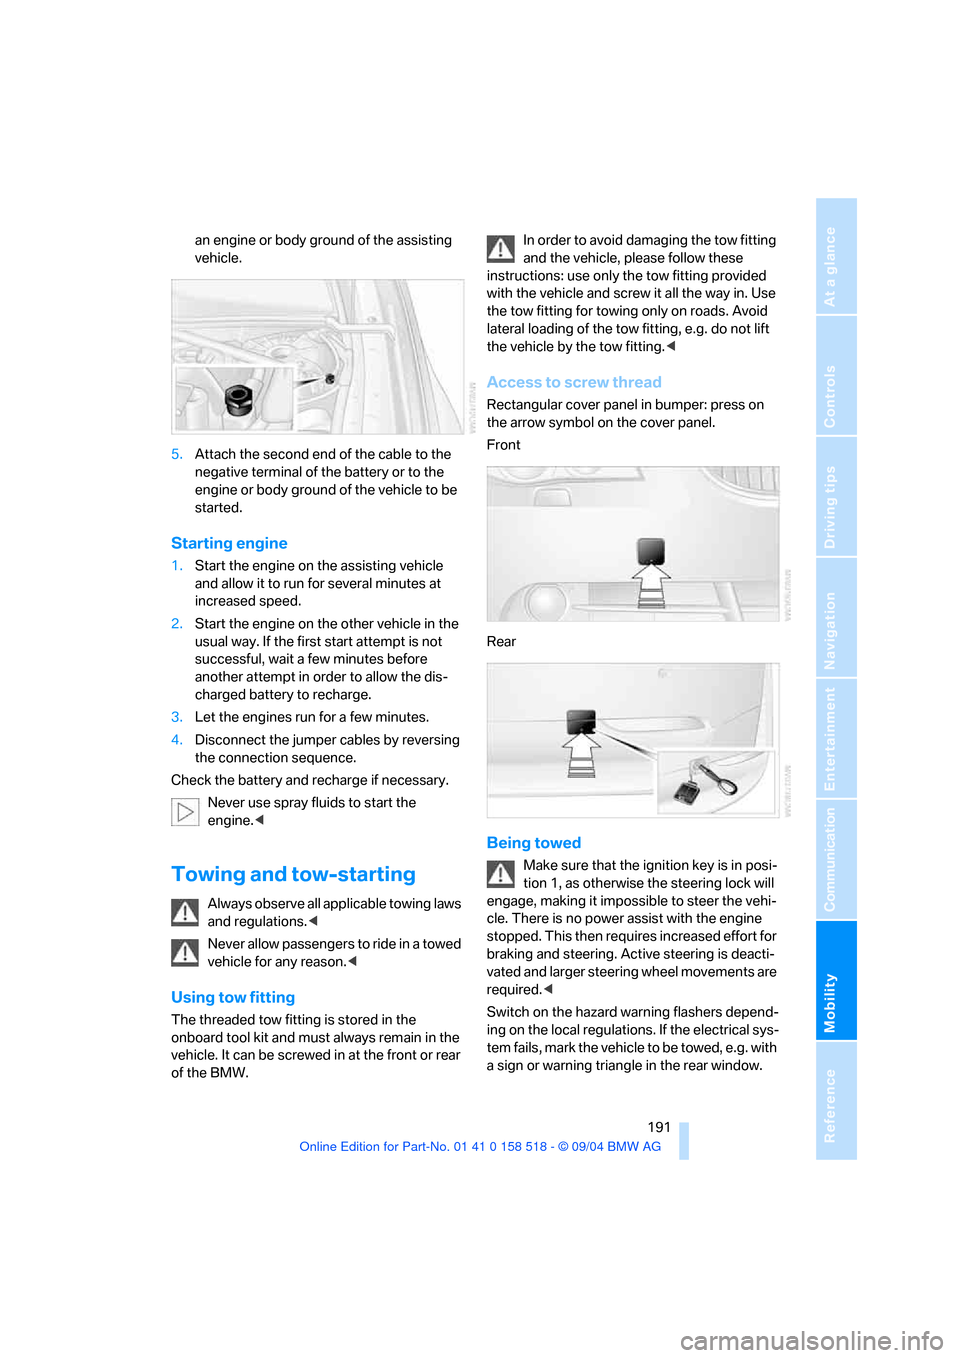
Access to screw thread
Rectangular cover panel in bumper: press on
the arrow symbol on the cover panel.
Front
Rear
Being towed
Make sure that the ignition key is in posi-
tion 1, as otherwise the steering lock will
engage, making it impossible to steer the vehi-
cle. There is no power assist with the engine
stopped. This then requires increased effort for
braking and steering. Active steering is deacti-
vated and larger steering wheel movements are
required.<
Switch on the hazard warning flashers depend-
ing on the local regulations. If the electrical sys-
tem fails, mark the vehicle to be towed, e.g. with
a sign or warning triangle in the rear window.
Page 205 of 221

Everything from A to Z
204 Braking
– CBC Cornering Brake
Control77
– DBC Dynamic Brake
Control77
– electronic brake-force
distribution77
– refer to Braking safely107
Breakdown assistance163
Breakdown services, refer to
Roadside Assistance190
Breaking-in the clutch106
Breaking-in the
differential106
Break-in period106
"Brightness"73
Brightness of Control
Display73
Buttons on steering wheel11
C
California Proposition 65
Warning6
"Call"155
Call
– accepting154
– displaying accepted156
– ending155
– in absence156
– starting154
Calling
– from phone book155
– from Top 8 list156
– redialing156
– refer to telephone Owner's
Manual
"Calling sender"158
Can holder, refer to Cup
holders99
Capacities198
Car battery, refer to Vehicle
battery187
Car care, refer to Caring for
your vehicle brochure
Car-care products, refer to
Caring for your vehicle
brochure"Car data"70
Care181
– refer to Caring for your
vehicle brochure
Cargo, securing102,109
Cargo loading108
Caring for artificial leather,
refer to Caring for your
vehicle brochure
Caring for leather, refer to
Caring for your vehicle
brochure
Caring for light-alloy wheels,
refer to Caring for your
vehicle brochure
Caring for plastic, refer to
Caring for your vehicle
brochure
Caring for the carpet, refer to
Caring for your vehicle
brochure
Caring for the vehicle finish,
refer to Caring for your
vehicle brochure
Car jack
– jacking points186
Car keys, refer to Key set28
Car phone153
– installation location, refer to
Center armrest98
– refer to Portable phone152
– refer to separate Owner's
Manual
Car radio, refer to Radio138
Car vacuum cleaner
connection, refer to
Sockets100
Car wash108
– also refer to Caring for your
vehicle brochure
Catalytic converter, refer to
Hot exhaust system106
"Categories"143
CBC Cornering Brake
Control77
CBS Condition Based
Service180
"CD"133,145CD changer145
– controls132
– fast forward/reverse147
– installation location147
– playing a track147
– random order147
– repeating a track146
– selecting a CD146
– selecting a track146
– switching on/off132
– tone control133
– volume133
CD player145
– controls132
– fast forward/reverse147
– playing a track147
– random order147
– repeating a track146
– selecting a track146
– switching on/off132
– tone control133
– volume133
Center armrest
– front98
– rear100
Center brake lamp184
Center console14
"Central locking"29
Central locking system29
– from inside vehicle31
Changes, technical
– refer to For your own
safety6
– refer to Parts and
accessories6
Changing gear
– automatic transmission with
Steptronic55
Changing settings
– on Control Display73
Changing the language on the
Control Display74
Changing the measurement
units on the Control
Display73
Changing wheels174,185
CHECK button69
Check Control67
Page 207 of 221
Everything from A to Z
206 Decommissioning the vehicle
– refer to Caring for your
vehicle brochure
Defrosting windows91
Defrosting windows and
removing condensation91
Defrosting windshield, refer to
Defrosting windows91
Defrost position, refer to
Defrosting windows91
"Delete address book" for
navigation122
"Delete all numbers" on the
portable phone157
"Delete data" for
navigation122
"Delete" for portable
phone157,158
Destination address
– deleting121
– entering115
Destination for navigation
– destination list119
– entry115
– selecting from address
book121
– selecting using
information118
– storing120
Destination guidance124
– bypassing route
sections127
– canceling voice
instructions46
– changing specified
route122
– displaying routes126
– distance and arrival124
– interrupting125
– starting124
– terminating/continuing125
– voice instructions125
– volume of voice
instructions126
Destination list119
Destinations recently driven
to119"Dial" for portable phone154
"Dial number"154
"Diamond button"46
Diamond button46
Digital clock65
Dimensions197
Dipstick for engine oil177
Directional indicators, refer to
Turn signals56
Direction announcements,
refer to Voice
instructions125
Direction instructions, refer to
Voice instructions125
Directory, refer to Phone
book155
Directory for navigation, refer
to Address book120
Disc brakes108
Displacement, refer to Engine
data196
Display, refer to Control
Center16
"Display off"21
Displays, refer to Instrument
cluster12
"Display settings"73
Displays on the windshield,
refer to Head-Up Display84
Disposal, vehicle battery187
Distance, refer to
Computer70
Distance cruise control, refer
to Active cruise control59
"Distance to dest."71
Distance to destination, refer
to Computer70
Distance warning, refer to
PDC Park Distance
Control76
Divided rear seat back, refer to
Folding down rear seat101
Door entry lighting89
Door keys28
Door lock31
Door locking, acknowl-
edgment signals30"Door locks"29
Doors
– manual operation31
– remote control29
DOT Quality Grades173
Draft-free ventilation93
Drinks holder, refer to Cup
holders99
Drive mode54
"Driver's door only"29
Driving lamps, refer to Parking
lamps/low beams87
Driving notes106
Driving route, refer to
Displaying route126
Driving stability control
system77
Driving through water107
Driving tips, refer to Driving
notes106
Dry air, refer to Cooling
function91
Drying the air, refer to Cooling
function91
DSC Dynamic Stability
Control78
– indicator lamp13,78
– malfunction79
DTC Dynamic Traction
Control78
– activating78
– indicator lamp13,78
DVD for navigation114
Dynamic Brake Control
DBC77
Dynamic Driving Control54
"Dynamic route" for
navigation123
Dynamic Stability Control
DSC78
– indicator lamp13,78,79
Dynamic Traction Control
DTC78
– indicator lamp13,78