2005 BMW 530I height
[x] Cancel search: heightPage 40 of 221
Controls
39Reference
At a glance
Driving tips
Communication
Navigation
Entertainment
Mobility
Please observe the information on damage to
safety belts provided on page43 and the infor-
mation on the active front head restraints
on
page42.
Seat adjustment
To ensure that the safety systems con-
tinue to provide optimized protection,
please observe the adjustment instructions on
page38.<
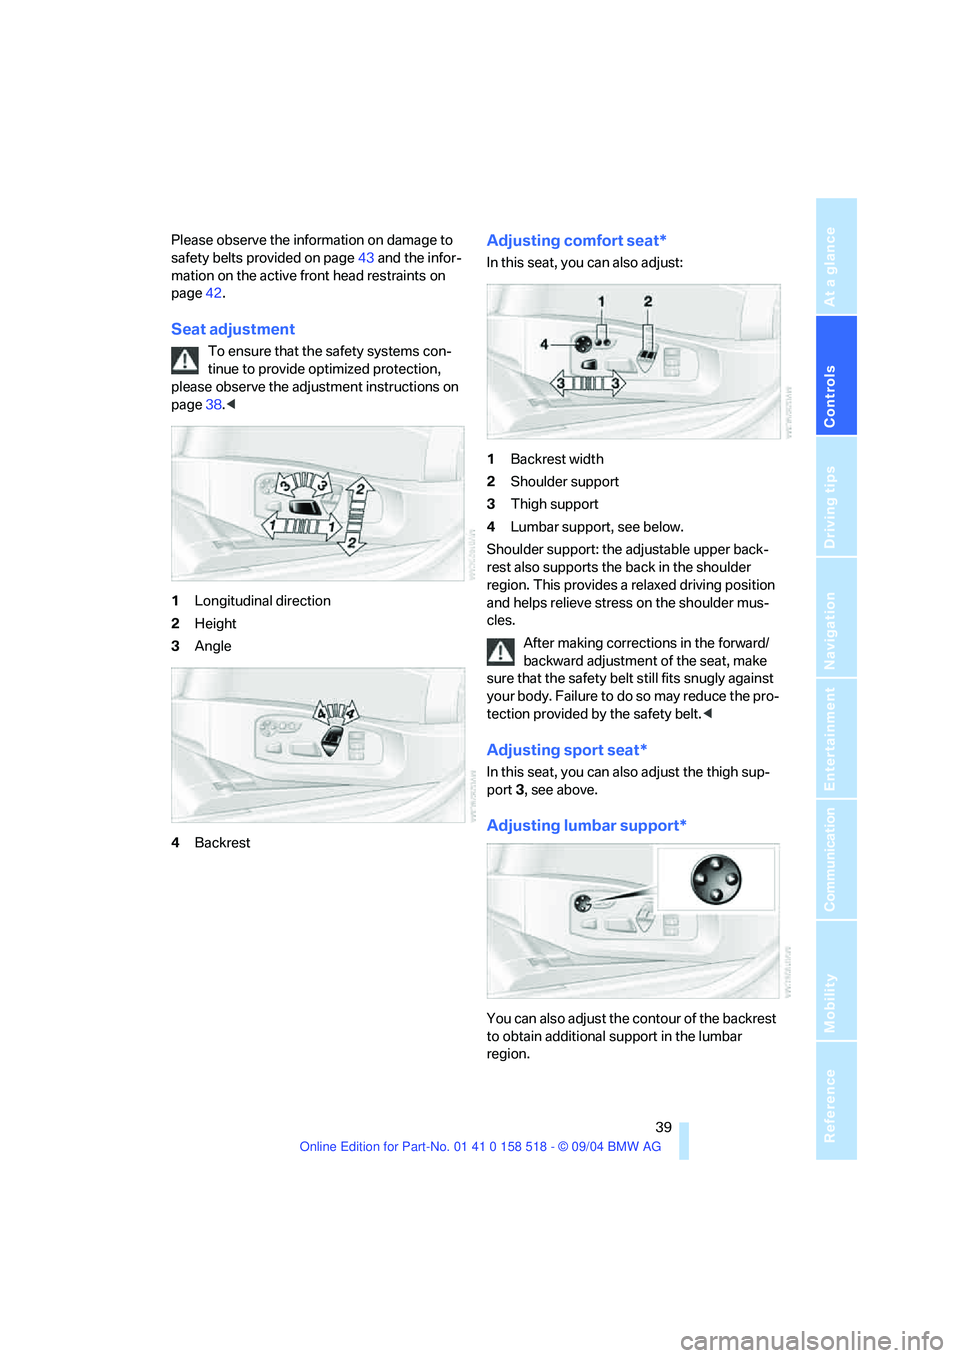
1Longitudinal direction
2Height
3Angle
4Backrest
Adjusting comfort seat*
In this seat, you can also adjust:
1Backrest width
2Shoulder support
3Thigh support
4Lumbar support, see below.
Shoulder support: the adjustable upper back-
rest also supports the back in the shoulder
region. This provides a relaxed driving position
and helps relieve stress on the shoulder mus-
cles.
After making corrections in the forward/
backward adjustment of the seat, make
sure that the safety belt still fits snugly against
your body. Failure to do so may reduce the pro-
tection provided by the safety belt.<
Adjusting sport seat*
In this seat, you can also adjust the thigh sup-
port 3, see above.
Adjusting lumbar support*
You can also adjust the contour of the backrest
to obtain additional support in the lumbar
region.
Page 43 of 221
Adjustments
42
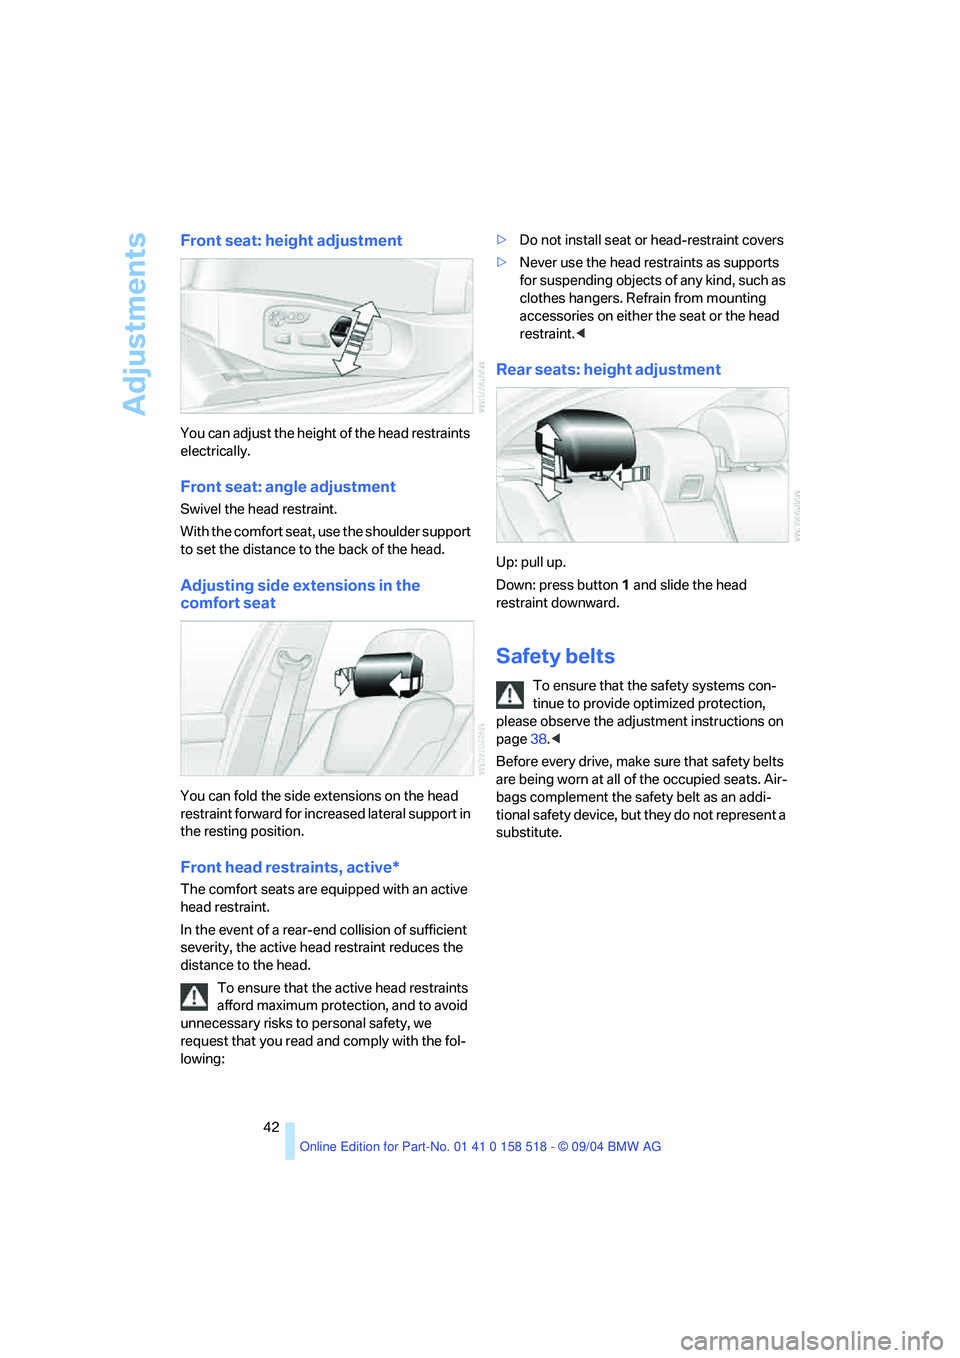
Front seat: height adjustment
You can adjust the height of the head restraints
electrically.
Front seat: angle adjustment
Swivel the head restraint.
With the comfort seat, use the shoulder support
to set the distance to the back of the head.
Adjusting side extensions in the
comfort seat
You can fold the side extensions on the head
restraint forward for increased lateral support in
the resting position.
Front head restraints, active*
The comfort seats are equipped with an active
head restraint.
In the event of a rear-end collision of sufficient
severity, the active head restraint reduces the
distance to the head.
To ensure that the active head restraints
afford maximum protection, and to avoid
unnecessary risks to personal safety, we
request that you read and comply with the fol-
lowing:>Do not install seat or head-restraint covers
>Never use the head restraints as supports
for suspending objects of any kind, such as
clothes hangers. Refrain from mounting
accessories on either the seat or the head
restraint.<
Rear seats: height adjustment
Up: pull up.
Down: press button1 and slide the head
restraint downward.
Safety belts
To ensure that the safety systems con-
tinue to provide optimized protection,
please observe the adjustment instructions on
page38.<
Before every drive, make sure that safety belts
are being worn at all of the occupied seats. Air-
bags complement the safety belt as an addi-
tional safety device, but they do not represent a
substitute.
Page 48 of 221
Controls
47Reference
At a glance
Driving tips
Communication
Navigation
Entertainment
Mobility
Transporting children safely
The right place for children
Children always in the rear
Accident research shows that the safest place
for children in a vehicle is in the rear seat.
Older children should be tightly secured with a
safety belt, after they have outgrown a booster
seat that is appropriate for their age, height and
weight.
A child sitting in the rear seat and not
properly restrained may place his or her
head on or near the airbag, if so equipped. For
example, a child, even though belted, may fall
asleep with his or her head against the side air-
bag. It may be difficult for a driver to ens ure that
children in the rear seat will remain properly
positioned at all times and do not place their
heads on or near the side airbag. Therefore, we
recommend that the rear seat side airbags, if
provided, be deactivated if you plan to transport
children in the rear seat.<
Deactivating rear seat side airbags
The rear seat side airbags may already have
been deactivated by a BMW center. Labels in
the rear door opening should indicate the status
of your rear seat side airbags. If you are uncer-
tain of their status, or wish to have the airbags
activated or deactivated, please contact your
BMW center.
Child-restraint system in the rear
Children under 13 years of age and chil-
dren less than 5 ft/150 cm tall should
always ride in the rear and the restraint systems
should be secured with the vehicle's safety
belts.<
Younger children should be secured in an
appropriate forward-facing child-restraint sys-
tem that has first been properly restrained. We
strongly urge you to carefully read and comply
with the instructions for installation and use provided by the child-restraint's manufacturer
whenever you use such a device.
All rear sitting positions in your vehicle meet the
recommendations of SAE J1819, an industry-
recommended practice for securing child-
restraint systems in motor vehicles.
Exception for front passenger seat
Should it be necessary to use a child-
restraint system on the front passenger
seat, the airbags on the front passenger side
must be deactivated. Otherwise, there is a con-
siderable risk of injury for the child when the air-
bags are triggered, even with a child-restraint
system. Your BMW center will be glad to advise
you.<
Never install a rearward-facing child-
restraint system in the front passenger
seat of this vehicle if the passenger's airbag is
not deactivated. If you do so, the child could be
severely injured when the airbag is trig-
gered.Your vehicle is equipped with an airbag
supplemental restraint system for the front pas-
senger. Because the backrest on any rearward-
facing child-restraint system – of the kind
designed for infants under 1 year and 20 Ibs./
9 kg – would be within the airbag's deployment
range, you should never mount such a system
in the front passenger seat, since the impact of
the airbag against the child restraint's backrest
could lead to serious or fatal injuries.<
More information on automatic deactivation of
the front passenger airbags, refer to page83.
Backrest width adjustment
The backrest width adjustment of the
passenger seat must be opened com-
pletely. After the child's seat is installed, mem-
ory positions must not be requested and the
active backrest width adjustment must be
deactivated, otherwise there is the risk of
injury.<
Page 64 of 221
Controls
63Reference
At a glance
Driving tips
Communication
Navigation
Entertainment
Mobility
Always remember that the range and abil-
ity of the system does have physical limi-
tations. It will not apply the brakes or decelerate
your vehicle when there is a slow-moving vehi-
cle, stopped vehicle or stationary object ahead
of you, as for example, at a traffic light or a
parked vehicle. Also, the system does not react
to oncoming traffic, pedestrians or other types
of potential traffic such as a rider on horseback.
It is also possible that the system may not
detect smaller moving objects such as motor-
cycles or bicycles. Be especially alert when
encountering any of these situations as the sys-
tem will neither automatically brake, nor provide
a warning to you. Also, be aware that every
decrease in the distance setting allows your
vehicle to come closer to a vehicle in front of
you and requires a heightened amount of alert-
ness.<
If while your vehicle is actively following a vehi-
cle in front of you and the vehicle ahead speeds
up or the lane ahead becomes clear, then your
vehicle will accelerate to the speed you have
selected. Be aware that changing to a clear,
unobstructed lane will also result in your vehicle
accelerating.
Be certain to deactivate the system when
you pull into an exit lane for a highway off-
ramp.<
Also, vehicles traveling in a staggered manner
on a highway may cause a delay in the system's
reaction to a vehicle in front of you or may cause
the system to react to a vehicle actually in the
lane next to you. Always be ready to take action
or apply the brakes if necessary.
Active cruise control can only decelerate the
vehicle to approx. 20 mph/30 km/h. If the sys-
tem reduces vehicle speed below 20 mph/
30 km/h or if DSC/ABS is engaged while driving,
the system will automatically deactivate.
Remember, the system cannot stop your
vehicle. In addition, the system is deacti-
vated whenever the driver applies the vehicle
brakes, shifts the transmission to neutral/N, or
deactivates DSC. After any deactivation, the
system will no longer automatically activate the
vehicle brakes, which means the driver must intervene and resume manual braking. You
should then reactivate the system only when
you are fully aware of the prior speed and dis-
tance settings.<
Active cruise control may brake when you
reduce the stored desired speed; however, the
driver must constantly monitor traffic and inter-
vene if necessary.
When you switch off the engine or ignition,
active cruise control is fully switched off, too,
and any settings you have selected are can-
celed.
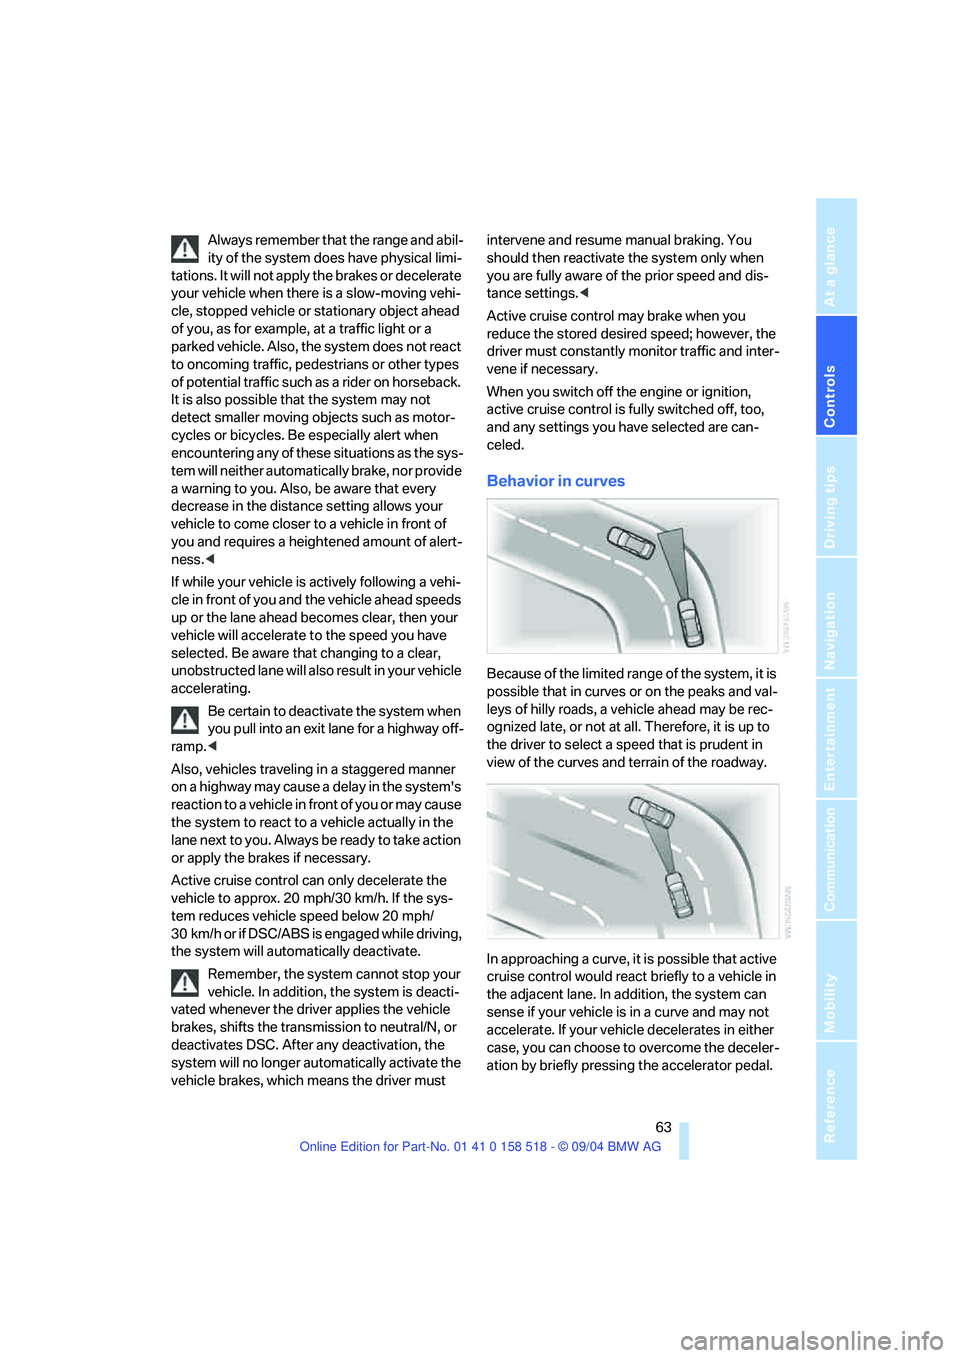
Behavior in curves
Because of the limited range of the system, it is
possible that in curves or on the peaks and val-
leys of hilly roads, a vehicle ahead may be rec-
ognized late, or not at all. Therefore, it is up to
the driver to select a speed that is prudent in
view of the curves and terrain of the roadway.
In approaching a curve, it is possible that active
cruise control would react briefly to a vehicle in
the adjacent lane. In addition, the system can
sense if your vehicle is in a curve and may not
accelerate. If your vehicle decelerates in either
case, you can choose to overcome the deceler-
ation by briefly pressing the accelerator pedal.
Page 177 of 221

Under the hood
176
Under the hood
Never attempt to perform any service or
repair operations on your vehicle without
the required, professional technical training. If
you do not know what repair procedures to fol-
low, have work on your vehicle done only by
your BMW center or a workshop that works
according to BMW repair procedures with cor-
respondingly trained personnel. If this work is
not carried out properly, there is a danger of
subsequent damage and related safety haz-
ards.<
Hood
Releasing
Pull the lever located under the left side of the
instrument cluster.
Opening
Press the release handle and open the hood.
Closing
Close the hood from a height of approx. 16 in/
40 cm with momentum. It must be clearly heard
to engage.
Make sure that the closing path of the
hood is clear, as otherwise injuries may
result.
If you see any signs that the hood is not com-
pletely closed while driving your vehicle, you
should stop at once and close it securely.<
Page 186 of 221
Mobility
185Reference
At a glance
Controls
Driving tips
Communication
Navigation
Entertainment
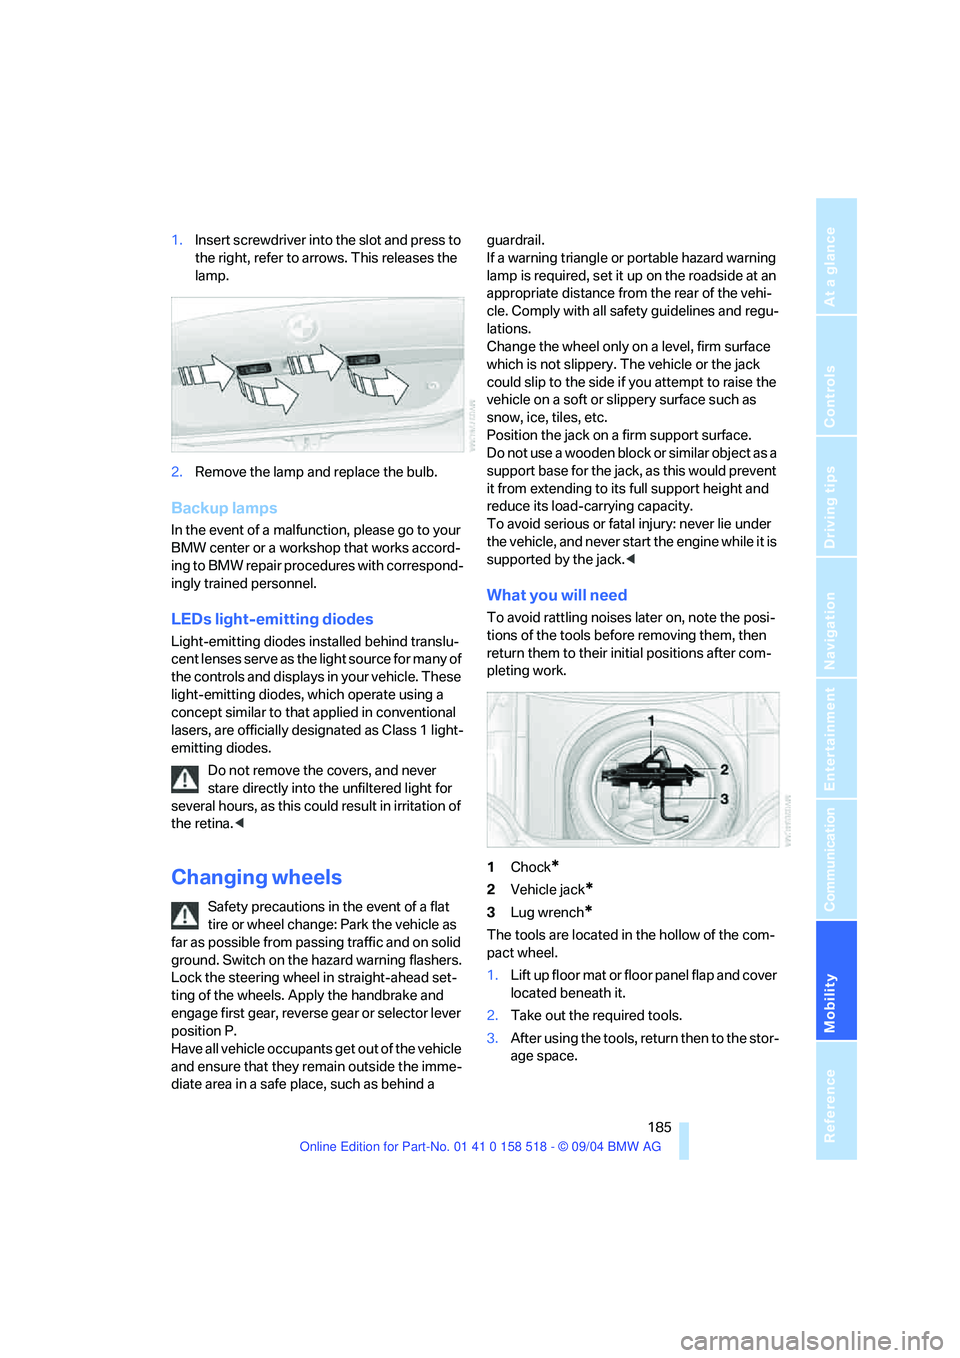
1.Insert screwdriver into the slot and press to
the right, refer to arrows. This releases the
lamp.
2.Remove the lamp and replace the bulb.
Backup lamps
In the event of a malfunction, please go to your
BMW center or a workshop that works accord-
ing to BMW repair procedures with correspond-
ingly trained personnel.
LEDs light-emitting diodes
Light-emitting diodes installed behind translu-
cent lenses serve as the light source for many of
the controls and displays in your vehicle. These
light-emitting diodes, which operate using a
concept similar to that applied in conventional
lasers, are officially designated as Class 1 light-
emitting diodes.
Do not remove the covers, and never
stare directly into the unfiltered light for
several hours, as this could result in irritation of
the retina.<
Changing wheels
Safety precautions in the event of a flat
tire or wheel change: Park the vehicle as
far as possible from passing traffic and on solid
ground. Switch on the hazard warning flashers.
Lock the steering wheel in straight-ahead set-
ting of the wheels. Apply the handbrake and
engage first gear, reverse gear or selector lever
position P.
Have all vehicle occupants get out of the vehicle
and ensure that they remain outside the imme-
diate area in a safe place, such as behind a guardrail.
If a warning triangle or portable hazard warning
lamp is required, set it up on the roadside at an
appropriate distance from the rear of the vehi-
cle. Comply with all safety guidelines and regu-
lations.
Change the wheel only on a level, firm surface
which is not slippery. The vehicle or the jack
could slip to the side if you attempt to raise the
vehicle on a soft or slippery surface such as
snow, ice, tiles, etc.
Position the jack on a firm support surface.
Do not use a wooden block or similar object as a
support base for the jack, as this would prevent
it from extending to its full support height and
reduce its load-carrying capacity.
To avoid serious or fatal injury: never lie under
the vehicle, and never start the engine while it is
supported by the jack.<
What you will need
To avoid rattling noises later on, note the posi-
tions of the tools before removing them, then
return them to their initial positions after com-
pleting work.
1Chock
*
2Vehicle jack*
3Lug wrench*
The tools are located in the hollow of the com-
pact wheel.
1.Lift up floor mat or floor panel flap and cover
located beneath it.
2.Take out the required tools.
3.After using the tools, return then to the stor-
age space.
Page 209 of 221
Everything from A to Z
208 Fuel consumption display
– computer, average fuel
consumption70
Fuel display, refer to Fuel
gage66
Fuel filler door168
– releasing in the event of
electrical malfunction168
Fuel gage66
Fuses187
G
Garage door opener, refer to
Integrated universal remote
control96
Gasoline, refer to Required
fuel169
Gasoline display, refer to Fuel
gage66
Gear changes
– SMG Sequential manual
transmission54
Gear display
– automatic transmission with
Steptronic55
– SMG Sequential manual
transmission53
Gearshift lever
– automatic transmission with
Steptronic55
– manual transmission53
– SMG Sequential manual
transmission53
General driving notes106
Glass sunroof, electric35
– auto-remote operation from
outside31
– opening and closing
manually37
– remote control30
Glove compartment97
– lighting97
– rechargeable flashlight98
GPS navigation, refer to
Navigation system114Grills, refer to Ventilation93
Grills of the automatic climate
control90
Gross vehicle weight, refer to
Weights198
H
Halogen lamps183
Handbrake52
– indicator lamp13,52
Hands-free system153
– refer to Microphone14
Hazard warning flashers15
Head airbags83
Headlamp control,
automatic87
Headlamp flasher56
Headlamps87
– care, refer to Caring for your
vehicle brochure
– cleaning, refer to Wiper
system57
– replacing bulbs183
Head Light, refer to Adaptive
Head Light88
"Headphone operation
only"137
"Headphones"137
Head restraints41
– front head restraints,
active42
Head-Up Display84
Heated mirrors45
Heated rear window90
Heated seats43
Heated steering wheel46
Heating90
– exterior mirrors45
– interior90
– rear window90
– residual heat utilization92
– seats43
– steering wheel46
Heating while stationary92Heating with engine switched
off, refer to Residual heat
utilization92
Heavy cargo, refer to Securing
cargo109
Height, refer to
Dimensions197
Height adjustment
– seats39
– steering wheel45
High beams88
– headlamp flasher88
– indicator lamp13
– replacing bulbs183
High water, refer to Driving
through water107
Hills108
Holder for cups99
"Home address"122
Hood176
Horn10
Hot exhaust system106
"Hour memo"74
"House number" for desti-
nation entry117
Hydraulic brake assistant,
refer to DBC Dynamic Brake
Control77
Hydroplaning107
I
Ice warning65
iDrive, refer to Control
Center16
Ignition key28
Ignition key positions, refer to
Ignition lock51
Ignition lock51
Independent ventilation94
– activating the activation
time95
– preselecting activation
times94
– switching on and off
directly94