2005 BMW 530I fuel
[x] Cancel search: fuelPage 4 of 221
Reference
At a glance
Controls
Driving tips
Communication
Navigation
Entertainment
Mobility
Contents
The fastest way to find specific topics is to use
the index on page202.
Using this Owner's Manual
4Notes
Reporting safety defects 7
At a glance
10Cockpit
16Control Center
22Voice command system
Controls
28Opening and closing
38Adjustments
47Transporting children safely
51Driving
65Everything under control
76Technology for comfort, convenience
and safety
87Lamps
90A congenial climate
96Practical interior accessories
Driving tips
106Things to remember when driving
Navigation
114Starting navigation system
115Destination entry
124Destination guidance
128What to do if …
Entertainment
132On/off and tone
138Radio
145CD player and CD changer
Communications
152Telephoning
161TeleService, BMW Assist
Mobility
168Refueling
170Wheels and tires
176Under the hood
180Maintenance
182Replacing components
189Giving and receiving assistance
Reference
196Technical data
199Short commands of voice command
system
202Everything from A to Z
Page 13 of 221
Cockpit
12
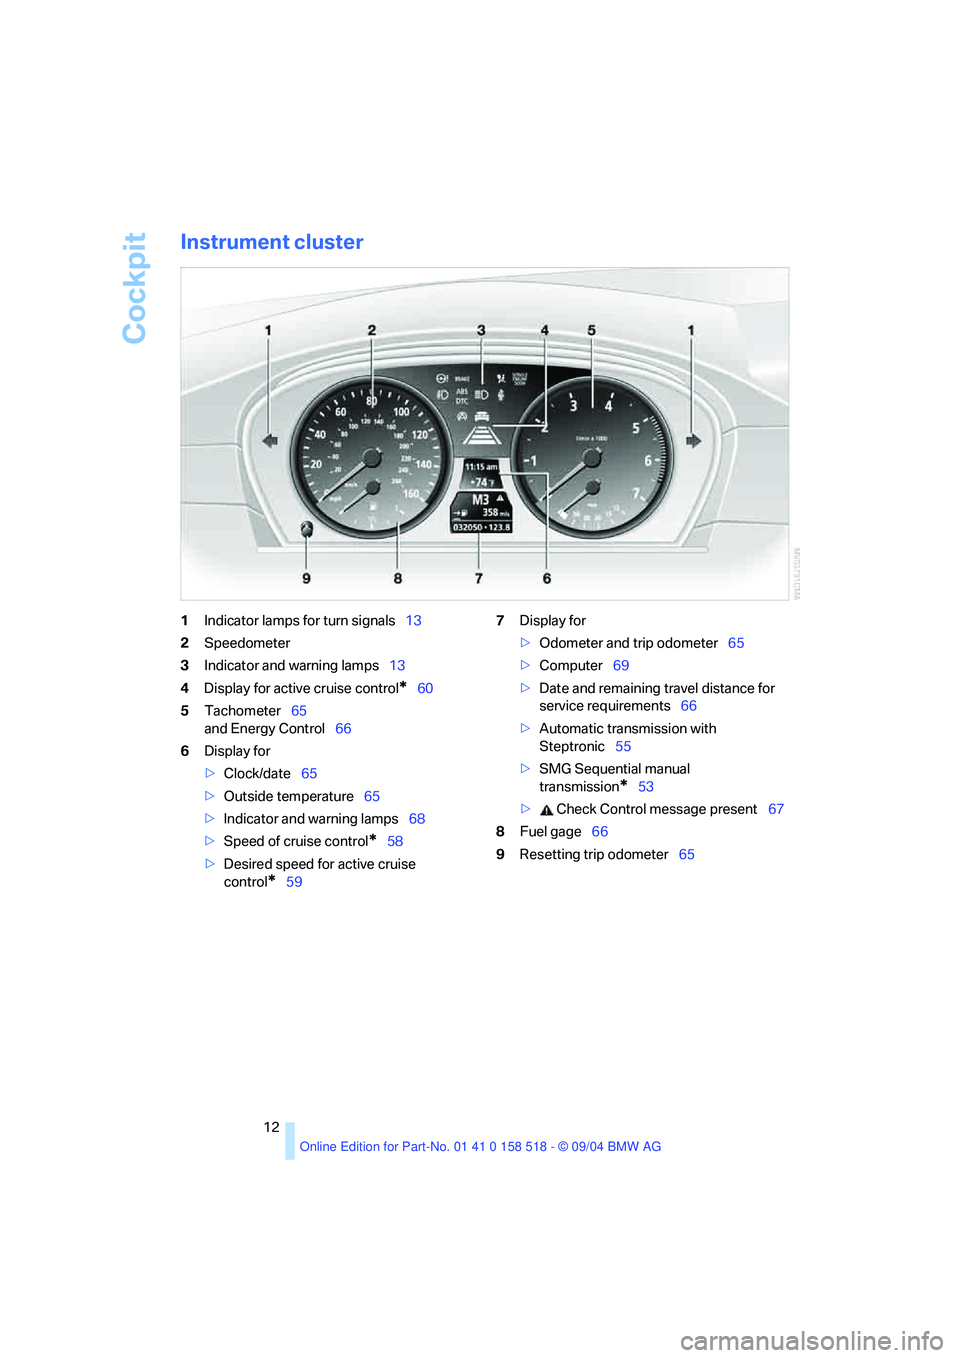
Instrument cluster
1Indicator lamps for turn signals13
2Speedometer
3Indicator and warning lamps13
4Display for active cruise control
*60
5Tachometer65
and Energy Control66
6Display for
>Clock/date65
>Outside temperature65
>Indicator and warning lamps68
>Speed of cruise control
*58
>Desired speed for active cruise
control
*597Display for
>Odometer and trip odometer65
>Computer69
>Date and remaining travel distance for
service requirements66
>Automatic transmission with
Steptronic55
>SMG Sequential manual
transmission
*53
> Check Control message present67
8Fuel gage66
9Resetting trip odometer65
Page 17 of 221
Control Center
16
Control Center
The Control Center groups the functions of a
large number of switches. This allows these
functions to be operated from a central position.
The following section provides an introduction to basic menu navigation. The control of the
individual functions is described in connection
with the relevant equipment.
Controls
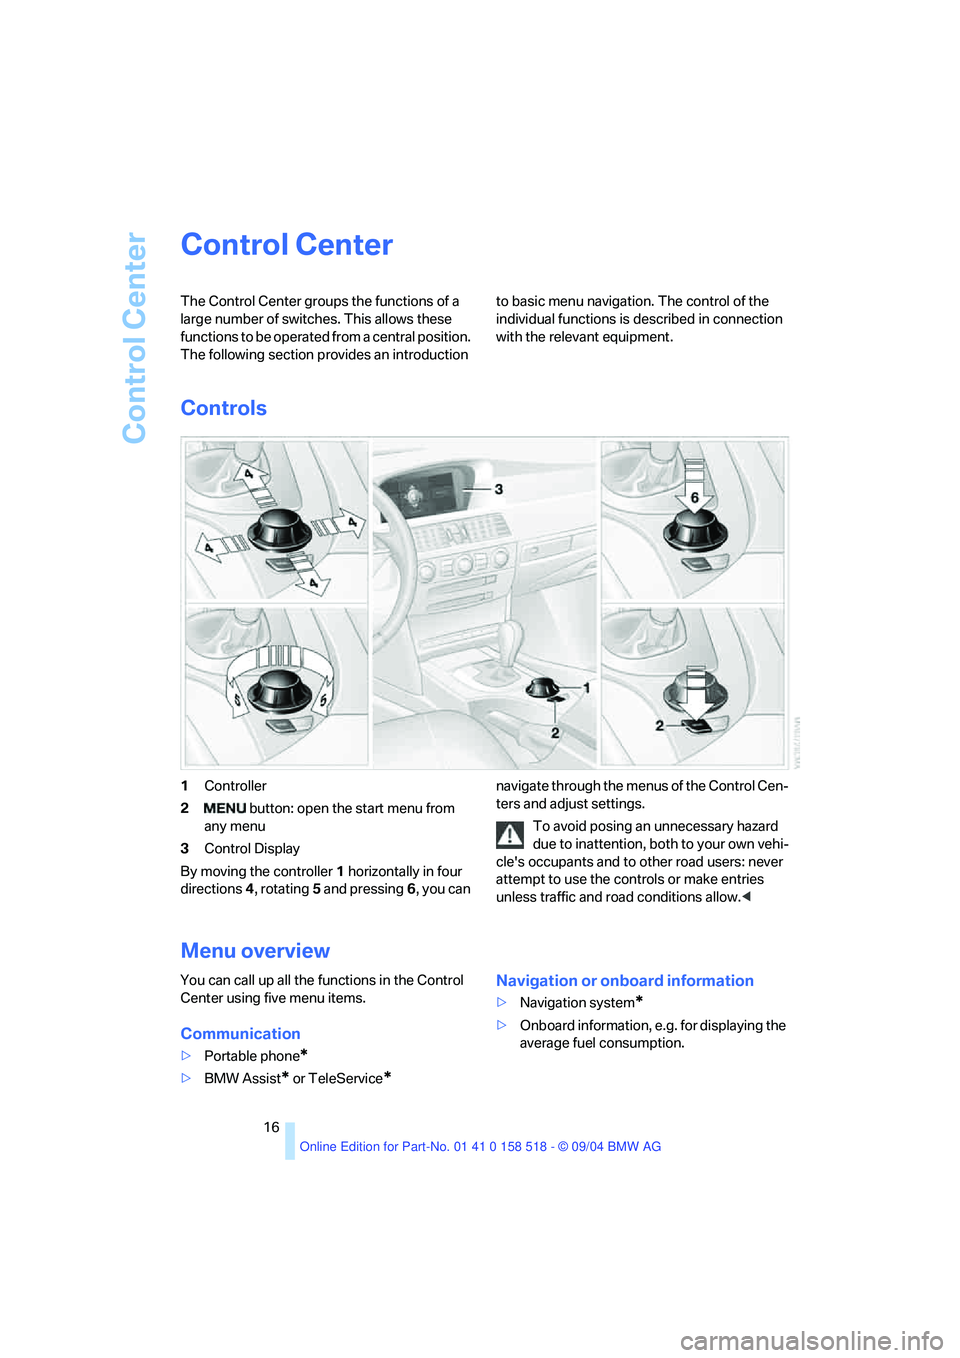
1Controller
2 button: open the start menu from
any menu
3Control Display
By moving the controller1 horizontally in four
directions4, rotating5 and pressing6, you can navigate through the menus of the Control Cen-
ters and adjust settings.
To avoid posing an unnecessary hazard
due to inattention, both to your own vehi-
cle's occupants and to other road users: never
attempt to use the controls or make entries
unless traffic and road conditions allow.<
Menu overview
You can call up all the functions in the Control
Center using five menu items.
Communication
>Portable phone*
>BMW Assist* or TeleService*
Navigation or onboard information
>Navigation system*
>Onboard information, e.g. for displaying the
average fuel consumption.
Page 30 of 221
Controls
29Reference
At a glance
Driving tips
Communication
Navigation
Entertainment
Mobility
In addition, the following, most recently
selected settings are recalled during unlocking:
>Positions of driver's seat, outside mirrors,
and steering wheel, refer to page40
>Audio sources, setting volume and tone,
refer to page133
>Telephone, setting volume, refer to
pages153,159
>Radio, displaying memorized stations, refer
to page140
Central locking system
The concept
The central locking system is ready for opera-
tion whenever the driver's door is closed. The
system simultaneously engages and releases
the locks on the following:
>Doors
>Luggage compartment lid
>Fuel filler door
The central locking system can be operated
from the outside
>via the remote control
>via the door lock
and from inside via the button for the central
locking system.
When actuated from the inside, the fuel filler
door is not locked, refer to page31.
The anti-theft system is automatically activated
whenever you operate the central locking sys-
tem from outside the vehicle. It prevents the
doors from being unlocked using the lock but-
tons or door handles. The alarm system is
armed/disarmed at the same time. The remote
control is also used to switch the interior lamps
on and off.
You can find more detailed information on the
alarm system on page33.
In an accident of sufficient severity, the central
locking system automatically unlocks the vehi-
cle. In addition, the hazard warning flashers and
interior lamps come on.
Opening and closing: from
outside
Using the remote control
Protect the remote control against unau-
thorized use by handing over only the
spare key, for example when using valet park-
ing.<
Because any persons or animals left unat-
tended in a parked vehicle could lock the
doors from the inside, you should always keep
the remote control with you; this precaution
ensures that you will remain able to unlock the
vehicle from the outside at all times.<
Unlocking
Use the button to unlock the vehicle accord-
ing to current settings.
Control Center, for principle details, refer to
page16.
1.Open the menu.
2.Select "Vehicle settings" and press the
controller.
3.Select "Door locks" and press the control-
ler.
4.Select "Central locking" and press the con-
troller.
5.Select "Unlock button" and press the con-
troller.
6.Select a menu item:
>"All doors"
Press the button once to unlock the
entire vehicle.
>"Driver's door only"
Press the button once to unlock only
the driver's door and the fuel filler door.
Press the button twice to unlock the
entire vehicle.
Page 32 of 221

Controls
31Reference
At a glance
Driving tips
Communication
Navigation
Entertainment
Mobility
LX8766E
LX8CAS
Compliance statement:
This device complies with part 15 of the FCC
Rules. Operation is subject to the following two
conditions:
>this device must not cause harmful interfer-
ence, and
>this device must accept any interference
received, including interference that may
cause undesired operation.
Any unauthorized modifications or
changes to these devices could void the
user's authority to operate this equipment.<
Using door lock
One turn of the key in the driver's door lock
unlocks the driver's door only.
Turning the key a second time unlocks all of the
remaining doors, the luggage compartment lid
and the fuel filler door.
Convenience operation
You also have the option of operating the win-
dows and the glass sunroof from the driver's
door lock.
>Opening:
With the door closed, turn the key to the
unlock position and hold it there.
>Closing:
With the door closed, turn the key to the
lock position and hold it there.
Watch during the closing process to be
sure that no one is injured. Releasing the
key stops the operation.<
Manual operation
If an electrical malfunction occurs, you can
unlock or lock the driver's door with the key in
the end positions of the door lock.
Opening and closing: from
inside
This button serves to unlock or lock doors and
the luggage compartment lid, but does not acti-
vate the anti-theft system. The fuel filler door
remains unlocked.
You can also make the following settings:
>The central locking system automatically
locks the vehicle after a short time when no
door has been opened.
>The central locking system automatically
locks the vehicle as soon as you start to
drive.
Control Center, for principle details, refer to
page16.
1.Open the menu.
2.Select "Vehicle settings" and press the
controller.
3.Select "Door locks" and press the control-
ler.
Page 52 of 221
Controls
51Reference
At a glance
Driving tips
Communication
Navigation
Entertainment
Mobility
Driving
Ignition lock
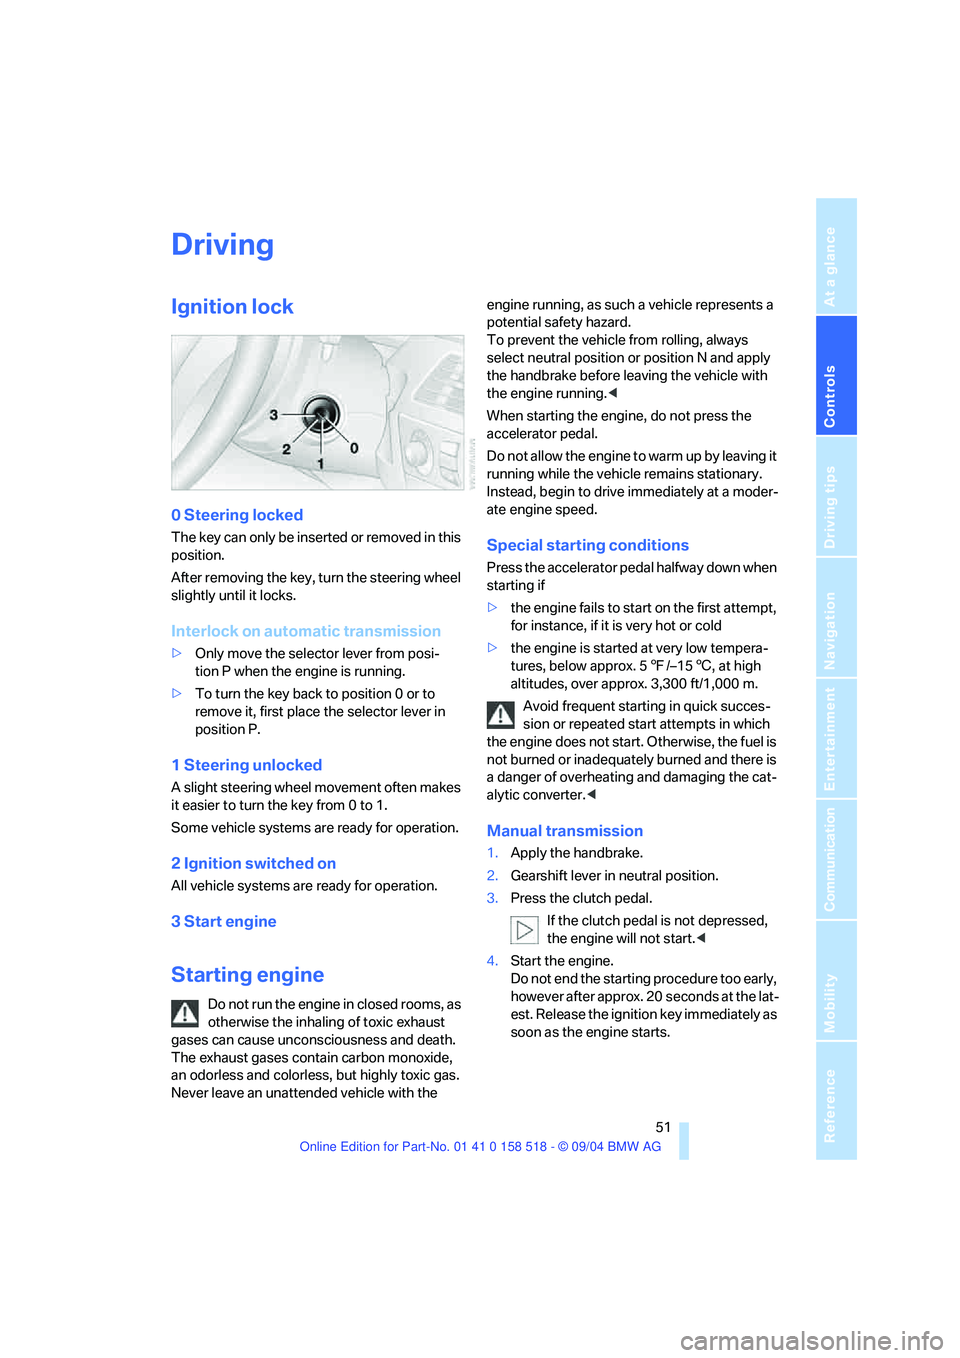
0 Steering locked
The key can only be inserted or removed in this
position.
After removing the key, turn the steering wheel
slightly until it locks.
Interlock on automatic transmission
>Only move the selector lever from posi-
tion P when the engine is running.
>To turn the key back to position 0 or to
remove it, first place the selector lever in
position P.
1 Steering unlocked
A slight steering wheel movement often makes
it easier to turn the key from 0 to 1.
Some vehicle systems are ready for operation.
2 Ignition switched on
All vehicle systems are ready for operation.
3 Start engine
Starting engine
Do not run the engine in closed rooms, as
otherwise the inhaling of toxic exhaust
gases can cause unconsciousness and death.
The exhaust gases contain carbon monoxide,
an odorless and colorless, but highly toxic gas.
Never leave an unattended vehicle with the engine running, as such a vehicle represents a
potential safety hazard.
To prevent the vehicle from rolling, always
select neutral position or position N and apply
the handbrake before leaving the vehicle with
the engine running.<
When starting the engine, do not press the
accelerator pedal.
Do not allow the engine to warm up by leaving it
running while the vehicle remains stationary.
Instead, begin to drive immediately at a moder-
ate engine speed.
Special starting conditions
Press the accelerator pedal halfway down when
starting if
>the engine fails to start on the first attempt,
for instance, if it is very hot or cold
>the engine is started at very low tempera-
tures, below approx. 57/–156, at high
altitudes, over approx. 3,300 ft/1,000 m.
Avoid frequent starting in quick succes-
sion or repeated start attempts in which
the engine does not start. Otherwise, the fuel is
not burned or inadequately burned and there is
a danger of overheating and damaging the cat-
alytic converter.<
Manual transmission
1.Apply the handbrake.
2.Gearshift lever in neutral position.
3.Press the clutch pedal.
If the clutch pedal is not depressed,
the engine will not start.<
4.Start the engine.
Do not end the starting procedure too early,
however after approx. 20 seconds at the lat-
est. Release the ignition key immediately as
soon as the engine starts.
Page 57 of 221
Driving
56
R Reverse
Select only when the vehicle is stationary.
N Neutral
For example, engage in automatic car washes.
The vehicle can roll.
D Drive, automatic position
Position for normal vehicle operation. All for-
ward gears are available.
Under normal operating conditions, fuel con-
sumption is lowest when driving in position D.
Kick-down
The kick-down mode provides maximum accel-
eration: press the accelerator pedal beyond the
full-throttle resistance point.
Manual operation and Sport program
M/S
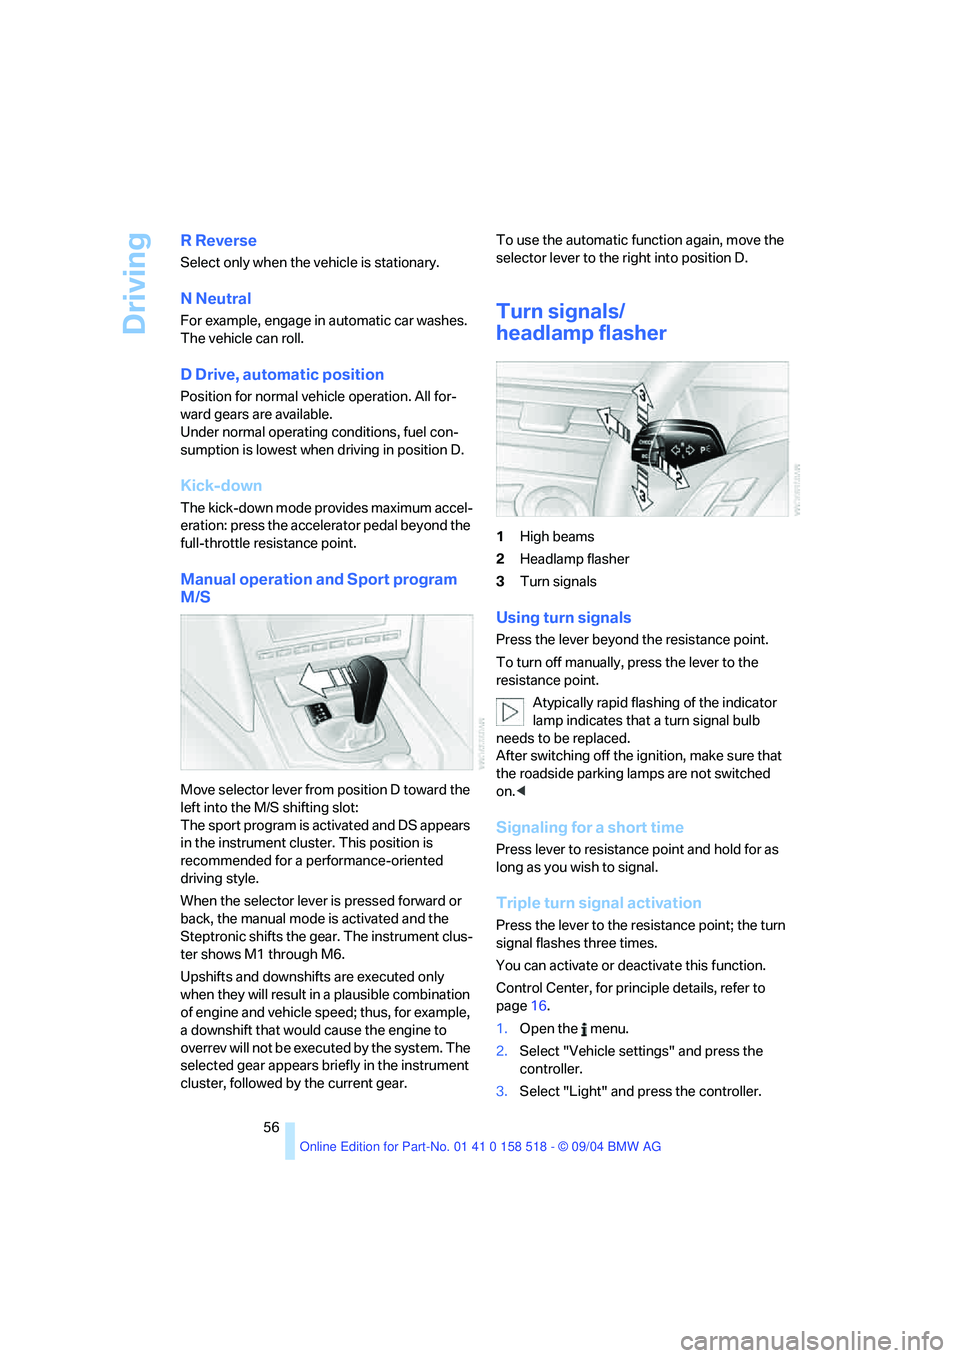
Move selector lever from position D toward the
left into the M/S shifting slot:
The sport program is activated and DS appears
in the instrument cluster. This position is
recommended for a performance-oriented
driving style.
When the selector lever is pressed forward or
back, the manual mode is activated and the
Steptronic shifts the gear. The instrument clus-
ter shows M1 through M6.
Upshifts and downshifts are executed only
when they will result in a plausible combination
of engine and vehicle speed; thus, for example,
a downshift that would cause the engine to
overrev will not be executed by the system. The
selected gear appears briefly in the instrument
cluster, followed by the current gear.To use the automatic function again, move the
selector lever to the right into position D.
Turn signals/
headlamp flasher
1High beams
2Headlamp flasher
3Turn signals
Using turn signals
Press the lever beyond the resistance point.
To turn off manually, press the lever to the
resistance point.
Atypically rapid flashing of the indicator
lamp indicates that a turn signal bulb
needs to be replaced.
After switching off the ignition, make sure that
the roadside parking lamps are not switched
on.<
Signaling for a short time
Press lever to resistance point and hold for as
long as you wish to signal.
Triple turn signal activation
Press the lever to the resistance point; the turn
signal flashes three times.
You can activate or deactivate this function.
Control Center, for principle details, refer to
page16.
1.Open the menu.
2.Select "Vehicle settings" and press the
controller.
3.Select "Light" and press the controller.
Page 66 of 221
Controls
65Reference
At a glance
Driving tips
Communication
Navigation
Entertainment
Mobility
Everything under control
Odometer, outside
temperature display, clock
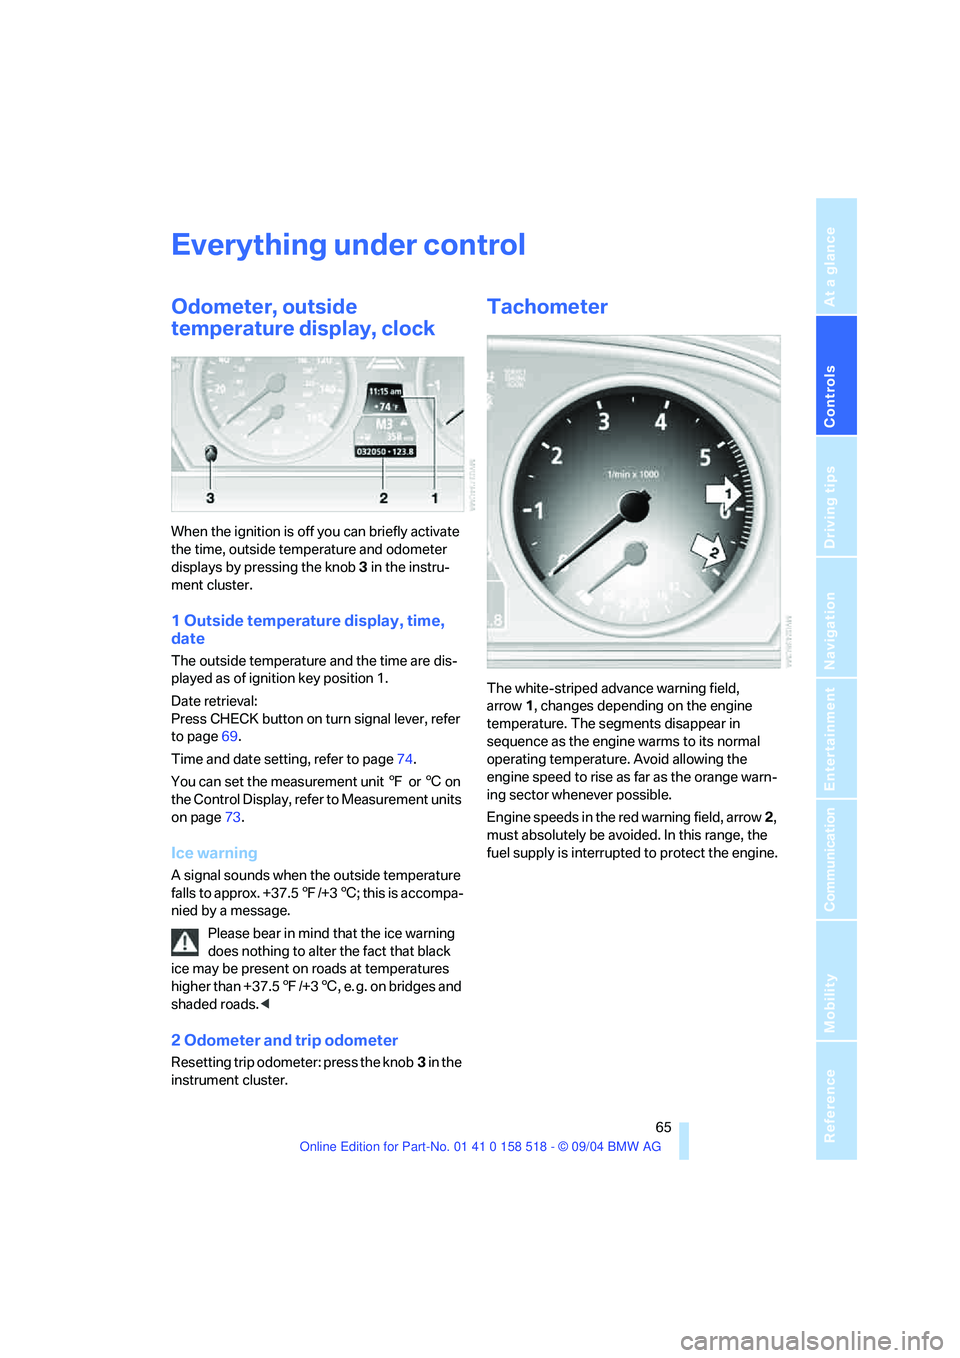
When the ignition is off you can briefly activate
the time, outside temperature and odometer
displays by pressing the knob 3 in the instru-
ment cluster.
1 Outside temperature display, time,
date
The outside temperature and the time are dis-
played as of ignition key position 1.
Date retrieval:
Press CHECK button on turn signal lever, refer
to page69.
Time and date setting, refer to page74.
You can set the measurement unit 7 or 6 on
the Control Display, refer to Measurement units
on page73.
Ice warning
A signal sounds when the outside temperature
falls to approx. +37.57/+36; this is accompa-
nied by a message.
Please bear in mind that the ice warning
does nothing to alter the fact that black
ice may be present on roads at temperatures
higher than +37.57/+36, e. g. on bridges and
shaded roads.<
2 Odometer and trip odometer
Resetting trip odometer: press the knob3 in the
instrument cluster.
Tachometer
The white-striped advance warning field,
arrow1, changes depending on the engine
temperature. The segments disappear in
sequence as the engine warms to its normal
operating temperature. Avoid allowing the
engine speed to rise as far as the orange warn-
ing sector whenever possible.
Engine speeds in the red warning field, arrow2,
must absolutely be avoided. In this range, the
fuel supply is interrupted to protect the engine.