2005 BMW 525I SEDAN steering
[x] Cancel search: steeringPage 11 of 221

Cockpit
10
Cockpit
Around the steering wheel: controls and displays
1Rear window blind*97
2Rear window safety switch35
3Opening and closing windows34
4Adjusting exterior mirrors455
Turn signals56
High beams, headlamp flasher88
Roadside parking lamps88
Check Control67
Computer69
Page 12 of 221
At a glance
11Reference
Controls
Driving tips
Communication
Navigation
Entertainment
Mobility
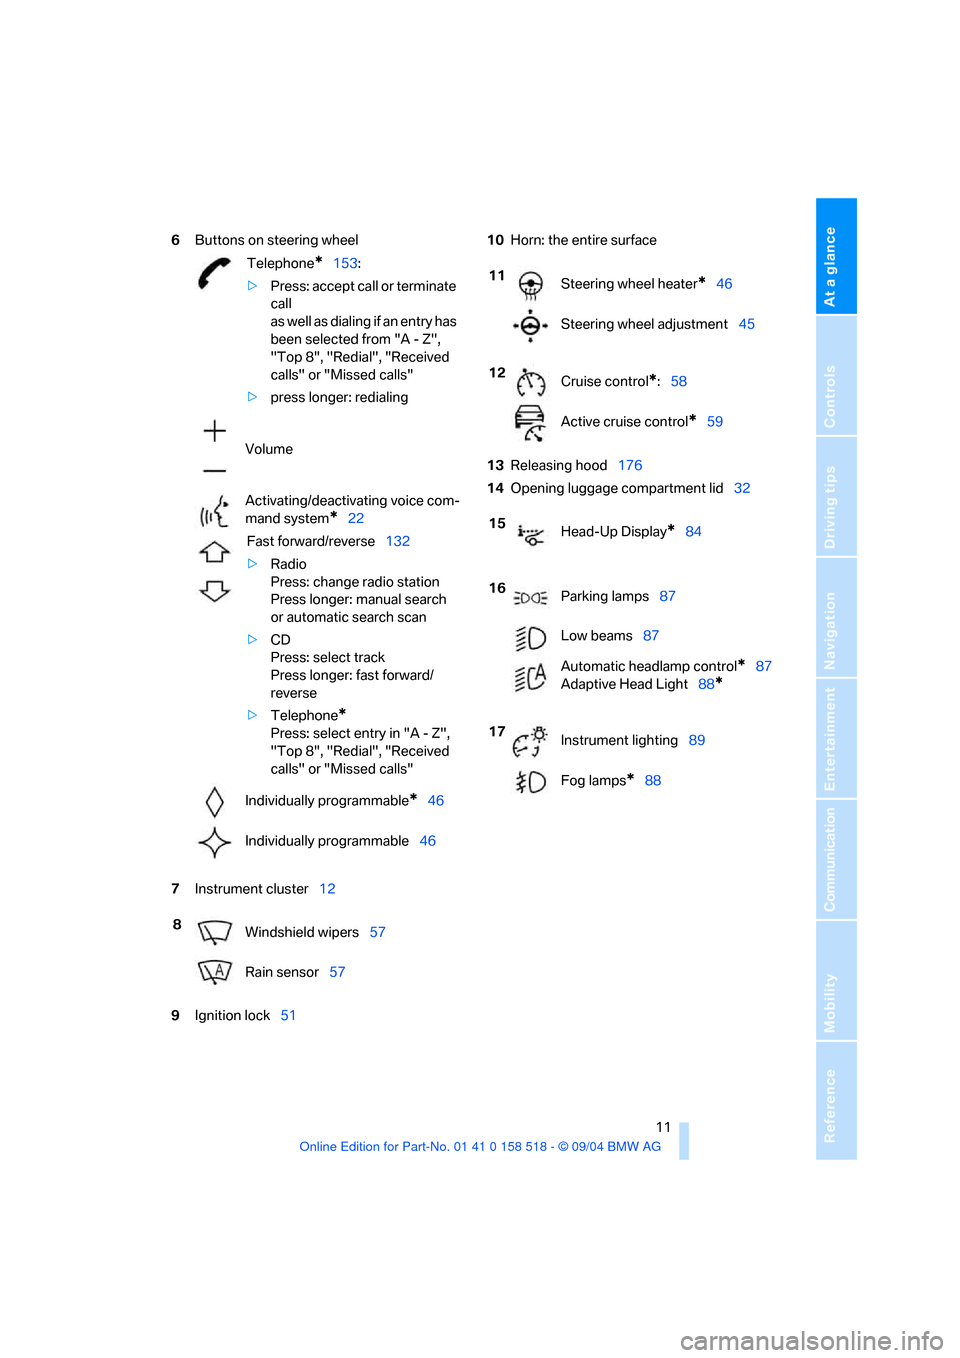
6Buttons on steering wheel
7Instrument cluster12
9Ignition lock5110Horn: the entire surface
13Releasing hood176
14Opening luggage compartment lid32
Telephone*153:
>Press: accept call or terminate
call
as well as dialing if an entry has
been selected from "A - Z",
"Top 8", "Redial", "Received
calls" or "Missed calls"
>press longer: redialing
Volume
Activating/deactivating voice com-
mand system
*22
Fast forward/reverse132
>Radio
Press: change radio station
Press longer: manual search
or automatic search scan
>CD
Press: select track
Press longer: fast forward/
reverse
>Telephone
*
Press: select entry in "A - Z",
"Top 8", "Redial", "Received
calls" or "Missed calls"
Individually programmable
*46
Individually programmable46
8
Windshield wipers57
Rain sensor57
11
Steering wheel heater*46
Steering wheel adjustment45
12
Cruise control
*:58
Active cruise control
*59
15
Head-Up Display
*84
16
Parking lamps87
Low beams87
Automatic headlamp control
*87
Adaptive Head Light88
*
17
Instrument lighting89
Fog lamps
*88
Page 23 of 221
Voice command system
22
Voice command system
The concept
The voice command system allows you to con-
trol operation of various vehicle systems with-
out ever removing your hands from the steering
wheel.
Individual menu items on the Control Display
can be spoken as commands. This frees you of
having to use the controller.
The voice command system transforms your
oral commands into control signals for the
selected systems and provides support in the
form of instructions or questions.
The voice command system uses a special
microphone located in the area of the interior
rearview mirror, refer to page14.
Precondition
In the Control Center, set the language that
applies for the voice command system in order
to enable identification of the spoken com-
mands. Setting the language of the Control
Center, refer to page74.
Symbol in the Owner's Manual
Voice commands
Activating voice command system
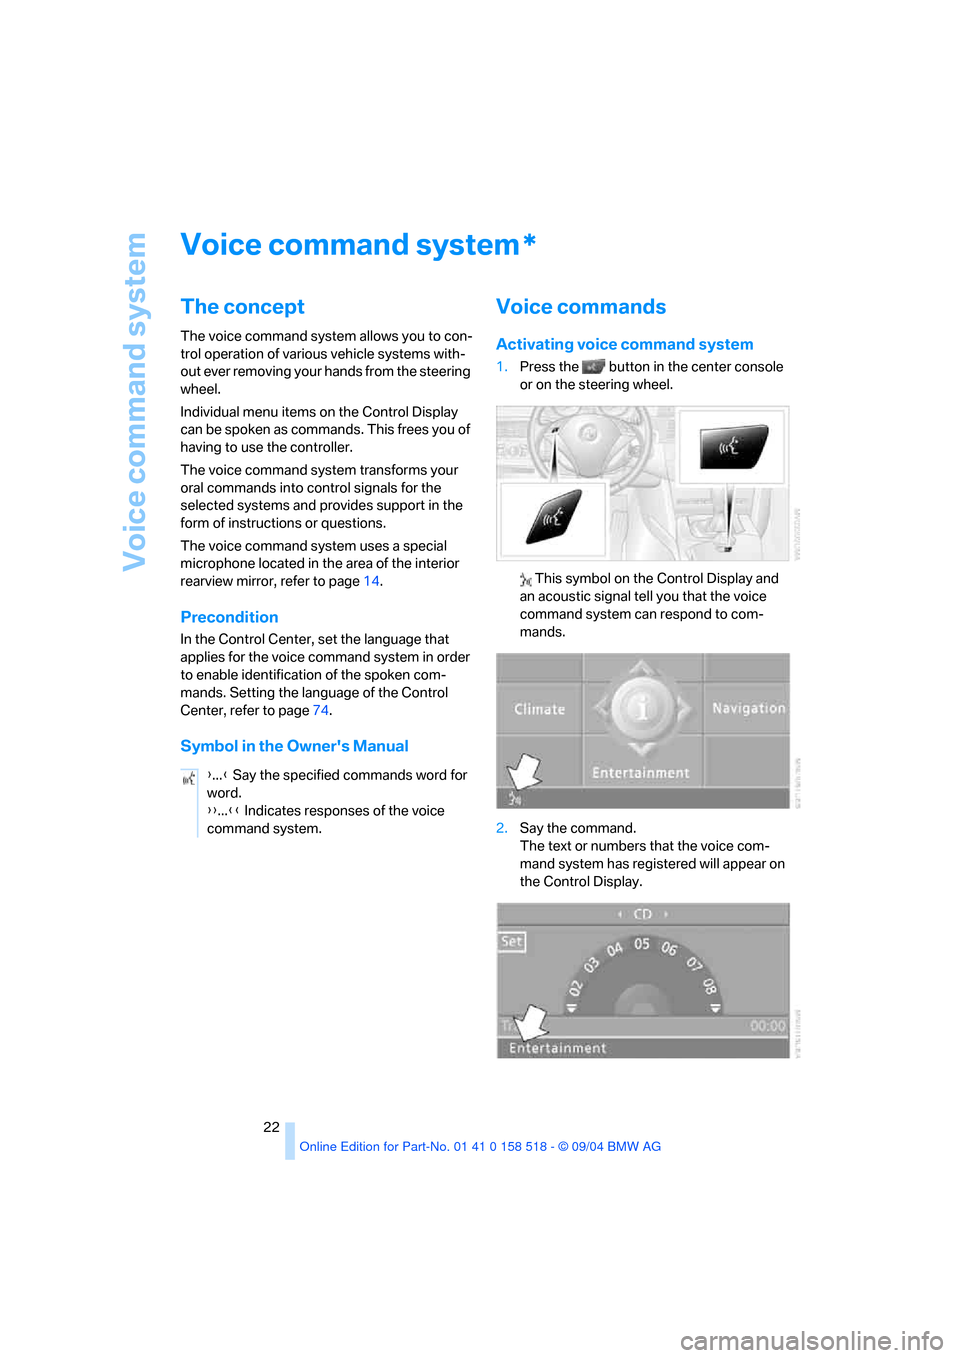
1.Press the button in the center console
or on the steering wheel.
This symbol on the Control Display and
an acoustic signal tell you that the voice
command system can respond to com-
mands.
2.Say the command.
The text or numbers that the voice com-
mand system has registered will appear on
the Control Display.
*
{...} Say the specified commands word for
word.
{{...}} Indicates responses of the voice
command system.
Page 24 of 221
At a glance
23Reference
Controls
Driving tips
Communication
Navigation
Entertainment
Mobility
This symbol appears on the Control Display
when you can input additional voice com-
mands.
If no other voice commands are possible, then
operate the equipment using the Control Cen-
ter.
Terminating or canceling voice
command system
Press the button on the steering wheel or
on the center console
or
Voice commands
Having the possible voice commands
read aloud
You can have the system read aloud the possi-
ble voice commands related to the selected
menu item on the Control Display.
For example, if you have selected "CD", the
system will read aloud the possible voice com-
mands for operating the CD player and the CD
changer
*:
Opening help
Using alternative voice commands
There are often a number of commands to run a
function, e.g.:
Calling up functions directly
With short commands you can carry out certain
functions directly, regardless of which menu
item is selected, refer to page199.
Opening the start menu
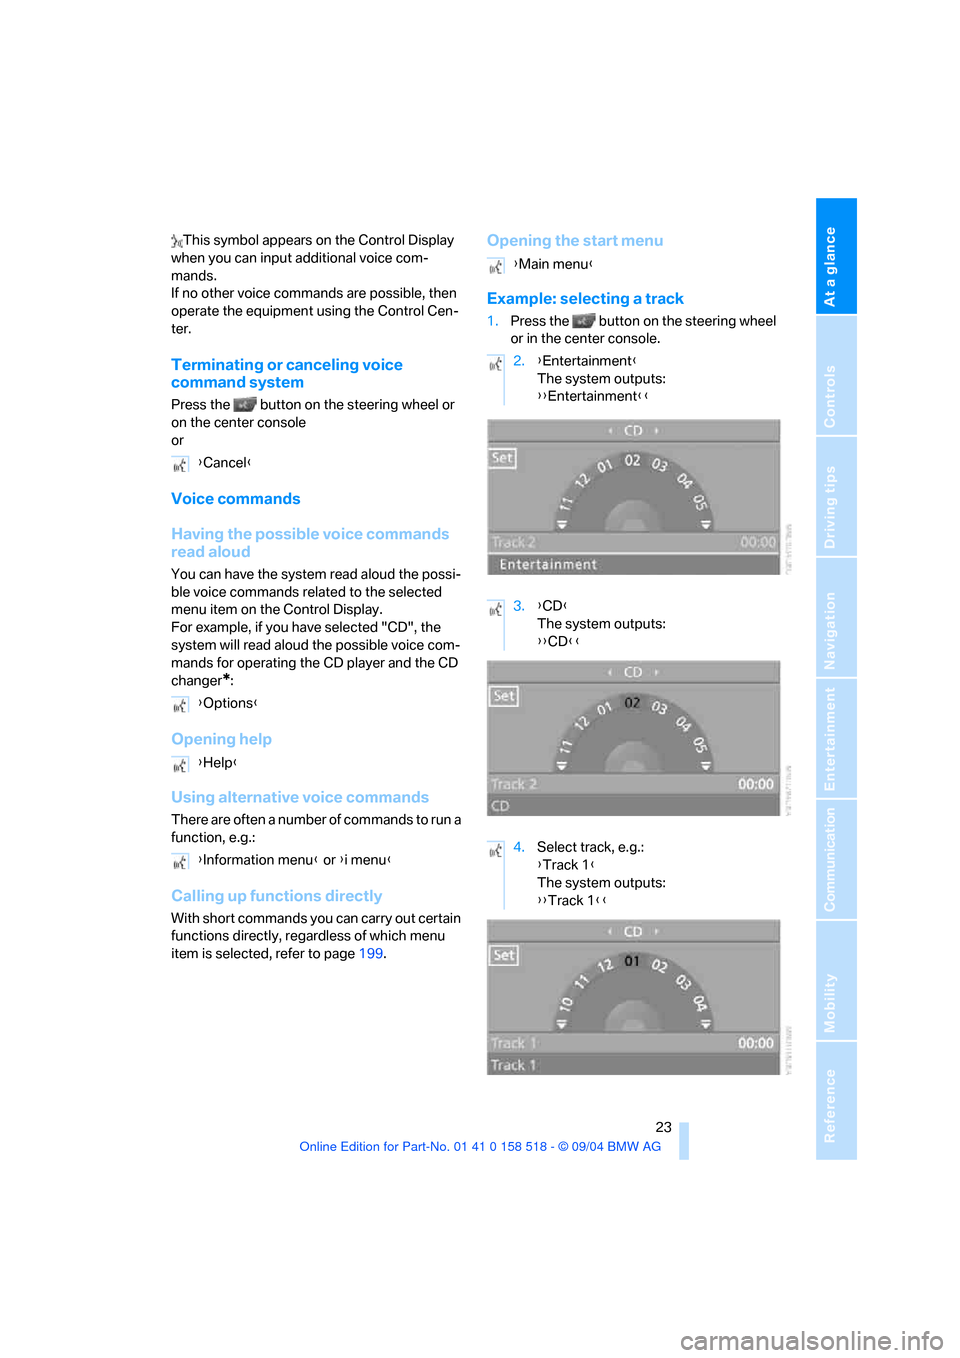
Example: selecting a track
1.Press the button on the steering wheel
or in the center console.
{Cancel}
{Options}
{Help}
{Information menu} or {i menu}
{Main menu}
2.{Entertainment}
The system outputs:
{{Entertainment}}
3.{CD}
The system outputs:
{{CD}}
4.Select track, e.g.:
{Track 1}
The system outputs:
{{Track 1}}
Page 29 of 221
Opening and closing
28
Opening and closing
The key set
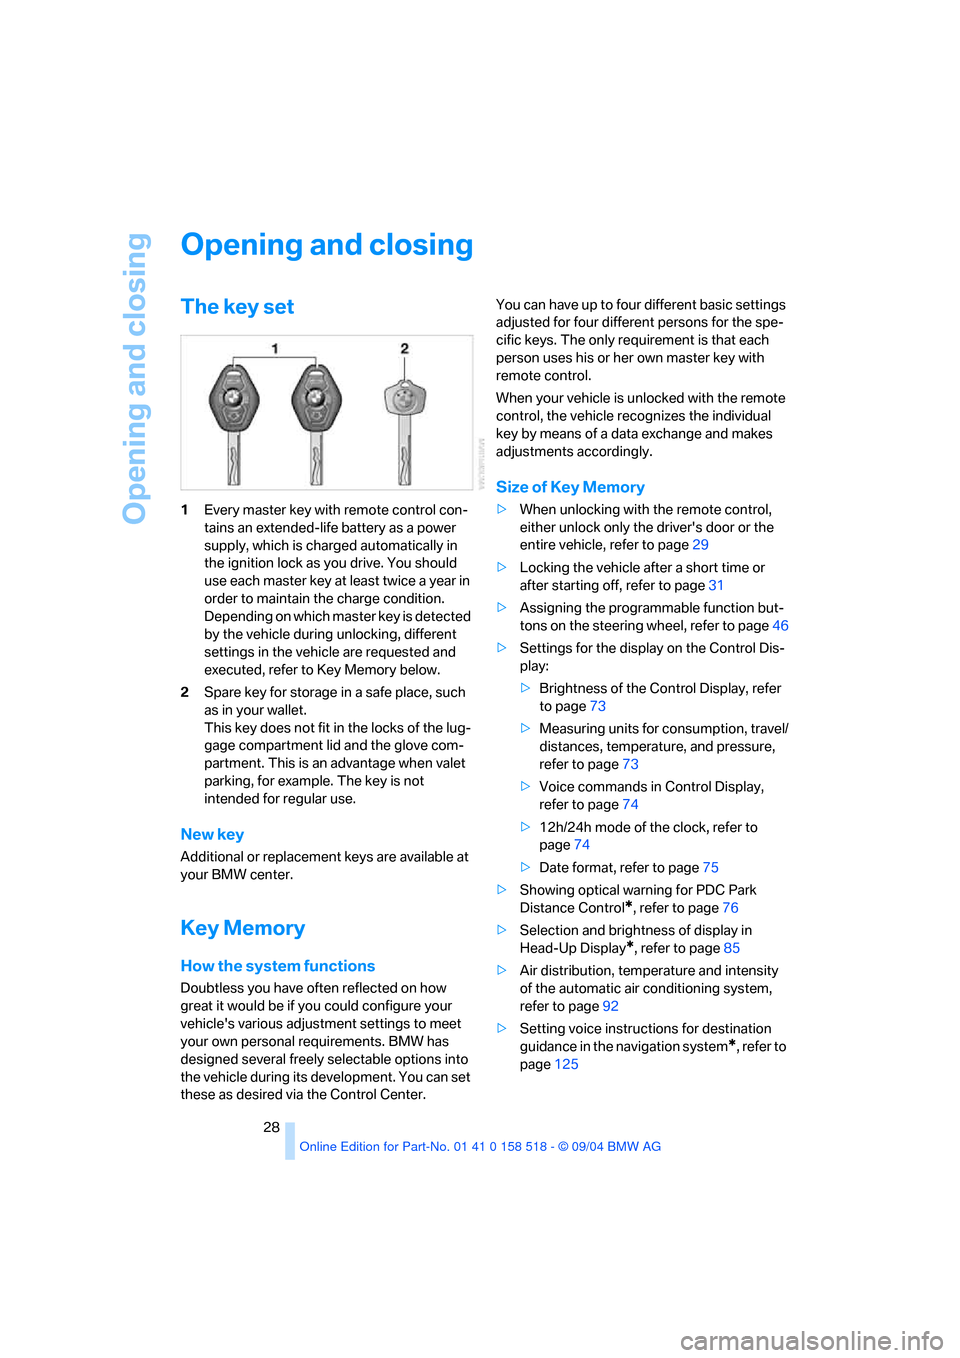
1Every master key with remote control con-
tains an extended-life battery as a power
supply, which is charged automatically in
the ignition lock as you drive. You should
use each master key at least twice a year in
order to maintain the charge condition.
Depending on which master key is detected
by the vehicle during unlocking, different
settings in the vehicle are requested and
executed, refer to Key Memory below.
2Spare key for storage in a safe place, such
as in your wallet.
This key does not fit in the locks of the lug-
gage compartment lid and the glove com-
partment. This is an advantage when valet
parking, for example. The key is not
intended for regular use.
New key
Additional or replacement keys are available at
your BMW center.
Key Memory
How the system functions
Doubtless you have often reflected on how
great it would be if you could configure your
vehicle's various adjustment settings to meet
your own personal requirements. BMW has
designed several freely selectable options into
the vehicle during its development. You can set
these as desired via the Control Center.You can have up to four different basic settings
adjusted for four different persons for the spe-
cific keys. The only requirement is that each
person uses his or her own master key with
remote control.
When your vehicle is unlocked with the remote
control, the vehicle recognizes the individual
key by means of a data exchange and makes
adjustments accordingly.
Size of Key Memory
>When unlocking with the remote control,
either unlock only the driver's door or the
entire vehicle, refer to page29
>Locking the vehicle after a short time or
after starting off, refer to page31
>Assigning the programmable function but-
tons on the steering wheel, refer to page46
>Settings for the display on the Control Dis-
play:
>Brightness of the Control Display, refer
to page73
>Measuring units for consumption, travel/
distances, temperature, and pressure,
refer to page73
>Voice commands in Control Display,
refer to page74
>12h/24h mode of the clock, refer to
page74
>Date format, refer to page75
>Showing optical warning for PDC Park
Distance Control
*, refer to page76
>Selection and brightness of display in
Head-Up Display
*, refer to page85
>Air distribution, temperature and intensity
of the automatic air conditioning system,
refer to page92
>Setting voice instructions for destination
guidance in the navigation system
*, refer to
page125
Page 30 of 221
Controls
29Reference
At a glance
Driving tips
Communication
Navigation
Entertainment
Mobility
In addition, the following, most recently
selected settings are recalled during unlocking:
>Positions of driver's seat, outside mirrors,
and steering wheel, refer to page40
>Audio sources, setting volume and tone,
refer to page133
>Telephone, setting volume, refer to
pages153,159
>Radio, displaying memorized stations, refer
to page140
Central locking system
The concept
The central locking system is ready for opera-
tion whenever the driver's door is closed. The
system simultaneously engages and releases
the locks on the following:
>Doors
>Luggage compartment lid
>Fuel filler door
The central locking system can be operated
from the outside
>via the remote control
>via the door lock
and from inside via the button for the central
locking system.
When actuated from the inside, the fuel filler
door is not locked, refer to page31.
The anti-theft system is automatically activated
whenever you operate the central locking sys-
tem from outside the vehicle. It prevents the
doors from being unlocked using the lock but-
tons or door handles. The alarm system is
armed/disarmed at the same time. The remote
control is also used to switch the interior lamps
on and off.
You can find more detailed information on the
alarm system on page33.
In an accident of sufficient severity, the central
locking system automatically unlocks the vehi-
cle. In addition, the hazard warning flashers and
interior lamps come on.
Opening and closing: from
outside
Using the remote control
Protect the remote control against unau-
thorized use by handing over only the
spare key, for example when using valet park-
ing.<
Because any persons or animals left unat-
tended in a parked vehicle could lock the
doors from the inside, you should always keep
the remote control with you; this precaution
ensures that you will remain able to unlock the
vehicle from the outside at all times.<
Unlocking
Use the button to unlock the vehicle accord-
ing to current settings.
Control Center, for principle details, refer to
page16.
1.Open the menu.
2.Select "Vehicle settings" and press the
controller.
3.Select "Door locks" and press the control-
ler.
4.Select "Central locking" and press the con-
troller.
5.Select "Unlock button" and press the con-
troller.
6.Select a menu item:
>"All doors"
Press the button once to unlock the
entire vehicle.
>"Driver's door only"
Press the button once to unlock only
the driver's door and the fuel filler door.
Press the button twice to unlock the
entire vehicle.
Page 39 of 221
Adjustments
38
Adjustments
Sitting safely
The ideal sitting position can make a vital con-
tribution to relaxed, fatigue-free driving. The sit-
ting position of the occupants also plays an
important role for passive safety together with
the safety belts and airbags in an accident. To
ensure that the safety systems operate with
optimal efficiency, we strongly urge you to
observe the instructions contained in the fol-
lowing section.
For additional information on transporting chil-
dren safely, refer to page47.
Airbags
Always maintain an adequate distance
between yourself and the airbags. Always
hold the steering wheel by its rim with hands at
the 9 o'clock and 3 o'clock positions, to mini-
mize the risk of injuries to your hands and arms
in the event of airbag deployment. No one and
nothing is to come between the airbags and the
seat occupant. Do not use the cover of the front
airbag on the front passenger side as a storage
area. Make sure that the front passenger is sit-
ting correctly and does not rest feet or legs on
the instrument panel, otherwise leg injuries can
occur if the front airbag is triggered. Never let an
occupant's head rest near or on a side airbag
because the inflating airbag could cause a seri-
ous or fatal injury.<
Even if you adhere to all the instructions, inju-
ries resulting from contact with airbags cannot
be fully excluded, depending on the circum-
stances. The ignition and inflation noise may
provoke a mild hearing loss in extremely sensi-
tive individuals. This effect is usually only tem-
porary.
For airbag locations and additional information
on airbags, refer to page83.
Safety belt
Before every drive, make sure that safety belts
are being worn at all of the occupied seats. Airbags complement the safety belt as an addi-
tional safety device, but they do not represent a
substitute.
At all times, occupants should sit upright
and be properly restrained: infants and
small children in appropriate child-restraint sys-
tems; larger children and adults using the safety
belts. Never allow more than one person to
wear a single safety belt. Never allow infants or
small children to ride in a passenger's lap.
Expectant mothers should always wear their
safety belts, taking care to position the lap belt
against the lower hips, where it will not exert
pressure against the abdominal area. Do not
route the belt across your neck, or run it across
sharp edges. Be sure that the belt does not
become caught or jammed. Avoid twisting the
belt while routing it snugly across the hips and
shoulder. Do not allow the belt to rest against
hard or fragile objects. Otherwise, in the event
of a frontal impact, a loose lap belt could slide
over your hips, leading to abdominal injury.
Avoid wearing clothing that prevents the belt
from fitting properly and pull the shoulder belt
periodically to readjust the tension across your
lap in order to avoid a reduction in the retention
effect of the safety belt.<
For instructions on operating safety belts, refer
to page42.
Seats
Note before adjusting
Never attempt to adjust your seat while
the vehicle is moving. The seat could
respond with unexpected movement, and the
ensuing loss of vehicle control could lead to an
accident. Also on the passenger side, do not
incline the backrest too far to the rear while the
vehicle is being driven, as otherwise there is a
danger in the event of an accident of 'sliding
under' the safety belt, eliminating the protec-
tion normally provided by the belt.<
Page 41 of 221
Adjustments
40 The upper hips and spinal column receive sup-
plementary support to help you maintain a
relaxed, upright sitting position.
>Increase or decrease curvature: push
switch forward or back.
>Shift curvature up or down: push switch up
or down.
Adjusting active backrest width*
First set a comfortable backrest width, see
above. Based on the backrest width set, the lat-
eral support is automatically adapted to the cur-
rent driving situation.
The adaptation of the backrest width and the
speed of the adjustment vary depending on the
program. You can select from among three pro-
grams from comfort to sport.
Press program button once:
>"Comfort" program: one LED
>"Normal" program: two LEDs
>"Sport" program: three LEDs
To switch off: press button longer.
Easy entry/exit*
To facilitate entry and exit, the backrest tempo-
rarily opens all the way.
Seat, mirror and steering
wheel memory*
You can store and request two different posi-
tions for the driver's seat and passenger seat
*,
external rearview mirrors, and steering wheel.
The adjustment of the lumbar support is not
stored in the memory.
Storing
1.Turn ignition key to position 1 or 2, refer to
page51.
2.Set the desired seat, exterior mirror and
steering wheel positions.
3.Press button:
The LED in the button lights up.
4.Press the desired memory button1 or2.
The LED goes out.
Requesting
Do not request a position from the mem-
ory while the vehicle is moving. There is a
risk of accident from unexpected movement of
the seat or steering wheel.<
Convenience mode
1.Open the driver's door after unlocking or
turn the ignition key to position 1.
2.Briefly press the desired memory button1
or2.
The system immediately cancels the
adjustment procedure when you briefly
press one of the seat adjustment buttons or
one of the memory buttons.