2005 BMW 525I SEDAN ECU
[x] Cancel search: ECUPage 2 of 221
525i
530i
545iOwner's Manual for Vehicle
Congratulations, and thank you for choosing a BMW.
Thorough familiarity with your vehicle will provide you with
enhanced control and security when you drive it. We therefore
have this request:
Please take the time to read this Owner's Manual and familiarize
yourself with the information that we have compiled for you
before starting off in your new vehicle. It contains important data
and instructions intended to assist you in gaining maximum use
and satisfaction from your BMW's unique range of technical fea-
tures. The manual also contains information on maintenance
designed to enhance operating safety and contribute to main-
taining the value of your BMW throughout an extended service
life.
This Owner's Manual should be considered a permanent part of
this vehicle. It should stay with the vehicle when sold to provide
the next owner with important operating, safety and maintenance
information.
This manual is supplemented by a Service and Warranty Infor-
mation Booklet for US models or a Warranty and Service Guide
Booklet for Canadian models.
We wish you an enjoyable driving experience.
BMW AG
Page 20 of 221
At a glance
19Reference
Controls
Driving tips
Communication
Navigation
Entertainment
Mobility
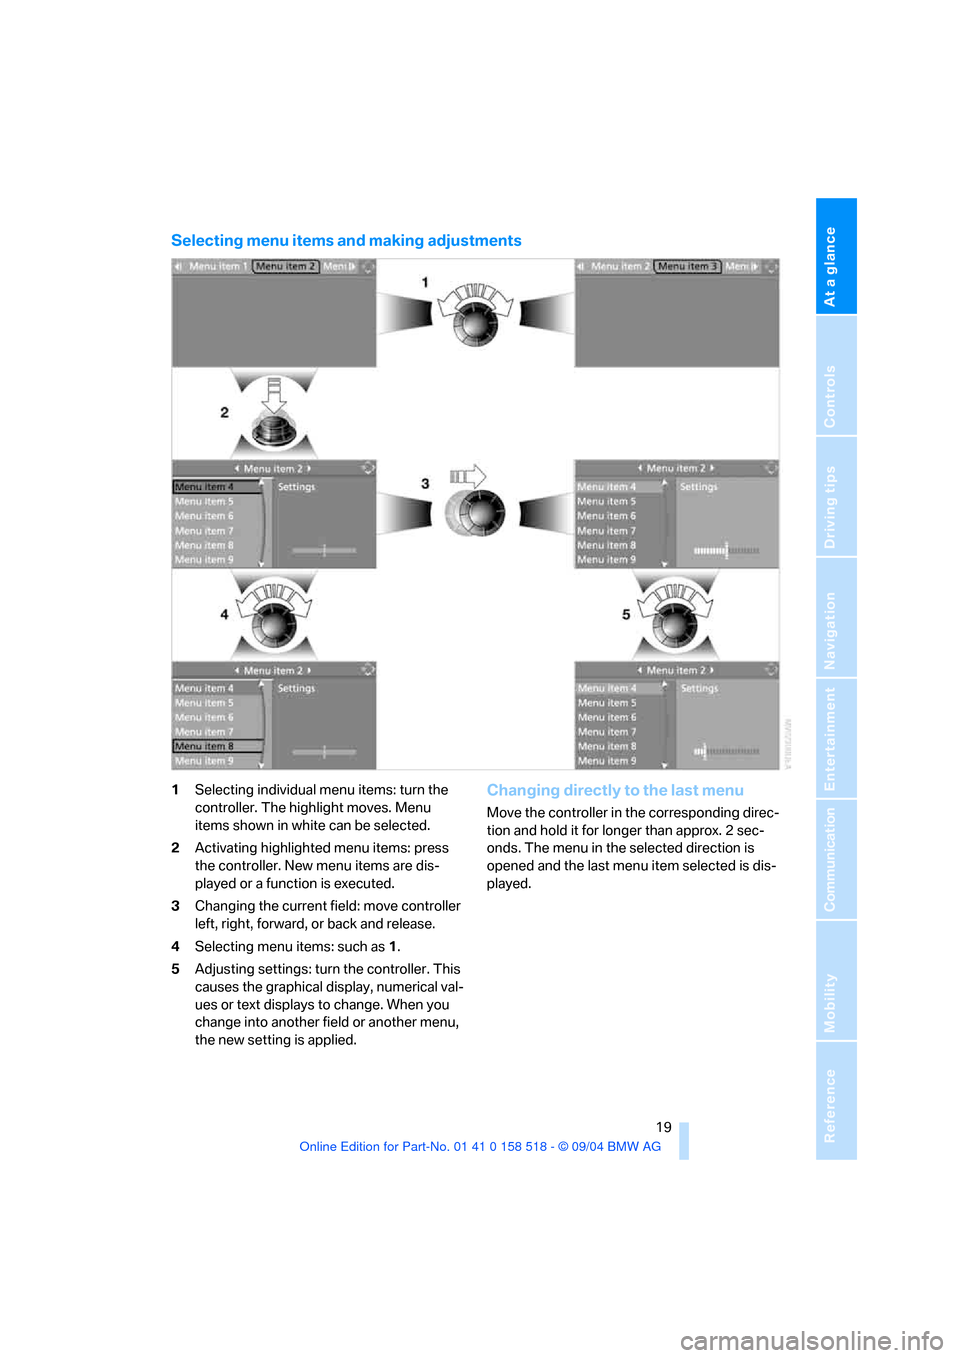
Selecting menu items and making adjustments
1Selecting individual menu items: turn the
controller. The highlight moves. Menu
items shown in white can be selected.
2Activating highlighted menu items: press
the controller. New menu items are dis-
played or a function is executed.
3Changing the current field: move controller
left, right, forward, or back and release.
4Selecting menu items: such as1.
5Adjusting settings: turn the controller. This
causes the graphical display, numerical val-
ues or text displays to change. When you
change into another field or another menu,
the new setting is applied.Changing directly to the last menu
Move the controller in the corresponding direc-
tion and hold it for longer than approx. 2 sec-
onds. The menu in the selected direction is
opened and the last menu item selected is dis-
played.
Page 29 of 221
Opening and closing
28
Opening and closing
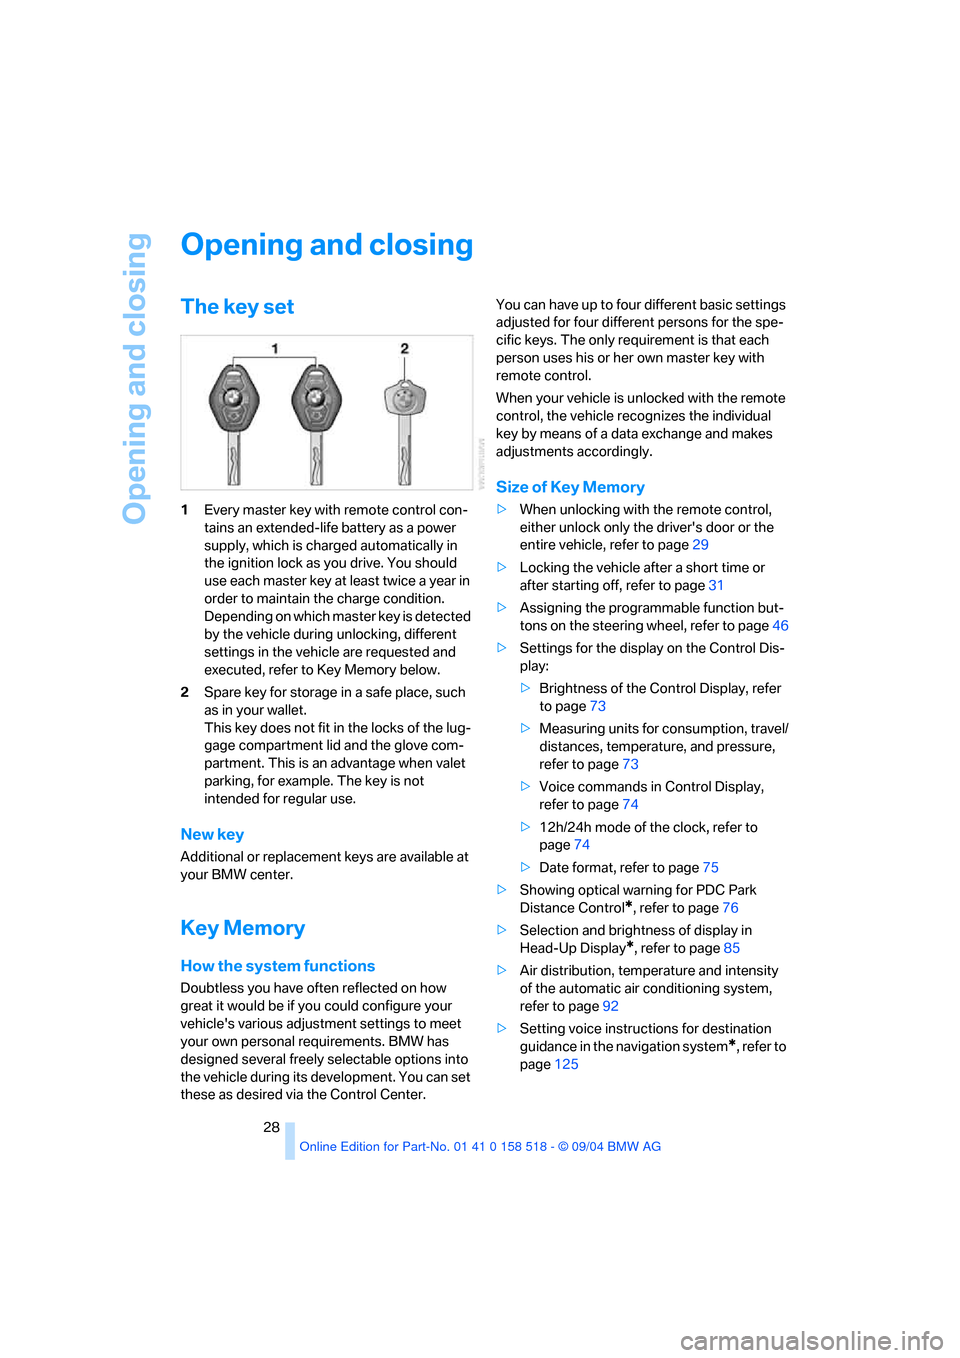
The key set
1Every master key with remote control con-
tains an extended-life battery as a power
supply, which is charged automatically in
the ignition lock as you drive. You should
use each master key at least twice a year in
order to maintain the charge condition.
Depending on which master key is detected
by the vehicle during unlocking, different
settings in the vehicle are requested and
executed, refer to Key Memory below.
2Spare key for storage in a safe place, such
as in your wallet.
This key does not fit in the locks of the lug-
gage compartment lid and the glove com-
partment. This is an advantage when valet
parking, for example. The key is not
intended for regular use.
New key
Additional or replacement keys are available at
your BMW center.
Key Memory
How the system functions
Doubtless you have often reflected on how
great it would be if you could configure your
vehicle's various adjustment settings to meet
your own personal requirements. BMW has
designed several freely selectable options into
the vehicle during its development. You can set
these as desired via the Control Center.You can have up to four different basic settings
adjusted for four different persons for the spe-
cific keys. The only requirement is that each
person uses his or her own master key with
remote control.
When your vehicle is unlocked with the remote
control, the vehicle recognizes the individual
key by means of a data exchange and makes
adjustments accordingly.
Size of Key Memory
>When unlocking with the remote control,
either unlock only the driver's door or the
entire vehicle, refer to page29
>Locking the vehicle after a short time or
after starting off, refer to page31
>Assigning the programmable function but-
tons on the steering wheel, refer to page46
>Settings for the display on the Control Dis-
play:
>Brightness of the Control Display, refer
to page73
>Measuring units for consumption, travel/
distances, temperature, and pressure,
refer to page73
>Voice commands in Control Display,
refer to page74
>12h/24h mode of the clock, refer to
page74
>Date format, refer to page75
>Showing optical warning for PDC Park
Distance Control
*, refer to page76
>Selection and brightness of display in
Head-Up Display
*, refer to page85
>Air distribution, temperature and intensity
of the automatic air conditioning system,
refer to page92
>Setting voice instructions for destination
guidance in the navigation system
*, refer to
page125
Page 48 of 221
Controls
47Reference
At a glance
Driving tips
Communication
Navigation
Entertainment
Mobility
Transporting children safely
The right place for children
Children always in the rear
Accident research shows that the safest place
for children in a vehicle is in the rear seat.
Older children should be tightly secured with a
safety belt, after they have outgrown a booster
seat that is appropriate for their age, height and
weight.
A child sitting in the rear seat and not
properly restrained may place his or her
head on or near the airbag, if so equipped. For
example, a child, even though belted, may fall
asleep with his or her head against the side air-
bag. It may be difficult for a driver to ens ure that
children in the rear seat will remain properly
positioned at all times and do not place their
heads on or near the side airbag. Therefore, we
recommend that the rear seat side airbags, if
provided, be deactivated if you plan to transport
children in the rear seat.<
Deactivating rear seat side airbags
The rear seat side airbags may already have
been deactivated by a BMW center. Labels in
the rear door opening should indicate the status
of your rear seat side airbags. If you are uncer-
tain of their status, or wish to have the airbags
activated or deactivated, please contact your
BMW center.
Child-restraint system in the rear
Children under 13 years of age and chil-
dren less than 5 ft/150 cm tall should
always ride in the rear and the restraint systems
should be secured with the vehicle's safety
belts.<
Younger children should be secured in an
appropriate forward-facing child-restraint sys-
tem that has first been properly restrained. We
strongly urge you to carefully read and comply
with the instructions for installation and use provided by the child-restraint's manufacturer
whenever you use such a device.
All rear sitting positions in your vehicle meet the
recommendations of SAE J1819, an industry-
recommended practice for securing child-
restraint systems in motor vehicles.
Exception for front passenger seat
Should it be necessary to use a child-
restraint system on the front passenger
seat, the airbags on the front passenger side
must be deactivated. Otherwise, there is a con-
siderable risk of injury for the child when the air-
bags are triggered, even with a child-restraint
system. Your BMW center will be glad to advise
you.<
Never install a rearward-facing child-
restraint system in the front passenger
seat of this vehicle if the passenger's airbag is
not deactivated. If you do so, the child could be
severely injured when the airbag is trig-
gered.Your vehicle is equipped with an airbag
supplemental restraint system for the front pas-
senger. Because the backrest on any rearward-
facing child-restraint system – of the kind
designed for infants under 1 year and 20 Ibs./
9 kg – would be within the airbag's deployment
range, you should never mount such a system
in the front passenger seat, since the impact of
the airbag against the child restraint's backrest
could lead to serious or fatal injuries.<
More information on automatic deactivation of
the front passenger airbags, refer to page83.
Backrest width adjustment
The backrest width adjustment of the
passenger seat must be opened com-
pletely. After the child's seat is installed, mem-
ory positions must not be requested and the
active backrest width adjustment must be
deactivated, otherwise there is the risk of
injury.<
Page 49 of 221
Transporting children safely
48 1.After the vehicle is unlocked, sit in the pas-
senger seat and close the door.
2.Open the backrest width adjustment com-
pletely, refer to page39.
3.Deactivate active backrest width adjust-
ment, refer to page40.
4.Install child's seat.
Installing child-restraint
systems
Before installing any child-restraint system or
child seat, read the following:
Observe the child-restraint system man-
ufacturer's instructions for installation
and use. Otherwise the degree of protection
may be reduced. After an accident, have all
parts of the child-restraint system and of the
relevant vehicle safety belt system checked and
r e p la c e d i f n e c e s s a ry . H a v e t h is w o r k d o n e o n ly
at your BMW center or at a workshop that works
according to BMW repair procedures with cor-
respondingly trained personnel. <
Commercially-available child-restraint systems
are designed to be secured with a lap belt or
with the lap belt portion of a combination lap/
shoulder belt. Improperly or inadequately
installed restraint systems can increase the risk
of injury to children. Always read and follow the
instructions that come with the system.
Child seat security
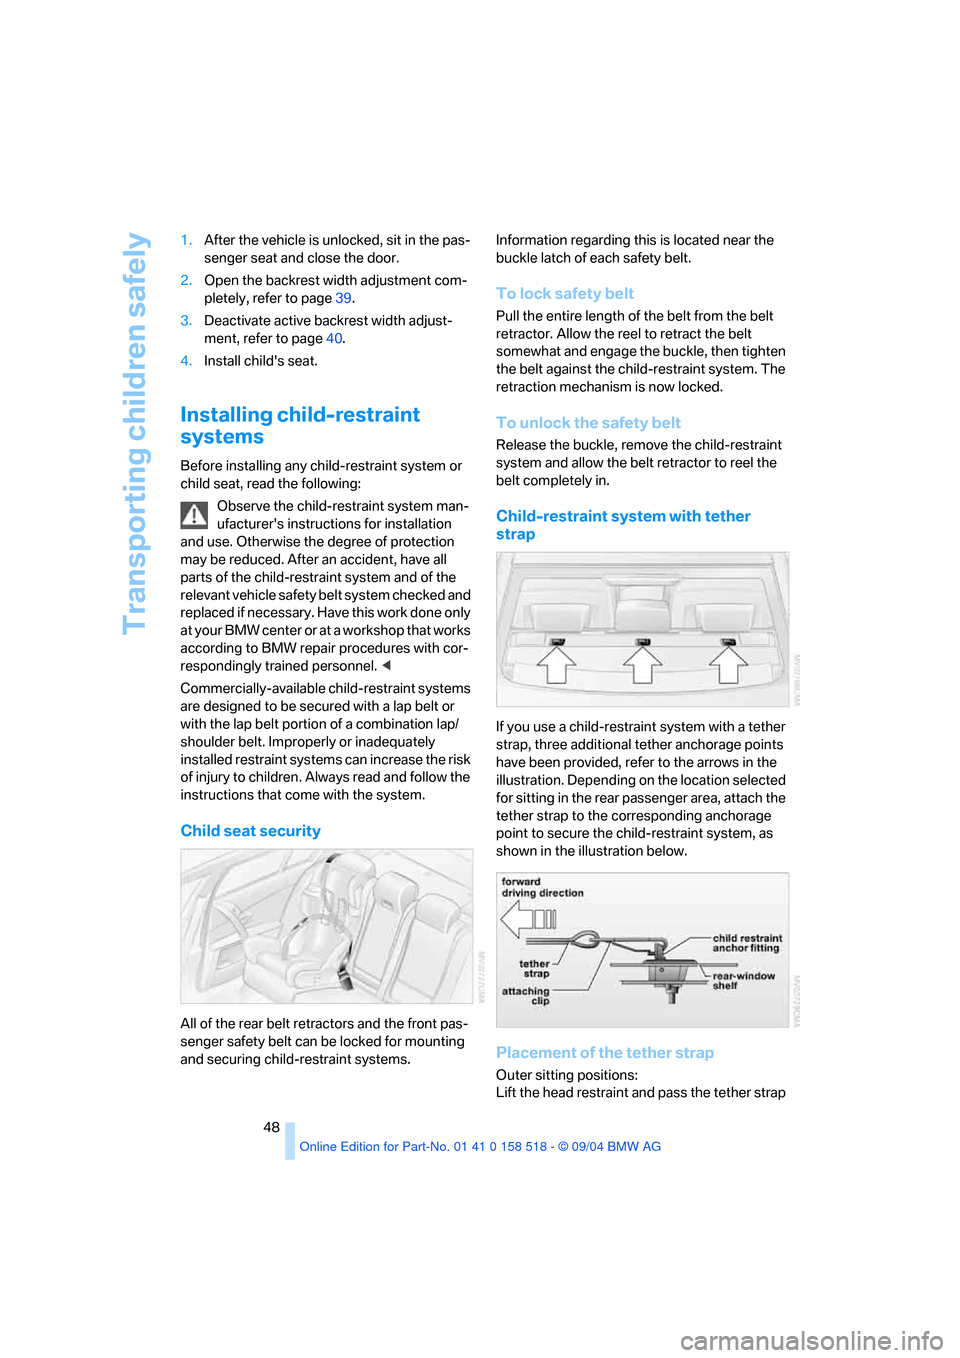
All of the rear belt retractors and the front pas-
senger safety belt can be locked for mounting
and securing child-restraint systems.Information regarding this is located near the
buckle latch of each safety belt.
To lock safety belt
Pull the entire length of the belt from the belt
retractor. Allow the reel to retract the belt
somewhat and engage the buckle, then tighten
the belt against the child-restraint system. The
retraction mechanism is now locked.
To unlock the safety belt
Release the buckle, remove the child-restraint
system and allow the belt retractor to reel the
belt completely in.
Child-restraint system with tether
strap
If you use a child-restraint system with a tether
strap, three additional tether anchorage points
have been provided, refer to the arrows in the
illustration. Depending on the location selected
for sitting in the rear passenger area, attach the
tether strap to the corresponding anchorage
point to secure the child-restraint system, as
shown in the illustration below.
Placement of the tether strap
Outer sitting positions:
Lift the head restraint and pass the tether strap
Page 55 of 221
Driving
54
Shiftlock
Press the brake pedal before shifting out of N;
the shift command will not be executed unless
the brake is applied.
R Reverse
Select only when the vehicle is stationary.
Sequential mode
After every engine start, as soon as the selector
lever is pushed to the right and the brake pedal
is pressed, the Sequential mode is activated.
You can shift up and down using the shifting
paddles or the selector lever. You do not need
to remove your foot from the accelerator to do
so.
It is also possible to start off in second gear, e. g.
in slippery conditions.
D Drive mode
In the Drive mode, all forward gears are shifted
automatically.
Shifting from Sequential mode to Drive mode:
press selector lever to the right toward D.
Kick-down:
For rapid acceleration, e. g. when passing, press
the accelerator pedal as far down as it will go.
You achieve maximum acceleration.
To switch back into the Sequential mode: press
selector lever to the right again toward D or shift
using the shifting paddles or the selector lever.
Start off quickly on slopes. Do not hold
the vehicle on a hill by pressing the accel-
erator, but apply the handbrake instead. Other-
wise overheating can occur in the transmission
region.<
Gear changes
Using selector lever
>To upshift, pull the selector lever back.
>To downshift, push the selector lever for-
ward.
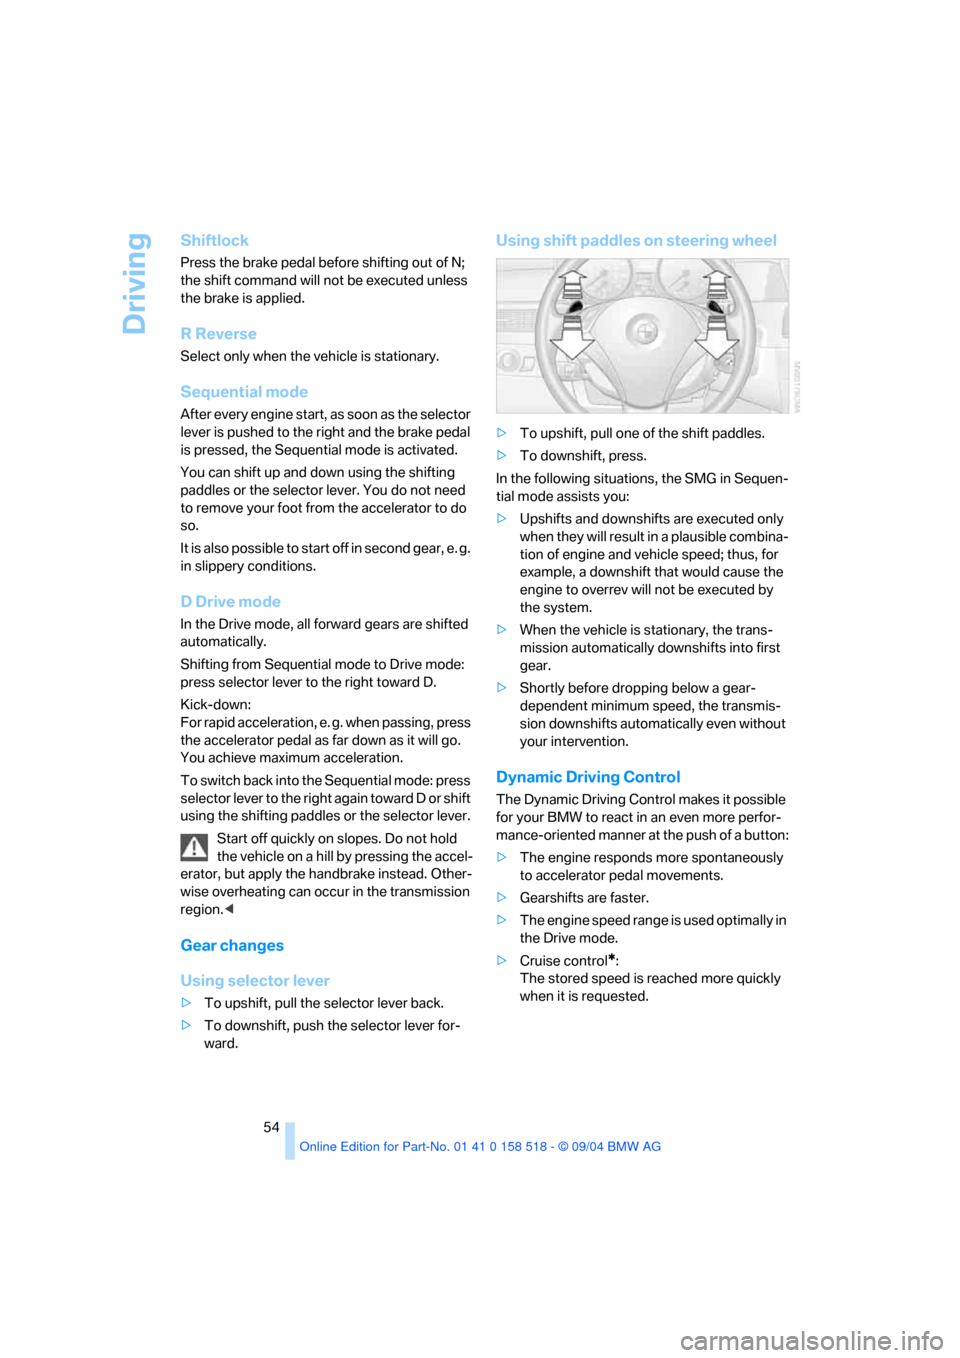
Using shift paddles on steering wheel
>To upshift, pull one of the shift paddles.
>To downshift, press.
In the following situations, the SMG in Sequen-
tial mode assists you:
>Upshifts and downshifts are executed only
when they will result in a plausible combina-
tion of engine and vehicle speed; thus, for
example, a downshift that would cause the
engine to overrev will not be executed by
the system.
>When the vehicle is stationary, the trans-
mission automatically downshifts into first
gear.
>Shortly before dropping below a gear-
dependent minimum speed, the transmis-
sion downshifts automatically even without
your intervention.
Dynamic Driving Control
The Dynamic Driving Control makes it possible
for your BMW to react in an even more perfor-
mance-oriented manner at the push of a button:
>The engine responds more spontaneously
to accelerator pedal movements.
>Gearshifts are faster.
>The engine speed range is used optimally in
the Drive mode.
>Cruise control
*:
The stored speed is reached more quickly
when it is requested.
Page 56 of 221

Controls
55Reference
At a glance
Driving tips
Communication
Navigation
Entertainment
Mobility
Activating system
Press the SPORT button with the ignition key in
position 2.
The LED in the button lights up and SPORT is
displayed in the instrument cluster.
Deactivating system
Press the SPORT button again.
The LED in the button and SPORT in the instru-
ment cluster go out.
Acceleration assistant
The acceleration assistant enables optimized
vehicle acceleration at racing car level on road
surfaces with good adhesion when starting off.
Do not use the acceleration assistant too
often, as otherwise components will wear
prematurely.<
1.Activate the Dynamic Traction Control.
2.Press the DTC button, refer to page78, for
longer than 3 seconds.
3.Quickly press accelerator pedal all the way
down: kick-down. The ideal starting-off
engine speed is set.
To maintain driving stability, do not deac-
tivate DSC if at all possible.<
Automatic transmission with
Steptronic
In addition to fully automatic operation, you can
also manually shift with the Steptronic, refer to
page56.
Selector lever positions
P R N D M/S + –
Displays in instrument cluster
P R N D DS M1 to M6
The selector lever position is indicated, and in
the manual mode the gear currently engaged.
Changing selector lever positions
An interlock prevents inadvertent gearshifts
into selector lever positions R and P. To cancel
the interlock, press the button on the front of
the selector lever knob, refer to arrow.
Shiftlock
Press the brake pedal before shifting out of P
or N; the shift command will not be executed
unless the brake is applied.
To prevent the vehicle from creeping after you
select a driving position, maintain pressure on
the brake pedal until you are ready to start.
P Park
Select only when the vehicle is stationary.
The rear wheels are locked.
Page 57 of 221

Driving
56
R Reverse
Select only when the vehicle is stationary.
N Neutral
For example, engage in automatic car washes.
The vehicle can roll.
D Drive, automatic position
Position for normal vehicle operation. All for-
ward gears are available.
Under normal operating conditions, fuel con-
sumption is lowest when driving in position D.
Kick-down
The kick-down mode provides maximum accel-
eration: press the accelerator pedal beyond the
full-throttle resistance point.
Manual operation and Sport program
M/S
Move selector lever from position D toward the
left into the M/S shifting slot:
The sport program is activated and DS appears
in the instrument cluster. This position is
recommended for a performance-oriented
driving style.
When the selector lever is pressed forward or
back, the manual mode is activated and the
Steptronic shifts the gear. The instrument clus-
ter shows M1 through M6.
Upshifts and downshifts are executed only
when they will result in a plausible combination
of engine and vehicle speed; thus, for example,
a downshift that would cause the engine to
overrev will not be executed by the system. The
selected gear appears briefly in the instrument
cluster, followed by the current gear.To use the automatic function again, move the
selector lever to the right into position D.
Turn signals/
headlamp flasher
1High beams
2Headlamp flasher
3Turn signals
Using turn signals
Press the lever beyond the resistance point.
To turn off manually, press the lever to the
resistance point.
Atypically rapid flashing of the indicator
lamp indicates that a turn signal bulb
needs to be replaced.
After switching off the ignition, make sure that
the roadside parking lamps are not switched
on.<
Signaling for a short time
Press lever to resistance point and hold for as
long as you wish to signal.
Triple turn signal activation
Press the lever to the resistance point; the turn
signal flashes three times.
You can activate or deactivate this function.
Control Center, for principle details, refer to
page16.
1.Open the menu.
2.Select "Vehicle settings" and press the
controller.
3.Select "Light" and press the controller.