2005 BMW 525I SEDAN ECU
[x] Cancel search: ECUPage 70 of 221
Controls
69Reference
At a glance
Driving tips
Communication
Navigation
Entertainment
Mobility
Recalling stored messages
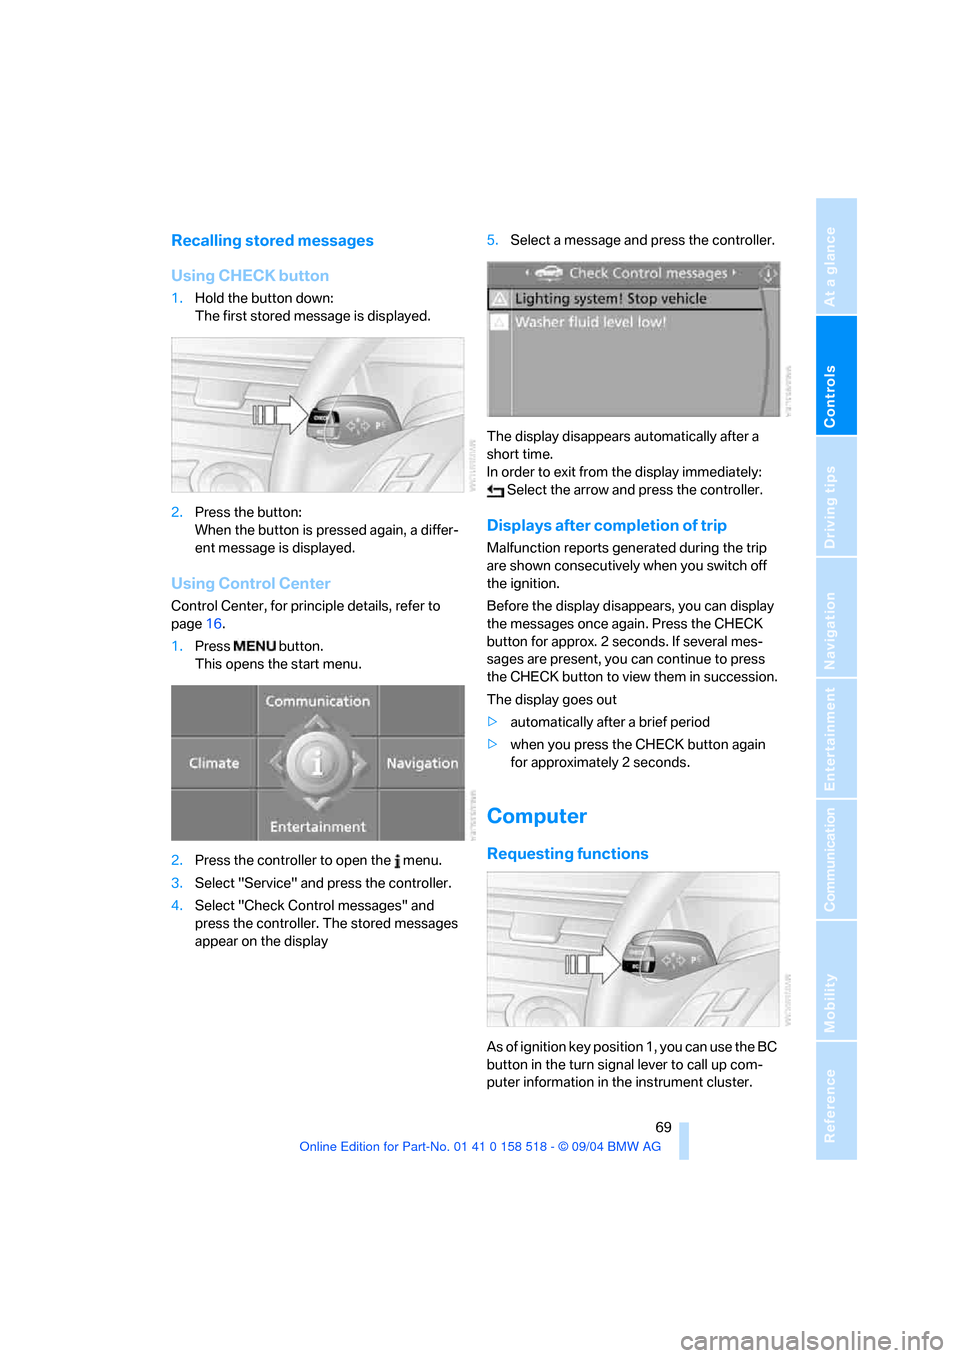
Using CHECK button
1.Hold the button down:
The first stored message is displayed.
2.Press the button:
When the button is pressed again, a differ-
ent message is displayed.
Using Control Center
Control Center, for principle details, refer to
page16.
1.Press button.
This opens the start menu.
2.Press the controller to open the menu.
3.Select "Service" and press the controller.
4.Select "Check Control messages" and
press the controller. The stored messages
appear on the display5.Select a message and press the controller.
The display disappears automatically after a
short time.
In order to exit from the display immediately:
Select the arrow and press the controller.
Displays after completion of trip
Malfunction reports generated during the trip
are shown consecutively when you switch off
the ignition.
Before the display disappears, you can display
the messages once again. Press the CHECK
button for approx. 2 seconds. If several mes-
sages are present, you can continue to press
the CHECK button to view them in succession.
The display goes out
>automatically after a brief period
>when you press the CHECK button again
for approximately 2 seconds.
Computer
Requesting functions
As of ignition key position 1, you can use the BC
button in the turn signal lever to call up com-
puter information in the instrument cluster.
Page 84 of 221
Controls
83Reference
At a glance
Driving tips
Communication
Navigation
Entertainment
Mobility
Airbags
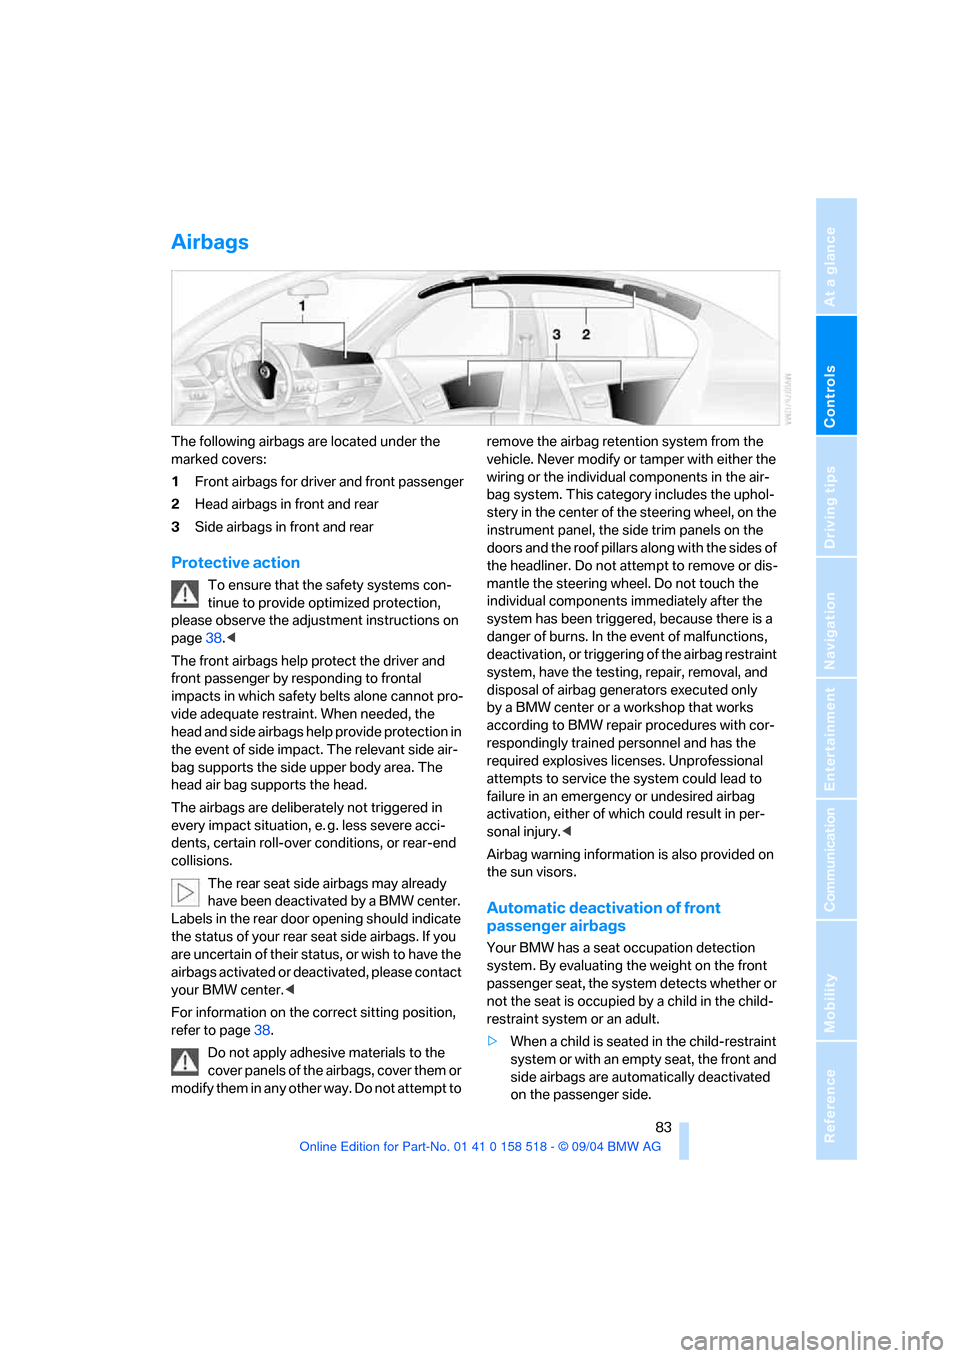
The following airbags are located under the
marked covers:
1Front airbags for driver and front passenger
2Head airbags in front and rear
3Side airbags in front and rear
Protective action
To ensure that the safety systems con-
tinue to provide optimized protection,
please observe the adjustment instructions on
page38.<
The front airbags help protect the driver and
front passenger by responding to frontal
impacts in which safety belts alone cannot pro-
vide adequate restraint. When needed, the
head and side airbags help provide protection in
the event of side impact. The relevant side air-
bag supports the side upper body area. The
head air bag supports the head.
The airbags are deliberately not triggered in
every impact situation, e. g. less severe acci-
dents, certain roll-over conditions, or rear-end
collisions.
The rear seat side airbags may already
have been deactivated by a BMW center.
Labels in the rear door opening should indicate
the status of your rear seat side airbags. If you
are uncertain of their status, or wish to have the
airbags activated or deactivated, please contact
your BMW center.<
For information on the correct sitting position,
refer to page38.
Do not apply adhesive materials to the
cover panels of the airbags, cover them or
modify them in any other way. Do not attempt to remove the airbag retention system from the
vehicle. Never modify or tamper with either the
wiring or the individual components in the air-
bag system. This category includes the uphol-
stery in the center of the steering wheel, on the
instrument panel, the side trim panels on the
doors and the roof pillars along with the sides of
the headliner. Do not attempt to remove or dis-
mantle the steering wheel. Do not touch the
individual components immediately after the
system has been triggered, because there is a
danger of burns. In the event of malfunctions,
deactivation, or triggering of the airbag restraint
system, have the testing, repair, removal, and
disposal of airbag generators executed only
by a BMW center or a workshop that works
according to BMW repair procedures with cor-
respondingly trained personnel and has the
required explosives licenses. Unprofessional
attempts to service the system could lead to
failure in an emergency or undesired airbag
activation, either of which could result in per-
sonal injury.<
Airbag warning information is also provided on
the sun visors.
Automatic deactivation of front
passenger airbags
Your BMW has a seat occupation detection
system. By evaluating the weight on the front
passenger seat, the system detects whether or
not the seat is occupied by a child in the child-
restraint system or an adult.
>When a child is seated in the child-restraint
system or with an empty seat, the front and
side airbags are automatically deactivated
on the passenger side.
Page 102 of 221
Controls
101Reference
At a glance
Driving tips
Communication
Navigation
Entertainment
Mobility
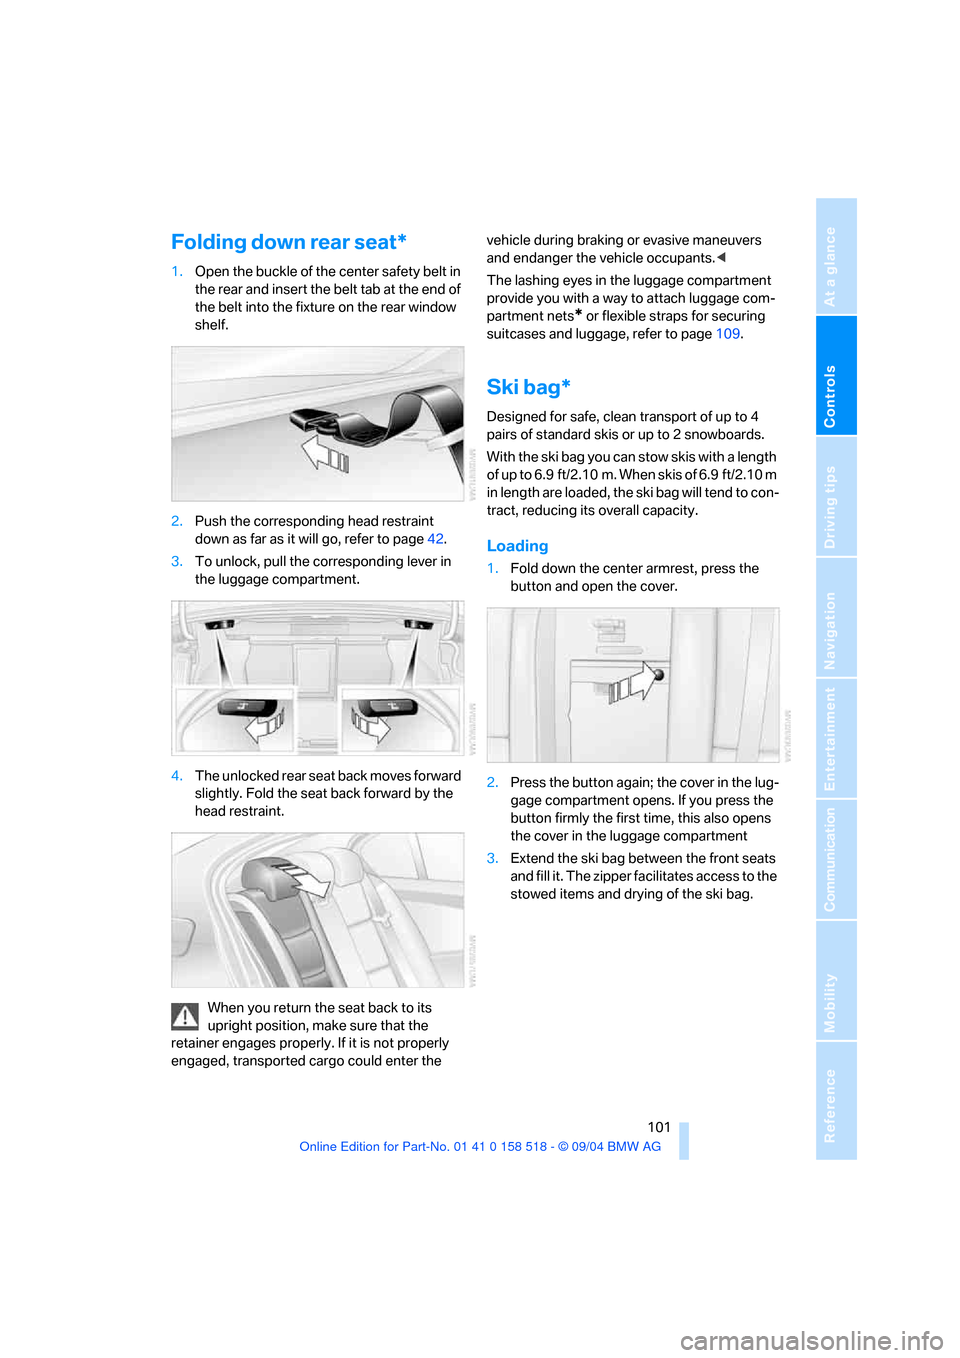
Folding down rear seat*
1.Open the buckle of the center safety belt in
the rear and insert the belt tab at the end of
the belt into the fixture on the rear window
shelf.
2.Push the corresponding head restraint
down as far as it will go, refer to page42.
3.To unlock, pull the corresponding lever in
the luggage compartment.
4.The unlocked rear seat back moves forward
slightly. Fold the seat back forward by the
head restraint.
When you return the seat back to its
upright position, make sure that the
retainer engages properly. If it is not properly
engaged, transported cargo could enter the vehicle during braking or evasive maneuvers
and endanger the vehicle occupants.<
The lashing eyes in the luggage compartment
provide you with a way to attach luggage com-
partment nets
* or flexible straps for securing
suitcases and luggage, refer to page109.
Ski bag*
Designed for safe, clean transport of up to 4
pairs of standard skis or up to 2 snowboards.
With the ski bag you can stow skis with a length
of up to 6.9 ft/2.10 m. When skis of 6.9 ft/2.10 m
in length are loaded, the ski bag will tend to con-
tract, reducing its overall capacity.
Loading
1.Fold down the center armrest, press the
button and open the cover.
2.Press the button again; the cover in the lug-
gage compartment opens. If you press the
button firmly the first time, this also opens
the cover in the luggage compartment
3.Extend the ski bag between the front seats
and fill it. The zipper facilitates access to the
stowed items and drying of the ski bag.
Page 103 of 221
Practical interior accessories
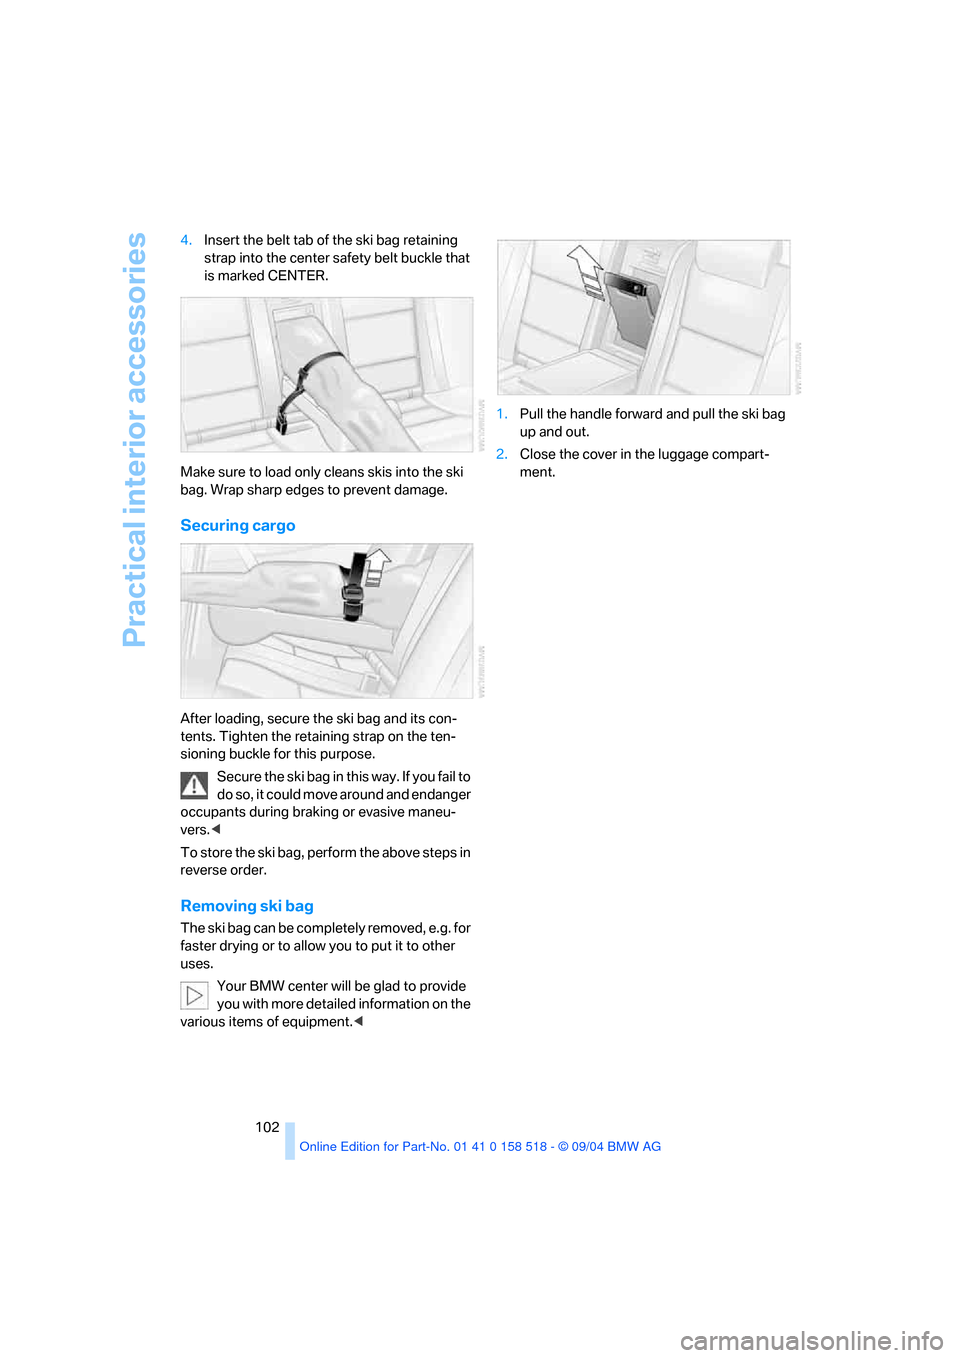
102 4.Insert the belt tab of the ski bag retaining
strap into the center safety belt buckle that
is marked CENTER.
Make sure to load only cleans skis into the ski
bag. Wrap sharp edges to prevent damage.
Securing cargo
After loading, secure the ski bag and its con-
tents. Tighten the retaining strap on the ten-
sioning buckle for this purpose.
Secure the ski bag in this way. If you fail to
do so, it could move around and endanger
occupants during braking or evasive maneu-
vers.<
To store the ski bag, perform the above steps in
reverse order.
Removing ski bag
The ski bag can be completely removed, e.g. for
faster drying or to allow you to put it to other
uses.
Your BMW center will be glad to provide
you with more detailed information on the
various items of equipment.< 1.Pull the handle forward and pull the ski bag
up and out.
2.Close the cover in the luggage compart-
ment.
Page 110 of 221
Driving tips
109Reference
At a glance
Controls
Communication
Navigation
Entertainment
Mobility
5.Determine the combined weight of luggage
and cargo being loaded on the vehicle. That
weight may not safely exceed the available
cargo and luggage load capacity calculated
in step 4.
6.If your vehicle will be towing a trailer, part of
the load from your trailer will be transferred
to your vehicle. Consult the manual for
transporting a trailer to determine how this
may reduce the available cargo and luggage
load capacity of your vehicle.
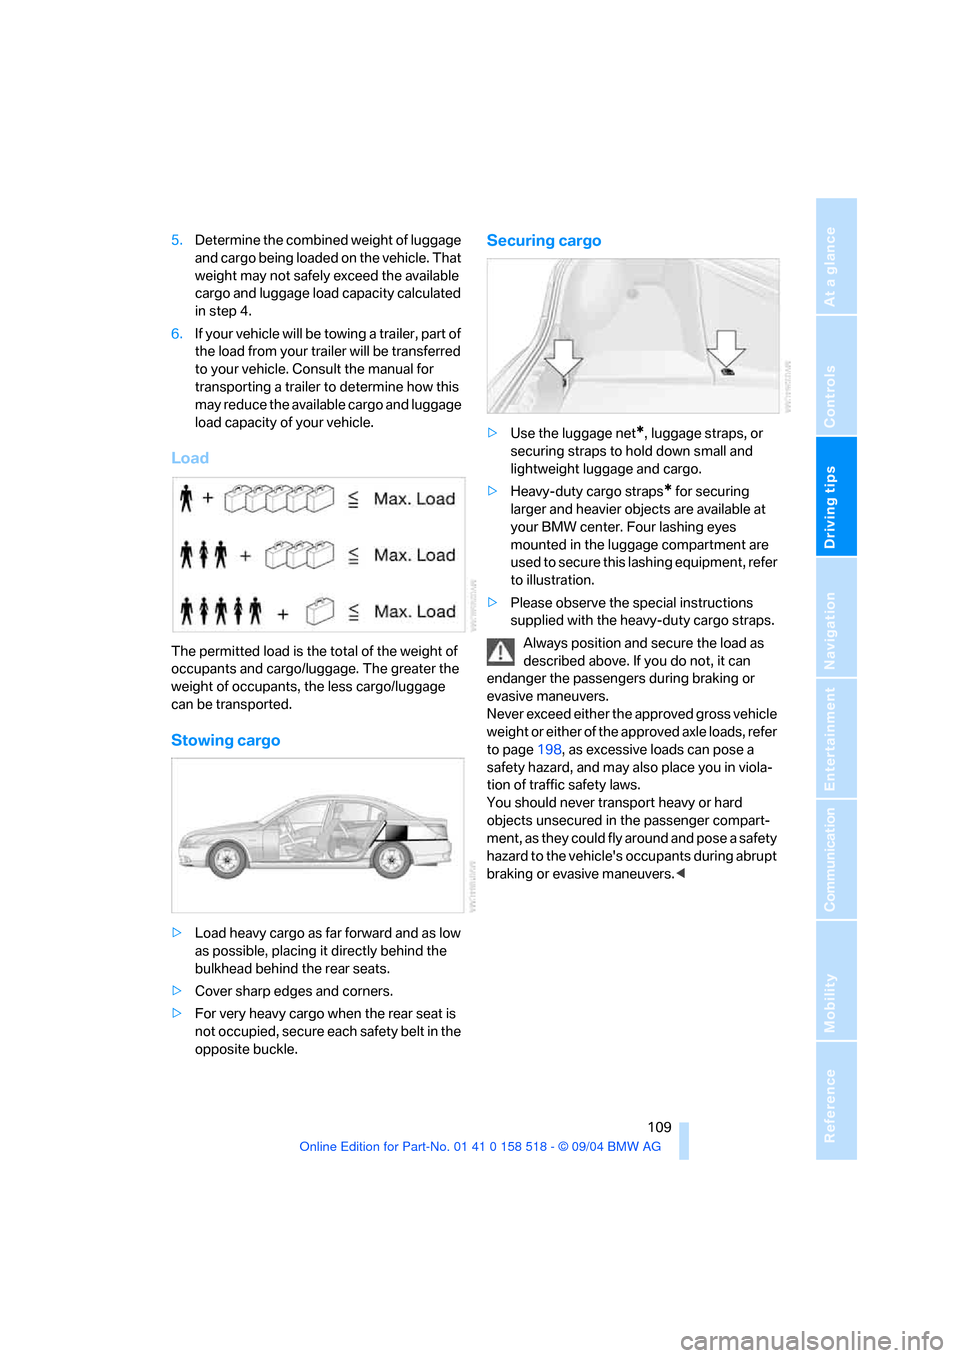
Load
The permitted load is the total of the weight of
occupants and cargo/luggage. The greater the
weight of occupants, the less cargo/luggage
can be transported.
Stowing cargo
>Load heavy cargo as far forward and as low
as possible, placing it directly behind the
bulkhead behind the rear seats.
>Cover sharp edges and corners.
>For very heavy cargo when the rear seat is
not occupied, secure each safety belt in the
opposite buckle.
Securing cargo
>Use the luggage net*, luggage straps, or
securing straps to hold down small and
lightweight luggage and cargo.
>Heavy-duty cargo straps
* for securing
larger and heavier objects are available at
your BMW center. Four lashing eyes
mounted in the luggage compartment are
used to secure this lashing equipment, refer
to illustration.
>Please observe the special instructions
supplied with the heavy-duty cargo straps.
Always position and secure the load as
described above. If you do not, it can
endanger the passengers during braking or
evasive maneuvers.
Never exceed either the approved gross vehicle
weight or either of the approved axle loads, refer
to page198, as excessive loads can pose a
safety hazard, and may also place you in viola-
tion of traffic safety laws.
You should never transport heavy or hard
objects unsecured in the passenger compart-
ment, as they could fly around and pose a safety
hazard to the vehicle's occupants during abrupt
braking or evasive maneuvers.<
Page 111 of 221
Things to remember when driving
110
Roof-mounted luggage rack*
A special rack system is available as an option
for your BMW. Please comply with the precau-
tions included with the installation instructions.
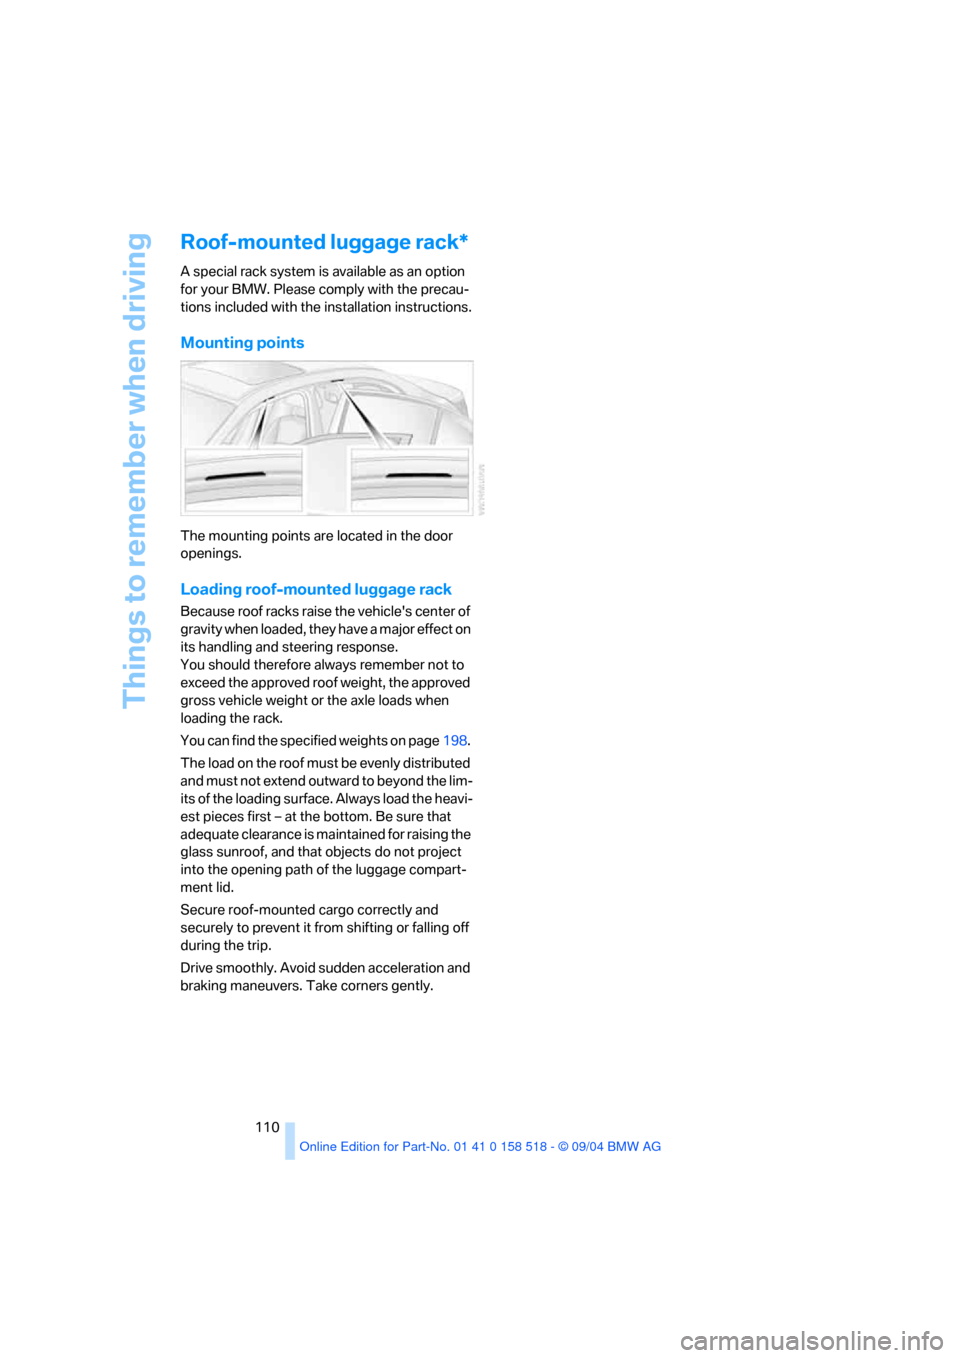
Mounting points
The mounting points are located in the door
openings.
Loading roof-mounted luggage rack
Because roof racks raise the vehicle's center of
gravity when loaded, they have a major effect on
its handling and steering response.
You should therefore always remember not to
exceed the approved roof weight, the approved
gross vehicle weight or the axle loads when
loading the rack.
You can find the specified weights on page198.
The load on the roof must be evenly distributed
and must not extend outward to beyond the lim-
its of the loading surface. Always load the heavi-
est pieces first – at the bottom. Be sure that
adequate clearance is maintained for raising the
glass sunroof, and that objects do not project
into the opening path of the luggage compart-
ment lid.
Secure roof-mounted cargo correctly and
securely to prevent it from shifting or falling off
during the trip.
Drive smoothly. Avoid sudden acceleration and
braking maneuvers. Take corners gently.
Page 127 of 221
Destination guidance
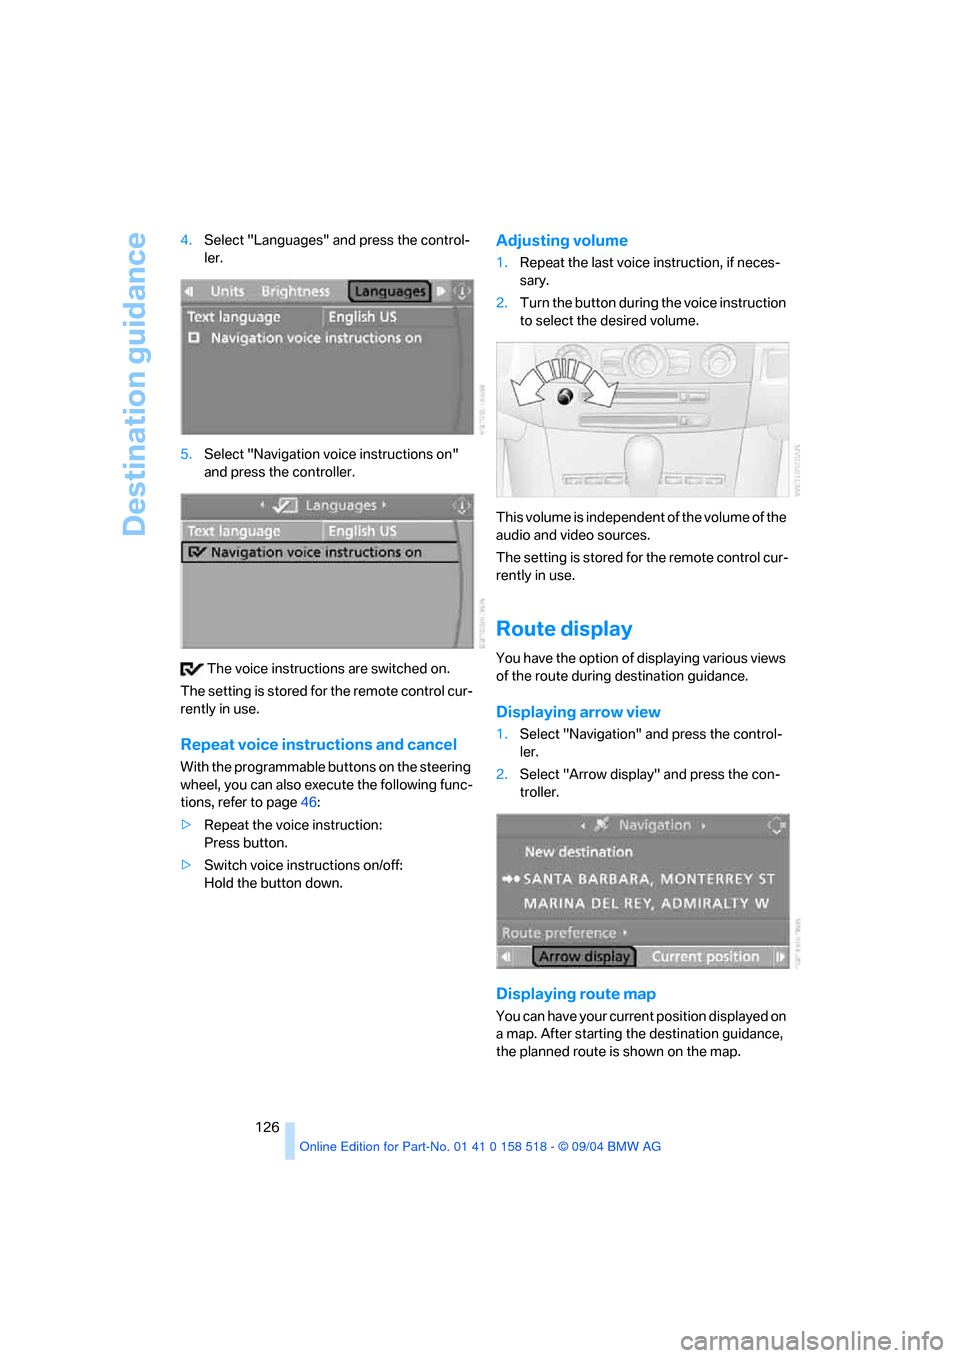
126 4.Select "Languages" and press the control-
ler.
5.Select "Navigation voice instructions on"
and press the controller.
The voice instructions are switched on.
The setting is stored for the remote control cur-
rently in use.
Repeat voice instructions and cancel
With the programmable buttons on the steering
wheel, you can also execute the following func-
tions, refer to page46:
>Repeat the voice instruction:
Press button.
>Switch voice instructions on/off:
Hold the button down.
Adjusting volume
1.Repeat the last voice instruction, if neces-
sary.
2.Turn the button during the voice instruction
to select the desired volume.
This volume is independent of the volume of the
audio and video sources.
The setting is stored for the remote control cur-
rently in use.
Route display
You have the option of displaying various views
of the route during destination guidance.
Displaying arrow view
1.Select "Navigation" and press the control-
ler.
2.Select "Arrow display" and press the con-
troller.
Displaying route map
You can have your current position displayed on
a map. After starting the destination guidance,
the planned route is shown on the map.
Page 177 of 221
Under the hood
176
Under the hood
Never attempt to perform any service or
repair operations on your vehicle without
the required, professional technical training. If
you do not know what repair procedures to fol-
low, have work on your vehicle done only by
your BMW center or a workshop that works
according to BMW repair procedures with cor-
respondingly trained personnel. If this work is
not carried out properly, there is a danger of
subsequent damage and related safety haz-
ards.<
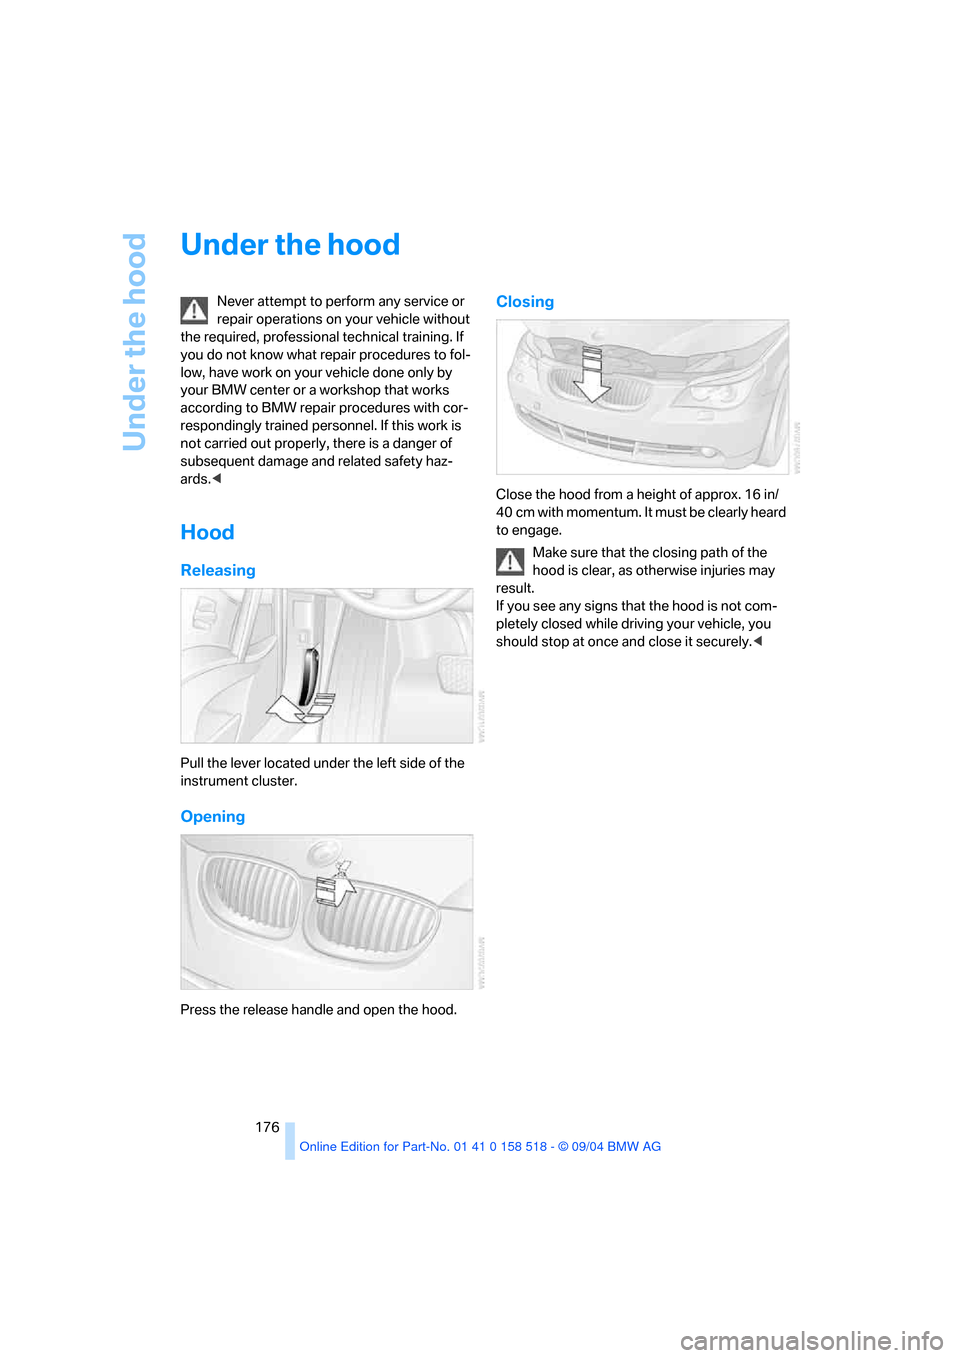
Hood
Releasing
Pull the lever located under the left side of the
instrument cluster.
Opening
Press the release handle and open the hood.
Closing
Close the hood from a height of approx. 16 in/
40 cm with momentum. It must be clearly heard
to engage.
Make sure that the closing path of the
hood is clear, as otherwise injuries may
result.
If you see any signs that the hood is not com-
pletely closed while driving your vehicle, you
should stop at once and close it securely.<