2005 BMW 525I SEDAN light
[x] Cancel search: lightPage 93 of 221
A congenial climate
92 The recirculated-air mode should not be used
over an extended period of time, as the air qual-
ity inside the vehicle deteriorates continu-
ously.<
Residual heat mode
Press this button when the engine
is switched off, but warm.
The heat stored in the engine is
used to heat the passenger com-
partment, e.g. while stopped at a school to pick
up a child.
You can adjust the automatic climate control
settings in ignition key position 1.
Provided that the engine has warmed to its nor-
mal operating temperature and the battery is
charged, you can use this function for up to
15 minutes after switching off the ignition. The
LED in the button lights up to confirm compli-
ance with both of these conditions.
Switching off automatic climate control
The air volume, the heater and the
cooling function are all switched
off.
You can restart the automatic cli-
mate control by pressing any of its buttons
except the REST button.
Settings using Control Center
Ignition key:
>On vehicles with separate drives for audio
CDs and navigation DVDs, ignition key in
position 2
>In vehicles with one drive for audio CDs,
ignition key in position 1Control Center, for principle details, refer to
page16.
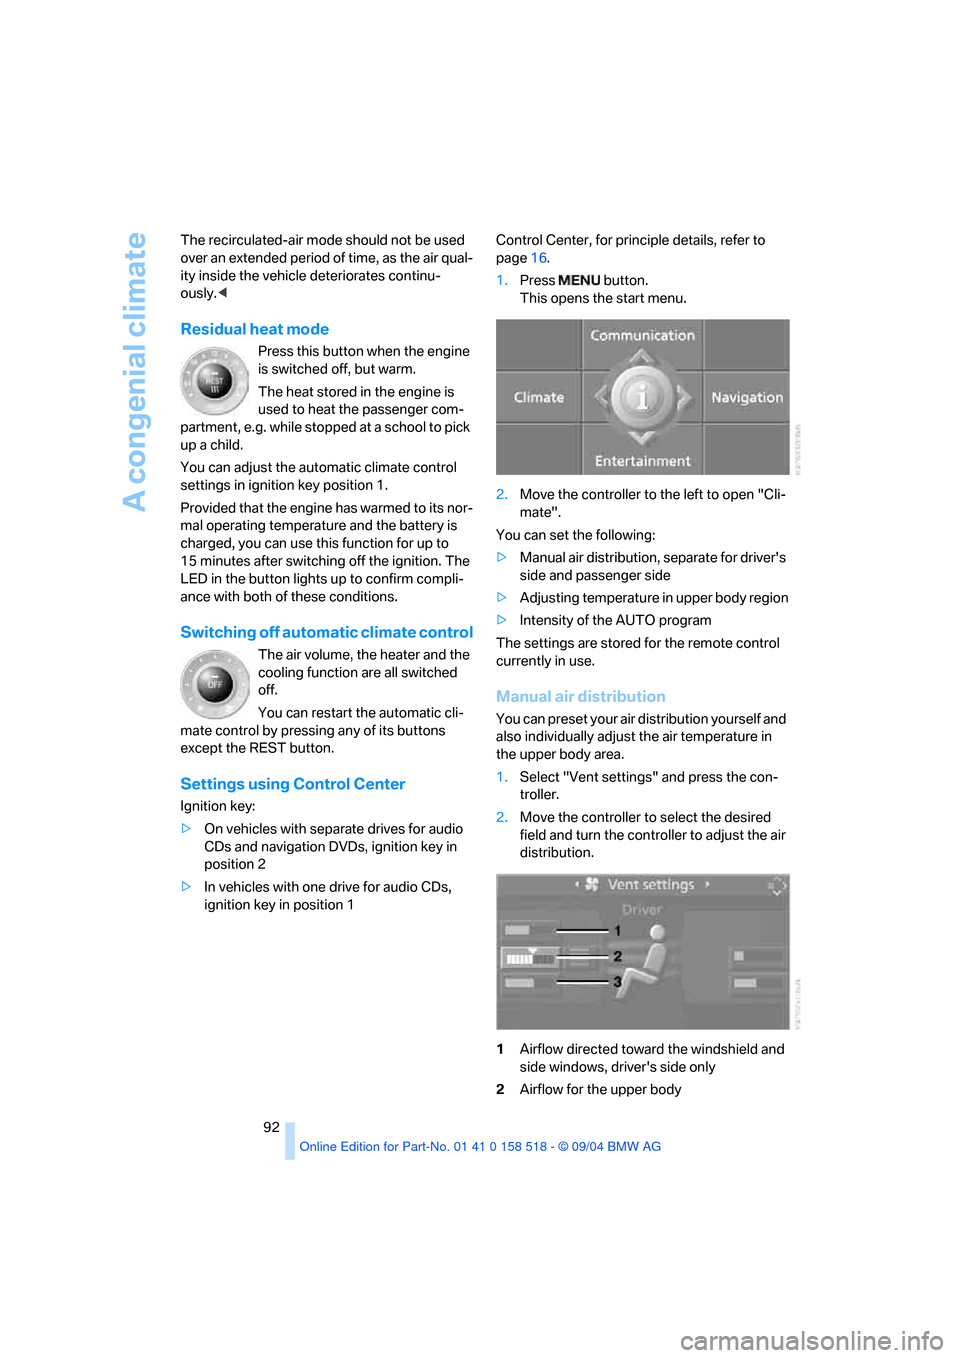
1.Press button.
This opens the start menu.
2.Move the controller to the left to open "Cli-
mate".
You can set the following:
>Manual air distribution, separate for driver's
side and passenger side
>Adjusting temperature in upper body region
>Intensity of the AUTO program
The settings are stored for the remote control
currently in use.
Manual air distribution
You can preset your air distribution yourself and
also individually adjust the air temperature in
the upper body area.
1.Select "Vent settings" and press the con-
troller.
2.Move the controller to select the desired
field and turn the controller to adjust the air
distribution.
1Airflow directed toward the windshield and
side windows, driver's side only
2Airflow for the upper body
Page 95 of 221
A congenial climate
94
Microfilter/activated-charcoal filter
The microfilter removes dust and pollen from
the incoming air. The activated-charcoal filter
provides additional protection by filtering gas-
eous pollutants from the outside air. Your BMW
center replaces this combined filter as a stan-
dard part of your scheduled maintenance.
You can select a display of more detailed infor-
mation on the Control Display, refer to page66.
Independent ventilation*
The independent ventilation blows air into the
passenger compartment to lower interior tem-
peratures.
The independent ventilation is controlled using
the Control Center. You can set two different
times for the system to start.
The independent ventilation remains on for
30 minutes. It can also be switched on and off
directly. Since the system uses a substantial
amount of electrical current, you should refrain
from activating it twice in succession without
allowing the battery to be recharged in normal
operation between use.
The independent ventilation is ready for use at
any outside temperature, up to ignition key
position 1.
The air emerges through the upper body region
vent outlets in the instrument panel. These vent
outlets must be open for the system to operate.
Switching on and off directly
Control Center, for principle details, refer to
page16.
1.Open "Climate".
2.Select "Parked car operation" and press the
controller.
3.Select "Automatic ventilation" and press
the controller.4.Select "Parked car ventilation" and press
the controller.
Independent ventilation is switched on and the
LED flashes.
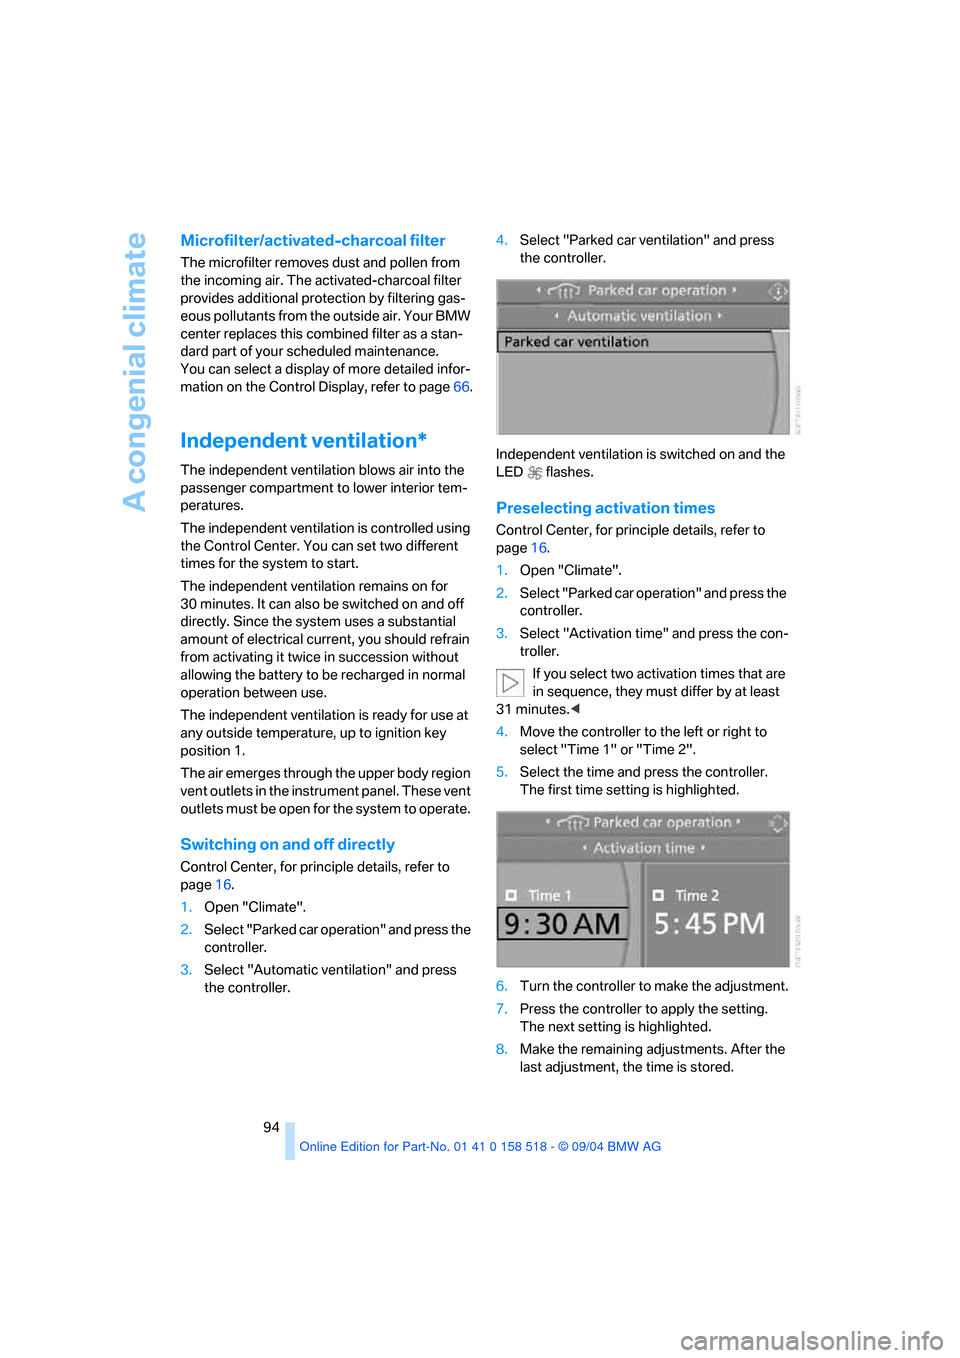
Preselecting activation times
Control Center, for principle details, refer to
page16.
1.Open "Climate".
2.Select "Parked car operation" and press the
controller.
3.Select "Activation time" and press the con-
troller.
If you select two activation times that are
in sequence, they must differ by at least
31 minutes.<
4.Move the controller to the left or right to
select "Time 1" or "Time 2".
5.Select the time and press the controller.
The first time setting is highlighted.
6.Turn the controller to make the adjustment.
7.Press the controller to apply the setting.
The next setting is highlighted.
8.Make the remaining adjustments. After the
last adjustment, the time is stored.
Page 96 of 221
Controls
95Reference
At a glance
Driving tips
Communication
Navigation
Entertainment
Mobility
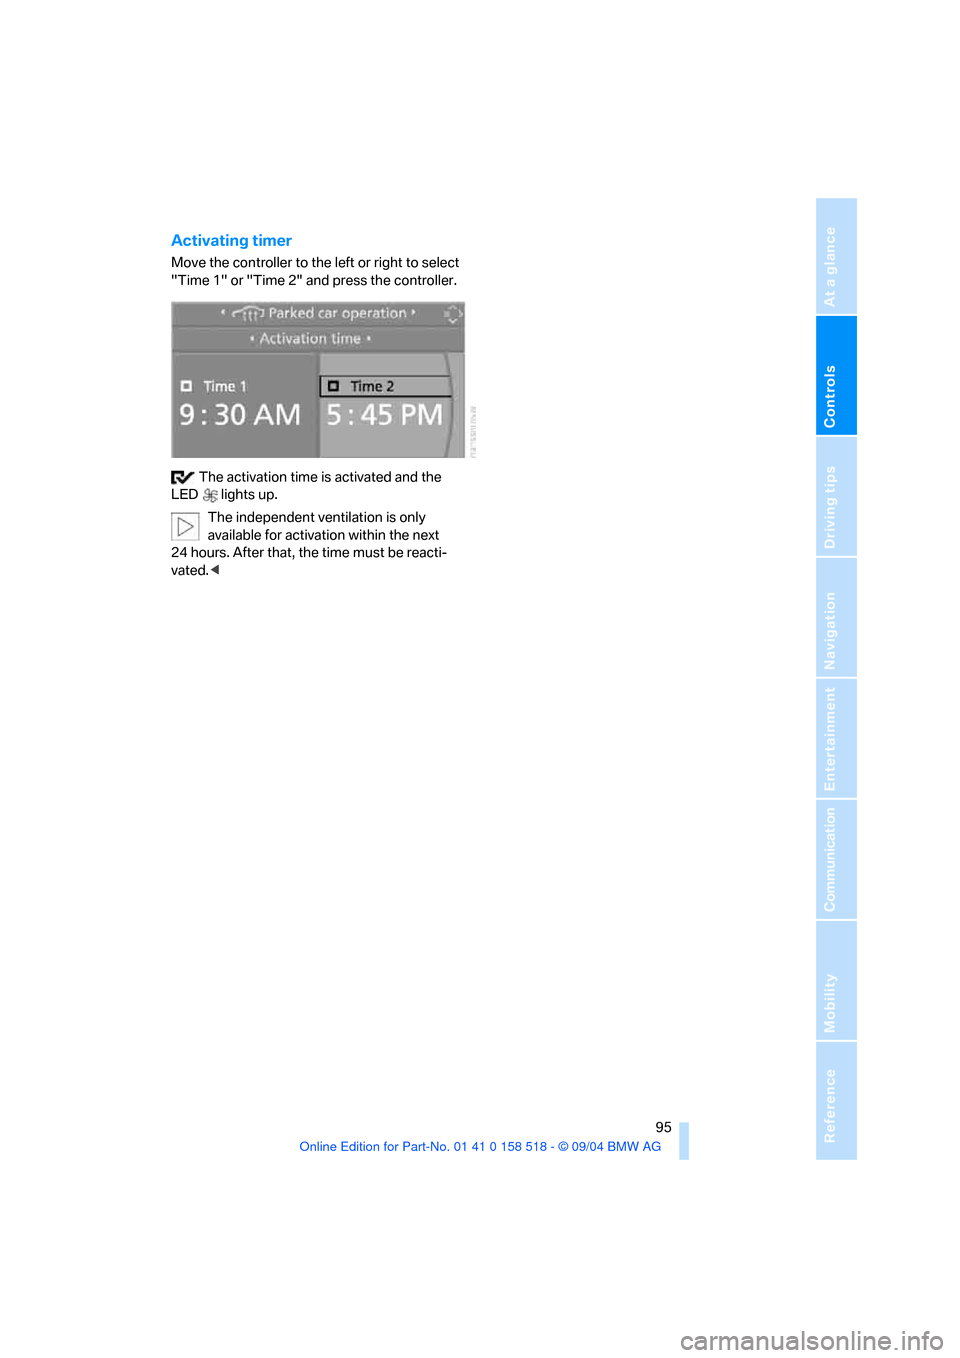
Activating timer
Move the controller to the left or right to select
"Time 1" or "Time 2" and press the controller.
The activation time is activated and the
LED lights up.
The independent ventilation is only
available for activation within the next
24 hours. After that, the time must be reacti-
vated.<
Page 98 of 221

Controls
97Reference
At a glance
Driving tips
Communication
Navigation
Entertainment
Mobility
The corresponding memory button 1 is now
programmed with the signal of the original
hand-held transmitter.
You can operate the system with the ignition
key in position 2.
If the device can not be operated after
repeated programming, check whether
the original hand-held transmitter uses an alter-
nating-code system. To do so, either read the
instructions for the original hand-held transmit-
ter or hold down the programmed memory
button1 of the integrated universal remote
control. If the LED 2 on the integrated universal
remote control flashes rapidly for a short time
and then remains lit for approx. 2 seconds, this
indicates that the original hand-held transmitter
uses an alternating-code system. In the case of
an alternating-code system, program the mem-
ory buttons1 as described at Alternating-code
transmitters.<
Alternating-code transmitters
To program the integrated universal remote
control, consult the operating instructions for
the equipment to be set. You will find informa-
tion there on the possibilities for synchroniza-
tion.
When programming hand-held transmitters
that employ an alternating code, please observe
the following supplementary instructions:
P r o g ra m m in g w i ll b e ea s i er w it h t h e a i d o f
a second person.<
1.Park your vehicle within the range of the
remote-controlled device.
2.Program the integrated universal remote
control as described above in the section
Fixed-code hand-held transmitters.
3.Locate the button on the receiver of the
device to be set, e. g. on the drive unit.
4.Press the button on the receiver of the
device to be set. After step 4, you have
approx. 30 seconds for step 5.
5.Press the programmed memory button1 of
the integrated universal remote control
three times.The corresponding memory button 1 is now
programmed with the signal of the original
hand-held transmitter.
Clearing memory buttons
Press both outer buttons1 for approx. 20 sec-
onds until the LED2 flashes: all memory but-
tons are cleared.
The memory of individual memory buttons 1
cannot be cleared.
Roller sun blinds*
Rear window blind
Press the button on the driver's door.
Roller sun blinds for rear side windows
Pull the loop of the roller sun blind and hook
onto bracket.
Glove compartment
Opening
Pull the handle. The light in the glove compart-
ment switches on.
Page 99 of 221
Practical interior accessories
98
Closing
Fold the cover up.
To prevent injury in the event of an acci-
dent while the vehicle is being driven,
close the glove compartment immediately after
use.<
Locking
Lock with a master key. Unlocking is also only
possible with a master key.
If you only hand over the spare key, e. g.
for valet parking, refer to page28, the
glove compartment cannot be unlocked.<
Rechargeable flashlight
The flashlight is located on the left side of the
glove compartment.
The flashlight can remain plugged in continu-
ously.
Be sure that the flashlight is switched off
when it is inserted into its holder. Failure
to comply with this precaution could lead to
overcharging and damage.<
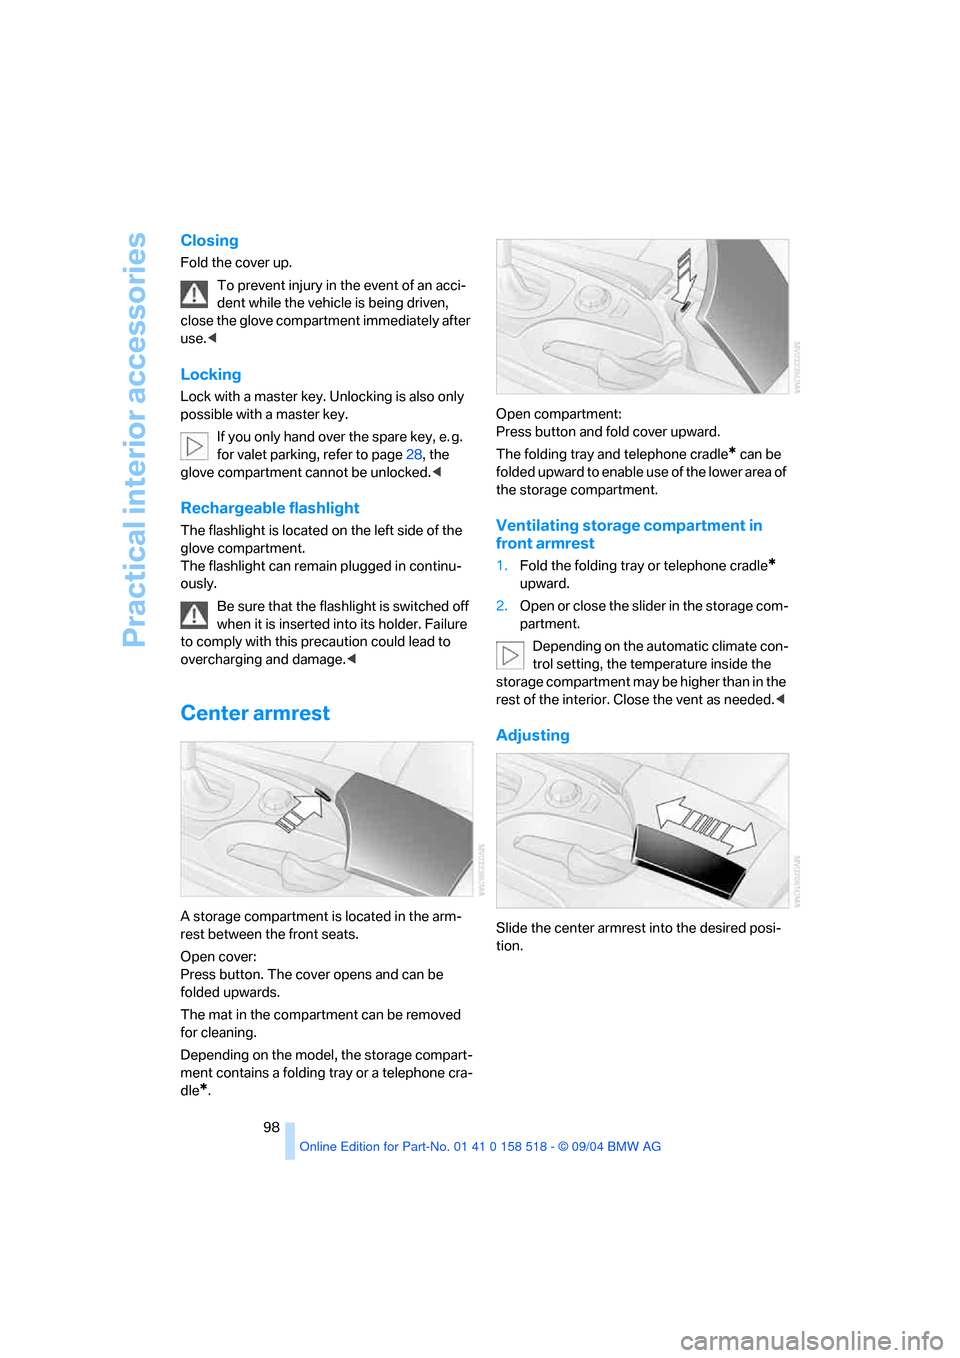
Center armrest
A storage compartment is located in the arm-
rest between the front seats.
Open cover:
Press button. The cover opens and can be
folded upwards.
The mat in the compartment can be removed
for cleaning.
Depending on the model, the storage compart-
ment contains a folding tray or a telephone cra-
dle
*.Open compartment:
Press button and fold cover upward.
The folding tray and telephone cradle
* can be
folded upward to enable use of the lower area of
the storage compartment.
Ventilating storage compartment in
front armrest
1.Fold the folding tray or telephone cradle*
upward.
2.Open or close the slider in the storage com-
partment.
Depending on the automatic climate con-
trol setting, the temperature inside the
storage compartment may be higher than in the
rest of the interior. Close the vent as needed.<
Adjusting
Slide the center armrest into the desired posi-
tion.
Page 100 of 221
Controls
99Reference
At a glance
Driving tips
Communication
Navigation
Entertainment
Mobility
Storage compartments
Storage compartment on center
console between front seats
Open by pressing the cover back.
Other compartments
There are other compartments in the doors as
well as in the front and rear center console.
Storage nets are located on the backrests of the
front seats.
Clothes hooks
When suspending clothing from the
hooks ensure that it will not obstruct the
driver's vision. Do not hang heavy objects on
the hooks. If you do so, they could cause per-
sonal injury to occupants during braking or eva-
sive maneuvers.<
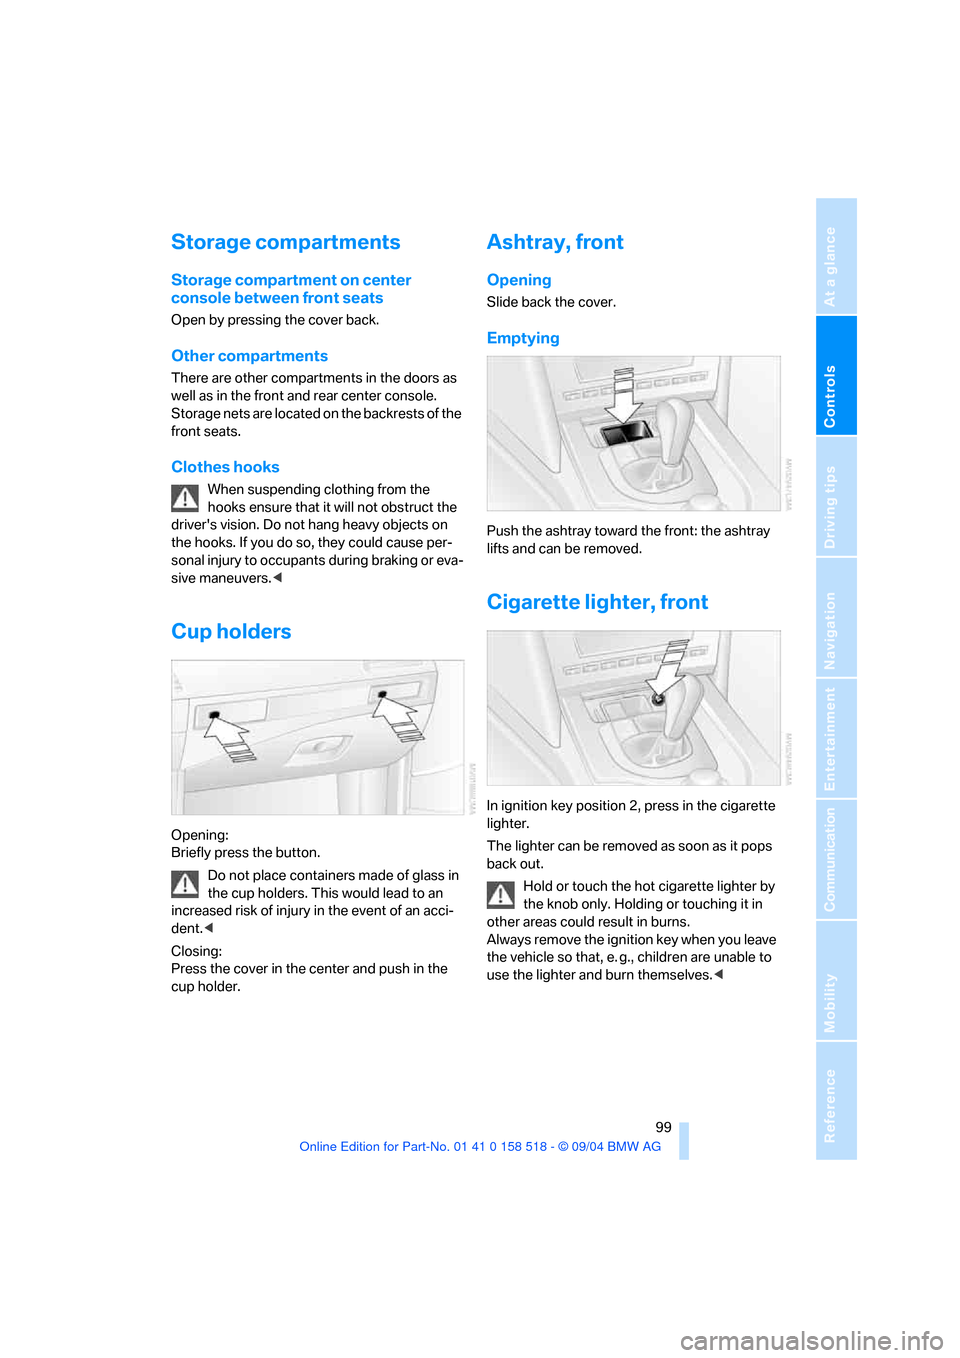
Cup holders
Opening:
Briefly press the button.
Do not place containers made of glass in
the cup holders. This would lead to an
increased risk of injury in the event of an acci-
dent.<
Closing:
Press the cover in the center and push in the
cup holder.
Ashtray, front
Opening
Slide back the cover.
Emptying
Push the ashtray toward the front: the ashtray
lifts and can be removed.
Cigarette lighter, front
In ignition key position 2, press in the cigarette
lighter.
The lighter can be removed as soon as it pops
back out.
Hold or touch the hot cigarette lighter by
the knob only. Holding or touching it in
other areas could result in burns.
Always remove the ignition key when you leave
the vehicle so that, e. g., children are unable to
use the lighter and burn themselves.<
Page 101 of 221
Practical interior accessories
100
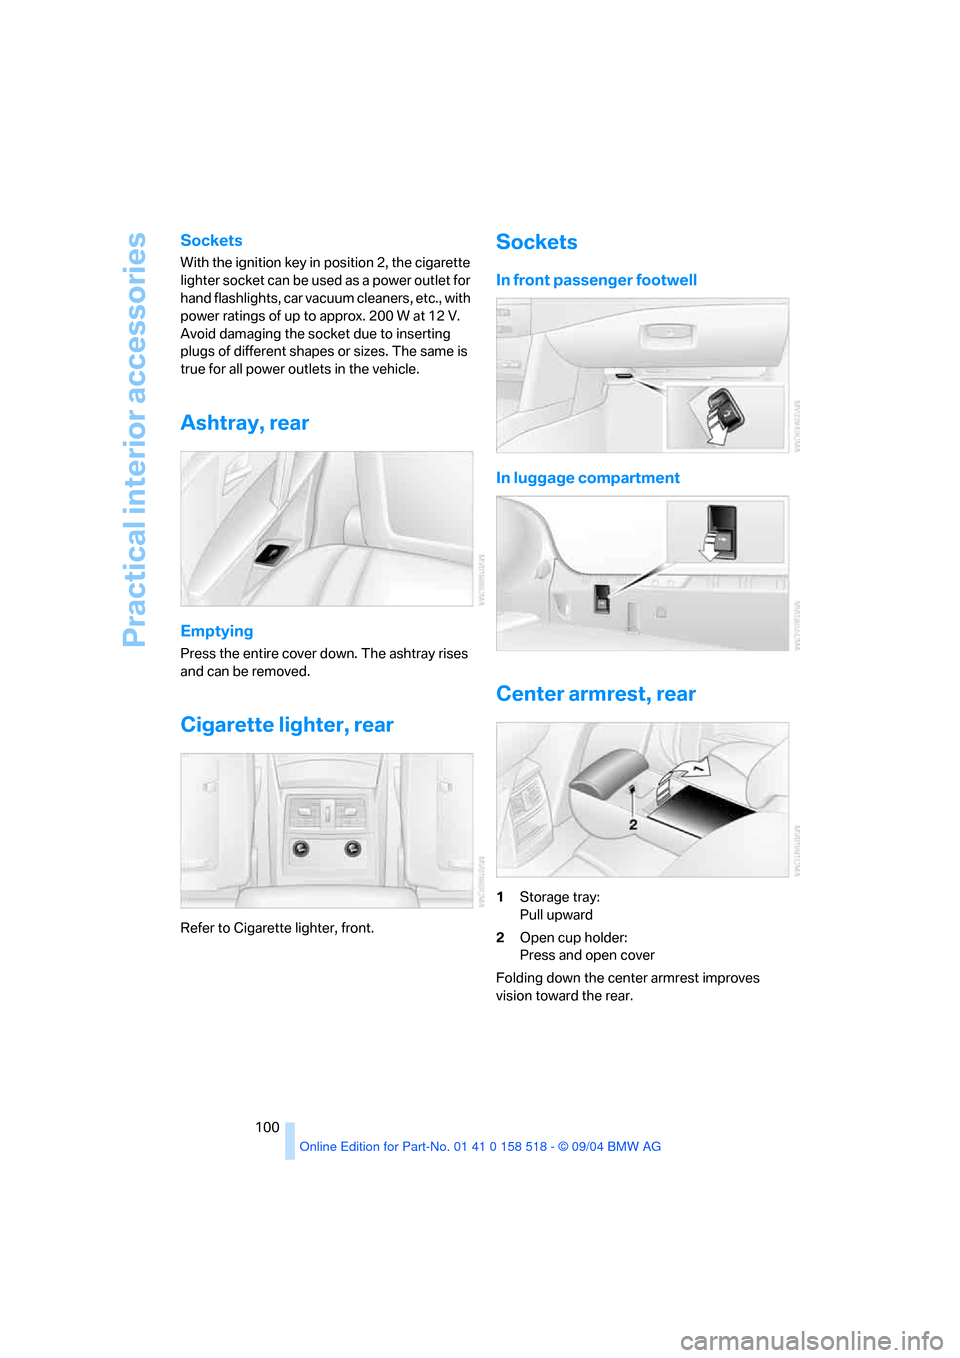
Sockets
With the ignition key in position 2, the cigarette
lighter socket can be used as a power outlet for
hand flashlights, car vacuum cleaners, etc., with
power ratings of up to approx. 200 W at 12 V.
Avoid damaging the socket due to inserting
plugs of different shapes or sizes. The same is
true for all power outlets in the vehicle.
Ashtray, rear
Emptying
Press the entire cover down. The ashtray rises
and can be removed.
Cigarette lighter, rear
Refer to Cigarette lighter, front.
Sockets
In front passenger footwell
In luggage compartment
Center armrest, rear
1Storage tray:
Pull upward
2Open cup holder:
Press and open cover
Folding down the center armrest improves
vision toward the rear.
Page 102 of 221
Controls
101Reference
At a glance
Driving tips
Communication
Navigation
Entertainment
Mobility
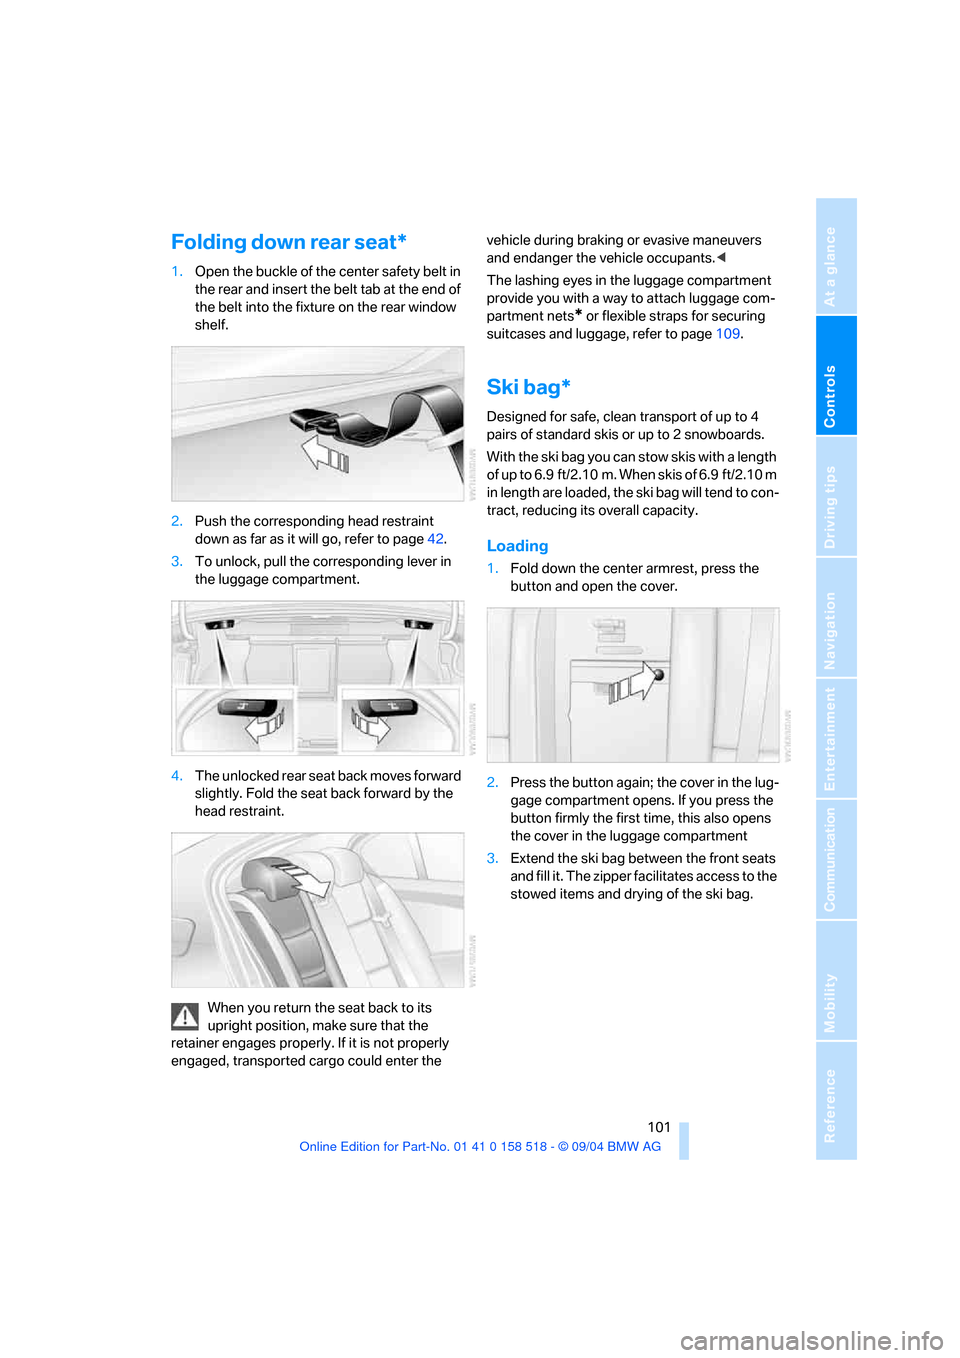
Folding down rear seat*
1.Open the buckle of the center safety belt in
the rear and insert the belt tab at the end of
the belt into the fixture on the rear window
shelf.
2.Push the corresponding head restraint
down as far as it will go, refer to page42.
3.To unlock, pull the corresponding lever in
the luggage compartment.
4.The unlocked rear seat back moves forward
slightly. Fold the seat back forward by the
head restraint.
When you return the seat back to its
upright position, make sure that the
retainer engages properly. If it is not properly
engaged, transported cargo could enter the vehicle during braking or evasive maneuvers
and endanger the vehicle occupants.<
The lashing eyes in the luggage compartment
provide you with a way to attach luggage com-
partment nets
* or flexible straps for securing
suitcases and luggage, refer to page109.
Ski bag*
Designed for safe, clean transport of up to 4
pairs of standard skis or up to 2 snowboards.
With the ski bag you can stow skis with a length
of up to 6.9 ft/2.10 m. When skis of 6.9 ft/2.10 m
in length are loaded, the ski bag will tend to con-
tract, reducing its overall capacity.
Loading
1.Fold down the center armrest, press the
button and open the cover.
2.Press the button again; the cover in the lug-
gage compartment opens. If you press the
button firmly the first time, this also opens
the cover in the luggage compartment
3.Extend the ski bag between the front seats
and fill it. The zipper facilitates access to the
stowed items and drying of the ski bag.