2005 BMW 525I SEDAN door lock
[x] Cancel search: door lockPage 37 of 221
Opening and closing
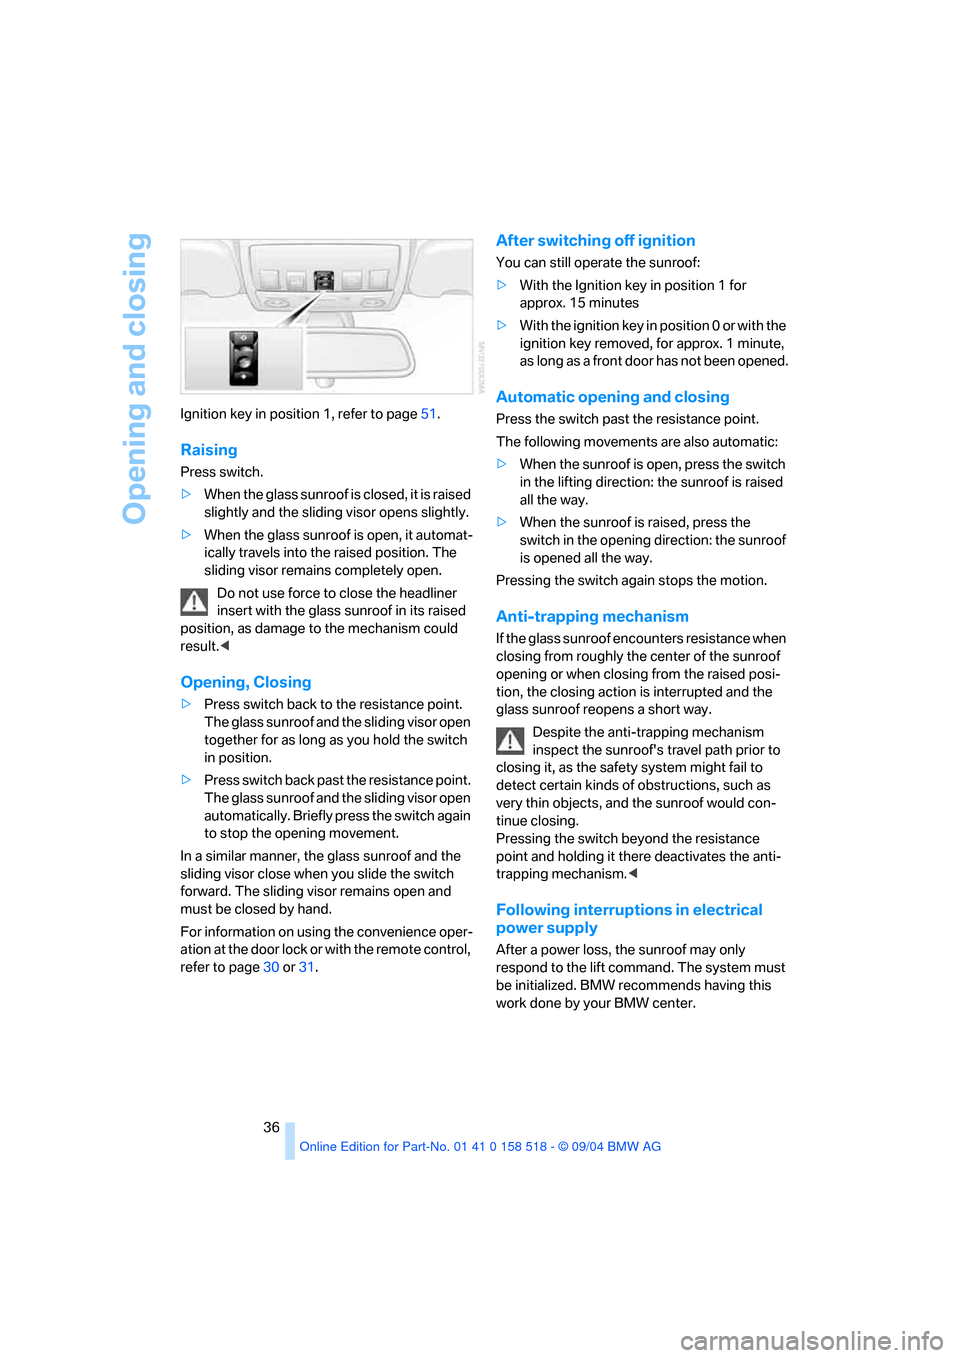
36 Ignition key in position 1, refer to page51.
Raising
Press switch.
>When the glass sunroof is closed, it is raised
slightly and the sliding visor opens slightly.
>When the glass sunroof is open, it automat-
ically travels into the raised position. The
sliding visor remains completely open.
Do not use force to close the headliner
insert with the glass sunroof in its raised
position, as damage to the mechanism could
result.<
Opening, Closing
>Press switch back to the resistance point.
The glass sunroof and the sliding visor open
together for as long as you hold the switch
in position.
>Press switch back past the resistance point.
The glass sunroof and the sliding visor open
automatically. Briefly press the switch again
to stop the opening movement.
In a similar manner, the glass sunroof and the
sliding visor close when you slide the switch
forward. The sliding visor remains open and
must be closed by hand.
For information on using the convenience oper-
ation at the door lock or with the remote control,
refer to page30 or31.
After switching off ignition
You can still operate the sunroof:
>With the Ignition key in position 1 for
approx. 15 minutes
>With the ignition key in position 0 or with the
ignition key removed, for approx. 1 minute,
as long as a front door has not been opened.
Automatic opening and closing
Press the switch past the resistance point.
The following movements are also automatic:
>When the sunroof is open, press the switch
in the lifting direction: the sunroof is raised
all the way.
>When the sunroof is raised, press the
switch in the opening direction: the sunroof
is opened all the way.
Pressing the switch again stops the motion.
Anti-trapping mechanism
If the glass sunroof encounters resistance when
closing from roughly the center of the sunroof
opening or when closing from the raised posi-
tion, the closing action is interrupted and the
glass sunroof reopens a short way.
Despite the anti-trapping mechanism
inspect the sunroof's travel path prior to
closing it, as the safety system might fail to
detect certain kinds of obstructions, such as
very thin objects, and the sunroof would con-
tinue closing.
Pressing the switch beyond the resistance
point and holding it there deactivates the anti-
trapping mechanism.<
Following interruptions in electrical
power supply
After a power loss, the sunroof may only
respond to the lift command. The system must
be initialized. BMW recommends having this
work done by your BMW center.
Page 41 of 221
Adjustments
40 The upper hips and spinal column receive sup-
plementary support to help you maintain a
relaxed, upright sitting position.
>Increase or decrease curvature: push
switch forward or back.
>Shift curvature up or down: push switch up
or down.
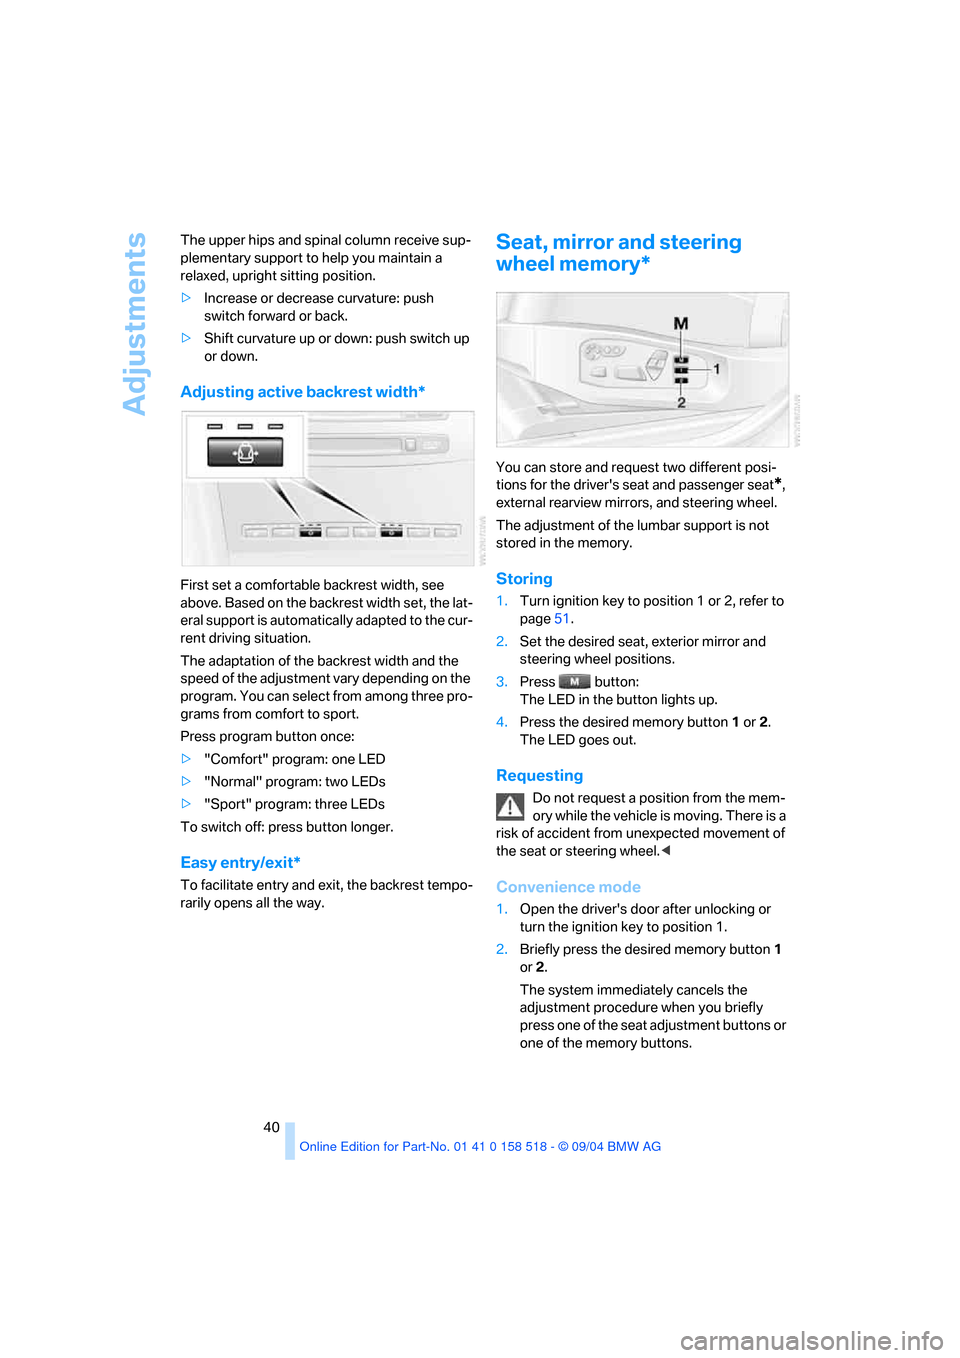
Adjusting active backrest width*
First set a comfortable backrest width, see
above. Based on the backrest width set, the lat-
eral support is automatically adapted to the cur-
rent driving situation.
The adaptation of the backrest width and the
speed of the adjustment vary depending on the
program. You can select from among three pro-
grams from comfort to sport.
Press program button once:
>"Comfort" program: one LED
>"Normal" program: two LEDs
>"Sport" program: three LEDs
To switch off: press button longer.
Easy entry/exit*
To facilitate entry and exit, the backrest tempo-
rarily opens all the way.
Seat, mirror and steering
wheel memory*
You can store and request two different posi-
tions for the driver's seat and passenger seat
*,
external rearview mirrors, and steering wheel.
The adjustment of the lumbar support is not
stored in the memory.
Storing
1.Turn ignition key to position 1 or 2, refer to
page51.
2.Set the desired seat, exterior mirror and
steering wheel positions.
3.Press button:
The LED in the button lights up.
4.Press the desired memory button1 or2.
The LED goes out.
Requesting
Do not request a position from the mem-
ory while the vehicle is moving. There is a
risk of accident from unexpected movement of
the seat or steering wheel.<
Convenience mode
1.Open the driver's door after unlocking or
turn the ignition key to position 1.
2.Briefly press the desired memory button1
or2.
The system immediately cancels the
adjustment procedure when you briefly
press one of the seat adjustment buttons or
one of the memory buttons.
Page 42 of 221
Controls
41Reference
At a glance
Driving tips
Communication
Navigation
Entertainment
Mobility
Safety feature
1.Close the driver's door and turn the ignition
key to position 0 or 2.
2.Press the desired memory button1 or2
and maintain pressure until the adjustment
process has been completed.
If the button was pressed inadvertently:
press the button again; the LED goes out.
Position stored in key
The positions of the driver's seat, the external
rearview mirrors, and steering wheel are stored
for the remote key currently in use.
You can choose when the position is requested:
>Request when unlocking vehicle
>Request when opening driver's door
Control Center, for principle details, refer to
page16.
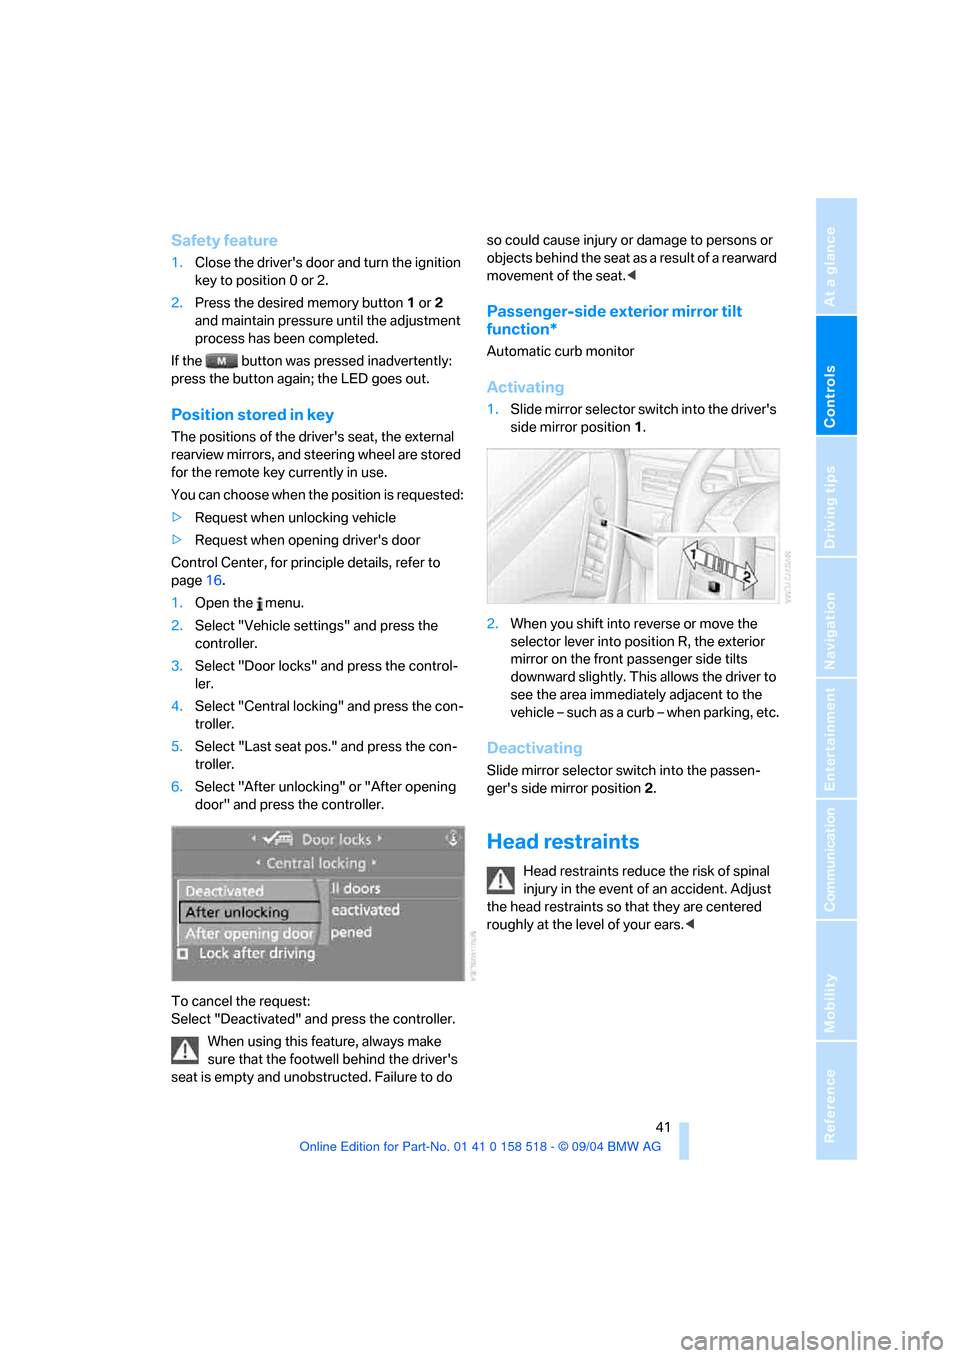
1.Open the menu.
2.Select "Vehicle settings" and press the
controller.
3.Select "Door locks" and press the control-
ler.
4.Select "Central locking" and press the con-
troller.
5.Select "Last seat pos." and press the con-
troller.
6.Select "After unlocking" or "After opening
door" and press the controller.
To cancel the request:
Select "Deactivated" and press the controller.
When using this feature, always make
sure that the footwell behind the driver's
seat is empty and unobstructed. Failure to do so could cause injury or damage to persons or
objects behind the seat as a result of a rearward
movement of the seat.<
Passenger-side exterior mirror tilt
function*
Automatic curb monitor
Activating
1.Slide mirror selector switch into the driver's
side mirror position 1.
2.When you shift into reverse or move the
selector lever into position R, the exterior
mirror on the front passenger side tilts
downward slightly. This allows the driver to
see the area immediately adjacent to the
vehicle – such as a curb – when parking, etc.
Deactivating
Slide mirror selector switch into the passen-
ger's side mirror position 2.
Head restraints
Head restraints reduce the risk of spinal
injury in the event of an accident. Adjust
the head restraints so that they are centered
roughly at the level of your ears.<
Page 49 of 221
Transporting children safely
48 1.After the vehicle is unlocked, sit in the pas-
senger seat and close the door.
2.Open the backrest width adjustment com-
pletely, refer to page39.
3.Deactivate active backrest width adjust-
ment, refer to page40.
4.Install child's seat.
Installing child-restraint
systems
Before installing any child-restraint system or
child seat, read the following:
Observe the child-restraint system man-
ufacturer's instructions for installation
and use. Otherwise the degree of protection
may be reduced. After an accident, have all
parts of the child-restraint system and of the
relevant vehicle safety belt system checked and
r e p la c e d i f n e c e s s a ry . H a v e t h is w o r k d o n e o n ly
at your BMW center or at a workshop that works
according to BMW repair procedures with cor-
respondingly trained personnel. <
Commercially-available child-restraint systems
are designed to be secured with a lap belt or
with the lap belt portion of a combination lap/
shoulder belt. Improperly or inadequately
installed restraint systems can increase the risk
of injury to children. Always read and follow the
instructions that come with the system.
Child seat security
All of the rear belt retractors and the front pas-
senger safety belt can be locked for mounting
and securing child-restraint systems.Information regarding this is located near the
buckle latch of each safety belt.
To lock safety belt
Pull the entire length of the belt from the belt
retractor. Allow the reel to retract the belt
somewhat and engage the buckle, then tighten
the belt against the child-restraint system. The
retraction mechanism is now locked.
To unlock the safety belt
Release the buckle, remove the child-restraint
system and allow the belt retractor to reel the
belt completely in.
Child-restraint system with tether
strap
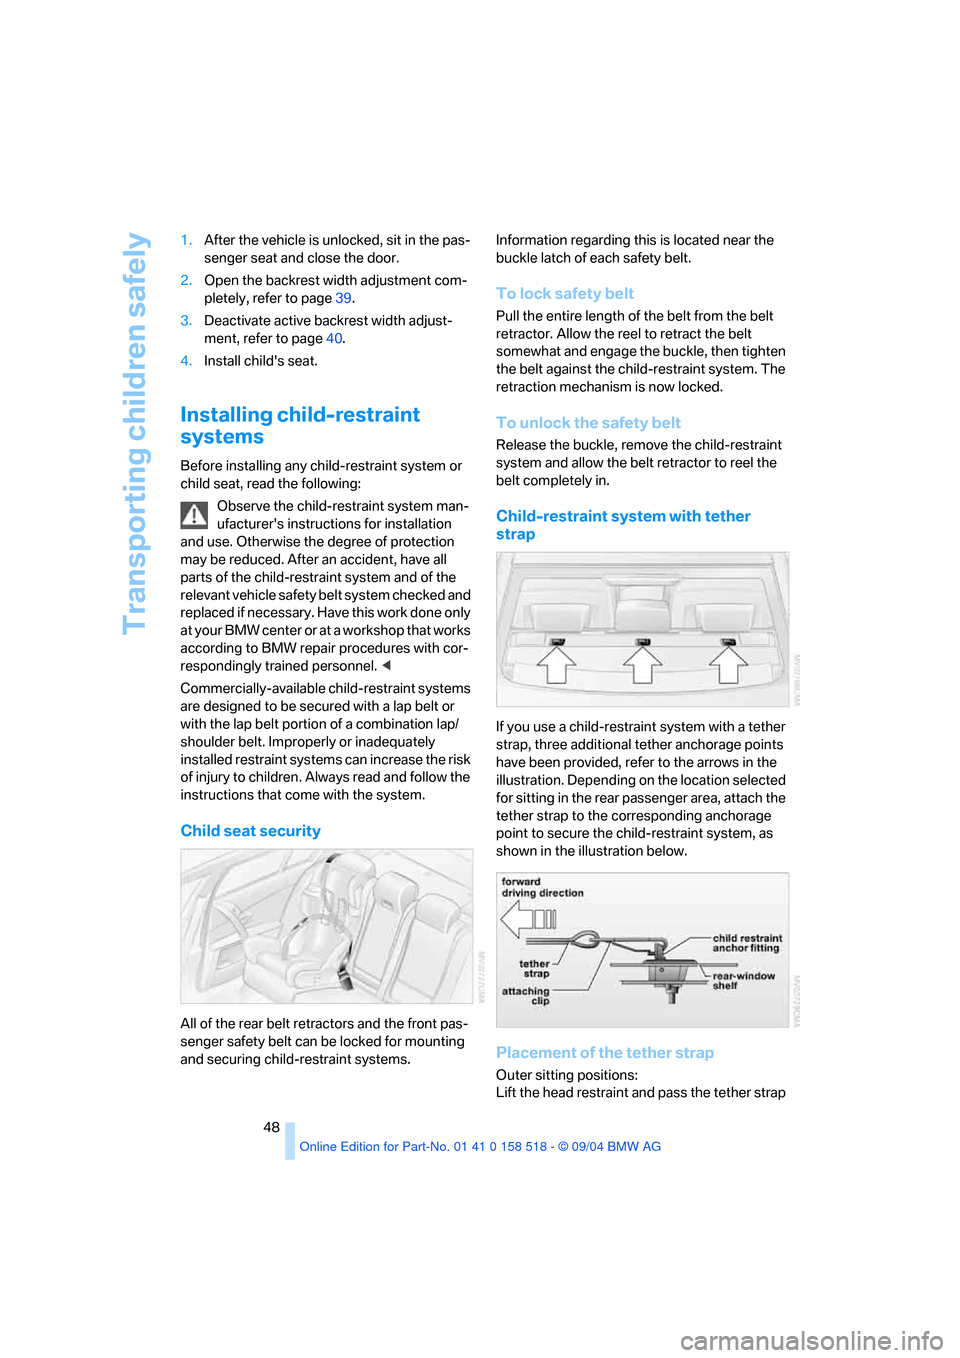
If you use a child-restraint system with a tether
strap, three additional tether anchorage points
have been provided, refer to the arrows in the
illustration. Depending on the location selected
for sitting in the rear passenger area, attach the
tether strap to the corresponding anchorage
point to secure the child-restraint system, as
shown in the illustration below.
Placement of the tether strap
Outer sitting positions:
Lift the head restraint and pass the tether strap
Page 51 of 221
Transporting children safely
50
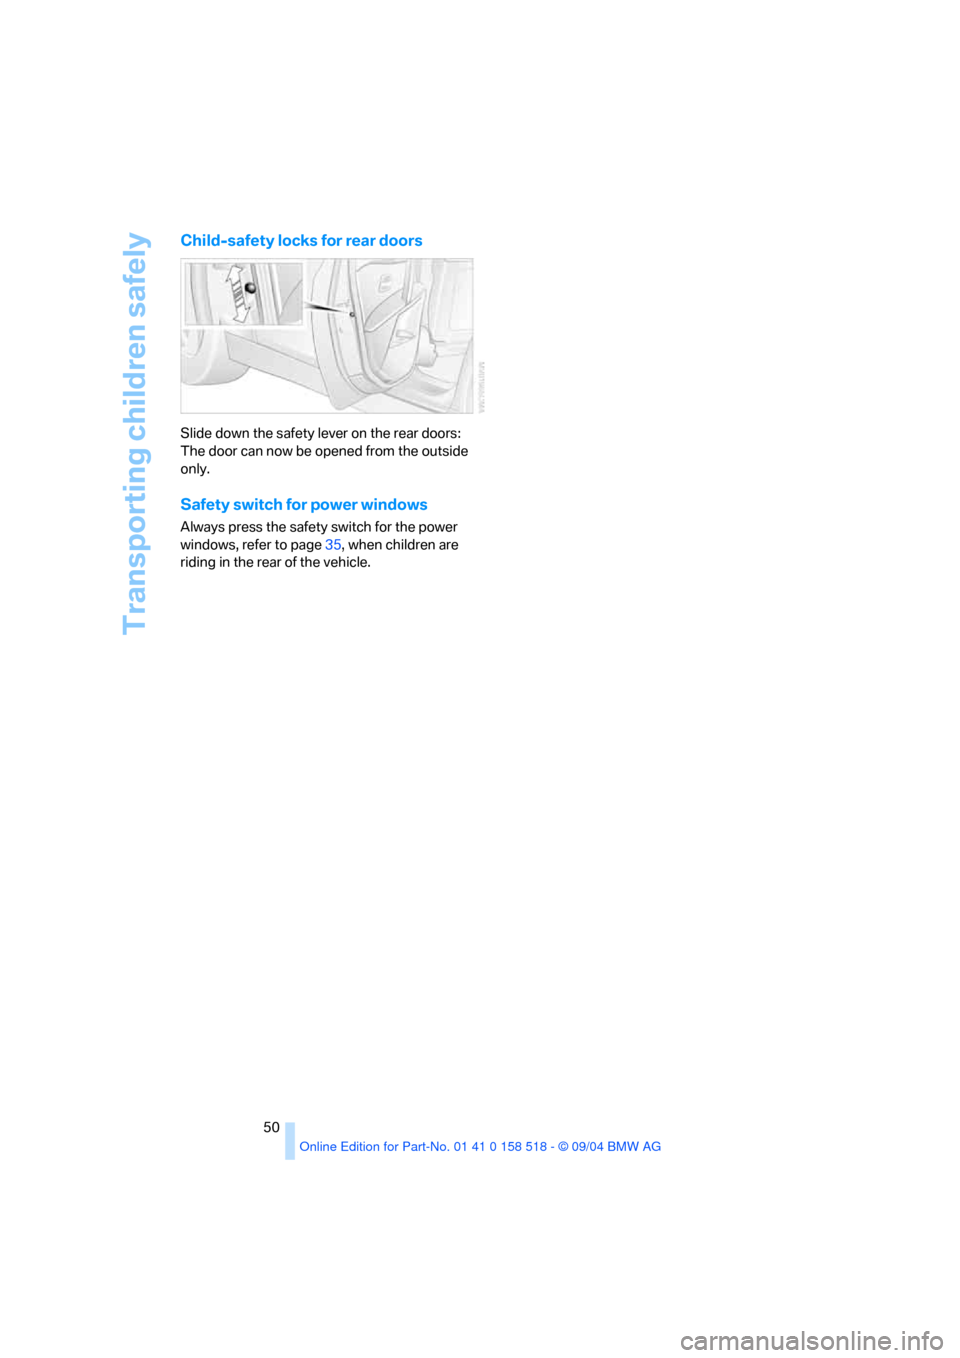
Child-safety locks for rear doors
Slide down the safety lever on the rear doors:
The door can now be opened from the outside
only.
Safety switch for power windows
Always press the safety switch for the power
windows, refer to page35, when children are
riding in the rear of the vehicle.
Page 169 of 221

Refueling
168
Refueling
Always switch off the engine before refu-
eling. If you do not, fuel cannot be dis-
pensed into the tank and a message on the
Control Display will appear.<
Always observe all applicable precautions
and regulations when handling fuels.
Never carry spare fuel containers in your vehi-
cle. Whether empty or full, these containers can
leak, cause an explosion, and lead to fire in the
event of a collision.<
Fuel filler door
To open and close: press the rear edge of the
fuel filler door.
Manual release
If an electrical malfunction should occur, you
can unlock the fuel filler door manually.
1.In the luggage compartment, raise the floor
mat and the cover located beneath it.
2.Open the snap fasteners of the right side
panel and take off the side panel.
3.Pull the knob with the gas pump symbol.
Observe the following when refueling
When handling fuels always observe any
safety guidelines posted at the service
station.<
Place the fuel filler cap in the bracket attached
to the fuel filler door.
When refueling, insert the filler nozzle com-
pletely into the filler pipe. Lifting the filler nozzle
during refueling leads to
>premature pump shutoff
>a reduced efficiency of the fuel-vapor
recovery system.
The fuel tank is full when the filler nozzle clicks
off the first time.
Fuel tank capacity
Approx. 18.5 gallons/70 liters, including the
reserve capacity of approx. 2.1 gallons/8 liters.
Refuel as soon as possible once your
cruising range falls below 30 miles/
50 km, as otherwise engine functions are not
ensured and damage can occur.<
Closing fuel filler cap
Fit the cap and turn it clockwise until you clearly
hear a click.
Close the filler cap carefully after refuel-
ling until a click is heard. While closing, be
sure not to squeeze the strap which is fastened
to the cap. A loose or missing cap will activate
an indicator lamp and the message Check Gas
Cap
* on the Control Display.<
Page 202 of 221
Reference 201
At a glance
Controls
Driving tips
Communication
Navigation
Entertainment
Mobility
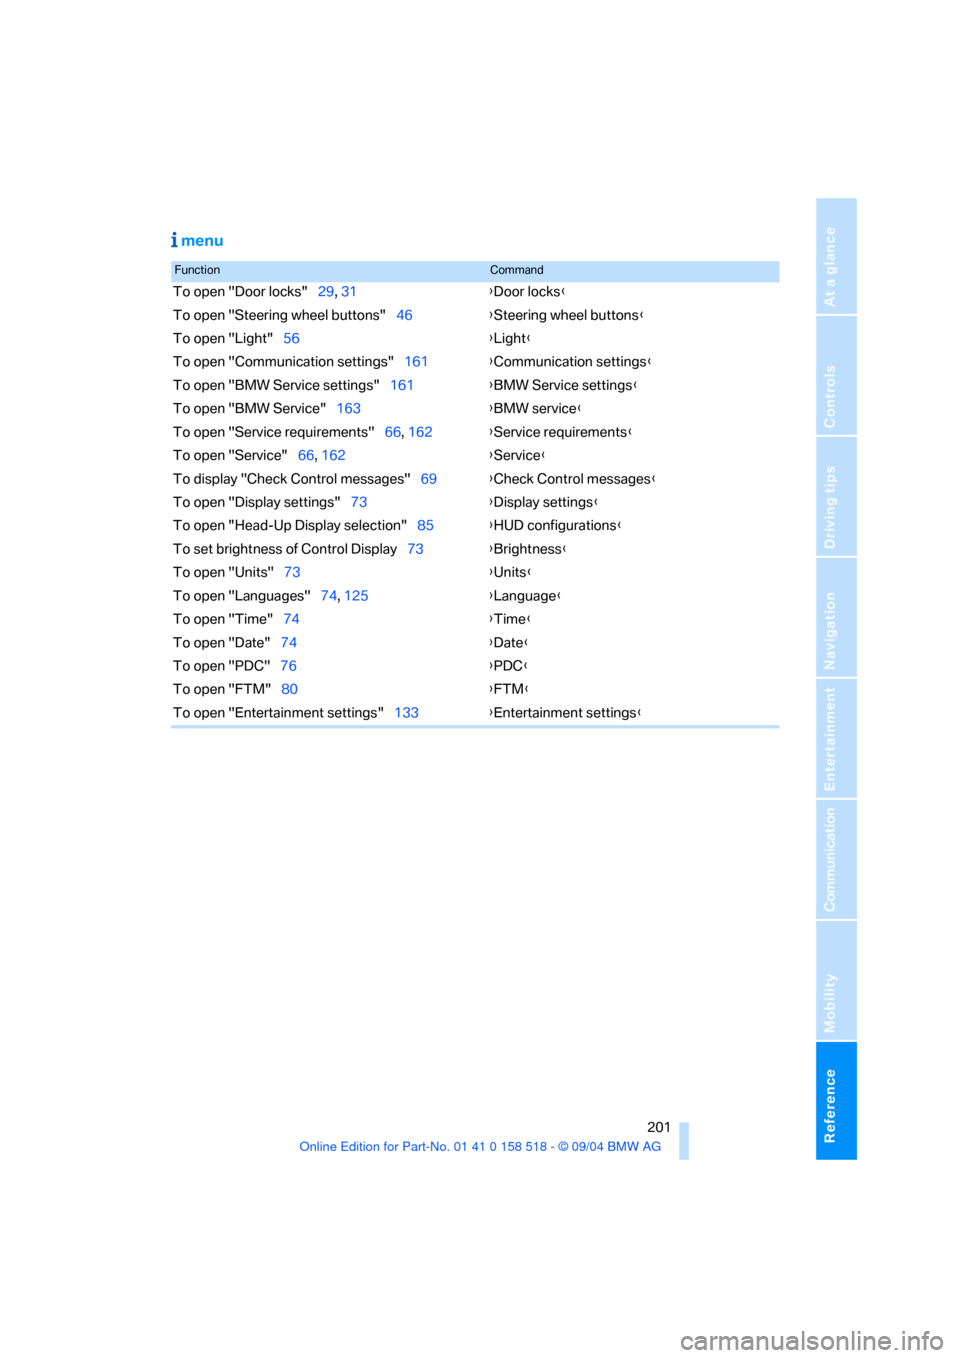
menu
FunctionCommand
To open "Door locks"29, 31{Door locks}
To open "Steering wheel buttons"46{Steering wheel buttons}
To open "Light"56{Light}
To open "Communication settings"161{Communication settings}
To open "BMW Service settings"161{BMW Service settings}
To open "BMW Service"163{BMW service}
To open "Service requirements"66, 162{Service requirements}
To open "Service"66, 162{Service}
To display "Check Control messages"69{Check Control messages}
To open "Display settings"73{Display settings}
To open "Head-Up Display selection"85{HUD configurations}
To set brightness of Control Display73{Brightness}
To open "Units"73{Units}
To open "Languages"74, 125{Language}
To open "Time"74{Time}
To open "Date"74{Date}
To open "PDC"76{PDC}
To open "FTM"80{FTM}
To open "Entertainment settings"133{Entertainment settings}
Page 203 of 221
Everything from A to Z
202
Everything from A to Z
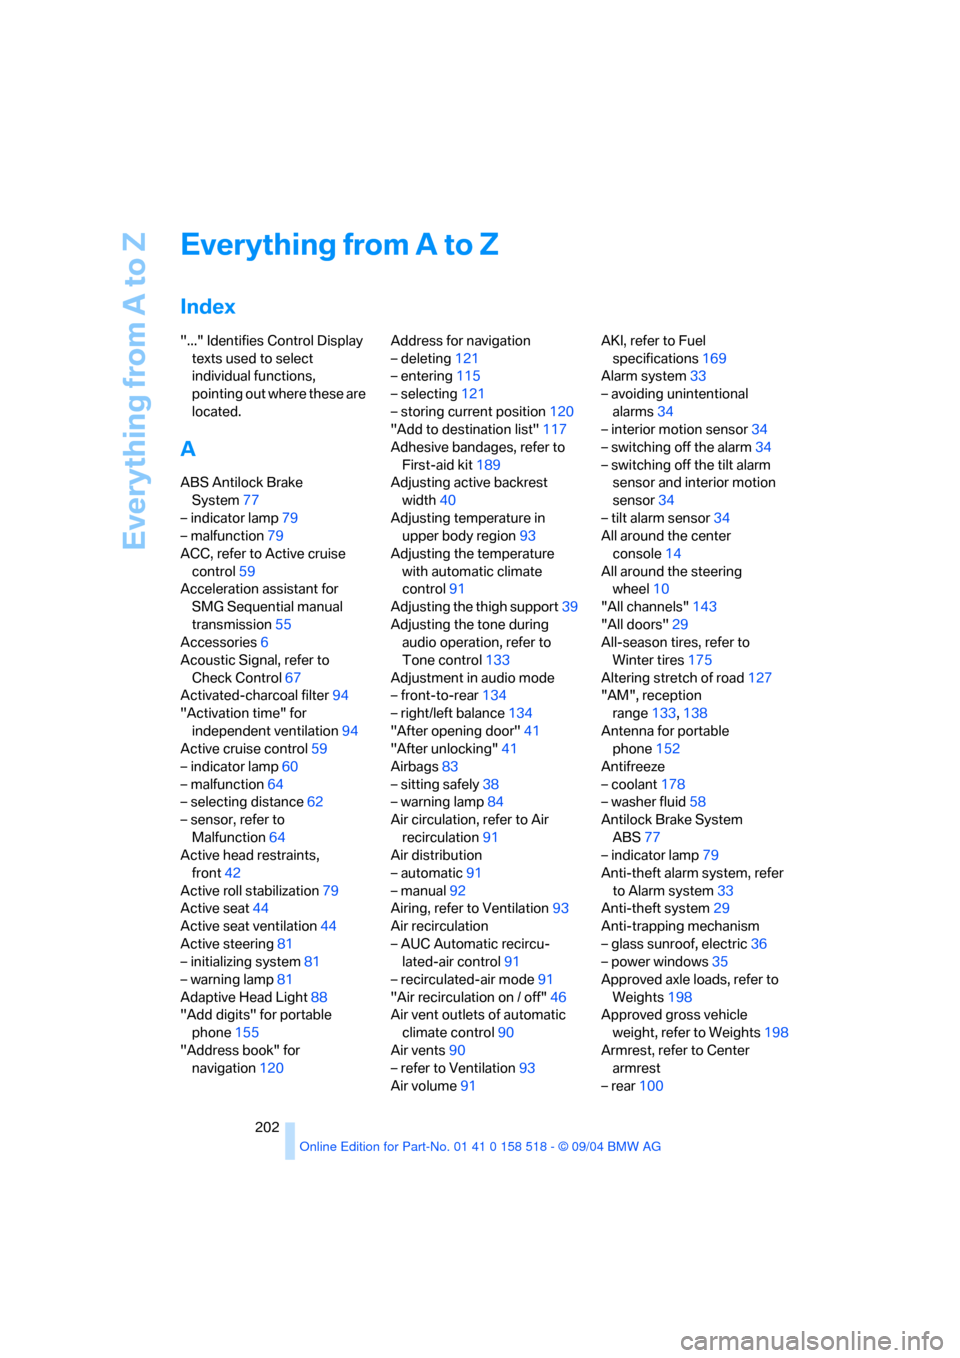
Index
"..." Identifies Control Display
texts used to select
individual functions,
pointing out where these are
located.
A
ABS Antilock Brake
System77
– indicator lamp79
– malfunction79
ACC, refer to Active cruise
control59
Acceleration assistant for
SMG Sequential manual
transmission55
Accessories6
Acoustic Signal, refer to
Check Control67
Activated-charcoal filter94
"Activation time" for
independent ventilation94
Active cruise control59
– indicator lamp60
– malfunction64
– selecting distance62
– sensor, refer to
Malfunction64
Active head restraints,
front42
Active roll stabilization79
Active seat44
Active seat ventilation44
Active steering81
– initializing system81
– warning lamp81
Adaptive Head Light88
"Add digits" for portable
phone155
"Address book" for
navigation120Address for navigation
– deleting121
– entering115
– selecting121
– storing current position120
"Add to destination list"117
Adhesive bandages, refer to
First-aid kit189
Adjusting active backrest
width40
Adjusting temperature in
upper body region93
Adjusting the temperature
with automatic climate
control91
Adjusting the thigh support39
Adjusting the tone during
audio operation, refer to
Tone control133
Adjustment in audio mode
– front-to-rear134
– right/left balance134
"After opening door"41
"After unlocking"41
Airbags83
– sitting safely38
– warning lamp84
Air circulation, refer to Air
recirculation91
Air distribution
– automatic91
– manual92
Airing, refer to Ventilation93
Air recirculation
– AUC Automatic recircu-
lated-air control91
– recirculated-air mode91
"Air recirculation on / off"46
Air vent outlets of automatic
climate control90
Air vents90
– refer to Ventilation93
Air volume91AKI, refer to Fuel
specifications169
Alarm system33
– avoiding unintentional
alarms34
– interior motion sensor34
– switching off the alarm34
– switching off the tilt alarm
sensor and interior motion
sensor34
– tilt alarm sensor34
All around the center
console14
All around the steering
wheel10
"All channels"143
"All doors"29
All-season tires, refer to
Winter tires175
Altering stretch of road127
"AM", reception
range133,138
Antenna for portable
phone152
Antifreeze
– coolant178
– washer fluid58
Antilock Brake System
ABS77
– indicator lamp79
Anti-theft alarm system, refer
to Alarm system33
Anti-theft system29
Anti-trapping mechanism
– glass sunroof, electric36
– power windows35
Approved axle loads, refer to
Weights198
Approved gross vehicle
weight, refer to Weights198
Armrest, refer to Center
armrest
– rear100