2005 BMW 525I SEDAN rear view mirror
[x] Cancel search: rear view mirrorPage 23 of 221

Voice command system
22
Voice command system
The concept
The voice command system allows you to con-
trol operation of various vehicle systems with-
out ever removing your hands from the steering
wheel.
Individual menu items on the Control Display
can be spoken as commands. This frees you of
having to use the controller.
The voice command system transforms your
oral commands into control signals for the
selected systems and provides support in the
form of instructions or questions.
The voice command system uses a special
microphone located in the area of the interior
rearview mirror, refer to page14.
Precondition
In the Control Center, set the language that
applies for the voice command system in order
to enable identification of the spoken com-
mands. Setting the language of the Control
Center, refer to page74.
Symbol in the Owner's Manual
Voice commands
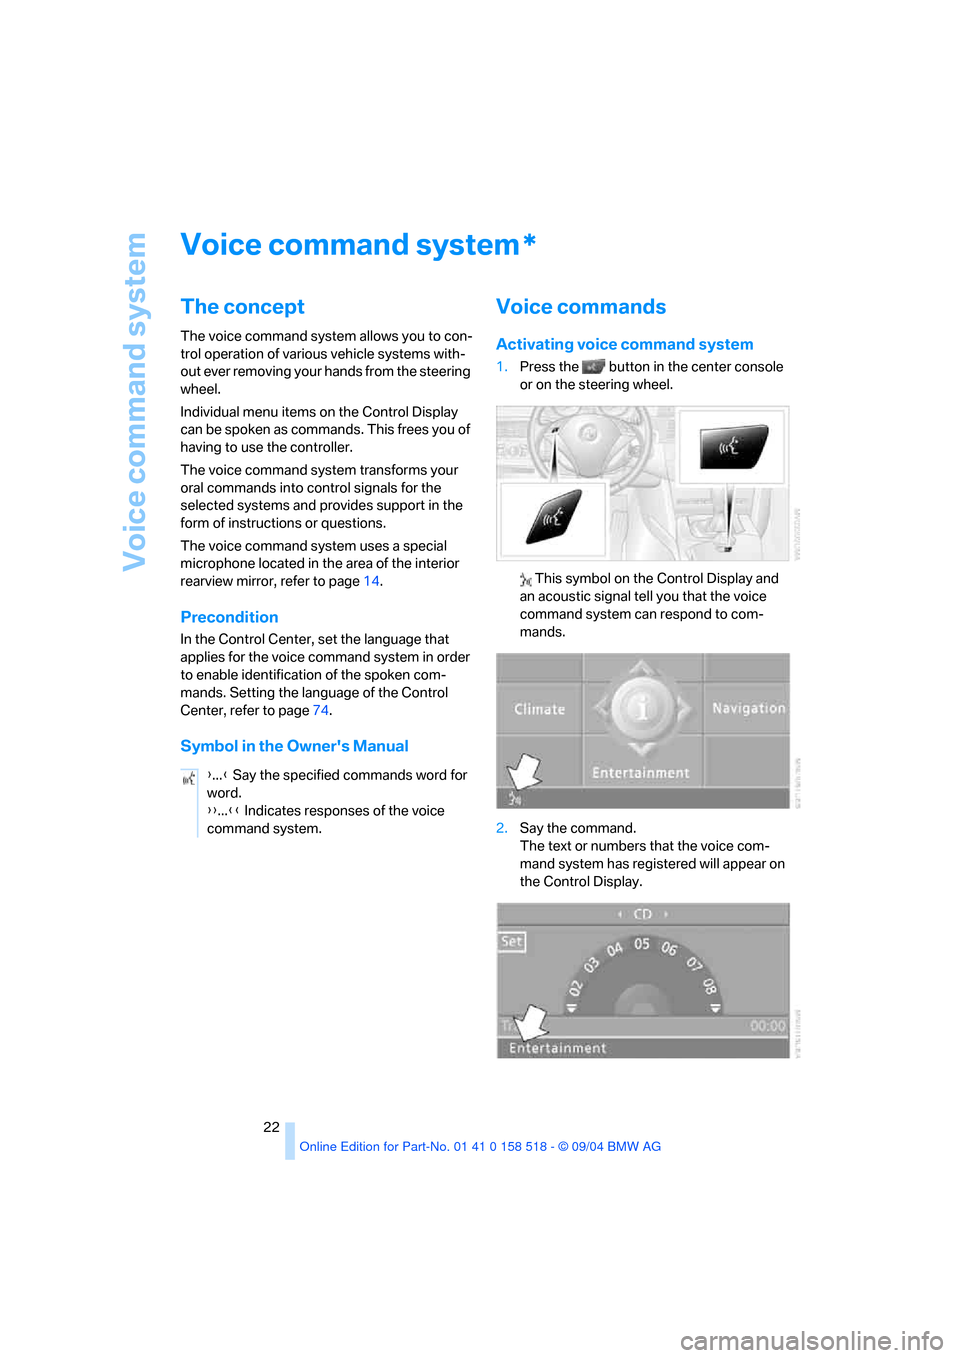
Activating voice command system
1.Press the button in the center console
or on the steering wheel.
This symbol on the Control Display and
an acoustic signal tell you that the voice
command system can respond to com-
mands.
2.Say the command.
The text or numbers that the voice com-
mand system has registered will appear on
the Control Display.
*
{...} Say the specified commands word for
word.
{{...}} Indicates responses of the voice
command system.
Page 35 of 221

Opening and closing
34 The system indicates that it has been correctly
armed by switching on the hazard warning
flashers for a single cycle and by emitting an
acoustic signal.
You can also open the luggage compartment lid
with the system armed using the button on
the remote control, refer to page30. When the
luggage compartment lid is closed, it is locked
again and monitored.
Switching off alarm
>Unlock the vehicle using the remote control,
refer to page29
>or turn the ignition key to position 1, refer to
page51.
Indicator lamp displays
>The indicator lamp under the inside rear-
view mirror flashes continuously: the sys-
tem is armed.
>The indicator lamp flashes after locking: the
doors or luggage compartment lid are not
properly closed. Even if you do not close the
alerted area, the system begins to monitor
the remaining areas, and the indicator lamp
flashes continuously after approx. 10 sec-
onds. However, the interior motion sensor
is not activated.
>The indicator lamp goes out after unlocking:
your vehicle has not been disturbed while
you were away.
>The indicator lamp flashes after unlocking
until the key is inserted into the lock, but can
blink for up to approx. 5 minutes: your vehi-
cle has been disturbed while you were
away.
Tilt alarm sensor and interior motion
sensor
Tilt alarm sensor
The tilt of the vehicle is monitored. The alarm
system reacts, e.g. in case of an attempted
wheel theft or towing.
Interior motion sensor
In order for the interior motion sensor to func-
tion properly, the windows and glass sunroof
must be completely closed.
Avoiding unintentional alarms
The tilt alarm sensor and interior motion sensor
may be switched off at the same time. This pre-
vents unintentional alarms, e.g. in the following
situations:
>In stacking garages
>When transporting on car-carrying trains
>When animals are to remain in the vehicle
Switching off tilt alarm sensor and
interior motion sensor
Press the button on the remote control
once again directly after locking.
The indicator lamp lights up briefly and then
flashes continuously. The tilt alarm sensor and
the interior motion sensor are switched off until
the next time the vehicle is unlocked and subse-
quently locked again.
Windows
To prevent injuries, exercise care when
closing the windows and keep them in
your field of vision until they are shut.
When leaving the vehicle, always remove the
ignition key and close the doors to prevent chil-
dren from operating the windows and injuring
themselves etc.<
Page 41 of 221

Adjustments
40 The upper hips and spinal column receive sup-
plementary support to help you maintain a
relaxed, upright sitting position.
>Increase or decrease curvature: push
switch forward or back.
>Shift curvature up or down: push switch up
or down.
Adjusting active backrest width*
First set a comfortable backrest width, see
above. Based on the backrest width set, the lat-
eral support is automatically adapted to the cur-
rent driving situation.
The adaptation of the backrest width and the
speed of the adjustment vary depending on the
program. You can select from among three pro-
grams from comfort to sport.
Press program button once:
>"Comfort" program: one LED
>"Normal" program: two LEDs
>"Sport" program: three LEDs
To switch off: press button longer.
Easy entry/exit*
To facilitate entry and exit, the backrest tempo-
rarily opens all the way.
Seat, mirror and steering
wheel memory*
You can store and request two different posi-
tions for the driver's seat and passenger seat
*,
external rearview mirrors, and steering wheel.
The adjustment of the lumbar support is not
stored in the memory.
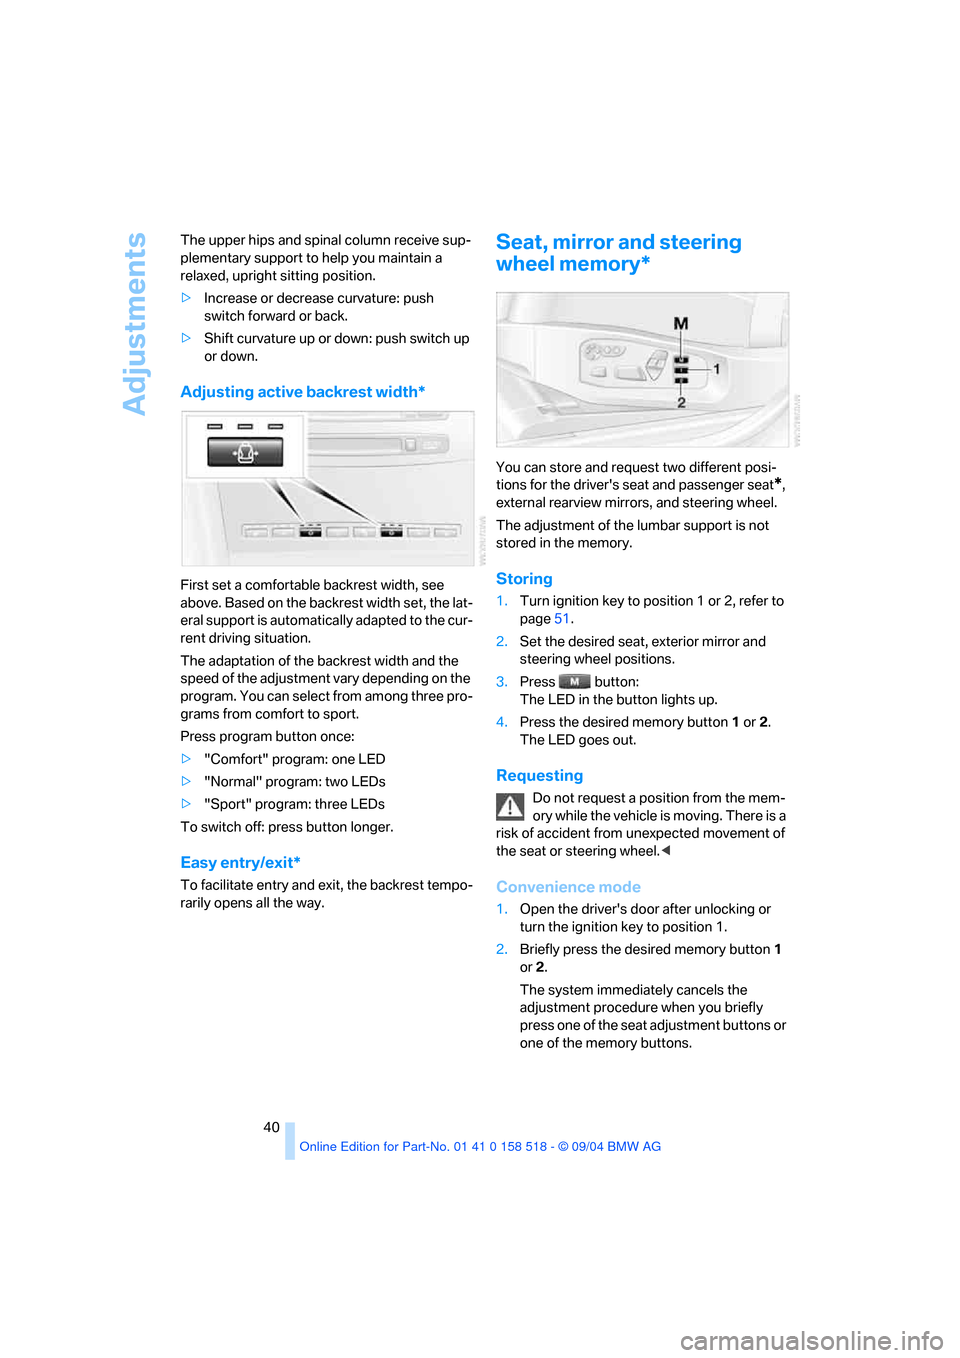
Storing
1.Turn ignition key to position 1 or 2, refer to
page51.
2.Set the desired seat, exterior mirror and
steering wheel positions.
3.Press button:
The LED in the button lights up.
4.Press the desired memory button1 or2.
The LED goes out.
Requesting
Do not request a position from the mem-
ory while the vehicle is moving. There is a
risk of accident from unexpected movement of
the seat or steering wheel.<
Convenience mode
1.Open the driver's door after unlocking or
turn the ignition key to position 1.
2.Briefly press the desired memory button1
or2.
The system immediately cancels the
adjustment procedure when you briefly
press one of the seat adjustment buttons or
one of the memory buttons.
Page 42 of 221

Controls
41Reference
At a glance
Driving tips
Communication
Navigation
Entertainment
Mobility
Safety feature
1.Close the driver's door and turn the ignition
key to position 0 or 2.
2.Press the desired memory button1 or2
and maintain pressure until the adjustment
process has been completed.
If the button was pressed inadvertently:
press the button again; the LED goes out.
Position stored in key
The positions of the driver's seat, the external
rearview mirrors, and steering wheel are stored
for the remote key currently in use.
You can choose when the position is requested:
>Request when unlocking vehicle
>Request when opening driver's door
Control Center, for principle details, refer to
page16.
1.Open the menu.
2.Select "Vehicle settings" and press the
controller.
3.Select "Door locks" and press the control-
ler.
4.Select "Central locking" and press the con-
troller.
5.Select "Last seat pos." and press the con-
troller.
6.Select "After unlocking" or "After opening
door" and press the controller.
To cancel the request:
Select "Deactivated" and press the controller.
When using this feature, always make
sure that the footwell behind the driver's
seat is empty and unobstructed. Failure to do so could cause injury or damage to persons or
objects behind the seat as a result of a rearward
movement of the seat.<
Passenger-side exterior mirror tilt
function*
Automatic curb monitor
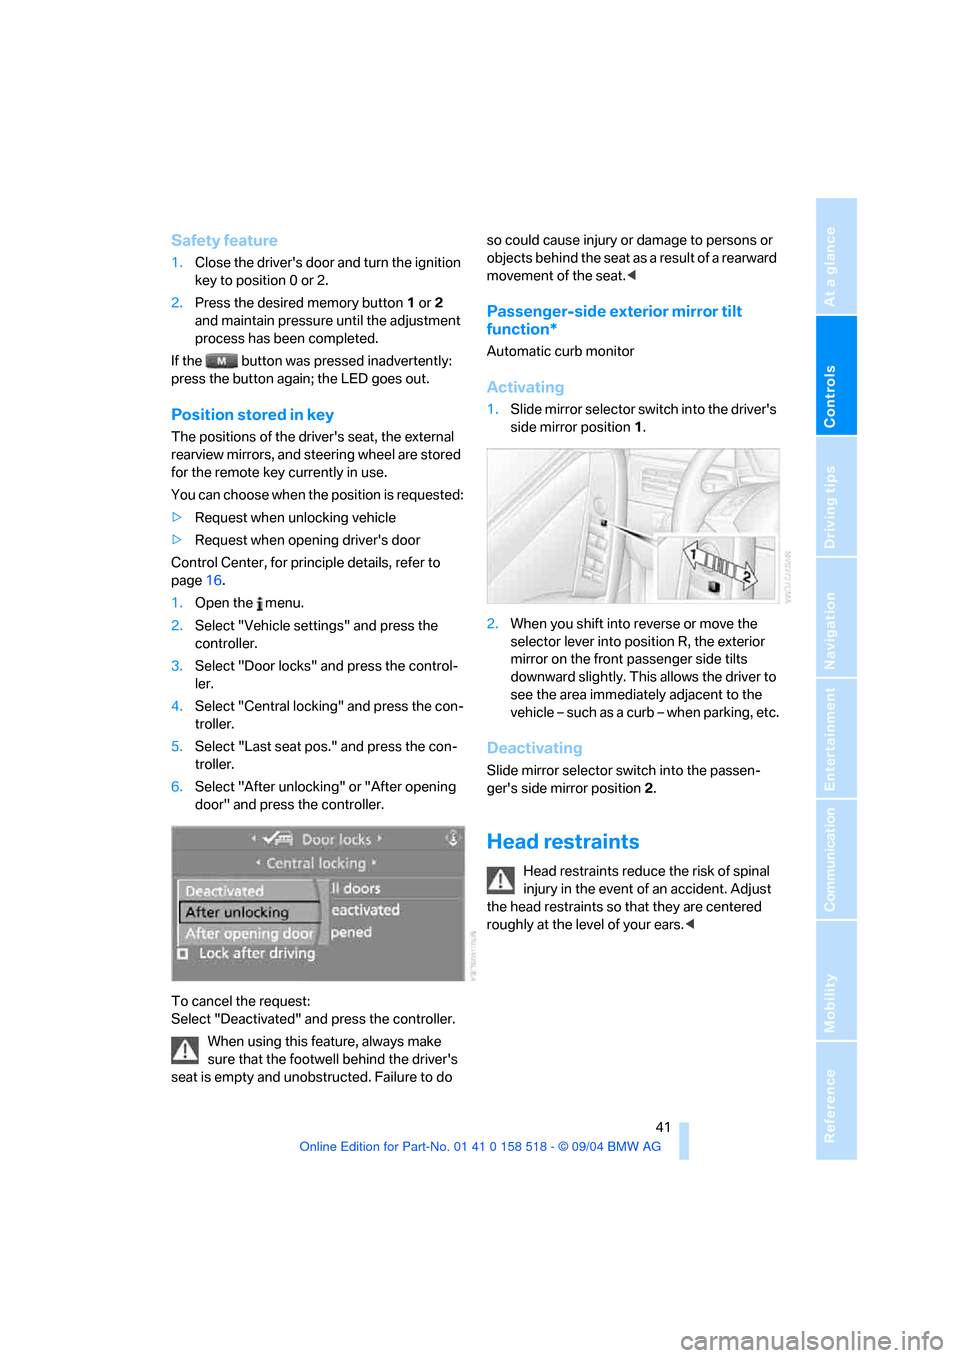
Activating
1.Slide mirror selector switch into the driver's
side mirror position 1.
2.When you shift into reverse or move the
selector lever into position R, the exterior
mirror on the front passenger side tilts
downward slightly. This allows the driver to
see the area immediately adjacent to the
vehicle – such as a curb – when parking, etc.
Deactivating
Slide mirror selector switch into the passen-
ger's side mirror position 2.
Head restraints
Head restraints reduce the risk of spinal
injury in the event of an accident. Adjust
the head restraints so that they are centered
roughly at the level of your ears.<
Page 46 of 221

Controls
45Reference
At a glance
Driving tips
Communication
Navigation
Entertainment
Mobility
Mirrors
Exterior mirrors
The mirror on the passenger side fea-
tures a lens with a more convex surface
than the mirror installed on the driver's side.
When estimating the distance between yourself
and other traffic, bear in mind that the objects
reflected in the mirror are closer than they
appear. This means that estimations of the dis-
tance to following traffic should not be regarded
as precise.<
1Adjustments
2Switching to the other mirror or to the auto-
matic parking function, refer to Tilting the
passenger-side mirror, page41
Storing the mirror positions, refer to Seat, mir-
ror and steering wheel memory on page40.
Manual adjustment
You can also adjust the mirrors manually if nec-
essary by pressing against the outer edges of
their mirror glass.
Folding mirrors in and out
To prevent the exterior mirrors on this
vehicle from being damaged, always fold
them in by hand before entering an automatic
car wash.<
Automatic heating
Both exterior mirrors are automatically heated
in ignition key position 2.
Interior rearview mirror
To reduce the dazzle effect of following vehi-
cles at night, turn the knob.
Automatically dimming mirrors, refer to
page107.
Steering wheel
Adjustments
Do not adjust steering wheel while driv-
ing. There is a risk of accident from unex-
pected movement of the steering wheel.<
The steering wheel can be adjusted in four
directions.
Storing steering wheel positions, refer to Seat,
mirror and steering wheel memory on page40.
Easy entry/exit*
To facilitate entry and exit, the steering wheel
temporarily moves into the uppermost position.
Page 58 of 221

Controls
57Reference
At a glance
Driving tips
Communication
Navigation
Entertainment
Mobility
4.Select "Triple turn signal activation" and
press the controller.
Triple turn signaling is activated.
Wiper system
1Switching on wipers
2Switching off wipers or brief wipe
3Activating/deactivating rain sensor
4Cleaning windshield and headlamps
5Adjusting rain sensor sensitivity level
Switching on wipers
The lever automatically returns to its initial posi-
tion when released.
Normal wiper speed
Press once.
The system reverts to operation in the intermit-
tent mode when the vehicle is stationary.
Fast wiper speed
Press twice or press beyond the resistance
point.
The system reverts to normal speed when the
vehicle is stationary.
Rain sensor
The wiper operation is controlled automatically
as a function of the rain intensity. The rain sen-
sor is located on the windshield, directly in front
of the interior rearview mirror.
Activating the rain sensor
Press button. The LED in the button lights up.
Adjusting rain sensor sensitivity level
Turn the serrated dial 5.
Deactivating the rain sensor
Press the button again. The LED goes out.
Deactivate the rain sensor when passing
through an automatic car wash. Failure to
do so could result in damage caused by undes-
ired wiper activation.<
Cleaning windshield and headlamps*
The system sprays washer fluid against the
windshield and activates the wipers for a brief
period.
When the vehicle lighting system is switched
on, the headlamps are cleaned at regular and
appropriate intervals.
Do not use the washers if there is any
danger that the fluid will freeze on the
windshield. If you do so, your vision could be
obscured. To avoid freezing, use a washer fluid
antifreeze, refer to Washer fluid. Do not use
washing mechanisms when the washer fluid
reservoir is empty, otherwise you will damage
the washer pump.<
Page 85 of 221

Technology for comfort, convenience and safety
84 >When an adult is traveling in the front seat,
the front and side airbags remain active on
the passenger side.
Although not desired, it can occur in the
case of heavier children that the front
passenger airbags remain active or in the case
of very light adults or young persons that the
front passenger airbags are deactivated. In
these cases, have the person ride in the rear
seat, refer to Passenger airbag status lamp
below. Do not load the passenger seat with any
items in addition to the person to be trans-
ported. Do not fit seat covers, seat cushion pad-
ding, ball mats or other items onto the front pas-
senger seat unless they are specifically
r e c o m m e n d e d b y B M W . D o n o t p l a c e a n y i t e m s
under the seat. Otherwise, the function of the
seat occupation detection could be impaired.<
Operational readiness of airbag system
As of ignition key position of 1, the warning
lamp lights up briefly, thus indicating the opera-
tional readiness of the entire airbag system and
the safety belt tensioners.
Airbag system malfunction
>The warning lamp does not light up as of
ignition key position 1.
>Warning lamp lights up continuously.
A malfunction could prevent the airbag
system from responding in the expected
manner to an impact occurring within its normal
response range.<
Passenger airbag status lamp
The indicator lamp located above the rear view
mirror indicates whether the front passenger
airbag system is active or not active/OFF.
The indicator lamp is used only for the
front passenger airbag system. The indi-
cator lamp illuminates to show that the front
passenger airbag system is OFF/not active.<
>The lamp illuminates briefly during startup,
but then goes out if the seat is empty, or an
adult or child of sufficient size is detected.
>The lamp remains illuminated when a child
in a rear facing child-restraint system is
detected and indicates that the passenger
airbag system is off.
If the lamp is illuminated when the seat is
occupied by a very light adult or teenager,
it is recommended that the person sit in the
rear.<
Find more information about passenger airbag
system and seat occupancy detection in the
section Automatic deactivation of front passen-
ger airbags above.
Head-Up Display*
The concept
With the Head-Up Display important informa-
tion is projected into the driver's field of view,
e.g. navigation instructions. This enables you to
take in this information without looking away
from the road.
Page 108 of 221

Driving tips
107Reference
At a glance
Controls
Communication
Navigation
Entertainment
Mobility
Portable phone in the vehicle
BMW discourages the use of mobile
communications devices, e. g. portable
phones, inside the vehicle without a direct con-
nection to an outside antenna. Otherwise, the
vehicle electronics and mobile communication
device can influence one another. In addition,
there is no assurance that the radiation which
results from transmission will be dissipated
from the vehicle interior.<
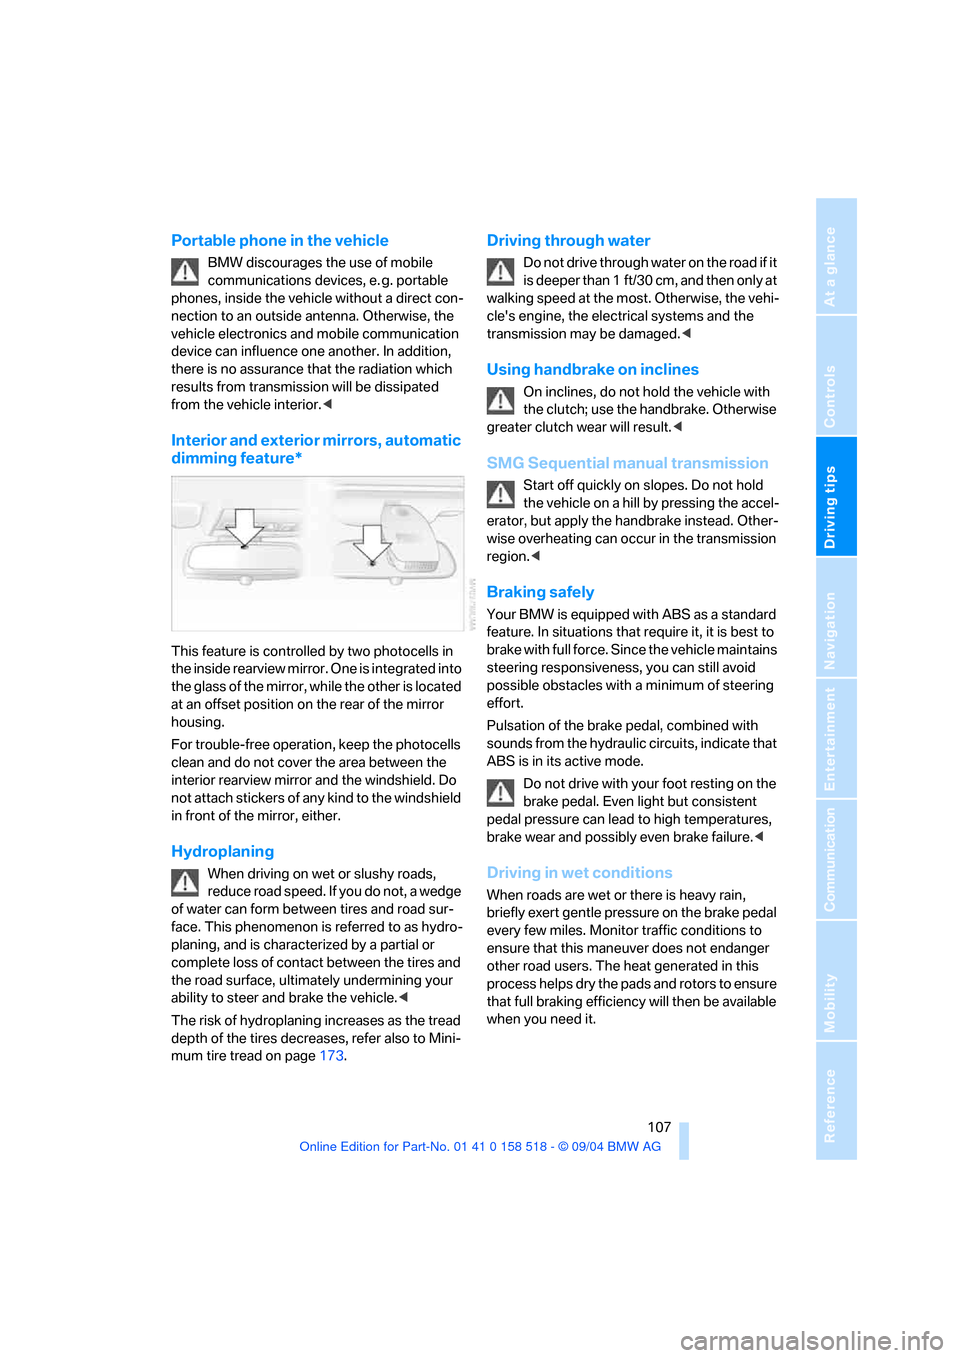
Interior and exterior mirrors, automatic
dimming feature*
This feature is controlled by two photocells in
the inside rearview mirror. One is integrated into
the glass of the mirror, while the other is located
at an offset position on the rear of the mirror
housing.
For trouble-free operation, keep the photocells
clean and do not cover the area between the
interior rearview mirror and the windshield. Do
not attach stickers of any kind to the windshield
in front of the mirror, either.
Hydroplaning
When driving on wet or slushy roads,
reduce road speed. If you do not, a wedge
of water can form between tires and road sur-
face. This phenomenon is referred to as hydro-
planing, and is characterized by a partial or
complete loss of contact between the tires and
the road surface, ultimately undermining your
ability to steer and brake the vehicle.<
The risk of hydroplaning increases as the tread
depth of the tires decreases, refer also to Mini-
mum tire tread on page173.
Driving through water
Do not drive through water on the road if it
is deeper than 1 ft/30 cm, and then only at
walking speed at the most. Otherwise, the vehi-
cle's engine, the electrical systems and the
transmission may be damaged.<
Using handbrake on inclines
On inclines, do not hold the vehicle with
the clutch; use the handbrake. Otherwise
greater clutch wear will result.<
SMG Sequential manual transmission
Start off quickly on slopes. Do not hold
the vehicle on a hill by pressing the accel-
erator, but apply the handbrake instead. Other-
wise overheating can occur in the transmission
region.<
Braking safely
Your BMW is equipped with ABS as a standard
feature. In situations that require it, it is best to
brake with full force. Since the vehicle maintains
steering responsiveness, you can still avoid
possible obstacles with a minimum of steering
effort.
Pulsation of the brake pedal, combined with
sounds from the hydraulic circuits, indicate that
ABS is in its active mode.
Do not drive with your foot resting on the
brake pedal. Even light but consistent
pedal pressure can lead to high temperatures,
brake wear and possibly even brake failure.<
Driving in wet conditions
When roads are wet or there is heavy rain,
briefly exert gentle pressure on the brake pedal
every few miles. Monitor traffic conditions to
ensure that this maneuver does not endanger
other road users. The heat generated in this
process helps dry the pads and rotors to ensure
that full braking efficiency will then be available
when you need it.