2005 BMW 525I turn signal
[x] Cancel search: turn signalPage 11 of 221
Cockpit
10
Cockpit
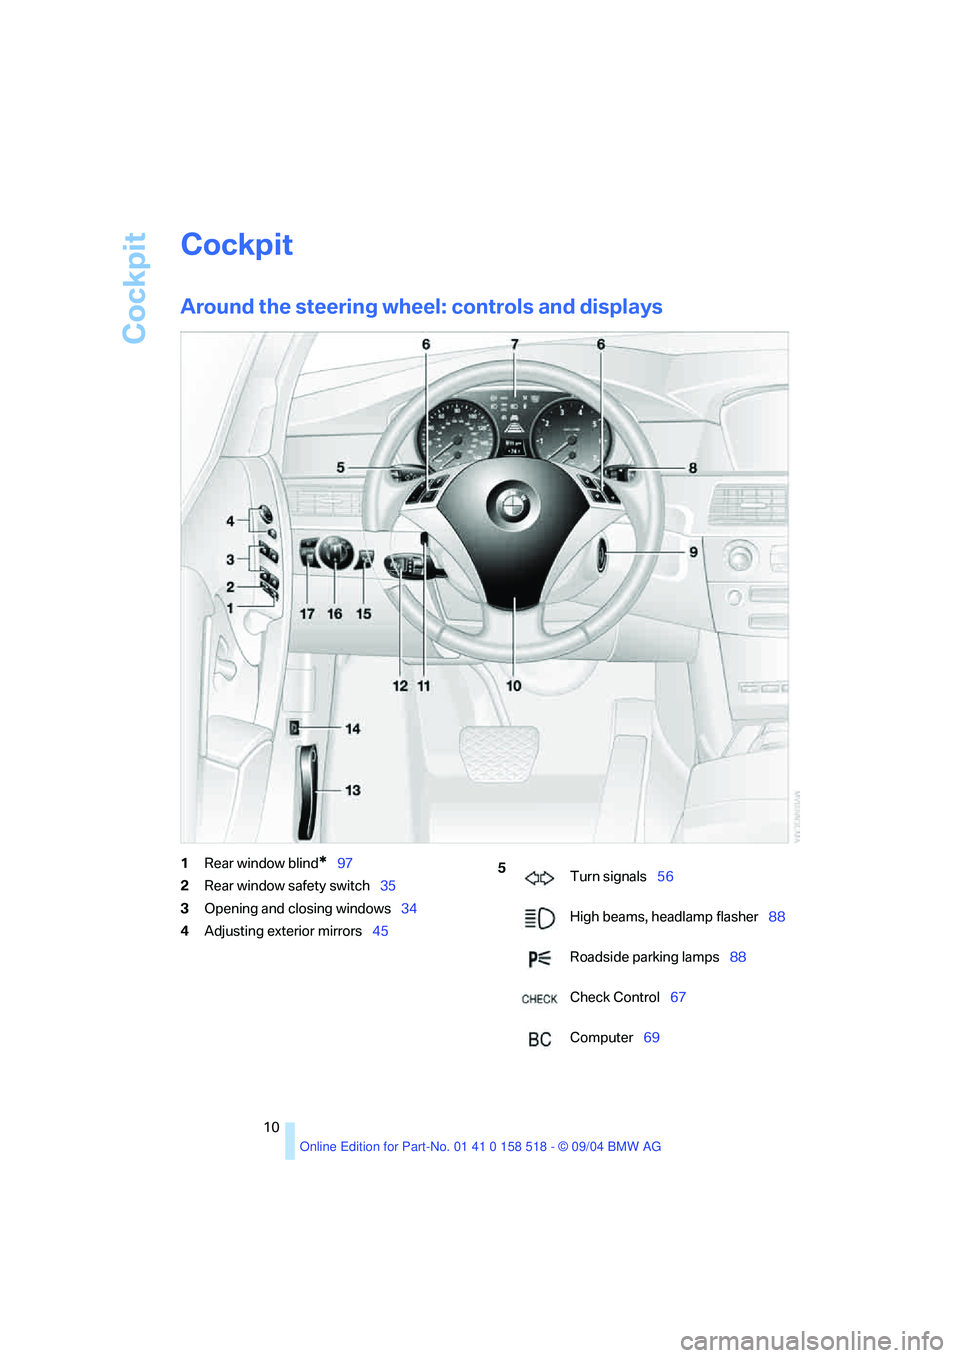
Around the steering wheel: controls and displays
1Rear window blind*97
2Rear window safety switch35
3Opening and closing windows34
4Adjusting exterior mirrors455
Turn signals56
High beams, headlamp flasher88
Roadside parking lamps88
Check Control67
Computer69
Page 13 of 221
Cockpit
12
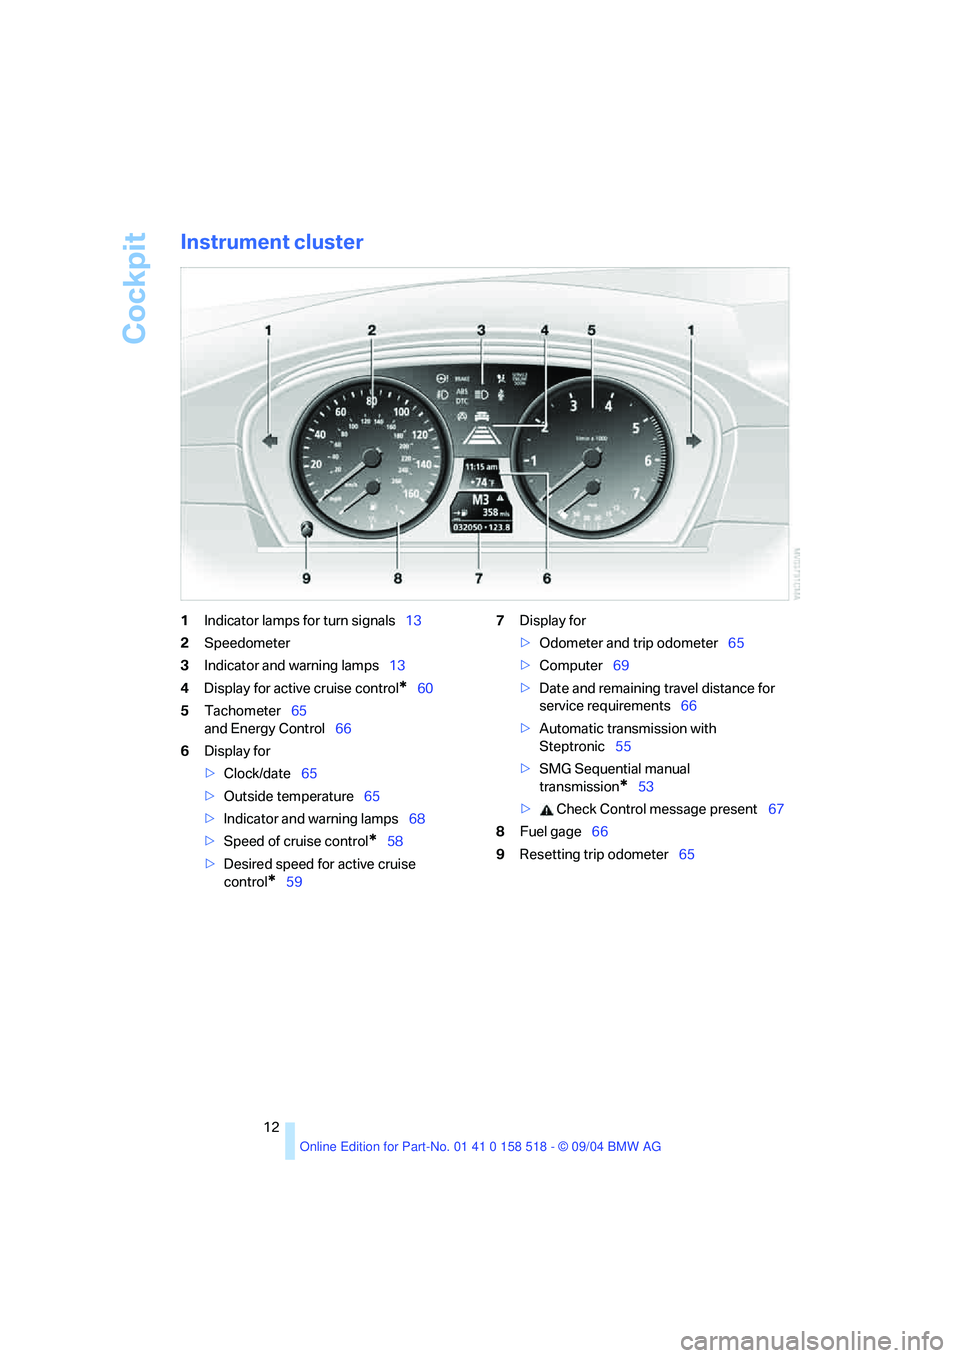
Instrument cluster
1Indicator lamps for turn signals13
2Speedometer
3Indicator and warning lamps13
4Display for active cruise control
*60
5Tachometer65
and Energy Control66
6Display for
>Clock/date65
>Outside temperature65
>Indicator and warning lamps68
>Speed of cruise control
*58
>Desired speed for active cruise
control
*597Display for
>Odometer and trip odometer65
>Computer69
>Date and remaining travel distance for
service requirements66
>Automatic transmission with
Steptronic55
>SMG Sequential manual
transmission
*53
> Check Control message present67
8Fuel gage66
9Resetting trip odometer65
Page 14 of 221

At a glance
13Reference
Controls
Driving tips
Communication
Navigation
Entertainment
Mobility
Indicator and warning lamps
The concept
Indicator and warning lamps and their combina-
tions are displayed in the display region1 and in
the display2. To better differentiate between
malfunctions, different symbols can be shown
on the display2.
Some lights in the display region1 are tested
for proper function by briefly lighting up during
starting of the engine or when the ignition is
switched on.
Acknowledging active functions
The following indicator lamps in the display
region1 indicate that the associated functions
are activated:
What to do in case of a malfunction
All warning lamps and indicator lamps not yet
listed are also accompanied by text messages
on the Control Display. These may contain
more information as to the cause of a malfunc-
tion and instructions on what to do.
Sometimes, warning lamps are also accompa-
nied by supplemental text messages on the
Control Display that are shown immediately.
Text messages that do not appear immediately
are stored and can be displayed subsequently.
For further information on displaying these
messages later, refer to Check Control on
page 67. Turn signals56
Handbrake engaged52
Handbrake engaged for Canadian
models
Front fog lamps88
DTC Dynamic Traction Control78
High beams/headlamp flasher88
DSC Dynamic Stability Control78
Page 35 of 221

Opening and closing
34 The system indicates that it has been correctly
armed by switching on the hazard warning
flashers for a single cycle and by emitting an
acoustic signal.
You can also open the luggage compartment lid
with the system armed using the button on
the remote control, refer to page30. When the
luggage compartment lid is closed, it is locked
again and monitored.
Switching off alarm
>Unlock the vehicle using the remote control,
refer to page29
>or turn the ignition key to position 1, refer to
page51.
Indicator lamp displays
>The indicator lamp under the inside rear-
view mirror flashes continuously: the sys-
tem is armed.
>The indicator lamp flashes after locking: the
doors or luggage compartment lid are not
properly closed. Even if you do not close the
alerted area, the system begins to monitor
the remaining areas, and the indicator lamp
flashes continuously after approx. 10 sec-
onds. However, the interior motion sensor
is not activated.
>The indicator lamp goes out after unlocking:
your vehicle has not been disturbed while
you were away.
>The indicator lamp flashes after unlocking
until the key is inserted into the lock, but can
blink for up to approx. 5 minutes: your vehi-
cle has been disturbed while you were
away.
Tilt alarm sensor and interior motion
sensor
Tilt alarm sensor
The tilt of the vehicle is monitored. The alarm
system reacts, e.g. in case of an attempted
wheel theft or towing.
Interior motion sensor
In order for the interior motion sensor to func-
tion properly, the windows and glass sunroof
must be completely closed.
Avoiding unintentional alarms
The tilt alarm sensor and interior motion sensor
may be switched off at the same time. This pre-
vents unintentional alarms, e.g. in the following
situations:
>In stacking garages
>When transporting on car-carrying trains
>When animals are to remain in the vehicle
Switching off tilt alarm sensor and
interior motion sensor
Press the button on the remote control
once again directly after locking.
The indicator lamp lights up briefly and then
flashes continuously. The tilt alarm sensor and
the interior motion sensor are switched off until
the next time the vehicle is unlocked and subse-
quently locked again.
Windows
To prevent injuries, exercise care when
closing the windows and keep them in
your field of vision until they are shut.
When leaving the vehicle, always remove the
ignition key and close the doors to prevent chil-
dren from operating the windows and injuring
themselves etc.<
Page 53 of 221
Driving
52
SMG Sequential manual transmission
and automatic transmission
Your BMW is equipped with the convenience
starting feature. It is sufficient to turn the igni-
tion key into position 3 for only a short time and
then release it again. The system responds by
automatically engaging the starter for a certain
period and allowing it to run until the engine
starts, after which it then disengages automati-
cally.
SMG Sequential manual transmission
1.Press the brake pedal.
2.Place selector lever in position N.
3.Start the engine.
If the engine does not start, shift back to
the last gear selected, refer to Instrument
cluster display, and then shift into position N.<
Automatic transmission
1.Press the brake pedal.
2.Place selector lever in position P or N.
3.Start the engine.
Switching off engine
Do not remove the ignition key while the
vehicle is rolling, as otherwise the steer-
ing wheel lock will immobilize the steering.
When leaving the vehicle, remove the ignition
key and lock the steering. When parking on a
downhill incline, apply the handbrake, as other-
wise the vehicle could roll away.<
Manual transmission
1.Turn the ignition key to position 1 or 0.
2.Shift into first gear or reverse.
SMG Sequential manual transmission
1.Engage a driving position.
2.Turn the ignition key to position 1 or 0.
A signal sounds if the transmission is in
Neutral when the engine is switched off.
Automatic transmission
1.Engage selector lever position P.
2.Turn the ignition key to position 1 or 0.
Handbrake
The handbrake is primarily intended to prevent
the vehicle from rolling while parked; it brakes
the rear wheels.
Indicator lamp
The indicator lamp lights up, and an
acoustic signal also sounds when start-
ing off. The handbrake is applied.
Indicator lamp for Canadian models.
Applying
The lever locks in position automatically.
Releasing
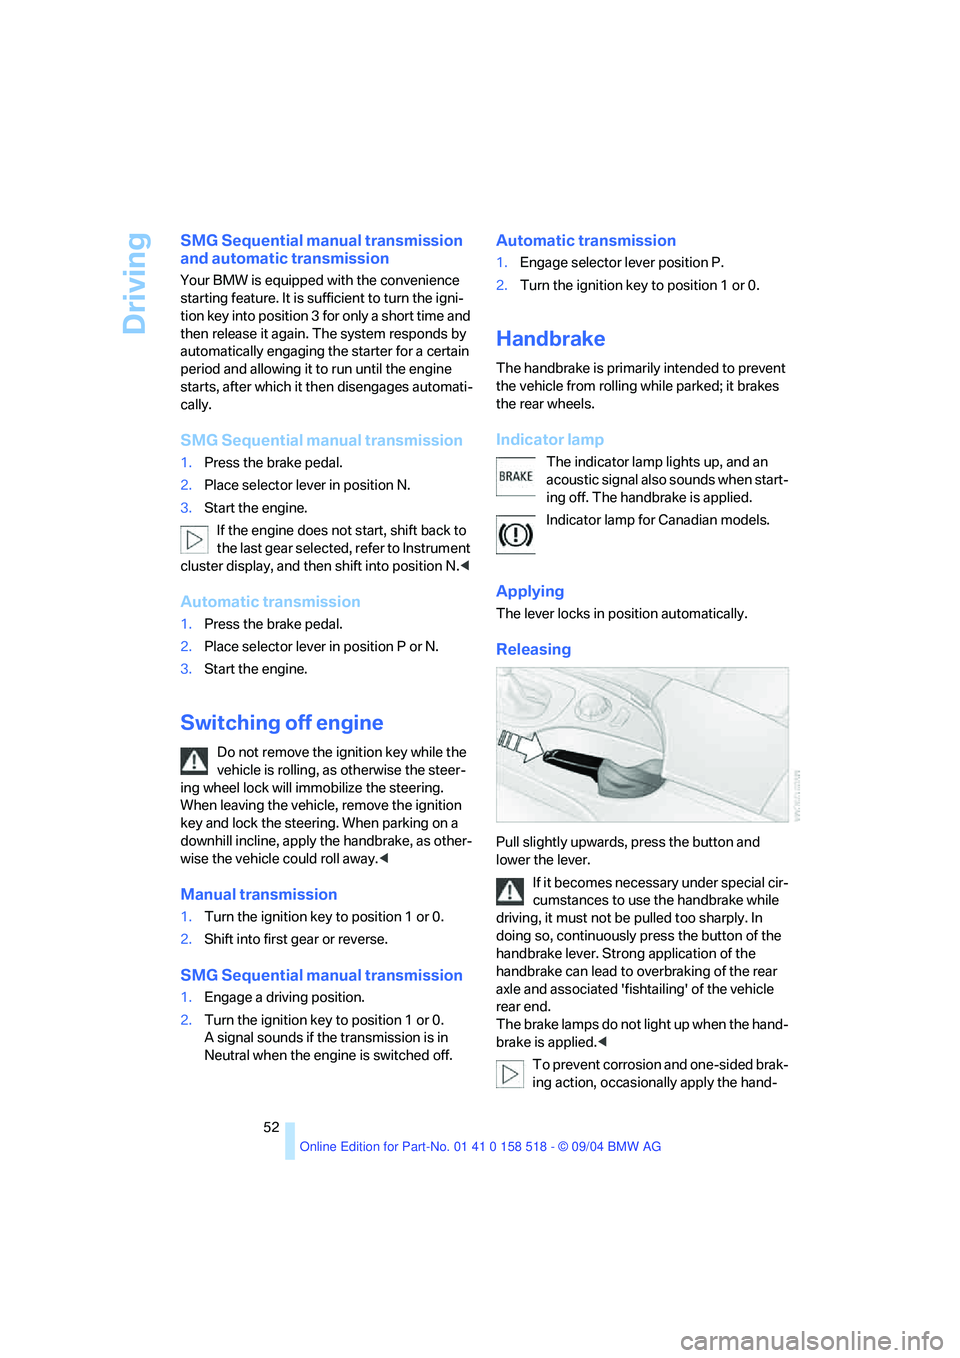
Pull slightly upwards, press the button and
lower the lever.
If it becomes necessary under special cir-
cumstances to use the handbrake while
driving, it must not be pulled too sharply. In
doing so, continuously press the button of the
handbrake lever. Strong application of the
handbrake can lead to overbraking of the rear
axle and associated 'fishtailing' of the vehicle
rear end.
The brake lamps do not light up when the hand-
brake is applied.<
To prevent corrosion and one-sided brak-
ing action, occasionally apply the hand-
Page 57 of 221
Driving
56
R Reverse
Select only when the vehicle is stationary.
N Neutral
For example, engage in automatic car washes.
The vehicle can roll.
D Drive, automatic position
Position for normal vehicle operation. All for-
ward gears are available.
Under normal operating conditions, fuel con-
sumption is lowest when driving in position D.
Kick-down
The kick-down mode provides maximum accel-
eration: press the accelerator pedal beyond the
full-throttle resistance point.
Manual operation and Sport program
M/S
Move selector lever from position D toward the
left into the M/S shifting slot:
The sport program is activated and DS appears
in the instrument cluster. This position is
recommended for a performance-oriented
driving style.
When the selector lever is pressed forward or
back, the manual mode is activated and the
Steptronic shifts the gear. The instrument clus-
ter shows M1 through M6.
Upshifts and downshifts are executed only
when they will result in a plausible combination
of engine and vehicle speed; thus, for example,
a downshift that would cause the engine to
overrev will not be executed by the system. The
selected gear appears briefly in the instrument
cluster, followed by the current gear.To use the automatic function again, move the
selector lever to the right into position D.
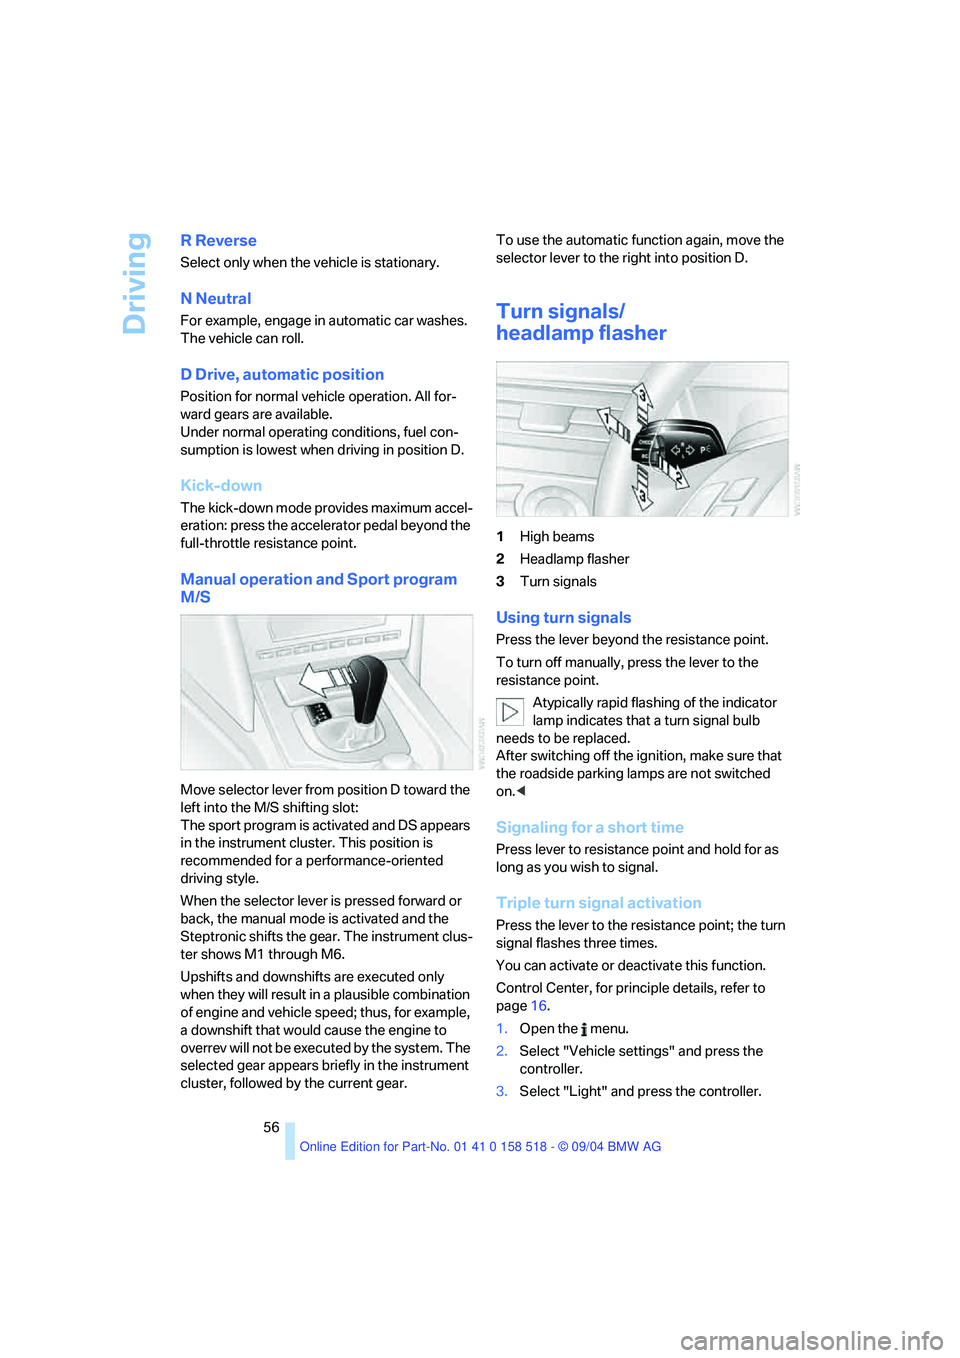
Turn signals/
headlamp flasher
1High beams
2Headlamp flasher
3Turn signals
Using turn signals
Press the lever beyond the resistance point.
To turn off manually, press the lever to the
resistance point.
Atypically rapid flashing of the indicator
lamp indicates that a turn signal bulb
needs to be replaced.
After switching off the ignition, make sure that
the roadside parking lamps are not switched
on.<
Signaling for a short time
Press lever to resistance point and hold for as
long as you wish to signal.
Triple turn signal activation
Press the lever to the resistance point; the turn
signal flashes three times.
You can activate or deactivate this function.
Control Center, for principle details, refer to
page16.
1.Open the menu.
2.Select "Vehicle settings" and press the
controller.
3.Select "Light" and press the controller.
Page 58 of 221
Controls
57Reference
At a glance
Driving tips
Communication
Navigation
Entertainment
Mobility
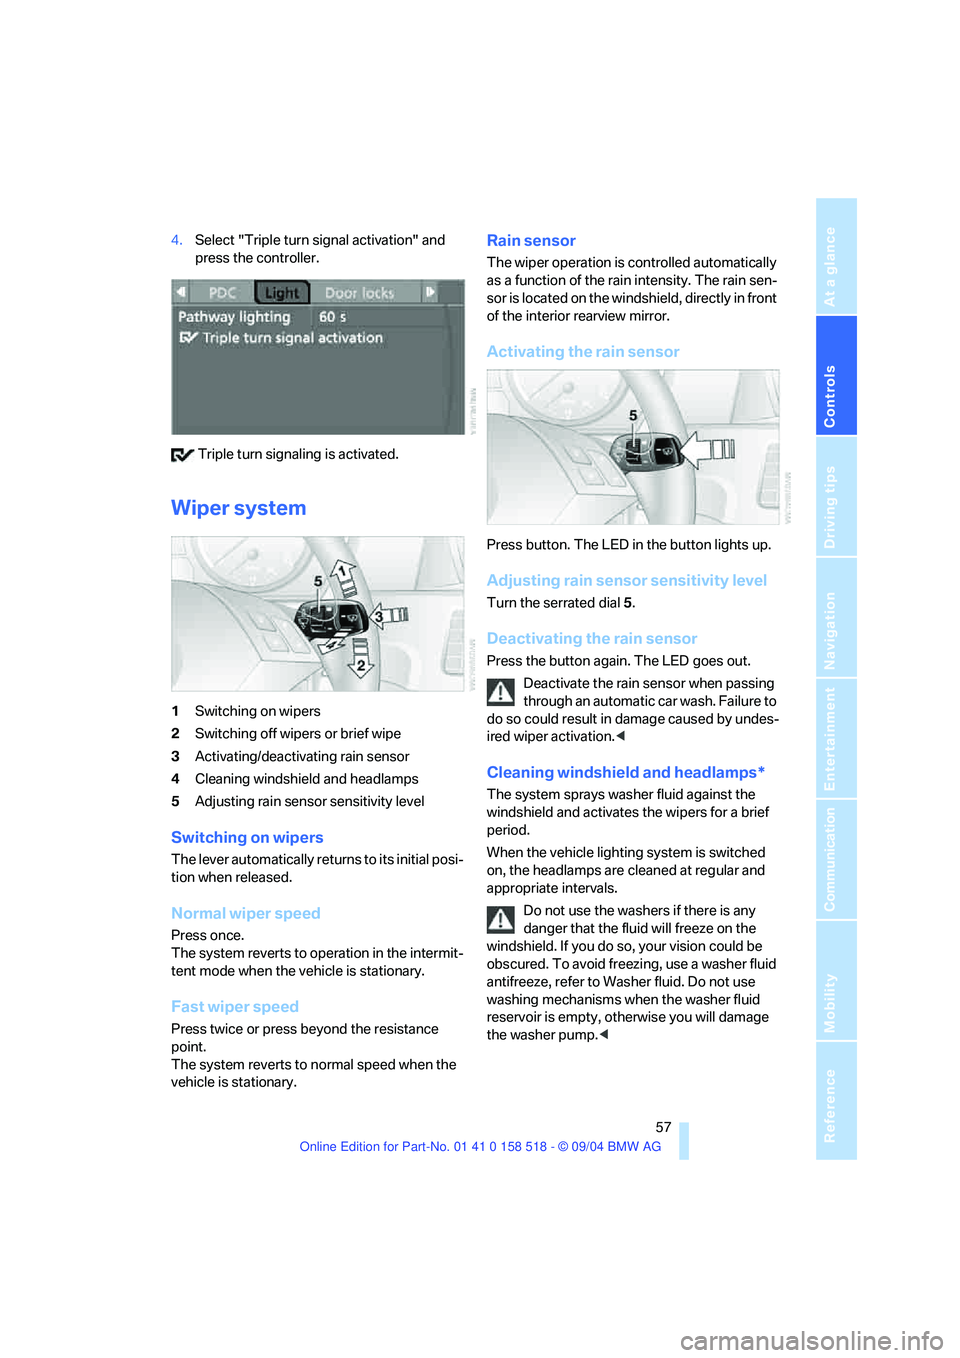
4.Select "Triple turn signal activation" and
press the controller.
Triple turn signaling is activated.
Wiper system
1Switching on wipers
2Switching off wipers or brief wipe
3Activating/deactivating rain sensor
4Cleaning windshield and headlamps
5Adjusting rain sensor sensitivity level
Switching on wipers
The lever automatically returns to its initial posi-
tion when released.
Normal wiper speed
Press once.
The system reverts to operation in the intermit-
tent mode when the vehicle is stationary.
Fast wiper speed
Press twice or press beyond the resistance
point.
The system reverts to normal speed when the
vehicle is stationary.
Rain sensor
The wiper operation is controlled automatically
as a function of the rain intensity. The rain sen-
sor is located on the windshield, directly in front
of the interior rearview mirror.
Activating the rain sensor
Press button. The LED in the button lights up.
Adjusting rain sensor sensitivity level
Turn the serrated dial 5.
Deactivating the rain sensor
Press the button again. The LED goes out.
Deactivate the rain sensor when passing
through an automatic car wash. Failure to
do so could result in damage caused by undes-
ired wiper activation.<
Cleaning windshield and headlamps*
The system sprays washer fluid against the
windshield and activates the wipers for a brief
period.
When the vehicle lighting system is switched
on, the headlamps are cleaned at regular and
appropriate intervals.
Do not use the washers if there is any
danger that the fluid will freeze on the
windshield. If you do so, your vision could be
obscured. To avoid freezing, use a washer fluid
antifreeze, refer to Washer fluid. Do not use
washing mechanisms when the washer fluid
reservoir is empty, otherwise you will damage
the washer pump.<
Page 66 of 221
Controls
65Reference
At a glance
Driving tips
Communication
Navigation
Entertainment
Mobility
Everything under control
Odometer, outside
temperature display, clock
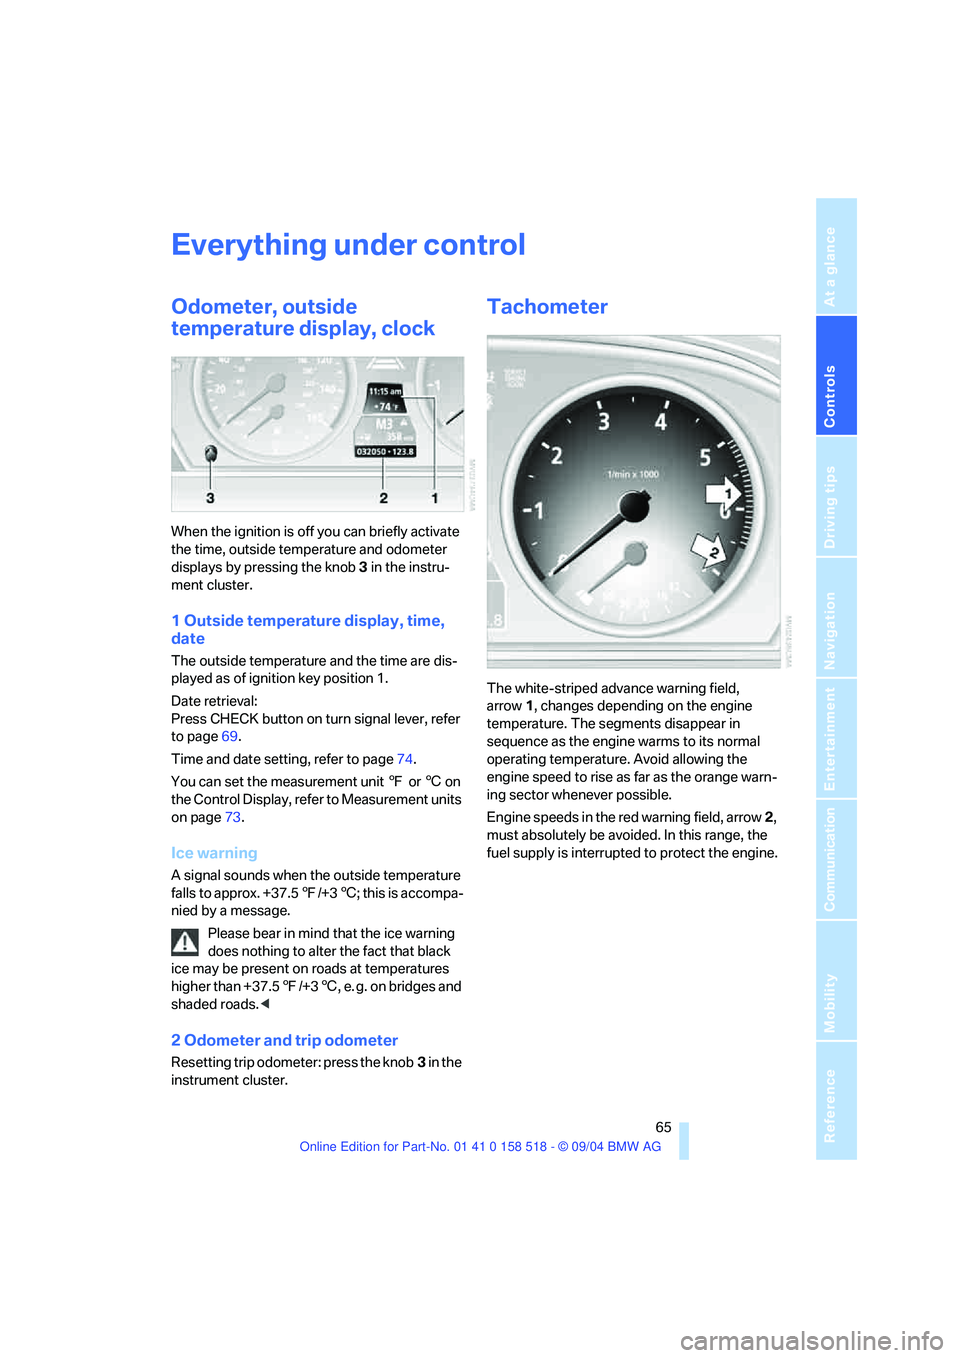
When the ignition is off you can briefly activate
the time, outside temperature and odometer
displays by pressing the knob 3 in the instru-
ment cluster.
1 Outside temperature display, time,
date
The outside temperature and the time are dis-
played as of ignition key position 1.
Date retrieval:
Press CHECK button on turn signal lever, refer
to page69.
Time and date setting, refer to page74.
You can set the measurement unit 7 or 6 on
the Control Display, refer to Measurement units
on page73.
Ice warning
A signal sounds when the outside temperature
falls to approx. +37.57/+36; this is accompa-
nied by a message.
Please bear in mind that the ice warning
does nothing to alter the fact that black
ice may be present on roads at temperatures
higher than +37.57/+36, e. g. on bridges and
shaded roads.<
2 Odometer and trip odometer
Resetting trip odometer: press the knob3 in the
instrument cluster.
Tachometer
The white-striped advance warning field,
arrow1, changes depending on the engine
temperature. The segments disappear in
sequence as the engine warms to its normal
operating temperature. Avoid allowing the
engine speed to rise as far as the orange warn-
ing sector whenever possible.
Engine speeds in the red warning field, arrow2,
must absolutely be avoided. In this range, the
fuel supply is interrupted to protect the engine.