2005 BMW 525I heating
[x] Cancel search: heatingPage 46 of 221
Controls
45Reference
At a glance
Driving tips
Communication
Navigation
Entertainment
Mobility
Mirrors
Exterior mirrors
The mirror on the passenger side fea-
tures a lens with a more convex surface
than the mirror installed on the driver's side.
When estimating the distance between yourself
and other traffic, bear in mind that the objects
reflected in the mirror are closer than they
appear. This means that estimations of the dis-
tance to following traffic should not be regarded
as precise.<
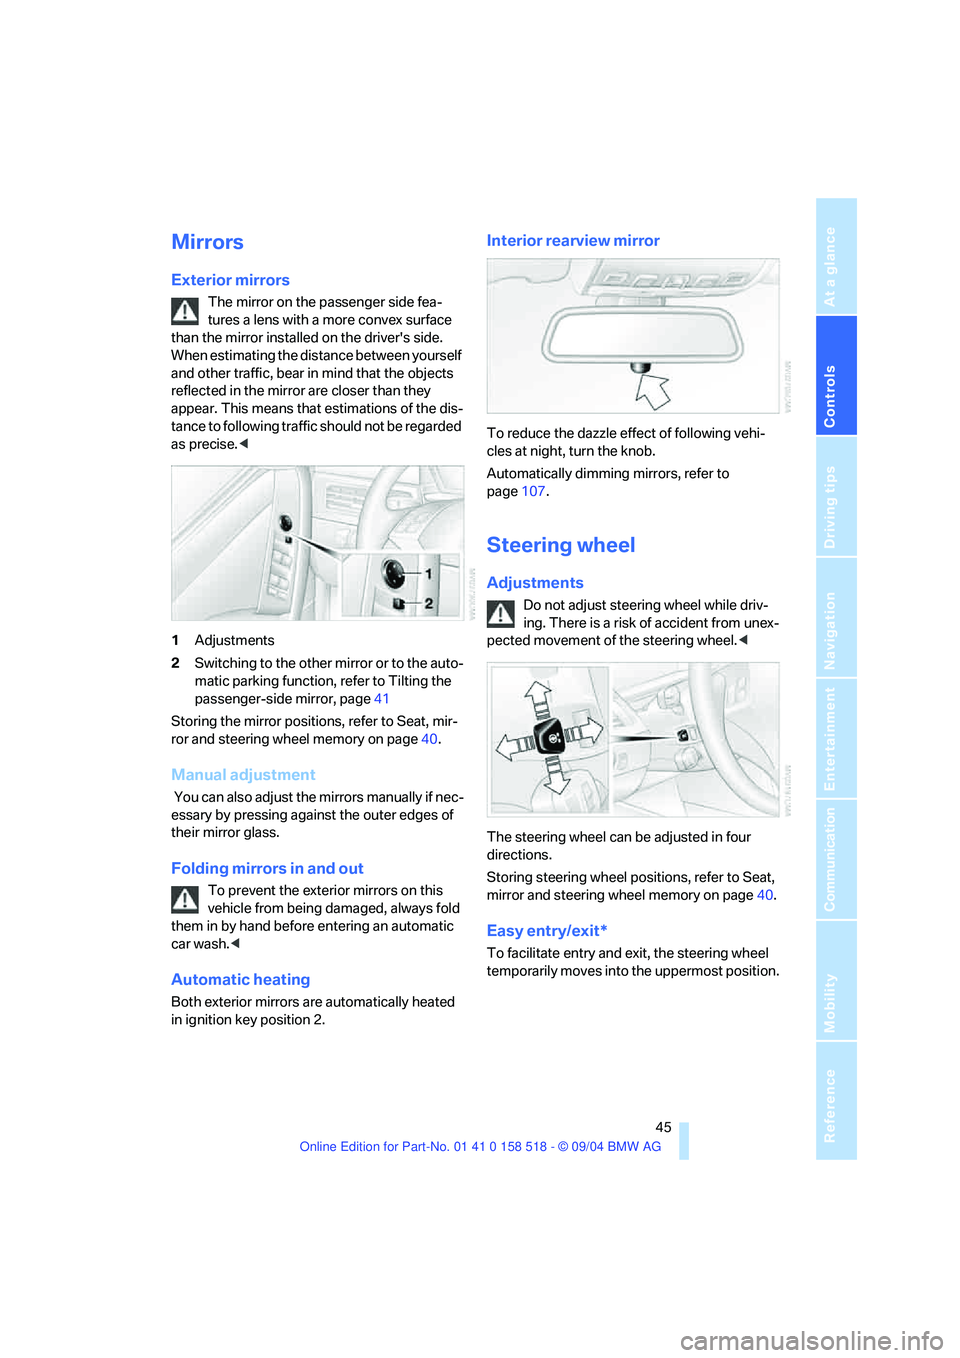
1Adjustments
2Switching to the other mirror or to the auto-
matic parking function, refer to Tilting the
passenger-side mirror, page41
Storing the mirror positions, refer to Seat, mir-
ror and steering wheel memory on page40.
Manual adjustment
You can also adjust the mirrors manually if nec-
essary by pressing against the outer edges of
their mirror glass.
Folding mirrors in and out
To prevent the exterior mirrors on this
vehicle from being damaged, always fold
them in by hand before entering an automatic
car wash.<
Automatic heating
Both exterior mirrors are automatically heated
in ignition key position 2.
Interior rearview mirror
To reduce the dazzle effect of following vehi-
cles at night, turn the knob.
Automatically dimming mirrors, refer to
page107.
Steering wheel
Adjustments
Do not adjust steering wheel while driv-
ing. There is a risk of accident from unex-
pected movement of the steering wheel.<
The steering wheel can be adjusted in four
directions.
Storing steering wheel positions, refer to Seat,
mirror and steering wheel memory on page40.
Easy entry/exit*
To facilitate entry and exit, the steering wheel
temporarily moves into the uppermost position.
Page 52 of 221
Controls
51Reference
At a glance
Driving tips
Communication
Navigation
Entertainment
Mobility
Driving
Ignition lock
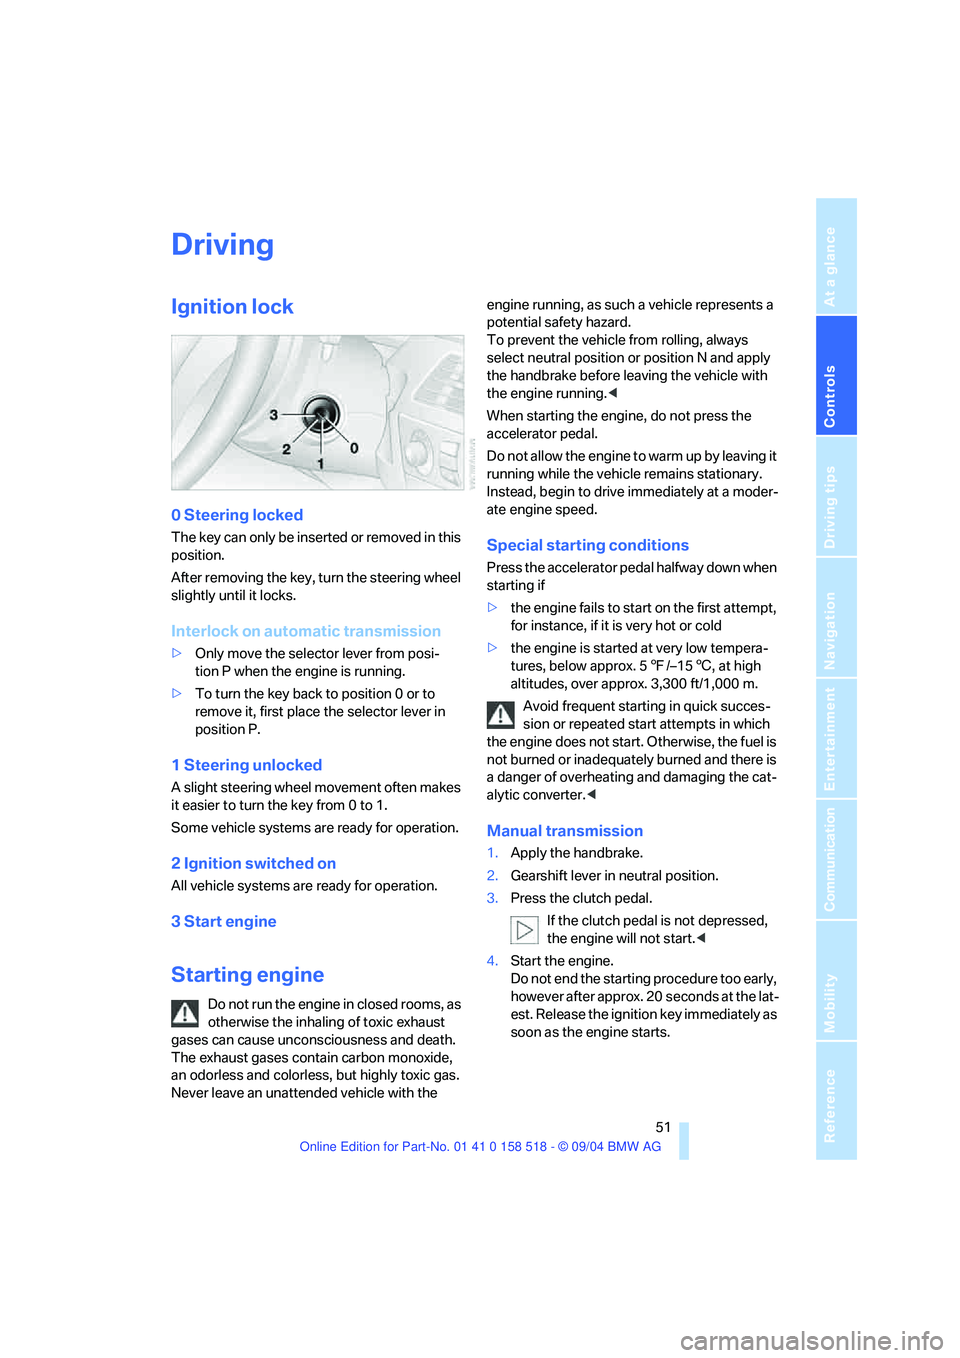
0 Steering locked
The key can only be inserted or removed in this
position.
After removing the key, turn the steering wheel
slightly until it locks.
Interlock on automatic transmission
>Only move the selector lever from posi-
tion P when the engine is running.
>To turn the key back to position 0 or to
remove it, first place the selector lever in
position P.
1 Steering unlocked
A slight steering wheel movement often makes
it easier to turn the key from 0 to 1.
Some vehicle systems are ready for operation.
2 Ignition switched on
All vehicle systems are ready for operation.
3 Start engine
Starting engine
Do not run the engine in closed rooms, as
otherwise the inhaling of toxic exhaust
gases can cause unconsciousness and death.
The exhaust gases contain carbon monoxide,
an odorless and colorless, but highly toxic gas.
Never leave an unattended vehicle with the engine running, as such a vehicle represents a
potential safety hazard.
To prevent the vehicle from rolling, always
select neutral position or position N and apply
the handbrake before leaving the vehicle with
the engine running.<
When starting the engine, do not press the
accelerator pedal.
Do not allow the engine to warm up by leaving it
running while the vehicle remains stationary.
Instead, begin to drive immediately at a moder-
ate engine speed.
Special starting conditions
Press the accelerator pedal halfway down when
starting if
>the engine fails to start on the first attempt,
for instance, if it is very hot or cold
>the engine is started at very low tempera-
tures, below approx. 57/–156, at high
altitudes, over approx. 3,300 ft/1,000 m.
Avoid frequent starting in quick succes-
sion or repeated start attempts in which
the engine does not start. Otherwise, the fuel is
not burned or inadequately burned and there is
a danger of overheating and damaging the cat-
alytic converter.<
Manual transmission
1.Apply the handbrake.
2.Gearshift lever in neutral position.
3.Press the clutch pedal.
If the clutch pedal is not depressed,
the engine will not start.<
4.Start the engine.
Do not end the starting procedure too early,
however after approx. 20 seconds at the lat-
est. Release the ignition key immediately as
soon as the engine starts.
Page 55 of 221
Driving
54
Shiftlock
Press the brake pedal before shifting out of N;
the shift command will not be executed unless
the brake is applied.
R Reverse
Select only when the vehicle is stationary.
Sequential mode
After every engine start, as soon as the selector
lever is pushed to the right and the brake pedal
is pressed, the Sequential mode is activated.
You can shift up and down using the shifting
paddles or the selector lever. You do not need
to remove your foot from the accelerator to do
so.
It is also possible to start off in second gear, e. g.
in slippery conditions.
D Drive mode
In the Drive mode, all forward gears are shifted
automatically.
Shifting from Sequential mode to Drive mode:
press selector lever to the right toward D.
Kick-down:
For rapid acceleration, e. g. when passing, press
the accelerator pedal as far down as it will go.
You achieve maximum acceleration.
To switch back into the Sequential mode: press
selector lever to the right again toward D or shift
using the shifting paddles or the selector lever.
Start off quickly on slopes. Do not hold
the vehicle on a hill by pressing the accel-
erator, but apply the handbrake instead. Other-
wise overheating can occur in the transmission
region.<
Gear changes
Using selector lever
>To upshift, pull the selector lever back.
>To downshift, push the selector lever for-
ward.
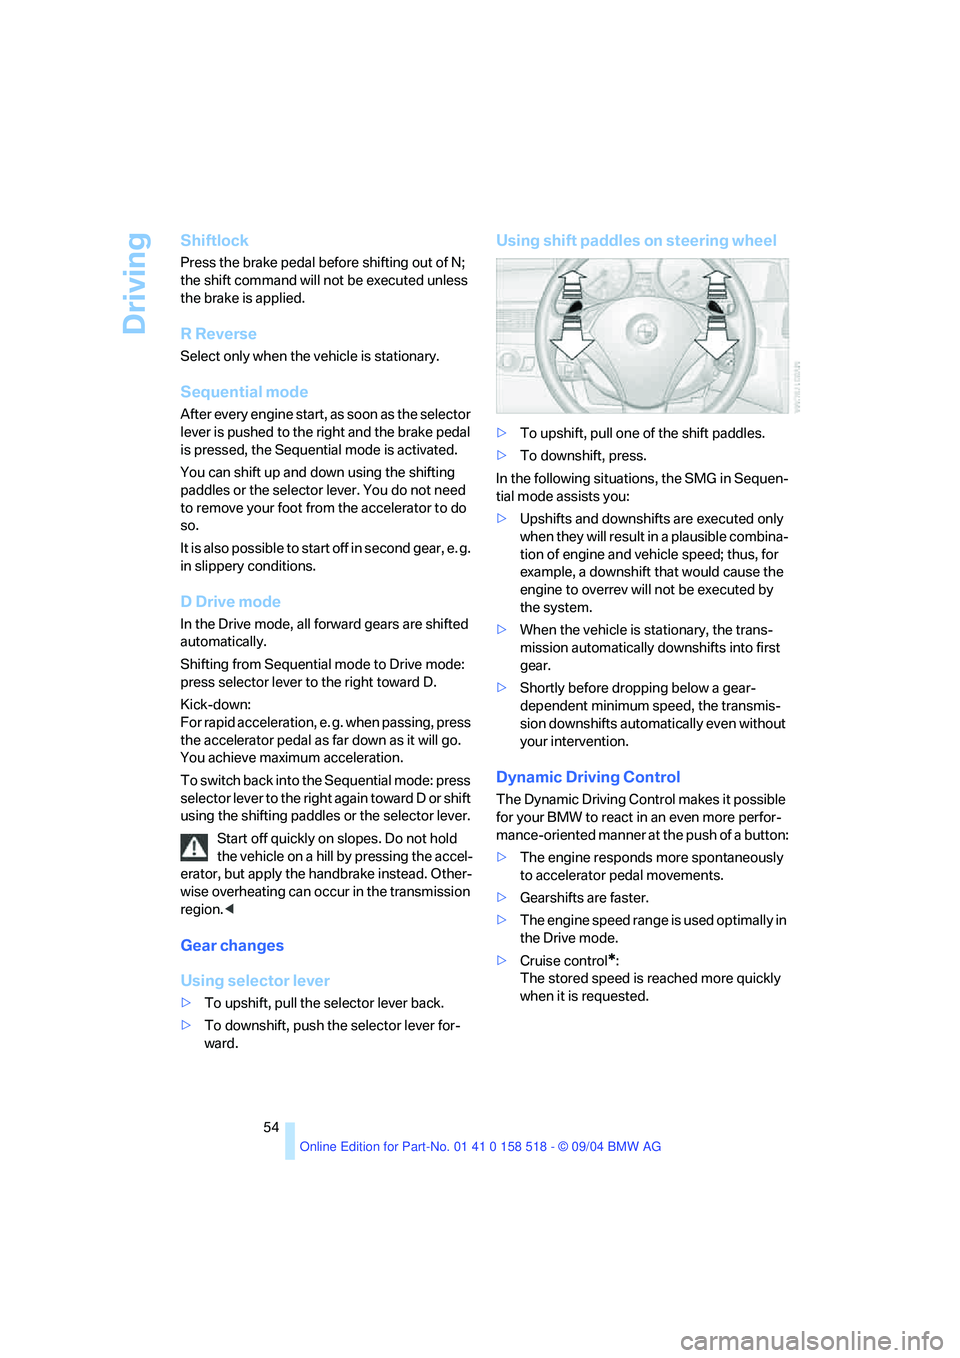
Using shift paddles on steering wheel
>To upshift, pull one of the shift paddles.
>To downshift, press.
In the following situations, the SMG in Sequen-
tial mode assists you:
>Upshifts and downshifts are executed only
when they will result in a plausible combina-
tion of engine and vehicle speed; thus, for
example, a downshift that would cause the
engine to overrev will not be executed by
the system.
>When the vehicle is stationary, the trans-
mission automatically downshifts into first
gear.
>Shortly before dropping below a gear-
dependent minimum speed, the transmis-
sion downshifts automatically even without
your intervention.
Dynamic Driving Control
The Dynamic Driving Control makes it possible
for your BMW to react in an even more perfor-
mance-oriented manner at the push of a button:
>The engine responds more spontaneously
to accelerator pedal movements.
>Gearshifts are faster.
>The engine speed range is used optimally in
the Drive mode.
>Cruise control
*:
The stored speed is reached more quickly
when it is requested.
Page 92 of 221
Controls
91Reference
At a glance
Driving tips
Communication
Navigation
Entertainment
Mobility
A congenial climate
For almost all conditions, the AUTO program
offers the optimal air distribution and air vol-
ume. Select an interior temperature you find
pleasant.
The following section contains more detailed
information on the available setting options.
AUTO program
The AUTO program handles the
adjustment of air distribution to the
windshield and side windows, in
the direction of the upper body, and in the foot-
well, as well as the adjustment of the air volume.
It also adapts your instructions for the tempera-
ture to outside influences throughout the year.
The cooling is switched on automatically with
the AUTO program. At the same time, a con-
densation sensor controls the program in such
a way that window condensation is prevented
as much as possible.
Adjusting temperature
You can also set the desired tem-
perature on the driver's side and
the passenger side by turning the
knob.
When you start driving, the system ensures that
the selected temperature is achieved as quickly
as possible. It then maintains this temperature,
regardless of the season.
Defrosting windows and removing
condensation
This program quickly removes ice
and condensation from the wind-
shield and front side windows.
Air volume, manual
You can adjust the air volume by
turning. You can reactivate the
automatic mode for the air volume
with the AUTO button.
Switching cooling function on and off
manually
The cooling function cools and
dehumidifies the incoming air
before also reheating it as
required, according to the temperature setting.
Depending on the weather, the windshield may
fog over briefly when the engine is started.
The cooling function is only available when the
engine is running and is switched on automati-
cally with the AUTO program.
Maximum cooling
This program quickly provides
maximum cooling.
The system switches to the recir-
culated-air mode and the air flows
at maximum air volume only from the air vent
outlets for the upper body area. For this reason
you should ensure that these vent outlets are
open before selecting this program.
AUC Automatic recirculated-air
control/Recirculated-air mode
You can respond to pollutants or
unpleasant odors in the immediate
environment by suspending the
supply of outside air. The system then recircu-
lates the air currently within the vehicle. During
AUC operation, a sensor detects pollutants in
the outside air and controls the shut-off auto-
matically.
By pressing the button repeatedly, you can
request three operating modes:
>LED off: outside air flows in continuously.
>Right LED on, AUC mode: the system
detects pollutants in the outside air and
shuts off the supply as needed.
>Left LED on, recirculated-air mode: the
supply of outside air is permanently shut off.
If condensation starts to form on the
inside window surfaces during operation
in the recirculated-air mode, you should switch
it off while also increasing the air volume as
required.
Page 108 of 221
Driving tips
107Reference
At a glance
Controls
Communication
Navigation
Entertainment
Mobility
Portable phone in the vehicle
BMW discourages the use of mobile
communications devices, e. g. portable
phones, inside the vehicle without a direct con-
nection to an outside antenna. Otherwise, the
vehicle electronics and mobile communication
device can influence one another. In addition,
there is no assurance that the radiation which
results from transmission will be dissipated
from the vehicle interior.<
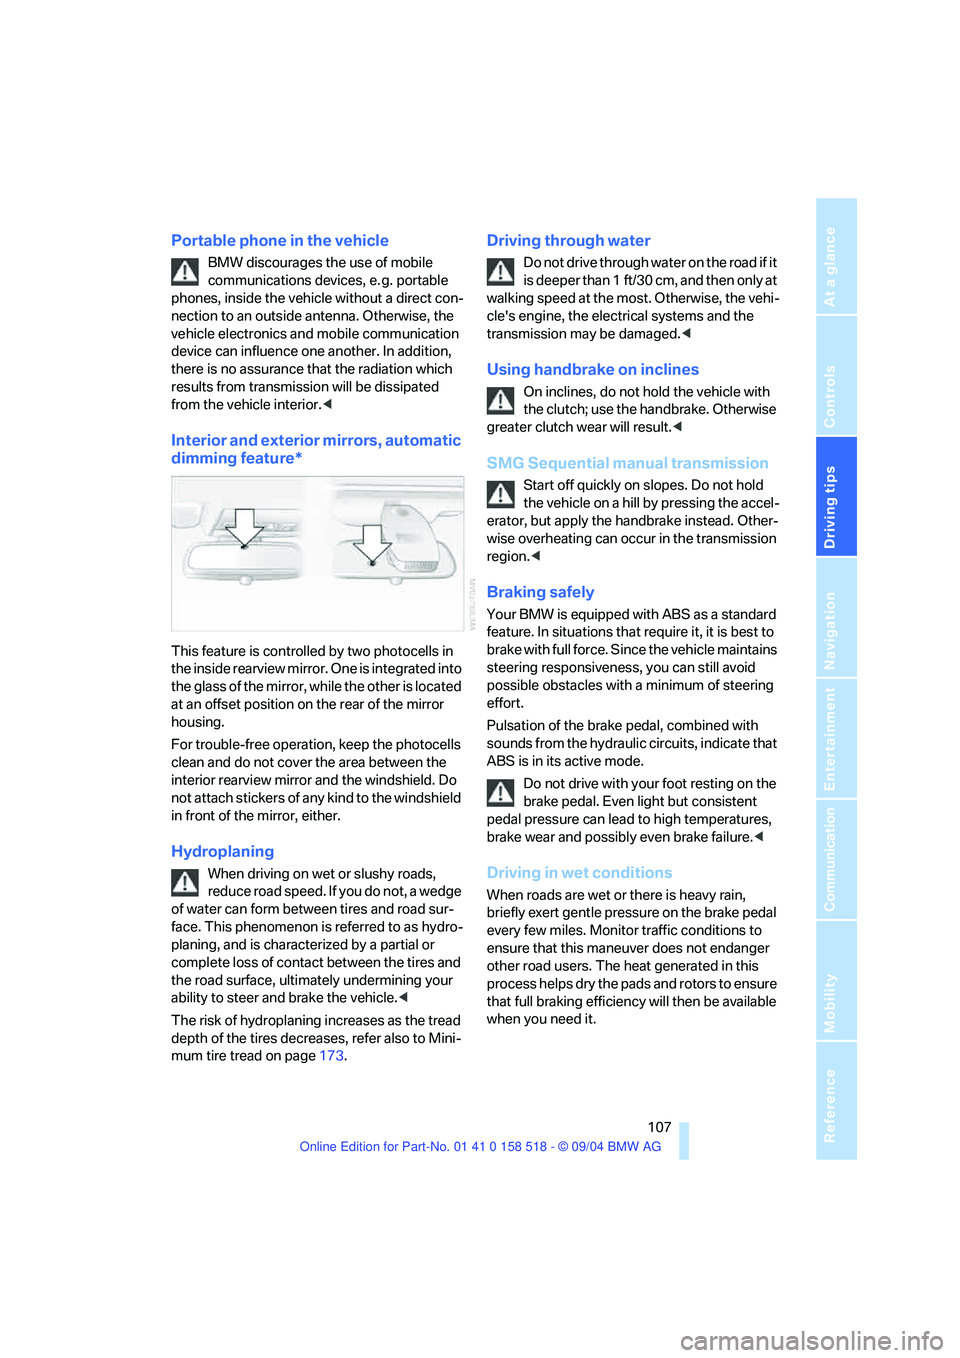
Interior and exterior mirrors, automatic
dimming feature*
This feature is controlled by two photocells in
the inside rearview mirror. One is integrated into
the glass of the mirror, while the other is located
at an offset position on the rear of the mirror
housing.
For trouble-free operation, keep the photocells
clean and do not cover the area between the
interior rearview mirror and the windshield. Do
not attach stickers of any kind to the windshield
in front of the mirror, either.
Hydroplaning
When driving on wet or slushy roads,
reduce road speed. If you do not, a wedge
of water can form between tires and road sur-
face. This phenomenon is referred to as hydro-
planing, and is characterized by a partial or
complete loss of contact between the tires and
the road surface, ultimately undermining your
ability to steer and brake the vehicle.<
The risk of hydroplaning increases as the tread
depth of the tires decreases, refer also to Mini-
mum tire tread on page173.
Driving through water
Do not drive through water on the road if it
is deeper than 1 ft/30 cm, and then only at
walking speed at the most. Otherwise, the vehi-
cle's engine, the electrical systems and the
transmission may be damaged.<
Using handbrake on inclines
On inclines, do not hold the vehicle with
the clutch; use the handbrake. Otherwise
greater clutch wear will result.<
SMG Sequential manual transmission
Start off quickly on slopes. Do not hold
the vehicle on a hill by pressing the accel-
erator, but apply the handbrake instead. Other-
wise overheating can occur in the transmission
region.<
Braking safely
Your BMW is equipped with ABS as a standard
feature. In situations that require it, it is best to
brake with full force. Since the vehicle maintains
steering responsiveness, you can still avoid
possible obstacles with a minimum of steering
effort.
Pulsation of the brake pedal, combined with
sounds from the hydraulic circuits, indicate that
ABS is in its active mode.
Do not drive with your foot resting on the
brake pedal. Even light but consistent
pedal pressure can lead to high temperatures,
brake wear and possibly even brake failure.<
Driving in wet conditions
When roads are wet or there is heavy rain,
briefly exert gentle pressure on the brake pedal
every few miles. Monitor traffic conditions to
ensure that this maneuver does not endanger
other road users. The heat generated in this
process helps dry the pads and rotors to ensure
that full braking efficiency will then be available
when you need it.
Page 109 of 221
Things to remember when driving
108
Hills
To prevent overheating and the resulting
reduced efficiency of the brake system,
drive long or steep downhill gradients in the
gear in which the least braking is required. Even
light but consistent pedal pressure can lead to
high temperatures, brake wear and possibly
even brake failure.<
You can further enhance the engine's braking
action by selecting a lower gear in the automatic
transmission's manual mode, downshifting as
far as first gear on extremely steep stretches,
refer to page56. This strategy helps you avoid
placing excessive loads on the brake system.
Never drive with the clutch pressed or
allow the vehicle to coast with the trans-
mission in Neutral – or with the engine switched
off – there is no engine braking when the trans-
mission is in Neutral, and no power-assist for
brakes and steering when the engine is not run-
ning.
Never allow floor mats, carpets or any other
objects to protrude into the area around the
accelerator and brake pedals and obstruct their
movement.<
Corrosion on brake rotors
When the vehicle is driven only occasionally,
during extended periods when the vehicle is not
used at all, and in operating conditions where
brake applications are less frequent, there is an
increased tendency for corrosion to form on
rotors, while contaminants accumulate on the
brake pads. This occurs because the minimum
pressure which must be exerted by the pads
during brake applications to clean the rotors is
not reached.
Should corrosion form on the brake rotors, the
brakes will tend to respond with a pulsating
effect that even extended application will fail to
cure.
When the vehicle is parked
Condensation forms in the air conditioner sys-
tem during operation, and then exits under the
vehicle.
Traces of condensed water under the
vehicle are therefore normal
.
Before driving into a car wash
To prevent the exterior mirrors on this vehicle
from being damaged, always fold them in by
hand before entering an automatic car wash.
Cargo loading
To avoid loading the tires beyond their
approved carrying capacity, never over-
load the vehicle. Overloading can lead to over-
heating and increases the rate at which damage
develops inside the tires. The ultimate result
can assume the form of a sudden blow-out.<
Determining loading limit
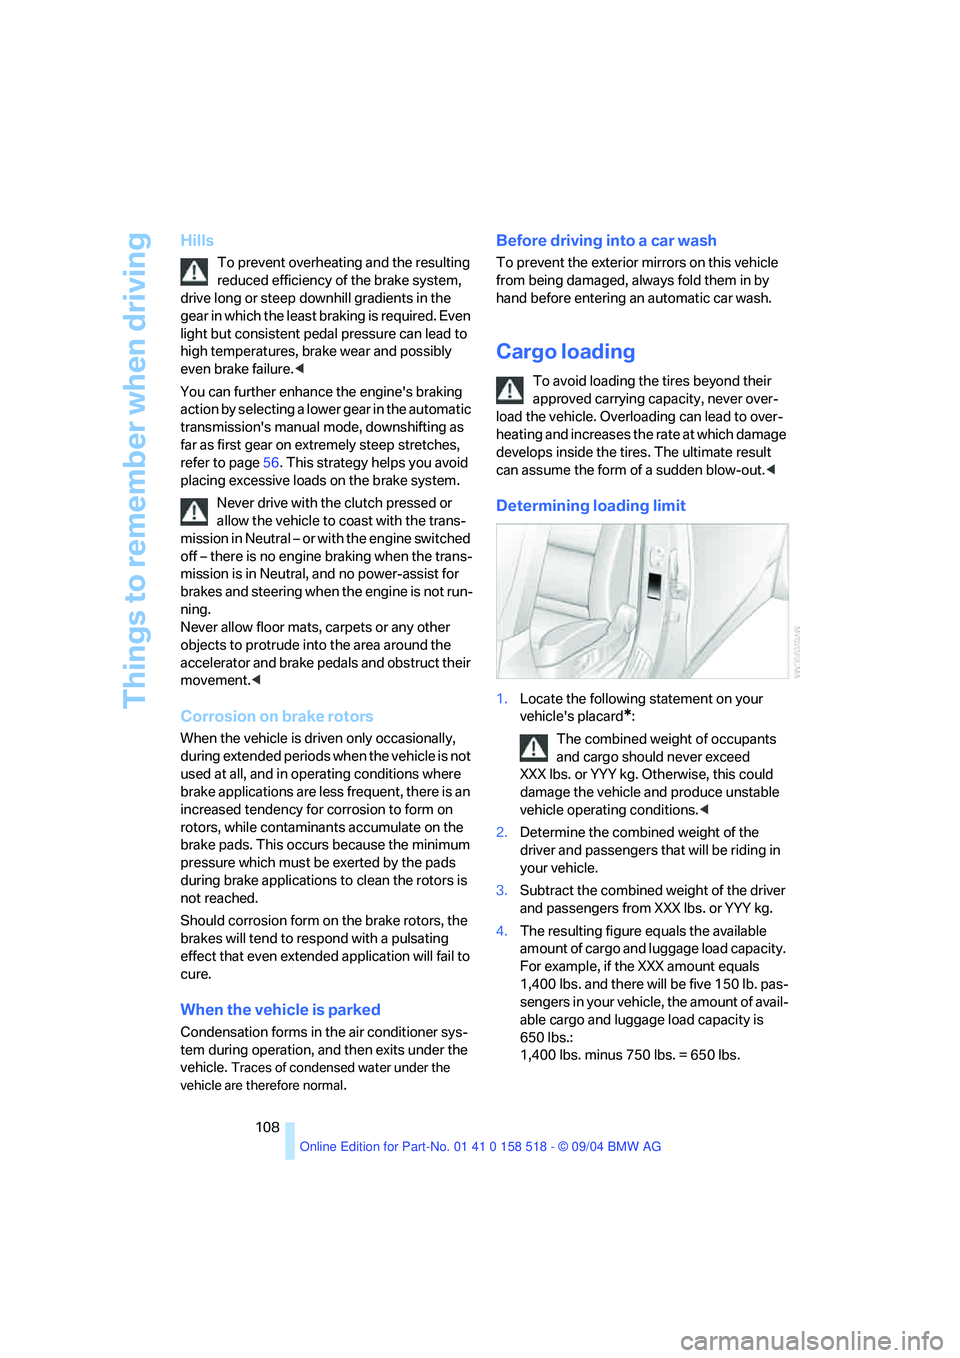
1.Locate the following statement on your
vehicle's placard
*:
The combined weight of occupants
and cargo should never exceed
XXX lbs. or YYY kg. Otherwise, this could
damage the vehicle and produce unstable
vehicle operating conditions.<
2.Determine the combined weight of the
driver and passengers that will be riding in
your vehicle.
3.Subtract the combined weight of the driver
and passengers from XXX lbs. or YYY kg.
4.The resulting figure equals the available
amount of cargo and luggage load capacity.
For example, if the XXX amount equals
1,400 lbs. and there will be five 150 lb. pas-
sengers in your vehicle, the amount of avail-
able cargo and luggage load capacity is
650 lbs.:
1,400 lbs. minus 750 lbs. = 650 lbs.
Page 201 of 221
Short commands of voice command system
200
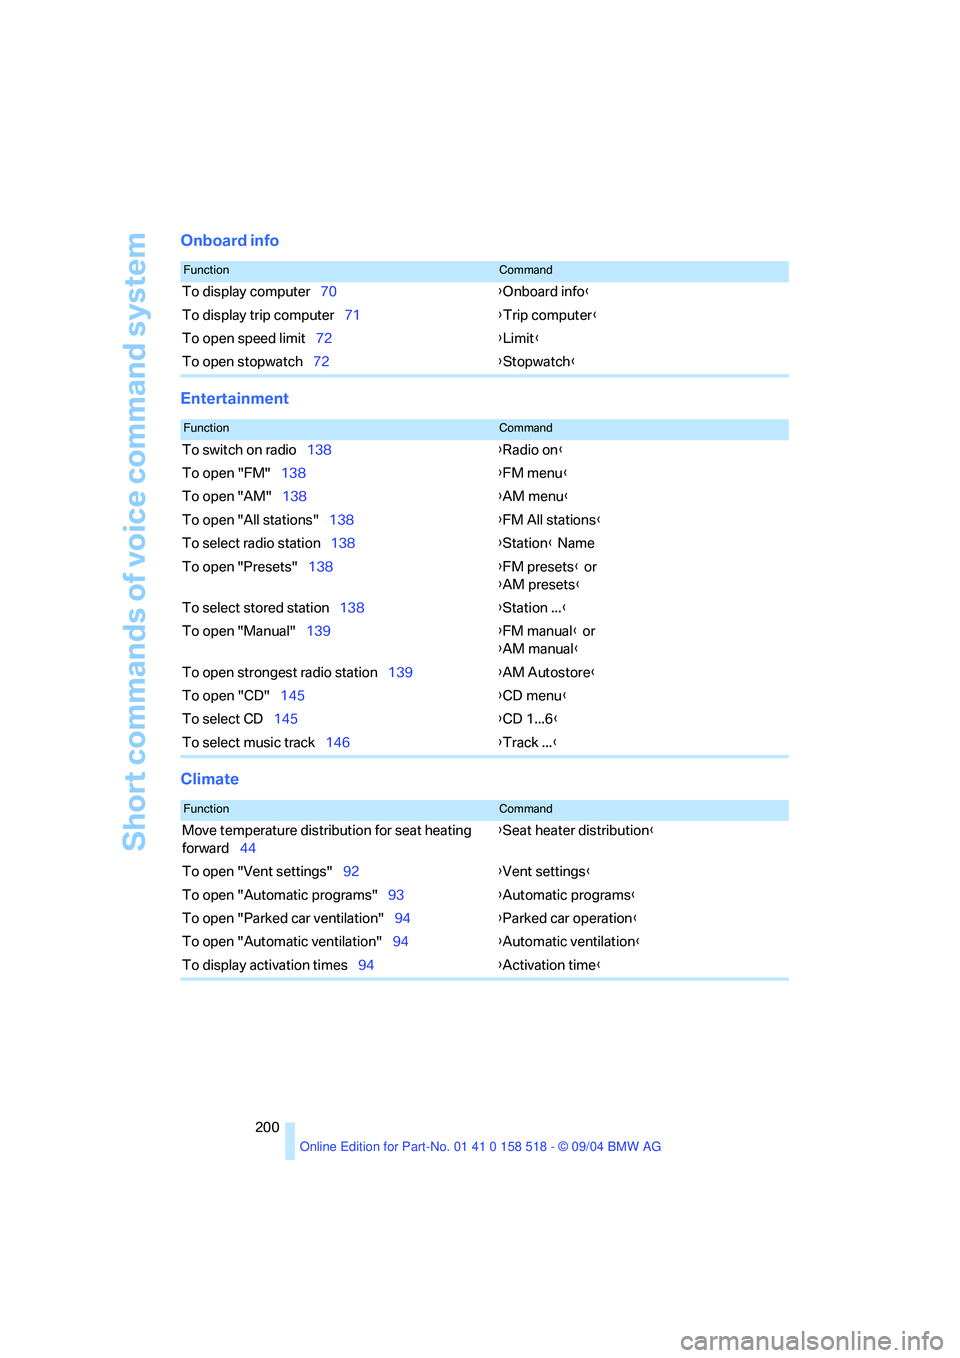
Onboard info
Entertainment
Climate
FunctionCommand
To display computer70{Onboard info}
To display trip computer71{Trip computer}
To open speed limit72{Limit}
To open stopwatch72{Stopwatch}
FunctionCommand
To switch on radio138{Radio on}
To open "FM"138{FM menu}
To open "AM"138{AM menu}
To open "All stations"138{FM All stations}
To select radio station138{Station} Name
To open "Presets"138{FM presets} or
{AM presets}
To select stored station138{Station ...}
To open "Manual"139{FM manual} or
{AM manual}
To open strongest radio station139{AM Autostore}
To open "CD"145{CD menu}
To select CD145{CD 1...6}
To select music track146{Track ...}
FunctionCommand
Move temperature distribution for seat heating
forward44{Seat heater distribution}
To open "Vent settings"92{Vent settings}
To open "Automatic programs"93{Automatic programs}
To open "Parked car ventilation"94{Parked car operation}
To open "Automatic ventilation"94{Automatic ventilation}
To display activation times94{Activation time}
Page 208 of 221
Reference 207
At a glance
Controls
Driving tips
Communica-
Navigation
Entertainment
Mobility
E
Easy entry/exit45
– backrest width40
Eject button, refer to Buttons
on CD player132
Electrical malfunction
– door lock31
– driver's door31
– fuel filler door168
– glass sunroof37
– glass sunroof, electric37
– luggage compartment lid33
Electric steering wheel
adjustment45
Electronic brake-force
distribution77
Emergency call189
Emergency operation, refer to
Manual operation
– door lock31
– driver's door31
– fuel filler door168
– glass sunroof37
– luggage compartment lid33
Emergency release of luggage
compartment lid from
luggage compartment's
interior33
Emergency services, refer to
Roadside Assistance190
"Emission inspect."67
"Enable services"162
"End call"155
Energy-conscious driving,
refer to Energy Control66
Energy Control66
Engine
– breaking-in106
– data196
– speed196
– starting51
– starting difficulties51
– switching off52
Engine compartment177
Engine coolant178Engine oil
– adding178
– checking the oil level177
– specified engine oils178
Engine output, refer to Engine
data196
Engine speed196
Engine starting, refer to
Starting engine51
"Enter address"116
Entering destination116
Entering the address115
Entering the intersection117
"Entertainment"133
"Entertainment settings"134
Entry map for destination117
"Equalizer", refer to Tone
control135
"ESN"142
ESP Electronic Stability
Program, refer to DSC
Dynamic Stability
Control78
Event Data Recorders181
Exhaust system, refer to Hot
exhaust system106
Exterior mirrors45
– automatic dimming
feature107
– automatic heating45
Exterior rearview mirror
– passenger-side mirror tilt
function41
F
Fader, tone control134
Failure messages, refer to
Check Control67
False alarm, refer to Avoiding
unintentional alarms34
Fastening safety belts, refer to
Safety belts42
– warning lamp43
Fastest route for
navigation122
"Fast route" for
navigation122First aid, refer to First-aid
kit189
First-aid kit189
Flashlight98
– refer to Rechargeable
flashlight98
Flash when locking/
unlocking30
Flat tire
– changing wheels185
– compact wheel186
– Flat Tire Monitor80
– run-flat tires80,174
Flat Tire Monitor79
– false alarms80
– initializing system80
– malfunctions81
– snow chains175
– system limits80
– warning lamp80
Flat tires, refer to Tire
condition173
"FM", reception
range133,138
FM, waveband138
Fog lamps88
– indicator lamp13,88
Folding down rear seat101
Folding rear seat back101
Footbrake, refer to Braking
safely107
Footwell lamps89
Forward, fast
– CD changer147
– CD player147
For your own safety6
Front airbags83
Front armrest, refer to Center
armrest
– front98
Front seat adjustment38
"FTM"80
Fuel169
– capacity198
– display66
– high-quality brands169
– quality169
– specifications169