2005 BMW 525I display
[x] Cancel search: displayPage 91 of 221
A congenial climate
90
A congenial climate
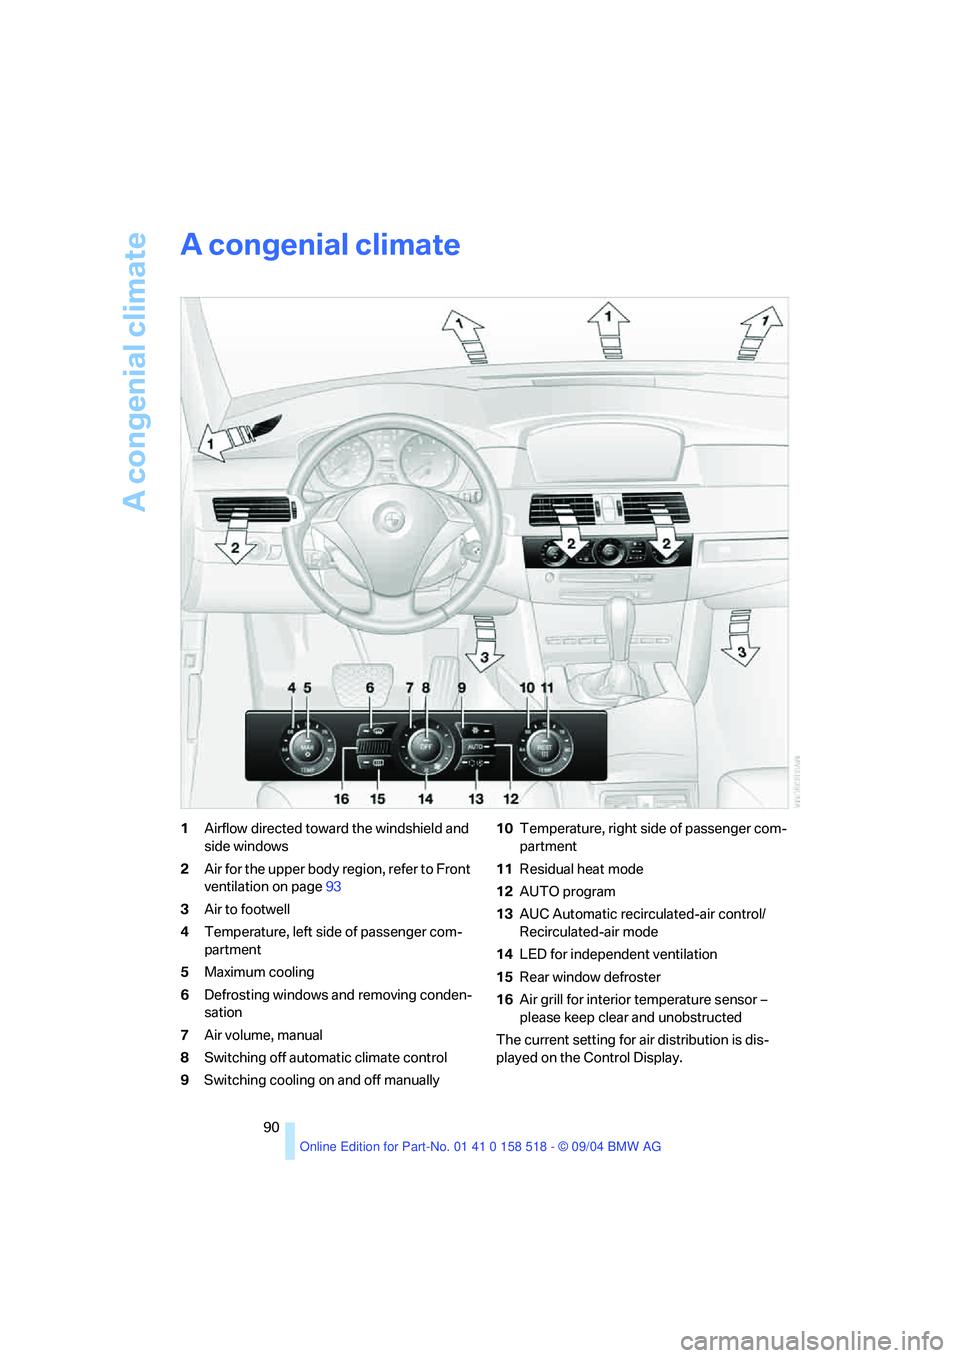
1Airflow directed toward the windshield and
side windows
2Air for the upper body region, refer to Front
ventilation on page93
3Air to footwell
4Temperature, left side of passenger com-
partment
5Maximum cooling
6Defrosting windows and removing conden-
sation
7Air volume, manual
8Switching off automatic climate control
9Switching cooling on and off manually10Temperature, right side of passenger com-
partment
11Residual heat mode
12AUTO program
13AUC Automatic recirculated-air control/
Recirculated-air mode
14LED for independent ventilation
15Rear window defroster
16Air grill for interior temperature sensor –
please keep clear and unobstructed
The current setting for air distribution is dis-
played on the Control Display.
Page 95 of 221
A congenial climate
94
Microfilter/activated-charcoal filter
The microfilter removes dust and pollen from
the incoming air. The activated-charcoal filter
provides additional protection by filtering gas-
eous pollutants from the outside air. Your BMW
center replaces this combined filter as a stan-
dard part of your scheduled maintenance.
You can select a display of more detailed infor-
mation on the Control Display, refer to page66.
Independent ventilation*
The independent ventilation blows air into the
passenger compartment to lower interior tem-
peratures.
The independent ventilation is controlled using
the Control Center. You can set two different
times for the system to start.
The independent ventilation remains on for
30 minutes. It can also be switched on and off
directly. Since the system uses a substantial
amount of electrical current, you should refrain
from activating it twice in succession without
allowing the battery to be recharged in normal
operation between use.
The independent ventilation is ready for use at
any outside temperature, up to ignition key
position 1.
The air emerges through the upper body region
vent outlets in the instrument panel. These vent
outlets must be open for the system to operate.
Switching on and off directly
Control Center, for principle details, refer to
page16.
1.Open "Climate".
2.Select "Parked car operation" and press the
controller.
3.Select "Automatic ventilation" and press
the controller.4.Select "Parked car ventilation" and press
the controller.
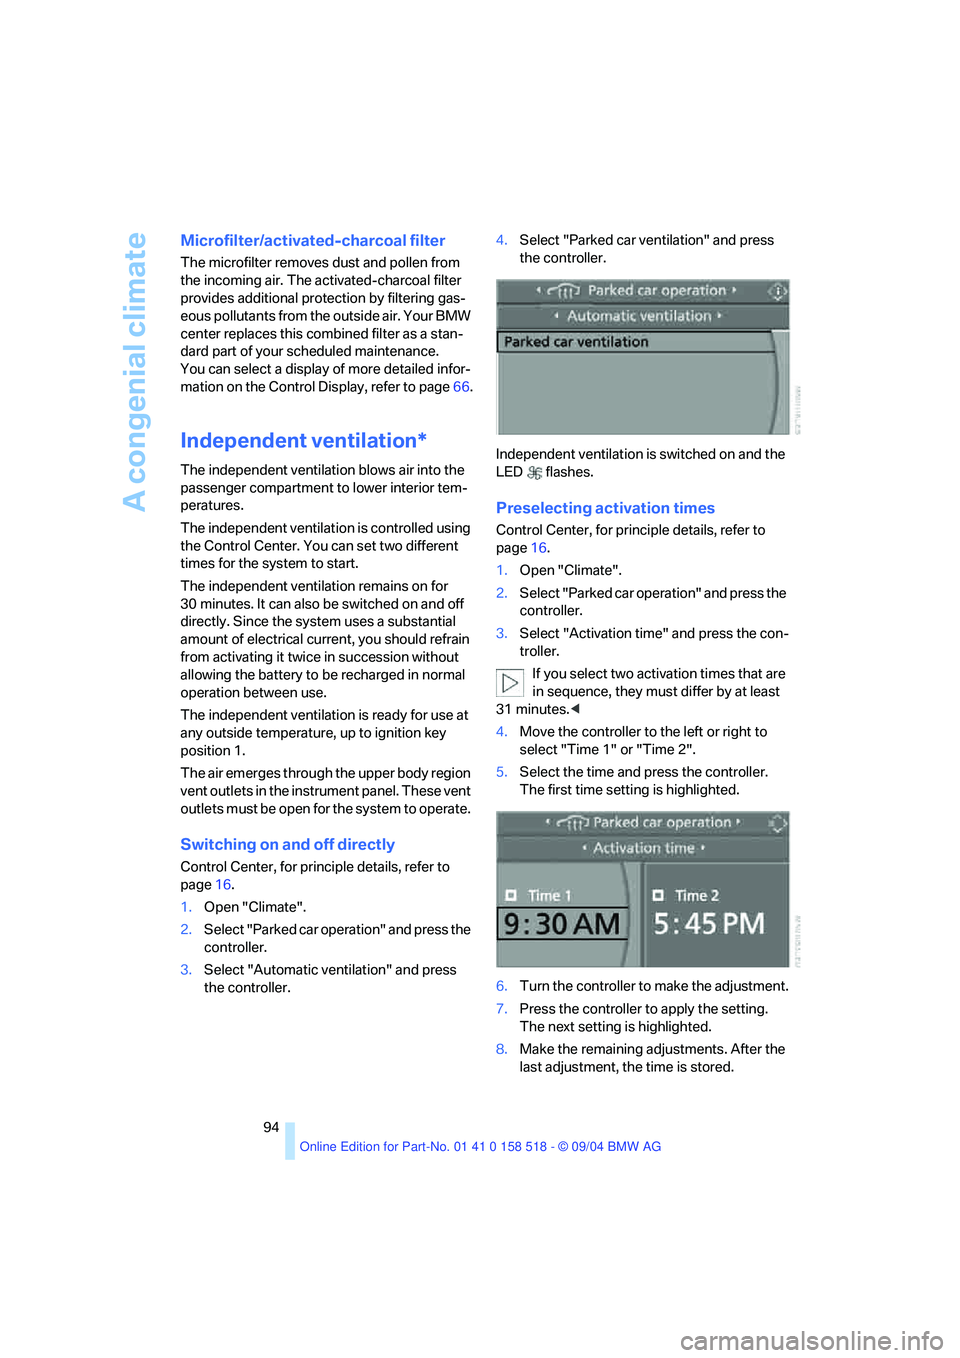
Independent ventilation is switched on and the
LED flashes.
Preselecting activation times
Control Center, for principle details, refer to
page16.
1.Open "Climate".
2.Select "Parked car operation" and press the
controller.
3.Select "Activation time" and press the con-
troller.
If you select two activation times that are
in sequence, they must differ by at least
31 minutes.<
4.Move the controller to the left or right to
select "Time 1" or "Time 2".
5.Select the time and press the controller.
The first time setting is highlighted.
6.Turn the controller to make the adjustment.
7.Press the controller to apply the setting.
The next setting is highlighted.
8.Make the remaining adjustments. After the
last adjustment, the time is stored.
Page 115 of 221
Starting navigation system
114
Starting navigation system
Your navigation system can use satellites to
ascertain the precise position of your vehicle
and guide you reliably to any destination you
enter.
Navigation DVD
Special navigation DVDs are required for each
navigation system. You can obtain the latest
version at your BMW center.
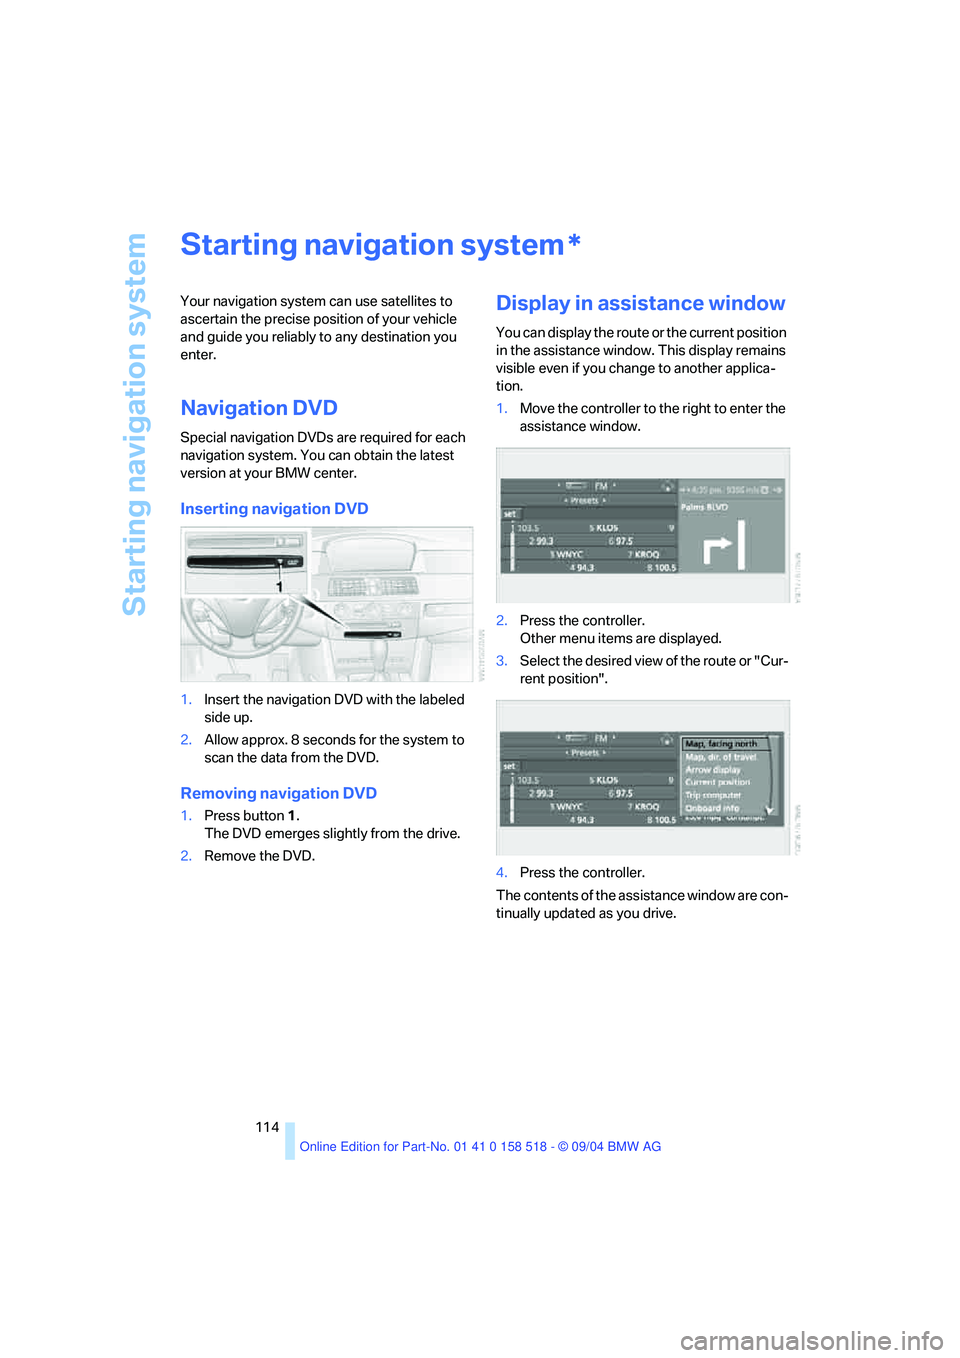
Inserting navigation DVD
1.Insert the navigation DVD with the labeled
side up.
2.Allow approx. 8 seconds for the system to
scan the data from the DVD.
Removing navigation DVD
1.Press button 1.
The DVD emerges slightly from the drive.
2.Remove the DVD.
Display in assistance window
You can display the route or the current position
in the assistance window. This display remains
visible even if you change to another applica-
tion.
1.Move the controller to the right to enter the
assistance window.
2.Press the controller.
Other menu items are displayed.
3.Select the desired view of the route or "Cur-
rent position".
4.Press the controller.
The contents of the assistance window are con-
tinually updated as you drive.
*
Page 117 of 221
Destination entry
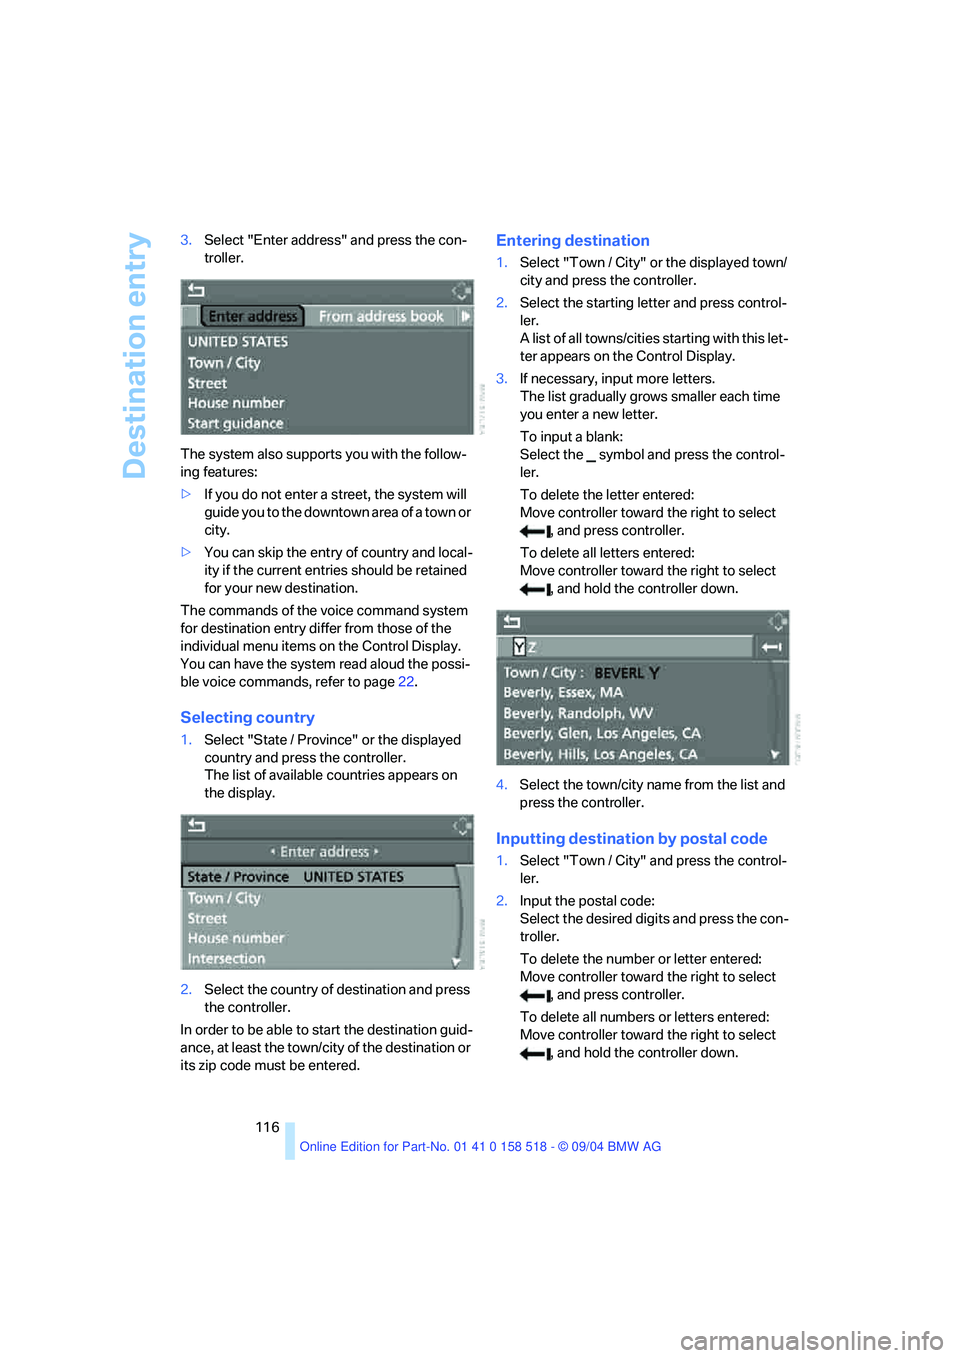
116 3.Select "Enter address" and press the con-
troller.
The system also supports you with the follow-
ing features:
>If you do not enter a street, the system will
guide you to the downtown area of a town or
city.
>You can skip the entry of country and local-
ity if the current entries should be retained
for your new destination.
The commands of the voice command system
for destination entry differ from those of the
individual menu items on the Control Display.
You can have the system read aloud the possi-
ble voice commands, refer to page22.
Selecting country
1.Select "State / Province" or the displayed
country and press the controller.
The list of available countries appears on
the display.
2.Select the country of destination and press
the controller.
In order to be able to start the destination guid-
ance, at least the town/city of the destination or
its zip code must be entered.
Entering destination
1.Select "Town / City" or the displayed town/
city and press the controller.
2.Select the starting letter and press control-
ler.
A list of all towns/cities starting with this let-
ter appears on the Control Display.
3.If necessary, input more letters.
The list gradually grows smaller each time
you enter a new letter.
To input a blank:
Select the symbol and press the control-
ler.
To delete the letter entered:
Move controller toward the right to select
, and press controller.
To delete all letters entered:
Move controller toward the right to select
, and hold the controller down.
4.Select the town/city name from the list and
press the controller.
Inputting destination by postal code
1.Select "Town / City" and press the control-
ler.
2.Input the postal code:
Select the desired digits and press the con-
troller.
To delete the number or letter entered:
Move controller toward the right to select
, and press controller.
To delete all numbers or letters entered:
Move controller toward the right to select
, and hold the controller down.
Page 118 of 221
Navigation
Driving tips
117Reference
At a glance
Controls
Communication
Entertainment
Mobility
3.Select the postal code and press the con-
troller.
The corresponding destination is displayed.
4.Select the destination and press the con-
troller.
Entering street, house number and
intersection
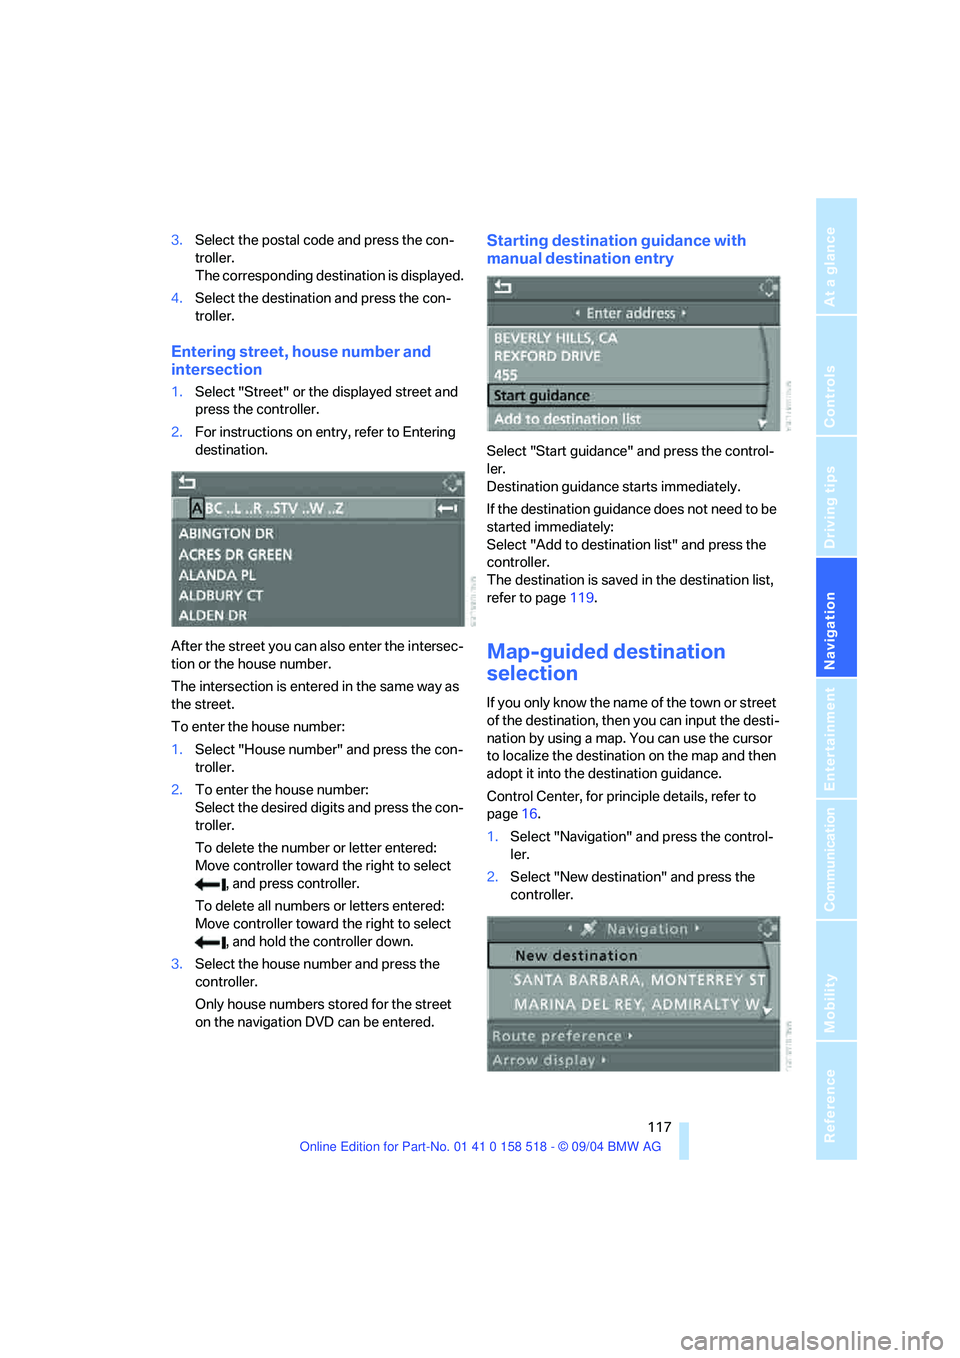
1.Select "Street" or the displayed street and
press the controller.
2.For instructions on entry, refer to Entering
destination.
After the street you can also enter the intersec-
tion or the house number.
The intersection is entered in the same way as
the street.
To enter the house number:
1.Select "House number" and press the con-
troller.
2.To enter the house number:
Select the desired digits and press the con-
troller.
To delete the number or letter entered:
Move controller toward the right to select
, and press controller.
To delete all numbers or letters entered:
Move controller toward the right to select
, and hold the controller down.
3.Select the house number and press the
controller.
Only house numbers stored for the street
on the navigation DVD can be entered.
Starting destination guidance with
manual destination entry
Select "Start guidance" and press the control-
ler.
Destination guidance starts immediately.
If the destination guidance does not need to be
started immediately:
Select "Add to destination list" and press the
controller.
The destination is saved in the destination list,
refer to page119.
Map-guided destination
selection
If you only know the name of the town or street
of the destination, then you can input the desti-
nation by using a map. You can use the cursor
to localize the destination on the map and then
adopt it into the destination guidance.
Control Center, for principle details, refer to
page16.
1.Select "Navigation" and press the control-
ler.
2.Select "New destination" and press the
controller.
Page 119 of 221
Destination entry
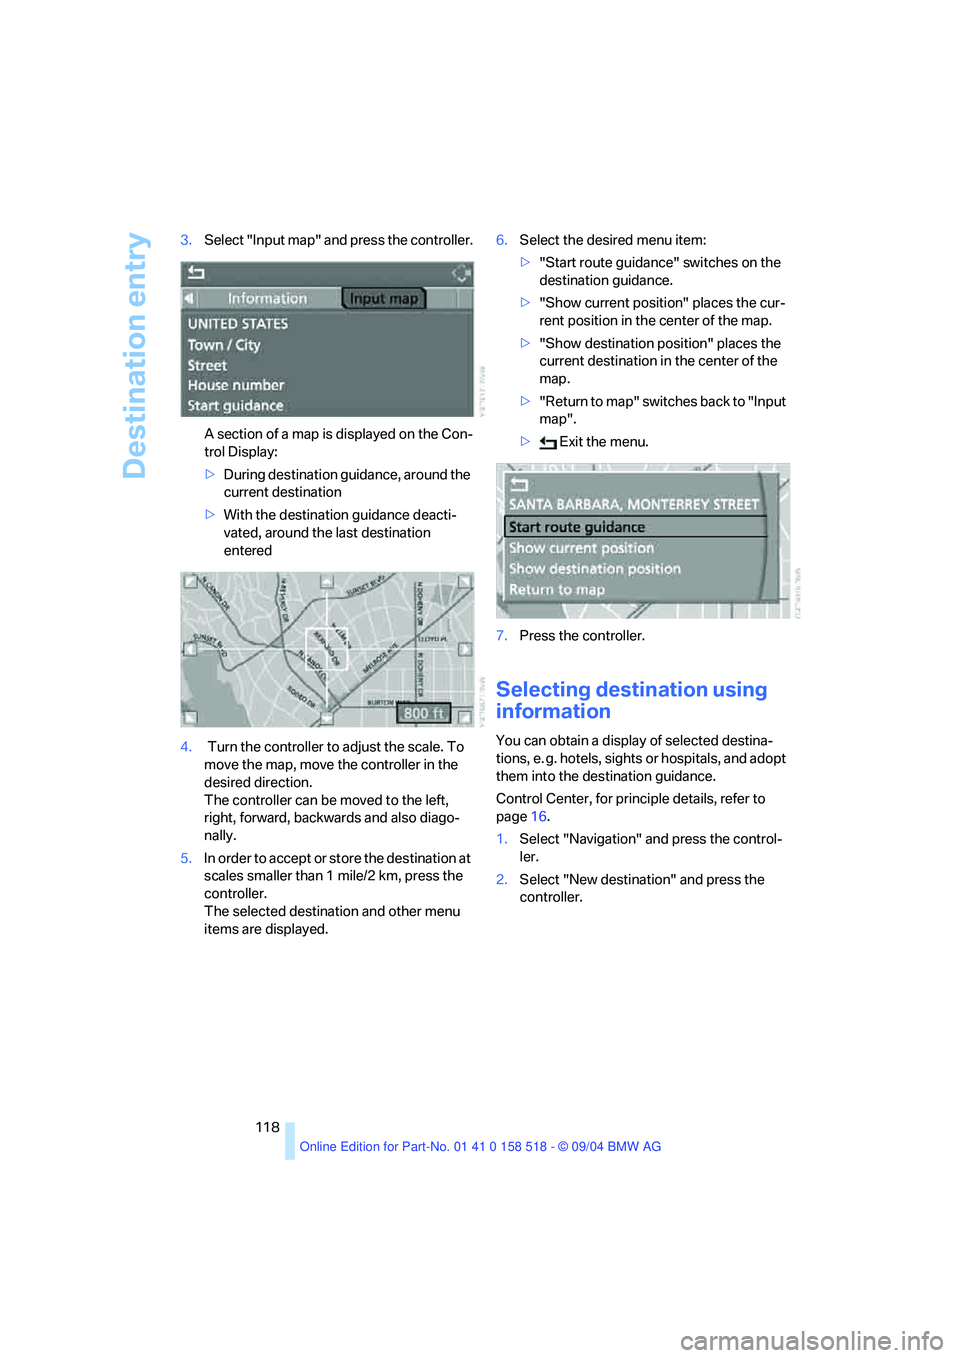
118 3.Select "Input map" and press the controller.
A section of a map is displayed on the Con-
trol Display:
>During destination guidance, around the
current destination
>With the destination guidance deacti-
vated, around the last destination
entered
4. Turn the controller to adjust the scale. To
move the map, move the controller in the
desired direction.
The controller can be moved to the left,
right, forward, backwards and also diago-
nally.
5.In order to accept or store the destination at
scales smaller than 1 mile/2 km, press the
controller.
The selected destination and other menu
items are displayed.6.Select the desired menu item:
>"Start route guidance" switches on the
destination guidance.
>"Show current position" places the cur-
rent position in the center of the map.
>"Show destination position" places the
current destination in the center of the
map.
>" R e t ur n t o m a p " s w i t c he s b a c k t o " I n p u t
map".
> Exit the menu.
7.Press the controller.
Selecting destination using
information
You can obtain a display of selected destina-
tions, e. g. hotels, sights or hospitals, and adopt
them into the destination guidance.
Control Center, for principle details, refer to
page16.
1.Select "Navigation" and press the control-
ler.
2.Select "New destination" and press the
controller.
Page 120 of 221
Navigation
Driving tips
119Reference
At a glance
Controls
Communication
Entertainment
Mobility
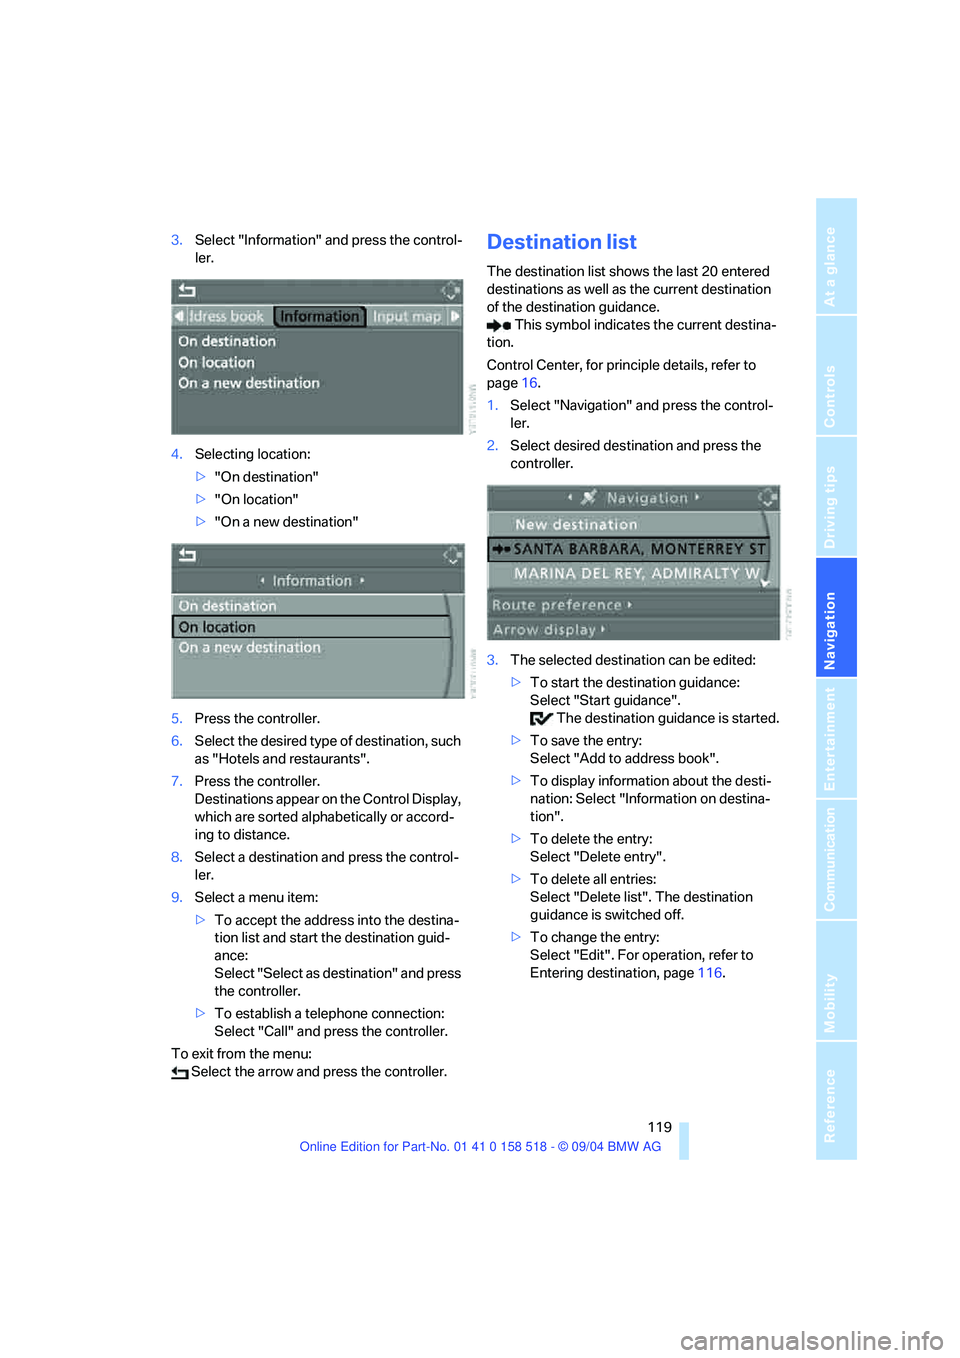
3.Select "Information" and press the control-
ler.
4.Selecting location:
>"On destination"
>"On location"
>"On a new destination"
5.Press the controller.
6.Select the desired type of destination, such
as "Hotels and restaurants".
7.Press the controller.
Destinations appear on the Control Display,
which are sorted alphabetically or accord-
ing to distance.
8.Select a destination and press the control-
ler.
9.Select a menu item:
>To accept the address into the destina-
tion list and start the destination guid-
ance:
Select "Select as destination" and press
the controller.
>To establish a telephone connection:
Select "Call" and press the controller.
To exit from the menu:
Select the arrow and press the controller.Destination list
The destination list shows the last 20 entered
destinations as well as the current destination
of the destination guidance.
This symbol indicates the current destina-
tion.
Control Center, for principle details, refer to
page16.
1.Select "Navigation" and press the control-
ler.
2.Select desired destination and press the
controller.
3.The selected destination can be edited:
>To start the destination guidance:
Select "Start guidance".
The destination guidance is started.
>To save the entry:
Select "Add to address book".
>To display information about the desti-
nation: Select "Information on destina-
tion".
>To delete the entry:
Select "Delete entry".
>To delete all entries:
Select "Delete list". The destination
guidance is switched off.
>To change the entry:
Select "Edit". For operation, refer to
Entering destination, page116.
Page 122 of 221
Navigation
Driving tips
121Reference
At a glance
Controls
Communication
Entertainment
Mobility
4.Select "Store in address book" and press
the controller.
You can also enter your current position into the
address book if you have left the sector covered
by the navigation DVD. In this case, you must
enter a name.
Selecting destinations from address
book
Control Center, for principle details, refer to
page16.
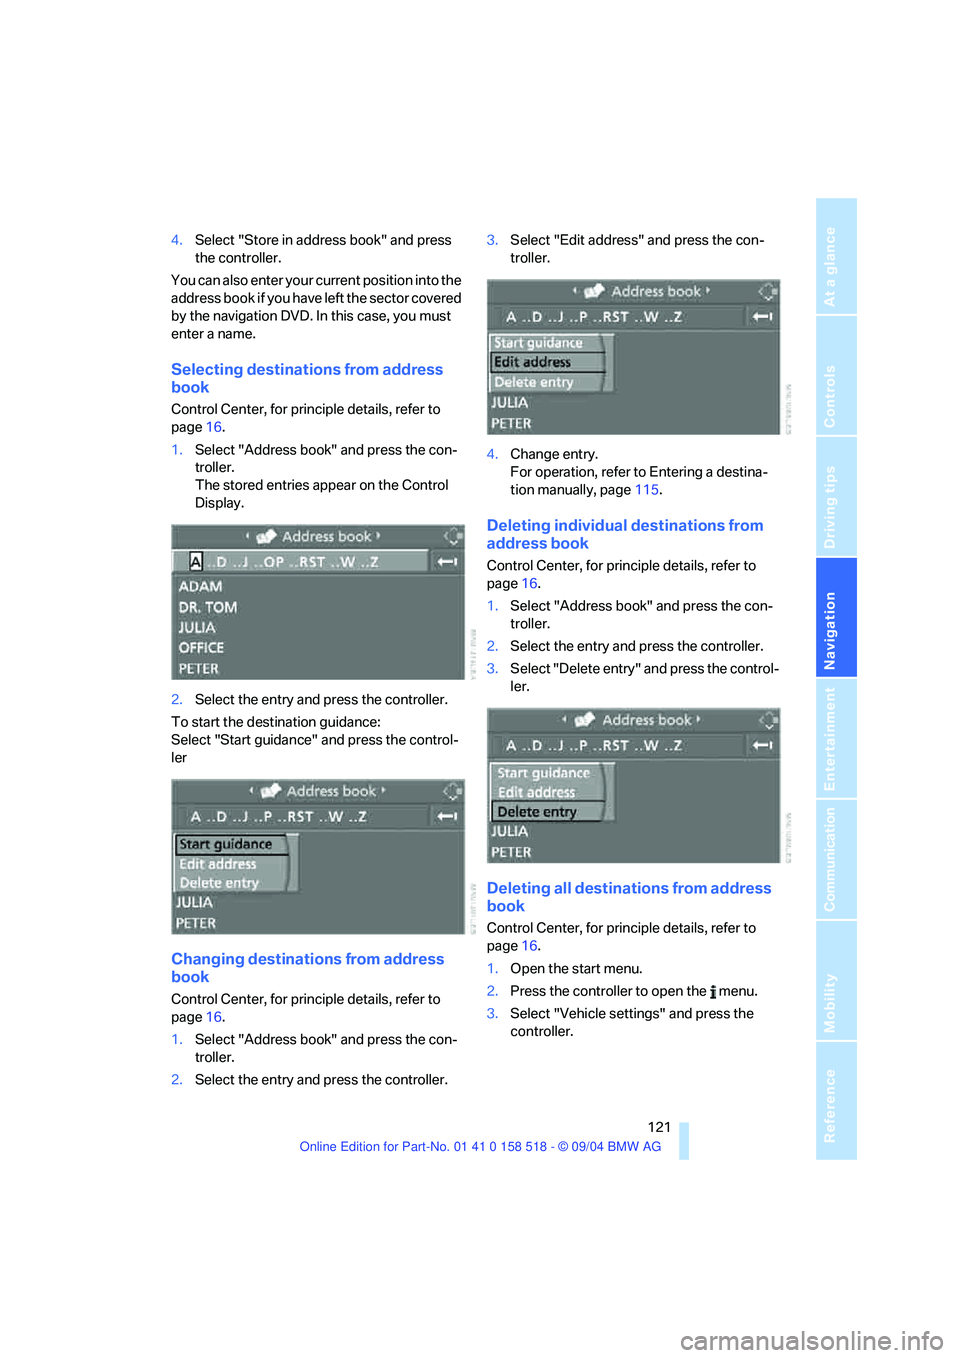
1.Select "Address book" and press the con-
troller.
The stored entries appear on the Control
Display.
2.Select the entry and press the controller.
To start the destination guidance:
Select "Start guidance" and press the control-
ler
Changing destinations from address
book
Control Center, for principle details, refer to
page16.
1.Select "Address book" and press the con-
troller.
2.Select the entry and press the controller.3.Select "Edit address" and press the con-
troller.
4.Change entry.
For operation, refer to Entering a destina-
tion manually, page115.
Deleting individual destinations from
address book
Control Center, for principle details, refer to
page16.
1.Select "Address book" and press the con-
troller.
2.Select the entry and press the controller.
3.Select "Delete entry" and press the control-
ler.
Deleting all destinations from address
book
Control Center, for principle details, refer to
page16.
1.Open the start menu.
2.Press the controller to open the menu.
3.Select "Vehicle settings" and press the
controller.