2005 BMW 330XI IDRIVE SEDAN change time
[x] Cancel search: change timePage 21 of 223
iDrive
20
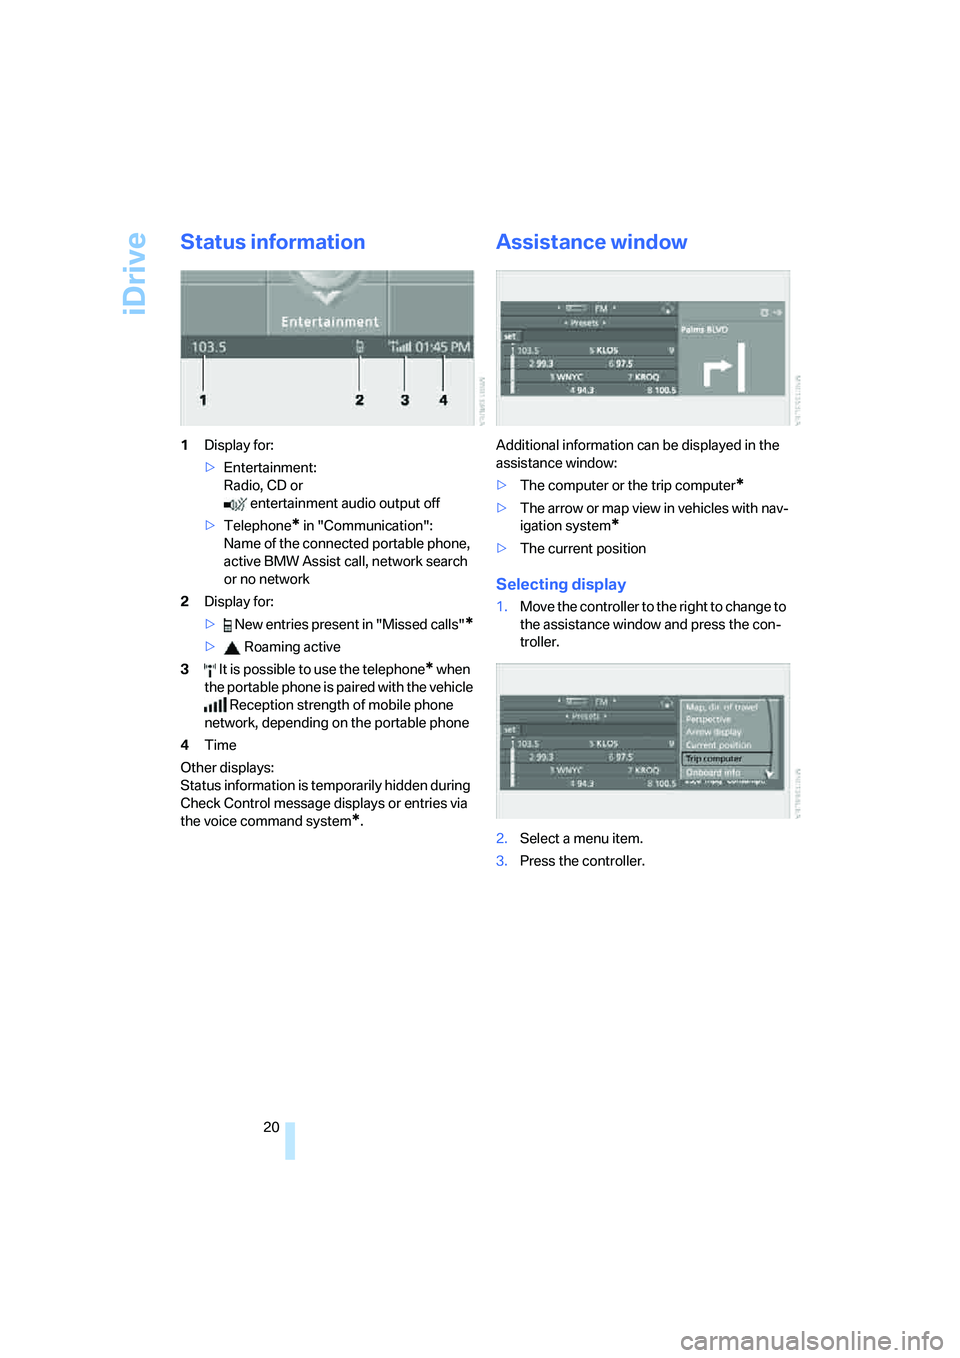
Status information
1Display for:
>Entertainment:
Radio, CD or
entertainment audio output off
>Telephone
* in "Communication":
Name of the connected portable phone,
active BMW Assist call, network search
or no network
2Display for:
> New entries present in "Missed calls"
*
> Roaming active
3 It is possible to use the telephone
* when
the portable phone is paired with the vehicle
Reception strength of mobile phone
network, depending on the portable phone
4Time
Other displays:
Status information is temporarily hidden during
Check Control message displays or entries via
the voice command system
*.
Assistance window
Additional information can be displayed in the
assistance window:
>The computer or the trip computer
*
>The arrow or map view in vehicles with nav-
igation system
*
>The current position
Selecting display
1.Move the controller to the right to change to
the assistance window and press the con-
troller.
2.Select a menu item.
3.Press the controller.
Page 30 of 223

Controls
29Reference
At a glance
Driving tips
Communications
Navigation
Entertainment
Mobility
Personal Profile
You can set many of your BMW's functions to
suit your personal needs and preferences.
Without any action on your part, Personal Pro-
file ensures that most of these settings are
stored for the remote control currently in use.
When you unlock the car, the remote control
used for the purpose is recognized and the set-
tings stored for it are called up and imple-
mented.
This means that your personal settings are
active when you return to your BMW, even if the
car was used in the meantime by someone else
with a remote control of their own and the set-
tings were changed accordingly.
You can configure a maximum of three remote
controls for three different people. The prereq-
uisite for this is that each person has his or her
own remote control.
Personal Profile settings
For more information on specific settings, refer
to the specified pages.
>Response of the central locking system
when the car is unlocked, refer to page30
>Automatic locking of the vehicle, refer to
page32
>Automatic adjustment of the driver's seat
and the exterior mirrors after unlocking
*,
refer to page43
>Functions assigned to the programmable
buttons
* on the steering wheel, refer to
page45
>12h/24h mode of the clock, refer to page72
>Date format, refer to page73
>Brightness of the Control Display, refer to
page76
>Language on the Control Display, refer to
page76
>Units of measure for fuel consumption, dis-
tance covered/remaining distances, and
temperature, refer to page68
>Show visual warning for Park Distance Con-
trol PDC
*, refer to page77>Automatic climate control: AUTO program,
activating/deactivating cooling function and
automatic recirculated-air control, setting
temperature, air flow rate and distribution,
refer to page90 ff
>Audio volume, refer to page135
>Tone control, refer to page135
>Speed-dependent volume control, refer to
page135
Central locking system
The concept
The central locking system is ready for opera-
tion whenever the driver's door is closed.
The system simultaneously engages and
releases the locks on the following:
>Doors
>Luggage compartment lid
>Fuel filler door
Operation of the central locking system
from outside
>Via the remote control
>Via the door lock
The anti-theft system is automatically activated
whenever you operate the central locking sys-
tem from outside the vehicle. It prevents the
doors from being unlocked using the lock but-
tons or door handles. The interior lamp and the
courtesy lamps
* are also switched on or off
with the remote control. The alarm system
* is
also armed or disarmed.
For further details of the alarm system,
refer to
page34.
Operation of the central locking system
from inside
By means of the button for central locking, refer
to page32.
In the event of a sufficiently severe accident, the
central locking system unlocks automatically. In
addition, the hazard warning flashers and inte-
rior lamps come on.
Page 32 of 223
Controls
31Reference
At a glance
Driving tips
Communications
Navigation
Entertainment
Mobility
Before and after each trip, check that the lug-
gage compartment lid has not been inadvert-
ently unlocked.<
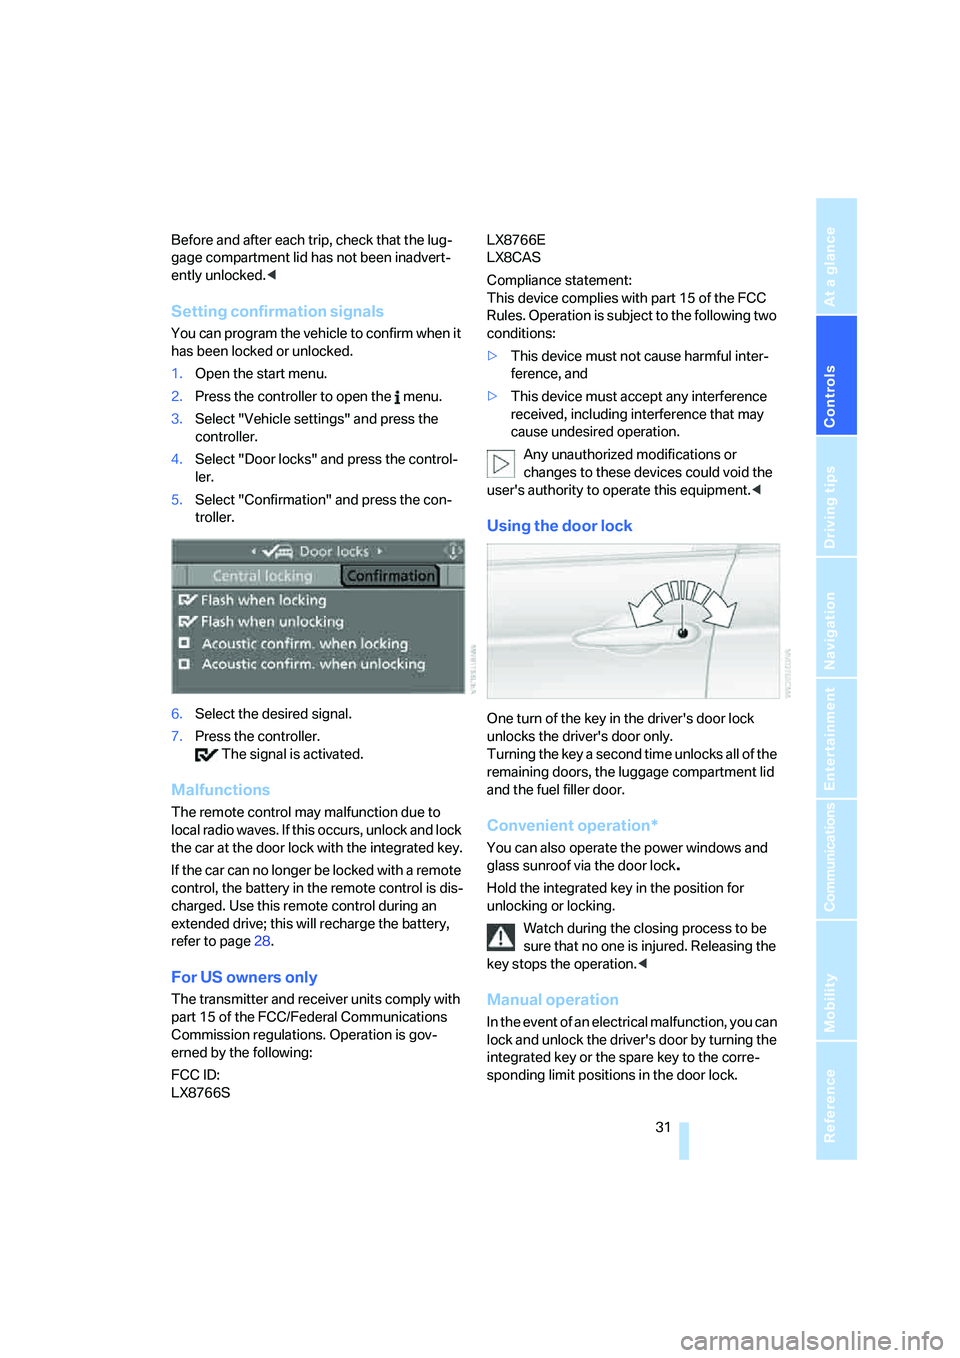
Setting confirmation signals
You can program the vehicle to confirm when it
has been locked or unlocked.
1.Open the start menu.
2.Press the controller to open the menu.
3.Select "Vehicle settings" and press the
controller.
4.Select "Door locks" and press the control-
ler.
5.Select "Confirmation" and press the con-
troller.
6.Select the desired signal.
7.Press the controller.
The signal is activated.
Malfunctions
The remote control may malfunction due to
local radio waves. If this occurs, unlock and lock
the car at the door lock with the integrated key.
If the car can no longer be locked with a remote
control, the battery in the remote control is dis-
charged. Use this remote control during an
extended drive; this will recharge the battery,
refer to page28.
For US owners only
The transmitter and receiver units comply with
part 15 of the FCC/Federal Communications
Commission regulations. Operation is gov-
erned by the following:
FCC ID:
LX8766S LX8766E
LX8CAS
Compliance statement:
This device complies with part 15 of the FCC
Rules. Operation is subject to the following two
conditions:
>This device must not cause harmful inter-
ference, and
>This device must accept any interference
received, including interference that may
cause undesired operation.
Any unauthorized modifications or
changes to these devices could void the
user's authority to operate this equipment.<
Using the door lock
One turn of the key in the driver's door lock
unlocks the driver's door only.
Turning the key a second time unlocks all of the
remaining doors, the luggage compartment lid
and the fuel filler door.
Convenient operation*
You can also operate the power windows and
glass sunroof via the door lock
.
Hold the integrated key in the position for
unlocking or locking.
Watch during the closing process to be
sure that no one is injured. Releasing the
key stops the operation.<
Manual operation
In the event of an electrical malfunction, you can
lock and unlock the driver's door by turning the
integrated key or the spare key to the corre-
sponding limit positions in the door lock.
Page 35 of 223

Opening and closing
34
Closing
The handle recesses on the interior trim of the
luggage compartment lid make it easier to pull
down.
Make sure that the closing path of the
luggage compartment lid is clear, as oth-
erwise injuries may result.<
Alarm system*
The concept
The vehicle alarm system responds:
>When a door, the hood or the luggage com-
partment lid is opened
>To movements inside the vehicle: Interior
motion sensor, refer to the information fur-
ther below
>When the car's inclination changes, for
instance if an attempt is made to jack it up
and steal the wheels or to raise it prior to
towing away
>When there is an interruption in the power
supply from the battery.
The system responds to unauthorized vehicle
entry and attempted theft by simultaneously
activating:
>An acoustic alarm, which lasts for a period
of approx. 30 seconds
>The hazard warning flashers, which operate
for approx. 5 minutes
*
>The high beams, which flash on and off in
the same rhythm.
Arming and disarming
When you lock or unlock the vehicle, either with
the remote control or at the door lock, the alarm
system is armed or disarmed at the same time.
The system indicates that it has been correctly
armed by switching on the hazard warning
flashers for a single cycle and by emitting an
acoustic signal.
Even when the alarm system is armed, you can
open the luggage compartment lid by means of
the button on the remote control, refer to
page30. When you subsequently close the lug-
gage compartment lid it is again locked and
monitored.
Switching off an alarm
>Unlock the car with the remote control, refer
to page30, or
>insert the remote control all the way into the
ignition lock.
Indicator lamp displays
>The indicator lamp under the inside rear-
view mirror flashes continuously: the sys-
tem is armed.
>The indicator lamp flashes after locking:
doors, hood or luggage compartment lid are
not properly closed. Even if you do not close
the alerted area, the system begins to mon-
itor the remaining areas, and the indicator
lamp flashes continuously after approx. 10
seconds. However, the interior motion sen-
sor is not activated.
>The indicator lamp goes out after unlocking:
your vehicle has not been disturbed while
you were away.
Page 59 of 223
Driving
58 personal responsibility, alertness and aware-
ness in adjusting speed, braking or otherwise
controlling the vehicle. The driver should
decide when to use the system on the basis of
road, traffic, visibility, and weather conditions.
Active cruise control is intended for use on
highway-type roadways where traffic is moving
relatively smoothly. Do not use this system in
city driving; heavy traffic such as during rush
hour; on curvy, winding roads, slippery roads or
roads with sharp curves such as highway off-
ramps; during inclement weather such as snow,
strong rain or fog; or when entering inter-
changes, service/parking areas or toll booths.
It is also important to regulate your vehicle's
speed and distance setting within applicable
legal limits. Always be ready to take action or
apply the brakes if necessary, especially when
the system is actively following a vehicle in front
of you. Otherwise, driving conditions could
result which violate the law or pose a risk of
accident.<
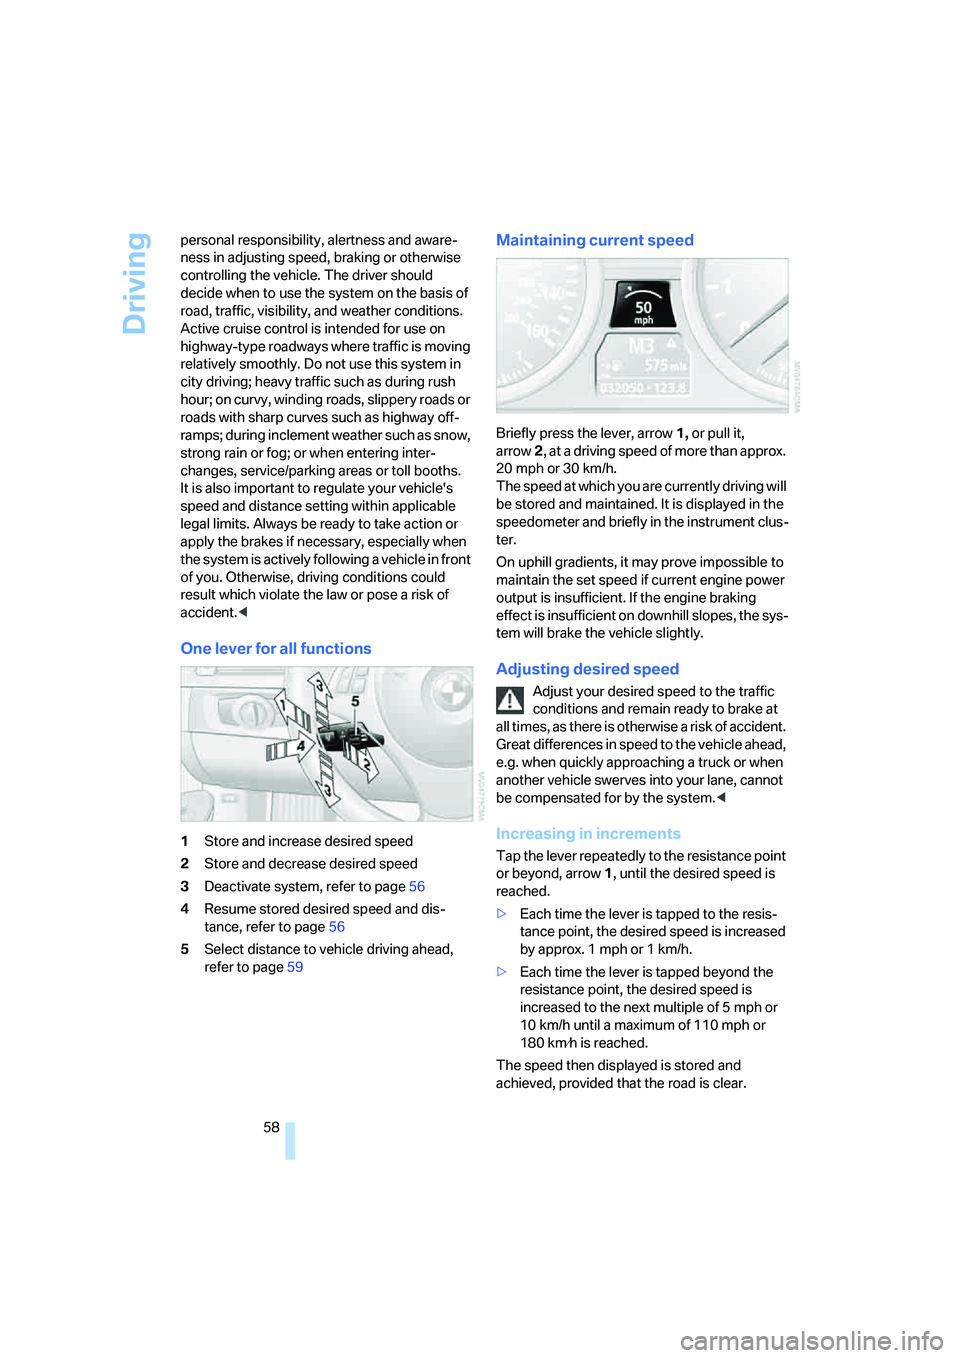
One lever for all functions
1Store and increase desired speed
2Store and decrease desired speed
3Deactivate system, refer to page56
4Resume stored desired speed and dis-
tance, refer to page56
5Select distance to vehicle driving ahead,
refer to page59
Maintaining current speed
Briefly press the lever, arrow1, or pull it,
arrow2, at a driving speed of more than approx.
20 mph or 30 km/h.
The speed at which you are currently driving will
be stored and maintained. It is displayed in the
speedometer and briefly in the instrument clus-
ter.
On uphill gradients, it may prove impossible to
maintain the set speed if current engine power
output is insufficient. If the engine braking
effect is insufficient on downhill slopes, the sys-
tem will brake the vehicle slightly.
Adjusting desired speed
Adjust your desired speed to the traffic
conditions and remain ready to brake at
all times, as there is otherwise a risk of accident.
Great differences in speed to the vehicle ahead,
e.g. when quickly approaching a truck or when
another vehicle swerves into your lane, cannot
be compensated for by the system.<
Increasing in increments
Tap the lever repeatedly to the resistance point
or beyond, arrow1, until the desired speed is
reached.
>Each time the lever is tapped to the resis-
tance point, the desired speed is increased
by approx. 1 mph or 1 km/h.
>Each time the lever is tapped beyond the
resistance point, the desired speed is
increased to the next multiple of 5 mph or
10 km/h until a maximum of 110 mph or
180 km⁄h is reached.
The speed then displayed is stored and
achieved, provided that the road is clear.
Page 68 of 223
Controls
67Reference
At a glance
Driving tips
Communications
Navigation
Entertainment
Mobility
>Driving time
>Distance traveled
>Average speed
>Average fuel consumption
Switching trip computer on/off and resetting all
values to zero:
1.Select "Set" and press the controller.
2.Select the desired menu item and press the
controller.
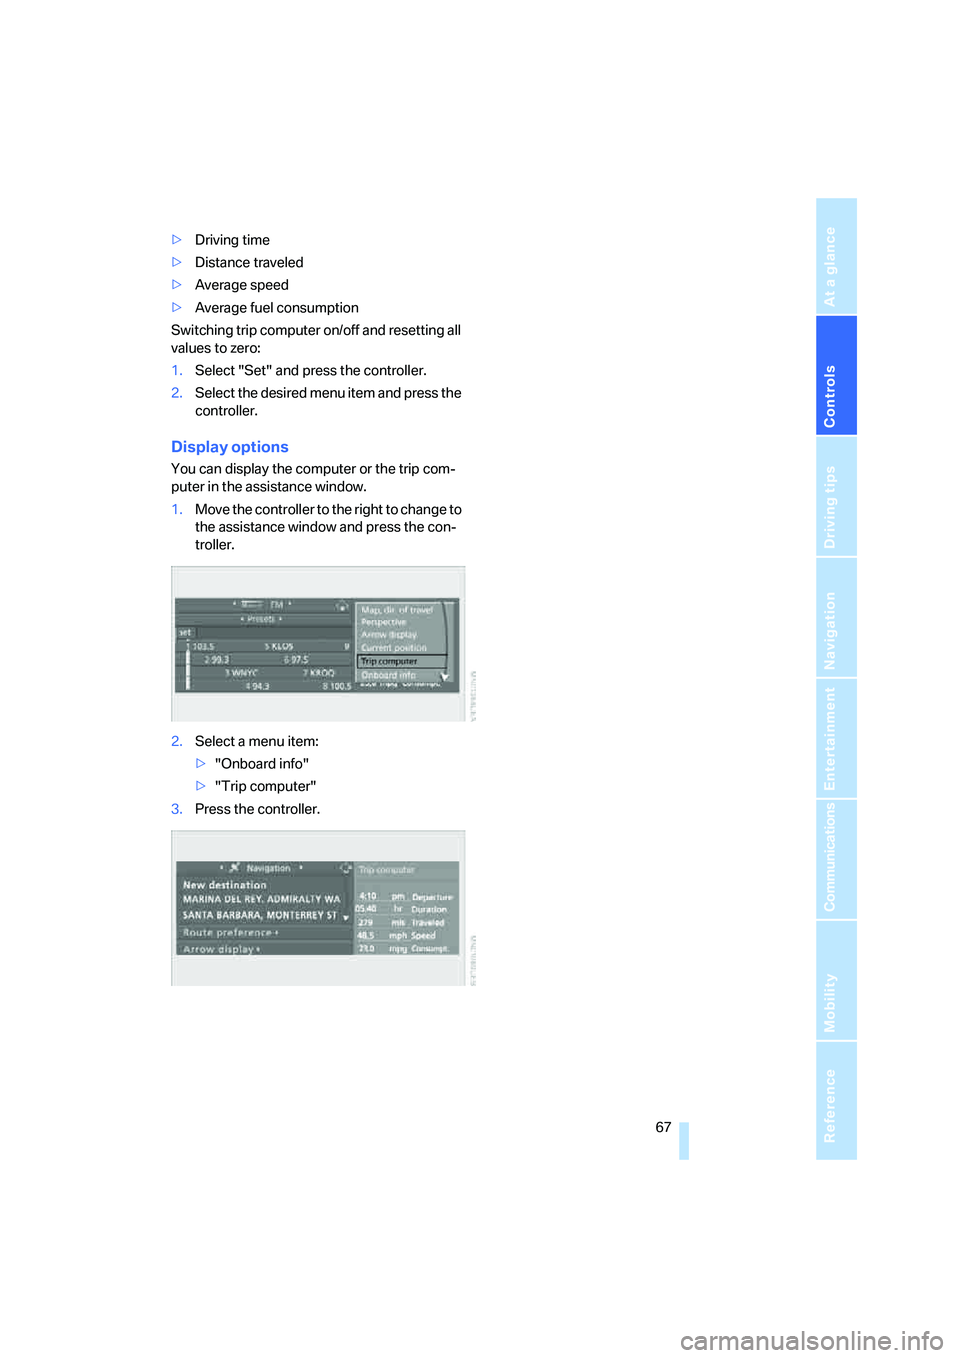
Display options
You can display the computer or the trip com-
puter in the assistance window.
1.Move the controller to the right to change to
the assistance window and press the con-
troller.
2.Select a menu item:
>"Onboard info"
>"Trip computer"
3.Press the controller.
Page 76 of 223
Controls
75Reference
At a glance
Driving tips
Communications
Navigation
Entertainment
Mobility
3.Lightly push button 1 to check for other
messages.
4.Press button 2.
The display again shows the outside tem-
perature and the time.
Viewing more information later
iDrive concept, refer to page16.
1.Press the button.
This opens the start menu.
2.Press the controller to open the menu.
3.Select "Service" and press the controller.
4.Select "Check Control messages" and
press the controller.
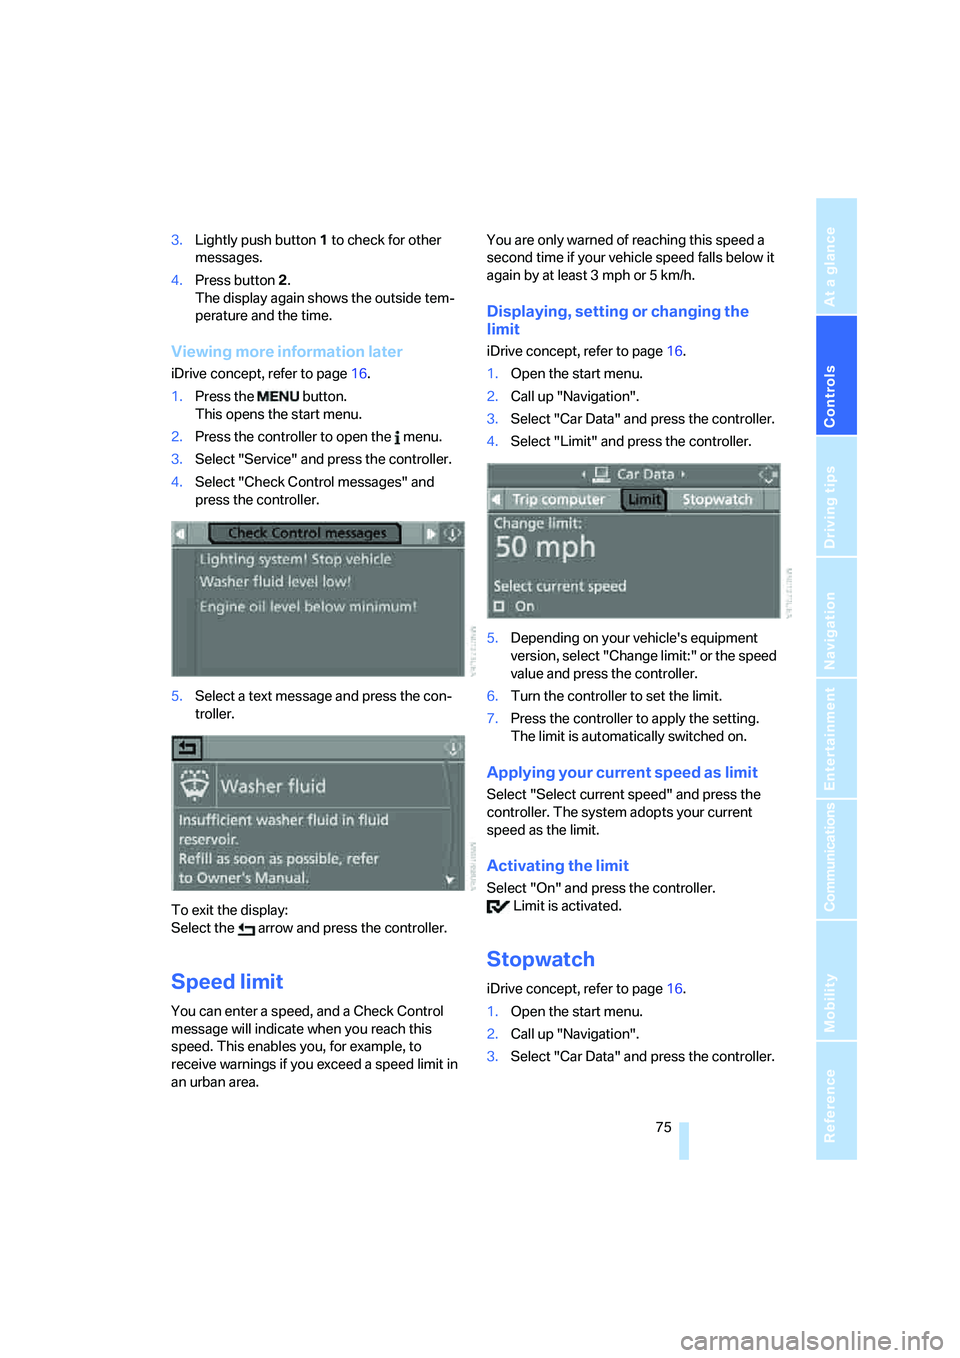
5.Select a text message and press the con-
troller.
To exit the display:
Select the arrow and press the controller.
Speed limit
You can enter a speed, and a Check Control
message will indicate when you reach this
speed. This enables you, for example, to
receive warnings if you exceed a speed limit in
an urban area. You are only warned of reaching this speed a
second time if your vehicle speed falls below it
again by at least 3 mph or 5 km/h.
Displaying, setting or changing the
limit
iDrive concept, refer to page16.
1.Open the start menu.
2.Call up "Navigation".
3.Select "Car Data" and press the controller.
4.Select "Limit" and press the controller.
5.Depending on your vehicle's equipment
version, select "Change limit:" or the speed
value and press the controller.
6.Turn the controller to set the limit.
7.Press the controller to apply the setting.
The limit is automatically switched on.
Applying your current speed as limit
Select "Select current speed" and press the
controller. The system adopts your current
speed as the limit.
Activating the limit
Select "On" and press the controller.
Limit is activated.
Stopwatch
iDrive concept, refer to page16.
1.Open the start menu.
2.Call up "Navigation".
3.Select "Car Data" and press the controller.
Page 77 of 223

Everything under control
76 4.Select "Stopwatch" and press the control-
ler.
Starting, stopping or resetting
>Select "Start" and press the controller.
The stopwatch starts at the displayed time.
>Select "Reset" and press the controller.
The stopwatch is reset and restarts if it was
running beforehand.
>Select "Stop" and press the controller.
This stops the timer.
Taking an interim time reading
Select "Interim time" and press the controller.
The interim time appears below the ongoing
primary stopwatch count.
All of the remaining functions remain
available at all times while the stopwatch
is running. The stopwatch continues operation
in the background.<
Altering settings
Language on the Control Display
The language on the Control Display can be set,
refer to the concept on page16. The setting is
stored for the remote control currently in use.
1.Open the start menu.
2.Press the controller to open the menu.
3.Select "Display settings" and press the
controller.4.Select "Languages" and press the control-
ler.
5.Select "Text language" and press the con-
troller. You can switch to another language
for the display texts and navigation mes-
sages.
6.Select and activate the desired language by
pressing the controller.
Brightness of the Control Display
The brightness is automatically adapted to the
ambient lighting conditions. Note, however,
that you can change the basic setting while the
low beams are switched on. The setting is
stored for the remote control currently in use.
1.Open the start menu.
2.Press the controller to open the menu.
3.Select "Display settings" and press the
controller.
4.Select "Brightness" and press the control-
ler.
5.Turn the controller until the desired setting
is selected.