2005 BMW 330XI IDRIVE SEDAN display
[x] Cancel search: displayPage 35 of 223

Opening and closing
34
Closing
The handle recesses on the interior trim of the
luggage compartment lid make it easier to pull
down.
Make sure that the closing path of the
luggage compartment lid is clear, as oth-
erwise injuries may result.<
Alarm system*
The concept
The vehicle alarm system responds:
>When a door, the hood or the luggage com-
partment lid is opened
>To movements inside the vehicle: Interior
motion sensor, refer to the information fur-
ther below
>When the car's inclination changes, for
instance if an attempt is made to jack it up
and steal the wheels or to raise it prior to
towing away
>When there is an interruption in the power
supply from the battery.
The system responds to unauthorized vehicle
entry and attempted theft by simultaneously
activating:
>An acoustic alarm, which lasts for a period
of approx. 30 seconds
>The hazard warning flashers, which operate
for approx. 5 minutes
*
>The high beams, which flash on and off in
the same rhythm.
Arming and disarming
When you lock or unlock the vehicle, either with
the remote control or at the door lock, the alarm
system is armed or disarmed at the same time.
The system indicates that it has been correctly
armed by switching on the hazard warning
flashers for a single cycle and by emitting an
acoustic signal.
Even when the alarm system is armed, you can
open the luggage compartment lid by means of
the button on the remote control, refer to
page30. When you subsequently close the lug-
gage compartment lid it is again locked and
monitored.
Switching off an alarm
>Unlock the car with the remote control, refer
to page30, or
>insert the remote control all the way into the
ignition lock.
Indicator lamp displays
>The indicator lamp under the inside rear-
view mirror flashes continuously: the sys-
tem is armed.
>The indicator lamp flashes after locking:
doors, hood or luggage compartment lid are
not properly closed. Even if you do not close
the alerted area, the system begins to mon-
itor the remaining areas, and the indicator
lamp flashes continuously after approx. 10
seconds. However, the interior motion sen-
sor is not activated.
>The indicator lamp goes out after unlocking:
your vehicle has not been disturbed while
you were away.
Page 44 of 223
Controls
43Reference
At a glance
Driving tips
Communications
Navigation
Entertainment
Mobility
If the button was pressed accidentally:
press the button again; the LED goes out.
Safety belts
Observe the adjustment instructions on
page39 to ensure the best possible per-
sonal protection.<
Before every drive, make sure that all occupants
wear their safety belts. Airbags complement the
safety belt as an additional safety device, but
they do not represent a substitute.
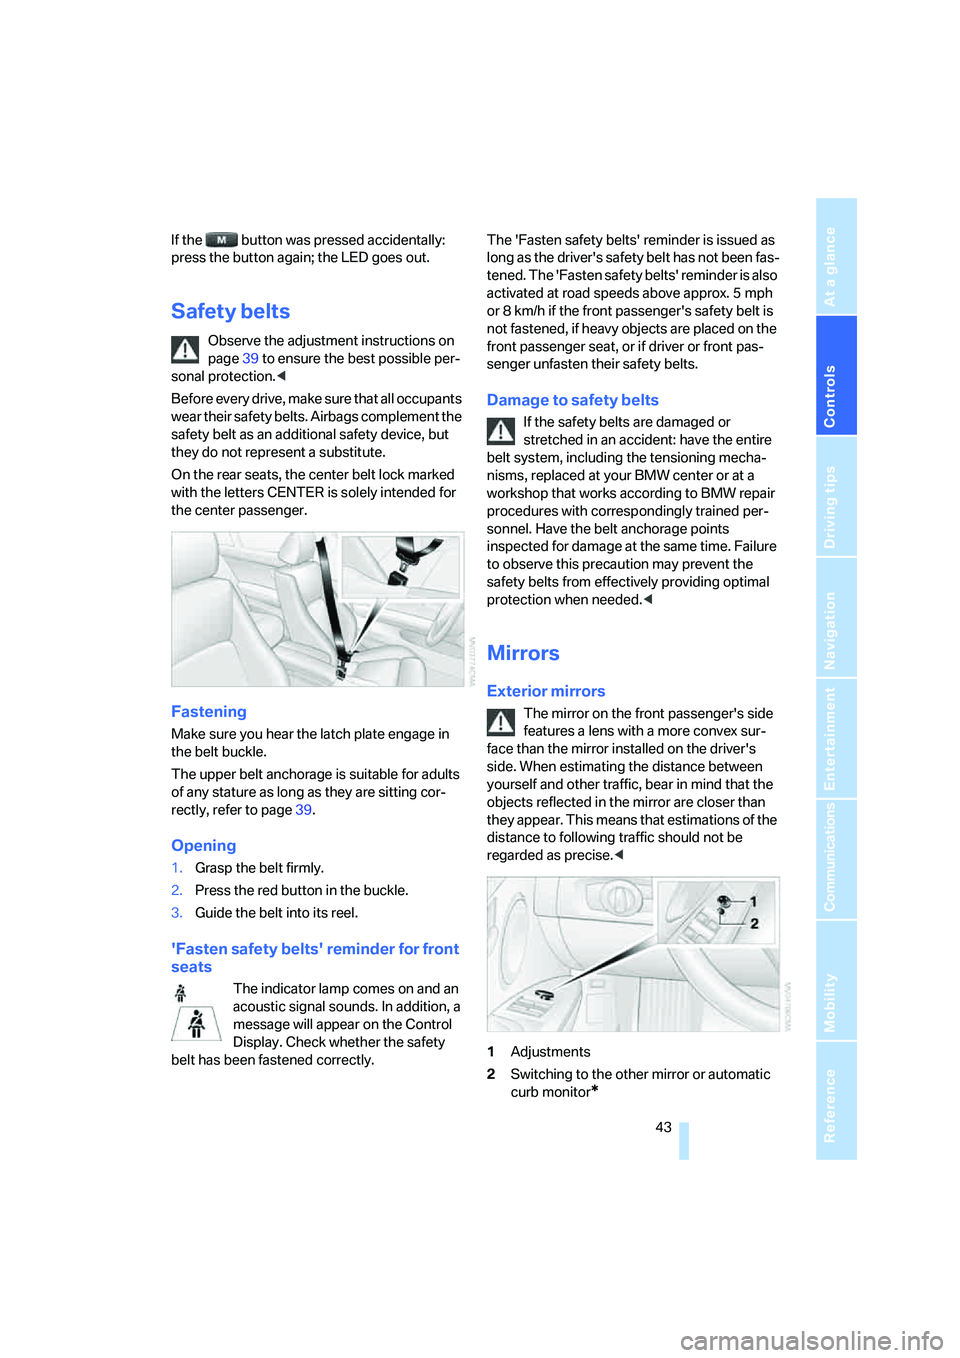
On the rear seats, the center belt lock marked
with the letters CENTER is solely intended for
the center passenger.
Fastening
Make sure you hear the latch plate engage in
the belt buckle.
The upper belt anchorage is suitable for adults
of any stature as long as they are sitting cor-
rectly, refer to page39.
Opening
1.Grasp the belt firmly.
2.Press the red button in the buckle.
3.Guide the belt into its reel.
'Fasten safety belts' reminder for front
seats
The indicator lamp comes on and an
acoustic signal sounds. In addition, a
message will appear on the Control
Display. Check whether the safety
belt has been fastened correctly.The 'Fasten safety belts' reminder is issued as
long as the driver's safety belt has not been fas-
tened. The 'Fasten safety belts' reminder is also
activated at road speeds above approx. 5 mph
or 8 km/h if the front passenger's safety belt is
not fastened, if heavy objects are placed on the
front passenger seat, or if driver or front pas-
senger unfasten their safety belts.
Damage to safety belts
If the safety belts are damaged or
stretched in an accident: have the entire
belt system, including the tensioning mecha-
nisms, replaced at your BMW center or at a
workshop that works according to BMW repair
procedures with correspondingly trained per-
sonnel. Have the belt anchorage points
inspected for damage at the same time. Failure
to observe this precaution may prevent the
safety belts from effectively providing optimal
protection when needed.<
Mirrors
Exterior mirrors
The mirror on the front passenger's side
features a lens with a more convex sur-
face than the mirror installed on the driver's
side. When estimating the distance between
yourself and other traffic, bear in mind that the
objects reflected in the mirror are closer than
they appear. This means that estimations of the
distance to following traffic should not be
regarded as precise.<
1Adjustments
2Switching to the other mirror or automatic
curb monitor
*
Page 46 of 223
Controls
45Reference
At a glance
Driving tips
Communications
Navigation
Entertainment
Mobility
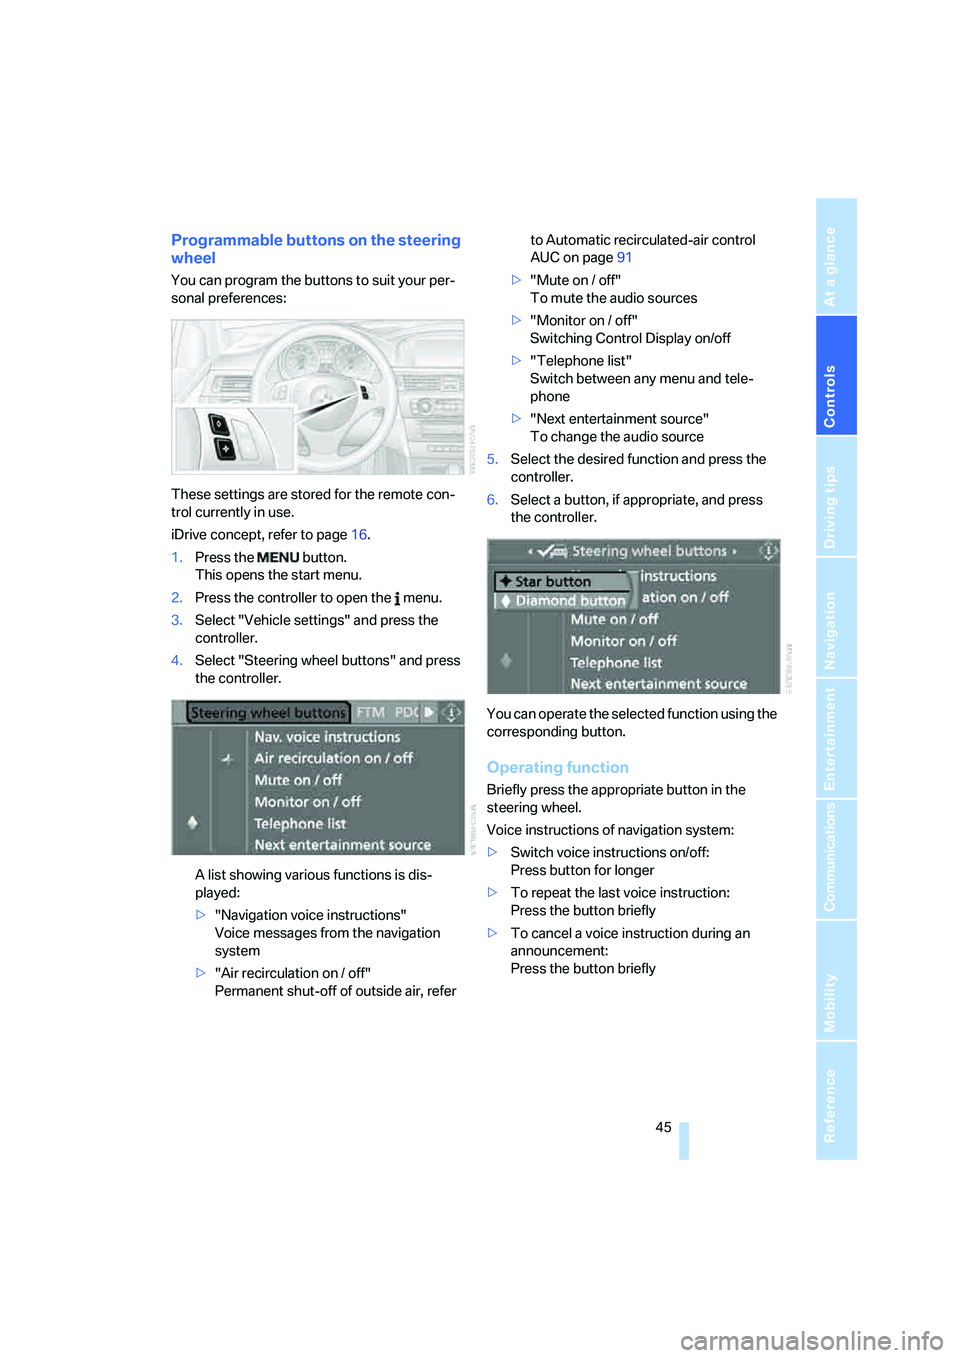
Programmable buttons on the steering
wheel
You can program the buttons to suit your per-
sonal preferences:
These settings are stored for the remote con-
trol currently in use.
iDrive concept, refer to page16.
1.Press the button.
This opens the start menu.
2.Press the controller to open the menu.
3.Select "Vehicle settings" and press the
controller.
4.Select "Steering wheel buttons" and press
the controller.
A list showing various functions is dis-
played:
>"Navigation voice instructions"
Voice messages from the navigation
system
>"Air recirculation on / off"
Permanent shut-off of outside air, refer to Automatic recirculated-air control
AUC on page91
>"Mute on / off"
To mute the audio sources
>"Monitor on / off"
Switching Control Display on/off
>"Telephone list"
Switch between any menu and tele-
phone
>"Next entertainment source"
To change the audio source
5.Select the desired function and press the
controller.
6.Select a button, if appropriate, and press
the controller.
.
You can operate the selected function using the
corresponding button.
Operating function
Briefly press the appropriate button in the
steering wheel.
Voice instructions of navigation system:
>Switch voice instructions on/off:
Press button for longer
>To repeat the last voice instruction:
Press the button briefly
>To cancel a voice instruction during an
announcement:
Press the button briefly
Page 53 of 223
Driving
52
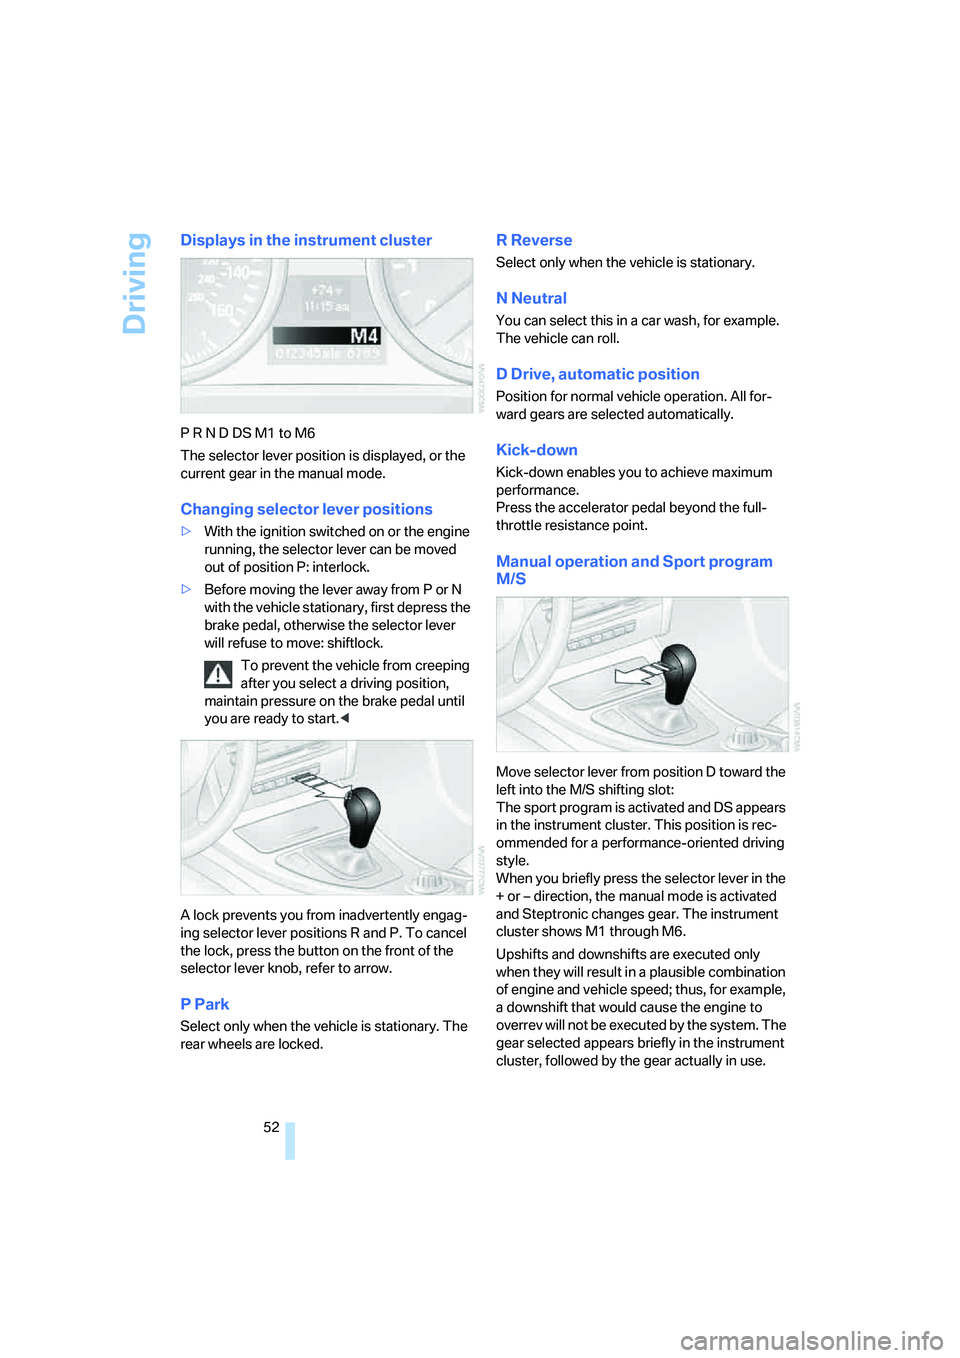
Displays in the instrument cluster
P R N D DS M1 to M6
The selector lever position is displayed, or the
current gear in the manual mode.
Changing selector lever positions
>With the ignition switched on or the engine
running, the selector lever can be moved
out of position P: interlock.
>Before moving the lever away from P or N
with the vehicle stationary, first depress the
brake pedal, otherwise the selector lever
will refuse to move: shiftlock.
To prevent the vehicle from creeping
after you select a driving position,
maintain pressure on the brake pedal until
you are ready to start.<
A lock prevents you from inadvertently engag-
ing selector lever positions R and P. To cancel
the lock, press the button on the front of the
selector lever knob, refer to arrow.
P Park
Select only when the vehicle is stationary. The
rear wheels are locked.
R Reverse
Select only when the vehicle is stationary.
N Neutral
You can select this in a car wash, for example.
The vehicle can roll.
D Drive, automatic position
Position for normal vehicle operation. All for-
ward gears are selected automatically.
Kick-down
Kick-down enables you to achieve maximum
performance.
Press the accelerator pedal beyond the full-
throttle resistance point.
Manual operation and Sport program
M/S
Move selector lever from position D toward the
left into the M/S shifting slot:
The sport program is activated and DS appears
in the instrument cluster. This position is rec-
ommended for a performance-oriented driving
style.
When you briefly press the selector lever in the
+ or – direction, the manual mode is activated
and Steptronic changes gear. The instrument
cluster shows M1 through M6.
Upshifts and downshifts are executed only
when they will result in a plausible combination
of engine and vehicle speed; thus, for example,
a downshift that would cause the engine to
overrev will not be executed by the system. The
gear selected appears briefly in the instrument
cluster, followed by the gear actually in use.
Page 56 of 223

Controls
55Reference
At a glance
Driving tips
Communications
Navigation
Entertainment
Mobility
Washer fluid
Washer fluid antifreeze is flammable.
Always keep it well away from sparks and
open flames, and store it in tightly closed con-
tainers well out of the reach of children. Comply
with the instructions on the container.<
Washer fluid reservoir
Fill with water and, if required, with a washer
antifreeze, according to manufacturer's recom-
mendations.
Mix the water and antifreeze before filling
the washer fluid reservoir to make sure
the correct concentration is maintained.<
Capacity
Approx. 6.3 US quarts/6 liters.
Cruise control*
The concept
Cruise control is available for use at speeds of
approx. 20 mph or 30 km/h. The car then mem-
orizes and maintains the speed that you specify
using the lever on the steering column. In order
to maintain the specified speed, the system brakes the vehicle when the engine braking
effect is insufficient on downhill gradients.
Do not use cruise control when driving
conditions are unfavorable for driving at a
constant speed. Otherwise you could lose con-
trol of the vehicle and cause an accident as a
result. Unfavorable driving conditions include,
for example, winding roads, heavy traffic or a
poor road surface, e.g. snow, rain, ice or loose
material.<
Manual transmission
You can shift gears while cruise control is acti-
vated. An indicator lamp notifies you that you
should shift gears when you drive for an
extended period at very high or very low engine
speeds, or the system is deactivated.
One lever for all functions
1Storing and maintaining speed or accelerat-
ing
2Storing and maintaining speed or deceler-
ating
3Deactivating cruise control
4Resuming a speed stored beforehand
Maintaining current speed
Tap the lever, arrow 1, or pull it briefly, arrow 2.
The car's current speed is stored and main-
tained. It is displayed in the speedometer and
briefly in the instrument cluster.
On uphill gradients, it may prove impossible to
maintain the set speed if current engine power
output is insufficient. If the engine braking
effect is insufficient on downhill slopes, the sys-
tem will brake the vehicle slightly.
Page 57 of 223
Driving
56
Increasing desired speed
Tap the lever repeatedly to the resistance point
or beyond, arrow1, until the desired speed is
reached.
>Each time the lever is tapped to the resis-
tance point, the desired speed is increased
by approx. 1 mph or 1 km/h.
>Each time the lever is tapped beyond the
resistance point, the desired speed is
increased to the next multiple of 5 mph or
10 km/h until a maximum of 110 mph or
180 km⁄h is reached.
The system stores and maintains the speed.
Accelerating using the lever
Accelerating slightly:
Press the lever to the resistance point, arrow 1,
until the desired speed is reached.
Accelerating significantly:
Press the lever beyond the resistance point,
arrow 1, until the desired speed is reached.
The vehicle accelerates without pressure on
the accelerator pedal. The system stores and
maintains the speed.
Decreasing desired speed
Pull the lever repeatedly to the resistance point
or beyond, arrow 2, until the desired speed is
reached.
>Each time the lever is pulled to the resis-
tance point, the desired speed is decreased
by approx. 1 mph or 1 km/h.
>Each time the lever is pulled back beyond
the resistance point, the desired speed is
decreased to the next multiple of 5 mph or
10 km/h until the minimum speed of
20 mph/30 km/h is reached.
The system stores and maintains the speed.
If the speed is to be reduced significantly,
press the brake pedal; otherwise, decel-
eration may be insufficient and dangerous situ-
ations could result.<
Deactivating cruise control
Tap the lever upwards or downwards, arrow3.
The displays in the speedometer disappear.
In addition, the system is automatically deacti-
vated:
>When you brake the vehicle
>When you switch gears very slowly or
engage neutral gear in cars with manual
transmission
>When you select the automatic transmis-
sion's neutral position N
>When you activate the Dynamic Traction
Control DTC
>When you deactivate the Dynamic Stability
Control DSC
>When DSC or ABS is intervening
Cruise control is not deactivated by depressing
the accelerator pedal. Once the accelerator
pedal is released, the stored speed is achieved
again and maintained.
Warning lamp
The warning lamp comes on when
cruise control has been automatically
deactivated by pressing the brake
pedal, engaging the handbrake or as a result of
DSC intervening. A message appears on the
Control Display.
Resuming a speed stored beforehand
Press button4 briefly: the stored speed is
resumed and maintained.
In the following instances, the stored speed is
deleted and can no longer be resumed:
>When driving control systems are interven-
ing
>In cars with manual transmission: when you
shift gears very slowly or engage neutral
gear
>In cars with automatic transmission: when
you engage selector lever position N
>When the ignition is switched off
Page 58 of 223
Controls
57Reference
At a glance
Driving tips
Communications
Navigation
Entertainment
Mobility
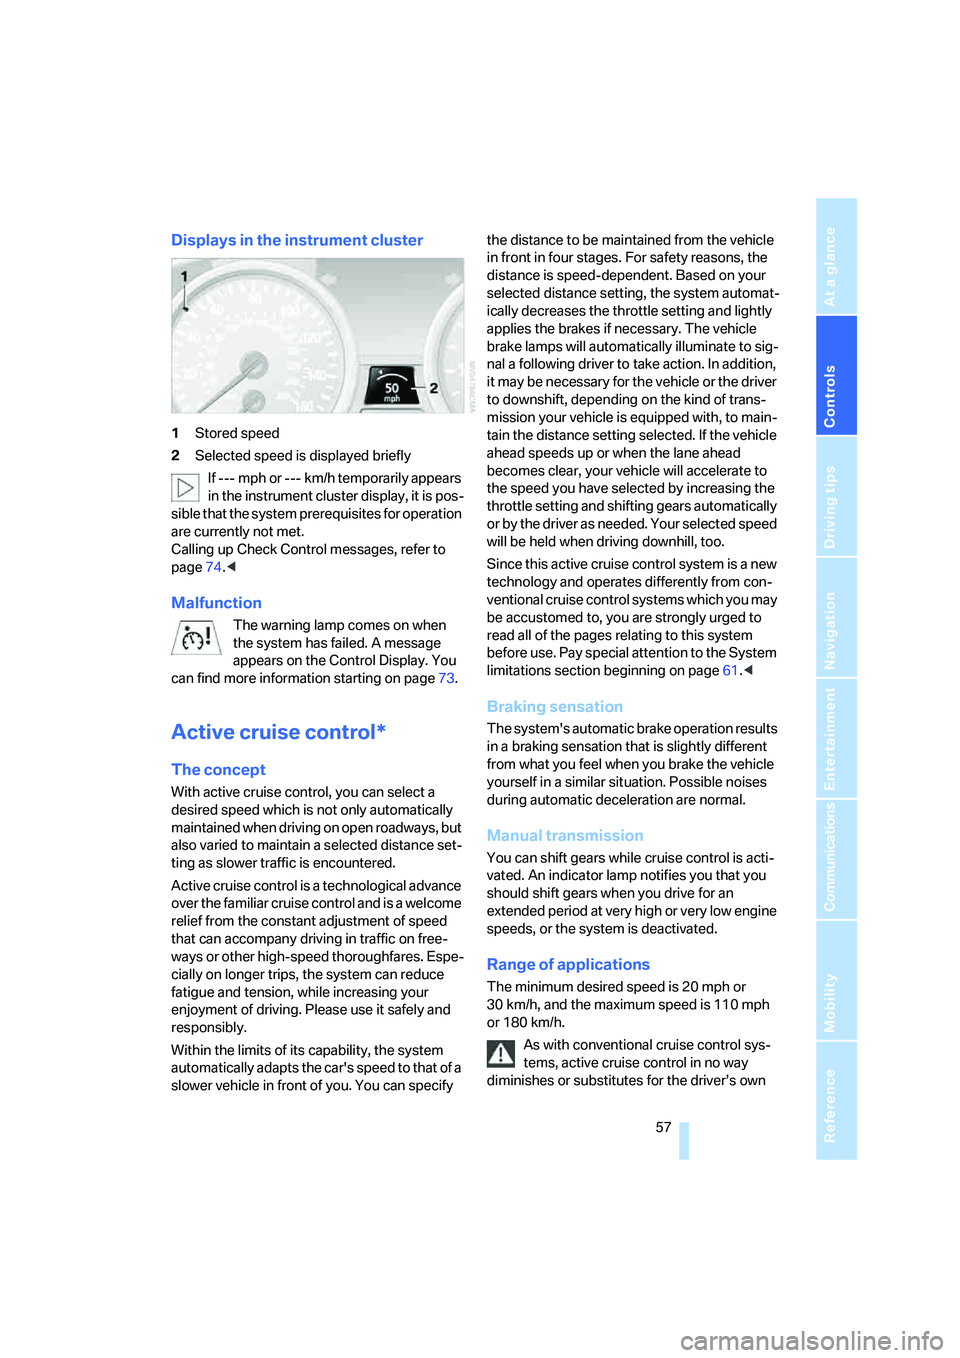
Displays in the instrument cluster
1Stored speed
2Selected speed is displayed briefly
If --- mph or --- km/h temporarily appears
in the instrument cluster display, it is pos-
sible that the system prerequisites for operation
are currently not met.
Calling up Check Control messages, refer to
page74.<
Malfunction
The warning lamp comes on when
the system has failed. A message
appears on the Control Display. You
can find more information starting on page73.
Active cruise control*
The concept
With active cruise control, you can select a
desired speed which is not only automatically
maintained when driving on open roadways, but
also varied to maintain a selected distance set-
ting as slower traffic is encountered.
Active cruise control is a technological advance
over the familiar cruise control and is a welcome
relief from the constant adjustment of speed
that can accompany driving in traffic on free-
ways or other high-speed thoroughfares. Espe-
cially on longer trips, the system can reduce
fatigue and tension, while increasing your
enjoyment of driving. Please use it safely and
responsibly.
Within the limits of its capability, the system
automatically adapts the car's speed to that of a
slower vehicle in front of you. You can specify the distance to be maintained from the vehicle
in front in four stages. For safety reasons, the
distance is speed-dependent. Based on your
selected distance setting, the system automat-
ically decreases the throttle setting and lightly
applies the brakes if necessary. The vehicle
brake lamps will automatically illuminate to sig-
nal a following driver to take action. In addition,
it may be necessary for the vehicle or the driver
to downshift, depending on the kind of trans-
mission your vehicle is equipped with, to main-
tain the distance setting selected. If the vehicle
ahead speeds up or when the lane ahead
becomes clear, your vehicle will accelerate to
the speed you have selected by increasing the
throttle setting and shifting gears automatically
or by the driver as needed. Your selected speed
will be held when driving downhill, too.
Since this active cruise control system is a new
technology and operates differently from con-
ventional cruise control systems which you may
be accustomed to, you are strongly urged to
read all of the pages relating to this system
before use. Pay special attention to the System
limitations section beginning on page61.<
Braking sensation
The system's automatic brake operation results
in a braking sensation that is slightly different
from what you feel when you brake the vehicle
yourself in a similar situation. Possible noises
during automatic deceleration are normal.
Manual transmission
You can shift gears while cruise control is acti-
vated. An indicator lamp notifies you that you
should shift gears when you drive for an
extended period at very high or very low engine
speeds, or the system is deactivated.
Range of applications
The minimum desired speed is 20 mph or
30 km/h, and the maximum speed is 110 mph
or 180 km/h.
As with conventional cruise control sys-
tems, active cruise control in no way
diminishes or substitutes for the driver’s own
Page 59 of 223
Driving
58 personal responsibility, alertness and aware-
ness in adjusting speed, braking or otherwise
controlling the vehicle. The driver should
decide when to use the system on the basis of
road, traffic, visibility, and weather conditions.
Active cruise control is intended for use on
highway-type roadways where traffic is moving
relatively smoothly. Do not use this system in
city driving; heavy traffic such as during rush
hour; on curvy, winding roads, slippery roads or
roads with sharp curves such as highway off-
ramps; during inclement weather such as snow,
strong rain or fog; or when entering inter-
changes, service/parking areas or toll booths.
It is also important to regulate your vehicle's
speed and distance setting within applicable
legal limits. Always be ready to take action or
apply the brakes if necessary, especially when
the system is actively following a vehicle in front
of you. Otherwise, driving conditions could
result which violate the law or pose a risk of
accident.<
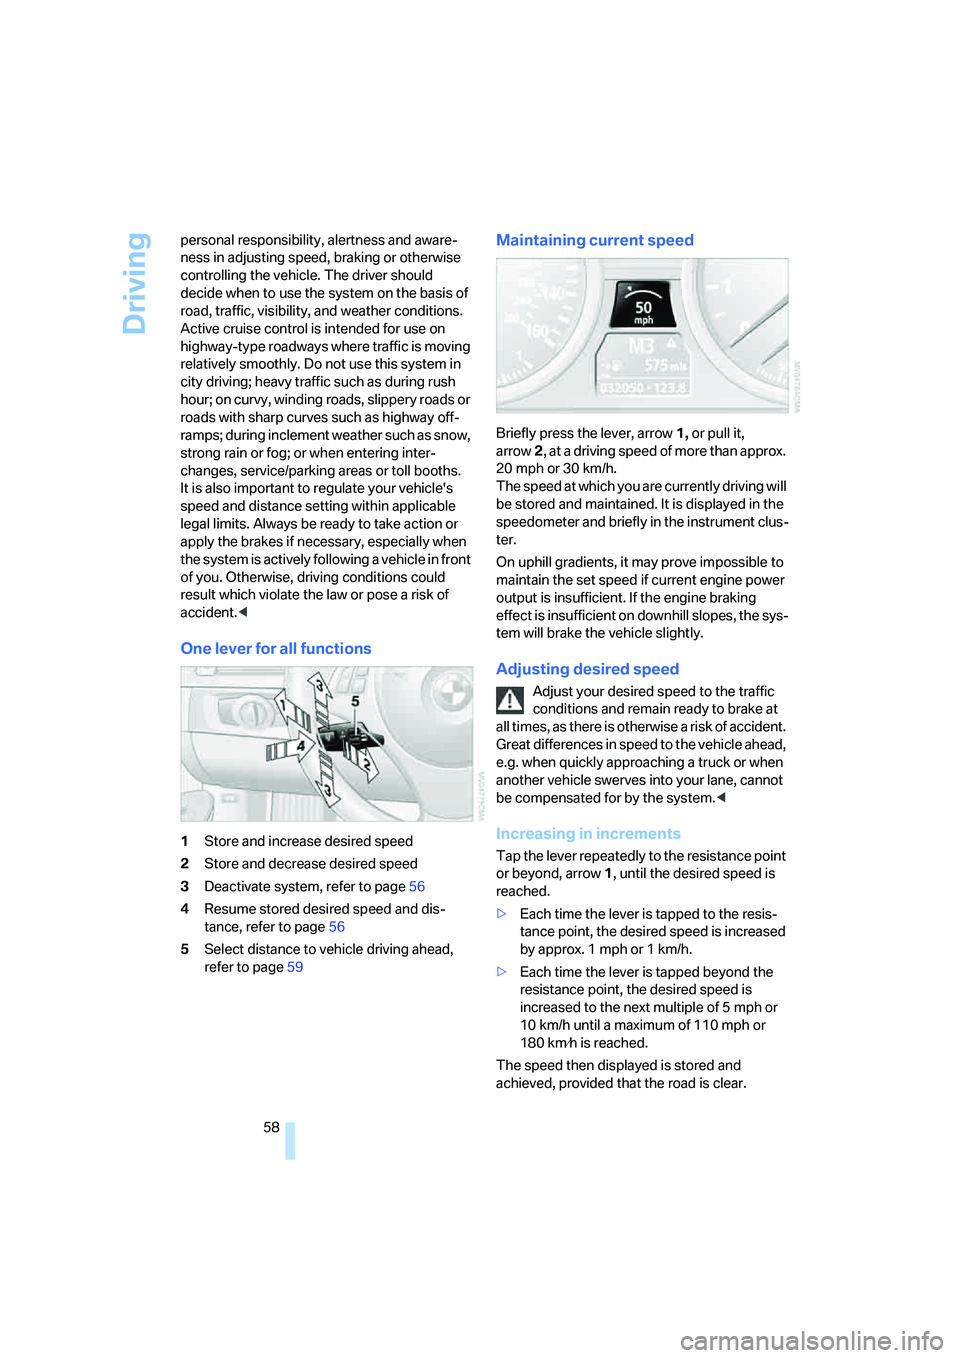
One lever for all functions
1Store and increase desired speed
2Store and decrease desired speed
3Deactivate system, refer to page56
4Resume stored desired speed and dis-
tance, refer to page56
5Select distance to vehicle driving ahead,
refer to page59
Maintaining current speed
Briefly press the lever, arrow1, or pull it,
arrow2, at a driving speed of more than approx.
20 mph or 30 km/h.
The speed at which you are currently driving will
be stored and maintained. It is displayed in the
speedometer and briefly in the instrument clus-
ter.
On uphill gradients, it may prove impossible to
maintain the set speed if current engine power
output is insufficient. If the engine braking
effect is insufficient on downhill slopes, the sys-
tem will brake the vehicle slightly.
Adjusting desired speed
Adjust your desired speed to the traffic
conditions and remain ready to brake at
all times, as there is otherwise a risk of accident.
Great differences in speed to the vehicle ahead,
e.g. when quickly approaching a truck or when
another vehicle swerves into your lane, cannot
be compensated for by the system.<
Increasing in increments
Tap the lever repeatedly to the resistance point
or beyond, arrow1, until the desired speed is
reached.
>Each time the lever is tapped to the resis-
tance point, the desired speed is increased
by approx. 1 mph or 1 km/h.
>Each time the lever is tapped beyond the
resistance point, the desired speed is
increased to the next multiple of 5 mph or
10 km/h until a maximum of 110 mph or
180 km⁄h is reached.
The speed then displayed is stored and
achieved, provided that the road is clear.