2005 BMW 325XI lights
[x] Cancel search: lightsPage 72 of 166

Technology for driving comfort and safety
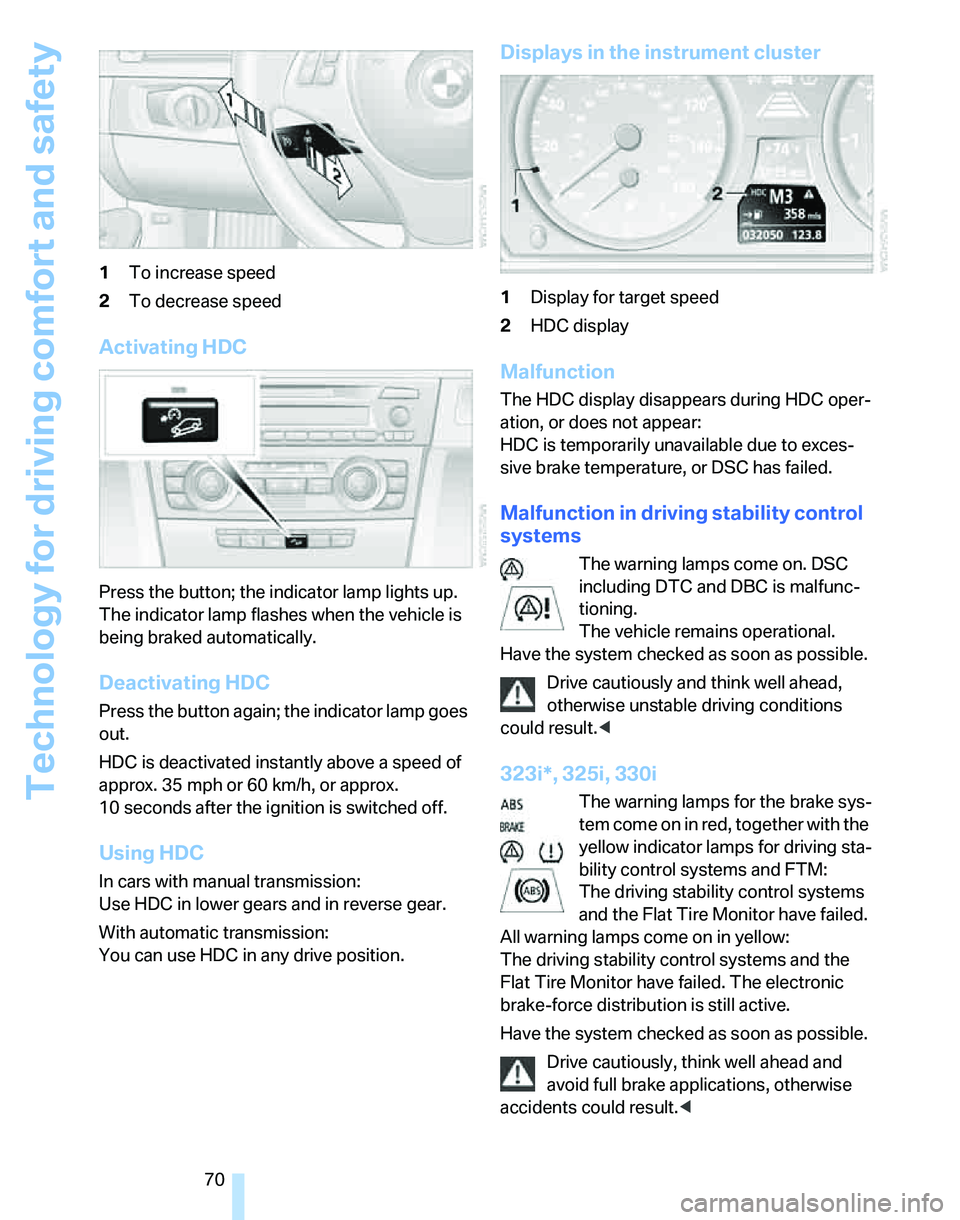
70 1To increase speed
2To decrease speed
Activating HDC
Press the button; the indicator lamp lights up.
The indicator lamp flashes when the vehicle is
being braked automatically.
Deactivating HDC
Press the button again; the indicator lamp goes
out.
HDC is deactivated instantly above a speed of
approx. 35 mph or 60 km/h, or approx.
10 seconds after the ignition is switched off.
Using HDC
In cars with manual transmission:
Use HDC in lower gears and in reverse gear.
With automatic transmission:
You can use HDC in any drive position.
Displays in the instrument cluster
1Display for target speed
2HDC display
Malfunction
The HDC display disappears during HDC oper-
ation, or does not appear:
HDC is temporarily unavailable due to exces-
sive brake temperature, or DSC has failed.
Malfunction in driving stability control
systems
The warning lamps come on. DSC
including DTC and DBC is malfunc-
tioning.
The vehicle remains operational.
Have the system checked as soon as possible.
Drive cautiously and think well ahead,
otherwise unstable driving conditions
could result.<
323i*, 325i, 330i
The warning lamps for the brake sys-
tem come on in red, together with the
yellow indicator lamps for driving sta-
bility control systems and FTM:
The driving stability control systems
and the Flat Tire Monitor have failed.
All warning lamps come on in yellow:
The driving stability control systems and the
Flat Tire Monitor have failed. The electronic
brake-force distribution is still active.
Have the system checked as soon as possible.
Drive cautiously, think well ahead and
avoid full brake applications, otherwise
accidents could result.<
Page 75 of 166

Reference
At a glance
Controls
Driving tips
Mobility
73
4 persons without luggage:
approx. 90 miles/150 km
>With a full load:
4 or more persons, luggage compart-
ment full:
approx. 30 miles/50 km
Drive cautiously and do not exceed a
speed of 50 mph or 80 km/h. In the event
of pressure loss, vehicle handling changes. This
includes reduced tracking stability in braking,
extended braking distance and altered natural
steering characteristics.
If unusual vibration or loud noises occur during
the journey, this may be an indication that the
damaged tire has finally failed. Reduce your
speed and pull over to the side of the road at the
earliest opportunity. Otherwise, parts of the tire
could come loose and cause an accident. Do
not continue driving. Contact your BMW Cen-
ter.<
Malfunction
The warning lamps come on in yel-
low. The Flat Tire Monitor has a mal-
function or has failed. Have the sys-
tem checked as soon as possible.
Active steering*
The concept
Active steering varies the turning angle of the
front wheels in relation to steering wheel move-
ments. It also varies the steering force required
to turn the wheels depending on the speed at
which you are driving.
When you are driving in the low road-speed
range, e.g. in a town or when parking, the steer-
ing angle increases, i.e. the steering becomes
very direct, and less effort is required to turn the
wheels. In the higher speed range, on the other
hand, the steering angle is reduced more and
more. This improves the handling capability of
your BMW over the entire speed range.
In critical situations, the system can make tar-
geted corrections to the steering angle pro-
vided by the driver and thus stabilize the vehicle before the driver intervenes. This stabilizing
intervention is simultaneously deactivated
when DSC is switched off, refer to page68.
Malfunction
The warning lamps come on. Active
steering is no longer operational. At
low speeds, greater steering wheel
movements are required, whereas at
higher speeds the vehicle reacts more sensi-
tively to steering wheel movements. Drive cau-
tiously and think well ahead. Have the system
checked.
If the warning lamp lights up during the first
engine starting following a power supply inter-
ruption, the system must be activated by being
initialized.
Brake Force Display*
The brake lamps light up in two stages,
depending on how sharply you apply the
brakes.
>Normal braking:
The brake lamps and the center brake lamp
light up.
>Sharp braking:
The illuminated surface of the brake lamps
is enlarged, as long as the rear fog light is
not switched on.
Page 78 of 166

Lamps
76
Lamps
Parking lamps/low beams
0Lamps off and daytime driving lamps
1Parking lamps and daytime driving lamps
2Low beams
3Automatic headlamp control
* and Adaptive
Head Light
*
Parking lamps
In switch position1, the front, rear and side
vehicle lighting is switched on. You can use the
parking lamps for parking. For the additional
option of roadside parking lamps on one side of
the car only, refer to page78.
The parking lamps will discharge the bat-
tery. Therefore, do not leave them on for
unduly long periods of time, otherwise the bat-
tery might not have enough power to start the
engine.<
Low beams
The low beams light up when the light switch is
in position 2 and the ignition is on.
If desired, the light switch can remain in the low-
beam headlamp position. The exterior lamps
are automatically switched off after the vehicle
is parked.
If necessary, switch on the parking lamps as
described in the section about parking lamps.
Automatic headlamp control*
When the switch is in position3, the low beams
are switched on and off automatically depend-ing on ambient light conditions, e.g. in a tunnel,
in twilight, or if there is precipitation. The LED
next to the symbol is illuminated when the low
beams are on.
When driving into tunnels with bright overhead
lights, there may be a delay before the head-
lamps come on.
The headlamps may also come on when the
sun is sitting low on a blue sky.
The low beams remain switched on inde-
pendent of the ambient lighting condi-
tions when you switch on the fog lamps
*.
When the daytime driving lamps are activated,
refer to page77, the low-beam headlamps are
always switched on when the switch is in posi-
tion 3 and the ignition is on.<
If desired, the light switch can remain in position
3. The exterior lamps are automatically
switched off after the vehicle is parked.
The automatic headlamp control cannot
serve as a substitute for your personal
judgment in determining when the lamps
should be switched on in response to ambient
lighting conditions. For example, the system
cannot detect fog or hazy weather. To avoid
safety risks, you should always switch on the
lamps manually under these conditions.<
Pathway lighting
If you activate the headlamp flasher after park-
ing the car, with the lights switched off, the low
beams come on and remain on for a certain
time.
You can adjust the operating period or deacti-
vate the function.
Operating principle, refer to page61.
1.Lightly push button1 in the turn indicator
s t a l k u p o r d o w n r e p e a t e d l y u n t i l t h e s y m b o l
Page 80 of 166

Lamps
78 of the road surface. Depending on the steering
angle and other parameters, the light from the
headlamp follows the course of the road.
Activating Adaptive Head Light
With the ignition on, turn the light switch to the
automatic headlamp control position, refer to
page76.
To avoid dazzling the drivers of oncoming vehi-
cles, Adaptive Head Light is not active when the
car is driven in reverse, and directs the light to
the front passenger's side when the vehicle is at
a standstill.
Malfunction
The LED next to the symbol for automatic head-
lamp control flashes. Adaptive Head Light is
malfunctioning or has failed. Have the system
checked as soon as possible.
High beams/roadside parking
lamps
1High beams
2Headlamp flasher
3Roadside parking lamps
*
Roadside parking lamps, left or right*
There is an additional option of switching on the
lamps on the side of the car facing the road
when parked, if permitted in the country of use.
After parking the vehicle, press the lever up or
down beyond the pressure point, arrow 3.
The roadside parking lamps drain the bat-
tery. Therefore, do not leave them on for
unduly long periods of time, otherwise the bat-tery might not have enough power to start the
engine.<
Fog lamps*
The parking lamps or low beams must
be switched on for the fog lamps to
operate. The green indicator lamp in
the instrument cluster lights up whenever the
fog lamps are on.
Depending on your vehicle's equipment ver-
sion, the fog lamps are switched off when you
activate the headlamp flasher or switch on the
high beams
*.
If the automatic headlamp control is acti-
vated, the low beams will come on auto-
matically when you switch on the fog lamps.<
Instrument lighting
You can adjust the brightness of the instrument
lighting only when the parking lamps or the low
beams are switched on.
1.Lightly push button 1 up or down repeat-
edly until the appropriate symbol appears in
Page 122 of 166

Under the hood
120
Possible displays
1Oil level OK
2Oil level is being checked.
This can take about 3 minutes if the car is at
a standstill on a level surface, or about
5 minutes while the car is on the move.
3Oil level down to minimum:
Add 1US quart/1liter of engine oil as soon
as possible, refer also to Adding engine oil.
4Oil level is too high.
Too much oil will harm the engine.
Have the vehicle checked without
delay.<
5The oil level sensor is defective.
Do not add engine oil. You can continue
your journey. Note the newly calculated dis-
tance remaining to the next oil service, refer
to page123. Have the system checked as
soon as possible.
Adding engine oil
Do not add the maximum amount of 1 US quart/
1 liter of engine oil until the following warning
lamp lights up in the instrument cluster, or in
cars with gasoline engines until the oil level
monitor shows "+1qts" or "+1l".
Add oil within the next 125 miles/200 km,
otherwise the engine could be dam-
aged.<
Keep oils, greases, etc. out of the reach of
children and comply with the warnings on
the containers. Otherwise, health hazards may
result.<
Oil change
Have oil changed only at your BMW Center or at
a workshop that works according to BMW
repair procedures with correspondingly trained
personnel.
Specified engine oils
The quality of the engine oil selected has critical
significance for the operation and service life of
an engine. BMW continuously approves spe-
cific oils after confirming their suitability for use
in its vehicles with extensive testing.
Only use approved BMW High Performance
Synthetic Oil.
Page 133 of 166

Reference
At a glance
Controls
Driving tips
Mobility
131
Giving and receiving assistance
Emergency calling*
Conditions for an emergency call:
>Full preparation package mobile phone
>BMW Assist is enabled. Enabling
BMW Assist, refer to separate Owner's
Manual.
>Radio readiness is on.
>The car phone is logged on to a mobile tele-
phone network.
>The emergency call system is operable.
If your subscription contract with BMW Assist
expires, the car phone can be deactivated by a
BMW Center without having to schedule an
appointment at a workshop. Once the car
phone has been deactivated, emergency calls
are not possible. The car phone can be reacti-
vated by a BMW Center after signing a new
contract.
Initiating an emergency call
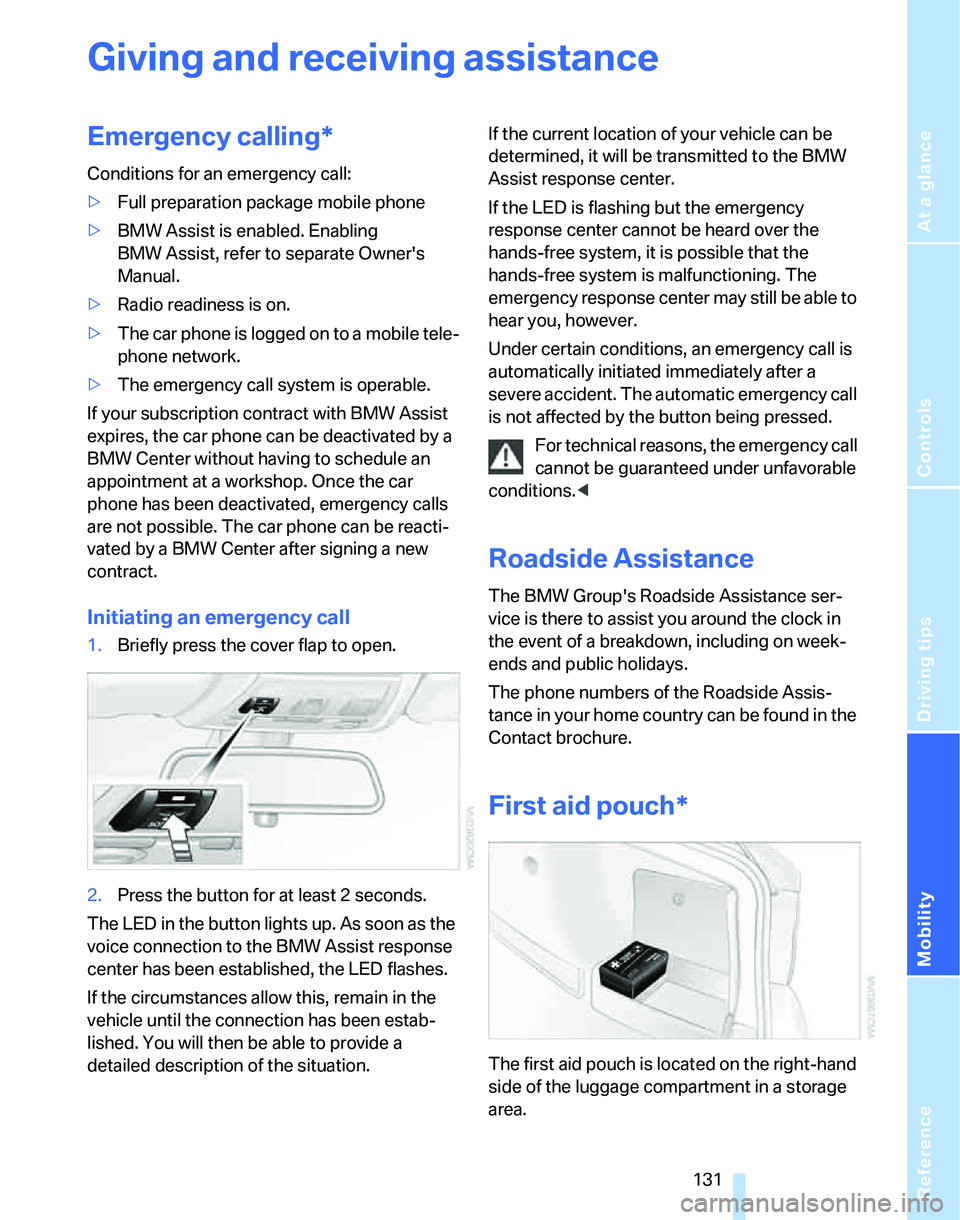
1.Briefly press the cover flap to open.
2.Press the button for at least 2 seconds.
The LED in the button lights up. As soon as the
voice connection to the BMW Assist response
center has been established, the LED flashes.
If the circumstances allow this, remain in the
vehicle until the connection has been estab-
lished. You will then be able to provide a
detailed description of the situation.If the current location of your vehicle can be
determined, it will be transmitted to the BMW
Assist response center.
If the LED is flashing but the emergency
response center cannot be heard over the
hands-free system, it is possible that the
hands-free system is malfunctioning. The
emergency response center may still be able to
hear you, however.
Under certain conditions, an emergency call is
automatically initiated immediately after a
severe accident. The automatic emergency call
is not affected by the button being pressed.
For technical reasons, the emergency call
cannot be guaranteed under unfavorable
conditions.<
Roadside Assistance
The BMW Group's Roadside Assistance ser-
vice is there to assist you around the clock in
the event of a breakdown, including on week-
ends and public holidays.
The phone numbers of the Roadside Assis-
tance in your home country can be found in the
Contact brochure.
First aid pouch*
The first aid pouch is located on the right-hand
side of the luggage compartment in a storage
area.
Page 138 of 166

Indicator and warning lamps
136
Indicator and warning lamps
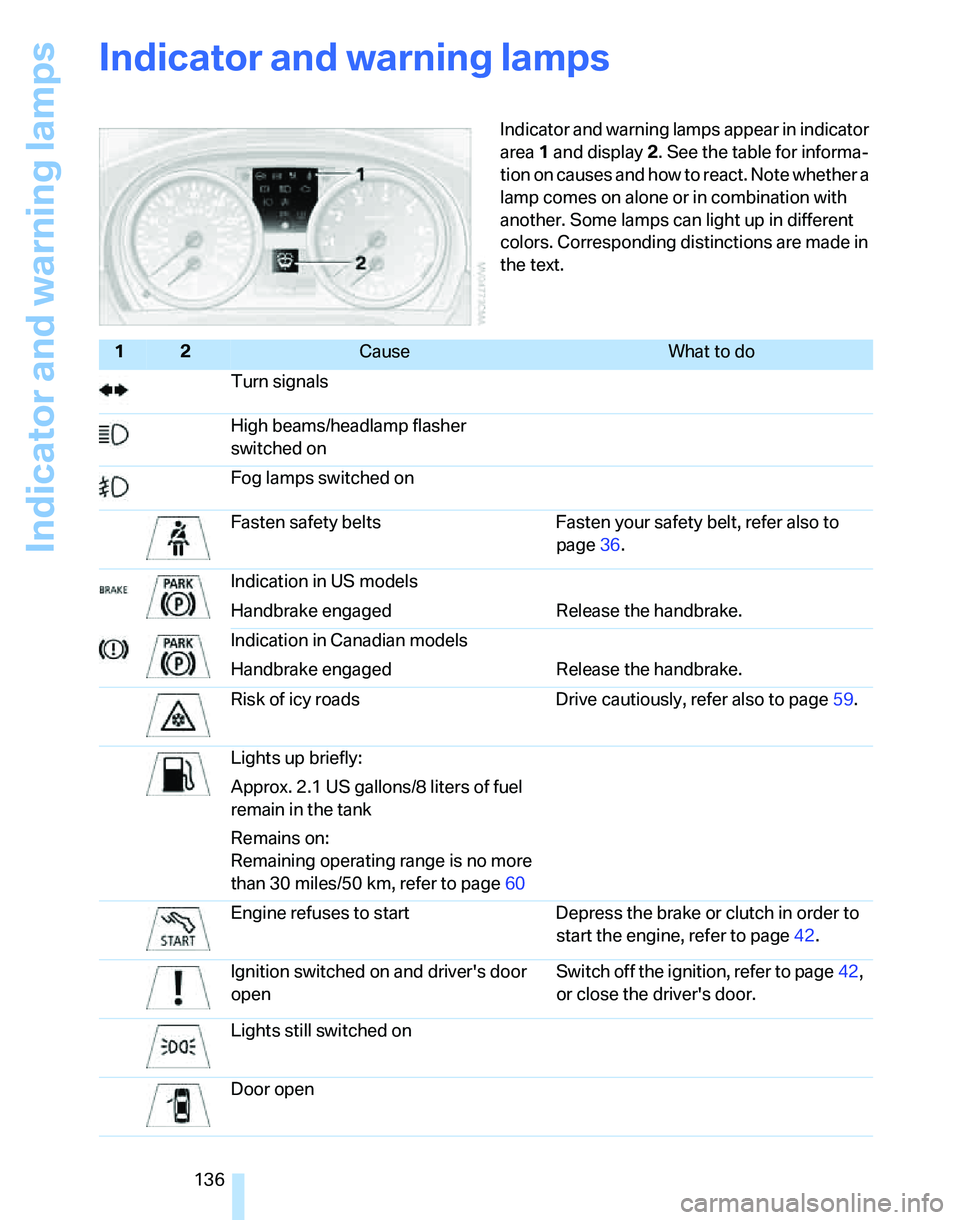
Indicator and warning lamps appear in indicator
area 1 and display 2. See the table for informa-
tion on causes and how to react. Note whether a
lamp comes on alone or in combination with
another. Some lamps can light up in different
colors. Corresponding distinctions are made in
the text.
12Cause What to do
Turn signals
High beams/headlamp flasher
switched on
Fog lamps switched on
Fasten safety belts Fasten your safety belt, refer also to
page36.
Indication in US models
Handbrake engaged Release the handbrake.
Indication in Canadian models
Handbrake engaged Release the handbrake.
Risk of icy roads Drive cautiously, refer also to page59.
Lights up briefly:
Approx. 2.1 US gallons/8 liters of fuel
remain in the tank
Remains on:
Remaining operating range is no more
than 30 miles/50 km, refer to page60
Engine refuses to start Depress the brake or clutch in order to
start the engine, refer to page42.
Ignition switched on and driver's door
openSwitch off the ignition, refer to page42,
or close the driver's door.
Lights still switched on
Door open
Page 139 of 166

Reference
At a glance
Controls
Driving tips
Mobility
137
Engine compartment lid open
Luggage compartment lid open
Window washer fluid level too low Add washer fluid as soon as possible,
refer to page50.
Lights up in red:
Service is due Schedule a service appointment
Check service requirements, refer to
page63.
Lights up in yellow:
The engine will start the next time the
start/stop button is touched, possibly
without the brake or clutch being
depressed
Remote control malfunctioning or, in
cars with convenient access, not
detectedThe engine cannot be started. Have the
remote control checked, if necessary.
Battery in remote control discharged Use the remote control for a longer jour-
ney or, in cars with convenient access,
replace the battery.
Lights up in red:
Driver's and/or front passenger's air-
bags malfunctioningHave the system checked immediately.
Lights up in yellow:
Belt tensioners and/or airbag system
for rear-seat passengers malfunction-
ingHave the system checked as soon as
possible.
Belt tensioners and/or airbag system
failedHave the system checked immediately.
Active steering defective You can continue your journey.
Steering characteristics are modified
and steering wheel could be off-center.
Steer carefully.
Have the system checked as soon as
possible.
Lights up:
Emergency call system has failed or is
malfunctioningHave the system checked as soon as
possible.
12Cause What to do