2005 BMW 325XI child lock
[x] Cancel search: child lockPage 30 of 166

Opening and closing
28
Opening, closing
>Press the switch to the resistance point.
The window continues to open as long as
you keep the switch pressed.
>Press the switch beyond the resistance
point.
The window opens automatically. Press the
switch again to stop the opening move-
ment.
You can close the windows in the same manner
by pulling the switch.
There are separate switches in the rear seat
armrests.
After switching off the ignition
When the remote control is removed or the igni-
tion is switched off, you can still operate the
windows for approx. 1 minute as long as no
door is opened.
For information on convenient operation via the
remote control or the door lock, refer to page20
or22. For information on closing with conve-
nient access, refer to Locking on page20.
Take the remote control with you when
you leave the car, otherwise children
could operate the electric windows and possi-
bly injure themselves.<
Anti-trapping mechanism
If the closing force exceeds a specific value as
an electric window closes, the closing action is
interrupted immediately and the window
reopens slightly.
Despite the anti-trapping mechanism
check and clear the window's travel path
prior to closing it, otherwise the safety system
might fail to detect certain kinds of obstruc-tions, such as thin objects, and the window
would continue closing.
Pulling the switch beyond the resistance point
and holding it limits the response of the anti-
trapping mechanism. In this case, if the closing
force exceeds a defined threshold, the window
will only open a few fractions of an inch/a few
millimeters.
If the switch is pulled past the resistance point
again within approx. 4 seconds, the anti-trap-
ping mechanism will be deactivated.<
Safety switch
With the safety switch, you can prevent the rear
windows from being opened or closed via the
switches in the rear passenger area, by chil-
dren, for example. When the safety function is
switched on, the LED comes on.
Always press the safety switch when chil-
dren ride in the rear, otherwise
unchecked closing of the windows could lead to
injuries.<
Accessories in a window area
If you install accessories within the power win-
dow movement range, e.g. a clip-on antenna for
your mobile phone, the system must be initial-
ized to teach it the new conditions. BMW rec-
ommends having this work done by your BMW
Center.
Glass sunroof*, electric
To prevent injuries, exercise care when
closing the glass sunroof and keep it in
your field of vision until it is shut.
Take the remote control with you when you
Page 31 of 166

Reference
At a glance
Controls
Driving tips
Mobility
29
leave the car, otherwise children could operate
the sunroof and possibly injure themselves.<
Raising
Press the switch.
>The closed glass sunroof is raised and the
sliding visor is opened slightly.
>When the glass sunroof is open, it automat-
ically travels into the raised position. The
sliding visor remains completely open.
Do not close the sliding visor forcibly with
the roof in the raised position, otherwise
this could damage the mechanism.<
Opening, closing
>Press the switch backwards to the resis-
tance point.
The glass sunroof and the sliding visor open
together as long as you hold the switch in
this position.
>Press the switch backwards past the resis-
tance point.
The glass sunroof and the sliding visor open
automatically. Briefly press the switch again
to stop the opening movement.
You can close the glass sunroof in a similar
manner by pressing the switch forwards. The
sliding visor remains open and can be closed by
hand.
For information on convenient operation via the
remote control or door lock, refer to page20
or22.
After the ignition is switched off
When the remote control has been removed or
the ignition switched off, you can still operate the glass sunroof for approx. 1 minute as long
as no door is opened.
Anti-trapping mechanism
If the glass sunroof encounters an obstruction
during closing from approximately the middle of
the opening in the roof, or during closing from
the raised position, the closing movement is
interrupted and the glass sunroof is opened
again slightly.
Despite the anti-trapping mechanism
check and clear the sunroof's travel path
prior to closing it, otherwise the safety system
might fail to detect certain kinds of obstruc-
tions, such as very thin objects, and the sunroof
would continue closing.
Pressing the switch beyond the resistance
point and holding it there deactivates the anti-
trapping mechanism.<
Following interruptions in electrical
power supply
After a power failure, there is a possibility that
the sunroof can only be raised. The system
must be initialized. BMW recommends having
this work done by your BMW Center.
Closing manually
In the event of an electrical malfunction, you can
move the glass sunroof manually:
1.Unclip the front of the cover of the interior
lamps using the screwdriver from the
onboard tool kit, refer to page125.
Page 33 of 166

Reference
At a glance
Controls
Driving tips
Mobility
31
Adjustments
Sitting safely
The ideal sitting position can make a vital con-
tribution to relaxed, fatigue-free driving. In con-
junction with the safety belts, the head
restraints and the airbags, the seated position
has a major influence on your safety in the event
of an accident. To ensure that the safety sys-
tems operate with optimal efficiency, we
strongly urge you to observe the instructions
contained in the following section.
For additional information on transporting chil-
dren safely, refer to page39.
Airbags
Always maintain an adequate distance
between yourself and the airbags. Always
grip the steering wheel on the rim, with your
hands in the 3 o'clock and 9 o'clock positions,
to minimize the risk of injury to the hands or
arms in the event of the airbag being triggered
off.
No one and nothing is to come between the air-
bags and the seat occupant.
Do not use the cover of the front airbag on the
front passenger side as a storage area. Make
sure that the front passenger is sitting correctly,
e.g. not resting feet or legs on the instrument
panel, otherwise leg injuries can occur if the
front airbag is triggered.
Make sure that passengers do not lean their
heads against the side or head airbags, other-
wise serious injuries could result if the side air-
bags suddenly deployed.<
Even if you follow all the instructions, injuries
resulting from contact with airbags cannot be
fully excluded, depending on the circum-
stances. The ignition and inflation noise may
provoke a mild hearing loss in extremely sensi-
tive individuals. This effect is usually only tem-
porary.
For airbag locations and additional information
on airbags, refer to page74.
Head restraint
A correctly adjusted head restraint reduces the
risk of neck injury in the event of an accident.
Adjust the head restraint in such a way
that its center is at approx. ear level. Oth-
erwise, there is an increased risk of injury in the
event of an accident.<
Head restraints, refer to page33.
Safety belt
Before every drive, make sure that all occupants
wear their safety belts. Airbags complement the
safety belt as an additional safety device, but
they do not represent a substitute.
Never allow more than one person to
wear a single safety belt. Never allow
infants or small children to ride in a passenger's
lap.
Expectant mothers should also wear the safety
belt, making sure that the strap in the pelvic
area is well down on the hips and does not press
against the abdominal region of the body.
Do not route the belt across your neck, or run it
across sharp edges. Be sure that the belt does
not become caught or jammed. The safety belt
should not be twisted and must be positioned
firmly over the pelvis and shoulder, as close to
the body as possible. It should not pass over
hard or fragile objects, otherwise the belt in the
pelvic area could slide over the hips in the event
of a head-on collision and injure the lower abdo-
men. Avoid wearing bulky clothing and regularly
pull the belt in the upper-body area taut, other-
wise its restraining effect could be impaired.<
Safety belts, refer to page36.
Seats
Note before adjusting
Never attempt to adjust your seat while
the vehicle is moving. The seat could
respond with unexpected movement, and the
Page 42 of 166

Transporting children safely
40
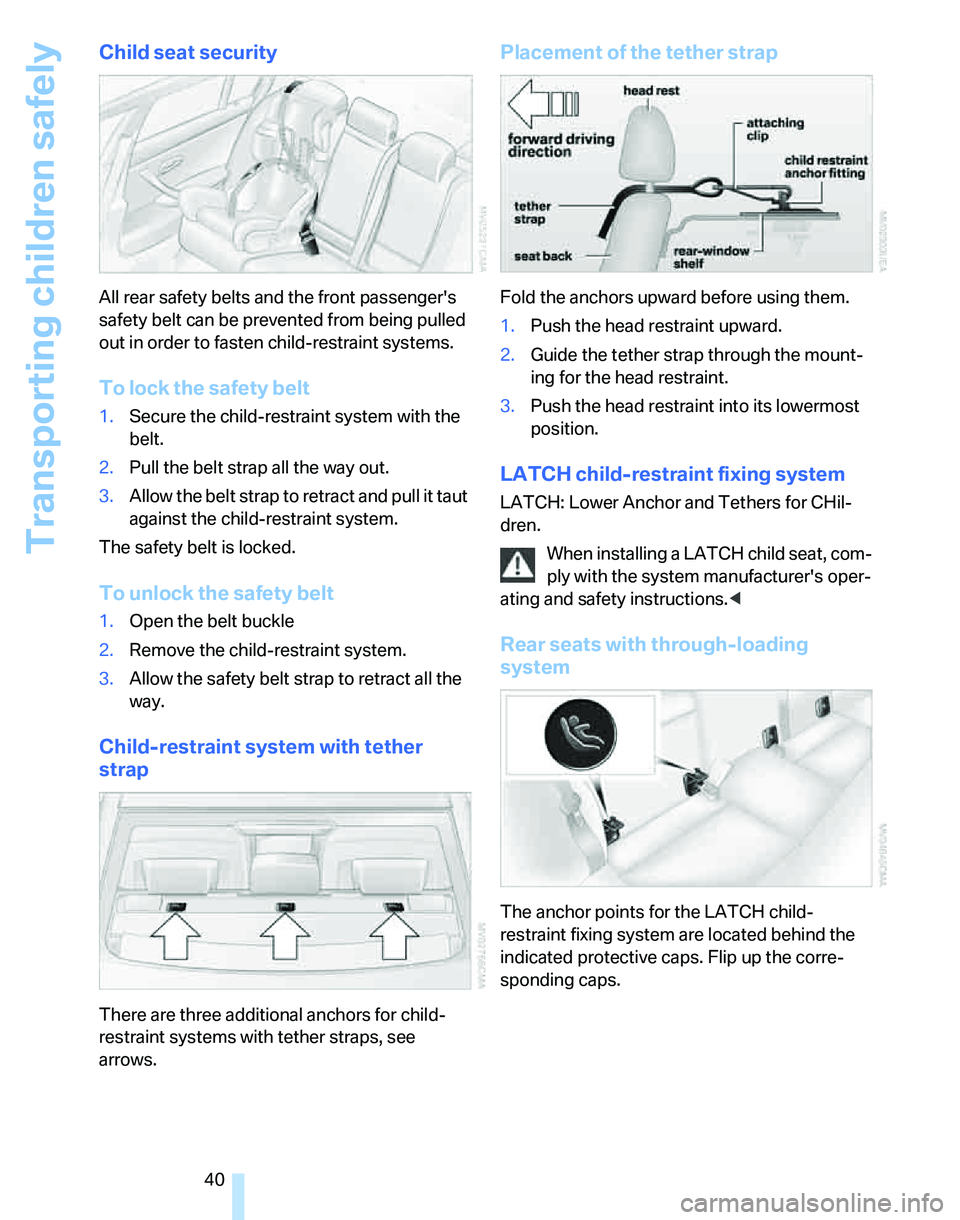
Child seat security
All rear safety belts and the front passenger's
safety belt can be prevented from being pulled
out in order to fasten child-restraint systems.
To lock the safety belt
1.Secure the child-restraint system with the
belt.
2.Pull the belt strap all the way out.
3.Allow the belt strap to retract and pull it taut
against the child-restraint system.
The safety belt is locked.
To unlock the safety belt
1.Open the belt buckle
2.Remove the child-restraint system.
3.Allow the safety belt strap to retract all the
way.
Child-restraint system with tether
strap
There are three additional anchors for child-
restraint systems with tether straps, see
arrows.
Placement of the tether strap
Fold the anchors upward before using them.
1.Push the head restraint upward.
2.Guide the tether strap through the mount-
ing for the head restraint.
3.Push the head restraint into its lowermost
position.
LATCH child-restraint fixing system
LATCH: Lower Anchor and Tethers for CHil-
dren.
When installing a LATCH child seat, com-
ply with the system manufacturer's oper-
ating and safety instructions.<
Rear seats with through-loading
system
The anchor points for the LATCH child-
restraint fixing system are located behind the
indicated protective caps. Flip up the corre-
sponding caps.
Page 43 of 166

Reference
At a glance
Controls
Driving tips
Mobility
41
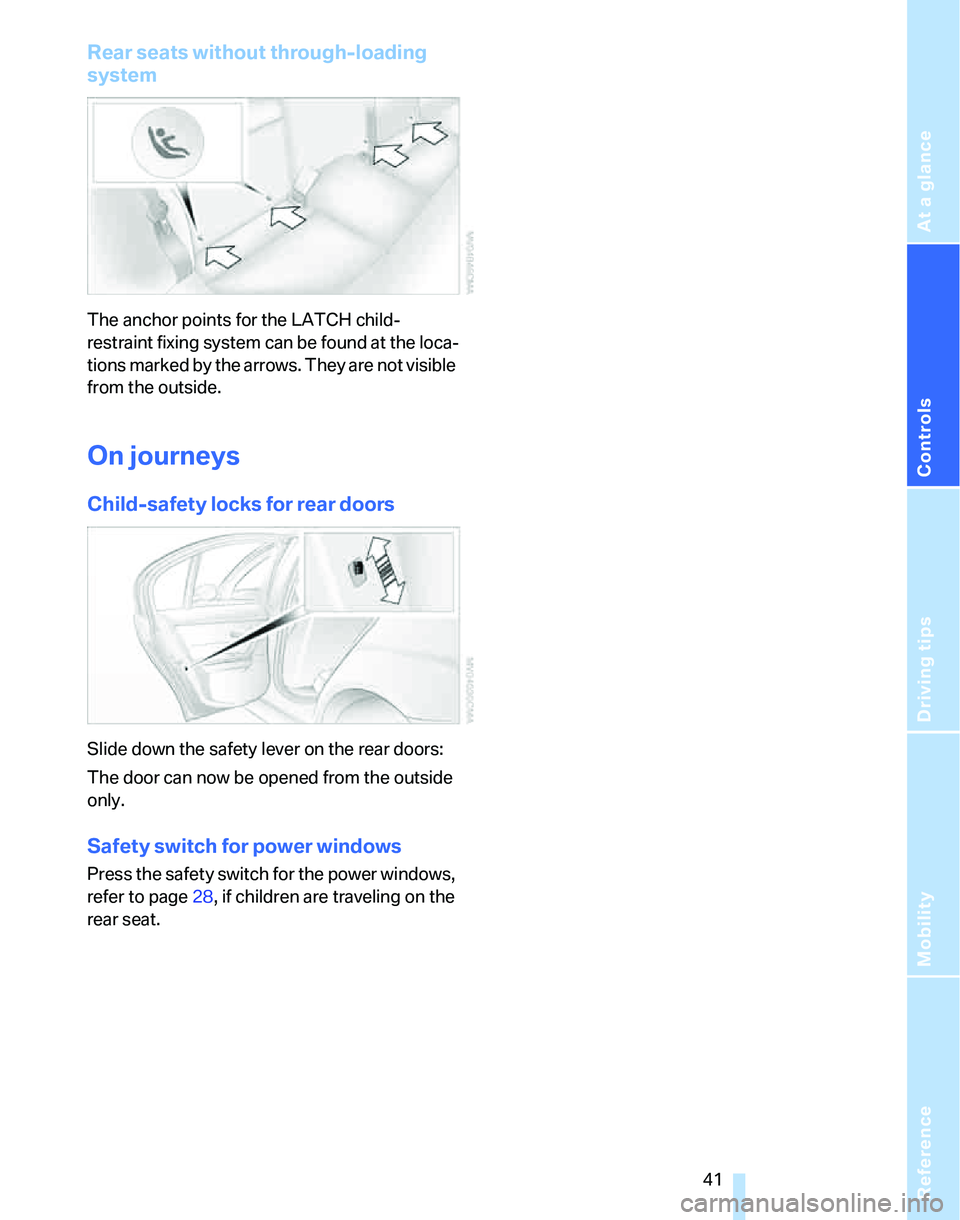
Rear seats without through-loading
system
The anchor points for the LATCH child-
restraint fixing system can be found at the loca-
tions marked by the arrows. They are not visible
from the outside.
On journeys
Child-safety locks for rear doors
Slide down the safety lever on the rear doors:
The door can now be opened from the outside
only.
Safety switch for power windows
Press the safety switch for the power windows,
refer to page28, if children are traveling on the
rear seat.
Page 86 of 166

Climate
84 should therefore open them for maximum cool-
ing.
AUTO program
The AUTO program adjusts the air
distribution to the windshield and
side windows, towards the upper
body area and into the footwell for you. The air
flow rate and your temperature specifications
will be adapted to outside influences as a result
of seasonal changes, e.g. sunlight or window
condensation.
The cooling is switched on automatically with
the AUTO program.
Adjusting air flow rate manually
Press the left side of the button to
reduce airflow. Press the right side
of the button to increase it.
You can reactivate the automatic mode for the
air flow rate with the AUTO button.
Switching the system on/off
With the blower at its lowest setting, press the
left side of the button to switch off the auto-
matic climate control. All indicators go out.
Press any button except REST to reactivate the
automatic climate control.
AUC Automatic recirculated-air
control/Recirculated-air mode
Switch on the desired operating
mode by pressing this button
repeatedly:
>LEDs off: outside air flows in continuously.
>Left-hand LED on, AUC mode: a sensor
detects pollutants in the outside air. If nec-
essary, the system blocks the supply of out-
side air and recirculates the inside air. As
soon as the concentration of pollutants in
the outside air has decreased sufficiently,
the system automatically switches back to
outside air supply.
>Right-hand LED on, recirculated-air mode:
the supply of outside air is permanently shut off. The system then recirculates the
air currently within the vehicle.
If condensation starts to form on the
inside window surfaces during operation
in the recirculated-air mode, you should switch
it off while also increasing the air flow rate as
required.
The recirculated-air mode should not be used
over an extended period of time, otherwise the
air quality inside the car will deteriorate contin-
uously.<
Via the button* on the steering wheel
You can switch between operating modes via a
button
on the steering wheel, refer to page11:
>When outside air is coming in, you can use
the button on the steering wheel to switch
between outside air and recirculated-air
mode.
>When recirculated-air mode or AUC mode
is switched on, you can use the button on
the steering wheel to switch between recir-
culated-air mode and AUC mode.
Residual heat
The heat stored in the engine is
used to heat the passenger com-
partment, e.g. while stopped at a
school to pick up a child.
The function can be switched on when the fol-
lowing conditions are met:
>Up to 15 minutes after the engine has been
switched off
>While the engine is at operating tempera-
ture
>As long as battery voltage is sufficient
>At an outside temperature below 777/
256
The LED is lit when the function is on.
As of radio readiness, you can set the interior
temperature, the air flow rate and the air distri-
bution.
Page 156 of 166

Everything from A to Z
154 Center console, refer to
Around the center
console14
Central locking
– from inside22
– from outside19
Central locking system19
– convenient access25
Changing bulbs125
Changing wheels129
Chassis number, refer to
Engine compartment119
Check Control65
Check Gas Cap106
Checking the air pressure,
refer to Tire inflation
pressure108
Child-restraint fixing system
LATCH40
Child-restraint systems39
Child-safety lock41
Child seats39
Chrome parts, care, refer to
Caring for your vehicle
brochure
Cigarette lighter91
– socket91
Cleaning, refer to Caring for
your vehicle brochure
Cleaning headlamps50
– washer fluid50
Clock59
– 12h/24h mode62
– setting time64
Closing
– from inside22
– from outside20
Clothes hooks90
Cockpit10
Cold start, refer to Starting the
engine43
Combined instrument, refer to
Instrument cluster12
Comfort Access, refer to
Convenient access25
Comfort area, refer to Around
the center console14Compartment for remote
control, refer to Ignition
lock42
Compass87
Computer60
Condensation, refer to When
the vehicle is parked100
Configuring settings, refer to
Personal Profile19
Confirmation signals for
locking/unlocking of the
vehicle21
Connecting vacuum cleaner,
refer to Connecting
electrical appliances91
Consumption display
– average consumption60
Consumption indicator
– Energy Control60
Control Display
– settings61
Controls and displays10
Convenience operation
– windows20
Convenience start, refer to
Starting the engine43
Convenient access25
– replacing the battery27
– what to observe before
entering a car wash27
Convenient operation
– windows with convenient
access26
– with convenient access26
Coolant121
– adding121
– checking level121
Coolant temperature59
Cooling, maximum83
Cooling fluid, refer to
Coolant121
Cornering lamps, refer to
Adaptive Head Light77
Courtesy lamps79
Cruise control51
– active53
– malfunction52
Cruising range60
Cup holders90Curb weight, refer to
Weights150
Current consumption, refer to
Energy Control60
D
Dashboard, refer to
Cockpit10
Dashboard, refer to
Instrument cluster12
Dashboard lighting, refer to
Instrument lighting78
Data148
– capacities151
– dimensions149
– engine148
– weights150
Date
– setting65
Daytime driving lamps77
DBC Dynamic Brake
Control68
DCC, refer to Cruise
control51
Deactivating front passenger
airbags74
Deadlocking, refer to
Locking20
Decommissioning the vehicle
– refer to Caring for your
vehicle brochure
Defect
– door lock22
– fuel filler door106
– glass sunroof29
Defogging windows82,85
Defrosting windows82,85
Defrosting windows and
removing condensation
– air conditioner82
– automatic climate control85
Defrosting windshield, refer to
Defrosting windows82,85
Defrost position, refer to
Defrosting windows82,85
Digital clock59
Digital compass87
Dimensions149
Page 159 of 166

Reference
At a glance
Controls
Driving tips
Mobility
157
Homepage4
Hood118
Horn10
Hot exhaust system98
Hydraulic brake assist, refer to
Dynamic Brake Control68
Hydroplaning99
I
Ice warning59
Ignition42
– switched off42
– switched on42
Ignition key, refer to
Integrated key/remote
control18
Ignition key position 1, refer to
Radio readiness42
Ignition key position 2, refer to
Ignition on42
Ignition lock42
Indicator and warning
lamps13,136
Individual air distribution81
Individual settings, refer to
Personal Profile19
Initializing
– compass, refer to
Calibrating88
– Flat Tire Monitor FTM72
– glass sunroof29
Instrument cluster12
Instrument lighting78
Instrument panel, refer to
Cockpit10
Integrated key18
Integrated universal remote
control86
Interior lamps79
– remote control20
Interior motion sensor25
Interior rearview mirror37
– automatic dimming
feature99
Interior rearview mirror with
digital compass87
Interlock47Intermittent mode of the
wipers50
J
Jacking points129
Jumpering, refer to Jump
starting132
Jump starting132
K
Key, refer to Integrated key/
remote control18
Keyless Go, refer to
Convenient access25
Keyless opening and closing,
refer to Convenient
access25
Key Memory, refer to Personal
Profile19
Kick-down48
– automatic transmission with
Steptronic48
– sequential manual gearbox
SMG46
Knock control106
L
Lamps, refer to Parking lamps/
low beams76
Lamps and bulbs, replacing
bulbs125
Lap-and-shoulder safety
belt36
Lashing eyes, refer to
Securing cargo101
LATCH child-restraint fixing
system40
LEDs light-emitting
diodes125
Length, refer to
Dimensions149
License plate lamp, replacing
bulbs128
Light-emitting diodes
LEDs125
Lighter91Lighting
– instruments78
– lamps and bulbs125
– of the vehicle, refer to
Lamps76
Light switch76
Limit145
Loading
– securing cargo101
Load securing equipment,
refer to Securing cargo101
Lock buttons in the doors,
refer to Locking23
Locking
– adjusting confirmation
signal21
– from inside23
– from outside20
– without remote control, refer
to Convenient access25
Locking and unlocking doors
– from inside22
– from outside20
Low beams76
– automatic76
– replacing bulbs126
Lower back support, refer to
Lumbar support32
Luggage compartment
– capacity150
– convenient access26
– folding up the floor panel93
– lamp79
– opening from inside23
– opening from outside23
Luggage compartment lid23
– convenient access26
– unlocking with remote
control21
Luggage compartment lid,
refer to Tailgate23
Luggage compartment net,
refer to Securing cargo101
Luggage rack, refer to Roof-
mounted luggage rack101
Lumbar support32