2005 BMW 325I SEDAN change time
[x] Cancel search: change timePage 81 of 223

Technology for driving comfort and safety
80 If the warning lamps for DSC come
on. DSC including DTC and DBC is
malfunctioning.
The stabilizing action and brake-
servo boost are no longer available. The vehicle
remains operational. Have the system checked
as soon as possible.
Drive-off assistant
The drive-off assistant enables you to drive off
smoothly on uphill gradients. It is not necessary
to use the handbrake for this.
1.Hold the car in place by pressing the brake
pedal.
2.Release the brake pedal and drive off with-
out delay.
The drive-off assistant holds the car in
place for approx. 2 seconds after the
brake pedal is released. Depending on vehicle
load, the car may roll backwards a little during
this time span. Drive off without delay after
releasing the brake pedal. Otherwise, the drive-
off assistant will no longer hold the car in place
after approx. 2 seconds and the car will start to
roll backwards.<
Malfunction
The warning lamps for the brake sys-
tem light up in yellow. The drive-off
assistant has failed. The car will not
be held in place after the brake pedal
is released. Have the system checked as soon
as possible.
Display of this malfunction on Cana-
dian models.
Flat Tire Monitor FTM
The concept
The Flat Tire Monitor monitors tire pressures
while the car is being driven. The system
reports any significant loss of pressure in one
tire in relation to another.If a tire loses pressure, its rolling radius
changes, and this in turn alters the speed of
rotation. This change is detected and is
reported as a flat tire.
Functional requirement
In order to assure the reliable reporting of a flat
tire, the system must be initialized for the cor-
rect tire inflation pressure.
The system must be reinitialized each
time a tire inflation pressure has been cor-
rected or a wheel or tire has been changed.<
System limitations
The Flat Tire Monitor is unable to warn
the driver of sudden, severe tire damage
caused by external factors, nor can it identify
the gradual loss of pressure that will inevitably
occur in all four tires over a lengthy period of
time.<
In the following situations, the system could be
delayed or malfunction:
>System has not been initialized
>Driving on snowy or slippery road surface
>Performance-oriented style of driving: slip
in the drive wheels, high lateral acceleration
>If snow chains are attached
Initializing the system
The initialization is completed during driv-
ing, which can be interrupted at any time.
When driving resumes, the initialization is con-
tinued automatically.
Do not initialize the system while snow chains
are attached.<
iDrive concept, refer to page16.
1.Press the button.
This opens the start menu.
2.Press the controller to open the menu.
3.Select "Vehicle settings" and press the
controller.
Page 91 of 223

Controlling the climate for pleasant driving
90
Automatic climate control
Comfortable interior climate
AUTO program7 offers the ideal air distribution
and air flow rate for practically all conditions,
refer to AUTO program below. All you need to
do is select an interior temperature which is
comfortable for you.
The following sections inform you in detail
about how to adjust the settings.
Most settings are stored for the remote control
currently in use, refer also to Personal Profile
settings on page29.
Adjusting air distribution manually
Direct the flow of air to the win-
dows, to the upper body area or to
the footwell.
You can switch the automatic air
distribution back on by pressing the AUTO but-
ton.
Manual fine adjustments in air
distribution
You can set the rate of incoming airflow for
manual air distribution.
iDrive concept, refer to page16.
1.Press the button.
This opens the start menu.
2.Move the controller to the left to call up "Cli-
mate".
3.Select "Vent settings" and press the con-
troller.
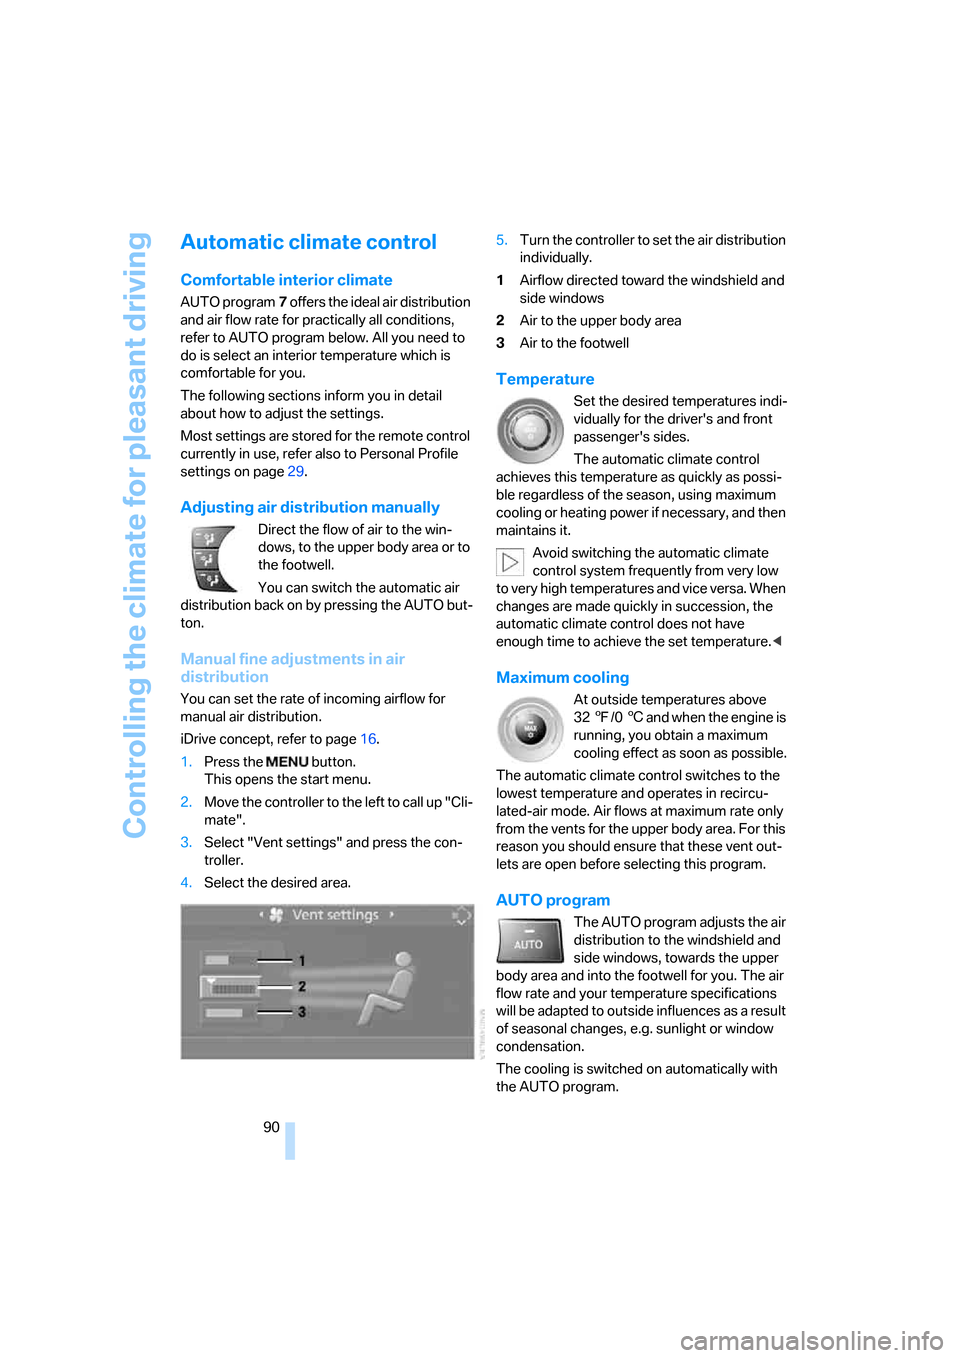
4.Select the desired area.5.Turn the controller to set the air distribution
individually.
1Airflow directed toward the windshield and
side windows
2Air to the upper body area
3Air to the footwell
Temperature
Set the desired temperatures indi-
vidually for the driver's and front
passenger's sides.
The automatic climate control
achieves this temperature as quickly as possi-
ble regardless of the season, using maximum
cooling or heating power if necessary, and then
maintains it.
Avoid switching the automatic climate
control system frequently from very low
to very high temperatures and vice versa. When
changes are made quickly in succession, the
automatic climate control does not have
enough time to achieve the set temperature.<
Maximum cooling
At outside temperatures above
327/06 and when the engine is
running, you obtain a maximum
cooling effect as soon as possible.
The automatic climate control switches to the
lowest temperature and operates in recircu-
lated-air mode. Air flows at maximum rate only
from the vents for the upper body area. For this
reason you should ensure that these vent out-
lets are open before selecting this program.
AUTO program
The AUTO program adjusts the air
distribution to the windshield and
side windows, towards the upper
body area and into the footwell for you. The air
flow rate and your temperature specifications
will be adapted to outside influences as a result
of seasonal changes, e.g. sunlight or window
condensation.
The cooling is switched on automatically with
the AUTO program.
Page 92 of 223

Controls
91Reference
At a glance
Driving tips
Communications
Navigation
Entertainment
Mobility
Intensity of the AUTO program
You can set the intensity of the air supply in the
AUTO program. This changes the duration of
time during which the vehicle interior is heated
or cooled.
1.Open the start menu.
2.Call up "Climate".
3.Select "Automatic programs" and press the
controller.
4.Select the desired area.
5.Press the controller to set the desired inten-
sity.
The selected intensity level of the auto-
matic program is switched on.
Adjusting air flow rate manually
Press the left side of the button to
reduce airflow. Press the right side
of the button to increase it. You can
reactivate the automatic mode for the air flow
rate with the AUTO button.
Switching the system on/off
With the blower at its lowest setting, press the
left side of the button to switch off the auto-
matic climate control. All indicators go out.
Press any button except REST to reactivate the
automatic climate control.
AUC Automatic recirculated-air
control/Recirculated-air mode
Set the desired operating mode by
pressing this button repeatedly:
>LEDs off: outside air flows in
continuously.>Left-hand LED on, AUC mode: a sensor
detects pollutants in the outside air. If nec-
essary, the system blocks the supply of out-
side air and recirculates the inside air. As
soon as the concentration of pollutants in
the outside air has decreased sufficiently,
the system automatically switches back to
outside air supply.
>Right-hand LED on, recirculated-air mode:
the supply of outside air is permanently
shut off. The system then recirculates the
air currently within the vehicle.
You can activate/deactivate the recirculated-air
mode by means of a freely programmable but-
ton
* in the steering wheel, refer to page11.
If condensation starts to form on the
inside window surfaces during operation
in the recirculated-air mode, you should switch
it off while also increasing the air flow rate as
required.
The recirculated-air mode should not be used
over an extended period of time, as otherwise
the air quality inside the car will deteriorate con-
tinuously.<
Using residual heat
The heat stored in the engine is
used to heat the passenger com-
partment, e.g. while stopped at a
school to pick up a child.
You can use this function for up to 15 minutes
after switching off the engine if it is warm and
the battery is sufficiently well charged. The out-
side temperature must be below 777/256.
The LED in the button comes on if these condi-
tions are met and the function is activated.
Defrosting windows and removing
condensation
This program quickly removes ice
and condensation from the wind-
shield and front side windows.
When the program is switched on, the LED
comes on.
Page 93 of 223

Controlling the climate for pleasant driving
92
Switching the cooling function on and
off
The cooling function cools and
dehumidifies the incoming air
before also reheating it as
required, according to the temperature setting.
Depending on the weather, the windshield may
fog over briefly when the engine is started.
The cooling function is only available when the
engine is running and is switched on automati-
cally with the AUTO program.
Rear window defroster
When the rear window defroster is
switched on, the LED comes on.
The defroster switches off auto-
matically after a certain time.
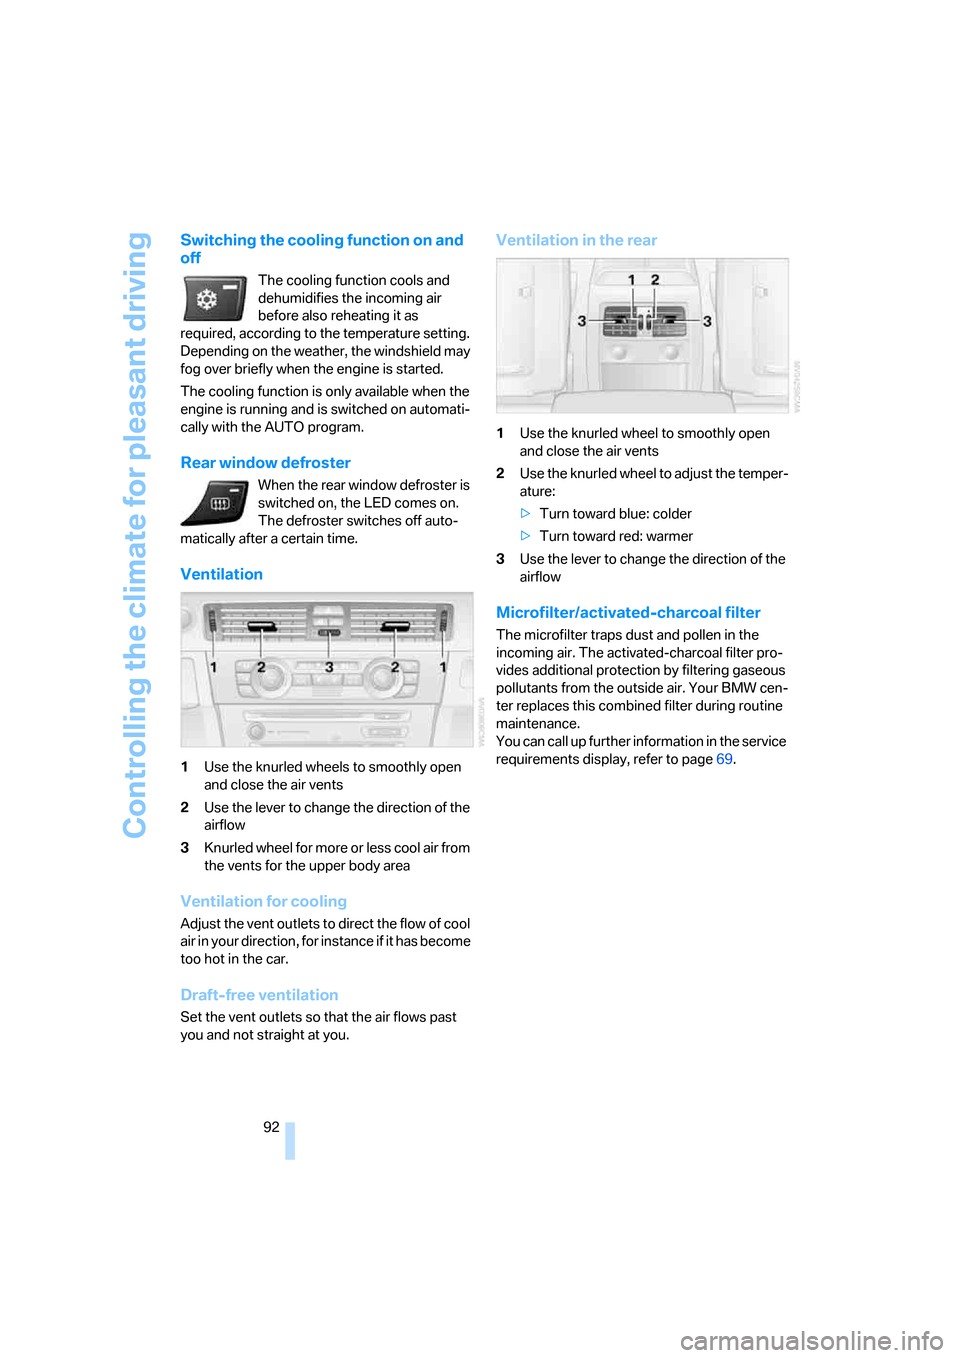
Ventilation
1Use the knurled wheels to smoothly open
and close the air vents
2Use the lever to change the direction of the
airflow
3Knurled wheel for more or less cool air from
the vents for the upper body area
Ventilation for cooling
Adjust the vent outlets to direct the flow of cool
air in your direction, for instance if it has become
too hot in the car.
Draft-free ventilation
Set the vent outlets so that the air flows past
you and not straight at you.
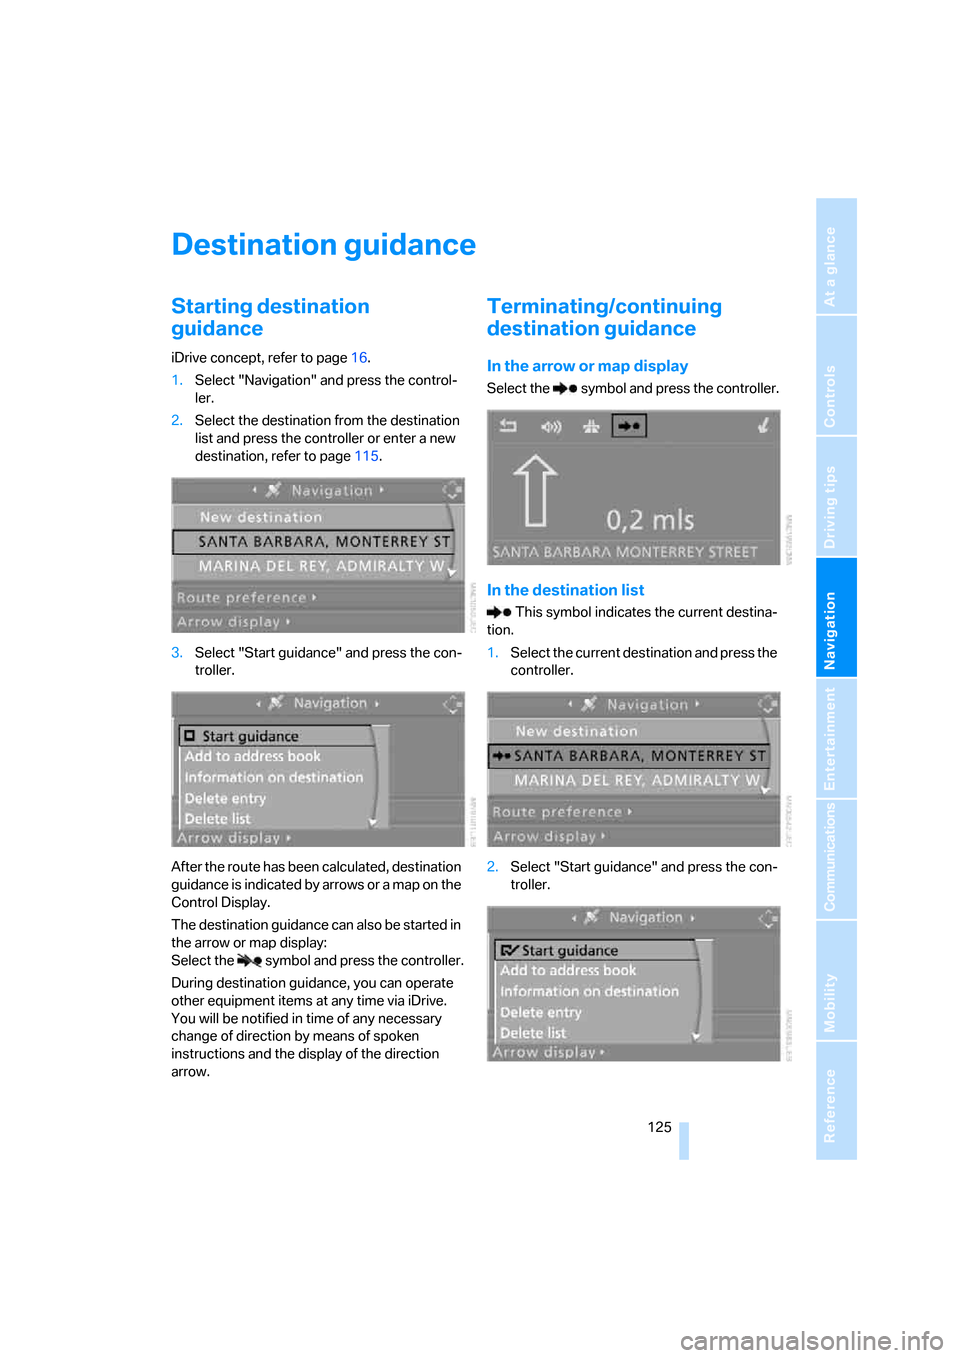
Ventilation in the rear
1Use the knurled wheel to smoothly open
and close the air vents
2Use the knurled wheel to adjust the temper-
ature:
>Turn toward blue: colder
>Turn toward red: warmer
3Use the lever to change the direction of the
airflow
Microfilter/activated-charcoal filter
The microfilter traps dust and pollen in the
incoming air. The activated-charcoal filter pro-
vides additional protection by filtering gaseous
pollutants from the outside air. Your BMW cen-
ter replaces this combined filter during routine
maintenance.
You can call up further information in the service
requirements display, refer to page69.
Page 126 of 223

Navigation
Driving tips
125Reference
At a glance
Controls
Communications
Entertainment
Mobility
Destination guidance
Starting destination
guidance
iDrive concept, refer to page16.
1.Select "Navigation" and press the control-
ler.
2.Select the destination from the destination
list and press the controller or enter a new
destination, refer to page115.
3.Select "Start guidance" and press the con-
troller.
After the route has been calculated, destination
guidance is indicated by arrows or a map on the
Control Display.
The destination guidance can also be started in
the arrow or map display:
Select the symbol and press the controller.
During destination guidance, you can operate
other equipment items at any time via iDrive.
You will be notified in time of any necessary
change of direction by means of spoken
instructions and the display of the direction
arrow.
Terminating/continuing
destination guidance
In the arrow or map display
Select the symbol and press the controller.
In the destination list
This symbol indicates the current destina-
tion.
1.Select the current destination and press the
controller.
2.Select "Start guidance" and press the con-
troller.
Page 127 of 223

Destination guidance
126 If you did not reach your destination before the
end of your last journey, the following question
will appear in the display at the start of the next
journey:
"Continue guidance to destination?".
The destination guidance starts automatically
after a short time.
To start destination guidance immediately:
Select "Yes" and press the controller.
Route display
You have the option of displaying various views
of the route during destination guidance.
From another menu, you can switch
directly to the screen last displayed, refer
to Convenient call-up of menu items on
page18.<
Displaying arrow view
1.Select "Navigation" and press the control-
ler.
2.Move the controller backwards twice so
that the fourth field from the top is high-
lighted. Turn the controller until "Arrow dis-
play" is selected and press the controller.
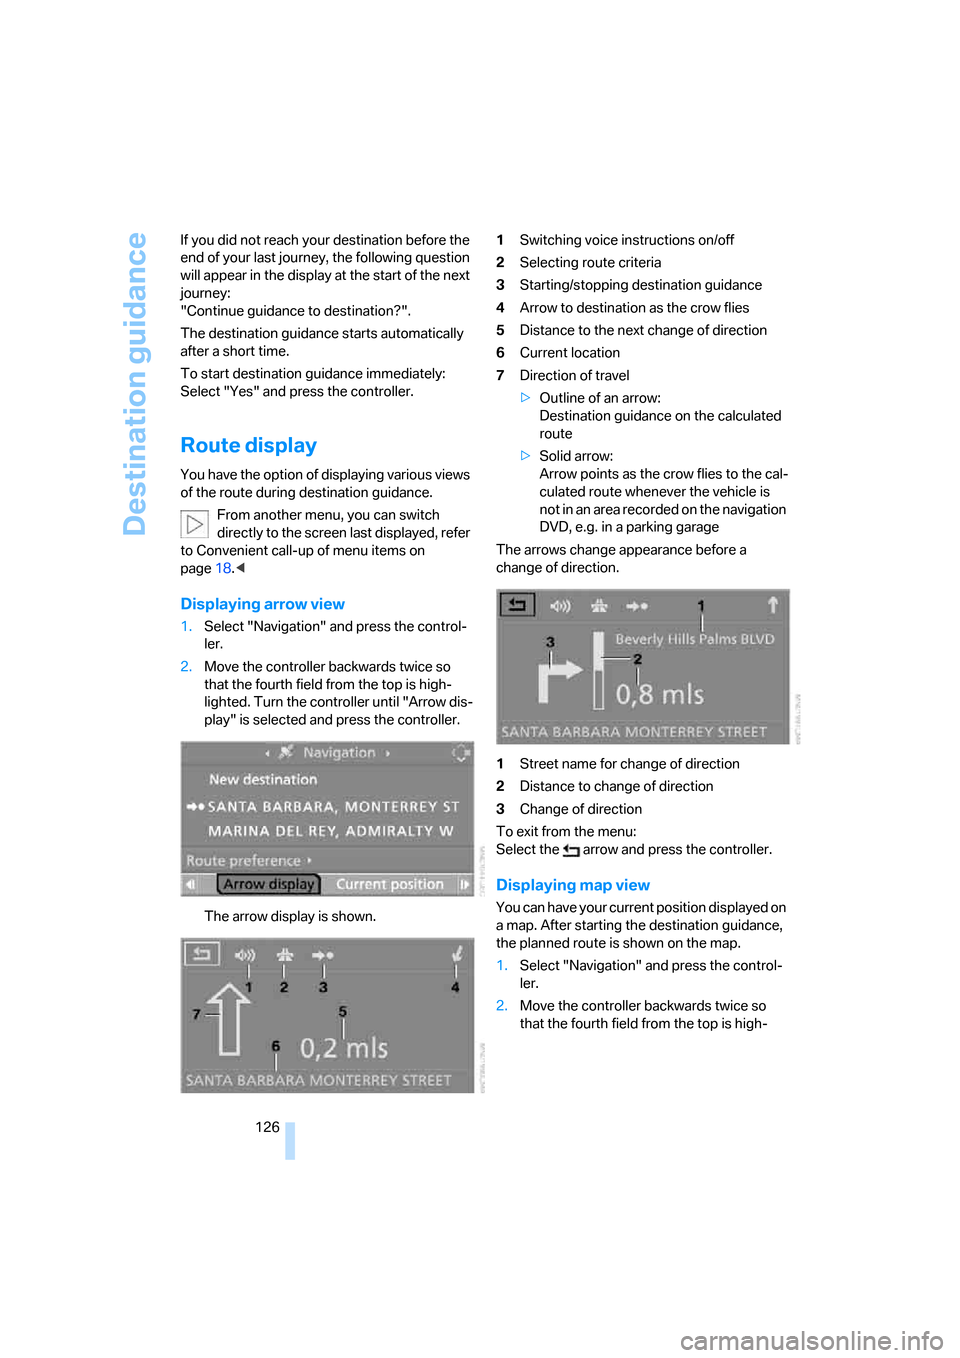
The arrow display is shown.1Switching voice instructions on/off
2Selecting route criteria
3Starting/stopping destination guidance
4Arrow to destination as the crow flies
5Distance to the next change of direction
6Current location
7Direction of travel
>Outline of an arrow:
Destination guidance on the calculated
route
>Solid arrow:
Arrow points as the crow flies to the cal-
culated route whenever the vehicle is
not in an area recorded on the navigation
DVD, e.g. in a parking garage
The arrows change appearance before a
change of direction.
1Street name for change of direction
2Distance to change of direction
3Change of direction
To exit from the menu:
Select the arrow and press the controller.
Displaying map view
You can have your current position displayed on
a map. After starting the destination guidance,
the planned route is shown on the map.
1.Select "Navigation" and press the control-
ler.
2.Move the controller backwards twice so
that the fourth field from the top is high-
Page 192 of 223

Mobility
191Reference
At a glance
Controls
Driving tips
Communications
Navigation
Entertainment
according to BMW repair procedures with cor-
respondingly trained personnel.
Light-emitting diodes LEDs
Light-emitting diodes installed behind translu-
c e n t l e n s e s s e r v e a s t h e l i g h t s o u r c e f o r m a n y o f
the controls and displays in your vehicle. These
light-emitting diodes, which operate using a
concept similar to that applied in conventional
lasers, are officially designated as Class 1 light-
emitting diodes.
Do not remove the covers or expose the
eyes directly to the unfiltered light source
for several hours at a time, as this could cause
irritation to the retina.<
Changing wheels
Your BMW is equipped with Run-Flat Tires as
standard. This removes the need to change a
wheel immediately in the event of a puncture.
The symbol identifying Run-Flat Tires is a circle
with the letters RSC on the sidewall, refer to
Run-Flat Tires, page178.
When mounting new tires or changing over
from summer to winter tires and vice versa,
mount Run-Flat Tires for your own safety. In the
event of a flat, moreover, no spare wheel is
available. Your BMW center will be glad to
advise you. Refer also to New wheels and tires,
page178.
The tools for changing wheels are avail-
able as optional accessories from your
BMW center.<
Jack mounting points
The jacking points are at the positions shown in
the illustration.
Vehicle battery
Battery care
The battery is 100 % maintenance-free, the
electrolyte will last for the life of the battery
when the vehicle is operated in a temperate cli-
mate. Your BMW center will be glad to advise in
all matters concerning the battery.
Charging battery
Only charge the battery in the vehicle via the
terminals in the engine compartment with the
engine off. Connections, refer to Jump starting
on page194.
Disposal
Have old batteries disposed of by your
BMW center or hand them in to a recy-
cling center. Maintain the battery in an upright
position for transport and storage. Always
secure the battery against tipping over during
transport.<
Power failure
After a temporary power loss, the functioning of
some equipment may be limited and require
reinitialization. Individual settings may likewise
have been lost and will have to be repro-
grammed:
>Time and date
These values must be updated, refer to
page71.
Page 205 of 223

Short commands for the voice command system
204
Climate
menu
To select radio presets138{Preset ...} or
{Choose preset}
To open "Manual"139{FM manual} or
{AM manual}
To open strongest radio station139{AM Autostore}
To call up CD player145{CD menu}
To switch on CD player145{CD}
To call up CD changer145{CD changer menu}
To switch on CD changer145{CD changer}
To select CD145{CD 1...6}
To select CD and music track146{CD 1...6 track ...}
To select track146{Track ...}
To open "Audio Aux"149{Audio Aux menu}
To call up DVD145{DVD player menu}
To switch on DVD145{DVD player}
FunctionCommand
FunctionCommand
To open "Vent settings"90{Vent settings}
To open "Automatic programs"91{Automatic programs}
FunctionCommand
To open "Door locks"30, 32{Door locks}
To open "Steering wheel buttons"45{Steering wheel buttons}
To open "Lighting"53{Lighting}
To open "Communication settings"160{Communication settings}
To open "BMW Service settings"160{BMW Service settings}
To open "BMW Service"162{BMW Service}
To open "Service requirements"70, 161{Service requirements}
To open "Service"70, 161{Service}
To display "Check Control messages"73{Check Control messages}
To open "Display settings"76{Display settings}
To set brightness of Control Display76{Brightness}
To open "Units"64{Units}
To open "Languages"76, 127{Languages}
To open "Time"71{Time}