2005 BMW 325I height
[x] Cancel search: heightPage 34 of 166
Adjustments
32 ensuing loss of vehicle control could lead to an
accident.
On the front passenger seat as well, do not
incline the backrest too far to the rear while the
vehicle is being driven, otherwise there is a dan-
ger in the event of an accident of sliding under
the safety belt, eliminating the protection nor-
mally provided by the belt.<
Comply with the instructions on head restraint
height on page33, and on damaged safety
belts on page36.
Seat adjustment
Observe the adjustment instructions on
page31 to ensure the best possible per-
sonal protection.<
Longitudinal direction
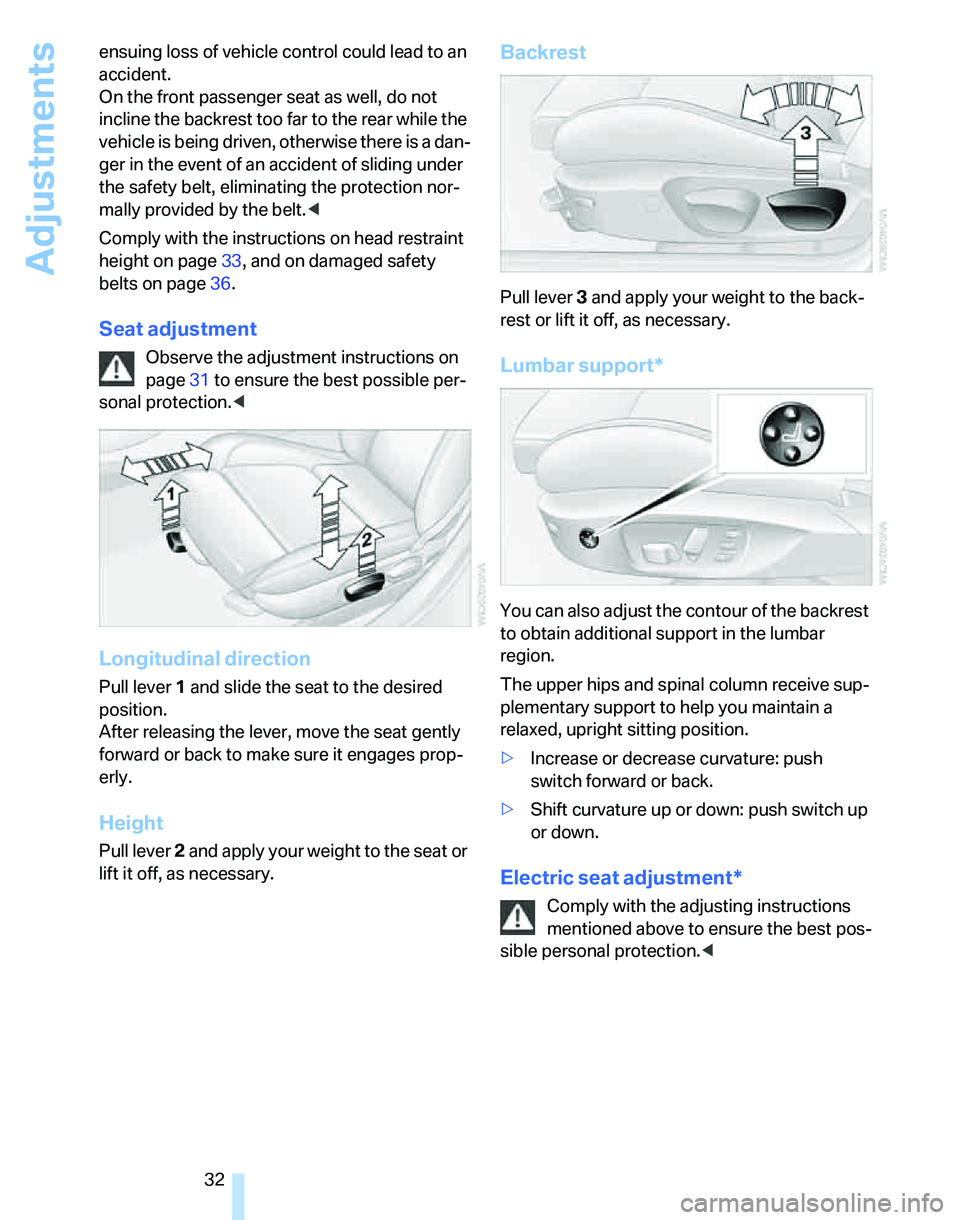
Pull lever 1 and slide the seat to the desired
position.
After releasing the lever, move the seat gently
forward or back to make sure it engages prop-
erly.
Height
Pull lever 2 and apply your weight to the seat or
lift it off, as necessary.
Backrest
Pull lever 3 and apply your weight to the back-
rest or lift it off, as necessary.
Lumbar support*
You can also adjust the contour of the backrest
to obtain additional support in the lumbar
region.
The upper hips and spinal column receive sup-
plementary support to help you maintain a
relaxed, upright sitting position.
>Increase or decrease curvature: push
switch forward or back.
>Shift curvature up or down: push switch up
or down.
Electric seat adjustment*
Comply with the adjusting instructions
mentioned above to ensure the best pos-
sible personal protection.<
Page 35 of 166
Reference
At a glance
Controls
Driving tips
Mobility
33
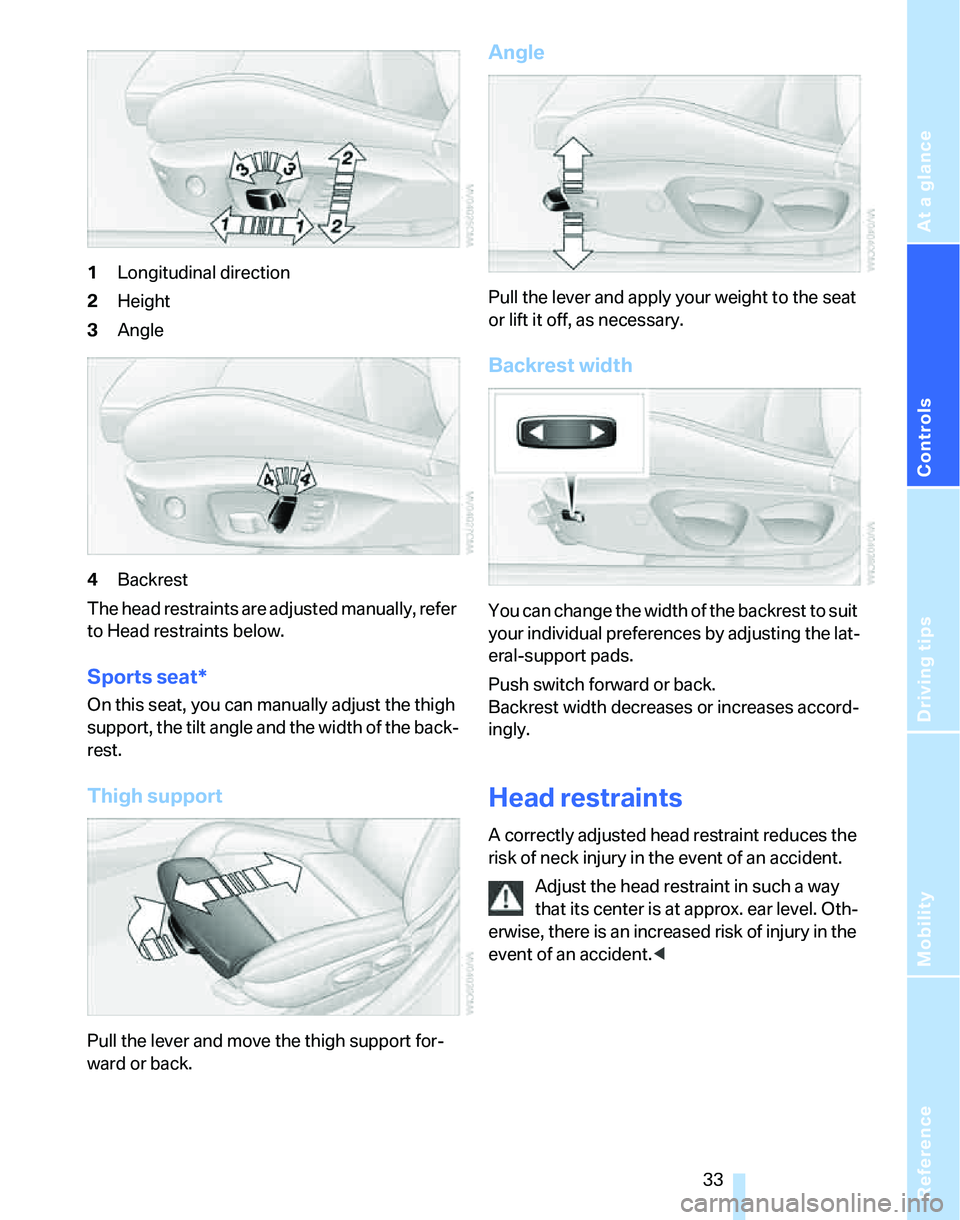
1Longitudinal direction
2Height
3Angle
4Backrest
The head restraints are adjusted manually, refer
to Head restraints below.
Sports seat*
On this seat, you can manually adjust the thigh
support, the tilt angle and the width of the back-
rest.
Thigh support
Pull the lever and move the thigh support for-
ward or back.
Angle
Pull the lever and apply your weight to the seat
or lift it off, as necessary.
Backrest width
You can change the width of the backrest to suit
your individual preferences by adjusting the lat-
eral-support pads.
Push switch forward or back.
Backrest width decreases or increases accord-
ingly.
Head restraints
A correctly adjusted head restraint reduces the
risk of neck injury in the event of an accident.
Adjust the head restraint in such a way
that its center is at approx. ear level. Oth-
erwise, there is an increased risk of injury in the
event of an accident.<
Page 36 of 166
Adjustments
34
Front seats
Height adjustment
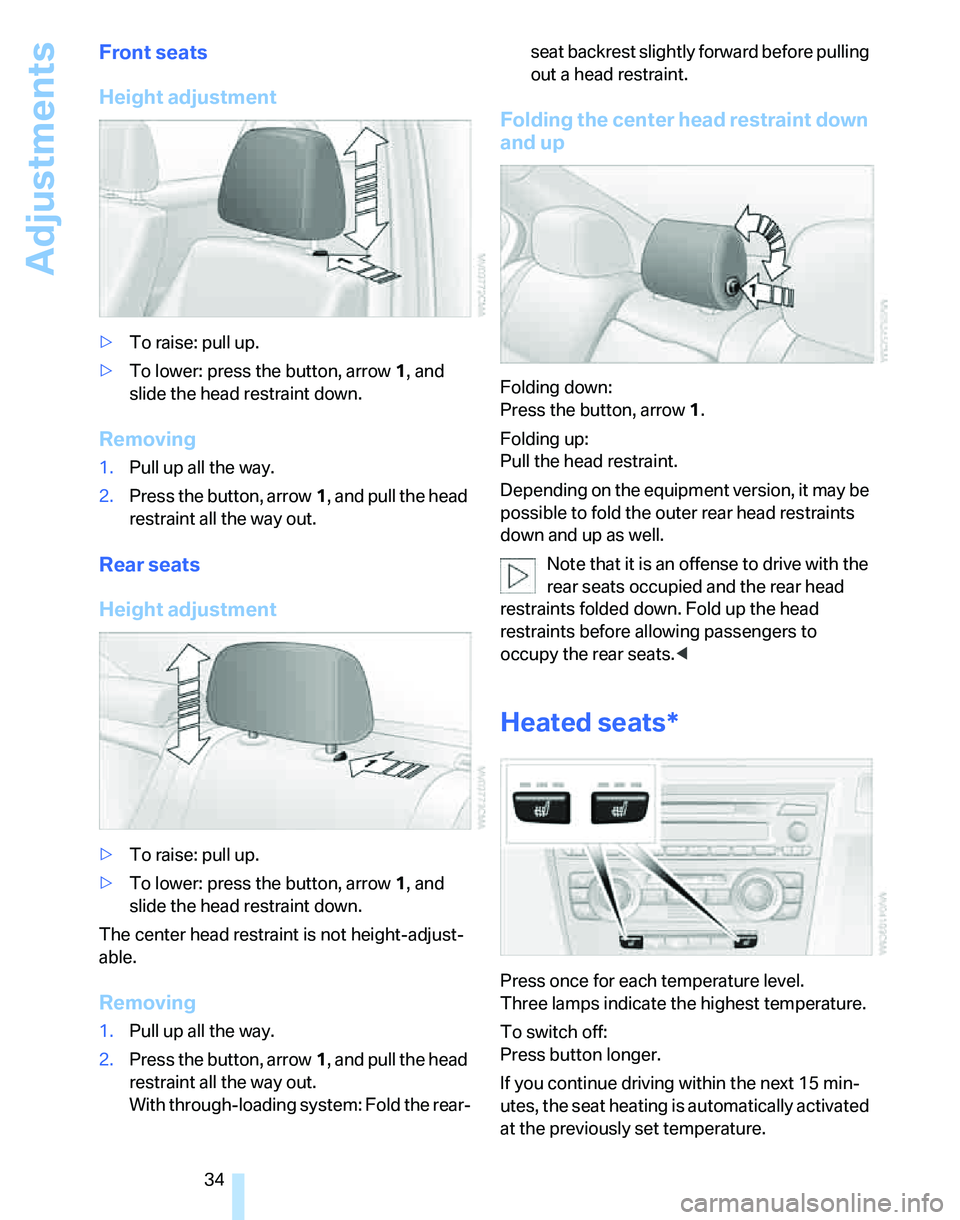
>To raise: pull up.
>To lower: press the button, arrow1, and
slide the head restraint down.
Removing
1.Pull up all the way.
2.Press the button, arrow1, and pull the head
restraint all the way out.
Rear seats
Height adjustment
>To raise: pull up.
>To lower: press the button, arrow1, and
slide the head restraint down.
The center head restraint is not height-adjust-
able.
Removing
1.Pull up all the way.
2.Press the button, arrow1, and pull the head
restraint all the way out.
With through-loading system: Fold the rear-seat backrest slightly forward before pulling
out a head restraint.
Folding the center head restraint down
and up
Folding down:
Press the button, arrow1.
Folding up:
Pull the head restraint.
Depending on the equipment version, it may be
possible to fold the outer rear head restraints
down and up as well.
Note that it is an offense to drive with the
rear seats occupied and the rear head
restraints folded down. Fold up the head
restraints before allowing passengers to
occupy the rear seats.<
Heated seats*
Press once for each temperature level.
Three lamps indicate the highest temperature.
To switch off:
Press button longer.
If you continue driving within the next 15 min-
utes, the seat heating is automatically activated
at the previously set temperature.
Page 40 of 166
Adjustments
38
Steering wheel
Adjustments
Do not adjust the steering wheel position
while the car is in motion, or an accident
may result from any unexpected movement.<
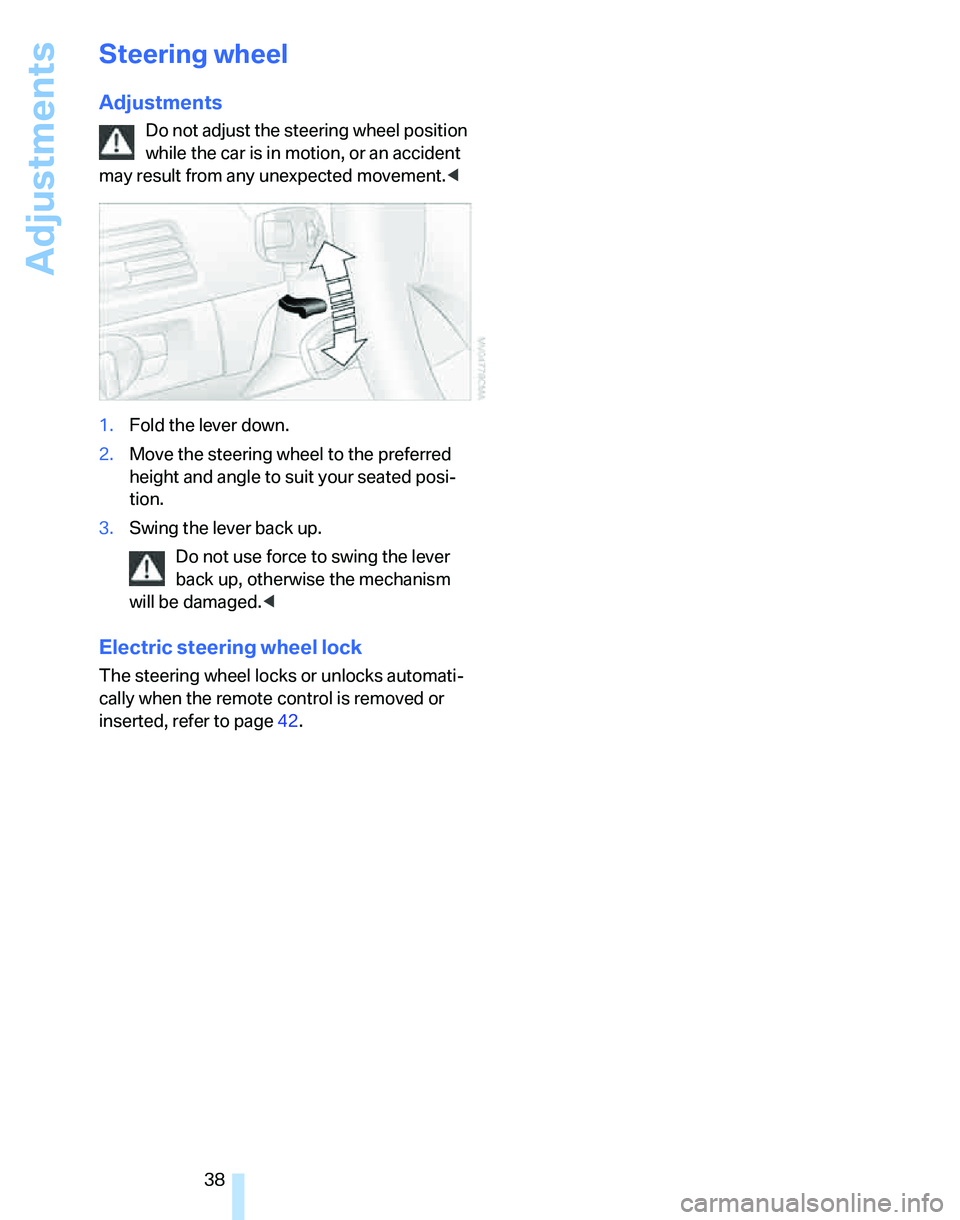
1.Fold the lever down.
2.Move the steering wheel to the preferred
height and angle to suit your seated posi-
tion.
3.Swing the lever back up.
Do not use force to swing the lever
back up, otherwise the mechanism
will be damaged.<
Electric steering wheel lock
The steering wheel locks or unlocks automati-
cally when the remote control is removed or
inserted, refer to page42.
Page 41 of 166
Reference
At a glance
Controls
Driving tips
Mobility
39
Transporting children safely
The right place for children
Do not leave children unattended in the
vehicle, otherwise they could endanger
themselves and/or other persons by opening
the doors, for example.<
The rear center seat is not suitable for installing
universal child-restraint systems for all age
groups, approved for the age group in question.
Children always in the rear
Accident research has shown that the safest
place for children is on the rear seats.
Children under the age of 13 or smaller
than 5 ft/150 cm may be transported only
in the rear in suitable child-restraint systems
appropriate for their age, weight and size. Oth-
erwise there is an increased risk of injury in the
event of an accident.<
Children 13 years of age or older must be buck-
led in with a safety belt as soon as there no
longer is any child-restraint system that is
appropriate for their age, size and weight.
All rear seats in your vehicle meet the recom-
mendations of the SAE J1819 standard for
safely mounting child-restraint systems in
motor vehicles.
Exception for front passenger seat
Should it be necessary to use a child-
restraint system on the front passenger
seat, the front and side airbags must be deacti-
vated. Otherwise, a child traveling on that seat
will be at an increased risk of injury if the airbags
are triggered off, even with a child-restraint sys-
tem. Your BMW Center will be glad to advise
you.<
For more information on automatic deactivation
of the front passenger airbags refer to page74.
Installing child-restraint
systems
Observe the child-restraint system man-
ufacturer's instructions for selecting,
installing and using child-restraint systems.
Otherwise the protective effect may be dimin-
ished.<
Standard child-restraint systems are designed
to be secured with a lap belt or with the lap-belt
section of a lap-and-shoulder belt. Incorrectly
or improperly installed child-restraint systems
can increase the risk of injury to children.
Always follow the installation instructions for
the system with the greatest care.
On the front passenger's seat
Before installing a child-restraint system
on the front passenger's seat, make sure
that the front and side airbags for the front pas-
senger are deactivated, otherwise there is an
increased risk of injury if the airbags deploy.<
Seat height
Before installing a universal child-restraint sys-
tem, move the front passenger's seat up as far
as it will go to ensure that the safety belt will be
ideally positioned. Do not change the seat
height afterward.
Backrest width
The backrest width of the front passenger
seat must be adjusted to its widest set-
ting, otherwise the stability of the child seat on
the front passenger seat is limited.<
1.Adjust the backrest width to its widest set-
ting, refer to page33.
2.Install the child seat.
Page 59 of 166

Reference
At a glance
Controls
Driving tips
Mobility
57
Malfunction
The warning lamp comes on when
the system has failed. You can find more information starting on page136.
System limitations
Always remember that the range and abil-
ity of the system does have physical limi-
tations. It will not apply the brakes or decelerate
your vehicle when there is a slow-moving vehi-
cle, stopped vehicle or stationary object ahead
of you, as for example, at a traffic light or a
parked vehicle. Also, the system does not react
to oncoming traffic, pedestrians or other types
of potential traffic such as a rider on horseback.
It is also possible that the system may not
detect smaller moving objects such as motor-
cycles or bicycles. Be especially alert when
encountering any of these situations as the sys-
tem will neither automatically brake, nor provide
a warning to you. Also, be aware that every
decrease in the distance setting allows your
vehicle to come closer to a vehicle in front of
you and requires a heightened amount of alert-
ness.<
Active cruise control is not and must not
be used as a collision avoidance/warning
system.<
If while your vehicle is actively following a vehi-
cle in front of you and the vehicle ahead speeds
up or the lane ahead becomes clear, then your
vehicle will accelerate to the speed you have
selected. Be aware that changing to a clear,
unobstructed lane will also result in your vehicle
accelerating.
Be certain to deactivate the system when
you pull into an exit lane for a highway off-
ramp.
reaction to a vehicle in front of you or may cause
the system to react to a vehicle actually in the
lane next to you. Always be ready to take action
or apply the brakes if necessary.
While active cruise control is capable of
braking your vehicle automatically when
you approach a slower vehicle ahead, it is
important to be aware that the ability of the sys-
tem to apply the brakes is also limited, e.g.
when you reduce your desired speed sharply.
The system cannot stop your vehicle. It uses
only a portion of braking system capacity and
does not utilize the full capacity of the vehicle
braking system. Therefore, the system cannot
decrease your speed for large differences in
speed between your vehicle and the vehicle
ahead. Examples: when you approach a vehicle
traveling at a much lower speed than your own
speed such as approaching a toll booth or when
a much slower vehicle cuts in front of you at
close range.<
Active cruise control can only decelerate the
vehicle to approx. 20 mph or 30 km/h.
Page 120 of 166
Under the hood
118
Under the hood
Do not work on the car unless you pos-
sess the necessary technical knowledge.
If you are unfamiliar with the statutory guide-
lines, have any work on the vehicle performed
only by a BMW Center or by a workshop that
work according to BMW repair procedures with
correspondingly trained personnel. If this work
is not carried out properly, there is a danger of
subsequent damage and related safety haz-
ards.<
Hood
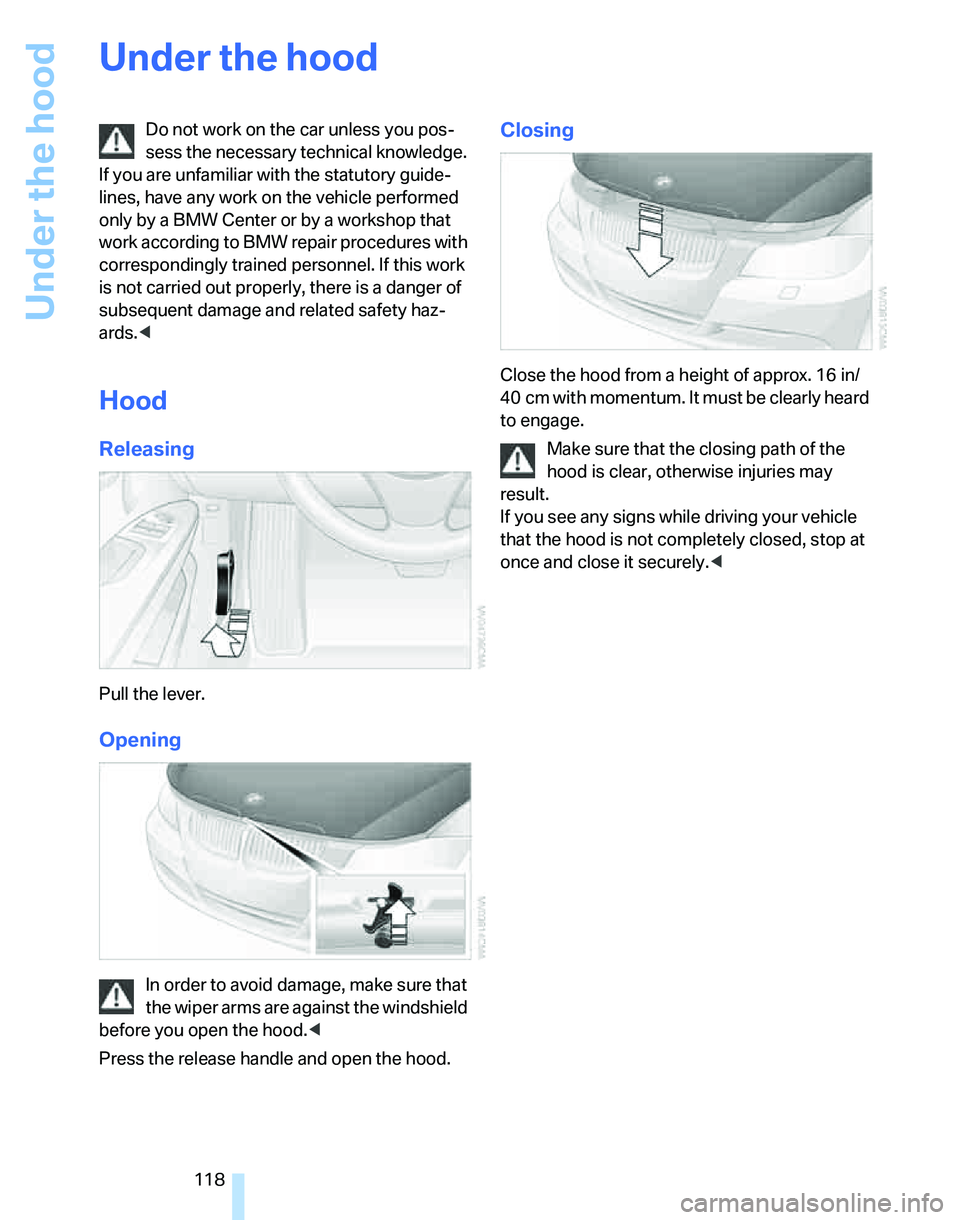
Releasing
Pull the lever.
Opening
In order to avoid damage, make sure that
the wiper arms are against the windshield
before you open the hood.<
Press the release handle and open the hood.
Closing
Close the hood from a height of approx. 16 in/
40 cm with momentum. It must be clearly heard
to engage.
Make sure that the closing path of the
hood is clear, otherwise injuries may
result.
If you see any signs while driving your vehicle
that the hood is not completely closed, stop at
once and close it securely.<
Page 158 of 166

Everything from A to Z
156 Filter
– refer to Microfilter/activated-
charcoal filter for automatic
climate control85
– refer to Microfilter for air
conditioner82
First aid pouch131
Fixture for remote control,
refer to Ignition lock42
Flashlight, refer to
Rechargeable flashlight89
Flash when locking/
unlocking21
Flat
– Run-Flat Tires116
Flat Tire Monitor FTM71
– indicating a flat tire72
– initializing the system72
– malfunction73
– snow chains72,117
– system limits72
Flat tires, refer to Tire
condition115
Fog lamps78
– indicator lamp78,136
Footbrake, refer to Braking
safely99
Footwell lamps79
For your own safety5
Front airbags74
Front seat adjustment31
FTM, refer to Flat Tire
Monitor71
Fuel106
– display60
– high-quality brands106
– quality106
– specifications106
– tank capacity151
Fuel clock, refer to Fuel
gauge60
Fuel consumption, refer to
Average fuel
consumption60
Fuel display, refer to Fuel
gauge60
Fuel filler door106
– releasing in the event of
electrical malfunction106Fuses129
G
Garage door opener, refer to
Integrated universal remote
control86
Gasoline, refer to Required
fuel106
Gasoline display, refer to Fuel
gauge60
Gasoline engine, checking oil
level119
Gear indicator
– automatic transmission with
Steptronic47
– sequential manual gearbox
SMG45
Gearshift lever
– automatic transmission with
Steptronic47
– manual transmission44
– sequential manual gearbox
SMG45
Gearshifts
– with automatic
transmission47
– with manual transmission44
– with the sequential manual
gearbox SMG45
General driving notes98
Glass sunroof, electric28
– anti-trapping mechanism29
– closing after electrical
malfunction29
– convenient operation20,22
– opening, closing29
– operation with convenient
access26
– raising29
– remote control20
Glove compartment89
– rechargeable flashlight89
Grills, refer to Air vents80
Gross vehicle weight, refer to
Weights150
H
Halogen lamps
– replacing bulbs126
Handbrake44
– indicator lamp44
– manual release22
Hand lamp, refer to
Rechargeable flashlight89
Hands-free system14
Hazard warning flashers14
Head airbags74
Headlamp control,
automatic76
Headlamp cover126
Headlamp flasher48
– indicator lamp11,14,136
Headlamps
– care, refer to Caring for your
vehicle brochure
– replacing bulbs126
Head restraints33
– sitting safely31
Heated
– mirrors37
– rear window81,85
– seats34
Heating80
– mirrors37
– rear window81,85
– seats34
Heating while at a standstill,
refer to Using residual
heat84
Heavy loads, refer to Stowing
cargo101
Height, refer to
Dimensions149
Height adjustment
– seats32
– steering wheel38
High beams78
– headlamp flasher78
– indicator lamp136
– replacing bulbs126
High water, refer to Driving
through water99
Hills99
Holders for cups90