Page 52 of 194
Drives49
General operation
RADIO, CD
NAME, TEL
NAV, INFO
CAR, SETUP
Compact Disc (CD)
Tips
It is possible that you may not be able to play CDs which are copy-
protected or CDs with CD ROM in your player. Only those CDs with
the logo “Compact Disc Digital Audio” on the CD itself can be
played.
Tips on taking care of your CDsTo assure high-quality performance, make sure your CDs are clean.
The following tips are also important:
Never use CDs which are damaged or defective.
Do not play CDs which are scratched or damaged. Never leave your
CD in direct sunlight. They could warp. Store them in their original
cases.
Never play CD singles or CDs which are not round
(shape CDs).
Your CD player and CD changer can play and holdstandard CDs. Do
not play 3 inch single CDs.CDs which are not round, (shape CDs)
must not be played. They can jam up the player and cause it to
malfunction.
Fig. 50 Compact Disc
Label
Fig. 51 Do not use the
following CDs!
A�AB
Page 53 of 194

Drives 50 Do not place an adhesive label on a CD.
Do not place an adhesive label on your CDs. Due to heat build-up
inside the CD player, the label could come loose and jam up the CD
player or CD changer.
Do not use protective rings.
Do not use commerically available protective rings. They could jam
up the player.
Cleaning your CDs
Use a soft, lint-free cloth to clean your CDs. Wipe the disc starting
f r o m t h e c e n t e r a n d w o r k i n g y o u r w a y o u t . Yo u c a n p u r c h as e s p e c i a l
cleaners to remove stubborn stains from your CD.
Never use CD cleaners which contain benzine or other corrosive
properties. They could damage your CD!Note
�
Never place an adhesive label on your CDs.
�
To prevent the CD player from malfunctioning, never use CD
protectors or stabilizers (available in most stores).
�
Never insert an out-of-round CD (shape CDs) in the CD slot.
�
Never leave your CDs exposed to direct sunlight.
�
The use of cleaning CDs can lead to mechanical damage to the
drive.
Tips on handling navigation DVDsTo ensure p erfect, high-quality navigatio n DVD playb ack, only clean
navigation DVDs should be used. In addition, observe the following:Do not use a damaged navigation DVD
You should not use a scratched or damaged navigation DVD. To
avoid damage, never expose the navigation DVD to direct sunlight.
Always keep the navigation DVD in a suitable jewel case (e.g. CD
case).
Do not attach labels
Do not attach labels to the navigation DVD. Attaching labels can
cause an imbalance. If the labels are exposed to heat, they can
become detached and cause damage to the navigation DVD drive.
Do not use protective rings
Co mm e r c i a ll y a v a i l a b l e p ro t e c t i v e r i n g s m u s t n o t b e us e d . Th e y c a n
jam in the navigation DVD drive and damage the drive mechanism.
Cleaning the navigation DVD
Use only a soft, lint-free cloth to clean the navigation DVD. Wipe the
DVD in a straight line from the center outwards. Heavy soiling can
be removed with a commercial CD cleaner or isopropyl alcohol.
Please never use fluids such as gasoline, paint thinner or vinyl
record cleaner or the surface of the DVD could be damaged!
Note
�
Never place an adhesive label on your Navigation DVD.
�
To a v o id d a ma g e to t h e DV D d ri v e , n e v e r us e a CD p ro t e c t i v e fi l m
or stabilizer (available in stores as a CD accessory).
�
Always keep the navigation DVD in a suitable jewel case (e.g. CD
case) to protect it from dirt, dust particles, scratches and other
damage.
�
Never expose the navigation DVD to direct sunlight.
�
The use of cleaning CDs can lead to mechanical damage to the
drive.
ACA�
Page 54 of 194

Drives51
General operation
RADIO, CD
NAME, TEL
NAV, INFO
CAR, SETUP
Tips
If outside temperatures are unusually high or low, the navigation
DVD function may be temporarily unavailable. A thermal switch has
been installed to protect the navigation DVD and the laser
scanner.Handling the navigation DVD or CD
Correct handling of the data carrier being used helps
to extend its life.Alwa ys hold a N avigatio n DVD o r CD either b y the hole in the center
or by the outer edge
�fig.52.
The CDs should never be forced into the slot. The CD will be pulled
into the CD changer automatically.
When inserting a CD into the drive, insert it with the printed side
facing up and straight.
Error messagesThe following may be the reason for a read error in the display:�
The navigation DVD, audio CD or MP3 CD is contaminated.
�
The navigation DVD, audio CD or MP3 CD was inserted upside
down (with the printed side down).
�
The navigation DVD, audio CD or MP3 CD is scratched.
�
There is condensation on the navigation DVD, audio CD or MP3
CD.
�
The mechanism for the CD changer, the navigation DVD drive or
the MP3 card reader is malfunctioning.
Check the navigation DVD, audio CD, MP3 CD or SD/MMC memory
card for damage.
Cl e a n th e n a v i g a t io n DV D, a ud i o C D o r M P 3 C D b y w i p i n g it f ro m t he
center toward the outside with a soft, lint-free cloth.
In cold weather and in rain showers, moisture (condensation) can
collect in the housing or on the data carriers. This can cause skips
or make playback impossible. When moisture is no longer present,
it should be possible to play them.
If the mechanism for the CD changer with magazine malfunctions,
remove the magazine from the changer
�page 46 and inspect the
CDs for damage and for correct positioning in the magazine
�page 48.
I f t h e m e c h a n i s m f o r t h e A u d i c d c h a n g e r m a l f u n c t i o n s , p u s h t h e C D
Eject button and the corresponding illuminated button to eject the
CD �page 44. Inspect the CD for damage.
Try to resume DVD/CD operation. If the malfunction persists, please
consult a qualified dealership.
Fig. 52 Holding your
Navigation DVD or CD
Page 55 of 194
Drives 52
TipsIf outside temperatures are unusually high or low, navigation
DVD/ CD playback may be te mpo rarily una vailab le. A thermal switch
has been installed to protect the navigation DVD/CDs and the laser
scanner.
Page 56 of 194
Drives53
General operation
RADIO, CD
NAME, TEL
NAV, INFO
CAR, SETUP
Page 78 of 194
CD/SD 74CD/SDIntroductionGeneral
C D a n d M P 3 o p e r a t i o n i s s e l e c t e d b y u s i n g t h e
function button.Depending on the equipment in your vehicle, you can use the
function to play an audio CD in the DVD navigation drive,
use a CD changer*
�page 79 or the MP3 player integrated into the
Navigation System �page 83.
You switch between the CD and MP3 function by using the control
button with the Source function
�page 77.
Selecting CD functionFig. 74 Display: Main CD menu (example of a list of tracks)– Insert an audio CD into a drive �page 34
– Press the function button �page 16. A main
audio menu �fig.74 or the previously active function
menu appears in the display.
– If necessary, press the control button with the Source
function and select CD �page 77.
– Press one of the control buttons �page 17 to move to
the appropriate submenus to �fig.74.
CD/SD
CD/SD
CD/SD
A1
A4
Page 79 of 194
CD/SD75
General operation
RADIO, CD
NAME, TEL
NAV, INFO
CAR, SETUP The following submenus are available in the CD
function:The following submenus are available in the CD Setup
function:
Selecting MP3 functionFig. 75 Display: Main MP3 menu (example of a list of tracks)– Insert an MP3 card or an MP3 CD into the appropriate
drive �page 37.
Control button
functions �
page 74,
fig. 74
CD submenus
CD list*
Audio CD
Empty
CD ROM
CD unreadable
Source
CD
MP3
Sound
Balance
Fader
Tr e b l e
Bass
DSP
a)b)
Volume settings (Navigation info)
a)Digital Signal Processingb)Vehicles with a BOSE® sound system in conjunction with an AudioPilot do
n o t h a v e a D S P f u n c t i o n . I n t h i s c a s e y o u r v e h i c l e i s e q u i p p e d w i t h D y n a m i c
Noise Compensation �page 94.
CD control
Forward
Reverse
Next
Previous
Random
Scan
A1A2A3A4
CD Setup submenu
Press the
function button in
the CD function
�page 82
Repeat CD
SETUP
Page 82 of 194
CD/SD 78
Tips�
Sound controls can be adjusted individually for each piece of
equipment
�page 92.
�
The audio source selected is shown in the title line of the
display.
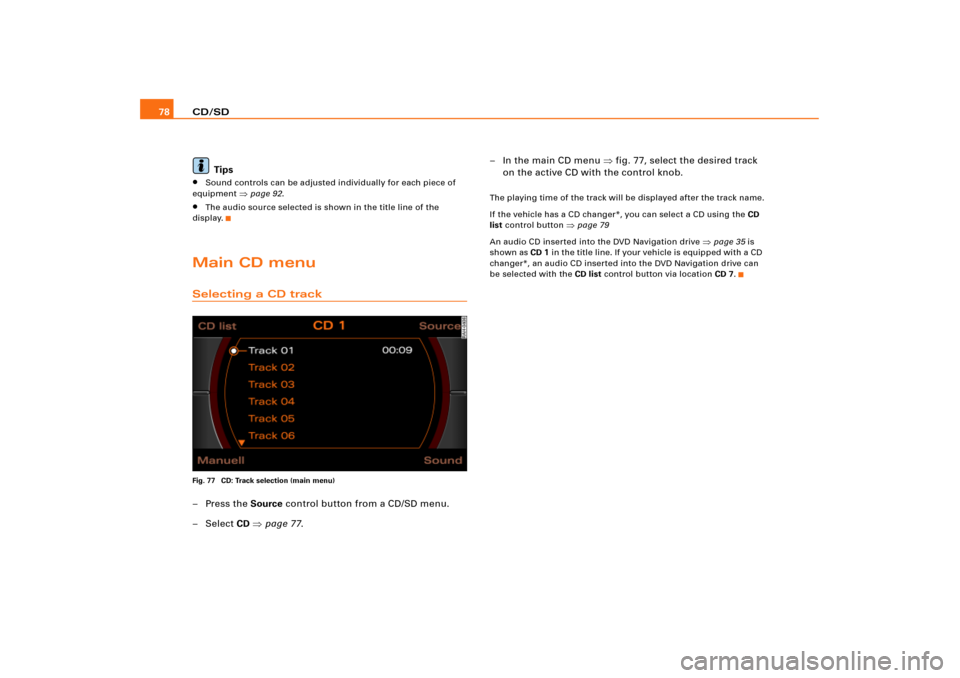
Main CD menuSelecting a CD trackFig. 77 CD: Track selection (main menu)–Press the Source control button from a CD/SD menu.
– Select CD �page 77.– In the main CD menu �fig.77, select the desired track
on the active CD with the control knob.
The playing time of the track will be displayed after the track name.
If the vehicle has a CD changer*, you can select a CD using the CD
list control button
�page 79
An audio CD inserted into the DVD Navigation drive
�page 35 is
shown as CD 1 in the title line. If your vehicle is equipped with a CD
changer*, an audio CD inserted into the DVD Navigation drive can
be selected with the CD list control button via location CD 7.

Tips
It is possible that you may not be able to play CDs which are copy-
protected or CDs with CD ROM in your play")