Page 44 of 194

Drives41
General operation
RADIO, CD
NAME, TEL
NAV, INFO
CAR, SETUP
Loading a memory card
The Navigation System contains two MP3 card
readers.
– Press the button to open the display �page 39,
fig.38.
– Insert the memory card with the label side up (contact
surface down) into the card reader slot �fig.39. The
missing corner of the memory card must point to the
front right as seen in the direction of travel �fig.40.
– Then push the memory card into the slot until you feel it
click into place. The memory card is flush with the area
around it.I f t h e m e m o r y c a r d h a s b e e n l o a d e d c o r r e c t l y, t h e f o r m a t t e d s t o r a g e
capacity of the card is displayed in the open display. In addition, the
file format “MP3”, or possibly the date carrier name, is displayed if
MP3 audio files have been stored on the card and they can be read
by the MP3 player.
As long as the message “Reading card...Please do not remove”
appears in the display, the memory card must not be removed from
the drive. If the memory card is removed from the drive, there is a
possibility that the data will be destroyed. In this case, the memory
card can no longer be read and must be formatted.
If a memory card has been inserted and not played, the data from
the ID3 tag s are re ad in the b ackground. If you star t playback of the
memory card immediately, the ID3 tag data are displayed for the
track being played.
Note
Use only single-piece SD/MMC memory cards. If you use SD/MMC
adapter cards (multi-piece memory cards), the memory card can
become detached from the adapter as the result of vibration while
driving. There is a possibility that individual pieces may become
stuck in the drive.
Fig. 39 Display open:
Inserting a memory
card.Fig. 40 Display open:
Position of the
SD/MMC card during
loading
�
A2
Page 45 of 194

Drives 42
Tips�
The MP3 player is operated through the main CD/SD function
�page 83.�
The storage capacity displayed equals the formatted storage
capacity of the SD or MMC card being used and may vary from the
capacity printed on the label.
Removing a memory card– Press the button to open the display �page 39,
fig.38.
– Give a short push on the memory card �f i g .4 1 . T h e c a r d
is released from the slot.
– Remove the memory card.
Once the memory card has been removed, the open display shows
Empty.
As long as the message “Reading card...Please do not remove”
appears in the display, the memory card must not be removed from
the drive. If the memory card is removed from the drive, there is a
possibility that the data will be destroyed. In this case, the memory
card can no longer be read and must be formatted.
Tips
�
A l w a y s k e e p t h e m e m o r y c a r d i n a s u i t a b l e c a s e t o p r o t e c t i t f r o m
dirt, dust particles, scratches and other damage
�page 48.
�
Never expose the memory cards to direct sunlight.
Fig. 41 Display open:
Removing a memory
card.
�
A2
Page 46 of 194

Drives43
General operation
RADIO, CD
NAME, TEL
NAV, INFO
CAR, SETUP
CD changerApplies to vehicles: with Audi cd changerLoading your CDs into the CD changerLoading just one CD
– Press the button . As soon as the CD changer
is ready for you to load a CD, the red LEDs on the inside
sides of the CD tray (not shown in the illustration)
start to blink.
– Insert the CD (printed side up and straight) into the CD
tray . The CD automatically loads into the next free slot
in the CD changer. The LED in the button will stop
blinking.Loading all CDs
– Press and hold the button for longer than 2
seconds.
– Wait until the red LEDs on the inside sides of the CD tray
(not shown in the illustration) start to blink.
– Now insert your other CDs (printed side up and straight)
o n e a t a t i m e i n t o t h e C D t r a y . Th e L E D s i n e a ch b u t t o n
will stop blinking once a CD has been loaded into the
slot.
Loading the CD into a specific empty slot
– Press the button . The LED in the button of
any empty slot will start to blink.
– If you want to load a CD into a specific slot, you can also
p r e s s a b u t t o n , w h e r e t h e L E D i s not lit a n d i n s e r t y o u r
CD.
– Wait until the red LEDs on the inside sides of the CD tray
(not shown in the illustration) start to blink.
– Now insert your CDs (printed side up and straight) into
the CD tray .
Loading the CD into a specific slot
– Press the button . The LEDs in the buttons
for the slots that already have CDs loaded blink.
– If you press an illuminated button that is not blinking
then that CD will be ejected.
– Remove the ejected CD from the CD tray .
Fig. 42 Audi cd
changer: Loading CDs
LOA D
A2
A;
A;
A3
LOA D
A2
A1
A;
A3
LOA D
A2
A
A3
A1
A;LOA D
A2
A A3
A1
Page 47 of 194

Drives 44
– Insert a CD that you want to load, label up, into the CD
tray .If you press the button again while you are loading all CDs,
the loading process will be interrupted.
Make sure you load your CDs label side up and straight �page 43, fig.42.
The CDs should never be forced into the slot. The CD will be pulled
into the CD changer automatically.
Aft e r a C D h as b e e n l o a d e d in to t h e CD ch a n g e r, yo u s h o u ld w a i t fo r
a moment until the red L ED on the inside side o f the tray blinks. The
CD tray is then ready to be loaded with the next CD.
If you choose a slot which already has a CD loaded in it, the CD will
be ejected. Remove the CD, and insert the new CD you want to have
in this slot.
I f yo u w a i t l o n g e r t h a n 3 0 s e c o n d s w i th o u t r e mo v in g t h e CD, th e C D
will be pulled back into the CD changer automatically.Tips
�
The CD is played through the main CD/SD function
�page 78.
�
If you have accidently ins er ted a CD upside down (with the label
side facing down), the Display will show a read-error-message.
�
Never force the CDs into the CD tray. The CD will be pulled into
the CD changer automatically.
�
Do not use any non circular CDs (for example, Shape CDs)
�page 49.
Applies to vehicles: with Audi cd changerEjecting CDsEjecting a CD
– Press the CD EJECT button �fig.43.
– Press the button (LED on) to eject an individual CD, or
– Press the CD EJECT button again to eject the CD you
are playing.
Ejecting all CDs
– Hold down the button for more than two seconds. All
CDs that are currently in the CD changer will be ejected.
Note�
Always keep your CDs in their original cases to protect them
from dirt, dust, scratches or other damage.
A1
LOAD
A1
Fig. 43 Audi cd
changer: Ejecting CDs
A1A2A2
A1
Page 48 of 194

Drives45
General operation
RADIO, CD
NAME, TEL
NAV, INFO
CAR, SETUP
�
Never expose CDs to direct sunlight.Tips
I f y o u w a i t l o n g e r t ha n 3 0 s e c o n d s wi t h o u t re m o v i n g t he C D, t h e CD
will be pulled back into the CD changer automatically.Applies to vehicles: with CD changer with magazineCD changer with magazine
CD changer with magazine:
�fig.44
Sliding door to close the CD slot
CD magazine slot
Cartridge eject button
CD Changer Magazine
�fig.45
Upper side of the magazine
Lower side of the magazine
As a r ul e , t h e C D ch a n g e r a n d m a g a z in e a re i n s t a l l e d i n t h e lu gg a g e
compartment of most vehicles. In other models, they may be
in s t a ll e d i n a c o mp a r tm e n t in t h e re a r s id e t r i m o r b e h i n d t h e d ri v e r
seat. Please refer to your Owner's Manual for the exact location.
Note
The CD changer is intended for use with 12 cm (4.7 inch) discs
only.
Fig. 44 CD changer
with magazine
Fig. 45 CD magazine
A;A�A A;A�
Page 49 of 194
Drives 46Removing and inserting the magazineYou can load and remove the CD magazine with the Naviga-
tion System switched on or off.
Removing the magazine from the CD changer
– Slide the changer door open �fig.46.
– Press the cartridge eject button �fig.46. The maga-
zine automatically comes out.
– Remove the magazine .
Inserting the magazine in the CD changer
– Open the sliding door of the CD slot �fig.46.
– Slide the magazine all the way in with the inscription
“disc” on top. While doing this, the arrow on the maga-
zine must point towards the magazine slot �fig.46.– Close the changer door .
After inserting the magazine, you will hear a “working noise” from
t h e CD c ha n g e r. Th e d e v i c e i s s im p l y c o u n t i n g h o w ma ny C Ds a r e i n
the changer.
If there is no magazine in the CD changer, a read error is shown in
the display.
Fig. 46 CD changer
with magazine
A1
A2
A3
A;
A1
Page 50 of 194

Drives47
General operation
RADIO, CD
NAME, TEL
NAV, INFO
CAR, SETUP
Loading the magazine with CDs– Hold the CD with the printed side facing up and grasping
it by the hole and outer edge �page 51, fig.52.
– Hold the magazine with “disc” facing upwards �fig.47.– Insert the CDs one at a time (printed side facing up) into
the magazine until they “click” into place �fig.48.
Always insert the CDs straight in the CD slot with the printed side
facing up.
M a ke s u re y o u p a y a t t e n t i o n to t h e C D s e que n c e o n t h e r i g h t s id e o f
the magazine.
I f y o u h a v e n o t f i l l e d C D s l o t s i n t h e m a g a z i n e , Empty appears in the
display when you select the Changer control button in the CD func-
tion.
Tips
Always close the sliding cover after inserting the magazine to
protect your CD changer from dirt and dust
�page 46, fig.46. This
helps to prevent malfunctions.
Fig. 47 Side of maga-
zine marked "disc" Fig. 48 Inserting the
CD in the magazine
A;
Page 51 of 194
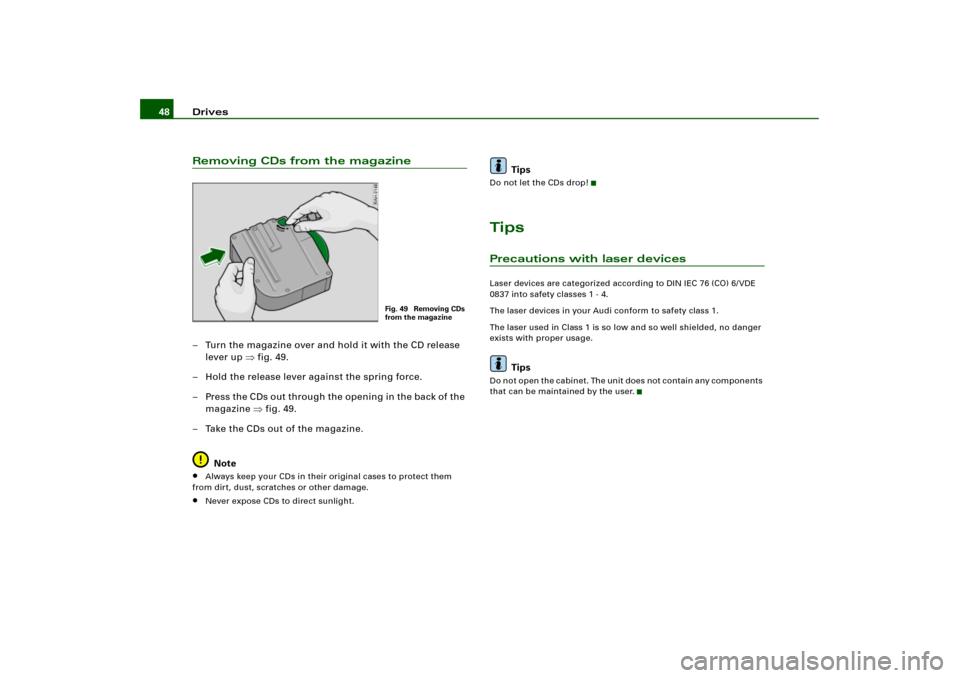
Drives 48Removing CDs from the magazine– Turn the magazine over and hold it with the CD release
lever up �fig.49.
– Hold the release lever against the spring force.
– Press the C Ds o ut through the open ing in the back of the
magazine �fig.49.
– Take the CDs out of the magazine.
Note�
Always keep your CDs in their original cases to protect them
from dirt, dust, scratches or other damage.
�
Never expose CDs to direct sunlight.
Tips
Do not let the CDs drop!TipsPrecautions with laser devicesLaser devices are categorized according to DIN IEC 76 (CO) 6/ VDE
0837 into safety classes 1 - 4.
The laser devices in your Audi conform to safety class 1.
The laser used in Class 1 is so low and so well shielded, no danger
exists with proper usage.
Tips
D o n o t o p e n t h e c a b i n e t . Th e u n i t d o e s n o t c o n t a i n a n y c o m p o n e n t s
that can be maintained by the user.
Fig. 49 Removing CDs
from the magazine