2005 AUDI A6 sensor
[x] Cancel search: sensorPage 24 of 92
Downloaded from www.Manualslib.com manuals search engine 26
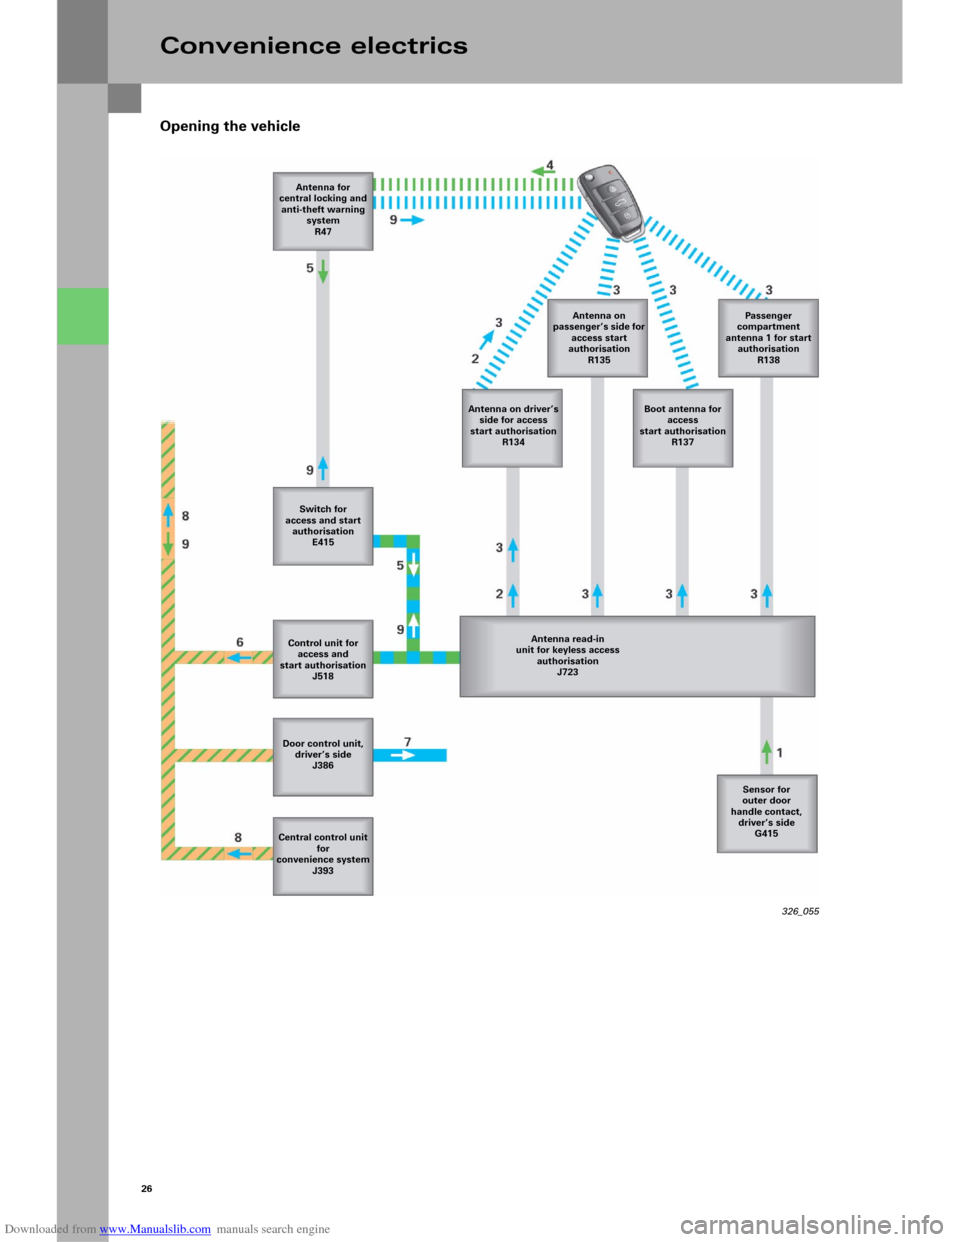
Opening the vehicle
Convenience electrics
326_055 Antenna for
central locking and
anti-theft warning
system
R47
Antenna on driver’s
side for access
start authorisation
R134Antenna on
passenger’s side for
access start
authorisation
R135Passeng er
compartment
antenna 1 for start
authorisation
R138
Boot antenna for
access
start authorisation
R137
Switch for
access and start
authorisation
E415
Antenna read-in
unit for keyless access
authorisation
J723 Control unit for
access and
start authorisation
J518
Door control unit,
driver’s side
J386
Central control unit
for
convenience system
J393Sensor for
outer door
handle contact,
driver’s side
G415
Page 25 of 92
Downloaded from www.Manualslib.com manuals search engine 27
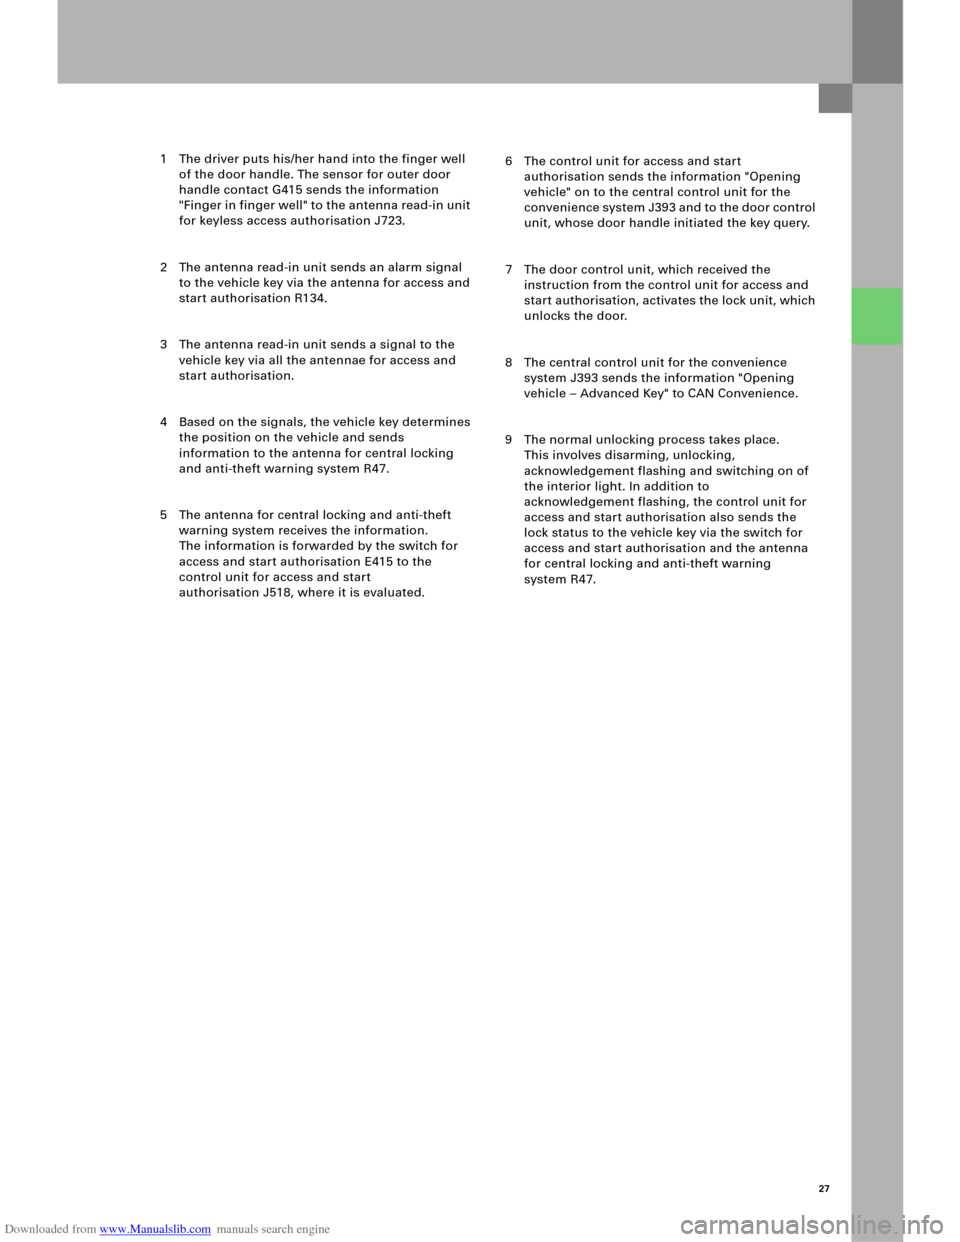
1 The driver puts his/her hand into the finger well
of the door handle. The sensor for outer door
handle contact G415 sends the information
"Finger in finger well" to the antenna read-in unit
for keyless access authorisation J723.
2 The antenna read-in unit sends an alarm signal
to the vehicle key via the antenna for access and
start authorisation R134.
3 The antenna read-in unit sends a signal to the
vehicle key via all the antennae for access and
start authorisation.
4 Based on the signals, the vehicle key determines
the position on the vehicle and sends
information to the antenna for central locking
and anti-theft warning system R47.
5 The antenna for central locking and anti-theft
warning system receives the information.
The information is forwarded by the switch for
access and start authorisation E415 to the
control unit for access and start
authorisation J518, where it is evaluated.6 The control unit for access and start
authorisation sends the information "Opening
vehicle" on to the central control unit for the
convenience system J393 and to the door control
unit, whose door handle initiated the key query.
7 The door control unit, which received the
instruction from the control unit for access and
start authorisation, activates the lock unit, which
unlocks the door.
8 The central control unit for the convenience
system J393 sends the information "Opening
vehicle – Advanced Key" to CAN Convenience.
9 The normal unlocking process takes place.
This involves disarming, unlocking,
acknowledgement flashing and switching on of
the interior light. In addition to
acknowledgement flashing, the control unit for
access and start authorisation also sends the
lock status to the vehicle key via the switch for
access and start authorisation and the antenna
for central locking and anti-theft warning
system R47.
Page 31 of 92
Downloaded from www.Manualslib.com manuals search engine 33
Bi-xenon headlights
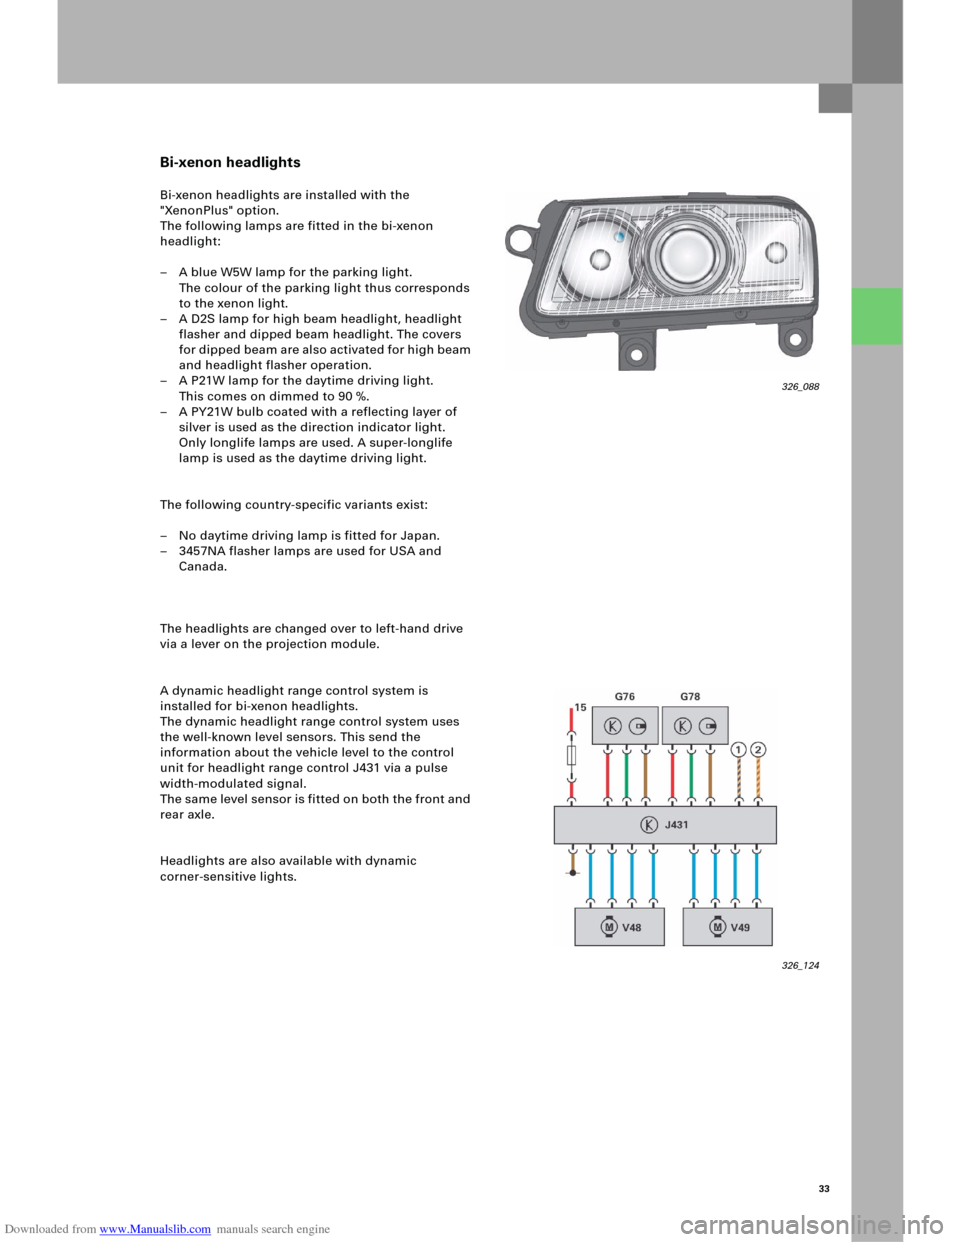
Bi-xenon headlights are installed with the
"XenonPlus" option.
The following lamps are fitted in the bi-xenon
headlight:
– A blue W5W lamp for the parking light.
The colour of the parking light thus corresponds
to the xenon light.
– A D2S lamp for high beam headlight, headlight
flasher and dipped beam headlight. The covers
fo r d i p p ed b e am a re al s o a c t i v at e d fo r h i gh b ea m
and headlight flasher operation.
– A P21W lamp for the daytime driving light.
This comes on dimmed to 90 %.
– A PY21W bulb coated with a reflecting layer of
silver is used as the direction indicator light.
Only longlife lamps are used. A super-longlife
lamp is used as the daytime driving light.
The following country-specific variants exist:
– No daytime driving lamp is fitted for Japan.
– 3457NA flasher lamps are used for USA and
Canada.
The headlights are changed over to left-hand drive
via a lever on the projection module.
A dynamic headlight range control system is
installed for bi-xenon headlights.
The dynamic headlight range control system uses
the well-known level sensors. This send the
information about the vehicle level to the control
unit for headlight range control J431 via a pulse
width-modulated signal.
The same level sensor is fitted on both the front and
rear axle.
Headlights are also available with dynamic
corner-sensitive lights.
326_088
326_124
Page 33 of 92
Downloaded from www.Manualslib.com manuals search engine 35
Internal structure
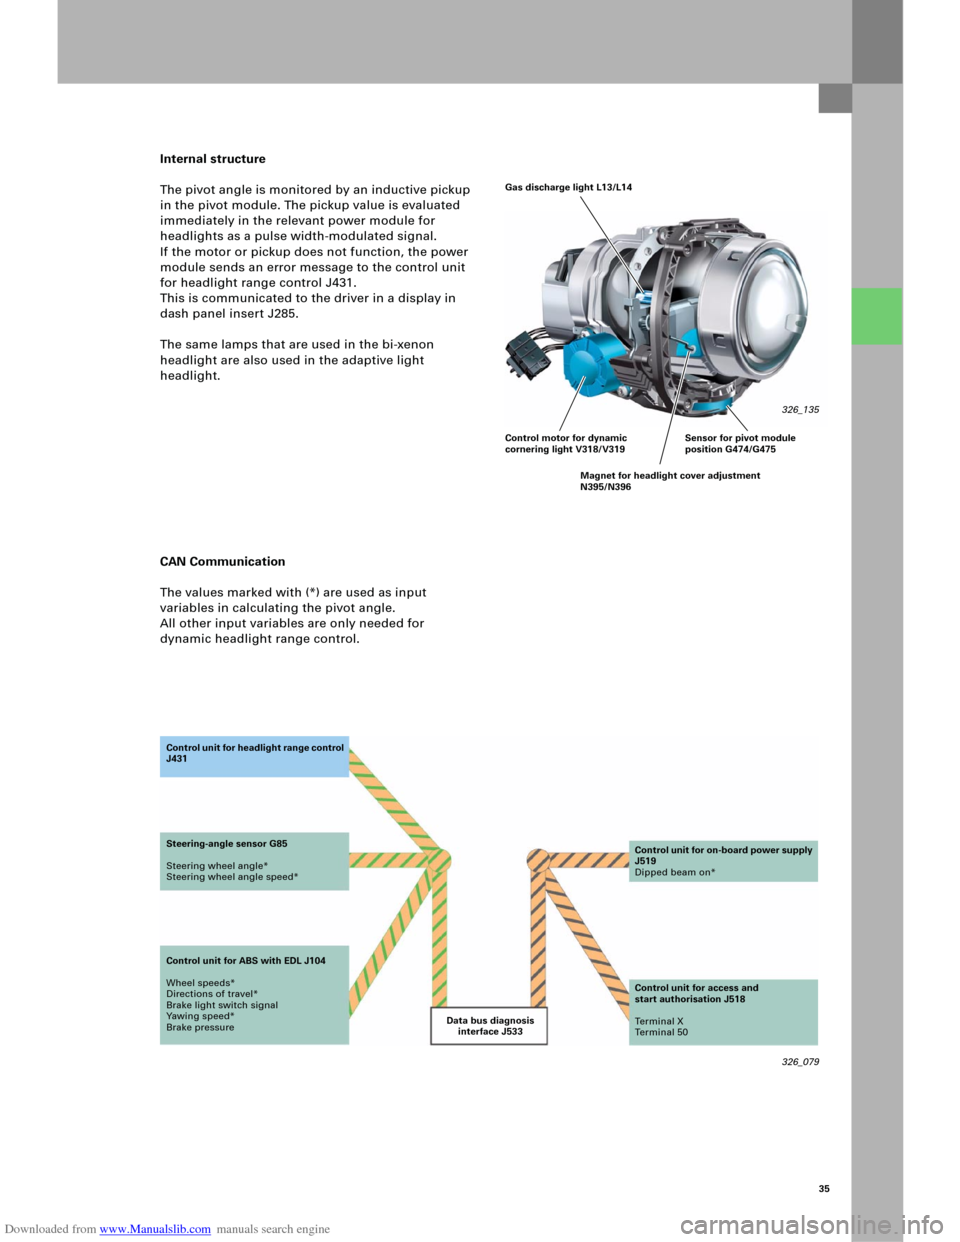
The pivot angle is monitored by an inductive pickup
in the pivot module. The pickup value is evaluated
immediately in the relevant power module for
headlights as a pulse width-modulated signal.
If the motor or pickup does not function, the power
module sends an error message to the control unit
for headlight range control J431.
This is communicated to the driver in a display in
dash panel insert J285.
The same lamps that are used in the bi-xenon
headlight are also used in the adaptive light
headlight.
CAN Communication
The values marked with (*) are used as input
variables in calculating the pivot angle.
All other input variables are only needed for
dynamic headlight range control.
326_079 Data bus diagnosis
interface J533 Co n t ro l u n it fo r h e a d li g h t ra n g e c o n t ro l
J431
Steering-angle sensor G85
Steering wheel angle*
Steering wheel angle speed*
Control unit for ABS with EDL J104
Wheel speeds*
Directions of travel*
Brake light switch signal
Yawing speed*
Brake pressureControl unit for on-board power supply
J519
Dipped beam on*
Control unit for access and
start authorisation J518
Te r m i n a l X
Te r m i n a l 5 0
Gas discharge light L13/L14
326_135
Control motor for dynamic
cornering light V318/V319
Magnet for headlight cover adjustment
N395/N396Sensor for pivot module
position G474/G475
Page 34 of 92
Downloaded from www.Manualslib.com manuals search engine 36
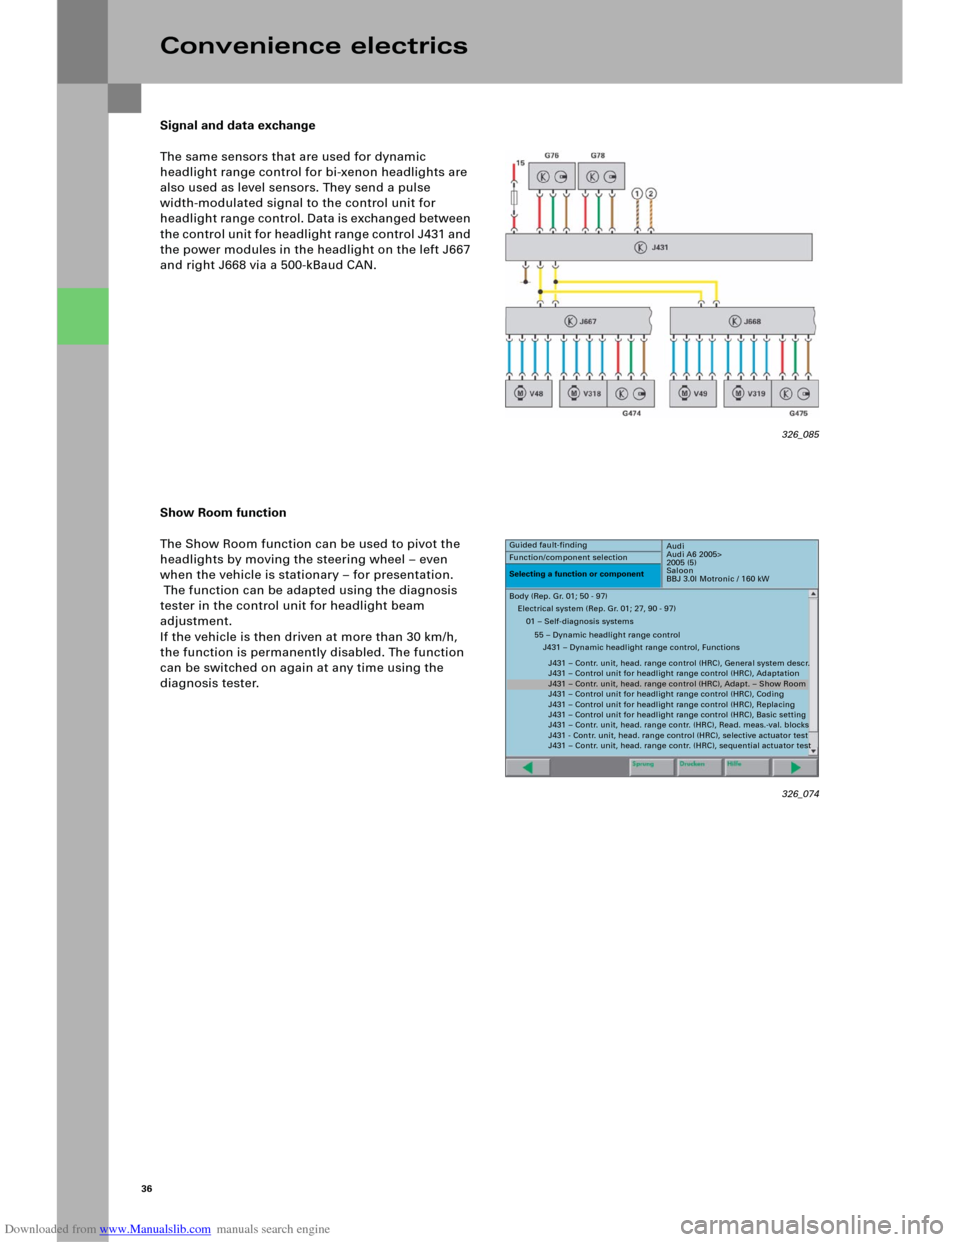
Signal and data exchange
The same sensors that are used for dynamic
headlight range control for bi-xenon headlights are
also used as level sensors. They send a pulse
width-modulated signal to the control unit for
headlight range control. Data is exchanged between
t h e c o n t ro l u n i t fo r h e ad l i gh t ra n g e c o n tro l J 4 3 1 an d
the power modules in the headlight on the left J667
and right J668 via a 500-kBaud CAN.
Show Room function
The Show Room function can be used to pivot the
headlights by moving the steering wheel – even
when the vehicle is stationary – for presentation.
The function can be adapted using the diagnosis
tester in the control unit for headlight beam
adjustment.
If the vehicle is then driven at more than 30 km/h,
the function is permanently disabled. The function
can be switched on again at any time using the
diagnosis tester.
Convenience electrics
326_074
Audi
Audi A6 2005>
2005 (5)
Saloon
BBJ 3.0l Motronic / 160 kW Guided fault-finding
Function/component selection
Selecting a function or component
Body (Rep. Gr. 01; 50 - 97)
Electrical system (Rep. Gr. 01; 27, 90 - 97)
01 – Self-diagnosis systems
55 – Dynamic headlight range control
J431 – Dynamic headlight range control, Functions
J431 – Contr. unit, head. range control (HRC), General system descr.
J431 – Control unit for headlight range control (HRC), Adaptation
J431 – Contr. unit, head. range control (HRC), Adapt. – Show Room
J431 – Control unit for headlight range control (HRC), Coding
J431 – Control unit for headlight range control (HRC), Replacing
J431 – Control unit for headlight range control (HRC), Basic setting
J431 – Contr. unit, head. range contr. (HRC), Read. meas.-val. blocks
J431 - Contr. unit, head. range control (HRC), selective actuator test
J431 – Contr. unit, head. range contr. (HRC), sequential actuator test
326_085
Page 38 of 92
Downloaded from www.Manualslib.com manuals search engine 40
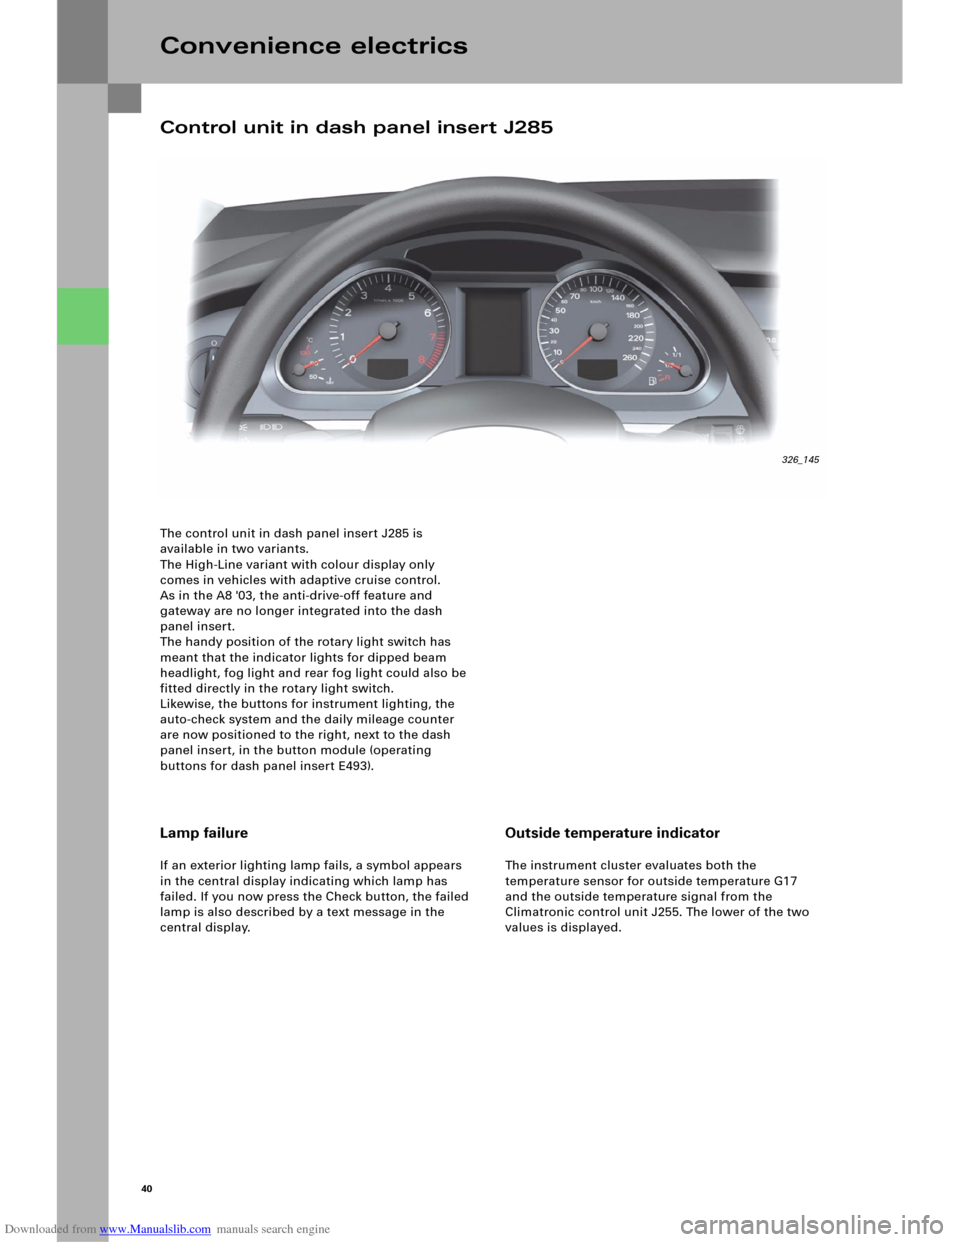
The control unit in dash panel insert J285 is
available in two variants.
The High-Line variant with colour display only
comes in vehicles with adaptive cruise control.
As in the A8 '03, the anti-drive-off feature and
gateway are no longer integrated into the dash
panel insert.
The handy position of the rotary light switch has
meant that the indicator lights for dipped beam
headlight, fog light and rear fog light could also be
fitted directly in the rotary light switch.
Likewise, the buttons for instrument lighting, the
auto-check system and the daily mileage counter
are now positioned to the right, next to the dash
panel insert, in the button module (operating
buttons for dash panel insert E493).
Convenience electrics
Lamp failure
If an exterior lighting lamp fails, a symbol appears
in the central display indicating which lamp has
failed. If you now press the Check button, the failed
lamp is also described by a text message in the
central display.
Outside temperature indicator
The instrument cluster evaluates both the
temperature sensor for outside temperature G17
and the outside temperature signal from the
Climatronic control unit J255. The lower of the two
values is displayed.
Control unit in dash panel insert J285
326_145
Page 39 of 92
Downloaded from www.Manualslib.com manuals search engine 41
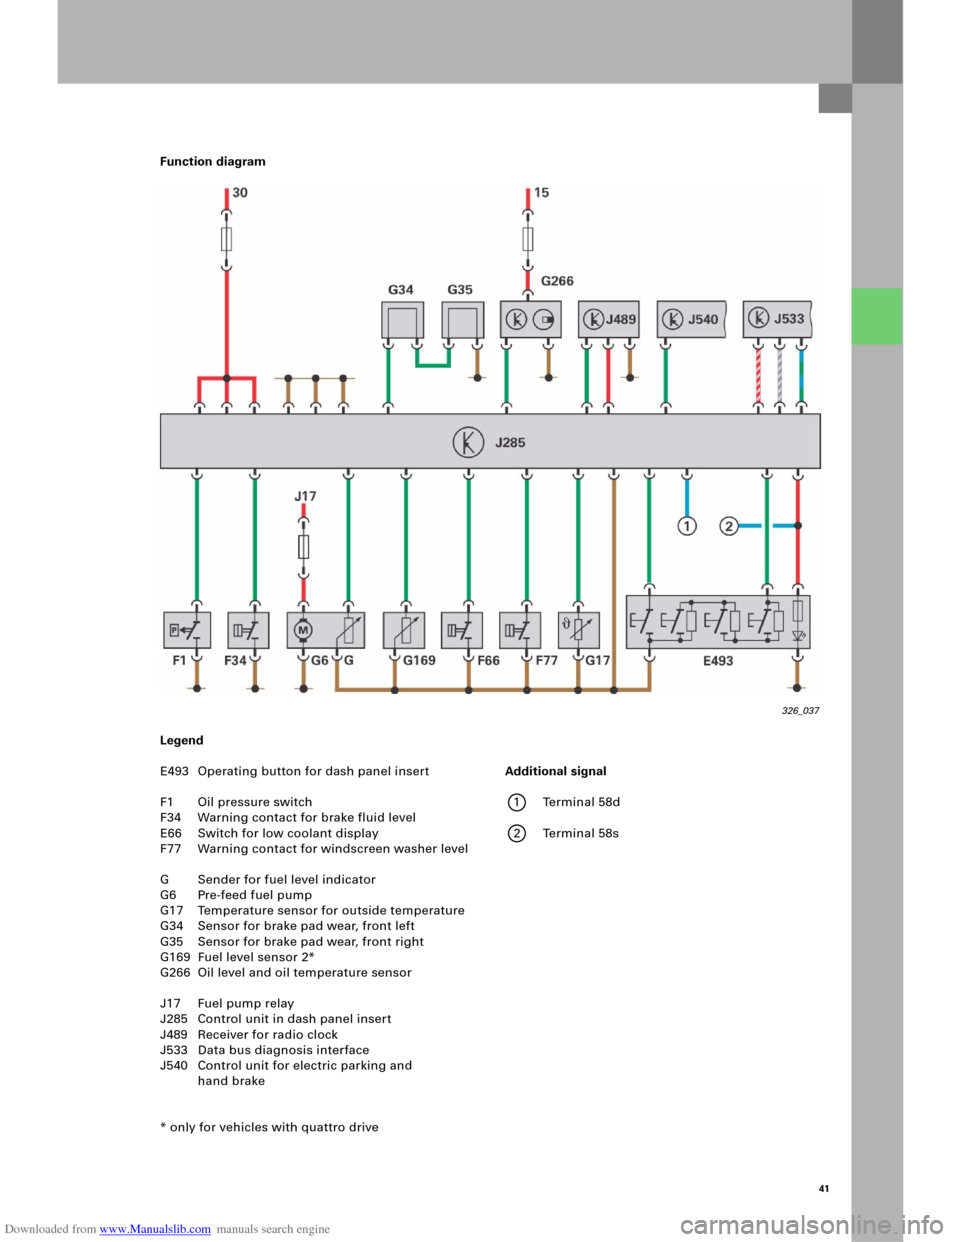
Function diagram
Legend
E493 Operating button for dash panel insert
F1 Oil pressure switch
F34 Warning contact for brake fluid level
E66 Switch for low coolant display
F77 Warning contact for windscreen washer level
G Sender for fuel level indicator
G6 Pre-feed fuel pump
G17 Temperature sensor for outside temperature
G34 Sensor for brake pad wear, front left
G35 Sensor for brake pad wear, front right
G169 Fuel level sensor 2*
G266 Oil level and oil temperature sensor
J17 Fuel pump relay
J285 Control unit in dash panel insert
J489 Receiver for radio clock
J533 Data bus diagnosis interface
J540 Control unit for electric parking and
hand brake
* only for vehicles with quattro drive
326_037
Additional signal
1 Terminal 58d
2 Terminal 58s
Page 40 of 92
Downloaded from www.Manualslib.com manuals search engine 42
Functions
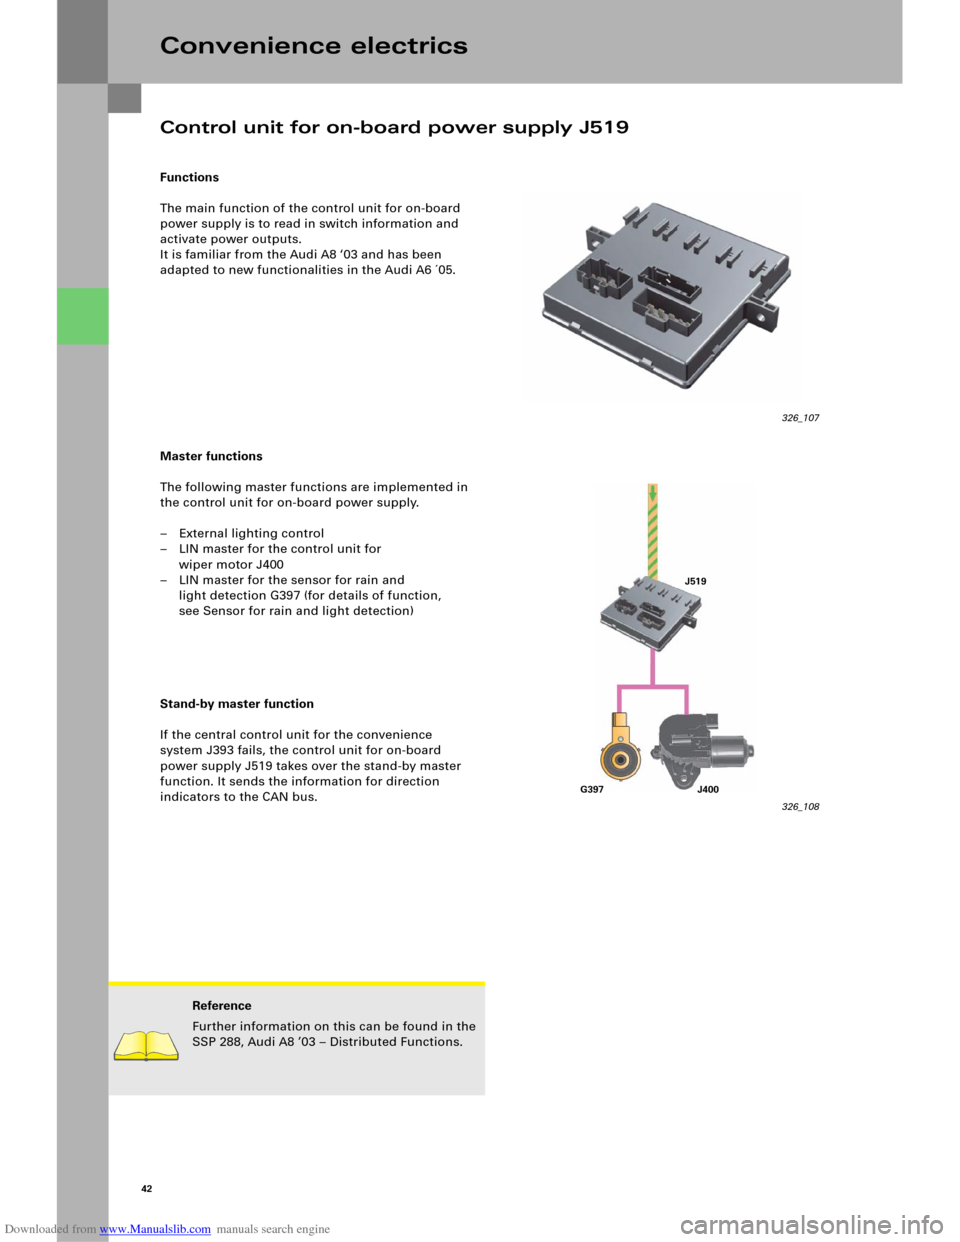
The main function of the control unit for on-board
power supply is to read in switch information and
activate power outputs.
It is familiar from the Audi A8 ‘03 and has been
adapted to new functionalities in the Audi A6 ´05.
Master functions
The following master functions are implemented in
the control unit for on-board power supply.
– External lighting control
– LIN master for the control unit for
wiper motor J400
– LIN master for the sensor for rain and
light detection G397 (for details of function,
see Sensor for rain and light detection)
Stand-by master function
If the central control unit for the convenience
system J393 fails, the control unit for on-board
power supply J519 takes over the stand-by master
function. It sends the information for direction
indicators to the CAN bus.
Convenience electrics
326_107
Reference
Further information on this can be found in the
SSP 288, Audi A8 ’03 – Distributed Functions.
326_108
Control unit for on-board power supply J519
J519
G397 J400