Page 146 of 243

Make sure the moonroof and the
windows are closed.
Turn of f the lights.
Place any packages, valuables, etc.
in the cargo area, or take them
with you.
Lock the doors.
Never park over dry leaves, tall
grass, or other f lammable
materials. The hot three way
catalytic converter could cause
these materials to catch on fire.
Always use the parking brake when
you park your vehicle. Make sure
the parking brake is set f irmly or
your vehicle may roll if it is parked
on an incline.
If your vehicle has an automatic
transmission, set the parking brake
bef ore you put the transmission in
Park. This keeps the vehicle f rom
moving and putting pressure on the
parking mechanism in the
transmission.
If the vehicle is f acing uphill, turn
the f ront wheels away f rom the
curb. If you have a manual
transmission, put it in f irst gear.
If the vehicle is f acing downhill,
turn the front wheels toward the
curb. If you have a manual
transmission, put it in reverse gear.
Make sure the parking brake is
f ully released bef ore driving away.
Driving with the parking brake
partially set can overheat or
damage the rear brakes.
Parking T ips
Parking
Driving
145
Page 181 of 243
Check the condition of the wiper
blades at least every six months.
Look f or signs of cracking in the
rubber, or areas that are getting
hard. Replace the blades if you f ind
these signs, or if they leave streaks
and unwiped areas when used.To replace a blade (f ront or rear):Raise the wiper arm of f the
windshield or rear window. Disconnect the blade assembly
fromthewiperarmbypushingin
the lock tab. Hold the lock tab in
while you push the blade assembly
toward the base of the arm.
2.
1.
Wiper Blades
180
WIPER ARMS
LOCK TAB
Page 182 of 243
Remove the blade f rom its holder
by grasping the tabbed end of the
blade. Pull f irmly until the tabs
come out of the holder.Examine the new wiper blades. If
they have no plastic or metal
reinf orcement along the back
edge, remove the metal
reinf orcement strips f rom the old
wiper blade, and install them in
the slots along the edge of the new
blade.Slide the new wiper blade into the
holder until the tabs lock.
Slide the wiper blade assembly
onto the wiper arm. Make sure it
locks in place.
Lower the wiper arm down against
the windshield or rear window.
3. 4. 5.
6.
7.
Wiper Blades
Maint enance
181
BLADE
BLADE
REINFORCEMENT
Page 189 of 243

�µ
Check the condition of the battery
monthlybylookingatthetest
indicator window. The label on the
battery explains the test indicator’s
colors.
Check the terminals f or corrosion (a
white or yellowish powder). To
remove it, cover the terminals with a
solution of baking soda and water. It
will bubble up and turn brown. When
this stops, wash it of f with plain
water. Dry off the battery with a
cloth or paper towel. Coat the terminals with grease to help prevent
f urther corrosion.
If additional battery maintenance is
needed, see your dealer or a
qualif ied technician.
Battery posts,
terminals, and related accessories
contain lead and lead compounds.
If your vehicle’s battery is
disconnected or goes dead, your
driver’s power window loses its
calibration and must be
reprogrammed (see page ), and
your audio system will disable itself .
Thenexttimeyouturnontheradio
youwillsee‘‘ ’’inthe
f requency display. Use the Preset
buttons to enter the five-digit code
(see page ). If you need to connect the battery to
a charger, disconnect both cables to
prevent damaging your vehicle’s
electrical system. Always disconnect
the negative ( ) cable first, and
reconnect it last.
78
112
Checking the Battery
WARNING:
Wash your hands af ter handling.
188
TEST INDICATOR WINDOW
The battery gives off explosive
hydrogen gas during normal
operation.
A spark or flame can cause the
battery to explode with enough
force to kill or seriously hurt you.
Wear protective clothing and a
face shield, or have a skilled
mechanic do the battery
maintenance.
Page 190 of 243
, there are several things you
should do to prepare it f or storage.
Proper preparation helps prevent
deterioration and ma")
If you need to park your vehicle f or
an extended period (more than one
month), there are several things you
should do to prepare it f or storage.
Proper preparation helps prevent
deterioration and makes it easier to
get your vehicle back on the road. If
possible, store your vehicle indoors.Fill the f uel tank.
Change the engine oil and f ilter.
Wash and dry the exterior
completely.
Cleantheinterior.Makesurethe
carpeting, floor mats, etc., are
completely dry.
Leave the parking brake off. Put
the transmission in Reverse
(manual) or Park (automatic). Block the rear wheels.
If the vehicle is to be stored f or a
longer period, it should be
supported on jackstands so the
tires are of f the ground.
Leave one window open slightly (if
the vehicle is being stored
indoors).
Disconnect the battery.
Support the f ront and rear wiper
blade arms with a f olded towel or
ragsotheydonottouchthe
windshield.
To minimize sticking, apply a
silicone spray lubricant to all door
and hatch seals. Also, apply a body
wax to the painted surf aces that
mate with the door and hatch seals.Cover the vehicle with a
‘‘breathable’’ cover, one made
f rom a porous material such as
cotton. Non-porous materials, such
as plastic sheeting, trap moisture,
which can damage the paint.
If possible, periodically run the
engine until it reaches f ull
operating temperature (the
cooling f an cycles twice).
Pref erably, do this once a month.
If you store your vehicle f or 12
months or longer, have your dealer
perf orm the inspections called f or in
the 24 months/30,000 miles (48,000
km) Maintenance Schedule (Normal
Conditions) as soon as you take it
out of storage (see page ). The
replacements called f or in the
maintenance schedule are not
needed unless the vehicle has
actually reached that time or mileage. 157
Vehicle Storage
Maint enance
189
Page 205 of 243

This indicator should never
come on when the engine is
running. If it starts f lashing or stays
on, the oil pressure has dropped very
low. Serious engine damage is
possible and you should take
immediate action. Saf ely pull of f the road, and shut
of f the engine. Turn on the hazard
warning indicators.
Let the vehicle sit f or a minute.
Open the hood, and check the oil
level (see page ). An engine
very low on oil can lose pressure
during cornering and other driving
maneuvers.
If necessary, add oil to bring the
level back to the full mark on the
dipstick (see page ).
Start the engine, and watch the oil
pressure indicator. If it does not go
out within 10 seconds, turn of f the
engine. There is a mechanical
problem that needs to be repaired
bef ore you can continue driving
(see
on page
). If the charging system
indicator comes on brightly
when the engine is running, the
battery is not being charged.
Immediately turn of f all electrical
accessories. Try not to use other
electrically operated controls such as
the power windows. Keep the engine
running; starting the engine will
discharge the battery rapidly.
Go to a service station or garage
where you can get technical
assistance.
1.
2.
3.
4.
125
162
213
L ow Oil Pressure Indicator, Charging System Indicator
L ow Oil Pressure Indicator
Emergency T owingCharging System Indicator
204
Running the engine with low oil
pressure can cause serious mechanical
damage almost immediately. Turn of f
the engine as soon as you can saf ely get
the vehicle stopped.
Page 212 of 243
�Î
�Î
�Î
�Î �Î
�µ
�µ
�µ
�µ �Î
�Î
�Î
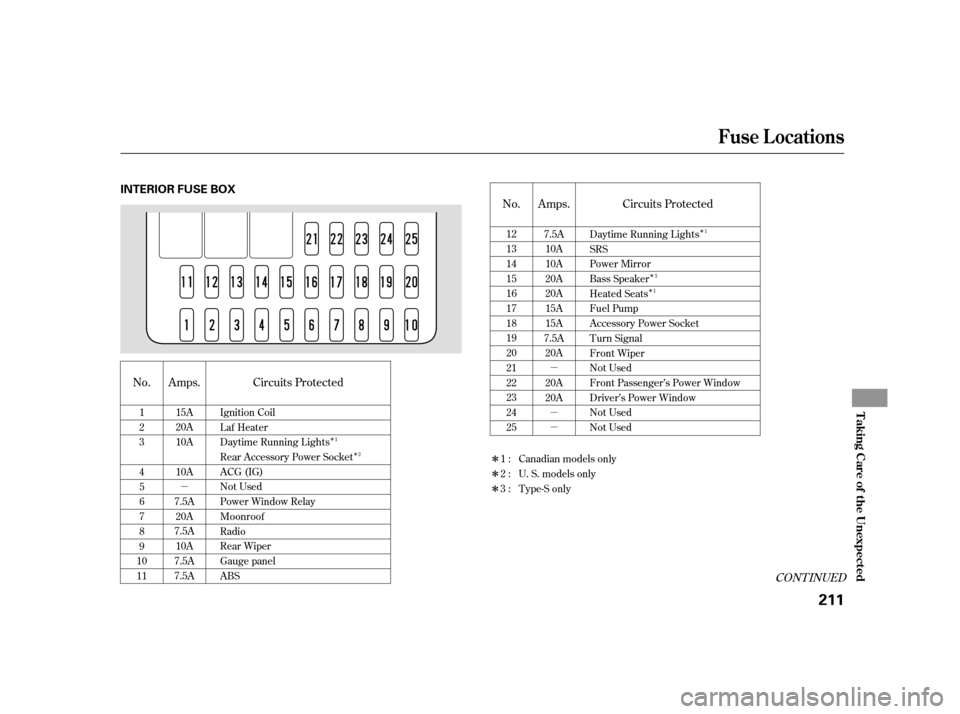
CONT INUED
Circuits Protected
Amps.
No.
No. Circuits Protected
Amps.
Daytime Running Lights
SRS
Power Mirror
Bass Speaker
Heated Seats
Fuel Pump
Accessory Power Socket
Turn Signal
Front Wiper
Not Used
Front Passenger’s Power Window
Driver’s Power Window
Not Used
Not Used
7.5A
10A
10A
20A
20A
15A
15A
7.5A 20A
20A
20A
12
13
14
15
16
17
18
19
20
21
22
23
24
25
1
2
3
4
5
6
7
8
9
10
11 Ignition Coil
Laf Heater
Daytime Running Lights
Rear Accessory Power Socket
ACG (IG)
Not Used
Power Window Relay
Moonroof
Radio
Rear Wiper
Gauge panel
ABS
15A
20A
10A
10A
7.5A 20A
7.5A 10A
7.5A
7.5A 1:
2:
3:
Canadian models only
U. S. models only
Type-S only1
3
1
1 2
Fuse Locations
T aking Care of t he Unexpect ed
211
INTERIOR FUSE BOX
Page 213 of 243
�µ�µ
�µ
No. Amps. Circuits Protected
1
2
3
4
5
6
7
8
9
10
11
12
13
14
15
16
17
18
19
20
21 25 30 A
10 A
7.5 A 20 A
10 A
20 A
15 A
20 A
7.5 A 30 A
40 A
40 A
40 A
30 A
20 A
15 A
20 A
100 A 40 A Condenser f an
Small Light
Interior Light
Cooling Fan
Hazard
FI ECU (ECM/PCM)
Horn, Stop
ABS (F/S)
Back Up
ABS Motor
Rear Demister
Heater Motor
Power Window
Option
Lef t Headlight
Door Lock
Right Headlight
Not Used
Main Fuse Battery
Main Fuse Ignition
Spare Fuse
Fuse Locations
212
UNDER HOOD FUSE BOX