Page 18 of 457

1-2
1
1 Clock
2 Speedometer
3 “SELECT” button
4 “RESET” button
5 Tachometer
6 Coolant temperature display / air intake
temperature display
7 Odometer / tripmeters / fuel reserve tripme-
ter / stopwatch
8 Shift timing indicator light
1 Clock
2 Speedometer
FEATURES
GEN
INFO
NOTE:
EAS00019
FEATURES
INSTRUMENT FUNCTIONS
Multi-function display
The multi-function meter unit is equipped with
the following:
�a speedometer (which shows the riding
speed)
�a tachometer (witch shows engine speed)
�an odometer (which shows the total distance
traveled)
�two tripmeters (which show the distance
traveled since they were last set to zero)
�a fuel reserve tripmeter (which shows the
distance traveled since the fuel level warning
light came on)
�a stopwatch
�a clock
�a coolant temperature display
�an air intake temperature display
�a self-diagnosis device
�a display brightness and shift timing indicator
light control mode
�Be sure to turn the key to “ON” before using the “SELECT” and “RESET” buttons.
Clock mode
Turn the key to “ON”.
To set the clock
1. Push the “SELECT” button and “RESET”
button together for at least two seconds.
2. When the hour digits start flashing, push the
“RESET” button to set the hours.
3. Push the “SELECT” button, and the minute
digits will start flashing.
4. Push the “RESET” button to set the minutes.
5. Push the “SELECT” button and then release
it to start the clock.
ProCarManuals.com
Page 19 of 457

1-3
FEATURES
GEN
INFO
1 Coolant temperature display / air intake
temperature display
2 Odometer / tripmeters / fuel reserve tripme-
ter / stopwatch
3 Shift timing indicator light
NOTE:
NOTE:Odometer, tripmeter, and stopwatch modes
Push the “SELECT” button to switch the display
between the odometer mode “ODO”, the trip-
meter modes “TRIP A” and “TRIP B” and the
stopwatch mode in the following order:
TRIP A � TRIP B � ODO � Stopwatch �
TRIP A
If the fuel level warning light comes on, the
odometer display will automatically change to
the fuel reserve tripmeter mode ”F-TRIP” and
start counting the distance traveled from that
point. In that case, push the ”SELECT” button to
switch the display between the various tripme-
ter, odometer, and stopwatch modes in the fol-
lowing order:
F-TRIP � Stopwatch � TRIP A � TRIP B �
ODO � F-TRIP
To reset a tripmeter, select it by pushing the “SE-
LECT” button, and then push the “RESET” button
for at least one second. If you do not reset the fuel
reserve tripmeter manually, it will reset itself auto-
matically and the display will return to the prior
mode after refueling and traveling 5 km (3 mi).
Stopwatch mode
Standard measurement
1. Push the “RESET” button to start the stopwatch.
2. Push the “SELECT” button to stop the stopwatch.
3. Push the “SELECT” button again to reset the stopwatch.
Split-time measurement
1. Push the “RESET” button to start the stopwatch.
2. Push the “RESET” button to measure split-times. (The colon “:” will start flashing.)
3. Push the “RESET” button to display the final split-time or push the “SELECT” button to stop the stop-
watch and display total elapsed time.
4. Push the “SELECT” button to reset the stopwatch.
Coolant temperature display
The coolant temperature display indicates the temperature of the coolant. Push the “RESET” button to
switch the coolant temperature display to the air intake temperature display.
When the coolant temperature display is selected, “C” is displayed before the coolant temperature.
Air intake temperature display
The air intake temperature display indicates the temperature of the air drawn into the air filter case. Push
the “RESET” button to switch the coolant temperature display to the air intake temperature display.
�Even if the air intake temperature is set to be displayed, the coolant temperature warning light comes
on when the engine overheats.
�When the key is turned to “ON”, the coolant temperature is automatically displayed, even if the air
intake temperature was displayed prior to turning the key to “OFF”.
�When the air intake temperature display is selected, “A” is displayed before thetemperature.
ProCarManuals.com
Page 30 of 457

2-2
ENGINE SPECIFICATIONSSPEC
2
ENGINE SPECIFICATIONS
ItemStandardLimit
Engine
Engine type
Displacement
Cylinder arrangement
Bore � stroke
Compression ratio
Engine idling speed
Vacuum pressure at engine idling
speed
Standard compression pressure
(at sea level)
Liquid-cooled, 4-stroke, DOHC
998 cm3 (60.90 cu.in)
Forward-inclined parallel 4-cylinder
77.0 � 53.6 mm (3.03 � 2.11 in)
12.4 : 1
1,150 � 1,250 r / min
22 kPa (165 mmHg, 6.5 inHg)
1,480 kPa (14.80 kg / cm
2,14.80 bar,
210.5 psi) at 350 r / min
���
���
���
���
���
���
���
���
Fuel
Recommended fuel
Fuel tank capacity
Total (including reserve)
Reserve only
Premium unleaded gasoline only
18 L (3.96 Imp gal, 4.76 US gal)
3.4 L (0.75 Imp gal, 0.90 US gal)���
���
���
Engine oil
Lubrication system
Recommended oil
Quantity
Total amount
Without oil filter cartridge
replacement
With oil filter cartridge replacement
Oil pressure
Engine oil temperature
Relief valve opening pressure
Wet sump
At 5�C (40�F) or higher
Yamalube 4 (20W40) or SAE 20W40
type SE motor oil
At 15�C (60�F) or lower
Yamalube 4 (10W30) or SAE 10W30
type SE motor oil
3.8 L (3.35 Imp qt, 4.02 US qt)
2.9 L (2.55 Imp qt, 3.07 US qt)
3.1 L (2.73 Imp qt, 3.28 US qt)
230 kPa at 5,000 r / min
(2.3 kg / cm
2 at 5,000 r / min)
(2.3 bar at 5,000 r / min)
(32.7 psi at 5,000 r / min)
100�C (212�F)
600 � 680 kPa (6.0 � 6.8 kg / cm
2,
6.0 � 6.8 bar, 87.0 � 98.6 psi)
���
���
���
���
���
���
ProCarManuals.com
Page 45 of 457
2-17
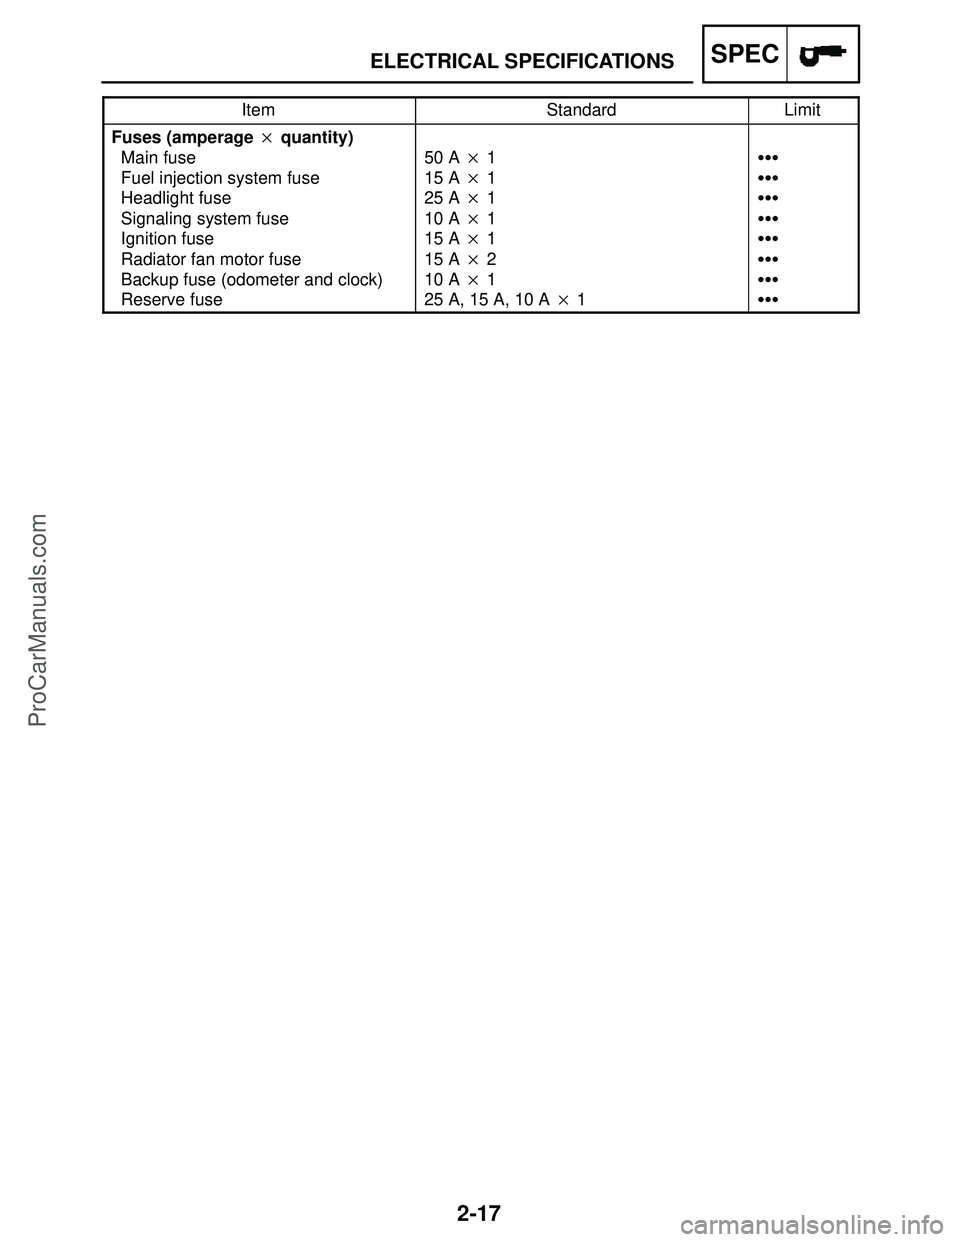
ELECTRICAL SPECIFICATIONSSPEC
ItemStandardLimit
Fuses (amperage � quantity)
Main fuse
Fuel injection system fuse
Headlight fuse
Signaling system fuse
Ignition fuse
Radiator fan motor fuse
Backup fuse (odometer and clock)
Reserve fuse
50 A � 1
15 A � 1
25 A � 1
10 A � 1
15 A � 1
15 A � 2
10 A � 1
25 A, 15 A, 10 A � 1���
���
���
���
���
���
���
���
ProCarManuals.com
Page 145 of 457
3-68
CHECKING THE FUSES
CHK
ADJ
WARNING
Pocket tester
90890-03112, YU-3112
b. If the pocket tester indicates “∞”, replace the
fuse.
3. Replace:
�blown fuse
a. Set the main switch to “OFF”.
b. Install a new fuse of the correct amperage
rating.
c. Set on the switches to verify if the electrical
circuit is operational.
d. If the fuse immediately blows again, check
the electrical circuit.
Fuses
Amperage
ratingQ’ty
Main50 A1
Fuel injection
system15 A1
Headlight25 A1
Signaling
system10 A1
Ignition15 A1
Backup fuse
(odometer
and clock)
10 A1
Radiator
fan motor15 A2
Reserve25 A, 15 A,
10 A1
Never use a fuse with an amperage rating
other than that specified. Improvising or us-
ing a fuse with the wrong amperage rating
may cause extensive damage to the electri-
cal system, cause the lighting and ignition
systems to malfunction and could possibly
cause a fire.
4. Install:
�front cowling inner panel (left)
Refer to “COWLINGS”.
�rider seat
Refer to “SEATS”.
ProCarManuals.com