Page 271 of 426

8-8 * Since these items require special tools, data and technical skills, have a Yamaha dealer perform the service.
** Lithium-soap-based grease
NOTE:�
Recommended brake fluid: DOT4
�
Brake fluid replacement:
•When disassembling the master cylinders or calipers, replace the brake fluid. Normally check the
brake fluid level and add fluid as required.
•On the inner parts of the master cylinders and calipers, replace the oil seals every two years.
•Replace the brake hoses every four years, or if cracked or damaged.
Wheel bearings*•Check bearing assemblies for looseness/damage.
•Replace if damaged.Steering system*•Check operation.
•Repair if damaged.
•Check toe-in.
•Adjust if necessary.Front and rear
suspension*•Check operation.
•Correct if necessary.Upper and lower arm
pivot and steering shaft*•Lubricate every 6 months.**Rear arm pivot*
•Lubricate every 6 months.**Fittings and fasteners*•Check all chassis fittings and fasteners.
•Correct if necessary.Lights and switches*•Check operation.
•Adjust headlight beams.
ITEM ROUTINEINITIAL EVERY
1
month3
months6
months6
months1
year
U5LP63.book Page 8 Monday, March 10, 2003 2:06 PM
Page 280 of 426

8-17 1. Engine oil tank
2. Engine oil tank filler cap
3. Dipstick
4. Maximum level mark
5. Minimum level mark
1. Réservoir d’huile de moteur
2. Bouchon de remplissage de l’huile de moteur
3. Jauge
4. Repère de niveau maximum
5. Repère de niveau minimum
1. Depósito de aceite de motor
2. Tapa de relleno del depósito de aceite de motor
3. Varilla de medición
4. Marca de nivel máximo
5. Marca de nivel mínimo
EBU12381
Engine oil and oil filter cartridge
The engine oil level should be checked before
each ride. In addition, the oil must be changed and
the oil filter cartridge replaced at the intervals
specified in the periodic maintenance and lubrica-
tion chart.
To check the engine oil level
1. Place the ATV on a level surface.
2. Start the engine, warm it up until the engine
oil has reached a normal temperature of
60°C, let it continue to idle for twenty to thirty
seconds. During this period, rev the engine
two or three times to approximately
3,000 r/min, and then turn the engine off.NOTE:_ To achieve the proper engine oil temperature for
an accurate oil level reading, the engine must
have first completely cooled down, and then
warmed up again for several minutes to normal
operating temperature. _
U5LP63.book Page 17 Monday, March 10, 2003 2:06 PM
Page 282 of 426
8-19
3. Wait a few minutes until the oil settles, re-
move the engine oil tank filler cap, wipe the
dipstick clean with a clean rag, insert it back
into the filler hole (without screwing it in), and
then remove it again to check the oil level.NOTE:_ The engine oil should be between the minimum
and maximum level marks. _4. If the engine oil is below the minimum level
mark, add sufficient oil of the recommended
type to raise it to the correct level.NOTE:_ When adding oil, be careful not to overfill the en-
gine oil tank; the oil level rises faster starting from
the half-level-portion on the dipstick. _5. Insert the dipstick into the oil filler hole, and
then tighten the oil filler cap.
U5LP63.book Page 19 Monday, March 10, 2003 2:06 PM
Page 284 of 426
8-21 1. Engine guard 2. Bolt (× 6)
1. Protège-carter 2. Boulon (× 6)
1. Protector del motor 2. Perno (× 6)
CAUTION:_ Make sure that the oil filler cap is securely
tightened, otherwise oil may seep out when
the engine is running. _To change the engine oil (with or without oil fil-
ter cartridge replacement)
1. Remove the engine guard by removing the
bolts.
2. Start the engine, warm it up for several min-
utes, and then turn it off.
3. Place an oil pan under the engine to collect
the used oil.
U5LP63.book Page 21 Monday, March 10, 2003 2:06 PM
Page 286 of 426
8-23 1. Crankcase engine oil drain bolt
1. Boulon de vidange d’huile du carter
1. Perno de drenaje de aceite de motor del cárter
1. Engine oil tank drain bolt
1. Boulon de vidange du réservoir d’huile de moteur
1. Perno de drenaje del depósito aceite de motor
4. Remove the crankcase engine oil drain bolt.
5. Remove the engine oil tank filler cap and the
oil tank drain bolt.
6. Check the washers for damage, and replace
if necessary.NOTE:_ Skip steps 7–9 if the oil filter cartridge is not being
replaced. _
U5LP63.book Page 23 Monday, March 10, 2003 2:06 PM
Page 288 of 426
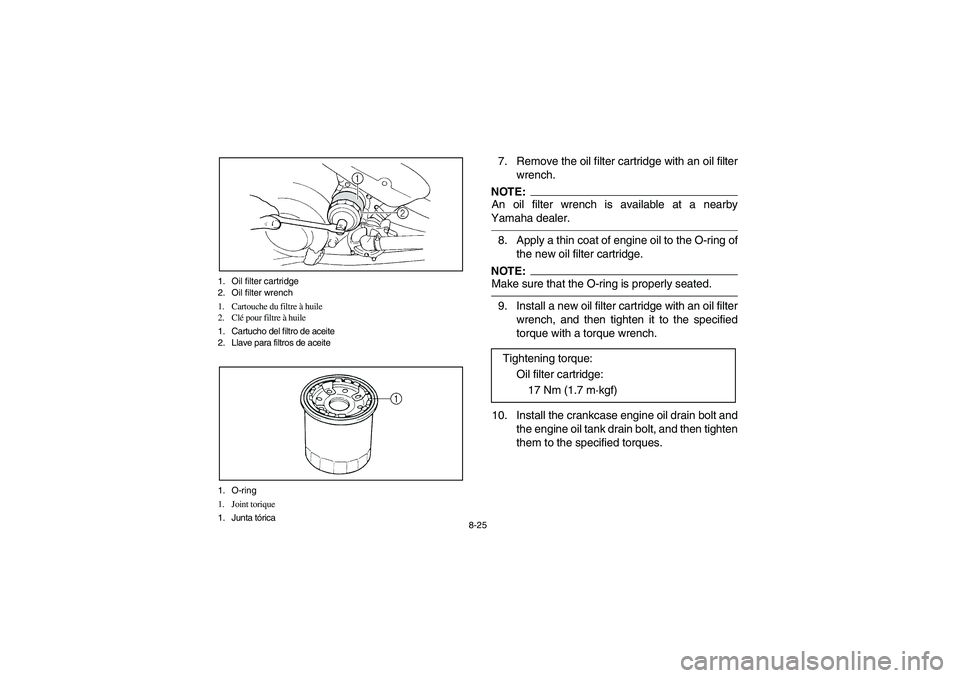
8-25 1. Oil filter cartridge
2. Oil filter wrench
1. Cartouche du filtre à huile
2. Clé pour filtre à huile
1. Cartucho del filtro de aceite
2. Llave para filtros de aceite
1. O-ring
1. Joint torique
1. Junta tórica
7. Remove the oil filter cartridge with an oil filter
wrench.NOTE:_ An oil filter wrench is available at a nearby
Yamaha dealer. _8. Apply a thin coat of engine oil to the O-ring of
the new oil filter cartridge.NOTE:_ Make sure that the O-ring is properly seated. _9. Install a new oil filter cartridge with an oil filter
wrench, and then tighten it to the specified
torque with a torque wrench.
10. Install the crankcase engine oil drain bolt and
the engine oil tank drain bolt, and then tighten
them to the specified torques. Tightening torque:
Oil filter cartridge:
17 Nm (1.7 m·kgf)
U5LP63.book Page 25 Monday, March 10, 2003 2:06 PM
Page 290 of 426
8-27
11. Pour only 1.75 L of the specified amount of
recommended engine oil through the engine
oil tank filler hole, insert the dipstick, and then
tighten the oil tank filler cap.
12. Start the engine, rev it several times, and
then turn it off.
13. Remove the engine oil tank filler cap, and
then gradually fill the oil tank with the remain-
ing oil quantity while regularly checking the oil
level on the dipstick.
14. Install the engine oil tank filler cap.Tightening torques:
Crankcase engine oil drain bolt:
30 Nm (3.0 m·kgf)
Engine oil tank drain bolt:
25 Nm (2.5 m·kgf)
U5LP63.book Page 27 Monday, March 10, 2003 2:06 PM
Page 292 of 426
8-29
CAUTION:_ �
In order to prevent clutch slippage (since
the engine oil also lubricates the clutch),
do not mix any chemical additives. Do not
use oils with a diesel specification of “CD”
or oils of a higher quality than specified. In
addition, do not use oils labeled “ENERGY
CONSERVING II” or higher.
�
Make sure that no foreign material enters
the crankcase.
_
Recommended engine oil:
See page 10-2.
Oil quantity:
Periodic oil change:
1.9 L
With oil filter cartridge replacement:
1.95 L
Total amount:
2.3 L
U5LP63.book Page 29 Monday, March 10, 2003 2:06 PM