2004 VOLVO V4 tow
[x] Cancel search: towPage 48 of 89

Replacement
Insert a new bulb in the holder.
Re-insert the bulb holder in the lamp housing and turn it clockwise until it clicks into place.
Press the lamp housing into place.
Make sure than locating pin (B) fits into the hole in the fender and slotted hole (C) around the screw.
Tighten the screw.
pg. 92 Replacing bulbs
Replacement of rear light bulbs - S40
All the bulbs in the rear light unit are replaced from inside the trunk
Procedure:
Switch off the lights and remove the ignition key.
Turn the clip 90° and pull it out. Fold the panel in the boot towards the middle so as to get access to the bulb
holders.
Push catches A and B in and remove the bulb holder. The bulbs are held in the bulb holder.
Leave the connector and cables connected to the bulb holder.
Remove the bulb by pressing it inwards and turning it a few degrees counterclockwise.
Insert a new bulb into the bulb holder and replace the holder. Check that the bulb works and refit the panel.
ProCarManuals.com
Page 49 of 89

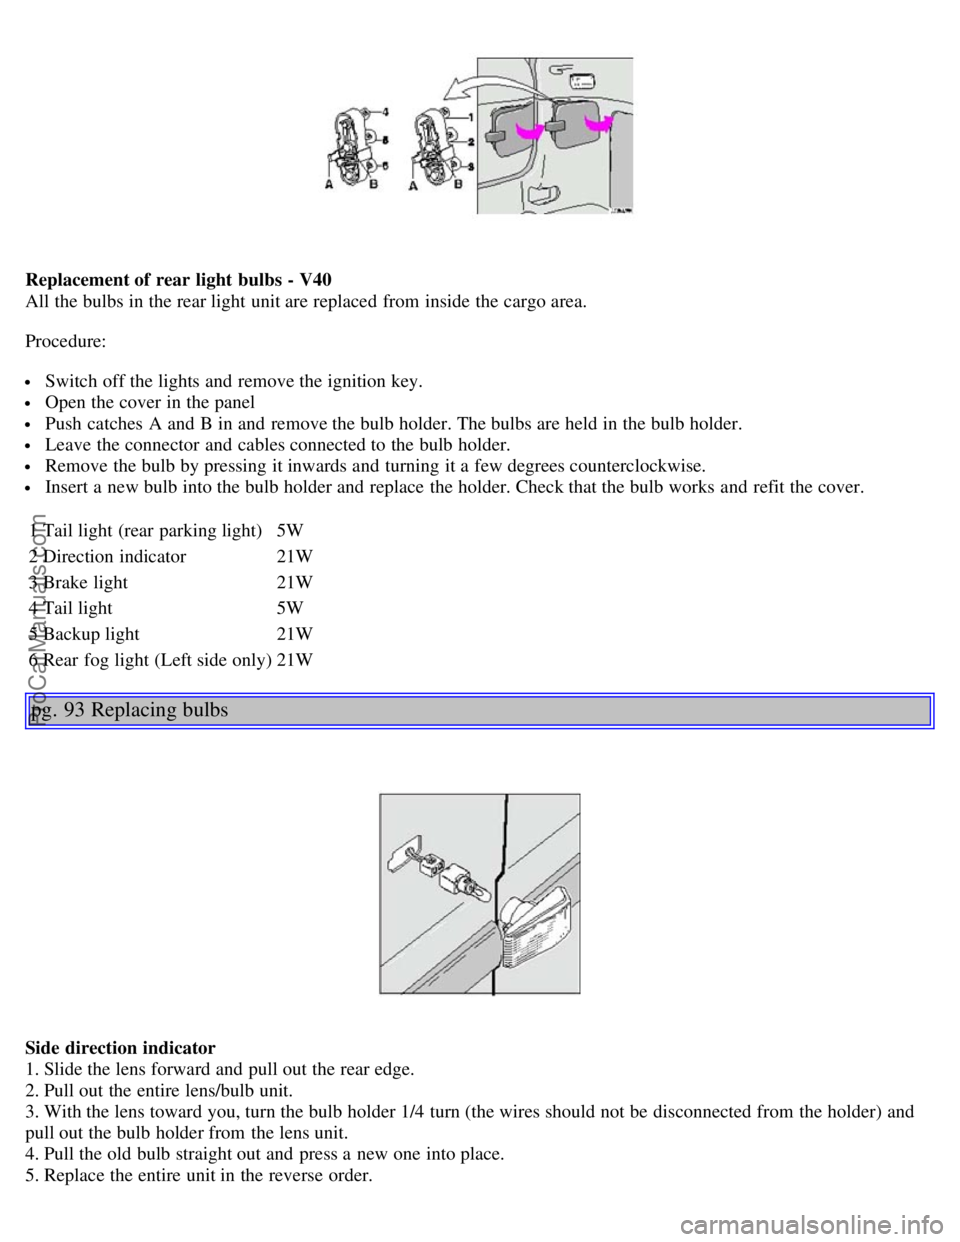
Replacement of rear light bulbs - V40
All the bulbs in the rear light unit are replaced from inside the cargo area.
Procedure:
Switch off the lights and remove the ignition key.
Open the cover in the panel
Push catches A and B in and remove the bulb holder. The bulbs are held in the bulb holder.
Leave the connector and cables connected to the bulb holder.
Remove the bulb by pressing it inwards and turning it a few degrees counterclockwise.
Insert a new bulb into the bulb holder and replace the holder. Check that the bulb works and refit the cover.
1 Tail light (rear parking light) 5W
2 Direction indicator 21W
3 Brake light 21W
4 Tail light 5W
5 Backup light 21W
6 Rear fog light (Left side only) 21W
pg. 93 Replacing bulbs
Side direction indicator
1. Slide the lens forward and pull out the rear edge.
2. Pull out the entire lens/bulb unit.
3. With the lens toward you, turn the bulb holder 1/4 turn (the wires should not be disconnected from the holder) and
pull out the bulb holder from the lens unit.
4. Pull the old bulb straight out and press a new one into place.
5. Replace the entire unit in the reverse order.
ProCarManuals.com
Page 53 of 89

toward the rear side of the engine.
After cleaning the engine, the spark plug wells should be inspected for water and blown dry if necessary.
Suitable detergents
Special car washing detergents should be used. A suitable mixture is about 2.5 fl. oz. (8.5 cl) of detergent to 2.6 US
gal. (10 liters) of warm water. After washing with a detergent the car should be well rinsed with clean water.
WARNING!
When the car is driven immediately after being washed, apply the brakes several times in order to remove any
moisture from the brake linings.
Engine cleaning agents should not be used when the engine is warm. This may constitute a fire risk.
NOTE: When washing the car, remember to remove dirt from the drain holes in the doors and sills. Painted Bumpers:
Wash the painted bumpers with the same cleaning agent used on the rest of the car. Never clean the bumpers with
gasoline or paint thinner. Difficult spots can be removed with denatured alcohol. To avoid scratches, do not dry the
bumpers with paper.
pg. 104 Automatic car washing, Polishing and waxing
Automatic washing - simple and quick
Brushless car washes are recommended. An automatic wash is a simple and quick way to clean your car, but it is
worth remembering that it may not be as thorough as when you yourself go over the car with sponge and water.
Keeping the underbody clean is most important, especially in the winter. Some automatic washers do not have
facilities for washing the underbody.
Before driving into an automatic wash, make sure that side view mirrors, auxiliary lamps, etc., are secure, otherwise
there is risk of the machine dislodging them. You should also lower the antenna (sedans).
We do NOT recommend washing your car in an automatic wash during the first six months because the paint
will not have hardened sufficiently.
Polishing and waxing
Normally, polishing is not required during the first year after delivery. However, waxing is recommended.
Before applying polish or wax the car must be washed and dried. Tar spots can be removed with kerosene or tar
remover. Difficult spots may require a fine rubbing compound.
After polishing use liquid or paste wax.
Several commercially available products contain both polish and wax.
Waxing alone does not substitute for polishing of a dull surface.
A wide range of polymer-based car waxes can be purchased today. These waxes are easy to use and produce a long-
lasting, high-gloss finish that protects the bodywork against oxidation, road dirt and fading.
Note: Machine buffing is not recommended.
pg. 105 Cleaning the upholstery
Cleaning the upholstery
ProCarManuals.com
Page 54 of 89

The fabric can be cleaned with soapy water or a detergent. For more difficult spots caused by oil, ice cream, shoe
polish, grease, etc., use a clothing/fabric stain remover.
The plastic in the upholstery can be cleaned with a soft cloth and mild soap solution.
Leather upholstery/suede-like upholstery (Alcantera™) can be cleaned with a soft cloth and mild soap solution.
For more difficult spots, Volvo offers a leather care kit.
Under no circumstances should gasoline, naphtha or similar cleaning agents be used on the plastic or the leather
since these can cause damage.
Cleaning the seat belts
Clean only with lukewarm water and mild soap solution.
Cleaning floor mats
The floor mats should be vacuumed or brushed clean regularly, especially during winter when they should be taken out
for drying. Spots on textile mats can be removed with a mild detergent. Make sure the carpets are properly secured in
the fixation points on the floor.
Bear in mind
Take extra care when removing stains such as ink or lipstick since the coloring can spread.
Use solvents sparingly. Too much solvent can damage the seat padding.
Start from the outside of the stain and work toward the center.
pg. 106
Contents | Top of Page
ProCarManuals.com
Page 66 of 89

may not be exceeded.
** Please refer to section "Trailer towing"WARNING!
When adding accessories, equipment, luggage and other cargo to your vehicle, the total loaded weight capacity of
the vehicle must not be exceeded.
All specifications are subject to change without notice.
pg. 128 On Call Roadside Assistance
Volvo On Call Roadside Assistance
Your new Volvo comes with a four year On Call Roadside Assistance program. Additional information, features, and
benefits are described in a separate information package in your glove compartment.
If you have misplaced your package, dial:
In the U.S.A .
1-800-63-VOLVO (1-800-638-6586)
In Canada:
1-800-263-0475
Technician certification
In addition to Volvo factory training, Volvo supports certification by the National Institute for Automotive Excellence
(A.S.E.). Certified technicians have demonstrated a high degree of competence in specific areas. Besides passing
exams each technicians must also have worked in the field for two or more years before a certificate is issued. These
professional technicians are best able to analyze vehicle problems and perform the necessary service procedures to
keep your Volvo at peak operating condition.
Contents | Top of Page
ProCarManuals.com
Page 82 of 89

CD Changer (option)139
CD player138
Center head restraint3
Central locking switch42
Chains - winter driving81
Changing a wheel87
Child booster cushion11
Child Restraint Anchorages14
Child safety15
Child safety locks - rear doors49
Concealed storage bin (wagon)59
Coolant - checking/changing117
Cooling system68,124
Cruise control31
D
Daytime Running Lights23
Detachable trailer hitch76
Detachable trailer hitch - installing76
Detachable trailer hitch - removing77
Dimensions127
Doors and locks42
Drive belt117
Driving economy64
Dynamic Stability Assistance (DSA)30
E
EBD74
ECC - Electronic Climate Control36,37
Electrical outlet33
Electrical system69,126
Electrically operated driver's seat50
Electrically operated front seats48
Electrically operated moonroof52
Emergency towing70
Emergency warning flashers26
Emissions systems112
Engine123
Engine air filter110
Engine compartment111
Engine oil115,122
Engine oil - checking/changing114
F
Floor mats65
Fog light - rear24
Fog lights24
ProCarManuals.com
Page 85 of 89

S
Safety defects - reporting16
Safety locks - child49
Seat belt maintenance16
Seat belts2,3
Seat belts - cleaning105
Seats47
Service reminder indicator23
Servicing111
Shift lock66
Shiftlock release99
Shiftlock release (override)99
Side Impact Protection System (SIPS)8
Side marker lamp replacement90
Side-view mirrors - heated26
SIPS8
Snow chains81
Snow tires81
Spare tire84
Spare tire (sedan)57
Spark plugs110, 124
Specifications121
SRS5,6,7
SRS diagnostic system22
SRS warning light5,22
Start inhibitor (immobilizer)40
Starting the engine65
Steering wheel adjustment34
Steering wheel lock26
Storage compartments54
Studded tires81
T
Tachometer20
Tailgate (opening/locking)45
Temperature gauge20
Temporary spare tire84
Timing belt110
Tire changing87
Tire pressure82
Tires80
Tires - changing87
Tool kit86
Towing70,71
Towing a trailer78
ProCarManuals.com
Page 86 of 89

Traction Control System (TRACS)23,74
Trailer hitch - detachable76
Trailer towing78
Transmission Lamp67
Trip Computer27
Trip odometer20
Trunk - opening from the inside - S4046
Turn signals25
U
UNIFORM TIRE QUALITY GRADING83
Uniform tire quality grading83
Upholstery - cleaning105
V
Vanity mirrors51
Vehicle Identification Number (VIN)108
Vehicle loading125
Volvo On Call128
Volvo SRS4
W
W - Winter/Wet Weather67
Warning flashers26
Warning lights22,23
Warranty109
Washer fluid reservoir118
Washing103
Waste bin - rear34
Waxing104
Weights127
Wheel changing86, 87, 88
Wheels and tires80
Whiplash Protection System (WHIPS)9
WHIPS9
Windows - electrically -operated38
Windshield wiper blades - replacing98
Winter driving75
Contents | Top of Page
ProCarManuals.com