2004 VOLVO S80 position light
[x] Cancel search: position lightPage 3 of 110

module. This is normal.
Fuel filler door
The fuel filler door, located on the right rear fender, is connected to your car's central locking system.
Press the button on the light switch panel (see page 32
) when the car is at a standstill to unlock the fuel filler door.
Please note that the fuel filler door will remain unlocked until the car begins to move forward.
An audible click will be heard when the fuel filler door relocks.
Fuel filler cap
After refueling, close the fuel filler cap by turning it clockwise until it clicks into place If this cap is not closed tightly
or if the engine is running when the car is refueled, the Malfunction Indicator Lamp ("Check Engine" light) may
indicate a fault.
Warning!
If your vehicle is involved in an accident, unseen damage may affect your vehicle's driveability and safety.
Important
Before you operate your car for the first time, please familiarize yourself with the new-engine oil consumption
information on page 122
. You should also be familiar with the information in the chapters one, two and four of
this manual.
Information contained in the balance of the manual is extremely useful and should be read after operating the
vehicle for the first time.
The manual is structured so that it can be used for reference. For this reason, it should be kept in the car for
ready access.
Do not export your Volvo to another country before investigating that country's applicable safety and exhaust
emission requirements. In some cases it may be difficult or impossible to comply with these requirements.
Modifications to the emission control system(s) may render your Volvo not certifiable for legal operation in the
U.S., Canada and other countries.
All information, illustrations and specifications contained in this manual are based on the latest product
information available at the time of publication. Please note that some vehicles may be equipped differently,
depending on special legal requirements and that optional equipment described in this manual may not be
available in all markets.
Volvo reserves the right to make model changes at any time, or to change specifications or design, without
notice and without incurring obligation.
CALIFORNIA Proposition 65 Warning
WARNING! Engine exhaust, some of its constituents, and certain vehicle components contain or emit chemicals
known to the state of California to cause cancer, and birth defects or other reproductive harm. In addition, certain
fluids contained in vehicles and certain products of component wear contain or emit chemicals known to the State
of California to cause cancer, and birth defects or other reproductive harm.
Volvo and the environment
Volvo is committed to the well being of our customers. As a natural part of this commitment, we care about the
environment in which we all live. Caring for the environment means an everyday involvement in reducing our
ProCarManuals.com
Page 9 of 110

When installing any optional equipment, make sure that the SRS system is not damaged. Do not attempt to service
any component of the SRS yourself. Attempting to do so may result in serious personal injury. If a problem arises,
take your car to the nearest authorized Volvo retailer for inspection as soon as possible.
pg. 5 Front airbags - SRS
A self -diagnostic system incorporated in the sensor monitors the SRS. This system does not, however, monitor the
Side Impact Protection System (SIPS) airbags. If a fault is detected, the warning light will illuminate. The light is
included in the warning/indicator light cluster in the instrument panel. Normally, the SRS warning lamp should light
up when the ignition key is turned to positions I, II or III and should go out after 7 seconds or when the engine is
started. Check that this light is functioning properly every time the car is started.
The following items are monitored by the self -diagnostic system:
Sensor unit
Cable harness
Gas generator igniters
WARNING!
Never drive an SRS equipped car with your hands on the steering wheel pad / airbag housing.
No objects, accessory equipment or stickers may be placed on, attached to or installed near the SRS cover in the
center of the steering wheel, the SRS cover above the glove compartment or the area affected by airbag deployment.
If the SRS warning light stays on after the engine has started or if it comes on while you are driving, drive the car
to the nearest authorized Volvo retailer for inspection as soon as possible.
There is no maintenance to perform on the SRS yourself. The month and year shown on the decal on the door pillar
ProCarManuals.com
Page 21 of 110

13 Fuel gauge
The fuel tank holds approximately 21.1 US gal. (80 liters).
When the warning light comes on there is approximately 1.8 US gal. (8 liters) of fuel remaining.
14 Indicator and warning lights
pg. 26 Indicator and warning lights
The indicator and warning lights described on pages 26 and 27 should never stay on when driving*
When the ignition key is turned, all of the warning lights in the lower right-hand side of the instrument panel should
go on to test the function of the bulbs. If a light does not go off after the engine has started, the system indicated
should be inspected.
NOTE: The parking brake reminder light will not go off until the parking brake has been fully released.
Warning lamp in the center of the instrument panel
This lamp lights up red or yellow depending on the severity of the fault that has been detected.
Yellow light: Follow the instructions shown in the text window.
Red light: Stop the car as soon as possible in a suitable location and read the message shown in the text window.
Supplemental Restraint System (SRS)
If the light comes on (or stays on after the vehicle has started), the SRS diagnostic system has detected a fault. Drive to
an authorized Volvo retailer for an inspection of the system. See the SRS section for more information.
BRAKE
Brake failure warning light
If the light comes on while driving or braking, stop immediately, open the hood and check the brake fluid level
in the reservoir. See page 124
for reservoir position and instructions.
Canadian models are equipped with this warning light:
Park
Brake
Parking brake reminder light
This light will be on when the parking brake (hand brake) is applied. The parking brake lever is situated between the
front seats.
Canadian models are equipped with this warning light:
ProCarManuals.com
Page 34 of 110

Coat hanger
Coat hanger
Use the coat hanger for clothes of normal weight.
pg. 54 Interior lighting
Courtesy light
Front reading lights
Courtesy light
The courtesy light can be turned on or off by pressing the button. The light also has a timer function which turns the
light on for 30 seconds if:
You unlock the car from the outside with the key or remote control.
You switch off the ignition (turn the key to position 0).
The courtesy light stays on for 10 minutes if one of the doors is left open after the car is unlocked.
The courtesy light switches off if:
The engine is started.
The car is locked from the outside with the key or remote control.
The interior courtesy light can be switched on or off at any time by pressing the center button in the panel above the
rearview mirror. When switched on with the engine off, the light will stay on for 10 minutes. When switched on with
the engine running, the light will stay on indefinitely. The light may be switched off at any time by pressing the center
button a second time.
The courtesy light timer periods can be changed. Consult your Volvo retailer.
ProCarManuals.com
Page 35 of 110

Overriding the Interior and Trunk Courtesy Lights
Normally if a car door is left open with the engine turned off, the interior courtesy light will stay on for 10 minutes.
Normally, if the trunk is left open with the engine turned off, the trunk courtesy lights will stay on for 10 minutes.
If a car door is left open or the interior courtesy lights are turned on while the engine is left running, the interior
courtesy lights will stay on indefinitely. Likewise, if the trunk is left open while the engine is running, the trunk
courtesy light will stay on indefinitely.
At times, you may wish to be assured that the courtesy lights will stay off regardless of door or trunk lid position.
To switch off the interior and trunk courtesy lights indefinitely, press and hold the center button in the panel above the
rearview mirror for 3 seconds.The courtesy lights will go off and remain off until the center button is pressed again.
Rear reading lights
Reading lights - front/rear
The reading lights can be switched on or off by pressing the respective buttons. These lights switch off automatically
after 10 minutes if the engine is not running. If the engine is running, the lights stay on indefinitely. The lights can be
switched off at any time by pressing the button.
pg. 55 Storage compartments
ProCarManuals.com
Page 37 of 110

Press button B to open the storage space in the center console for cassettes, change holder, etc.
Secure long loads with the seat belt
Carry long loads
The center backrest cushion folds forward, allowing you to transport long, light cargo such as skis in the trunk of your
car. To lower the backrest:
Pull the right release control handle in the trunk to release the backrest (see page 54).
From the rear seat, fold down the right section of the backrest slightly *.
Release the flap by pushing the catch (located on the rear side of the backrest) upward and pulling the flap forward.
Return the backrest to the upright position.
* If your car is equipped with the optional integrated child booster cushion, this cushion must be folded down before
you fold down the backrest (see page 13
).
pg. 57 Spare tire, Cargo net in trunk
Spare tire
The spare tire, jack and tool bag are located under the floor of the trunk. To access the spare tire:
Raise the rear edge of the floor of the trunk and fold it back toward the rear seat backrest.
Lift out the trunk floor support (certain models) from the spare tire securing bracket.
Release the strap to lift out the jack and tool bag.
Unscrew the securing bracket and lift out the spare tire.
To return the spare tire to the trunk, follow the reverse procedure.
WARNING!
Make sure that the spare tire, jack and tool bag are properly secured with the securing bracket and strap to help keep
ProCarManuals.com
Page 38 of 110
these components in place in the event of a sudden stop.
NOTE: See page 98 for information on how the jack should be used.
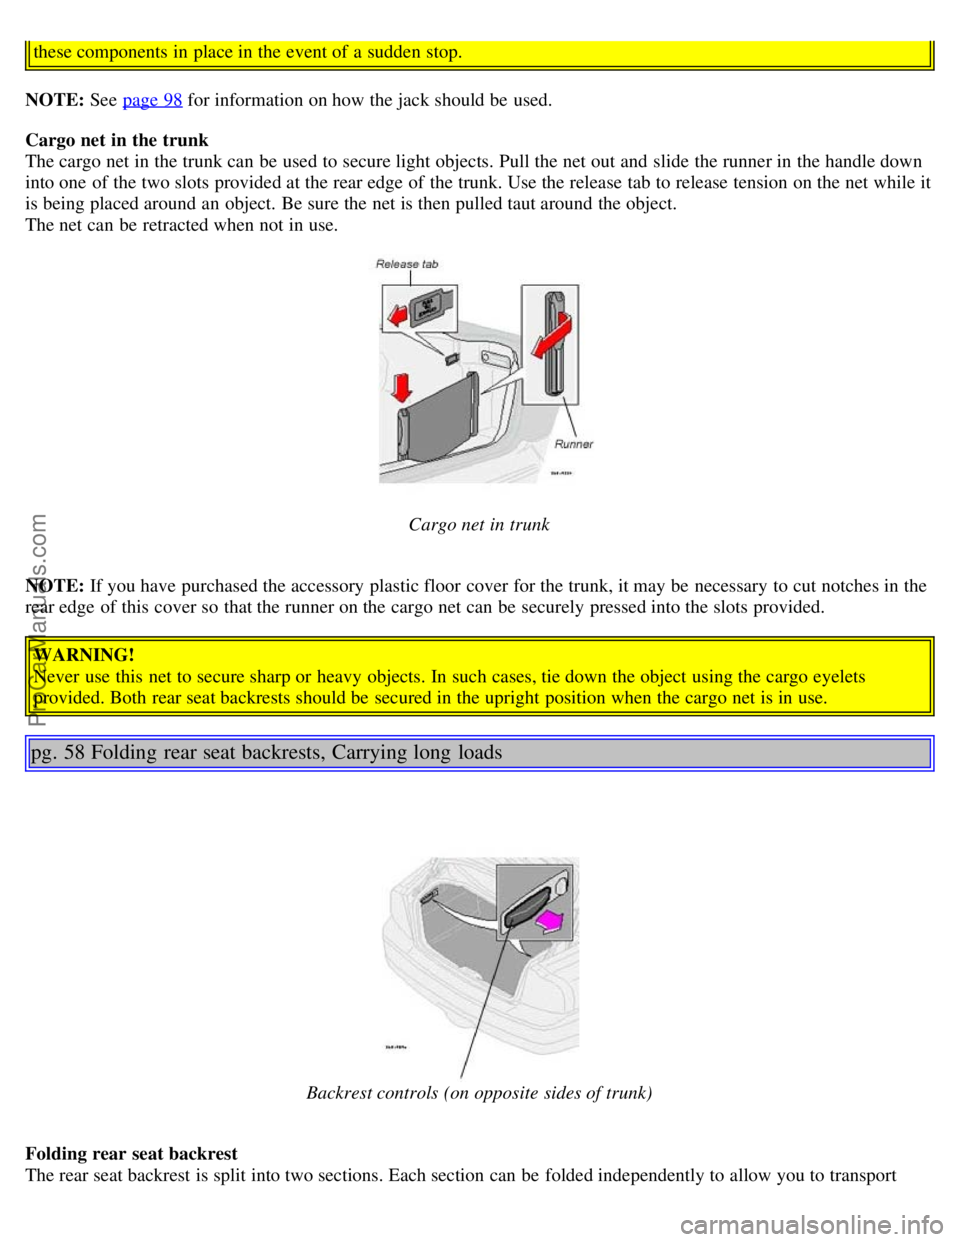
Cargo net in the trunk
The cargo net in the trunk can be used to secure light objects. Pull the net out and slide the runner in the handle down
into one of the two slots provided at the rear edge of the trunk. Use the release tab to release tension on the net while it
is being placed around an object. Be sure the net is then pulled taut around the object.
The net can be retracted when not in use.
Cargo net in trunk
NOTE: If you have purchased the accessory plastic floor cover for the trunk, it may be necessary to cut notches in the
rear edge of this cover so that the runner on the cargo net can be securely pressed into the slots provided.
WARNING!
Never use this net to secure sharp or heavy objects. In such cases, tie down the object using the cargo eyelets
provided. Both rear seat backrests should be secured in the upright position when the cargo net is in use.
pg. 58 Folding rear seat backrests, Carrying long loads
Backrest controls (on opposite sides of trunk)
Folding rear seat backrest
The rear seat backrest is split into two sections. Each section can be folded independently to allow you to transport
ProCarManuals.com
Page 46 of 110

Valet security locking
The security locking feature of your car allow you to prevent unwanted access to your trunk and glove compartment,
while still allowing a parking attendant to unlock, start, and relock the rest of your car. To prevent unwanted access to
the trunk and glove compartment do the following:
Give your service key to the parking attendant.
Insert your master key into the glove compartment. Turn it 90 degrees clockwise and remove the key. The glove
compartment cannot be unlocked with the service key.
Insert your master key into the ignition and turn it to position II.
Press the trunk lock button in the center console. An LED and a message in the text window will show that the trunk
lock has be activated.
Turn off the car and remove the master key.
With the trunk lock activated, neither the service key nor the remote control will open the trunk.
The function can be turned off (deactivated) by turning the ignition key to position II and pressing the trunk lock
button again (the LED in the button will go out and VALET LOCK OFF" will be displayed in the text window).
* The position of this button may vary, depending on the specifications of your car.
pg. 65 Alarm
Alarm
The alarm is automatically armed whenever you lock your car.
When armed, the alarm continuously monitors a number of points on the car. The following conditions will set off the
alarm:
The hood is forced opened.
The trunk is forced opened.
A door is forced opened.
The ignition switch is tampered with.
If there is movement in the passenger compartment (if the car is equipped with the optional movement sensor).
The car is lifted or towed (if the car is equipped with the optional inclination sensor).
The battery is disconnected (while the alarm is set).
Arming the alarm
Press the LOCK button on the remote control, lock the car using the key in the driver's door or press the central lock
button on one of the front doors with the door open. One long flash of the turn signals will confirm that the alarm is
armed.
Disarming the alarm
Press the UNLOCK button on the remote control or unlock the doors with the key.
Turning off (stopping) the alarm
If the alarm is sounding, it can be stopped by pressing the UNLOCK button on the remote control or by unlocking the
driver's door with the key.
Visual alarm signal
The visual alarm signal is given by flashing all turn signals and turning on the interior lighting for approximately 5
minutes.
Audible alarm signal
An audible alarm signal is given by a battery powered siren. One alarm cycle lasts for 25 seconds.
ProCarManuals.com