2004 VOLKSWAGEN GOLF PLUS Ecu
[x] Cancel search: EcuPage 355 of 541
If transmission has leake d out of th e missio n.
If there is o r n o oil in th e transmiss io n cause of damage to your ve hicl e, it mus t be moved
w ith th e dri ve wheels off th e ground.
If the front and rear w heels cannot t u rn.
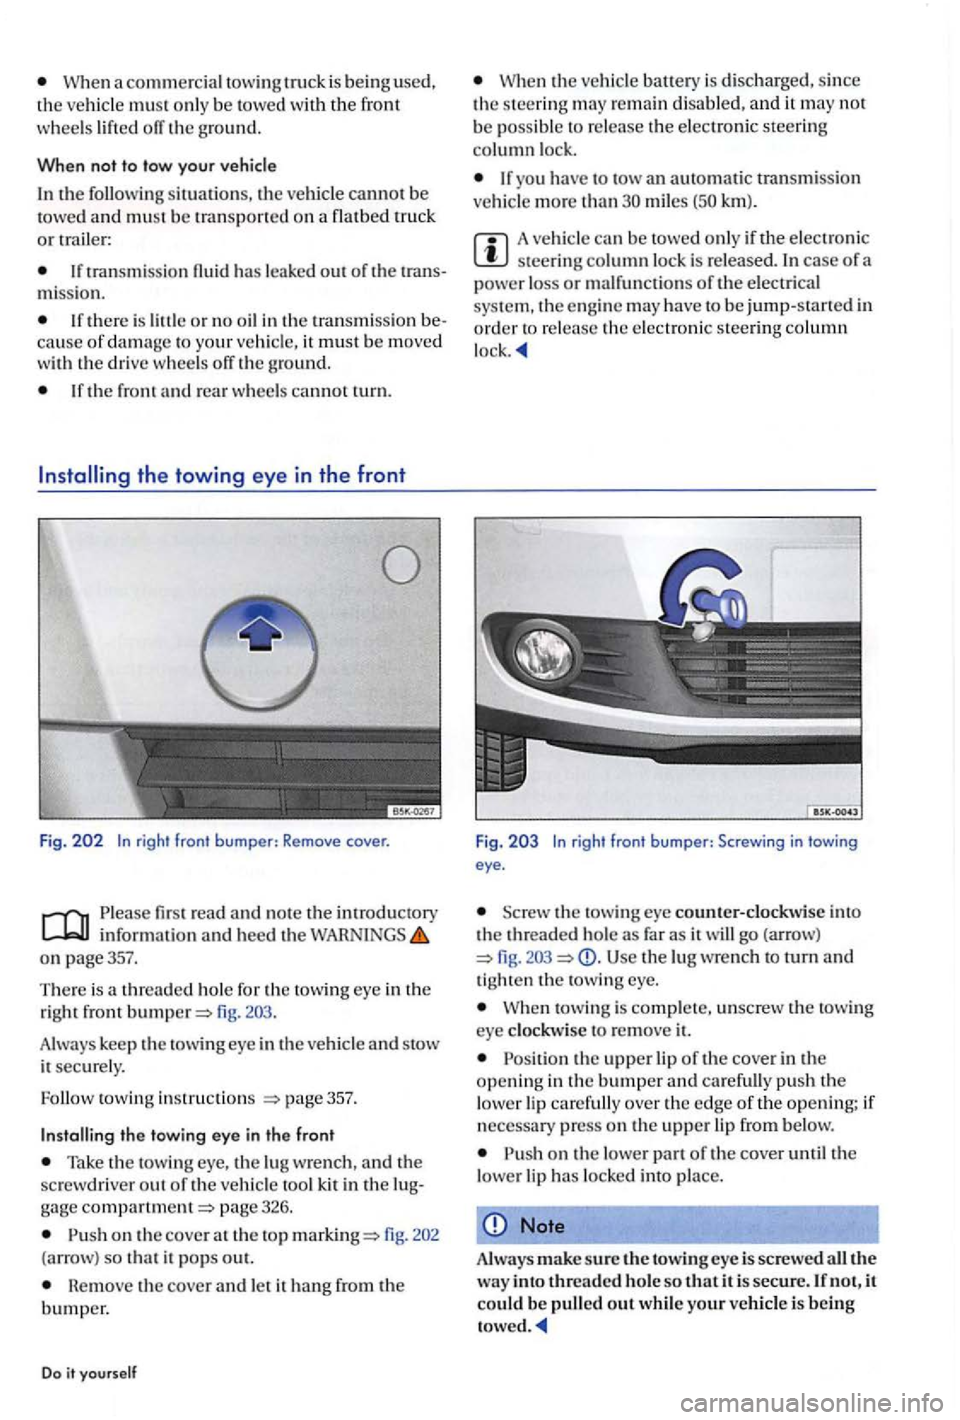
Fig . 202 In righ t front bumper : Remove cover.
read and note the introdu ctory information and heed the on page357.
T he re is a thread ed hole for
the tow ing eye in the
right front
Take the tow ing eye, the lu g wre nch, and the
sc rewdriver out o f the ve hicle too l kit in the page 326.
on the cove r at the top 202
(a rrow ) so that it pops out.
Remove the cover and let it hang from the bumper.
Do it yourself
the ve hicl e battery is disc harged, since the s teering re m ain disabled, and it may not be poss ibl e to release the elect ro ni c steerin g column lock.
If yo u have to tow an automatic tran smissio n
ve hicl e m ore th an miles km ).
A vehicle can be to we d onl y if the electro nic steerin g co lumn lock is released. In case of a
power loss or malfunc tions of the e lectrical
sys te m , th e e ngine may have to be jump-start ed in order to re lease the electroni c steerin g column
Fig . 2 0 3 In righ t front bumper: Screwing in t owi ng eye .
the tow ing eye counter-clock wise into the threaded ho le as far as it will go (arrow) Use the lug wrenc h to turn and tig ht en th e towing eye.
towing is compl e te, unscrew the towi ng eye cl ock wise to re m ove it.
on the lower part of the cover until the
lower lip has locke d into pla ce.
Note
Always make sure the towin g eye is screwe d all the w ay into threaded hole so that it is secure. If not, it could be pull ed out while your vehicle is being
Page 356 of 541
the towing eye in the rear
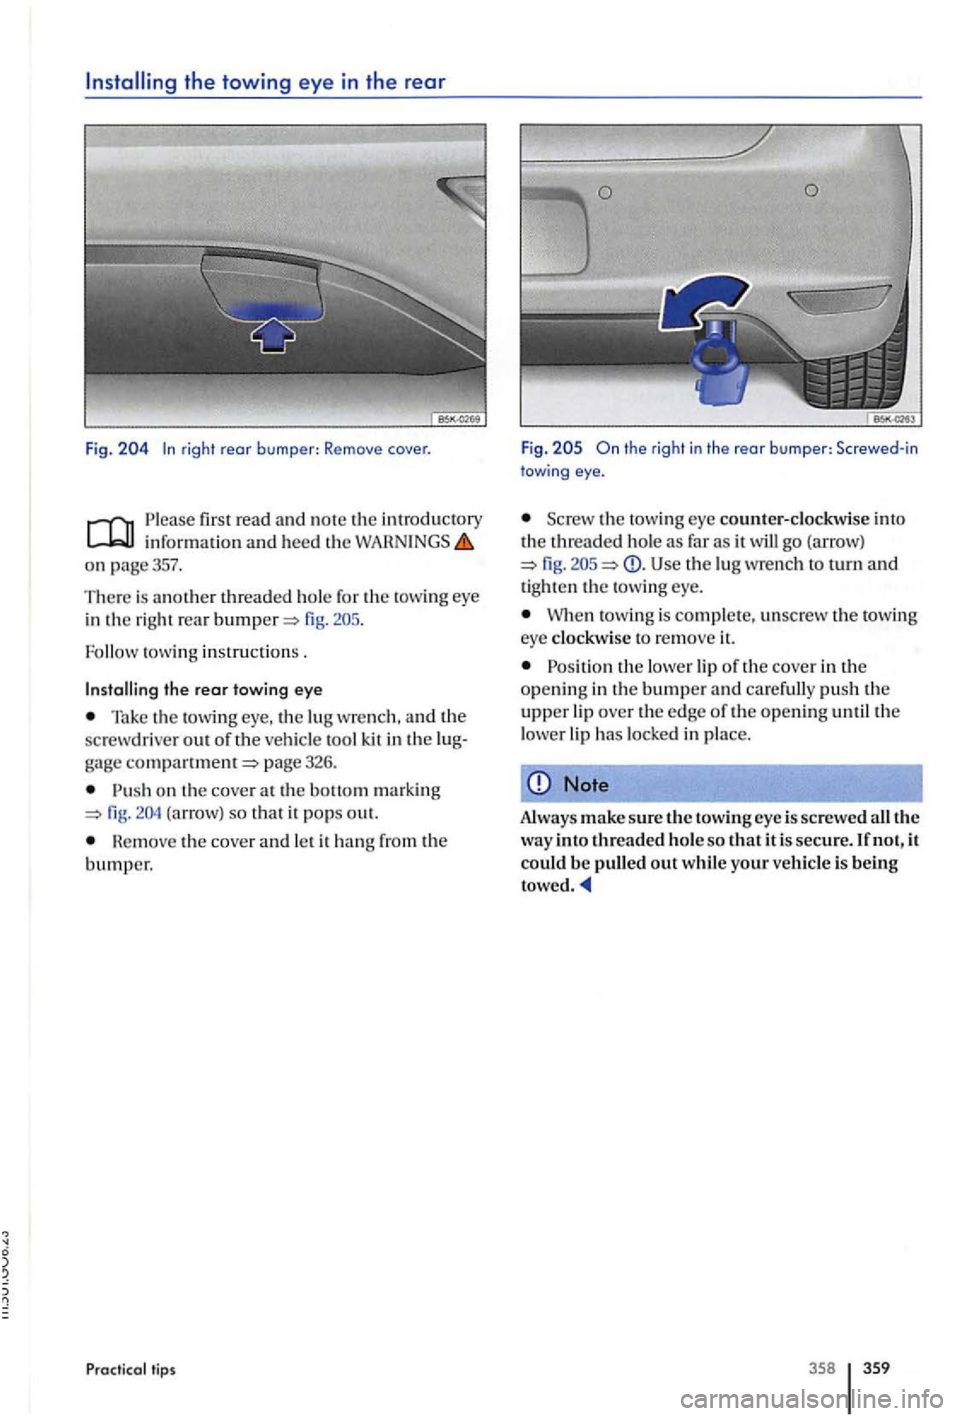
Fig. rig ht rear b umper: Remove cover.
P le ase first read and not e th e information and heed the
on page357.
The re is another threaded hole for the towing eye
in the right rear
tow ing instruction s .
the rear towing eye
Tak e the towing eye, the lu g w rench, and the
sc rewdrive r out of the veh icle tool kit in the
Pu sh on the cove r at the (arrow) so that it po ps out.
th e cover and le t it
tips
Fig .
the towing eye counter-clockwise into
th e threade d hol e as far as it will go (arrow) fig. Use th e lu g wrench to turn and tighten th e towin g eye.
W hen t owi ng is complet e, unscrew the towin g
eye clockwise to remove
Position th e lower lip of th e cover in th e
o penin g in the bumper and ca re full y push th e upper lip over the edge of th e opening until the
l ower lip has locke d in plac e.
Note
Always make sure the towing eye is screwe d all the way into threaded ho le so that it is secure . If n ot, it could be pulled out while your veh icle is being
358 359
Page 362 of 541
light bulb
License plate lamp .. ................. 35 1
light bulbs . . . . . . . . . . . . . . . . . . . 344 In front bumper ......... ............ 348
In
the body ............. ............
In the h ea d light ..................... 347
In th e r
ear hatch ....•................ 34 9
Tai
llights ....................... 349,
o il leve l ...................... 249
Driving safely ...... ............... 28, 29
Gell ing read y
..................... 28, 29
In an emergency ................
Lifting vehicle with jack . . . . . . . . . . 333, 334
Ligh t bulb re pla cement . . . . . . . . . . . . . . 346
Preparation s for changin g a wheel . . . . 331
Sa fe ty belts . . . . . . . . . . . . . . . . . . . . . . . . . . 72
Ti re mobility set. . . . . . . . . . . . . . . . . . . . . 338
Uphol stery ........................... 271
and th e Advanced Airbag System. . . . . .
anchorages..... 116
Sec urin g wi
th the Top Tether strap. . . . liB
safe ty lo ck . . . . . . . . . . . . . . . . . . . . . . . . 44
safety seat. . . . . . . . . . . . . . . . . . . . . . . .
the rear seat . . . . . . . . . . . . . . . . . . . . . lOB
seat
Booster
seat. . . . . . . .. . . . . . .. . . . . . .. . . 1L2
seat mounting................. 112
Infant carrier ........................
Securing wit h lo ckab le safet y belt . . . . . 114
Secu ring w ith safety b elt . . . . . . . . . . . . . 114
seats s eat mounting. . . . . . . . . . . . .
care. . . . . . . . . . . . . . . . . . . . . . . . . . . 267
lig h ter. . . . . . . . . . . . . . . . . . . . . . . . 169
Als o see: A ir co nd itio ning . . . . . . . . . . . . 226
sunroof . . . . . . . . . . . . . . . . . . . . . . . 51
Rear hatch . . . . . . . . . . . . . . . . . . . . . . . . . . . 47
Vehicle . . . . . . . . . . . . . . . . . . . . . . . . . . . 39,
hooks . . . . . . . . . . . . . . . . . . . . . . . . . . . . 165
.................................. 6
number . . . . . . . . . . . . . . . . . . . . . . . . . . 327
we ight
Determination (North America) .......
spare wheel
Dr iving style
........................ 288
. . . . . . . . . . . . . . . . . . . . . . . . . . . . . . . 19
information . . . . . . . . . . . . . . . . . 3ll
units . . . . . . . . . . . . . . . . . . . . . . . . . .
Engine coolant . . . . . . . . . . . . . . . . . . 252
Co
unter-steering assista nce. . . . . . . . . . . . .
h o ld er
Front center co nsole. . . . . . . . . . . . . . . . . 166
Rear center co nsole ................. . 167
weight . . . . . . . . . . . . . . . . . . . . . . . . . . .
D
Data recorded b y control units . . . . . . . . . .
Data recorded whil e driving. . . . . . . . . . . . .
Data recorde r . . . . . . . . . . . . . . . . . . . . . . . . . .
Dayt ime running lights. . . . . . . . . . . . . . . . . 124
Dynamic
Page 369 of 541
Reve rse camera .........................
Roof rack .............................. 149
Run -flat tires
Code ................................ 291
s
.................................. 178
belt height adjusters ............... 75
b elt load limit er ................... 78
belt position ...................... 74
b elt preten sioncr .................. 78
belt retractor ...................... 78
belts .............................. 67
Belt pos ition .......................... 74
Belt sta tu s display.................... 68
Checklist ............................. 72
C leaning ............................ 275
Extende r ............................. 76
Faste ning ............................ 73
Lockab le sa fe ty belt ................... 72
No t fas tened......................... b elt height adjuste rs ............ 75
b elt load limiter. ................ 78
belt prete nsioner ............... 78 belt retractor ................... 78 Twisted belt .......................... 72
Unfa stening .......................... 73
U sin g ................................ 72
Wa rnin g light. . . . . . . . . . . . . . . . . . . . . . . . 68
b elt s protect . . . . . . . . . . . . . . . . . . . . . . 7 1
continents ........ 312
heating............................ 65
position
Imp roper seating positions ............ 57
.................................. 56
Secu ri
ng a load
Roof rack. . . . . . . . . . . . . . . . . . . . . . . . . . . . 15 1
Selector lever lock ..
.................... 183
th e vehicl e . . . . . . . . . . . . . . . . . . . . . . . 4
reminder display. . . . . . . . . . . . . . . .
Settin gs
A ir
conditioner ...................... 231
paddles
T ipt ronic
............................ 185
Alphabetical index
Shiftin g ................................ 179
Auto matic transmis sion .............. 182
Eme rge ncy relea sing of the selector leve r. .
325
Gea rs hif t lever (
manual transmi ssion) . 182
Manual tra nsmiss ion ................. 182
Selector lever (automati c trans missio n) 182
Warnin g and indicator lights ..........
Curtain Protection
see Airbag system . . . . . . . . . . . . . . . . . . . . 98
Sitt in
g................................. 56
Adjust ing hea d restra ints .............. 61
Adjusting th e s teeri ng w heel position.. 63
Electrically adjus table front seat.... . . .
In stalling head restrai nts . . . . . . . . . . . . . 62
Mecha nica l front
seat . . . . . . . . . . . . . . . . 59
Number of seats . . . . . . . . . . . . . . . . . . . . . 56 sea tin g pos ition... . . . . . . . . . . . . 58
Rear backre st
........................ 143
Remov ing head restra ints . . . . . . . . . . . . . 62
heating. . . . . . . . . . . . . . . . . . . . . . . . . 65
chains . . . . . . . . . . . . . . . . . . . . . . . . . . 295
Compact spare w heel . . . . . . . . . . . . . . . 295
parts. . . . . . . . . . . . . . . . . . . . . . . .
consid era tion s
Car wash . . . . . . . . . . . . . . . . . . . . . . . . . . . 263
Dr iving with a trailer
................. 156
Foldi ng m irror in
.................... 136
....... .................. 189, 192
park ing
.............................. 33
e mi ssion ..................... 241 Towi ng. . . . . . . . . . . . . . . . . . . . . . . . . 357, 358
Vehi cle was hing . . . . . . . . . . . . . . . . . . . . 263 W ashing ve hicle . . . . . . . . . . . . . . . . . . . . . 42
Page 454 of 541
Message The playback can skip on poor roads or dur-ing severe vibration .
CD
CHECK CD
TEMPERATURE
in serted.
cannot be played .
A different audio source is
played .
Mechanical defect
in
------------------
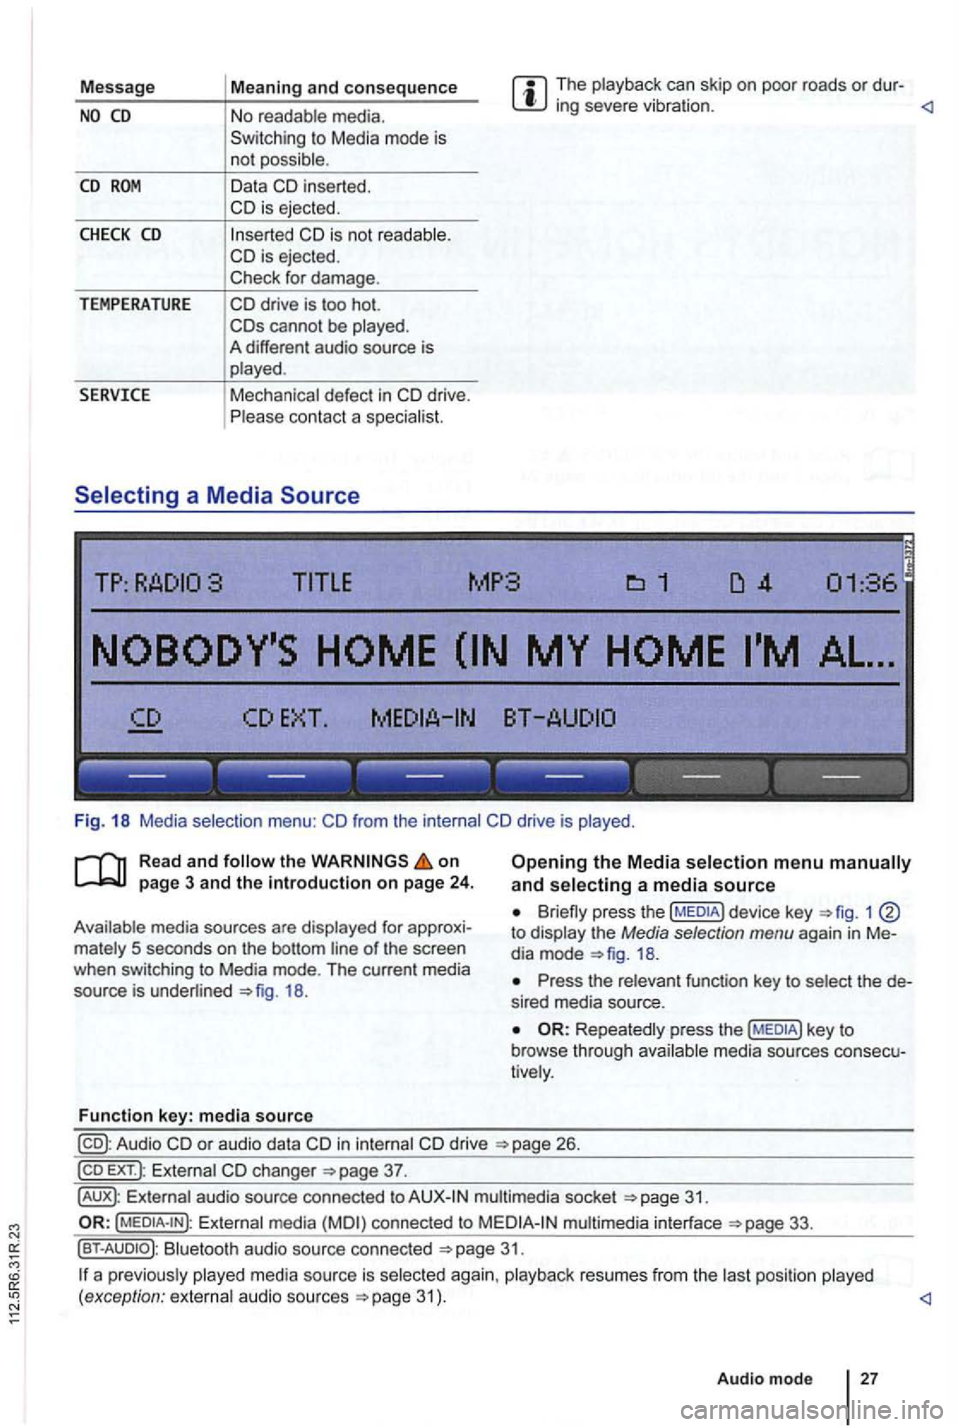
Fig. 18 Media selection menu:
the on
18.
Function key: media source
Opening the Media selection menu and selecting a media source
1 to display the Media selection menu again in Me
dia mode
Press the relevant function key to select the de
s ired media source.
Repeatedly press the media sources consecu
tively .
in internal drive 26.
EXT .): External changer
audio source connected to multimedia socket
Externa l media connected to multimedia interface
Bluetooth audio source connected 31.
a p reviously 31 ) .
Audio mode
27
Page 455 of 541
------------------
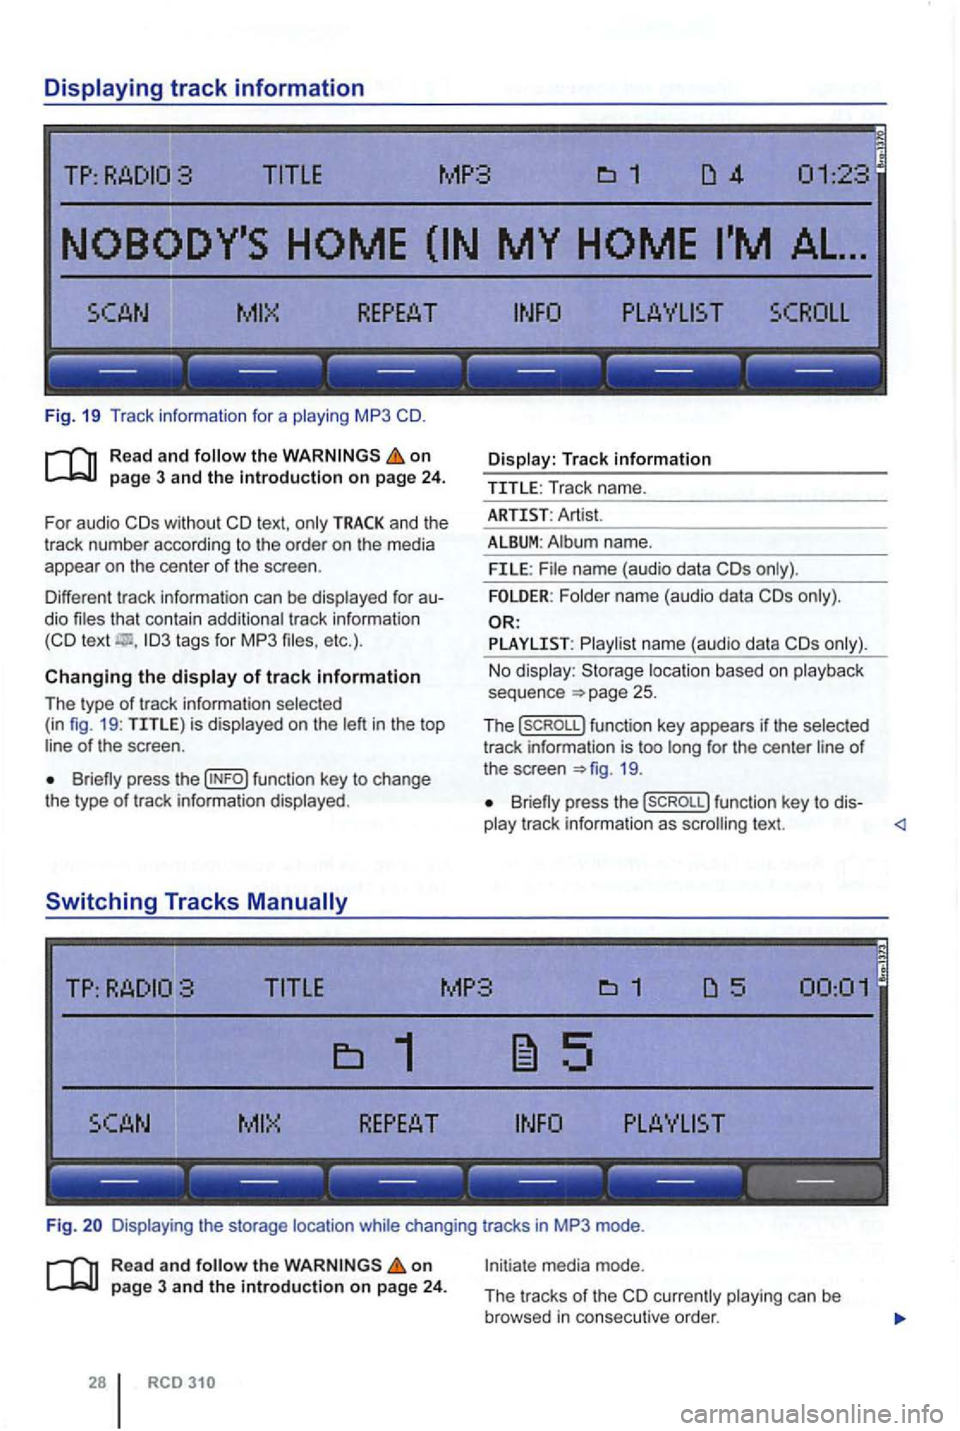
Fig. 19 Tr ack information for a playing MP3
on
and the
t rack number according to the order on the media
appear on the center of the scree n.
Different tr ack information can be displayed
for au
dio files that contain add itiona l tr ack information
Briefly press the
Display : Track information
TITLE : Track name.
ARTI ST: Artist.
ALBUM: Album name.
FILE: File name (audio data
Folder name (audio data
PLAYLIST : P lay list na me (a udi o data
loca tion based on play back
seq uence 25 .
The (sCROLL) funct ion key appears if the selec ted
track information is too long for the center line of the screen 19.
Briefly press the (SCROLL) function key to dis-
play track information as scrolling text.
Fig. Disp laying the storage location while changing tracks in MP3 mode .
Rea d and the on page 3 and the introduction on pag e 24.
RCD
Initiate media mode.
The tracks
of th e currently playing can be
browsed in consecu tive order.
Page 531 of 541
miles or one yea r after last service, whichever occurs first.
AdBiue® Fluid: Check and add if necessary engine only)
Air
cable)
Body : Visua l inspection for corrosion
Brakes : sorber for leaks and damage, check thickness of
b ra ke pads, brake disc cond itio n and chec k br ake
flu id
r oof, roof, a n d hard top : Check for func tion and damage, clean
and (if
joints : Check for leaks and damage
turer work proced ure;
thereafter ment becomes necessary . Subsequent DPF is a minimum of thereafter. and engine
Door checks and mounting pins: lubricate
(if
Engine: Change
and damage
Engine and engine compart ment co mponents :
Check (from f or and damage , check
t r ansm ission , drive, and drive shaft boots
Exhaust system : Check for damage, and
secure fittings
and
daytime running ing, and automatic Check adjustmen t
Hybrid components : Perform a tion of high
and box cigarette
lighter /power outlets , horn, and
Check
lighting : F ront and rear partment turn and hazard warning Check
Rear window: Check (if
Ribbed Check condition
Reset
ice on the service sticke r and to th e drive r's
side door
engines except
and (if
Test drive: Check braking, kick-down, steering,
Tie rod ends : Check for excessive check
boots
Timing Check and if necessary check
every not at check every
Tires: Check tread depth, condi tio n, wea r spare)
Tires: Rotate fron t to rea r
(non Automatic) : Change
fluid and (if
under underbody
trims . pipe and
Windshield washer,
and add if nec e ssary