2004 VOLKSWAGEN GOLF steering wheel
[x] Cancel search: steering wheelPage 187 of 444
Convenience
Door open
ATA confirm
Conv. mode
Mirrors
adjust
Fa cto ry setti ng
Back
Booklet 3.1 and Equipment
Function
The ve hicle locks doors w he n the veh icle is m ov ing and unl ocks the doors w hen the key is remo ved from the ig n ition lock.
The activation of the q ui red.
Co nve
nience operation of the po wer windows: determines if the drive rs doo r window , windows or no window s ho ul d be ope ned when th e ve hicle is unlocke d. This function can only be activa te d
via the drive r's door.
The front passenger sid e mirror be adjusted automatically
of these fu nctio ns to the ori gin al factory ring s.
men u.
The menus shown in the dis p lay de pends on th e
ve hicle electron ics and the option s
Lights & Vision menu
Vario us se ttings can be made for vehicle Lighting
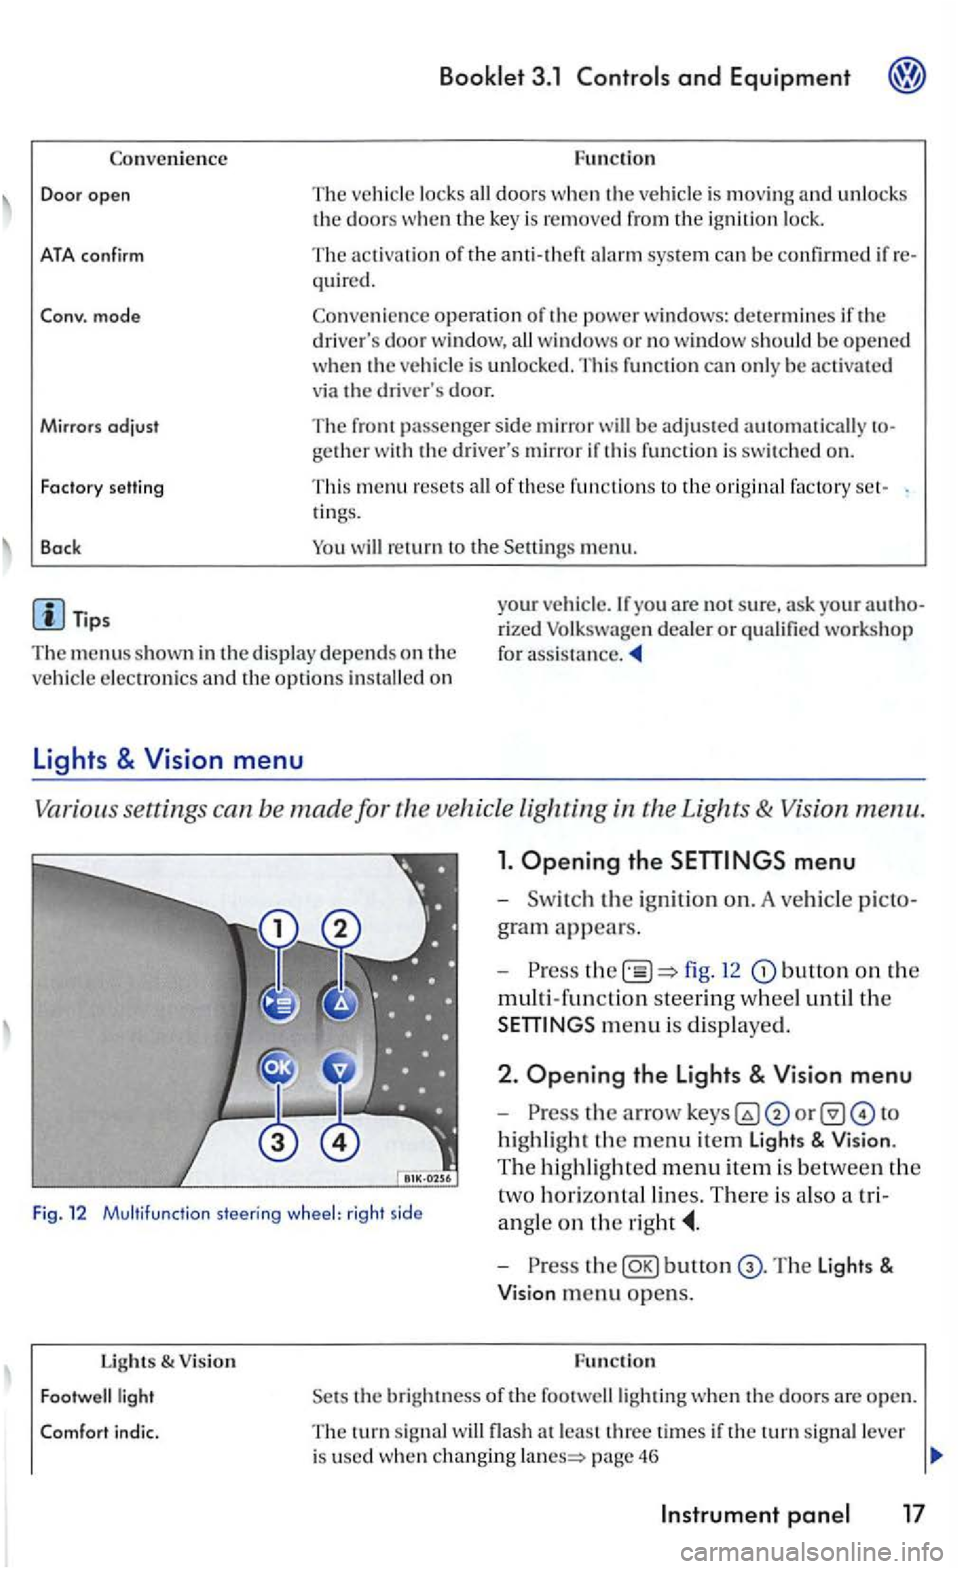
1. Opening the
fig. 12 button on the
multi-fun ction steering w hee l until th e
m enu is dis played .
Fig. 12 Multifu nctio n steering wheel: rig ht side
2 . Opening the Lights & Vision menu
-
highli ght the m enu item Light s & Vision .
T he hi ghli gh te d m e
nu item is be tween the
t
wo h orizontal lin es. There is als o a tri
a n gle
on the
Lights & V ision
bunon
the bright ness of the footwelllighting when th e doo rs a re open.
T he turn sig nal flash a t le ast thre e time s if the tu rn sig nal lever
i s used whe n changing page 46
Page 188 of 444
Booklet 3 .1 Controls and Equipment
Functio n lights & Vision
Factory setting This menu resets all of these functio ns to the original factory tings.
Back Heturn to the m enu.
Tips
The menus shown in the dis play depends o n ve hicle electronics and the options installed on
Applies to with sound system
Sound system menu
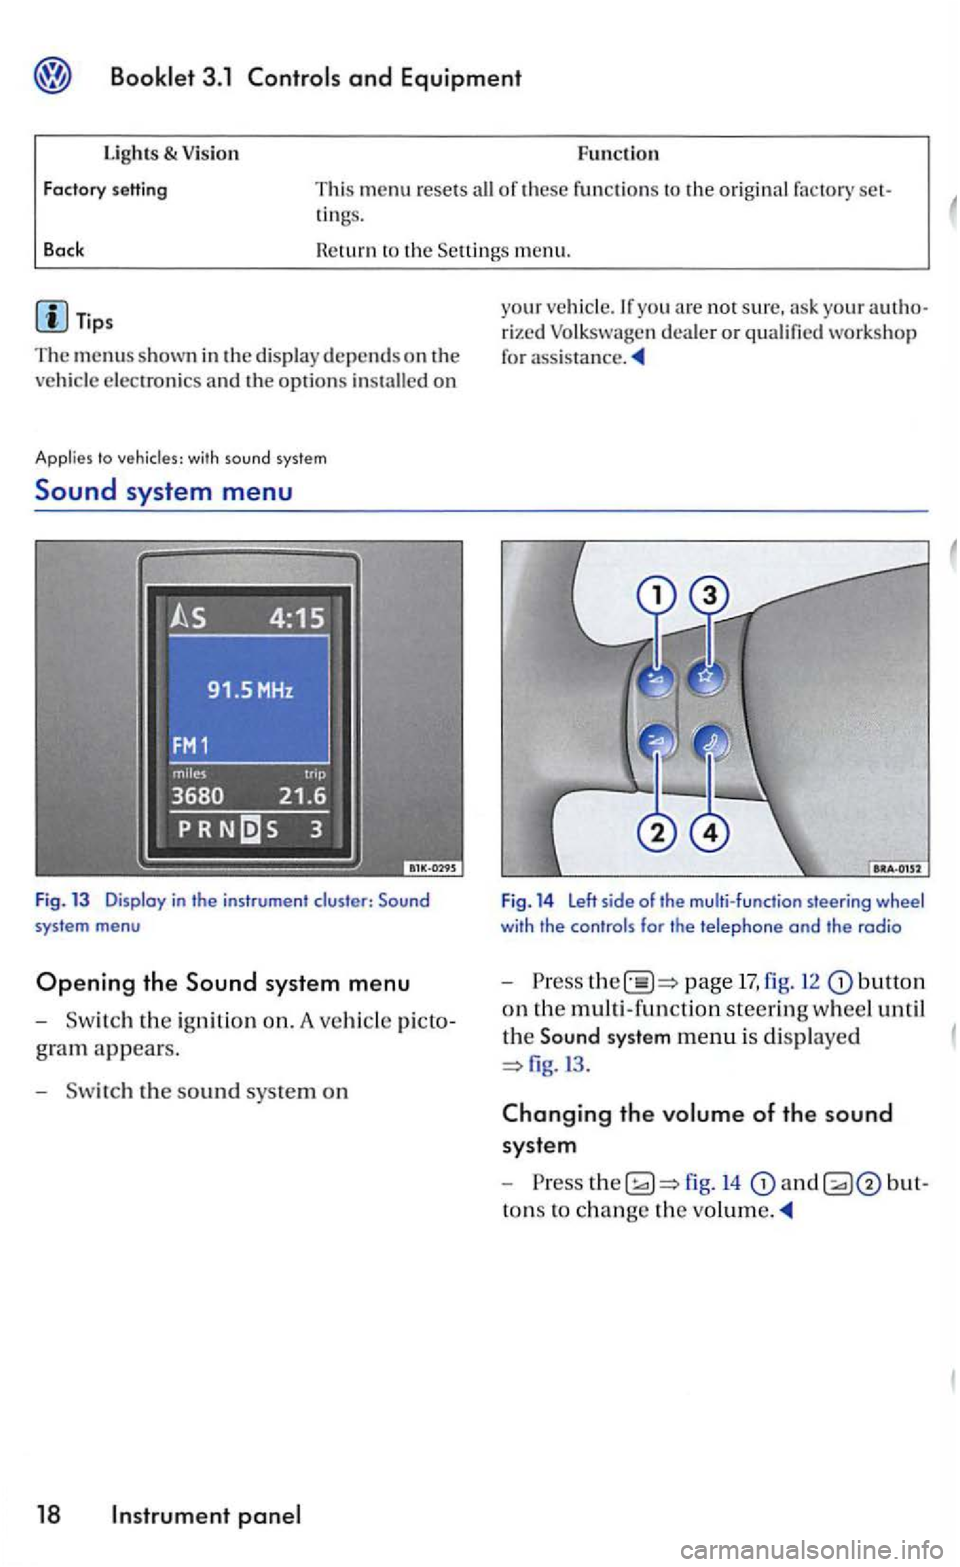
Fig. 13 Display in the instrument cluster:
gram appears.
- Sw itch the s
ound sys te m on
18 panel
your veh icle.lfyou arc not sure, your rized Volk swage n dea ler or qualified workshop
for
Fig. 14 Left side of the multi-function steering wheel with the controls for the telephone and the radio
-Press page 17, fig. 12 butto n
on th e multi -functio n steerin g wheel until
th e
Sound system menu is di splaye d
fig.l3 .
Changing the volume of the sound
syste m
-
to ns to ch ange the
Page 190 of 444
and Equipment
Applies to with multi-function indicotor
Multi -Function
The Multi -Function Indica tor (MF!) shows you various trave l data .
tion
The MF l is equipped with two automatic
m e
mories: 1- Trip m emory and 2 -To ta l
j o
urney m em ory. The se lected memory
w
ill be s hown in the uppe r r ight-hand
co rner
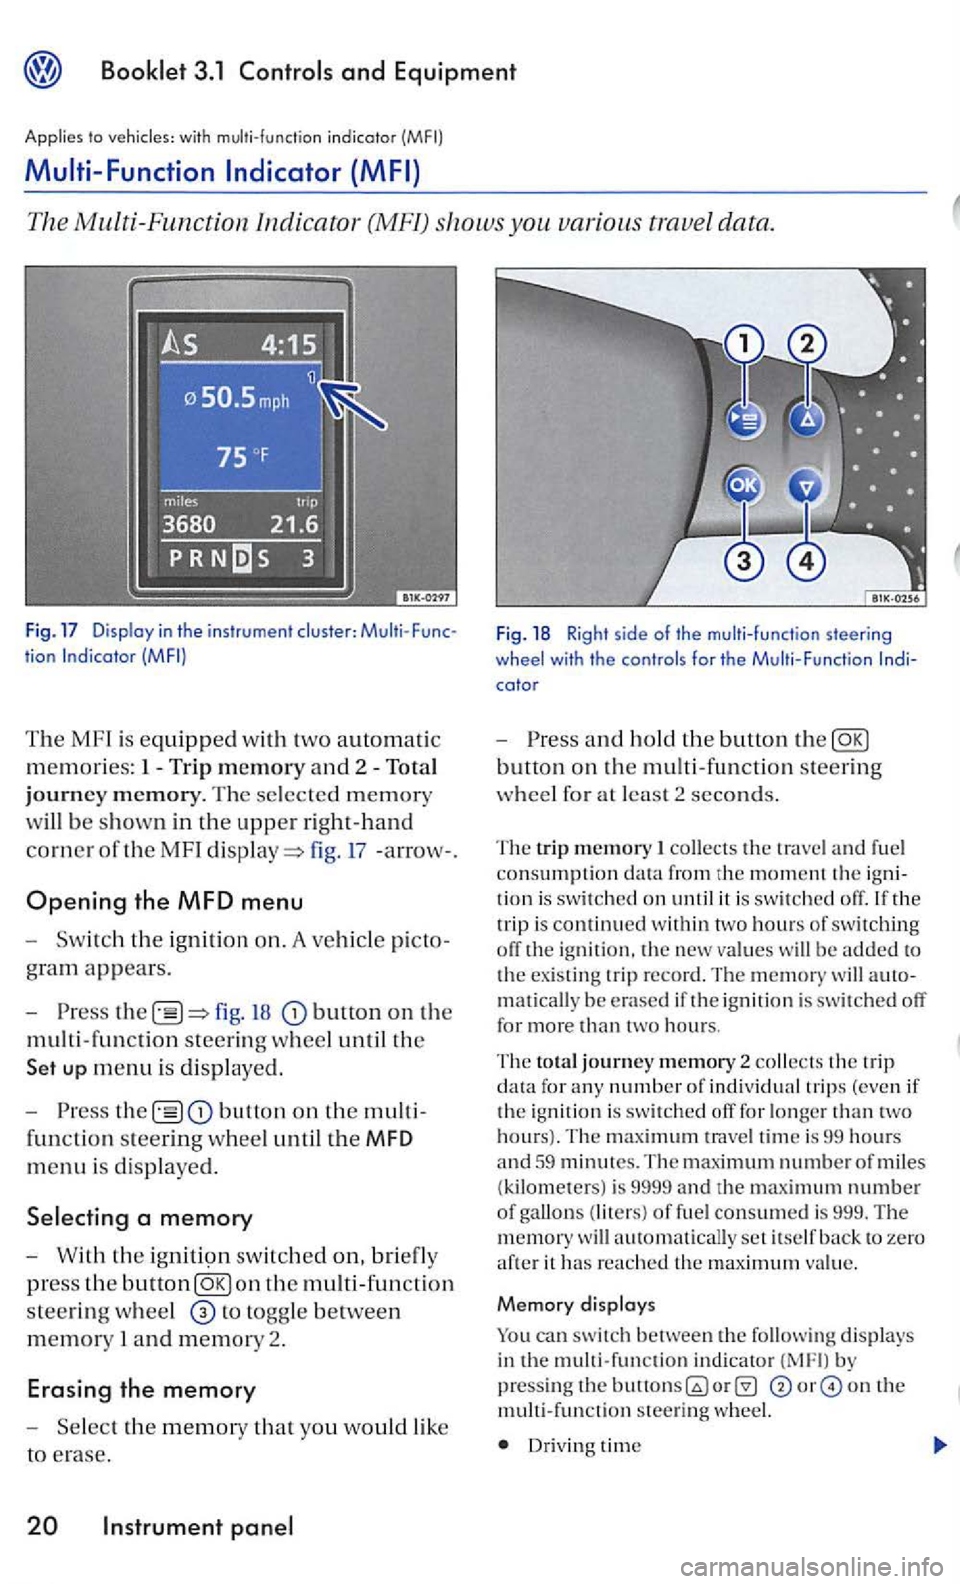
oft he MF I fig. 17 -arrow- .
Opening the MFD menu
t h e ig nition on. A ve hicle picto
gram appears.
fig. button on the
m ult i- fun c
tion steering wheel until th e
up menu is di spl ay ed.
the button on th e multi
functio n st
eering wheel until the MFD
menu is displaye d .
W ith th e ig n iti9n switch ed on, briefly
press the button
to togg le between
mem ory I and memory 2.
Erasing the memory
Fig. 18 Righ t s ide of the multi-func tion steering
wheel with th e controls for the M ult i-Function
a n d ho ld t he butto n th e
collects the trave l a nd fuel
consumption the trip i s continued w ith in tw o hours of switching off the ig nition. th e new value s w ill be added to
t h e existing trip r ecord. The m emory will matically be e rased if i gnition i s switch ed off for more than two hours.
The to ta l journey m em ory 2 collects the trip data fo r any number of individ ual trip s (even if
t h e ignition is swi tched off for longer than tw o hours). T he trave l tim e is 99 hours and 59 minutes. The maximum number of miles (kilometers) is 9999 and th e maximum number of gallon s (liters) of fue l consumed is 999. The w ill automatically set itself back to zero aft e r it has re a ched th e maximu m value.
M emory d isplays
can switch between the follow in g displays in th e multi-function indicator b y pressin g the on th e mult i-func tion s teering wheel.
Dr iv in g time
Page 191 of 444
and Equipment
Average ruel co nsumption
Miles to empty
Distance trave le d
Average speed
S peed warning
min Driving time
Th e
displa y shows the amount or time that has gone by s ince the ig nition was sw itched on.
The m aximum displa y va lue in both memories
i s 99 hours and 59 minutes. The memory will reset itselrback to zero once thi s va lue has been rea ch ed.
gallons miles km) Current fuel con
sum ption
Th e di spla y w
ill sh ow the consumptio n in gallons (liters) per
book le t3.2 and chapter
0 gallons/100 miles (0 km) Average fuel
consumption
T he ave rage ruel c
onsumption will appear you have drive n approximately ya rds
(meters). Dashes w ill appear in th e displa y that time. The di spla y
Miles Miles {kilometer s) to empty
Th e m il
es ( kilom ete rs) to empty is calc ulated
u sing th e ru el ta nk contents and current ru el consumption. shows how rar the ve hicl e can travel u sin g the same speed and dri ving co ndi
ti o ns as
yo u have
dri ven approxi mately yards ( mete rs).
Dashe s w ill appear in the dis p lay until that time. The disp lay will b e updated every 5 seconds
while the ve hicle is m ov ing.
Speed warning
Th e s
peed wa rning can be set so yo u will see and hear wa rnin g whe n yo u reach the desired speed . For example. this settin g co uld be used to
l e t yo u know iryou exceed the posted speed
limit. When you r eac h the desired sp eed. press on th e multi
fun ction steering wheel. and hold th e button to erase th e sto re d speed.
temperature di splay
T he t e
mperature range is F to to At outside tempera ture s be tween-F and and a (ice warning) appears in addition to the outs id e tempera ture di splay. Thi s symbol ro r approximately 5 seconds and
F
W he n the ve hicl e is s tanding still o r tra velin g at
very low speed s, the temperature di spla yed may be slig htl y hi gh er than the actual outsid e te m
p erature as a result or heat radiate d rrom the engin e.
Roads and bridges can be dangerously icy even the outside air temperature is above r r eez ing.
Jryou use th e outside temperature di sp la y
t o tell you about rrost conditions, remember that roads can even ice over at temperatures above F (+
A lways remember, eve n if the
Neve r rely exclu siv el y on this the outsid e temperature display.
Always reduce your s peed and dri ve with special care under weathe r conditions w hen the c hances that you will encounter icy road surfaces a re greater.
In strument 21
Page 194 of 444
Press button.
Compass
+ 1
-1
Bock
Tips
In display F uncti on
T he
name of the d is played menu
Increase th e set value b y I
Decreases th e set val ue by I
The Compa ss menu closes and t he last di sp layed menu opens aga in.
T
he menu s s hown in t he display depend s on the
ve hicle electro nics and the options in stalled on
yo ur ve hicle. If you are not s u re, ask your rized Volkswagen deale r or qualified work s hop for
Steer ing
Applies to vehicles: with multi-function steer ing whee l
These contro ls let taking your hands off
the steering wheel.
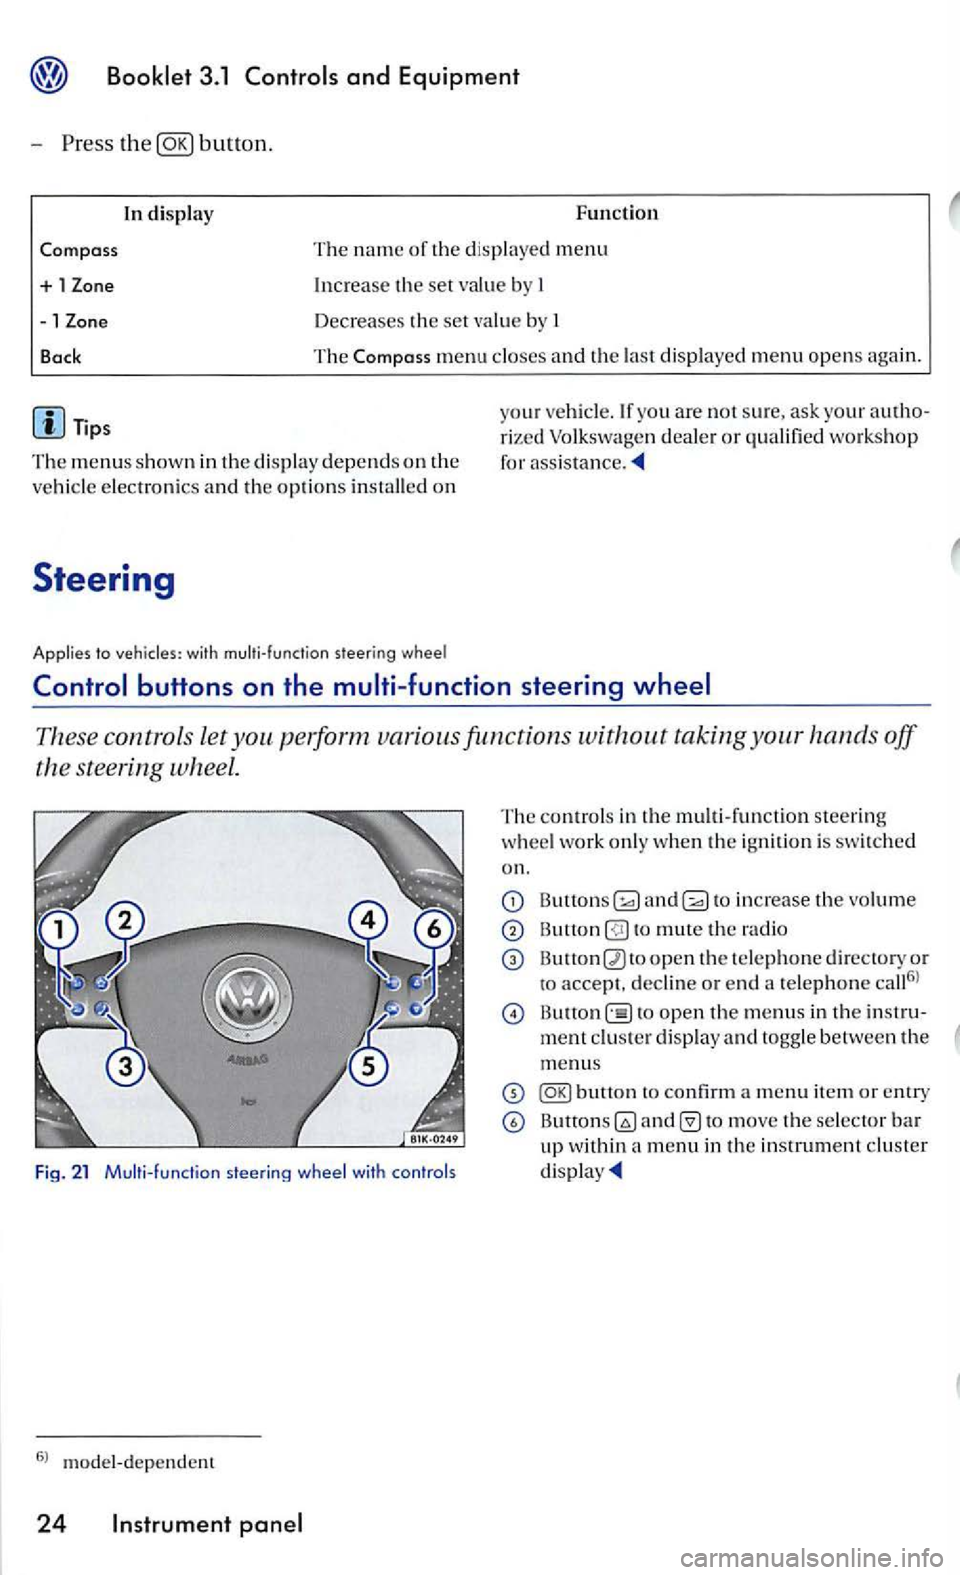
Fig. 21 Multi- funct ion
The contro ls in th e m ult i- fun ctio n steering
w heel work only when the ignition is swi tched
on.
and to increase the vo lume
to mute th e radio
open th e te le phone d irectory or
to accept. decli ne or e nd a te lephone call6
l
open th e menus in th e
to move the selector bar up within a menu in th e in strument cluster
Page 195 of 444
Applies to vehicles' with
and drive 1:
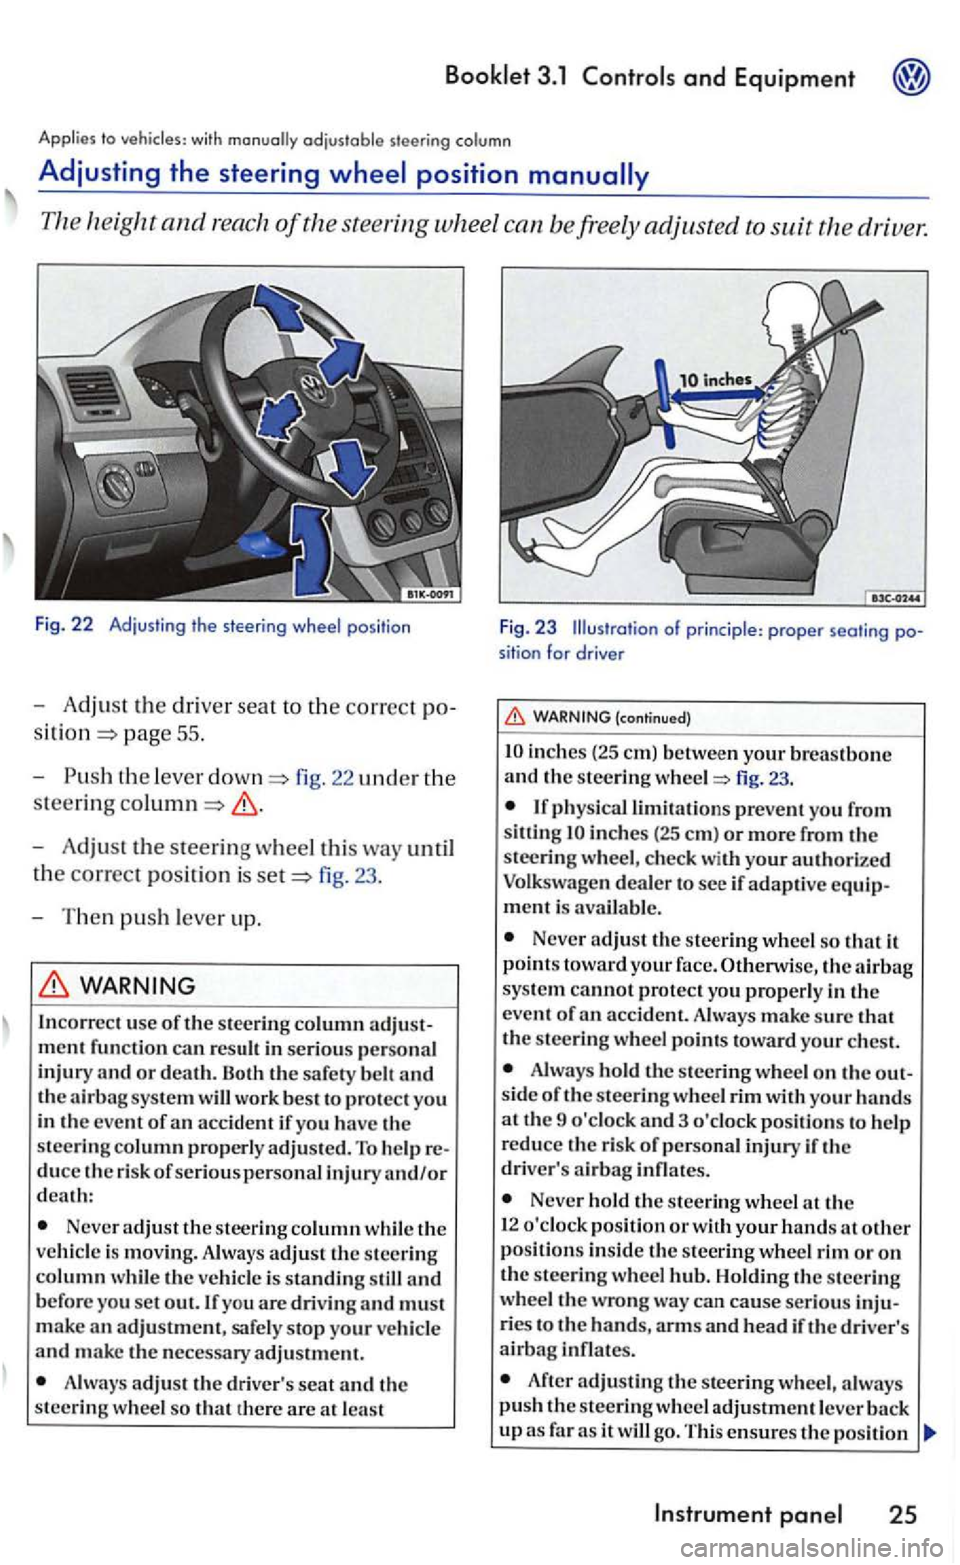
Fig. 22 Adjust in g t he s tee ring wheel pos itio n
-Adjust the dri ver seat to the correct po
pag e 55 .
- Push
the leve r fig. 22 uncl er the
steering
-Adjust the steering wheel this way until
t h e
correct posit ion is fig. 23 .
- T hen
push lever up.
WARNING
In correc t use of the stee ring column
Neve r adjust the steer ing column while th e
ve hicl e is movin g. Always adjust th e steering column w hil e th e veh icle is standing still and b efore you set out. If you are drivin g and must
m ake an adjustment, safe ly stop your ve hicl e and make the necessary adjustment.
A lways adjus t th e driv er's seat and th e
steering w hee l so that th ere are at lea st
F ig. 23 Illustration of princi ple : proper seati ng position for drive r
(continued)
inch es (2 5 em) betwe en your breastbone and th e s teering fig. 23.
inches (25 em ) or more from the
steeri ng w heel, c hec k with your authori ze d
Volkswagen deale r to see if adaptive equipment is avai la ble .
Never adjust the steering wheel so that it
p oin ts toward your face. Otherwise, the sys te m cannot protect yo u properly in the
e ve nt of
Alwa ys hold the s teering wheel o n the out
s id e of the s teering whee l rim with your hands at th e 9 o'clock and 3 o 'clock pos itions to help
r educe th e risk of p ersonal injury if th e
driver' s
Never hold the stee rin g wheel th e
1 2 o'clock pos ition or w ith your hands at other position s in side th e s teering wheel rim or on the steerin g wheel Holdin g th e s teerin g
wheel the wrong wa y ca n cause serious inju
ries t o the hands, arm s and hea d if the driver's airbag infl ates.
After adjusting the stee rin g wheel, a lwa ys push the s teerin g wh eel adjustment leve r
Instrument
Page 197 of 444
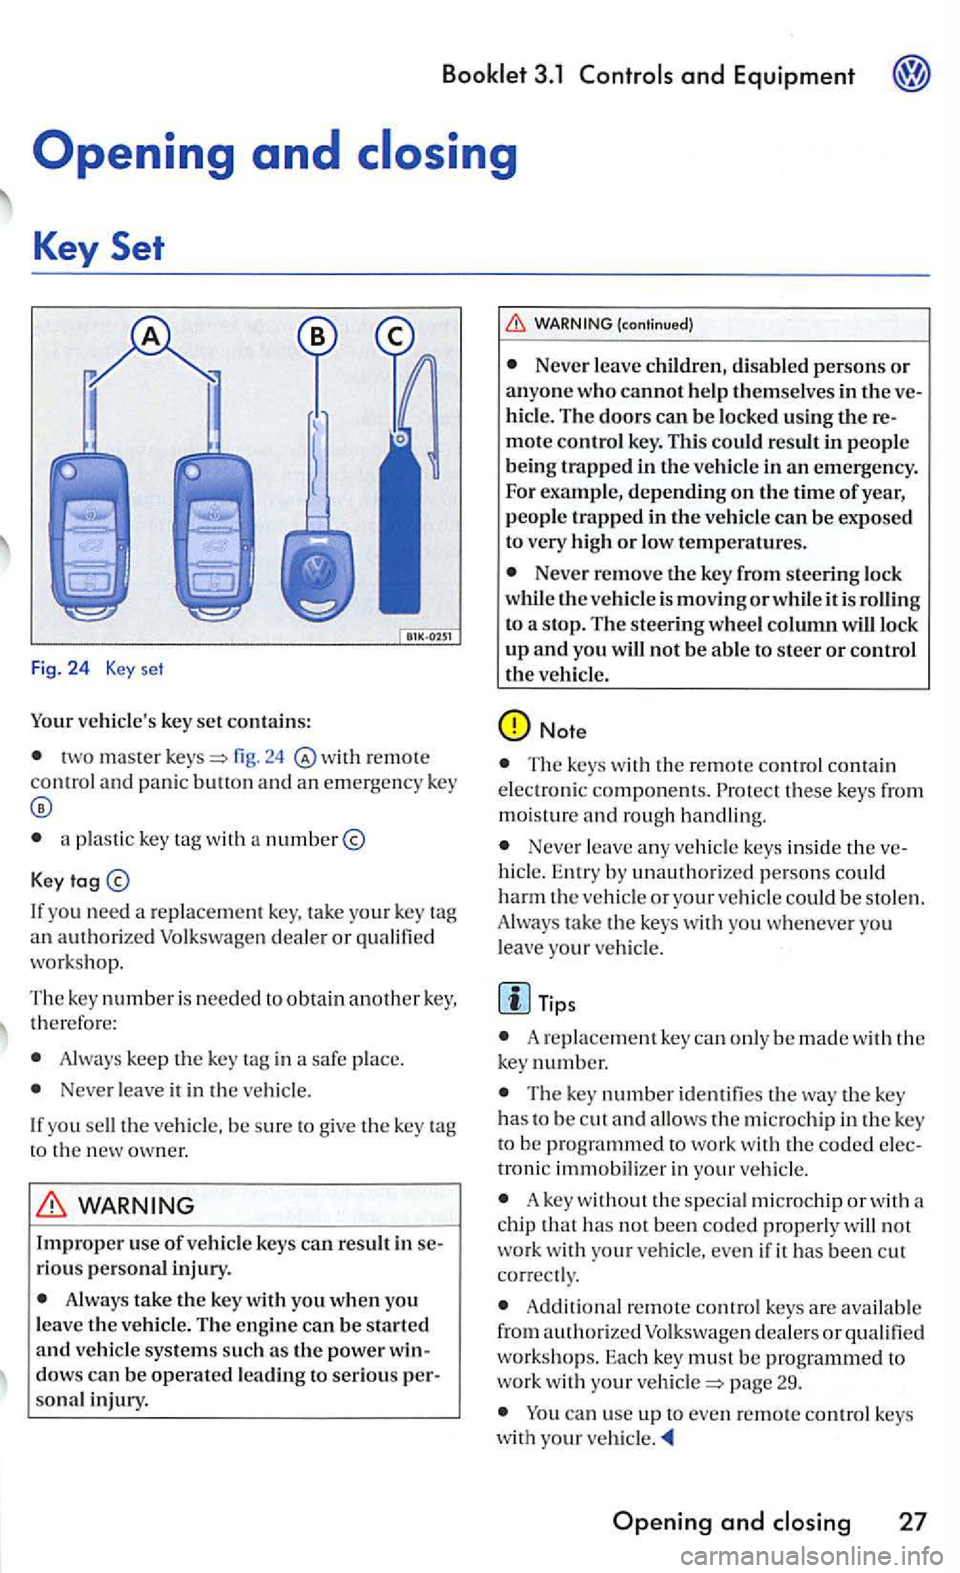
Your vehicle's key set contains:
two master r e mot e control and panic butt on and an emergency key
a plastic key with a number@
Key
If yo u n eed a replace ment ke y. tak e your key
work shop.
The key numbe r i s needed to obtain another key, th erefo re:
Always keep the key tag in a safe place.
Ne ver leave it in the ve hicle.
I f
you sell the ve hicl e. be sure to giv e the key
sonal injury.
(continued)
Neve r leave ch ildren, disabled persons or anyone who cannot help themselves in the hicl e. The doors can be lock ed using
or low tempera tures.
Never remove the key from steering lock
w hil e the vehicle is moving or while it is rolling
to a stop. The steering wheel column will lock up and you will not be able to steer or control the veh icle.
Note
Th e keys with the remote control contai n
e lec troni c component s. these ke ys from
m oisture and rough handling.
Never leave any ve hicl e keys insid e th e hicl e. Entry by unauthorize d pe rso ns co uld harm the vehicl e or your vehicl e cou ld be stol en .
Alway s take the keys with you whe neve r you
l eav e your ve hicl e.
Tips
A re pla cement key ca n only be made w ith ke y number.
The key number identifie s the key has to be c ut and allo ws micro chip in the key
troni c immobilizer in your vehicle .
A key without the special microchip or with a
c hip that has not bee n coded properl y will not work wi th you r vehicle, even if it has been c ut
co rrect ly .
A dd ition al remote contro l keys are availab le
from authori zed Volk swage n dealers or to work with your pag e 29.
ca n use up to even remote co ntrol keys
w ith your
Opening and
Page 198 of 444
3.1
key
Locking and
remote control key can lock and unlo ck the vehicle from a distance.
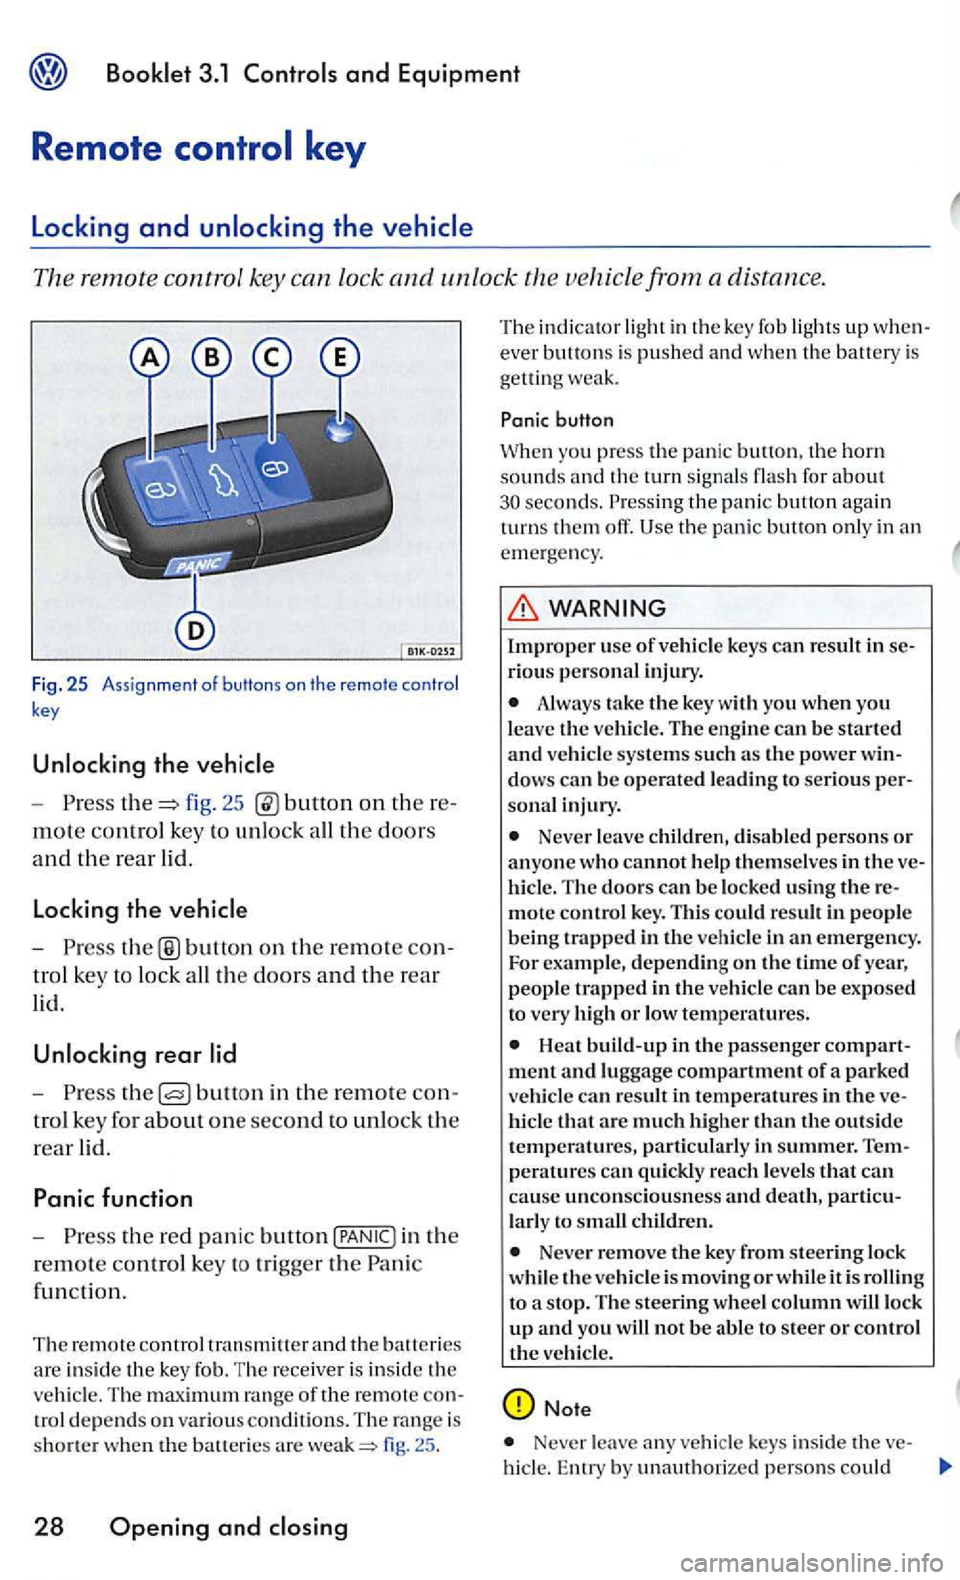
Fig. 25 Ass ignment of butt ons on the remote control
key
- P res s fig. 25 on th ere
mote control key to unl ock all th e doors
and th e rear lid.
Locking the
-button on the rem ote con
t ro l key to lock all the doors and the rear
lid.
rear
-Press bullo n in the re mote con
tro l key for a
bout one second to unlock the
rear lid.
Panic function
-Press the red pani c button in the
r
emote co ntrol key to tri gge r the Pan ic
fun cti
on.
Th e remote control
fig. 25 .
28 Opening and
T he ind ica tor lig ht in th e key fob ligh ts up w hen
ever bu tto ns is pushed a nd when th e batt ery is
get ting weak.
button
Whe n you press the panic the horn sounds the turn signal s flas h for about the pani c button again
turn s them off.
WARNING
Improper us e of vehicle keys can result in serio us perso nal inj ury .
Always take the key with yo u when you leave the ve hicle. The engine can be started and vehicle systems su ch as th e power win
dow s can be operated l ead ing to seri o us person al in ju ry.
Never leave childr en, disabl ed p erson s or anyone who cannot help them selves in t he ve
hi cle . The doors can be locked using the re
mote control key. T his co uld result in peo pl e
being trapped in th e vehicl e in an emergency.
For example, depending on the time of year, people trapped i n th e vehicl e can be exposed
t o very high or low tem peratures.
hicl e that arc much high er than the outside temperatures, particularly in summer. T empe ra tures can quickly reac h levels that can
cause uncon scio usnes s and death, partic u
l a rl y to sm all children.
Neve r remove the key from steering lock
whi le th e vehicle is mov in g or whil e it is t o a s top. The s teering wheel column wiU lock up and you will not be a bl e to steer or control the veh icle.
Note
Never leave any veh icle keys inside the ve-
hicl e. En try by unauth orized persons could