Page 330 of 506

324
2004 SIENNA from Aug. ’04 Prod. (OM45422U)
If the direction is not indicated or the
system does not operate properly, contact
your Toyota dealer.
Compass sensor
The compas")
04 SIENNA_U (L/O 0408)
324
2004 SIENNA from Aug. ’04 Prod. (OM45422U)
If the direction is not indicated or the
system does not operate properly, contact
your Toyota dealer.
Compass sensor
The compass sensor is on the roof of
the vehicle.
NOTICE
Do not put magnets or a metal object
on or near the roof of the vehicle.
Doing this may cause malfunction of
the compass sensor.
CALIBRATING THE COMPASS (deviation
calibration)
The direction display on the compass
deviates from the true direction deter-
mined by the earth’s magnetic field. The
angle of deviation varies according to the
geographic position of the vehicle.
To adjust for this deviation;
1. Stop the vehicle in a level place and switch the display to the outside tem-
perature. (To switch to this mode, see
“—Outside temperature and cruise in-
formation display” on page 321.)
2. Push and hold both the “MODE” and “E/M” buttons simultaneously for 5 sec-
onds until the “VAR” indication appears
on the compass display.
3. Push the “E/M” button several times until the desired zone number appears
on the compass display.
If the button is not pushed for 10 sec-
onds, the display returns to the compass/
outside temperature mode and the number
that is last set is memorized.
To select the zone where the vehicle is
currently located, refer to the following
map.
Page 331 of 506
04 SIENNA_U (L/O 0408)
325
2004 SIENNA from Aug. ’04 Prod. (OM45422U)
Zone number
After calibration, leaving the system for
several seconds returns to the compass
mode.
CAUTION
Do not adjust the display while the
vehicle is moving. Be sure to adjust
the display only when the vehicle is
stopped.
Samoa: 5
Guam: 8
Saipan: 8
Page 332 of 506

326
2004 SIENNA from Aug. ’04 Prod. (OM45422U)
CALIBRATING THE COMPASS (circling
calibration)
Sometimes the direction display on the
compass may not change after a turn. In")
04 SIENNA_U (L/O 0408)
326
2004 SIENNA from Aug. ’04 Prod. (OM45422U)
CALIBRATING THE COMPASS (circling
calibration)
Sometimes the direction display on the
compass may not change after a turn. In
this case, the compass needs to be cali-
brated.
To calibrate the compass manually, do the
following;1. Stop the vehicle in a level place and switch the display to the outside tem-
perature. (To switch to this mode, see
“—Outside temperature and cruise in-
formation display” on page 321.) 2. Push and hold both the “MODE” and
“E/M” buttons simultaneously for 10
seconds until the “CAL” indication ap-
pears on the compass display. (At this
time, the compass display is locked in
“N”.)3. Drive the vehicle in a circle at 8 km/h(5 mph) or less. If there is not enough
space to drive in a circle, drive around
the block.
When the “CAL” indication goes off and
the compass returns to the normal mode,
calibration is complete.
If you want to restart the calibration be-
fore it is complete, push both of the
“MODE” and “E/M” buttons simultaneously
for 10 seconds again.
Page 333 of 506

327
2004 SIENNA from Aug. ’04 Prod. (OM45422U)
Perform circling calibration just after
you have purchased your Toyota. And
then always perform circling calibration
after the b")
04 SIENNA_U (L/O 0408)
327
2004 SIENNA from Aug. ’04 Prod. (OM45422U)
Perform circling calibration just after
you have purchased your Toyota. And
then always perform circling calibration
after the battery has been removed, re-
placed or disconnected.
�Do not perform circling calibration of
the compass in a place where the
earth’s magnetic field is subject to in-
terference by artificial magnetic fields
(underground parking, under a steel
tower, between buildings, roof parking,
near a crossing, near a large vehicle,
etc.).
�During calibration, do not operate elec-
tric systems (moon roof, power win-
dows, etc.) as they may interfere with
the calibration.
CAUTION
�When doing the circling calibration,
be sure to secure a wide space,
and watch out for people and ve-
hicles in the neighborhood. Do not
violate any local traffic rules while
performing circling calibration.
�Do not adjust the display while the
vehicle is moving. Be sure to adjust
the display only when the vehicle is
stopped.
With manual air conditioning system
With automatic air conditioning system
Clock
Page 343 of 506

337
2004 SIENNA from Aug. ’04 Prod. (OM45422U)
The system may not detect the follow-
ing.
�Thin objects such as a wire or rope
�Objects with a surface area too small
to refle")
04 SIENNA_U (L/O 0408)
337
2004 SIENNA from Aug. ’04 Prod. (OM45422U)
The system may not detect the follow-
ing.
�Thin objects such as a wire or rope
�Objects with a surface area too small
to reflect ultrasonic waves such as
wire gauze
�Sound wave absorbing objects or mate-
rial such as cotton or snow
�A person near the vehicle (depending
on the type of clothes worn)
�Objects with a sharp edge
�Small or short objects
�Tall objects with an upper part project-
ing toward the vehicle
�Objects just under the bumper
�Objects very close to your vehicle
In the following cases, have your
Toyota dealer check the system.
�When the bumper is damaged.
�When the indicator is continuously on. The rear view monitor system assists
the driver by displaying an image of
the rear of the vehicle while backing
up. The displayed image on the screen
is a horizontally reversed mirror image
of the inside rear view mirror.
To display the rear view image on the
screen, place the selector lever in the
“R” position when the ignition switch
in the “ON” position.
If you move the selector lever out of the
“R” position, the screen returns to the
previous screen. Operating another func-
tion of the navigation system will display
another screen.
The rear view monitor system is a supple-
ment device intended to assist back up.
When backing up, be sure to check be-
hind and all around the vehicle visually.
CAUTION
�Never depend on the rear view
monitor system entirely when back-
ing up. Always make sure your in-
tended oath is clear.
Use caution just as you would when
backing up any vehicle.
�Never back up while looking only at
the screen. The image on the
screen is different from actual con-
ditions. Depicted distances between
objects and flat surfaces will differ
from actual distances. If you back
up while looking only at the screen,
you may hit a vehicle, a person or
an object. When backing up, be
sure to check behind and all around
the vehicle visually and with mir-
rors before proceeding.
�Do not use the system when the
back door is not completely closed.
Rear view monitor system
Page 344 of 506
04 SIENNA_U (L/O 0408)
338
2004 SIENNA from Aug. ’04 Prod. (OM45422U)
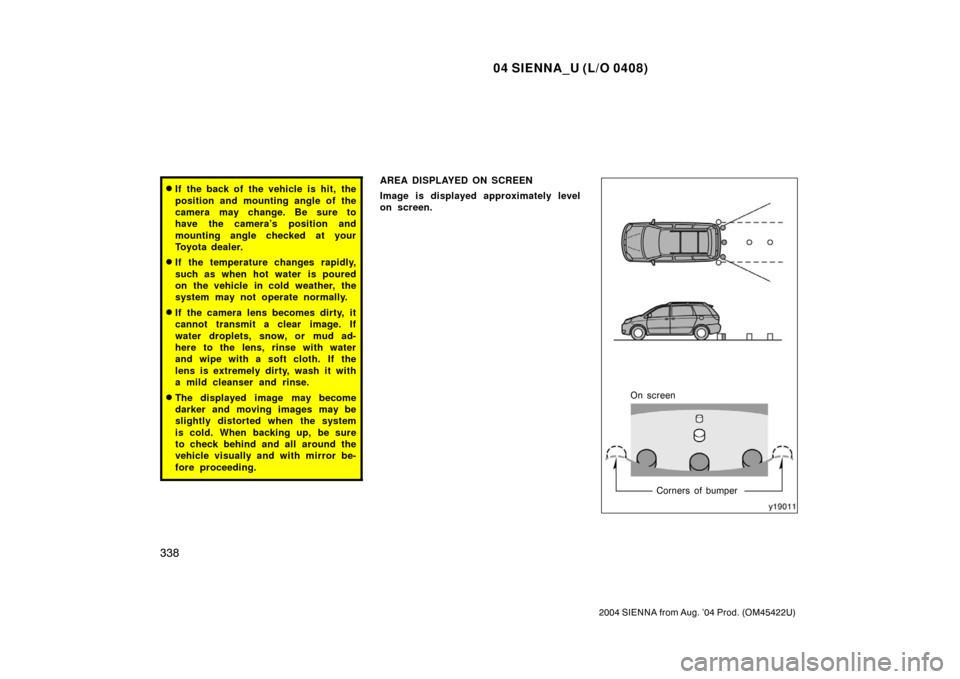
�If the back of the vehicle is hit, the
position and mounting angle of the
camera may change. Be sure to
have the camera’s position and
mounting angle checked at your
Toyota dealer.
�If the temperature changes rapidly,
such as when hot water is poured
on the vehicle in cold weather, the
system may not operate normally.
�If the camera lens becomes dirty, it
cannot transmit a clear image. If
water droplets, snow, or mud ad-
here to the lens, rinse with water
and wipe with a soft cloth. If the
lens is extremely dirty, wash it with
a mild cleanser and rinse.
�The displayed image may become
darker and moving images may be
slightly distorted when the system
is cold. When backing up, be sure
to check behind and all around the
vehicle visually and with mirror be-
fore proceeding.
AREA DISPLAYED ON SCREEN
Image is displayed approximately level
on screen.
On screenCorners of bumper
Page 345 of 506

339
2004 SIENNA from Aug. ’04 Prod. (OM45422U)
�The area detected by the camera is
limited. The camera does not detect
objects which are close to either
corner of the bumper")
04 SIENNA_U (L/O 0408)
339
2004 SIENNA from Aug. ’04 Prod. (OM45422U)
�The area detected by the camera is
limited. The camera does not detect
objects which are close to either
corner of the bumper or under the
bumper.
�The area displayed on the screen
may vary according to vehicle orien-
tation or road conditions.
THE REAR VIEW MONITOR SYSTEM
CAMERA
The rear view monitor system camera is
located on the back door as shown in the
illustration. The camera uses a special
lens. The distance of the image that ap-
pears on the screen differs from the actu-
al distance.
In the following cases, it may become
difficult to see the images on the screen,
even when the system is functioning.
�In the dark (for example, at night)
�When the temperature near the lens is
high or low
�When water droplets are adhering to
the camera, or when humidity is high
(for example, when it rains)
�When foreign matter (for example,
snow or mud) is adhering to the cam-
era
�When the sun or the beam of head-
lights is shining directly into the cam-
era lens
Page 464 of 506

458
2004 SIENNA from Aug. ’04 Prod. (OM45422U)
Oil identification marks
Either or both API registered marks are
added to some oil containers to help
you select the oil you sho")
04 SIENNA_U (L/O 0408)
458
2004 SIENNA from Aug. ’04 Prod. (OM45422U)
Oil identification marks
Either or both API registered marks are
added to some oil containers to help
you select the oil you should use.
The API Service Symbol is located any-
where on the outside of the container.
The top portion of the label shows the oil
quality by API (American Petroleum Insti-
tute) designations such as SL. The center
portion of the label shows the SAE viscos-
ity grade such as SAE 5W−30. “Energy −
Conserving” shown in the lower portion,
indicates that the oil has fuel −saving ca-
pabilities.
The ILSAC (International Lubricant Stan-
dardization and Approval Committee) Certi-
fication Mark is displayed on the front of
the container.
To ensure excellent lubrication perfor-
mance for your engine, “Toyota Genuine
Motor Oil” is available, which has been
specifically tested and approved for all
Toyota engines.
Please contact your Toyota dealer for fur-
ther details about “Toyota Genuine Motor
Oil”. Look at the see�through coolant reser-
voir when the engine is cold. The cool-
ant level is satisfactory if it is between
the “FULL” and “LOW” lines on the
reservoir. If the level is low, add ethyl-
ene�glycol type coolant for a proper
corrosion protection of aluminum com-
ponents.
The coolant level in the reservoir will vary
with engine temperature. However, if the
level is on or below the “LOW” line, add
coolant. Bring the level up to the “FULL”
line.
Always use ethylene
−glycol type coolant
for a proper corrosion protection of alumi-
num components. See information in the
next column.
If the coolant level drops within a short
time after replenishing, there may be a
leak in the system. Visually check the
radiator, hoses, engine coolant filler cap,
radiator cap and drain cock and water
pump.
If you can find no leak, have your Toyota
dealer test the cap pressure and check
for leaks in the cooling system.
Checking the engine coolant
level

325
2004 SIENNA from Aug. ’04 Prod. (OM45422U)
Zone number
After calibration, leaving the system for
several seconds returns to the compass
mode.
CAUTION
Do not adjust the dis")