Page 143 of 506
04 SIENNA_U (L/O 0408)
137
2004 SIENNA from Aug. ’04 Prod. (OM45422U)
Follow the procedure below for a child
restraint system that requires the use
of a top strap.
Anchor brackets
Use the anchor brackets on the back of
the third seats to attach the top strap.
Anchor bracket is installed for right side
and center seating position.TO USE THE ANCHORAGES:1. Remove the head restraint.
— U sin g a to p st rap
(for third seats)
Page 144 of 506
04 SIENNA_U (L/O 0408)
138
2004 SIENNA from Aug. ’04 Prod. (OM45422U)
2. Fix the child restraint system withthe seat belt.
Latch the hook onto the anchor
bracket and tighten the top strap.
For instructions to install the child re-
straint system, see “Child restraint” on
page 121 in this Section.
CAUTION
�Do not replace the head restraint
when the child restraint system is
installed. The head restraint may in-
terfere with the top strap and the
child restraint system can not be
securely restrained. This may cause
death or serious injuries in a colli-
sion.
�Make sure the top strap is securely
latched, and check that the child
restraint system is secure by push-
ing and pulling it in different direc-
tions. Follow all the installation in-
structions provided by its manufac-
turer.
7�passenger models
8�passenger models
—Installation with child
restraint lower anchorages
(for second seats)
Page 145 of 506
04 SIENNA_U (L/O 0408)
139
2004 SIENNA from Aug. ’04 Prod. (OM45422U)
Lower anchorages for the child restraint
systems complying with the FMVSS225
or CMVSS210.2 specifications are
installed in the rear seat.
The anchorages are installed in the seat
cushion of each second seat.
Child restraint systems complying with the
FMVSS213 or CMVSS213 specification
can be fixed to these anchorages. In this
case, it is not necessary to fix the child
restraint system with a seat belt on the
vehicle.
1st lock
position
5th lock
position
CHILD RESTRAINT SYSTEM
INSTALLATION
1. Fold down the seatback. Make sure the rear seat legs are relocked into
place (folding down the seatback will
disengage them) by pushing down-
ward on the back of the seat. Adjust
the seatback to the 1st lock position
(most upright position) and then to
the 5th lock position.
Make sure the seat and seatback is
locked securely.
Canada only
Type A (anchor position indicated by
buttons)
Page 147 of 506

04 SIENNA_U (L/O 0408)
141
2004 SIENNA from Aug. ’04 Prod. (OM45422U)
2. Turn up the covers for the lower an-chorages. Confirm the position of
the lower anchorages near the but-
tons or tags on the seatback.
3. Type A—Latch the hooks of lower straps onto the anchorages and
tighten the lower straps.
Type B—Latch the buckles onto the
anchorages.
For owners in Canada— The symbol on
a child restraint system indicates the pres-
ence of a lower connector system.
If your child restraint system has a top
strap, it should be anchored. (For the
installation of the top strap, see “—Using
a top strap (for second seats)” on page
135 in this Section.)
For installation details, refer to the instruc-
tion manual equipped with each product.CAUTION
�When using the lower anchorages
for the child restraint system, be
sure that there are no irregular ob-
jects around the anchorages or that
the seat belt is not caught.
�Push and pull the child restraint
system in different directions to be
sure it is secure. Follow all the
installation instructions provided by
its manufacturer.
�After securing the child restraint
system, never slide or recline the
seat.
�Do not install a child restraint sys-
tem on the second seat if it inter-
feres with the lock mechanism of
the front seats. This can cause
death or serious injury to the child
and front passenger in case of sud-
den braking or a collision.
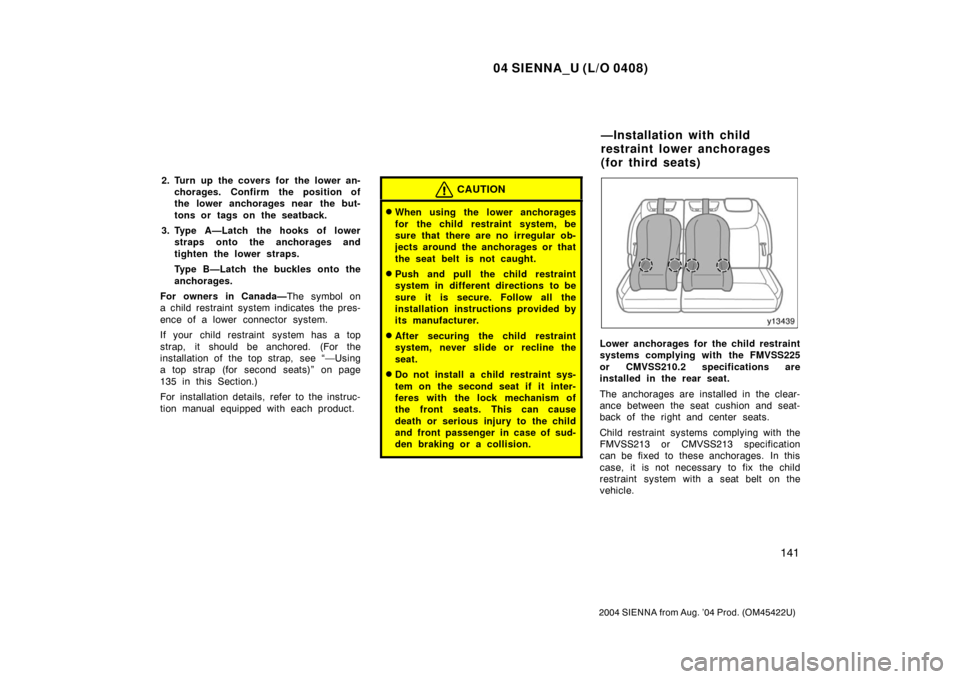
Lower anchorages for the child restraint
systems complying with the FMVSS225
or CMVSS210.2 specifications are
installed in the rear seat.
The anchorages are installed in the clear-
ance between the seat cushion and seat-
back of the right and center seats.
Child restraint systems complying with the
FMVSS213 or CMVSS213 specification
can be fixed to these anchorages. In this
case, it is not necessary to fix the child
restraint system with a seat belt on the
vehicle.
—Installation with child
restraint lower anchorages
(for third seats)
Page 148 of 506
04 SIENNA_U (L/O 0408)
142
2004 SIENNA from Aug. ’04 Prod. (OM45422U)
1st lock
position
11 t h l o c k
position
CHILD RESTRAINT SYSTEM
INSTALLATION 1. Fold down the seatback and back to the 1st lock position (most upright
position) until it locks into place.
Adjust the seatback to the 11th lock
position.
Make sure the seatback is locked secure-
ly.
Canada only
Ty p e ACanada only
Ty p e B
Page 149 of 506

04 SIENNA_U (L/O 0408)
143
2004 SIENNA from Aug. ’04 Prod. (OM45422U)
2. Widen the clearance between theseat cushion and seatback a little
and confirm the position of the low-
er anchorages.
3. Type A—Latch the hooks of lower straps onto the anchorages and
tighten the lower straps.
Type B—Latch the buckles onto the
anchorages.
For owners in Canada— The symbol on
a child restraint system indicates the pres-
ence of a lower connector system.
If your child restraint system has a top
strap, it should be anchored. (For the
installation of the top strap, see “—Using
a top strap (for third seats)” on page 137
in this Section.)
For installation details, refer to the instruc-
tion manual equipped with each product.CAUTION
�When using the lower anchorages
for the child restraint system, be
sure that there are no irregular ob-
jects around the anchorages or that
the seat belt is not caught.
�Push and pull the child restraint
system in different directions to be
sure it is secure. Follow all the
installation instructions provided by
its manufacturer.
�After securing the child restraint
system, never recline the seat.
�Do not put a child restraint system
on the third seat if it interferes with
the lock mechanism of the second
seats. This can cause death or seri-
ous injury to the child and front
passenger in case of sudden brak-
ing or a collision.
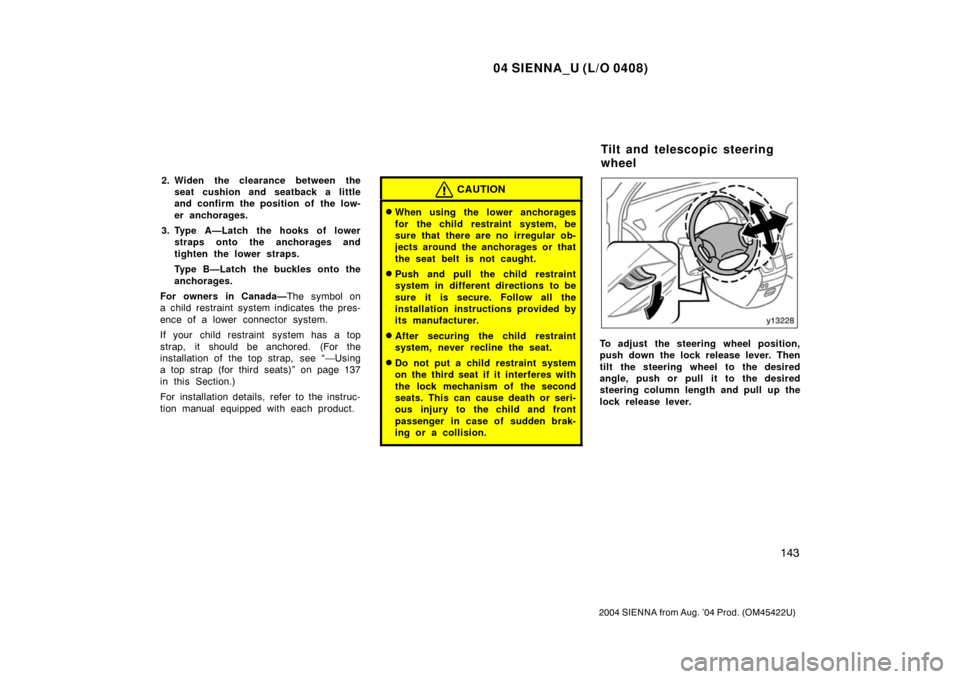
To adjust the steering wheel position,
push down the lock release lever. Then
tilt the steering wheel to the desired
angle, push or pull it to the desired
steering column length and pull up the
lock release lever.
Tilt and telescopic steering
wheel