Page 8 of 506
04 SIENNA_U (L/O 0408)
2
2004 SIENNA from Aug. ’04 Prod. (OM45422U)
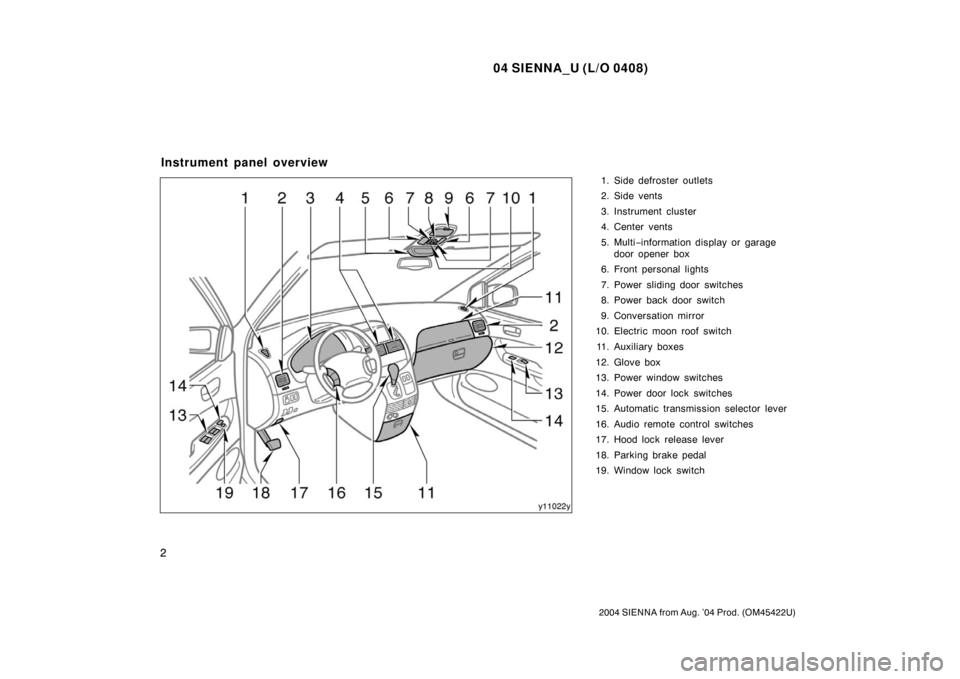
1. Side defroster outlets
2. Side vents
3. Instrument cluster
4. Center vents
5. Multi−information display or garage
door opener box
6. Front personal lights
7. Power sliding door switches
8. Power back door switch
9. Conversation mirror
10. Electric moon roof switch
11. Auxiliary boxes
12. Glove box
13. Power window switches
14. Power door lock switches
15. Automatic transmission selector lever
16. Audio remote control switches
17. Hood lock release lever
18. Parking brake pedal
19. Window lock switch
Instrument panel overview
Page 321 of 506

04 SIENNA_U (L/O 0408)
315
2004 SIENNA from Aug. ’04 Prod. (OM45422U)
OPERATION OF INSTRUMENTS AND
CONTROLS
Other equipment
Multi−information display 316
. . . . . . . . . . . . . . . . . . . . . . . . . . . . . . . . . . . .
Clock 327
. . . . . . . . . . . . . . . . . . . . . . . . . . . . . . . . . . . . \
. . . . . . . . . . . . . . . . . .
Conversation mirror 328
. . . . . . . . . . . . . . . . . . . . . . . . . . . . . . . . . . . . \
. . . . .
Toyota park assist system 329
. . . . . . . . . . . . . . . . . . . . . . . . . . . . . . . . . . .
Rear view monitor system 337
. . . . . . . . . . . . . . . . . . . . . . . . . . . . . . . . . . .
Power outlets 340
. . . . . . . . . . . . . . . . . . . . . . . . . . . . . . . . . . . . \
. . . . . . . . . .
Glove box 342
. . . . . . . . . . . . . . . . . . . . . . . . . . . . . . . . . . . . \
. . . . . . . . . . . . . .
Garage door opener box 343
. . . . . . . . . . . . . . . . . . . . . . . . . . . . . . . . . . . . \
Auxiliary boxes 345
. . . . . . . . . . . . . . . . . . . . . . . . . . . . . . . . . . . . \
. . . . . . . . .
Coin holder 348
. . . . . . . . . . . . . . . . . . . . . . . . . . . . . . . . . . . . \
. . . . . . . . . . . .
Cup holders 349
. . . . . . . . . . . . . . . . . . . . . . . . . . . . . . . . . . . . \
. . . . . . . . . . . .
Bottle holders 351
. . . . . . . . . . . . . . . . . . . . . . . . . . . . . . . . . . . . \
. . . . . . . . . .
Storage box 351
. . . . . . . . . . . . . . . . . . . . . . . . . . . . . . . . . . . . \
. . . . . . . . . . . .
Removable console box 352
. . . . . . . . . . . . . . . . . . . . . . . . . . . . . . . . . . . . \
.
Note pad holder 356
. . . . . . . . . . . . . . . . . . . . . . . . . . . . . . . . . . . . \
. . . . . . . .
Front seat side table 357
. . . . . . . . . . . . . . . . . . . . . . . . . . . . . . . . . . . . \
. . . .
Coat hooks 358
. . . . . . . . . . . . . . . . . . . . . . . . . . . . . . . . . . . . \
. . . . . . . . . . . .
Grocery bag hooks 359
. . . . . . . . . . . . . . . . . . . . . . . . . . . . . . . . . . . . \
. . . . .
Cargo net hooks 360
. . . . . . . . . . . . . . . . . . . . . . . . . . . . . . . . . . . . \
. . . . . . . .
Tie −down hooks 361
. . . . . . . . . . . . . . . . . . . . . . . . . . . . . . . . . . . . \
. . . . . . . .
Roof luggage carrier 361
. . . . . . . . . . . . . . . . . . . . . . . . . . . . . . . . . . . . \
. . . .
Sun shade 362
. . . . . . . . . . . . . . . . . . . . . . . . . . . . . . . . . . . . \
. . . . . . . . . . . . .
Floor mat 363
. . . . . . . . . . . . . . . . . . . . . . . . . . . . . . . . . . . . \
. . . . . . . . . . . . . .
SECTION 1 9
Page 322 of 506
04 SIENNA_U (L/O 0408)
316
2004 SIENNA from Aug. ’04 Prod. (OM45422U)
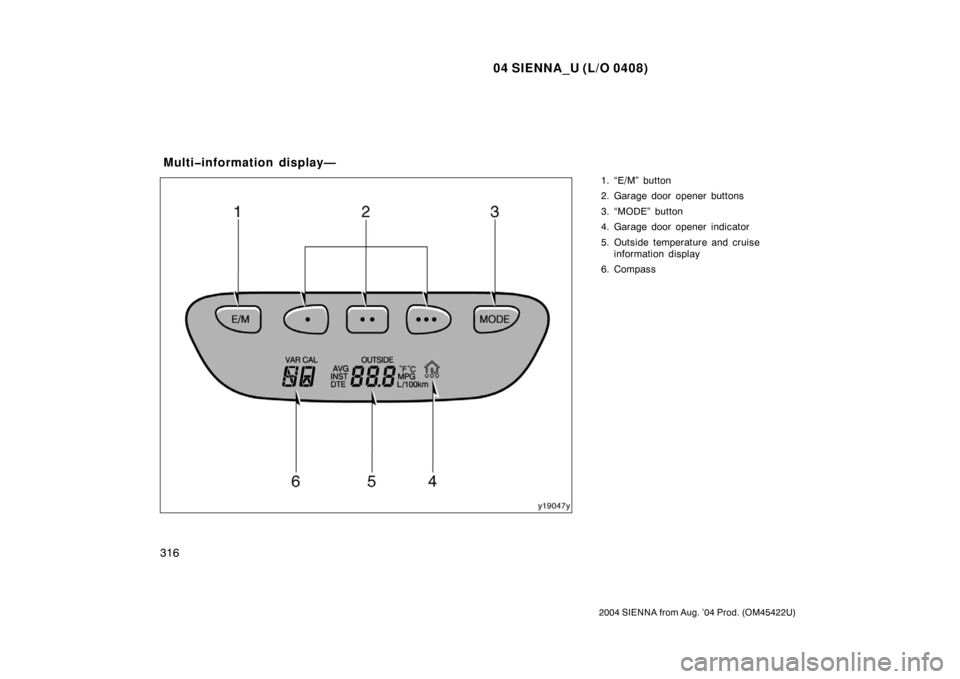
1. “E/M” button
2. Garage door opener buttons
3. “MODE” button
4. Garage door opener indicator
5. Outside temperature and cruiseinformation display
6. Compass
Multiinformation display—
Page 324 of 506
04 SIENNA_U (L/O 0408)
318
2004 SIENNA from Aug. ’04 Prod. (OM45422U)
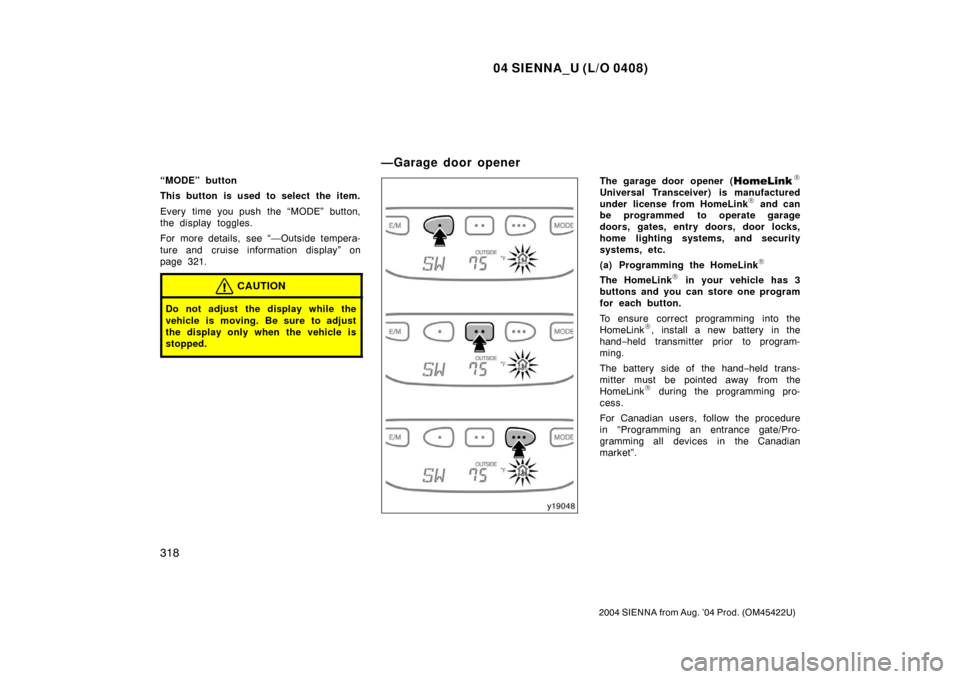
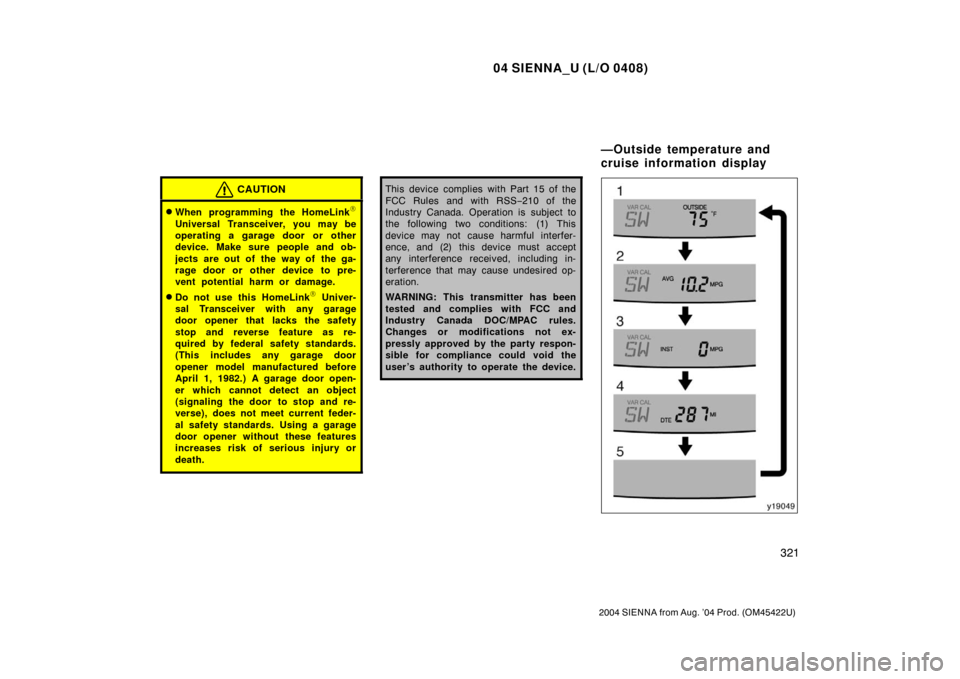
“MODE” button
This button is used to select the item.
Every time you push the “MODE” button,
the display toggles.
For more details, see “—Outside tempera-
ture and cruise information display” on
page 321.
CAUTION
Do not adjust the display while the
vehicle is moving. Be sure to adjust
the display only when the vehicle is
stopped.
The garage door opener (\b
Universal Transceiver) is manufactured
under license from HomeLink\b and can
be programmed to operate garage
doors, gates, entry doors, door locks,
home lighting systems, and security
systems, etc.
(a) Programming the HomeLink
\b
The HomeLink\b in your vehicle has 3
buttons and you can store one program
for each button.
To ensure correct programming into the
HomeLink
\b, install a new battery in the
hand− held transmitter prior to program-
ming.
The battery side of the hand −held trans-
mitter must be pointed away from the
HomeLink
\b during the programming pro-
cess.
For Canadian users, follow the procedure
in “Programming an entrance gate/Pro-
gramming all devices in the Canadian
market”.
—Garage door opener
Page 325 of 506

04 SIENNA_U (L/O 0408)
319
2004 SIENNA from Aug. ’04 Prod. (OM45422U)
1. Decide which of 3 HomeLink\b buttons
you want to program. Push and hold
down one of the buttons until the indi-
cator corresponding to the selected
channel begins to flash.
2. Place your hand− held garage transmit-
ter 25 to 75 mm (1 to 3 in.) away from
the surface of the HomeLink
\b.
Keep the indicator light on the HomeLink
\b
in view while programming.
3. Simultaneously press and hold the hand− held garage transmitter button
along with the selected HomeLink
\b but-
ton.
4. When the indicator light on the HomeLink
\b changes from a slow to a
rapid flash after 20 seconds, you can
release both buttons.
5. Test the operation of the HomeLink
\b by
pressing the newly programmed button.
If programming a garage door opener,
check to see if the garage door opens
and closes. If the garage door does not operate, iden-
tify if your garage transmitter is of the
“Rolling Code” type. Press and hold the
programmed HomeLink
\b button. The ga-
rage door has the rolling code feature if
the indicator light (on the HomeLink
\b)
flashes rapidly and then remains lit after
2 seconds. If your garage transmitter is
the “Rolling Code” type, proceed to the
heading “Programming a ro lling code sys-
tem”.
6. Repeat steps 2 through 5 for each re- maining HomeLink
\b button to program
another device.
Programming a rolling code system
If your device is “Rolling Code”
equipped, it is necessary to follow
steps 1 through 4 under the heading
“Programming the HomeLink
\b” before
proceeding with the steps listed below.
1. Locate the “training” button on the ceil- ing mounted garage door opener motor.
The exact location and color of the
button may vary by brand of garage
door opener. Refer to the owner ’s
guide supplied by the garage door
opener manufacturer for the location of
this “training” button. 2. Press the “training” button on the ceil-
ing mounted garage door opener motor.
Following this step, you have 30 seconds
in which to initiate step 3 below. 3. Press and release the vehicle’s pro- grammed HomeLink
\b button twice. The
garage door may open. If the door
does open, the programming process is
complete. If the door does not open,
press and release the button a third
time. This third press and release will
complete the programming process by
opening the garage door.
The ceiling mounted garage door opener
motor should now recognize the
HomeLink
\b unit and be able activate the
garage door up/down.
4. Repeat steps 1 through 3 for each re- maining HomeLink
\b button to program
another rolling code system.
Page 327 of 506
04 SIENNA_U (L/O 0408)
321
2004 SIENNA from Aug. ’04 Prod. (OM45422U)
CAUTION
�When programming the HomeLink\b
Universal Transceiver, you may be
operating a garage door or other
device. Make sure people and ob-
jects are out of the way of the ga-
rage door or other device to pre-
vent potential harm or damage.
�Do not use this HomeLink\b Univer-
sal Transceiver with any garage
door opener that lacks the safety
stop and reverse feature as re-
quired by federal safety standards.
(This includes any garage door
opener model manufactured before
April 1, 1982.) A garage door open-
er which cannot detect an object
(signaling the door to stop and re-
verse), does not meet current feder-
al safety standards. Using a garage
door opener without these features
increases risk of serious injury or
death.
This device complies with Part 15 of the
FCC Rules and with RSS −210 of the
Industry Canada. Operation is subject to
the following two conditions: (1) This
device may not cause harmful interfer-
ence, and (2) this device must accept
any interference received, including in-
terference that may cause undesired op-
eration.
WARNING: This transmitter has been
tested and complies with FCC and
Industry Canada DOC/MPAC rules.
Changes or modifications not ex-
pressly approved by the party respon-
sible for compliance could void the
user ’s authority to operate the device.
—Outside temperature and
cruise information display
Page 349 of 506
04 SIENNA_U (L/O 0408)
343
2004 SIENNA from Aug. ’04 Prod. (OM45422U)
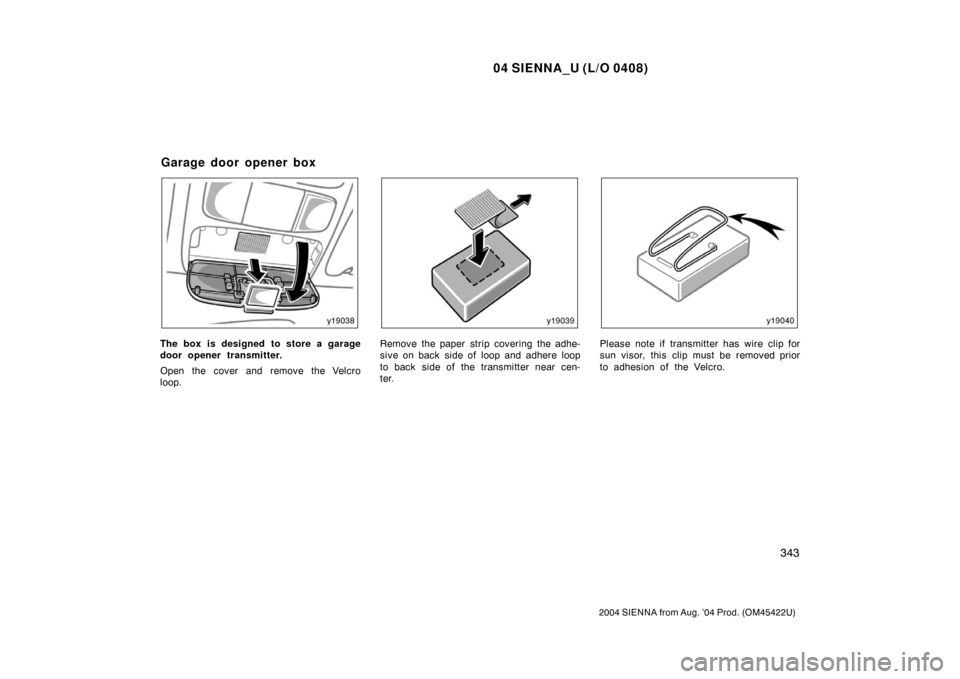
The box is designed to store a garage
door opener transmitter.
Open the cover and remove the Velcro
loop.Remove the paper strip covering the adhe-
sive on back side of loop and adhere loop
to back side of the transmitter near cen-
ter.Please note if transmitter has wire clip for
sun visor, this clip must be removed prior
to adhesion of the Velcro.
Garage door opener box
Page 350 of 506
04 SIENNA_U (L/O 0408)
344
2004 SIENNA from Aug. ’04 Prod. (OM45422U)
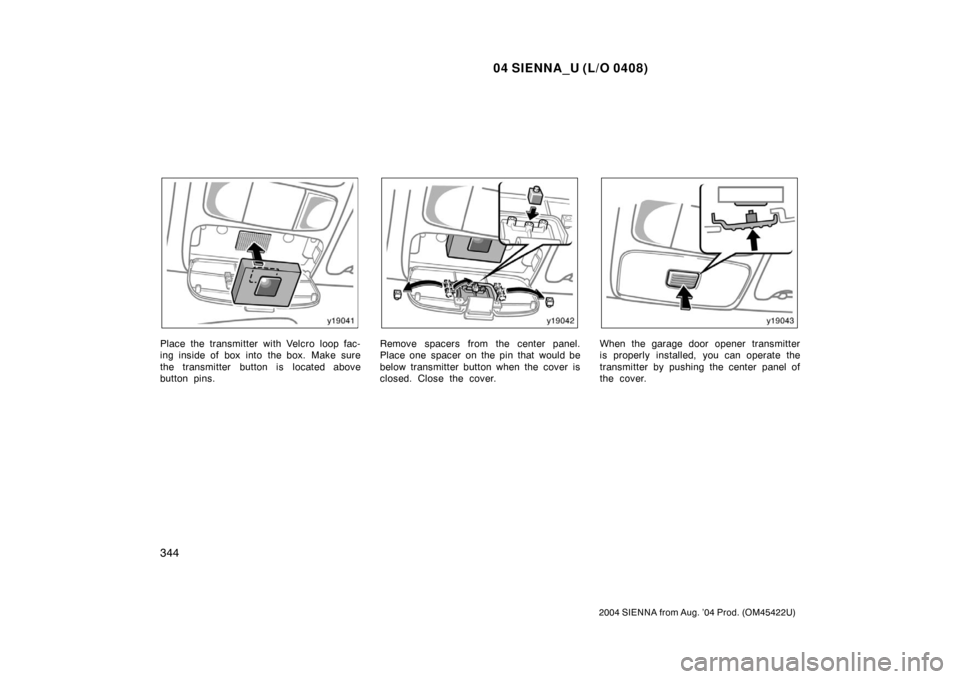
Place the transmitter with Velcro loop fac-
ing inside of box into the box. Make sure
the transmitter button is located above
button pins.Remove spacers from the center panel.
Place one spacer on the pin that would be
below transmitter button when the cover is
closed. Close the cover.When the garage door opener transmitter
is properly installed, you can operate the
transmitter by pushing the center panel of
the cover.